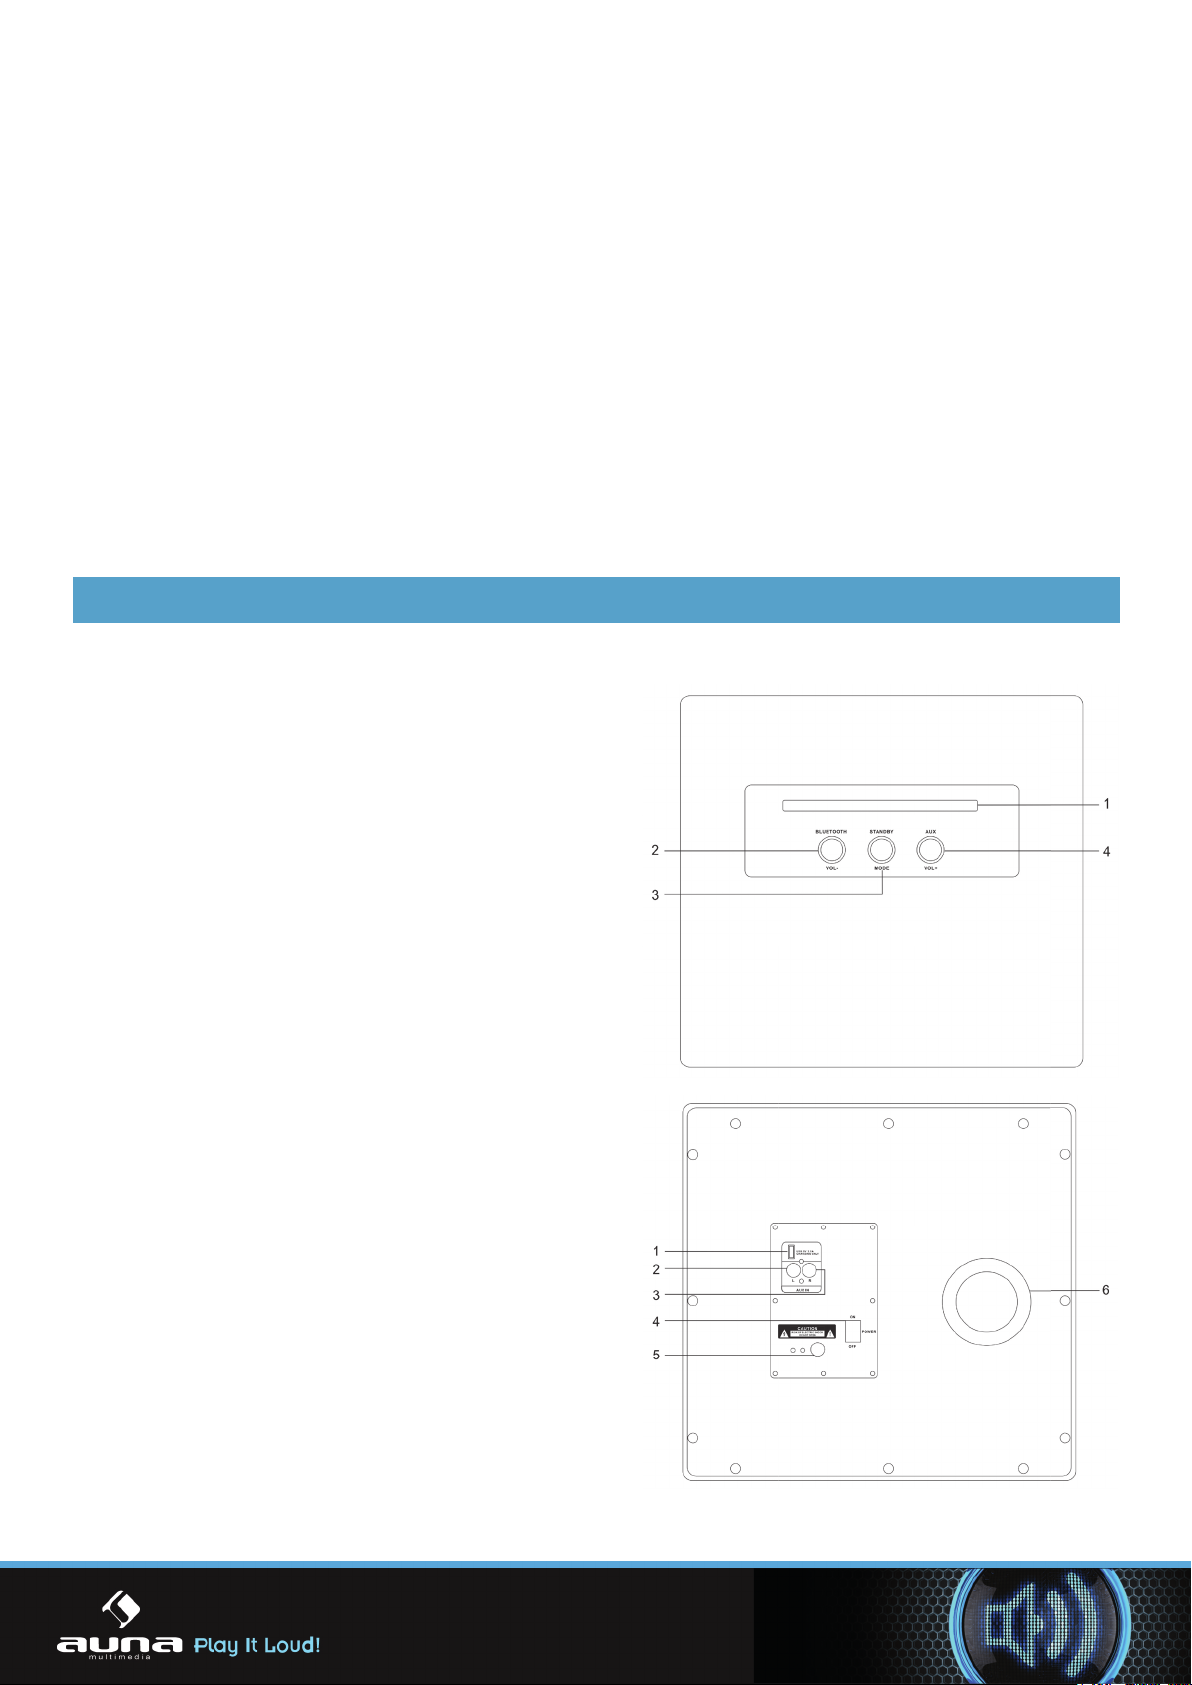
auna HighQube User manual

AUNA HighQube
10027414 10027415

Sehr geehrter Kunde,
Zunächst möchten wir Ihnen zum Erwerb Ihres Gerätes gratulieren. Bitte lesen Sie die folgenden
Anschluss- und Anwendungshinweise sorgfältig durch und befolgen Sie diese um möglichen techni-
schen Schäden vorzubeugen.
Technische Daten
Artikelnummer 10027414, 10027415
Stromversorgung AC 110-240 V / 50/60 Hz
Lautsprechereinheiten 2 x 10.16 cm Gesamtspektrum
1 x 13.34 cm Subwoofer
Änderungen der Technischen Daten und des Designs ohne Vorankündigungen, aufgrund von tech-
nischen Verbesserungen, bleiben vorbehalten.
Lieferumfang
• Lautsprecherbox
• Lautsprecherhalter
• Standfuß
• Fernbedienung (inklusive Batterien)
• 7 Schrauben
• AUX-in Kabel
• Multi-USB Ladekabel
• Bedienungsanleitung
Besondere Hinweise und Vorkehrungen
• Um Feuer oder elektrischen Schlag zu vermeiden, setzen Sie das Gerät nicht Feuchtigkeit und
Regen aus.
• Der Einsatz des Geräts in der Nähe von fl uoreszierendem Licht kann Störungen verursachen.
• Tauschen Sie die Batterien nur gegen Batterien desselben Typs aus.
• Mischen sie keine Alkali Batterien, Zink-Kohle Batterien oder aufl adbare Batterien.
• Um elektrischem Stromschlag vorzubeugen, entfernen Sie nicht die die Abdeckung. Das Gerät
enthält Teile, die dem Benutzer nicht zugänglich sind. Reparaturen dürfen nur von qualifi zierten
Fachkräften durchgeführt werden.
WARNUNG
Die Knopfbatterie der Fernbedienung enthält Quecksilber und darf nicht im normalen Haus-
müll entsorgt werden. Entsorgen Sie die Batterie fachgerecht. Lithium Batterien dürfen
nicht im Hausmüll entsorgt und verbrannt werden, da sie explodieren könnten.
Sicherheitshinweise
• Verwenden Sie das Gerät nicht in der Nähe von Wasser.
• Benutzen Sie zum Reinigen nur einen trockenen Lappen.
• Decken Sie die Ventilationsöffnungen nicht ab und halten Sie sich bei der Installation an die An-
weisungen des Herstellers.
• Installieren Sie das Gerät nicht in der Nähe von Hitzequellen, Heizungen, Öfen, Kochern und Ge-
räten (Verstärker eingeschlossen), die Hitze erzeugen.
• Verlegen Sie das Netzkabel so, dass niemand darüber läuft oder das Kabel abgeklemmt wird.
• Benutzen Sie nur vom Hersteller angegebene Zubehörteile.
2
2

• Ziehen Sie den Stecker aus der Steckdose wenn es blitzt und stürmt oder wenn Sie längere Zeit
weg sind.
• Lassen Sie Reparaturen nur von qualifi zierten Fachkräften durchführen. Lassen Sie das Gerät
überprüfen wenn es in irgendeiner Weise beschädigt oder wenn das Netzkabel oder der Stecker
beschädigt sind. Gleiches gilt falls Flüssigkeiten oder Gegenstände auf dem Gerät gelandet sind,
das Gerät Regen oder Feuchtigkeit ausgesetzt war, nicht ordnungsgemäß funktioniert oder umge-
fallen ist.
• Ziehen Sie den Stecker aus der Steckdose, wenn sie die Lautsprecher nicht benutzen oder reinigen.
• Drehen Sie die Lautstärke nicht zu weit hoch, damit Sie Ihr Gehör oder das Gerät nicht beschädigen.
• Benutzen Sie das Gerät nicht in nasser oder extrem feuchter Umgebung.
Zusätzliche Hinweise
• Setzen Sie das Gerät keinen Tropfen oder Spritzern aus und stellen sie auch keine mit Flüssigkeiten
gefüllten Gefäße, wie Vasen, darauf ab.
• Setzen Sie die Batterien nicht starken Hitze, direkter Sonneneinstrahlung, Feuer oder Ähnlichem aus.
• Warnhinweise befi nden sich auf der Rückseite des Geräts.
• Informationen zur Kennzeichnung befi nden sich ebenfalls auf der Rückseite.
Gerätebeschreibung
Oberes Bedienfeld
1. Halter: Für iPhone, Smartphones und Tablets.
2. Bluetooth/Vol-: Bluetooth Kontrollleuchte.
Drücken Sie auf diese Taste um die Lautstärke
zu reduzieren.
3. Kontrollleuchte und Standby/Mode: Drücken
Sie die Taste, um die Lautsprecher an- und auszu-
schalten oder zwischen Bluetooth/AUX zu wählen.
Drücken Sie die Taste einmal, um den Lautspre-
cher aus dem Standby-Modus anzuschalten. Wenn
Sie sich im Bluetooth/AUX Modus befi nden halten
Sie die Taste 2-3 Sekunden gedrückt, um den
Lautsprecher auszuschalten. Falls sie im Bluetooth
Modus zwischen Bluetooth und AUX wechseln wol-
len, drücken Sie die Taste ein oder zwei Mal.
4. AUX Indicator/Vol+: AUX Kontrollleuchte.
Drücken Sie diese Taste um die Laustärke zu
erhöhen.
Rückseite
1. USB-Anschluss zum Aufl aden
2. AUX-In Anschluss (Cinch-Eingang) L
3. AUX-In Anschluss (Cinch-Eingang) R
4. An/Aus Schalter
5. Netzkabel
6. Luftauslass
3

Fernbedienung und Tasten
1. STANDBY
Zum an- und ausschalten.
2. BLUETOOTH
Um in den Bluetooth-Modus zu wechseln.
3. MUTE
Mit dieser Taste können Sie den Ton aus- oder
anzuschalten. Halten Sie die Taste 3-5 Sekun-
den gedrückt, um Bass/Höhen rauszunehmen.
4. AUX
Um in den AUX-Modus zu wechseln.
5. SKIP BACKWARD
Im Bluetooth-Modus einen Titel zurückspringen.
6. SKIP FORWARD
Im Bluetooth Modus einen Titel vorspringen.
7. PLAY/PAUSE
Um Titel zu starten oder anzuhalten. Drücken
Sie die Taste 3-5 Sekunden um den Bluetooth
Kopplungsmodus zu starten.
8. BASS+
Erhöht die Bassleistung des Lautsprechers.
9. BASS-
Reduziert die Bassleistung des Lautsprechers.
10.TREB+
Erhöht die Höhenleistung des Lautsprechers.
11.TREB-
Reduziert die Höhenleistung des Lautsprechers.
12.VOLUME+
Erhöht die Lautstärke.
13.VOLUME-
Reduziert die Lautstärke.
Installation
• Nehmen Sie Lautsprecher und
Ständer vorsichtig aus der Ver-
packung und drehen Sie ihn.
• Entnehmen Sie die 7 Schrauben.
• Richten Sie den Halter an den
vier Löchern auf der Lautspre-
cherbox aus.
• Schrauben Sie die Schrauben
in die Lautsprecherbox.
• Schrauben Sie den Standfuß
an den Lautsprecherhalter.
• Drehen Sie den Lausprecher
um und stellen Sie ihn auf den
Standfuß.
4
4

Inbetriebnahme
Anschließen
• Stecken Sie den Stecker in eine 230 V Steckdose und schalten
Sie den Lausprecher an.
Fernbedienung
• Ziehen Sie das Batteriefach aus der Fernbedienung.
• Stecken Sie eine 3 V CR2025 Knopfzelle in das Batteriefach und
beachten sie die Polmarkierung. Falls die Batterie falsch einge-
legt ist funktioniert die Fernbedienung nicht.
• Entsorgen Sie alte Batterien fachgerecht. Lassen Sie Batterien
nicht in der Reichweite von Kindern liegen, damit sie nicht da-
mit spielen oder die Batterie verschlucken.
WARNUNG
Wenn Sie die Batterie beschädigen kann sie explodieren
oder auslaufen. Versuchen Sie nicht die Batterie zu laden
oder auseinanderzubauen. Verbrennen Sie alte Batterien
nicht.
• Wenn Sie die Fernbedienung längere Zeit nicht benutzen ent-
nehmen Sie bitte alle Batterien, um Schäden oder Verletzungen
durch auslaufende Batteriefl üssigkeit vorzubeugen.
• Benutzen Sie nur die angegebenen Batteriegrößen und Batte-
rietypen.
• Wenn Sie die Fernbedienung benutzen, zielen Sie damit direkt
auf den Infrarot-Sensor am Gerät. Stellen Sie keine Gegenstän-
de zwischen den Sensor und die Fernbedienung.
Bluetooth Verbindung
Wenn Sie Ihre Musik über Bluetooth (Profi l A2DP) von ihrem Smartphone, Tablet, Computer oder MP3-
Player abspielen wollen, müssen Sie erst eine Verbindung zwischen Ihrem Gerät und dem Lautsprecher
aufbauen. Mehr Infos zu Bluetooth Verbindungen fi nden Sie in der Bedienungsanleitung Ihres Gerätes.
Dort fi nden Sie auch eine Anleitung zum Thema Verbindung, Suche und Einstellungen.
• Drücken Sie die STANDBY Taste am Lautsprecher, um den Lautsprecher anzuschalten. Achten Sie
darauf, dass der An/Aus Schalter auf ON steht. Drücken Sie erneut auf die STANDBY Taste um in den
Bluetooth-Modus zu wechseln.
• Die blaue LED leuchtet, wenn Sie sich im Bluetooth-Modus befi nden.
• Aktivieren Sie Bluetooth auf dem Gerät, das Sie mit der Box verbinden wollen, suchen Sie nach
dem Lautsprecher und wählen Sie ihn aus.
• Falls Sie nach einem Passwort gefragt werden geben Sie den Code „0000“ ein.
• Die blaue LED beginnt zu fl ackern, sobald der Lautsprecher eine Verbindung mit ihrem Gerät auf-
baut. Wenn sie langsam blinkt wurde die Verbindung erfolgreich aufgebaut.
• Falls die Verbindung fehlschlägt, versuchen Sie es ein weiteres Mal.
• Nun können Sie Musik von Ihrem Bluetooth-Gerät über den Lautsprecher abspielen.
• Die Lautstärke können Sie entweder an Ihrem Gerät oder am Lautsprecher anpassen.
5

6
6
AUX-In
Schließen Sie ein Kabel an die AUX-In Buchse am Lautsprecher an, um Musik von einem externen
Gerät, einem iPad, iPod oder iPhone 5 zu hören. Stecken dazu das eine Ende des Kabels in ihre ex-
terne Musikquelle (iPod, iPHone, iPad, TV, Videorecorder, DVD Player, MP3 Player, Kassettendeck, MD
Player, etc.) und das das andere Ende in die AUX-In Buchse am Lautsprecher. Nun können Sie die
AUX Funktion benutzen:
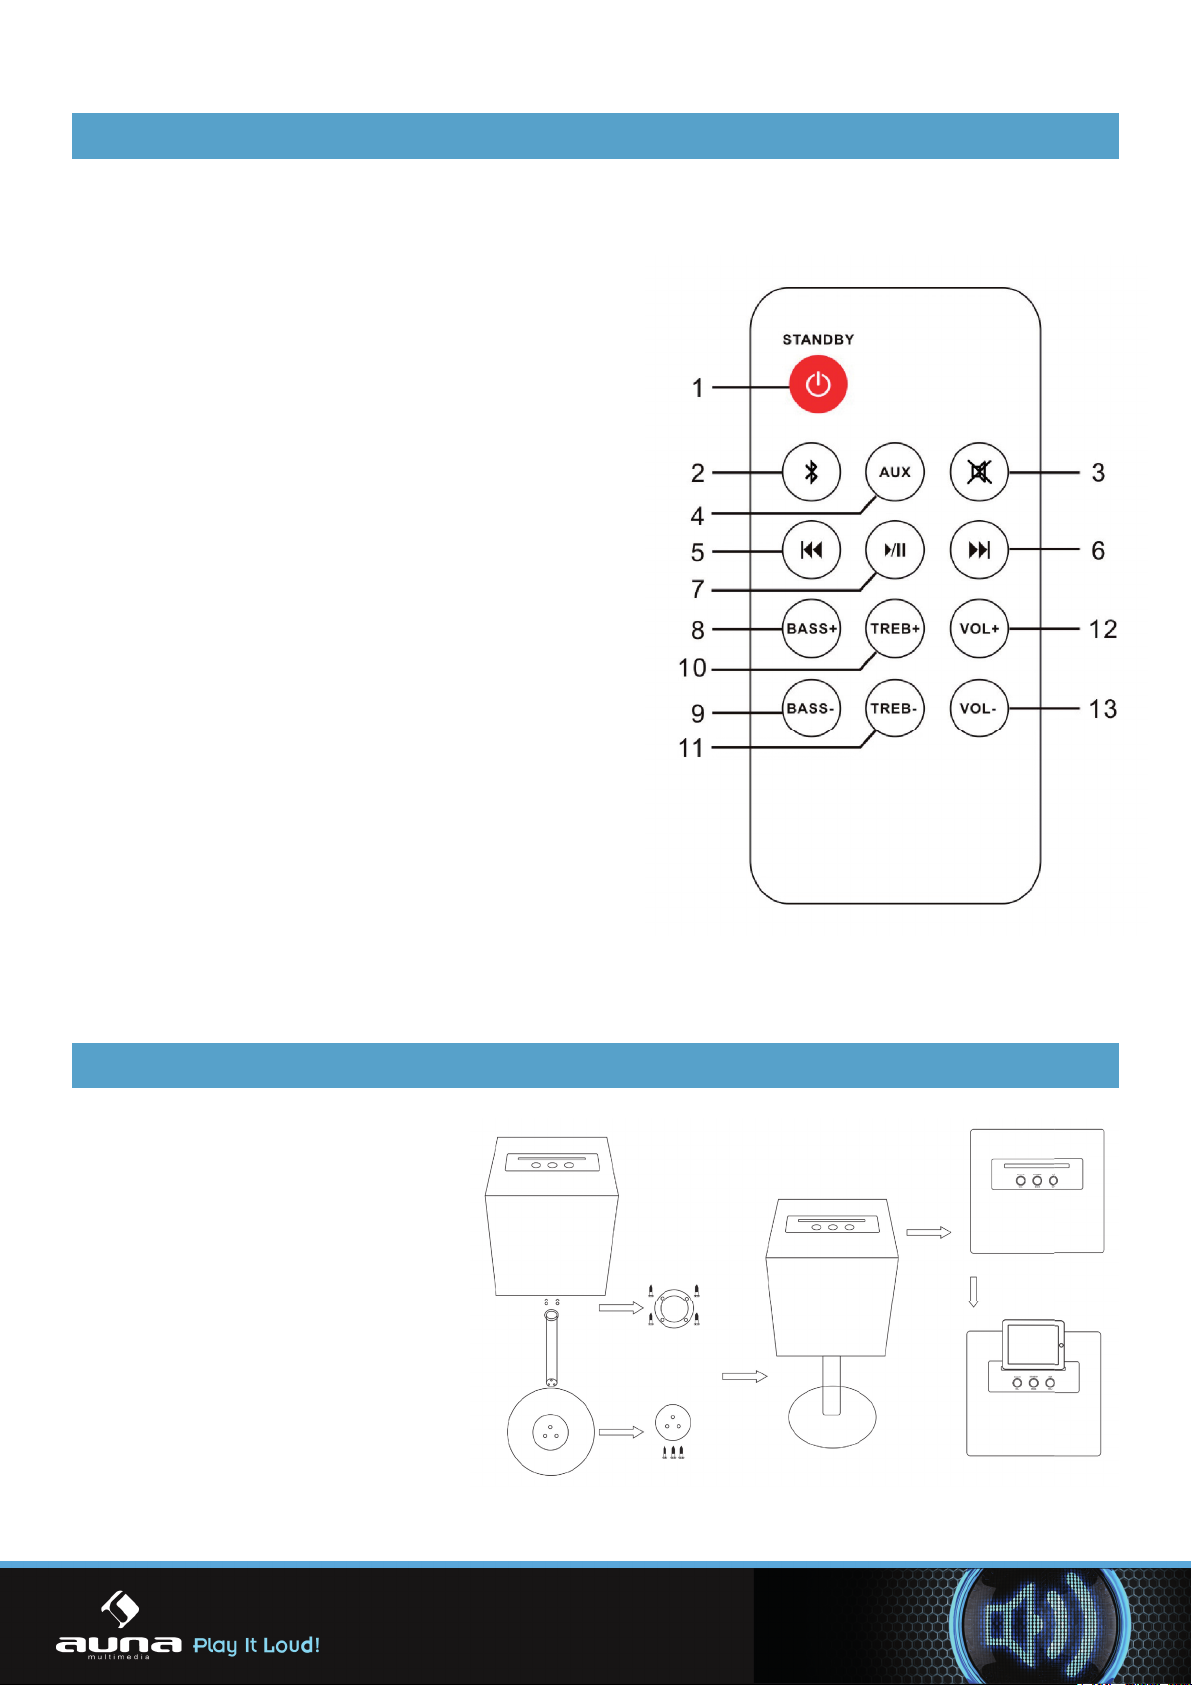
• Nachdem Sie die Geräte angeschlossen haben drücken Sie die STANBY Taste auf der Fernbedie-
nung, um den Lautsprecher einzuschalten.
• Drücken Sie auf die AUX Taste auf der Fernbedienung oder dem Bedienfeld an der Box, um die
AUX Funktion auszuwählen. Die Kontrollleuchte leuchtet grün, sobald die Funktion aktiv ist. Nun
können Sie die Musik der externen Quelle auf dem Lautsprecher abspielen.
• Schalten Sie Ihr externes Gerät an und spielen Sie die Musik wie üblich ab.
• Benutzen Sie die VOLUME+/-, BASS+/- und TREBLE+/- Tasten, um die Musik nach Ihren Wün-
schen anzupassen.
• Falls Sie die AUX Funktion nicht mehr nutzen, entfernen Sie das Kabel aus dem Lautsprecher und
schalten Sie ihn aus.
USB-Port
• Der USB Port ist nur zum Laden von Tablets und Smartphones geeignet, die sich über einen 5V-
Anschluss laden lassen.
• Der mitgelieferte USB-Adapter unterstützt Geräte von Apple, LG, Samsung, Motorola, Nokia, Sony
Ericsson und Black Berry.
Pfl ege und Wartung
• Ziehen Sie den Stecker immer aus der Steckdose, bevor Sie das Gerät reinigen.
• Reinigen Sie den Lautsprecher mit einem weichen, feuchten, fusselfreien Lappen.
• Benutzen Sie keine Scheuermittel oder scharfe Reiniger.
Entsorgung von Altgeräten
Befi ndet sich die linke Abbildung (durchgestrichene Mülltonne auf Rädern) auf dem
Produkt, gilt die Europäische Richtlinie 2002/96/EG. Diese Produkte dürfen nicht mit
dem normalen Hausmüll entsorgt werden. Informieren Sie sich über die örtlichen Re-
gelungen zur getrennten Sammlung elektrischer und elektronischer Gerätschaften.
Richten Sie sich nach den örtlichen Regelungen und entsorgen Sie Altgeräte nicht
über den Hausmüll. Durch die regelkonforme Entsorgung der Altgeräte werden Um-
welt und die Gesundheit ihrer Mitmenschen vor möglichen negativen Konsequenzen
geschützt. Materialrecycling hilft, den Verbrauch von Rohstoffen zu verringern.
Konformitätserklärung
Hersteller: CHAL-TEC Vertriebs- + Handels GmbH, Wallstraße 16, 10179 Berlin.
Dieses Produkt entspricht den folgenden Europäischen Richtlinien:
2014/35/EU (Niederspannung)
2014/30/EU (EMV)
2011/65/EG (RoHS)

Dear Customer,
Congratulations on purchasing this eqipment. Please read this manual carefully and take care of the
followring hints on installation and use to avoid technical damages.
Technical Data
Item number 10027414, 10027415
Power Supply AC 110-240 V / 50/60 Hz
Speaker Units 2 x 10.16 cm full range
1 x 13.34 cm Subwoofer
As a result of continual improvements, the design and specifi cations of the product within may
differ slightly from the unit illustrated on the packing
Lieferumfang
• Speaker body
• Speaker holder
• Speaker stand
• Remote control (batteries included)
• 7 pcs screws
• AUX in cable (RCA)
• Multi USB charging adapter
• Instruction manual
Warning and Precautions
• To prevent fi re or shock hazards, do not expose this unit to rain or moisture.
• Use of this unit near fl uorescent lighting may cause remote interference.
• Replace batteries only with the same or equivalent type.
• Do not mix alkaline, standard (carbon-zinc), or rechargeable (ni-cad, ni-mh, etc) batteries.
• To reduce the risk of electric shock, do not remove cover (or back). There are no user-serviceable
parts inside. Refer servicing to qualifi ed service personnel.
WARNING
The remote control’s button cell battery contains mercury. Do not put in the trash. Dispose
of as hazardous waste. Lithium batteries should be recycled and not disposed of in normal
household waste. They should never be incinerated as they might explode.
Safety Instructions
• Do not use this apparatus near water.
• Clean only with a dry cloth.
• Do not block any ventilation openings. Install in accordance with the manufacturer’s instructions.
• Do not install near any heat sources such as radiators and other heating sources, stoves, cookers
or other apparatus (including amplifi ers) that produce heat.
• Protect the power cord from being walked on or pinched particularly at plugs and the point where
they exit from the apparatus.
• Only use attachments/accessories specifi ed by the manufacturer.
7

• Unplug this apparatus during lightning storms or when unused for long periods of time.
• Refer all servicing to qualifi ed service personnel. Servicing is required when the apparatus has
been damaged in any way, such as the power-supply cord or the plug is damaged, liquid has been
spilled or objects have fallen into the apparatus, the apparatus has been exposed to rain or mois-
ture, does not operate normally, or has been dropped.
• Unplug the equipment from the power outlet when not in use and before cleaning.
• Do not play music at excessive volume levels as damage to hearing and / or equipment may occur.
• Do not use this equipment in wet or damp surroundings.
Additional Warnings
• The apparatus shall not be exposed to dripping or splashing and that no objects fi lled with liquids,
such as vases, shall be placed on apparatus.
• Battery shall not be exposed to excessive heat such as sunshine, fi re etc.
• Caution marking is located at the back panel of apparatus.
• The marking information is located at the back panel of apparatus.
Product Description
Top panel
1. Groove: to hold iPad/iPhone or other smart-
phones and tablets.
2. Bluetooth indicator/Vol-: Bluetooth indica-
tor. Press to decrease volume.
3. Indicator and key for Standby/Mode: Press
to turn the speaker power on and off, and Blu-
etooth/AUX in selection. Under power/standby
mode - press once to turn the speaker on Un-
der Bluetooth or AUX mode - press and hold
for 2-3 seconds to switch speaker power OFF.
Under Bluetooth or AUX mode - press one or
two times to switch between Bluetooth and AUX
in source.
4. AUX Indicator/Vol+: AUX in indicator. Press
to increase volume
Back panel
1. USB port for charging
2. AUX in (Auxiliary input RCA type) L
3. AUX in (Auxiliary input RCA type) R
4. Main power switch
5. AC power cable
6. Air Hole
8
8

Remote Control and Keys
1. STANDBY
Press to turn the speaker power off or on.
2. BLUETOOTH
Press to change to bluetooth mode.
3. MUTE
Press to mute the volume on & off. Long press
3-5 second to reset bass/treble to fl at level.
4. AUX
Press to switch to AUX in mode.
5. SKIP BACKWARD
Press to skip music backwards on the Bluetooth
device.
6. SKIP FORWARD
Press to skip music forward on the Bluetooth
device.
7. PLAY/PAUSE
Press to play/ pause. Press and hold 3-5 se-
cond for Bluetooth pairing mode.
8. BASS+
Increases the level of Bass output.
9. BASS-
Decreases the level of Bass output.
10.TREB+
Press to increase the level of Treble output.
11.TREB-
Decreases the level of treble output.
12.VOLUME+
Increases the volume.
13.VOLUME-
Decrease the volume.
Installation
• Take out the speaker body and
speaker stand carefully from
the box an turn it around.
• Take out the 7 screws.
• Align the four holes on the
speaker body and stand.
• Screw the stand into the body
by using a screw driver.
• Place the speaker so it’s stan-
ding on the fl oor.
9

Getting Started
Power
• Insert the plug into an AC 230V socket and switch the power
„ON“ at the back panel of the unit.
Remote
• Slide out the battery holder from the remote control case.
• Place one 3V CR2025 battery into the battery holder, observing
the polar marking. If the battery is placed incorrectly, the re-
mote control will not work.
• Insert the battery holder into the battery compartment.
• Dispose of the old battery properly. Do not leave it lying around
where your child or pet could play with or swallow it.
WARNUNG
Battery may explode or leak if it is mistreated. Do not
attempt to recharge it or disassemble it. Do not dispose
of the old battery in a fi re.
• Please remove all the batteries to prevent damage or injury
from possible battery leakage if the unit will not be used for a
long period of time.
• Use only the specifi ed size and type of battery.
• Aim the remote control directly at remote control sensor (IR)
on the front panel.
• Don’t put any objects between the remote control and the sys-
tem while operating the unit.
Pairing Bluetooth Devices
If you want to use Bluetooth (Bluetooth profi le A2DP) to play music from your smartphone/tablet/
computer/MP3 player, you will need to pair (identify) the device. You can fi nd out more about Blue-
tooth in the user guide supplied with your Bluetooth device. The user guide will include information
about pairing, searching and settings.
• Press the standby/mode button on the speaker or the remote control to switch on the speaker (check
that the power switch on the rear of the speaker is ON).
• Press standby/mode button again to switch to Bluetooth.
• The blue LED indicates the selected source.
• Activate Bluetooth on the player/phone, search for the speaker “Please advise the BT pairing
name”and select it.
• If you are prompted for a password, enter 0000.
• The blue LED fl ashes quickly while the speaker is being paired with the Bluetooth device, and slowly
if pairing is successful.
• If pairing fails fi rst time, try again.
• Now you can play music from your Bluetooth device through the speaker. You can adjust the volume
on the speaker or from the Bluetooth device.
• Previously paired devices connect to the speaker automatically when the speaker is switched on
(Bluetooth must be activated on the Bluetooth device).
10
10

AUX In
You can enjoy the music from the speaker when the AUX in jack is connected to the external audio
device or iPod, iPad Mini or iPhone 5th. Plug one side of the AUX in cable to the Audio Output jacks of
your auxiliary sound source (iPod/iPhone/iPad, TV, VCR, DVD Player, MP3 player, Cassette Deck, Mini
Disc Player, etc,), plug the other side of the AUX in socket on the back panel of the tower speaker,
refer to the connection options as below image, the auxiliary function is ready now for using.
Press the STANDBY button on the remote control to power on the unit when the connecting process
as above is fi nished.
• Press the AUX button on the remote or press the power button on the unit to select AUX function,
the Green Aux LED lights up. The sound from the auxiliary source will be heard through the spea-
kers of this system.
• Switch on your audio device, play your audio device as usual.
• Press the VOLUME+/-, BASS+/- or the TREBLE-/+ on the speaker to adjust the sound effect level.
• Please remove the AUX in cable if it is not going to be used for a long time and switch off the
speaker.
USB-Port
• USB port is only for charging tablets and smartphones that are chargeable in 5V.
• The included multi USB charging adapter supports media players from Apple, LG, Samsung, Moto-
rola, Nokia, Sony Ericsson and Black Berry.
Care and Maintenance
• Always disconnect the equipment from the power supply before cleaning.
• Clean the equipment with a soft, damp, lint free cloth.
• Do not use abrasives or harsh cleaners.
Environment Concerns
According to the European waste regulation 2002/96/EG this symbol on the product
or on its packaging indicates that this product may not be treated as household was-
te. Instead it should be taken to the appropriate collection point for the recycling of
electrical and electronic equipment. by ensuring this product is disposed of correctly,
you will help prevent potential negative consequences for the environment and hu-
man health, which could otherwiese be caused by inappropriate waste handling of
this product. For more detailled information about recycling of this product, please
contact your local council or your household waste disposial service.
Declaration of Conformity
Producer: CHAL-TEC Vertriebs- + Handels GmbH, Wallstraße 16, 10179 Berlin.
This produkt is conform to the followring European Directives:
2014/35/EU (Niederspannung)
2014/30/EU (EMV)
2011/65/EG (RoHS)
11

12
12
This manual suits for next models
2
Table of contents
Languages:
Other auna Speakers manuals

auna
auna Blaster DAB User manual

auna
auna Line 100 A User manual

auna
auna Areal Bar 150 User manual

auna
auna Linie 500 DA User manual

auna
auna Brooklyn Beat User manual

auna
auna Areal Bar 750 User manual

auna
auna 10033065 User manual

auna
auna Streetstar Retro 50 User manual

auna
auna DiscoStar 10028847 User manual

auna
auna Linie 400 A User manual

auna
auna 10032598 User manual

auna
auna Areal Bar 360 HDMI User manual

auna
auna ST-2000 User manual

auna
auna Bazzter User manual

auna
auna Areal Bar 355 User manual

auna
auna 10003999 User manual

auna
auna ULTRASONIC CD User manual

auna
auna 10030357 User manual

auna
auna Dazzle 5.0 User manual

auna
auna 10032085 User manual