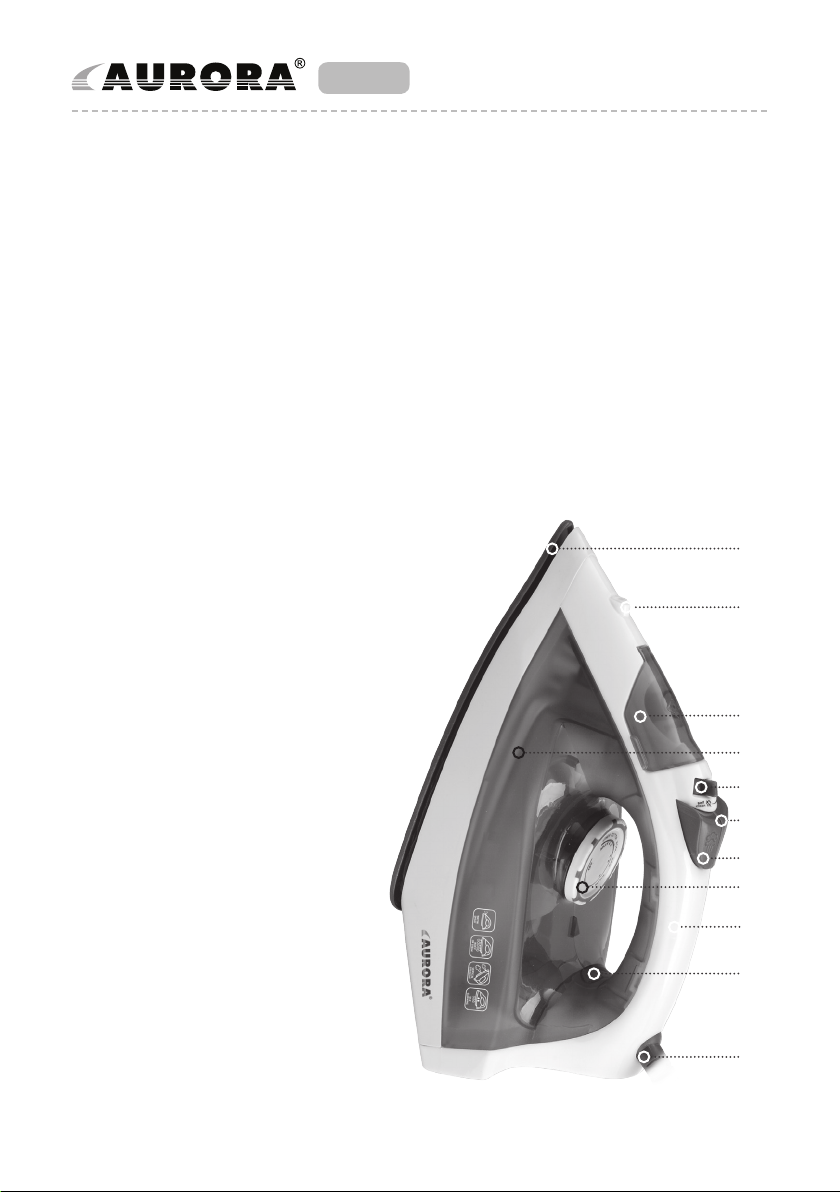
Aurora AU 3430 User manual

AU 3430
STEAM IRON
ONLY FOR HOUSEHOLD USE
Electric
www.aurora-ua.com
www.aurora-tm.com

AU 3430
2
Electric STEAM IRON
Опис схеми приладу
Описание схемы
прибора
1. Soleplate
2. Spray
3. Water lling inlet
4. Transparent water tank
5. Variable steam control
6. Spray button
7. Button steam
8. Thermoregulator
9. Handle
10. Indicator light
11. Protective device cord
Components
identication
1. Робоча поверхня
2. Розбризкувач
3. Отвір резервуара для води
4. Прозорий резервуар для води
5. Регулятор ступеня відпарювання
6. Кнопка розбризкувача
7. Кнопка подачі пари
8. Терморегулятор
9. Ручка
10. Световой индикатор работы
11. Захисний пристрій електрошнура
1. Рабочая поверхность
2. Разбрызгиватель
3. Отверстие резервуара для воды
4. Прозрачный резервуар для воды
5. Регулятор степени отпаривания
6. Кнопка разбрызгивания
7. Кнопка подачи пара
8. Терморегулятор
9. Ручка
10. Световой индикатор работы
11. Защитное устройство электрошнура
4
2
3
11
8
5
6
7
1
10
9

UKR
AU 3430
3
Electric STEAM IRON
ЗАХОДИ БЕЗПЕКИ
.
, -
. .
ПЕРЕД ПЕРШИМ ВИКОРИСТАННЯМ
-
,
.
,
’ .
.
.
, -
, -
, .
-
.
.
,
.
, -
.
,
, -
.
, ,
- .
-
.
-
,
.
-
.
.
,
.
,
.
--
, .,
.
.
-
( ) -
, ,
,
-
, .
-
.
,
.
УВАГА! -
-
.
УВАГА! ,
, -
.
УВАГА! -
.
!
УВАГА!
. -
.
-
0ºC,
2 .

UKR
AU 3430
4
Electric STEAM IRON
ВИКОРИСТАННЯ ПРИЛАДУ
ВСТАНОВЛЕННЯ ТЕМПЕРАТУРИ ПРАСУВАННЯ
-
.
-
:
, . .
,
. , -
,
.
,
. ,
60% 40%
,
.
-
, .
НАПОВНЕННЯ РЕЗЕРВУАРУ ДЛЯ ВОДИ
. -
, .
,
.
ВИБІР ПОЛОЖЕННЯ ТІЛА ПРИ ПРАСУВАННІ
, .
, -
.
-
.
, .
ВІДПАРюВАННЯ
Переведіть терморегулятор у позицію «••» чи
«•••». Натисніть кнопку відпарювання.
УВАГА!
, -
5 .
РОЗБРИЗКУВАННЯ
, .
.
ПАРОВИЙ УДАР
-
’
місць. Встановіть терморегулятор у позицію «••»
чи «•••». Встановіть регулятор ступеню відпарю-
.
.
ВЕРТИКАЛЬНЕ ВІДПАРюВАННЯ
,
.
. -
. -
, . -
-
,
-
.
. .
. , .
, , -
.

UKR
AU 3430
5
Electric STEAM IRON
ЧИСТКА ТА ДОГЛЯД
ЗБЕРІГАННЯ
ТЕХНІЧНІ ХАРАКТЕРИСТИКИ
, -
. , .
.
, , . -
, .
220-240 ~50
1800
СУХЕ ПРАСУВАННЯ
,
.
. -
.
САМООЧИЩЕННЯ
, . -
. -
гулятора встановіть температуру «MAX». Після
, ,
. -
,
. -
,
, .
-
.
.
, -
.
ЧИСТКА ВІД НАКИПУ
, . -
морегулятор у максимальну позицію «MAX».
. -
, . -
.
, -
-
,
. , ,
. -
.
-
. , -
.
ЗАКІНЧЕННЯ ПРАСУВАННЯ
. -
гулятор у положення «Min». Відключіть праску
. .
УВАГА!
.
, ,
.
.
. ’
, .

AU 3430 RU
6
Electric STEAM IRON
.
, .
.
ПЕРЕД ПЕРВЫМ ИСПОЛЬЗОВАНИЕМ
МЕРЫ ПРЕДОСТОРОЖНОСТИ
.
,
-
.
. -
.
,
,
, -
. -
.
-
.
, .
.
-
, ,
, .
-
, ,
.
-
-
.
, -
, -
.
.
.
,
.
, -
.
-, -
.,
.
-
.
( ) -
,
,
,
-
,
.
.
,
.
ВНИМАНИЕ! -
.
ВНИМАНИЕ! , -
, .
ВНИМАНИЕ!
. !
ВНИМАНИЕ! -
. -
.
0ºC,
2 .

AU 3430 RU
7
Electric STEAM IRON
ИСПОЛЬЗОВАНИЕ ПРИБОРА
УСТАНОВКА ТЕМПЕРАТУРЫ ГЛАЖКИ
-
.
-
:
, -
..
,
. ,
, -
.
,
. ,
60% 40%
,
. -
-
, .
НАПОЛНЕНИЕ РЕЗЕРВУАРА ДЛЯ ВОДЫ
. -
. ,
.
.
,
.
ВЫБОР ПОЛОЖЕНИЯ ТЕЛА
, . -
,
.
-
.
,
.
ОТПАРИВАНИЕ
-
ние «••» или «•••». Нажмите кнопку отпаривания.
ВНИМАНИЕ! -
,
5 .
РАЗБРЫЗГИВАНИЕ
,
. -
.
ПАРОВОЙ УДАР
-
. -
тор в положение «••» или «•••».
ВЕРТИКАЛЬНОЕ ОТПАРИВАНИЕ
, .
.
-
. ,
.
-
,
.
. . -
. , . -
, ,
.

AU 3430 RU
8
Electric STEAM IRON
ЧИСТКА И УХОД
ХРАНЕНИЕ
ТЕХНИЧЕСКИЕ ХАРАКТЕРИСТИКИ
, .
, . -
.
, .
, .
220-240 ~50
1800
СУХАЯ ГЛАЖКА
,
. -
-
. -
.
САМООЧИСТКА
, .
. -
новите температуру «MAX». После того, как подо-
, .
, -
.
, , .
-
. -
. -
, .
ЧИСТКА ОТ НАКИПИ
, . -
лятор в положении «MAX», а регулятор подачи
.
. ,
.
.
, .
, , .
-
. -
. -
, .
ОКОНЧАНИЕ ГЛАЖКИ
. -
гулятор в положение «Min». Отключите утюг
. .
.
, -
.
ВНИМАНИЕ!
.
, ,
.
.
.
,
.

AU 3430 ENG
9
Electric STEAM IRON
SAFETY PRECAUTIONS
Remove the protective cover and gently rub with a dampened cloth.
Some parts of the iron were greased during manufacture, and as a result, the appliance may slightly
smoke when switched on for the rst time. After a short while, this will cease.
BEFORE FIRST USE
Read these instructions carefully before using the
appliance, in order to avoid handling damage.
Incorrect handling can result in damage to the
appliance, property loss or personal injury.
The appliance is intended for household use only.
Do not use for industrial purposes.
Before connecting the iron for the rst time,
check that your mains voltage corresponds to
that indicated on the rating label.
Do not use outdoors and in rooms with high hu-
midity.
Do not immerse the appliance and cord in water
or any other liquids.
Never yank the cord disconnecting the iron from
the outlet; instead, grasp the plug and pull to dis-
connect.
Keep the cord away from hot surfaces and sharp
edges.
Always unplug the iron from the power outlet be-
fore lling or emptying the water tank and when
not in use.
Do not operate the appliance with a damaged
cord or plug, or after it has been immersed in wa-
ter, or damaged in any manner.
To avoid the risk of electric shock, do not attempt
to disassemble or repair the appliance by your-
self.
If the cord is damaged, it must be replaced at an
authorized service center, in order to avoid hazard.
Contact the nearest service centre for examina-
tion, repair or adjustment of the iron.
Close supervision is necessary for this appliance
being used near children.
Do not let children use the iron.
Place the appliance on an ironing board carefully,
in order to avoid damaging the soleplate.
Be careful not to touch hot metal parts of the iron.
Be careful around zippers and similar items to
prevent the soleplate from scratching.
Do not place the iron on metal or rough surfaces.
This appliance is not intended for use by persons
(including children) with reduced physical, sen-
sory or mental capabilities, or lack of experience
and knowledge, unless they have been given
supervision or instruction concerning use of the
appliance by a person responsible for their safety.
Children should be supervised to ensure that
they do no play with the appliance.
Never leave the iron unattended while in use.
WARNING! To avoid overloading the power sup-
ply, do not use the device in conjunction with
other power-consuming devices.
WARNING! Troubles caused by scale appearing
on the device parts are not covered by warranty.
ATTENTION! Do not let children play with plastic
bags or packaging lm. The threat of suocation!
ATTENTION! Power plug wire and a grounding
prong. Only connect the appliance to a properly
grounded outlet.
If the appliance has been exposed to tempera-
tures below 0ºC for some time, it should be kept
at room temperature for at least 2 hours before
using.

AU 3430 ENG
10
Electric STEAM IRON
USING THE APPLIANCE
TEMPERATURE SETTINGS
Before you begin, check the clothing label for spe-
cic ironing instructions and fabric composition.
Sort garments according to the dierent heat set-
tings required: wool to wool, cotton to cotton, etc.
The iron heats up much faster than it cools down.
Thus, iron fabrics that require lower temperatures
rst, and then iron the items compatible with
higher temperature settings. Iron blended fab-
rics at settings for the lower-temperature ber.
For example, the fabric is 60% polyester and 40%
cotton; you must choose the ironing temperature
for polyester. Turn the temperature knob to the
position in accordance with the type of fabric to
be ironed.
WATER TANK FILLING
Before lling the water tank ensure the plug is
removed from the power outlet. Carefully pour
water into the water inlet until the maximum wa-
ter level is reached. Do not exceed the maximum
water level indicator. When ironing, make sure to
unplug the appliance from the power outlet be-
fore relling.
BODY POSITION WHILE IRONING
While ironing, keep your back straight. Set the
ironing board so that the handle was on a par
with the elbow. When the temperature is set cor-
rectly, there is no need to press hard on the iron.
For best results, iron your clothes slightly damp.
STEAM IRONING
Switch the temperature control dial to “••” or “•••”
position. Push the steam button.
NOTE! In order to prevent water leakage from the
soleplate, please do not press the steam button
continuously for more than 5 seconds.
SPRAYING
As long as there is enough water in the water
tank, you may use the spray button at any tem-
perature setting during steam or dry ironing.
Press the spray button several times to activate
the pump while ironing.
BURST OF STEAM
The burst of steam feature provides additional
steam for removing stubborn wrinkles. Turn the
temperature control dial to the “••” or “•••” posi-
tion. Turn the variable steam control to the maxi-
mum position. Press the steam burst button.
VERTICAL STEAM
Ensure that there is enough water in the water
tank. Place the steam iron on its heel rest and
plug it. Set the temperature control dial and vari-
able steam control to their maximum positions.
Hold the iron vertically and press the steam burst
button.
The anti-drip feature automatically activates to
prevent vaporization, so that you can iron the
most delicate fabrics without risk of spoiling or
staining them.
Plug the iron into an outlet. The indicator light will turn on. Set the temperature by turning the tempera-
ture control dial to adequate choice. When the light turns o, you may start ironing.
When the temperature is changed from a high setting to a lower temperature setting during ironing, the
indicator light will go out immediately. It is not recommended to iron before the light comes on again.

AU 3430 ENG
11
Electric STEAM IRON
CARE AND CLEANING
STORAGE
SPECIFICATIONS
Before cleaning the appliance make sure it is unplugged from the power supply and has completely
cooled down. To clean the exterior of your iron, wipe over with a damp soft cloth and wipe dry. Never use
harsh abrasives to clean the soleplate as these will damage it.
Empty the water tank and wind the power cord around the heel rest. To protect the soleplate from scratch-
ing, corroding or staining, always place the steam iron in an upright position on its heel rest.
Power source 220-240 V ~50 Hz
Power 1800 Watt
DRY IRONING
The steam iron can be used on the dry setting
with or without water in the water tank, however
it is best to avoid having the water tank full while
dry ironing. Turn the variable steam control to the
minimum position.
SELF-CLEANING
Fill the water tank to the maximum mark, then
close the lid. Connect the unit to the mains. With
the thermostat set the temperature «MAX». Af-
ter working surface heats up, switch o the unit
from the mains. Hold the iron above the sink, turn
the steam regulator to the far left. Steam press-
ing steam and boiling water, leaving the nozzles
remove contamination. It should shake the iron
back and forth. With strong iron contamination
should repeat the self-cleaning cycle. To dry the
sole poprasuyte unnecessary piece of cloth.
DESCALING
Fill the water tank up to the maximum level and
then close it. Set the temperature controller to
position «MAX», and the steam regulator to the
maximum steaming. Plug it to the power supply.
Allow the iron to heat up until the indicator light
goes out. Unplug the iron. Holding the iron hori-
zontally over the sink, press the steam button.
Boiling water and steam will be ejected from the
holes in soleplate with impurities washed out.
Rock the iron forwards and backwards during this
operation. Repeat self-cleaning if you notice that
much impurity has been washed out. Move the
iron over an old piece of cloth.
WHEN YOU FINISHED IRONING
Set the iron vertically. Turn the temperature con-
trol dial to “Min”. Unplug the iron from the power
supply. Let it cool down completely. Wind the
cord. Store the appliance vertically, to avoid dam-
aging the surface.
CAUTION! Empty the iron’s water tank after each use.
This symbol on the product and packaging means that used electrical and electronic products and batteries should not be
mixed with general household waste. They need to take special reception points. For more information on the existing systems
of waste collection, contact the local authorities. Proper disposal helps to save valuable resources and prevent potential nega-
tive eects on human health and the environment that may result from improper handling of waste.

AU 3430
12
Electric STEAM IRON
ОПИС \ ОПИСАНИЕ \ COMPONENTS IDENTIFICATION
УКРАїНСЬКА
РУССКИЙ
ENGLISH
2
3
6
9
ЗМІСТ \ СОДЕРЖАНИЕ \ CONTENT
Table of contents
Languages:
Other Aurora Iron manuals

Aurora
Aurora AU 3424 User manual

Aurora
Aurora AU 191 User manual

Aurora
Aurora AU 3432 User manual

Aurora
Aurora AU 323 User manual

Aurora
Aurora AU 3163 User manual

Aurora
Aurora AU 3433 User manual

Aurora
Aurora AU 3164 User manual

Aurora
Aurora AU 3421 User manual

Aurora
Aurora AU 3150 User manual

Aurora
Aurora AU 3434 User manual

Aurora
Aurora AU 3152 User manual

Aurora
Aurora AU 3152 User manual

Aurora
Aurora AU 3028 User manual

Aurora
Aurora AU 3022 User manual

Aurora
Aurora AU 3425 User manual

Aurora
Aurora AU 3162 User manual

Aurora
Aurora AU 3156 User manual

Aurora
Aurora AU 3423 User manual

Aurora
Aurora AU 3161 User manual

Aurora
Aurora AU 3424 User manual