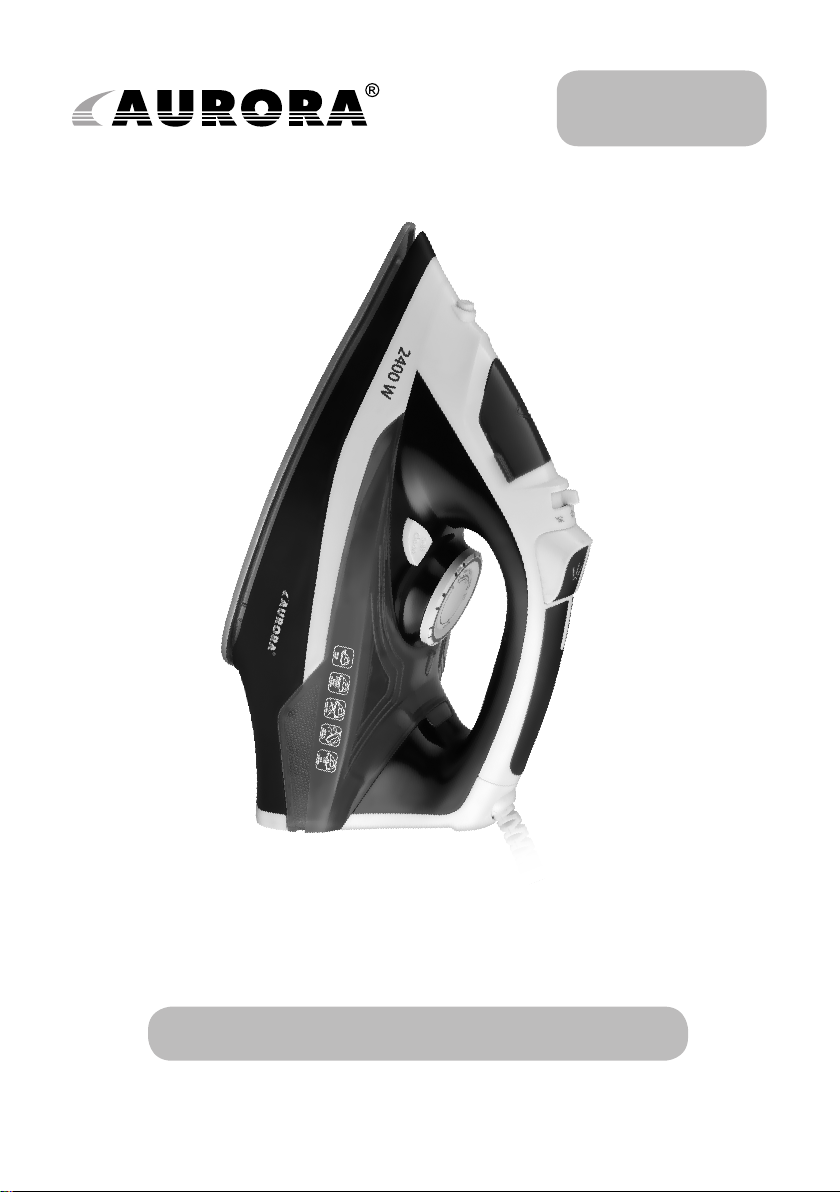
Aurora AU 3434 User manual

AU 3434
ONLY FOR HOUSEHOLD USE
www.aurora-tm.eu
STEAM IRON
ELECTRIC

2
SPECIFICATIONS
Power supply 220-240V ~50-60Hz
Power 2000-2400 W
1. Powierzchnia robocza
2. Spryskiwacz
3. Pokrywka zbiorniczka wody
4. Przezroczysty zbiorniczek wody
5. Regulator stopnia parowania
6. Samooczyszczające przycisk
7. Przycisk spryskiwacza
8. Przycisk uderzenia pary
9. Termoregulator
10. Lampka sygnalizacyjna
nagrzewania
11. Pokrętło
1. Working surface
2. Sprinkler
3. Cover of the water tank
4. Transparent water tank
5. Steaming regulator
6. Self clean button
7. Sprinkling button
8. Steam button
9. Thermoregulator
10. Heating indicator lamp
11. Handle
1. Darbinis paviršius
2. Purkštuvas
3. Vandens bakelio dangtelis
4. Permatomas vandens bakelis
5. Garų tiekimo lygio reguliatorius
6. Savaiminio išsivalymo
mygtuką
7. Purškimo mygtukas
8. Garo tiekimo mygtukas
9. Temperatūros reguliatorius
10. Kontrolinė įkaitimo lemputė
11. Rankenėlė
1. Darba virsma
2. Izsmidzinātājs
3. Ūdens tvertnes vāciņš
4. Ūdens tvertnes vāciņš
5. Tvaicēšanas pakāpes regulators
6. Pašattīrīšanās poga
7. Izsmidzināšanas poga
8. Tvaika poga
9. Termostats
10. Uzsildīšanas gaismas indikators
11. Rokturis
1. Tööpind
2. Pihusti
3. Veenõu kaas
4. Läbipaistev veenõu
5. Aurutamise taseme regulaator
6. Isepuhastuv nuppu
7. Pihustamise nupp
8. Aurunupp
9. Termoregulaator
10. Kuumenemise
valgusindikaator
11. Käepide
1.
2.
3.
4.
5.
6.
7.
8.
9.
10.
11.
1.
2.
3.
4.
5.
6.
7.
8.
9.
10.
11.
1. Suprafaa de lucru
2. Pulverizator
3. Capacul rezervorului de apă
4. Rezervor de apă transparent
5. Regulatorul debitului de aburi
6. Buton pentru auto-curăare
7. Buton pentru stropire
8. Buton pentru dispersarea
jetului de aburi
9. Regulator de temperatură
10. Indicator luminos de încălzire
11. Mâner
1. Munkafelület
2. Permetező
3. Víztartály fedele
4. Átlátszó víztartály
5. Páramennyiég szabályozó
6. Önzisztítás gombja
7. Permetezés gombja
8. Páraadagoló gomb
9. Hőfok szabályozó
10. Fényvisszajelző
11. Fogantyú
ENG Components
identication
RUS
POL Opis schematu
urządzenia LTU Prietaiso schemos
aprašymas
LVA Ierīces shēmas
apraksts EST Seadme
skeemi kirjeldus ROU Schema
descriere produs
HUN Készülék
áramkörének leírása
1. Arbeitsäche
2. Sprühdüse
3. Deckel des Wassertanks
4. Transparenter Wassertank
5. Dampfregler
6. Knopf für
Selbstreinigungsfunktion
7. Knopf für Sprühfunktion
8. Dampfschießknopf
9. Temperaturregler
10. Aufheizkontrolleuchte
11. Gri
DEU Beschreibung
der geräteschaltung
1. Plan de travail
2. Pulvérisateur
3. Clapet du réservoir d’eau
4. Réservoir transparent d’eau
5. Régulateur de défroissage
6. Bouton de nettoyage
automatique
7. Bouton de pulvérisation
8. Bouton pressing
9. Thermostat
10. Voyant lumineux de chaue
11. Poignée
FRA Description du
circuit de l’appareil
1. Pracovní plocha
2. Roztřikovač
3. Víko nádrže vody
4. Průhledná nádrž na vodu
5. Regulátor stupně napařování
6. Tlačítko samoočištění
7. Tlačitko roztřikování
8. Tlačítko pro doodávku páry
9. Teploregulátor
10. Světelný indikator nahřívání
11. Držadlo
CZE Popis okruhu
zařízení
1.
2.
3.
4.
5.
6.
7.
8.
9.
10.
11.
BGR
4
2
11
3
10
5
1
9
6
UKR
7
8

3
SECURITY MEASURES
Please read this manual carefully before using the product to avoid
damage during use. Before switching on the product, make sure that
the technical specications of the product shown on the label corre-
spond to the parameters of the electric network. Incorrect use can
lead to damage of the product, cause material damage or cause dam-
age to the health of the user. Use only for household purposes in ac-
cordance with this Manual. The product is not intended for commer-
cial use. Use the product only for its intended purpose. Do not use the
product outdoors and in rooms with high humidity. Always unplug
the product from the electrical network when it is not in use, as well as
before assembly, disassembly and cleaning. The product must not be
unattended while it is connected to the electric network. Make sure
that the power cord does not touch the sharp edges of furniture and
hot surfaces. To avoid electric shock, do not attempt to disassemble or
repair the product by yourself. When disconnecting the product from
the electric network, do not pull on the power cord, hold the plug. Do
not twist or wind the cord.The product is not designed to be operated
by an external timer or a separate remote control system.The product
is not intended for use by persons with reduced physical, sensory or
mental abilities, or if they have no experience or knowledge, if they are
not controlled or instructed about the use of the device by the person
responsible for their safety Do not allow children to use the product
as a toy. Do not use accessories that are not included in the delivery
suite. ATTENTION! Do not allow children to play with plastic bags or
wrapping lm. THREAT OF SUFFOCATION! ATTENTION! Do not use
this product outdoors. ATTENTION! Be especially careful if children
under 8 years or people with disabilities are close to the product in
use. ATTENTION! Do not use this product near combustible materials,
explosives, or self-igniting gases. Do not install this product near a gas
or electric stove, or other heat sources. Do not expose the product to
direct sunlight. ATTENTION! Do not allow children under 8 years to
touch the body, the power cord and the plug of the power cord while
the product is in operation. If the product has been kept for a while at
a temperature below 0ºC, it must be left at room temperature for at
least 2 hours before switching it on. ATTENTION! Do not handle the
power cord and the power cord plug with wet hands. ATTENTION!
Unplug the product from the electric network every time before
cleaning, and also if you do not use it. When connecting the product
to an electrical network do not use an adapter. ATTENTION! To avoid
overloading the electric network, do not connect the product with
other powerful electrical appliances to the same electric network.
Before lling or draining water from the tank, and if you do not use
the product, disconnect it from the electric network. Place the iron on
the ironing board carefully, so not to damage the work surface. AT-
TENTION! Do not ll in the water tank with avoured uids, vinegar,
starch solution, descaling agents, chemicals, etc. ATTENTION! The
power cord plug has a wire and a grounding prong. Only connect the
product to a properly grounded socket. ATTENTION! Do not place the
iron on metal or rough surfaces. Avoid ironing on zippers, rivets, etc.,
as they can damage the working surface. ATTENTION! Be careful and
do not touch the metal parts of the iron. ATTENTION! Regularly clean
the iron from scum. Malfunctions caused by the scum appearance on
the component parts of the product are not a guarantee event. AT-
TENTION! For additional protection in the power circuit, it is advisable
to install a residual current device with a rated operating current not
exceeding 30 mA. To install the device, contact a specialist.
USE OF THE PRODUCT
Plug the power cord of the iron into an socket. The indicator lights
up. Set the mechanical controller to the required temperature.When
the indicator turns o, you can start ironing. If you set the tempera-
ture less than when you ironed, it is not recommended to start iron-
ing until the indicator lights up again.
IRON TEMPERATURE SETTING
Before work starts, refer to the instructions for ironing a particular
type of fabric. Select products for the ber composition, depending
on the temperature of ironing: woolen to woolen, cotton to cotton,
etc. Heating of the iron is faster than cooling. So, start ironing the
products that require the lowest temperature, then go on to the
next products. If the fabric consists of dierent kinds of bers, you
need to start the ironing process from the lowest required temper-
ature. For example, fabric consists of 60% of polyester and 40% of
cotton you need to choose the temperature for polyester. Turn the
temperature controller to the position according to the type of fab-
ric that you are going to iron.
FILLING THE WATER TANK
Before lling the tank with water, unplug the product from the elec-
tric network. Gently ll the tank with water. To prevent overow, do
ENG
CONTENT \ съдържанието \ ObSAHU \ SISU \ INHAlT \ CONTENT
\ TARTAlOM \ SATURS \ TURINYS \ zAwARTOść \ CONțINUT \
содержание \ Зміст
SECURITY MEASURES -------------------------------------- 3
МЕРКИ ЗА БЕЗОПАСНОСТ------------------------------- 4
BEZPEČNOSTNÍ OPATŘENÍ-------------------------------- 5
SICHERHEITSMASSNAHMEN----------------------------- 6
OHUTUSMEETMED ----------------------------------------- 8
MESURES DE SÉCURITÉ------------------------------------ 9
BIZTONSÁGI INTÉZKEDÉSEK ----------------------------10
DROŠĪBAS PASĀKUMI -------------------------------------11
SAUGUMO REIKALAVIMAI -------------------------------12
ŚRODKI BEZPIECZEŃSTWA ------------------------------13
MĂSURI DE SECURITATE----------------------------------14
МЕРЫ БЕЗОПАСНОСТИ ---------------------------------15
ЗАХОДИ БЕЗПЕКИ -----------------------------------------17
WARRANTY LIABILITIES-----------------------------------19
МЕЖДУНАРОДНИ ГАРАНЦИОННИ ЗАДЪЛЖЕНИЯ 19
VŠEOBECNÉ ZÁRUČNÍ PODMÍNKY --------------------20
GARANTII -----------------------------------------------------21
GARANTIjA---------------------------------------------------21
GARANTIjOS SąLYGOS -----------------------------------21
WARUNKI GWARANCjI------------------------------------21
GARANTIA NATIONALA SI INTERNATIONALA A
PRODUCATORULUI ----------------------------------------22
УСЛОВИЯ ГАРАНТИИ -------------------------------------22
ГАРАНТІЙНІ УМОВИ---------------------------------------23
WARRANTY CARD / ГАРАНЦИОНЕН ТАЛОН
/ ZÁRUČNÍ TALON / GARANTIIVALON /
GARANTIjAS TALONS / GARANTIjOS TALONAS
/ TALON GWARANCjI / TALON DE GARANȚIE /
ГАРАНТИЙНЫЙ ТАЛОН / ГАРАНТІЙНИЙ ТАЛОН 24

4
not pour water above the mark on the tank. If you want to add water
during ironing, rst unplug the iron from the electric network.
SELECTING THE BODY POSITION
Iron holding your back straight. Set the height of the ironing board
so that the iron handle is on the same level with the elbow. If the
temperature is correct, there is no need to press the iron hard. The
best results are achieved when the laundry is a little wet.
STEAMING
Turn the temperature controller to the position “••” or “•••” . Press the
steam button. ATTENTION! To prevent water dripping from steam
holes, hold the steam button for no more than 5 seconds.
SPRAYING
Spraying can be used at dierent temperatures and dierent operat-
ing modes of the product if there is enough water in the tank. To use
this function, press the Spray button a few times.
STEAM FLOW
This function is used for additional single supply of the steam when
smoothening very crushed places. Set the thermostat to “••” or “•••”
position, press the steam button.
VERTICAL STEAMING
Make sure there is enough water in the tank. Connect the iron to
the electric network and place it vertically. Set the thermostat and
the control of the steam stripping to the maximum position. While
holding the iron vertically, press the steam button. The anti-leakage
function automatically prevents the formation of drops, allowing you
to iron delicate fabrics without risk of spoiling them or putting stains.
DRY IRONING
You can iron in dry mode, even if the tank is lled with water. How-
ever, with prolonged operation in this mode, it is not recommended
to pour into the reservoir too much water. Set the steam control to
the minimum position.
ANTI-LEAKAGE FUNCTION„ANTI-DRIP“
The “anti-drip” function helps to avoid the water leakage and the
formation of divorces on the fabric, when the iron is operating at
low temperatures.
SELF-CLEANING
Fill the reservoir with water to the maximum mark, close the lid. Con-
nect the iron to the electric network. Use the thermostat to set the
temperature to “MAX”. After the sole is heated, turn o the iron from
the electric network. While holding the iron horizontally above the
sink, press the “Self-clean” button. Steam and boiling water, going
out from the nozzles, will remove impurities. In this case, the iron
should be shaken forward and backward. If the iron becomes heav-
ily soiled, repeat the self-cleaning cycle. To dry the sole of the iron,
iron a piece of unnecessary fabric.
END OF IRONING
Install the iron vertically. Set the controller to the “Min” position. Un-
plug the iron from the electric network. Let it cool down. You can
wind the cord. Keep the iron in an upright position to avoid damage
of the working surface.
ATTENTION! At the end of the work, it is always necessary to re-
move water from the tank.
ClEANING AND MAINTENANCE
Before cleaning the appliance, make sure that the iron is disconnected from the electric network and completely cooled down. Clean the
bodyt with a damp cloth, then wipe it dry. Do not use abrasive cleaners to clean the sole. Empty the water tank and then wind the power cord
around the iron base. To protect the working surface from damage, store the device in an upright position.
STORAGE
Before storage, make sure that the product is disconnected from electric network. Complete all the requirements of the CLEANING AND
MAINTENANCE section. Keep the product in a dry, cool place and out of the reach of children.
мерКи За БеЗоПасност
,
, .
, ,
, , -
.
,
.
. . -
.
,
.
, ,
, .
, -
. ,
. -
, -
.
, , .
. -
-
.
,
, , -
,
,
.
. ,
. !
.
! !
. ! ,
8- -
. ! -
,
.
,
. . -
! 8-
, -
, .
0ºC,
2 -
. !
. ! -
,
. ! -
, .
!
.
. ! -
,
.
-
, . -
, -
. !
, , ,
, . !
.
. !
. ,
., . !
. -
! -
, 30 mA .
, .
BGR

5
УПотреБа на Уреда
.
.
. ,
. - , ,
, , -
.
,
. -
:
, .
- . ,
, - ,
. -
,
- . ,
60% 40% , -
.
, , .
,
.
. ,
.
, .
, . -
,
. -
. - ,
.
Завъртете температурния регулатор в положение „••“ или „•••“.
. ! -
,
5 .
,
. , -
.
-
.
терморегулатора в положение „••“ или „•••“.
, .
.
. -
, .
,
-
.
,
. , , -
. -
.
,
.
,
. .
„MAX“. -
, .
, „Self-clean“.
, , -
. .
,
. , -
.
. -
„Min“. . .
. -
, .
! -
.
ПоЧистВане и ПоддръжКа
, , .
, . .
.
, .
съХранение
, . -
. , .
bEzPEČNOSTNÍ OPATŘENÍ
Před použitím spotřebiče si pečlivě přečtěte tuto příručku, abyste pře-
dešli poškození během používání. Před zapnutím zařízení se ujistěte,
že technické parametry spotřebiče uvedené na štítku odpovídají pa-
rametrům sítě. Nesprávné použití může vést k poškození spotřebiče,
poškození materiálu nebo poškození zdraví uživatele. Používejte pouze
pro domácí potřeby v souladu s tímto návodem. Spotřebič není určen
pro komerční použití. Spotřebič používejte pouze k určenému účelu.
Nepoužívejte spotřebič v bezprostřední blízkosti kuchyňského dřezu,
venku a v místnostech s vysokou vlhkostí. Mixér vždy odpojte od zá-
suvky, pokud jej necháváte bez dozoru a take před jeho sestavením,
rozebráním nebo mytím. Spotřebič nesmí být bez dozoru, pokud je při-
pojen k síti. Ujistěte se, že se napájecí kabel nedotýká ostrých hran ná-
bytku a horkých ploch. Abyste se vyhnuli úrazu elektrickým proudem,
nepokoušejte se sami rozebrat nebo opravit spotřebič. Při odpojování
spotřebiče od elektrické sítě netahejte za napájecí šňůru, držte se za vi-
dličku. Nepřekrucujte a nenavinujte sítový kabel. Spotřebič není určen
k pohanění externím časovačem nebo zvláštním systémem dálkového
ovládání. Spotřebič není určen pro použití osobami se sníženými fyzic-
kými, smyslovými nebo duševními schopnostmi, nebo pokud nemají
žádné zkušenosti nebo znalosti, nejsou-li kontrolovány nebo poučeni
o používání přístroje osobou odpovědnou za jejich bezpečnost. Nedo-
volte dětem používat výrobek jako hračku. Nepoužívejte příslušenství,
které není součástí dodávky. POZOR! Nedovolte dětem hrát s plastový-
mi sáčky nebo fólií. NEBEZPEČÍ DUŠNOSTI. POZOR! Nepoužívejte tento
spotřebič venku. POZOR! Buďte obzvlášť opatrní, pokud se v blízkosti
spotřebiče nacházejí děti do 8 let nebo osoby se zdravotním postiže-
ním. POZOR! Nepoužívejte tento spotřebič v blízkosti hořlavých mate-
riálů, výbušnin nebo samozápalných plynů. Neinstalujte tento spotře-
bič v blízkosti plynového nebo elektrického sporáku nebo jiných zdrojů
tepla. Nevystavujte spotřebič přímému slunečnímu záření. POZOR!
Nedovolte dětem mladším 8 let, aby se dotýkali pouzdra, napájecího
kabelu a zástrčky napájecího kabelu, když je zařízení v provozu. Pokud
byl spotřebič po určitou dobu uchováván při teplotě pod 0 °C, musí být
ponechán při pokojové teplotě po dobu nejméně 2 hodin před zapnu-
tím. POZOR! Nedotýkejte se napájecí šnůry a zástrčky mokrýma ruka-
ma. POZOR! Odpojte spotřebič od elektrické sítě vždy před čištěním a
také pokud jej nepoužíváte. POZOR! Při připojení spotřebiče k elektric-
ké zásuvce nepoužívejte adaptér. POZOR! Zástrčka napájecího kabelu
CZE
Table of contents
Other Aurora Iron manuals

Aurora
Aurora AU 3424 User manual

Aurora
Aurora AU 3162 User manual

Aurora
Aurora AU 3421 User manual

Aurora
Aurora AU 191 User manual

Aurora
Aurora AU 3437 User manual

Aurora
Aurora AU 3151 User manual

Aurora
Aurora AU 3153 User manual

Aurora
Aurora AU 3163 User manual

Aurora
Aurora AU 3423 User manual

Aurora
Aurora AU 3157 User manual

Aurora
Aurora AU 025 User manual

Aurora
Aurora AU 3152 User manual

Aurora
Aurora AU 3164 User manual

Aurora
Aurora AU 3152 User manual

Aurora
Aurora AU 3424 User manual

Aurora
Aurora AU 3430 User manual

Aurora
Aurora AU 3425 User manual

Aurora
Aurora AU 3150 User manual

Aurora
Aurora AU 3150 User manual

Aurora
Aurora AU 027 User manual