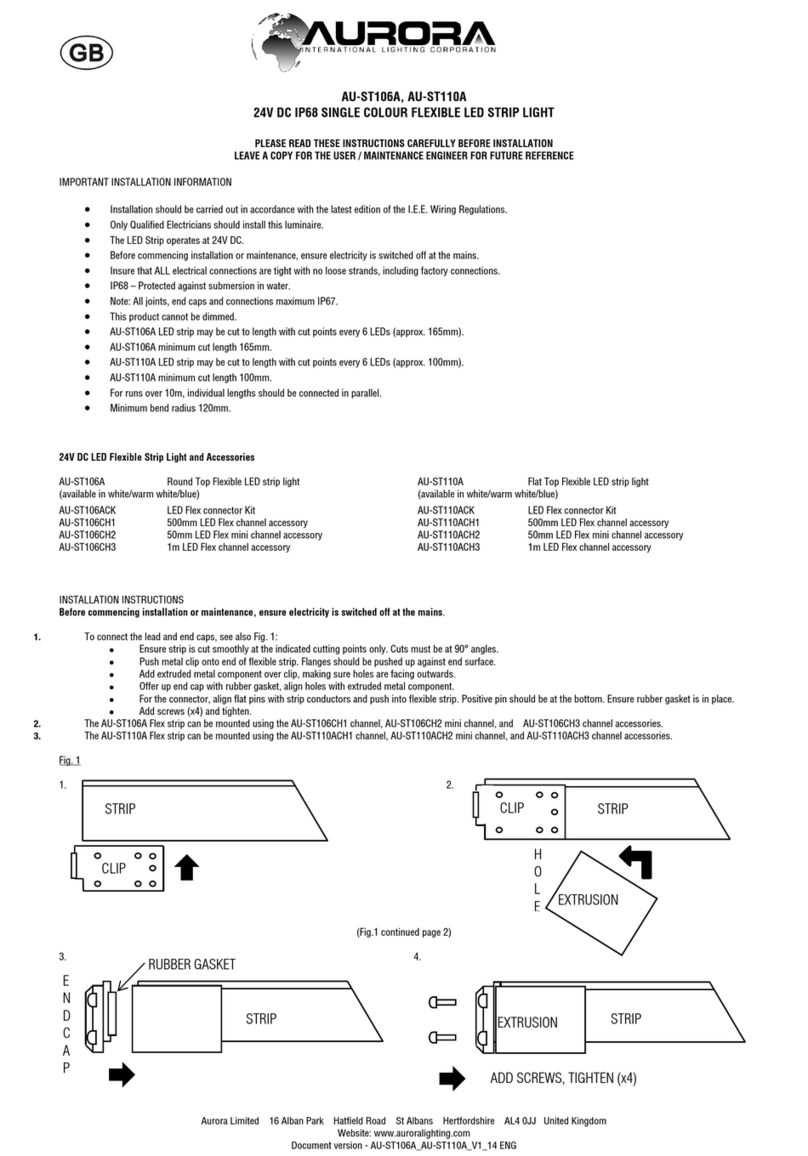
IMPORTANT INSTALLATION INFORMATION
• Installation should be carried out in accordance with the current edition
of the National Wiring Regulations. If in doubt, consult a
qualied electrician.
• Before commencing installation or maintenance, ensure electricity is
switched off at the mains.
• Ensure that ALL electrical connections are tight with no loose strands.
• When connecting to an LED Driver ensure that the polarity is correct.
The strip may be damaged if connected incorrectly.
• The LED Strip operates at 24V DC.
• A 24V DC LED Driveris Required (Not Included).
• This luminaire is not dimmable.
• Apply Strip to a clean Surface (g 8).
• (+) - Red, (-) - Black.
WICHTIGE INSTALLATIONSINFORMATIONEN
• Die Installation muss gemäß der neuesten Ausgabe der nationalen
elektrischen Anschlussvorschriften durchgeführt werden. Falls Sie sich
nicht sicher sein sollten, wenden Sie sich an einen qualifizierten Elektriker.
• Vor dem Beginn der Installation oder Wartung, müssen Sie sicherstellen,
dass der Netzstrom abgetrennt ist.
• Stellen Sie sicher, dass ALLE elektrischen Anschlüsse fest sind und keine
losen Litzen aufweisen.
• Stellen Sie bei der Verbindung mit einem LED-Treiber sicher, dass die Polarität
korrekt ist. Die Leiste kann beschädigt werden, wenn sie nicht richtig verbunden
wurde.
• Die LED-Leiste arbeitet bei 24V DC.
• Ein 24V DC LED-Treiber ist erforderlich (nicht im Lieferumfang enthalten).
• Dieser Beleuchtungskörper ist nicht dimmbar.
• Bringen Sie den Strip auf einer sauberen Oberäche an (g 8).
• (+) - Rot, (-) - Schwarz.
INFORMATION IMPORTANTE CONCERNANT L’INSTALLATION
• Cette installation doit être effectuée en conformité avec la dernière
édition du Règlement national de câblage. En cas de doute, consultez
un électricien qualié.
• Avant de commencer l’installation ou l’entretien, vériez que
l’alimentation est coupée au secteur.
• Veillez à ce que TOUTES les connexions électriques soient bien serrées,
sans ls lâches.
• Lors de la connexion à un driver LED, assurez-vous que la polarité est
correcte. Le bandeau peut se retrouver endommagé s’il est connecté de
façon incorrecte.
• Le bandeau LED fonctionne sur du 24 V DC.
• Un driver LED 24 V DC s’avère nécessaire (non inclus).
• Ce luminaire n’est pas gradable.
• Appliquer le ruban sur une surface lisse et nettoyée (g 8).
• (+) - Rouge, (-) - Noir.
IMPORTANTI INFORMAZIONI PER L’INSTALLAZIONE
• Si consiglia di installare il prodotto in conformità con l’edizione corrente delle
Normative nazionali di cablaggio (National Wiring Regulations). Incaso
di dubbio, consultare un elettricista qualificato.
• Disinserire l‘alimentazione di rete prima dell‘installazione o della manutenzione.
• Assicurarsi che TUTTI i collegamenti elettrici siano fissi senza fili volanti.
• Quando la si collega a un driver LED,assicurarsi che la polarità sia corretta. La
striscia può danneggiarsi se non viene collegata correttamente.
• La striscia LED è esercita a 24V DC.
• Un LED Driver 24V DC è richiesto (non incluso).
• Non dimmerabile.
• Posizionare la striscia su una supercie pulita (g 8).
• (+) - Rosso, (-) - Nero.
GB FR DE IT
NL ES SE UAE
BELANGRIJKE INSTALLATIE-INFORMATIE
• Installatie dient te worden uitgevoerd conform de geldende nationale
veiligheidsbepalingen voor elektrische installaties. Raadpleeg in geval van
twijfel een gediplomeerd elektricien.
• Schakel de stroomtoevoer met uw hoofdschakelaar uit alvorens met de
installatie of het onderhoud te beginnen.
• Zorg ervoor dat ALLE elektrische connecties goed vast zitten, en er geen
losse draden zijn.
• Zorg bij het verbinden met een LED-driver ervoor dat de polariteit correct is. De
strip kan worden beschadigd als hij onjuist wordt verbonden.
• De LED-strip werkt op 24V DC.
• Een 24V DC LED-driver nodig (niet inbegrepen).
• Deze lamp is niet dimbaar.
• Breng de strip aan op een schone ondergrond (g 8).
• (+) - Rood, (-) - Zwart.
VIKTIG INSTALLATIONSINFORMATION
• Installationen måste utföras av behörig elinstallatör och i enlighet med
gällande installationsföreskrifter.
• Kontrollera att huvudströmbrytaren är avstängd innan installation eller
underhållsarbete påbörjas.
• Kontrollera att ALLA elektriska kablar är säkert förbundna utan några
lösa parter.
• Se till att polariteten är korrekt vid anslutning till en 24V LED-drivenhet. Stripen
kan skadas om den kopplas in felaktigt.
• Denna LED-Strip drivs med 24V DC.
• En 24V DC LED-driver krävs (ej inkluderad)
• Dessa armaturer är inte dimbara.
• Applicera remsan på en ren yta (g 8).
• (+) - Röd, (-) - Svart.
IMPORTANTE INFORMACIÓN DE INSTALACIÓN
• Debe realizar la instalación de acuerdo con la edición actual de la
Normativa Nacional de Cableado. En caso de duda, consulte con
un electricista cualificado.
• Antes de iniciar las labores de instalación o mantenimiento asegúrese de
desconectar el suministro eléctrico.
• Asegúrese de que TODAS las conexiones eléctricas estén bien fijadas
sin cabos sueltos.
• Cuando conecte un controlador de LED,asegúrese de que la polaridad sea
correcta. La tira puede dañarse si se conecta incorrectamente.
• La tira LED funciona a 24V CC.
• Requiere un dispositivo controlador de LED de 24V CC (no incluido).
• Esta luminaria no es regulable en intensidad
• Asegúrese de que la supercie a la que se aplicará la tira
está limpia y sin grasa. (g 8).
• (+) - Rojo, (-) - Negro.
•
•
•
•LED
•24LED
•.)(24V
•
•.(g 8) LED
•.- (-) , - (+)
