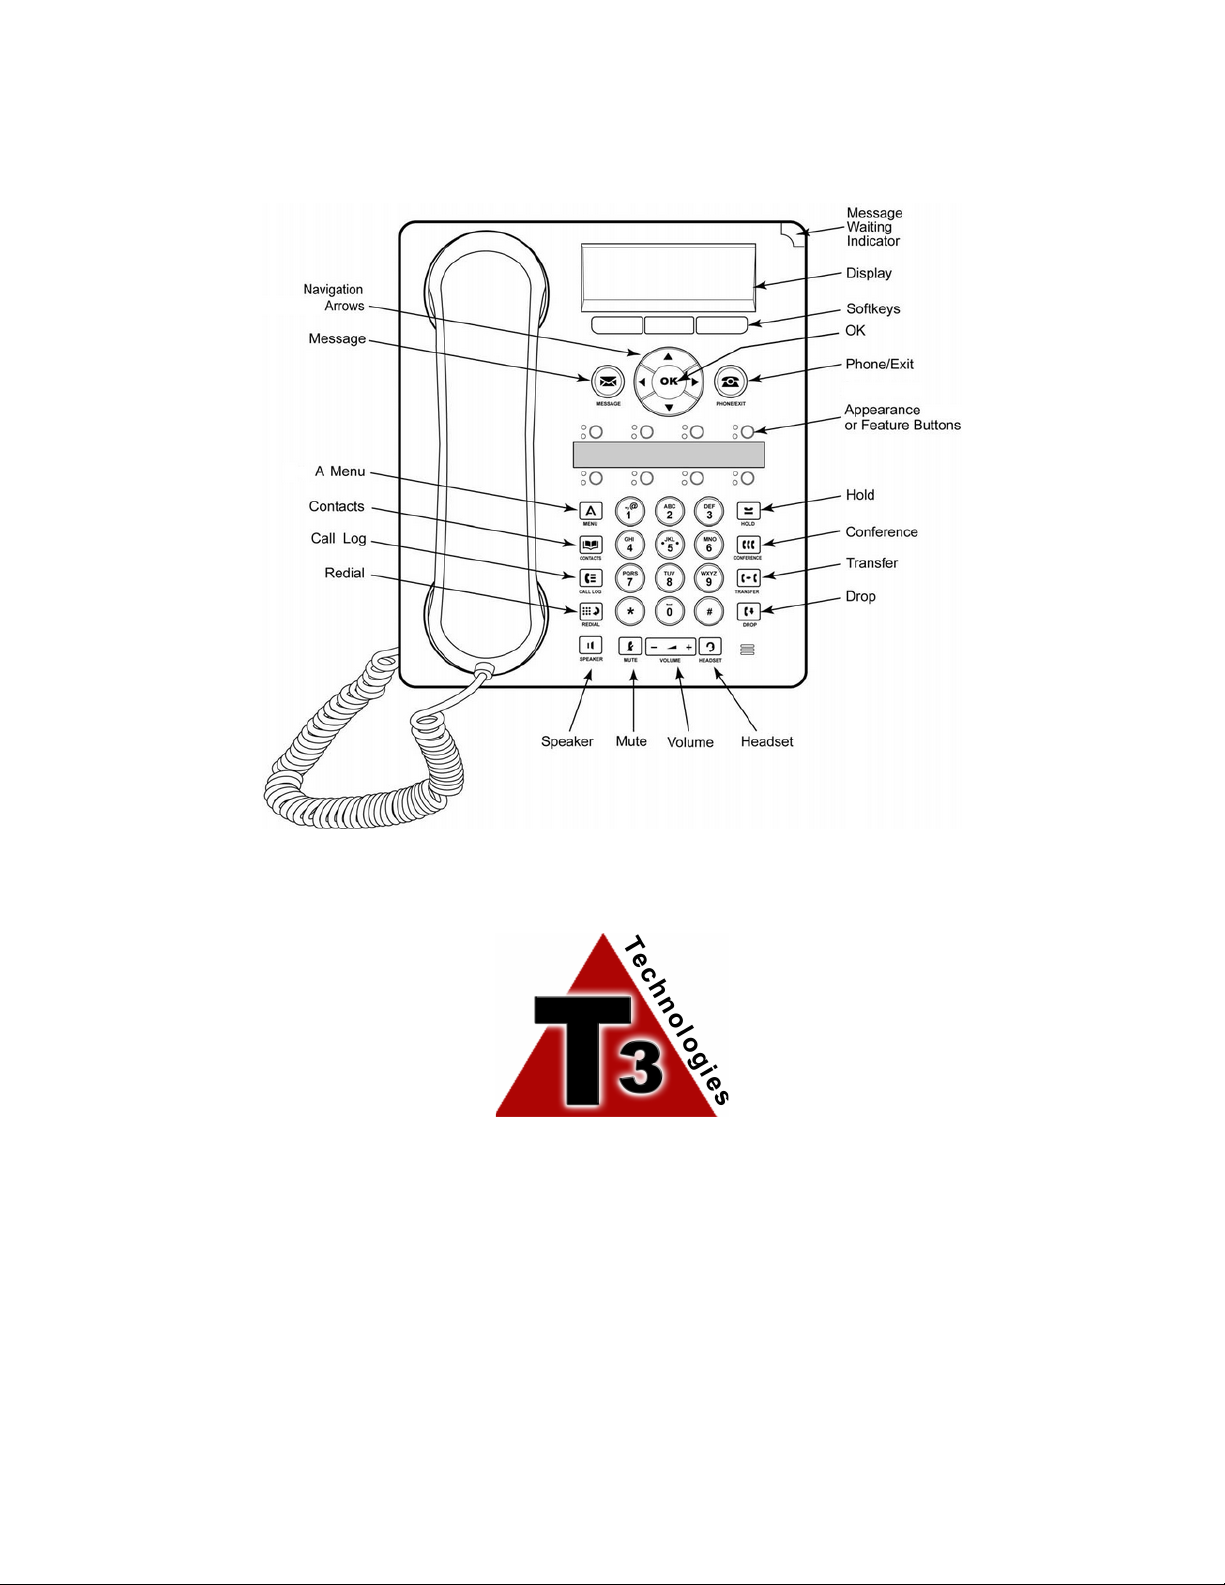
Avaya 1408 User manual

1408 Telephone
Intutity Voice Mail
T3 Technologies, LLC
PO Box 289
Whitehall, PA 18052
(484) 245-0060
www.t3-tek.com

2
Key Description
Soft Keys - These 3 keys below the display have variable functions. When the key
is active, its function is indicated by the text label above it. The left hand key is
usually linked to the OK key.
Message - This key is used to access your voicemail system. By default this uses a
series of menus on your phone's display.
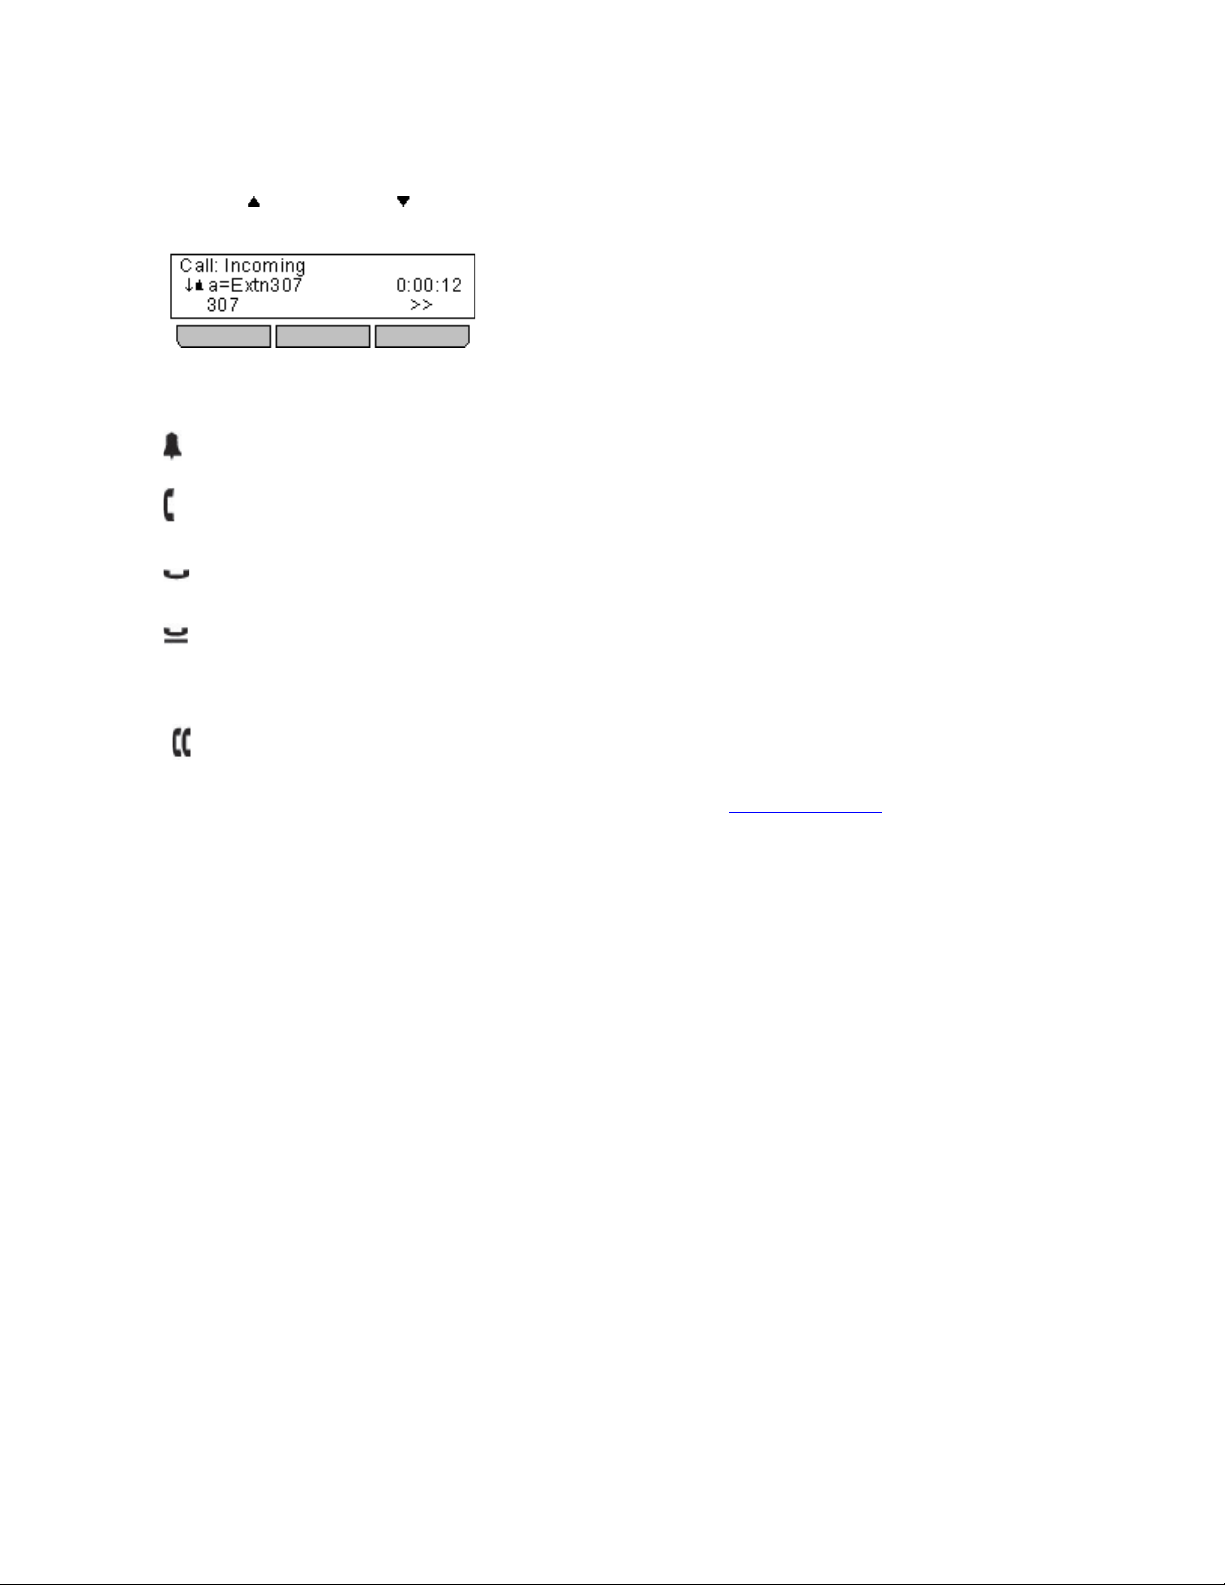
Navigation Keys - Press the up and down arrow keys to scroll through lists. The
arrow icons indicate where you are in a list. In some menus, you can also use the
left and right arrow keys to enter and exit different levels of the menu. A menu
option that accesses a sub-menu is indicated by the ... dots (ellipsis) icon after its
name.
In some menus, the and symbols in the display indicate a value that can be changed
by pressing the left and right arrow keys.
OK - The OK key normally matches the function offered by the left hand soft key
below the screen.
PHONE/EXIT - This key is used to exit any menu you are in and return to the
appearance buttons menu. During a call it can also be used to toggle the options
displayed on the appearance menu.
MENU - This key is used to access a menu for phone settings and information.
CONTACTS - This key is used to display the various directories (personal and
shared) of names and telephone numbers to which you have access.
CALL LOG - This key displays a record of you most recent answered, missed and
outgoing calls. The button is illuminated when you have new missed calls.
REDIAL - This key is used to either redial the last call you made or to show a list
of the last calls you made from which you can select the number to redial.
HOLD - This key is used to put the call you are currently talking to on hold.
CONFERENCE - This key is used to start a conference call and to add callers to an
existing conference.
TRANSFER - This key is used to transfer calls to another number.
DROP - Press the Drop key to drop the active call. It can also be used to redirect a
ringing call to voicemail. While on a conference call, you can press the Drop key to
drop a person from the conference call.
VOLUME - Press + plus or – minus on the Volume key to adjust the volume of the
incoming call. Separate volumes can be adjusted for the ringer, handset, headset and
speaker.
HEADSET - This key is used to answer and end calls using a headset connected to
the phones headset socket. The button is lit when you are connected to a call using
the headset.
MUTE - This key can be used to mute your speech to the currently connected call.
The button is lit while mute is active.
SPEAKER - This key is used to answer and end calls using the phone's handsfree
speaker and microphone. The button is lit when you are connected to a call
handsfree.
These keys have two roles:

4
Status Icons
The icons displayed on the call appearance/feature buttons of your 1408
telephone are explained in the following table.
Use the up and down arrow keys to scroll through details of the current call on each
appearance button.
If there is currently a call on the appearance button, an icon will be displayed indicating the
status of the call.
•Alerting
The call is alerting your phone.
•Connected
The call is the currently connected call to which you are talking.
•On Hold
The call is on hold.
•Held Elsewhere
The call has been put on hold by someone else who answered the call using an appearance
button on their phone.
•Conference
The call is a conference call.
A >> double-arrow at the bottom left indicates that there are soft key options available that could
be applied to the call. To access these, press the >> double-arrow soft key and select the required
function.
Call Appearance Button Lamps
The following lamp states are used by appearance buttons configured to be call appearance
buttons.

5
Button Lamps State
Red off.
Green off.
Idle
The call appearance is not in use and is not currently selected.
Red on.
Green off.
Idle + Selected
The call appearance is not in use but is the current selected button that will
be used if the user goes off hook.
Red off.
Green slow
flash.
Alerting
The matching call appearance is alerting for an incoming call. This is
accompanied by ringing. If the user is already on a call, only a single ring
is given.
Red on.
Green slow
flash.
Alerting + Selected
As above but Ringing Line Preference has made this the user's current
selected button.
Red on.
Green on.
In Use Here
The user has a call connected on the call appearance or is dialing.
Red off.
Green on.
In Use Elsewhere
The call appearance button is in use on a bridged appearance.
Red off.
Green fast flash.
On Hold Here
The call has been put on hold by this user.
Red off.
Green flash.
On Hold Elsewhere
A call on a bridged appearance button matched to the call appearance has
been put on hold. Calls on a call appearance that are put on hold by
another user will continue to show connected lamp status, though the
phone display will indicate a held call.
Red off.
Green broken
flash.
Inaccessible
The button pressed is not accessible. The call is still dialing, ringing or
cannot be bridged into.

6
1408 VOICE TERMINAL INSTRUCTIONS
Call-Handling Features
Answer a Call
When a call arrives at your 1408 Digital Telephone, you hear a ringing tone and a blinking green led
appears on the associated call appearance. In addition, call identification information is displayed with a
icon.
To answer an incoming call, do one of the following:
If not active on another call, answer the call using your handset, headset, or speakerphone.
If active on a call already, place the active call on hold and then answer the incoming call.
Make a Call
To make a call manually:
1. Go off hook using the handset, headset, or speaker.
2. When you hear dial tone, enter the extension or telephone number using the dial pad.
To have the 1408 telephone make a call automatically, do one of the following:
Press Redial to have the phone dial the last number that you dialed
Access the Call Log and initiate a call to a specific entry.
Access the contacts menu and initiate call to a specific entry
Hold
To put call on hold, press red hold button. Call stays on hold until you can return to it.
To return to held call, press the call appearance button of the held call.
Speakerphone
1. To make or answer call without lifting the handset, press Speaker button.
2. Place or answer the call.
3. Adjust the speaker volume if needed by pressing the volume control arrow buttons
4. Press Speaker button again to end the call.

7
Transfer (TNT)
1. While on a call, press the Transfer button, the caller is put on “soft-hold”
2. You hear dial tone, dial the number to which you want to transfer the call.
3. Do one of the following:
a. To transfer without announcing it, press the Transfer button again and hang up.
Transfer is complete.
b. To announce the call before transferring it, wait for the called party to answer. Go to
step 4.
4. When the called party answers, announce the call.
5. Press Transfer again to complete the transfer and hang up
Transfer to a User mail box without ringing the telephone: you can press Transfer, dial # and the
extension and press Transfer to send a caller directly to a Users mailbox without ringing the telephone.
Conference (CNC)
The conference feature allows you to conference multiple parties on a call.
To add another party to a call:
1. Press Conference button, the caller is put on “soft-hold”
2. You hear dial tone, dial the number of the person you want to add to a call.
3. Wait for an answer
4. Press the Conference button again to add the new party to the call.
5. Repeat steps 1-4 for each party you want to conference in to the call.
To add a held call to an active call:
1. Place all calls on HOLD.
2. Press the Conference button, all calls will be joined together.
To add a new incoming call to an active conference call:
1. When your phone rings, put the conference call on hold and answer the new incoming call.
2. After answering the incoming call, place the new call on HOLD.
3. Press the Conference button, all calls will be joined together.
Drop
To remove a participant from the conference call:
1. Press the Drop button.
2. Use navigation keys to scroll to the conference participant
3. When the person you wish to drop is in the display, press the drop button or the drop
soft key.
Redial
To redial a previously dialed number:
1. Press the Redial button.
2. Previously dialed numbers will be displayed.
3. Press the up and down navigation keys to the number you wish to Redial.
4. Either press the button or pick up the handset.

8
Selected Voice Features
Send All Calls/Do Not Disturb
1. Press this button (while on-hook). All calls will be sent to your cover path.
2. To cancel, press the send call button again.
Call Forwarding All Calls
1. Press the Call Forward All button.
2. In your display, dial the extension or outside number where calls will be sent
temporally.
3. Press Done.
4. Press the button again to cancel.
5. NOTE: The phone retains the last entry, if you are forwarding to a
different number, after pressing Forward button, remove old number by
pressing key under <<<, then enter new number, and press Done.
Call Park
This feature allows you to put call on hold at your extension for retrieval from any
extension.
1. Press Call Park button ( 1, 2, or 3 ).
2. Hang up.
To retrieve a parked call from another extension:
1. Pick up handset or press Speaker
2. Press the indicated Park Button
3. Press the CPkUp soft button

9
Contacts Button
This menu is accessed by pressing the key. It is used to
display names and numbers that you can then use for making
calls.
The directory includes names stored for use by all users,
names stored for use by just you and the name and numbers
of all the other users and groups on the phone system.
The Contact Menu diagram shows a summary of the menu
options.
The contacts shown in the directory come from a number of sources.
•Personal Directory Contacts
These contacts are stored by the telephone system as part of your user settings.
•They are displayed on the phone while you are using it. If you hot desk to another 1408, 1416,
1608 or 1616 phone, your personal contacts move with you.
•You can have up to 100 personal directory entries[2] which you can add, edit and delete these
through the phone.
•The system administrator can also add, edit and delete your personal directory entries.
•User Contacts
These contacts list all[3] the other users on the telephone system. If your system is part of a
Small Community Network of IP Office telephone systems, it includes users on the other
systems.
•Group Contacts
These contacts list all the hunt groups on the telephone system. If your system is part of a
Small Community Network of IP Office telephone systems, it includes those hunt groups that
the system administrator has configured to be advertised across the network.
•External Contacts
These contacts are viewable and useable by all phone users. These are two types of external
contacts:
•Some external contacts are entered into the telephone system configuration by the system
administrator.[1]
•Other external contacts are those imported by the telephone system from other directory
sources.
Adding Contacts to the Personal Directory
So long as the telephone system capacity has not been reached, you can add up to 100 personal directory entries.
1. Access your personal directory contacts:
a. Press the CONTACTS key. The directory menu is displayed.
b. Use the left and right arrow keys to select your Personal directory.
2. Press the New soft key.
•The menu now allows editing of the name and number. Use the up and down arrow keys to
switch between number and name entry.

10
•When the name has been entered as required, press the OK soft key.
•When the number has been are required, press the Save soft key.
•To exit without making any changes, press the Cancel soft key.
Making Calls from the Directory
You can use any directory contacts to make a call. You can also use the directory in almost any telephone function
where you need to select the number for a destination, for example during transfers.
1. Access the contacts directory:
a. Press the CONTACTS key. The directory menu is displayed.
b. Use the left and right arrow keys to select which type of directory entries you want
displayed.
•All
All directory entries.
•External
Directory entries stored by the telephony system for all users to use.
•Groups
The names and numbers of hunt groups on the telephone system.
•Users
The names and numbers of other users on the telephone system.
•Personal
Your own personal directory entries.
c. Either press the List soft key to display all the directory entries or start dialing the name to
display only matching entries.
d. Use the up and down arrow keys to scroll through the matching entries. To return to the start
to match a different directory selection, press the Clear soft key.
2. When the required entry is displayed, press Call.
3. Continue as for a normally dialed call.
Call Log
Viewing the Call Log
1.Access the call log.
a.Press the CALL LOG button.
b.The display will change to show your call log records. The caller's name is shown if known, otherwise the number.
c. Use the left and right arrow keys to select which call log records you are viewing. The options are All, Missed, Answered
and Outgoing.
•If you have any new missed call records (ie. the CALL LOG button lamp is illuminated) the call log will open showing your
missed calls.

11
d.Use the up and down arrow keys to scroll through the records.
2.Press the Call soft key or OK to call the number displayed in the call record.
Making Calls from the Call Log
1. From the Home screen, press the Log softkey
2. Use left/right arrow buttons to scroll through the Call Log Summary pages.
3. When you locate an entry you want to call, press the button corresponding to
the entry.
4. Press the Call softkey to make the call.
Saving a Call Log Entry to Your Speed Dial List
1. From the Home screen, press the Log softkey.
2. Use left/right arrow buttons to scroll through the Call Log pages.
3. When you locate entry to be saved, press the button corresponding to the
entry.
4. Press the Save softkey.
5. Do one of the following;
a. To save entry as shown, press the Save softkey.
b. To edit, press the button to the left of the Number line twice. Then,
make your changes. When you are done entering changes, press the
Save softkey.

12
Personal Settings/ Options
Pressing the MENU key accesses a menu that can be used to control various phone
settings. These are mainly settings stored by the phone rather than user settings that
move with you.
Ring Pattern
Press the MENU button.
Press the Select soft key.
Use the up and down arrow keys to locate the option Personalized Ringing.
Press the Select soft key.
Use the up and down arrow keys to scroll through the different available ring
patterns.
Press the Play soft key to repeat the currently display ring pattern.
To make the currently displayed ring pattern the selected ring pattern for the phone
press the Save soft key.
To leave the menu without making any changes press the Cancel soft key.
When completed, press the Done soft key.
Press the Exit soft key to exit the menus.
Display Contrast
Press the MENU button.
Press the Select soft key.
Use the up and down arrow keys to locate the option Contrast.
Press the Select soft key.
Use the left and right arrow keys to adjust the brightness as required.
When completed, press the Done soft key.
Press the Exit soft key to exit the menus.
To view the whole user manual for the 1408 phone, please visit
http://marketingtools.avaya.com/knowledgebase .

13
Notes

14
Voicemail
If your telephone system includes a voicemail server, pressing the MESSAGES button accesses a
series of menus referred to as "visual voice".[1] You can use these menus to playback messages and
change various voicemail settings.
Checking Messages
Press the MESSAGES button.
Depending on how your system is configured, you may be required to enter your voicemail password and then
press the Done soft key.
The visual voice menu is displayed. The numbers shown against the Listen option indicate the number of
new, old and saved messages in your mailbox.
If the system administrator has configured you to receive message waiting indication for any hunt group
mailboxes, you can also use the up and down arrow keys to display the hunt group names and the number
of messages in those mailboxes.
Press the Select soft key.
Use the up and down arrow keys to select which messages (New, Old or Saved) that you want to listen to and
press Select. The details of the first message of that type are displayed.
You can use the up and down arrow keys to scroll through the messages.
Use the soft keys to control the playback actions:
Listen/Pause
Start/stop playback of the currently displayed
message.
Delete
Delete the message.
More
Switch between the different sets of available soft key functions.
Save
Mark the message as saved. Saved messages are not normally automatically
deleted.
Copy
Copy the message to another mailbox. The menu will prompt you to enter the destination
number.
Call
Call the person who left the message.
Changing the Mailbox Greeting
Press the MESSAGES button.
Depending on how your system is configured, you may be required to enter your voicemail password and then
press the Done soft key.
The visual voice menu is displayed.
Use the up and down arrow keys to scroll to the option Greeting.
Press the Select soft key or OK.
Use the soft keys to listen to and record your mailbox greeting.
Listen
Listen to the current greeting or the new greeting just recorded.
Record
Record a new greeting. Note that the greeting must be at least 3 seconds long or the voicemail system will

15
discard it.
More
Switch between the different sets of available soft key
functions.
Submit
Submit the new recording as your mailbox greeting.
Delete
Delete your current mailbox greeting. The voicemail will use its default
greeting.
Changing the Email Mode
1
.
Press the MESSAGES button.
Depending on how your system is configured, you may be required to enter your voicemail password and
then press the Done soft key.
The visual voice menu is displayed.
Use the up and down arrow keys to scroll to the option Email. This option is only available if your email
address has been set in your voicemail settings by the system administrator.
Press the Select soft key or OK.
The menu displays your current voicemail email mode setting. Use the up and down arrow keys to scroll
through the possible settings:
Email Mode Off
Do not send any emails.
Email Mode Copy
Send an email with a copy of the new voicemail message
attached.
Email Mode Fwd
Send an email with the new voicemail message attached and delete the message from the voicemail
mailbox.
Email Mode Alert
Send an email telling you there is a new message but do not attach a copy of the message.
When the required setting is displayed, press the Select soft key. To exit without changing the setting, press the
Exit soft key.
Changing Your Voicemail Password
Press the MESSAGES button.
Depending on how your system is configured, you may be required to enter your voicemail password and
then press the Done soft key.
The visual voice menu is displayed.
Use the up and down arrow keys to scroll to the option Password.
Press the Select soft key or OK.
Enter your current password and press Done.
Enter the new password that you want to use.
The new password must be at least 4
digits long
A series of number (for example
1234) or repeated numbers are not

16
allowed
Press Done.
IP OFFICE – INTUITY VOICEMAIL
LOGGING IN FOR THE FIRST TIME
1. Press VOICE MAIL button for voice mail or dial *17 .
a. From outside of the office dial .
2. Dial your extension number and # sign. (If calling from your extension, just press #)
3. When prompted for your password press # only, as you do not yet have a password.
4. Next, you will be prompted to enter a new password. Your new password must be at least
digits.
a. Enter your new password and # sign.
b. You will be prompted to re-enter your new password and # sign.
5. Next you will be prompted to record your name.
a. Press 1 to record your name (first name & last name).
b. Record your name then press 1.
c. Press 2 3 to listen to your name.
d. Press 21 to re-record if necessary
e. Press *# to approve your name.
YOU SHOULD RECORD YOUR GREETING RIGHT AWAY
1. Press 3 to administer your greetings.
2. Press 1 to create your greeting.
3. “Enter greeting number”. Choose the appropriate greeting number (1 – 9)
4. Press 1 to record your personal greeting.
a. Record your greeting then press 1.
b. Press # to approve your greeting. Or
c. Press 2 3 to listen to your greeting. Or
d. Press 2 1 to re-record.
5. YOU MUST NEXT ACTIVATE GREETING 1 FOR ALL CALLS
a. “To make greeting 1 active for ALL CALLS, Press 1.”
Greeting Examples: "This is __(your name/department)______. I'm either on my phone or away from
my desk. Please leave your name, number, and reason for calling at the tone or press 0 for immediate
assistance."
"Hello and thank you for calling (company name). This is ____________and today is (day &
date) I am either on my phone or away from my desk. Please leave a detailed message at the
tone and I will return your call as quickly as possible. If you need immediate assistance, please
press 0 now.
NOTE:
To retrieve messages from outside of the office, dial your direct dial number or
dial your extension on the main number; when you hear your greeting, dial *7 .
To record a message Press 1
To get your messages, Press 2

17
To Administer Greetings, Press 3
To Administer Personal Options (name recording, password), Press 5
TO LISTEN TO MESSAGES
1. Log in to VOICE MAIL.
2. Press 2 to get messages.
3. Press 0 to listen to messages.
4. Press * D to delete your messages.
5. Press # to skip and go to the next message.
6. If you wish to respond to, or forward the message, Press 1 and follow instructions.
Other Options:
Press 3 to pause
Press 5 to back up 5 seconds OR Press 6 to advance 5 seconds
Press 0 to replay from the beginning
Press **U (**8) to undelete
Press *T (*8) to transfer out of voicemail and dial an extension on the switch
Press **9 to disengage from the voicemail system

18
Other manuals for 1408
18
Table of contents
Other Avaya IP Phone manuals

Avaya
Avaya 1140E User manual

Avaya
Avaya one-X 1616 User manual

Avaya
Avaya IP Office 9621 User manual

Avaya
Avaya 9610 User manual

Avaya
Avaya 1616 User manual

Avaya
Avaya J169 User manual

Avaya
Avaya 1600 Series Service manual

Avaya
Avaya one-X 9600 Series User manual

Avaya
Avaya J129 Instruction Manual

Avaya
Avaya IP Office 5420 User manual

Avaya
Avaya 4600 Series User manual

Avaya
Avaya 700426711 User manual

Avaya
Avaya 5601 User manual

Avaya
Avaya J139 User manual

Avaya
Avaya IP Office 4602 User manual

Avaya
Avaya IP Office 4602 User manual

Avaya
Avaya Vantage 1.0 User manual

Avaya
Avaya IP OFFICE 2410 User manual

Avaya
Avaya J139 Guide

Avaya
Avaya one-X 9670G User manual