Avaya IP OFFICE 2420 User manual

2420 Users Guide
Avaya 2420 Model Telephone
General Overview Information
The latest addition to digital telephone offerings by Telecommunications is the
Avaya 2420 multi-line set. This set is designed for high volume end-users working
in busy University departments. This new set is designed to provide various
features in a single easily accessible unit to assist in meeting the needs of today's
high volume of calls and information gathering for business and academic
pursuits. Features include:
Call Log This feature allows a user to customize how their set
tracks incoming and outgoing calls. The calls can be
incorporated into the telephone's speed dial list and
directory for personal records.
Speed Dial List This feature provides each user with the ability to store
and manage up to 104 entries for daily speed dialing
activities. These entries are used for quick access to
frequently dialed numbers.
Large Screen Display The new large screen design displays all feature and
calling options in a series of soft-key display screens.
The term soft-key refers to the fact that these buttons
are programmable to meet your particular department's
needs by your Telecommunications Account Manager.
Additional Capabilities Each 2420 set has a built in headset jack and
preprogrammed button for headset users. Previous
telephones in the Avaya product line required extra
equipment and/or programming. The 2420 is completely
headset ready.
Standard Functions The basic functions of the new 2420 model are based
upon the current functionality that is found in Avaya's
earlier digital model phones like the 6408, 6416, and the
6424 so users familiar with these phones will find this
model very user friendly.

2420 Model Telephones - Call Log
2420 Users Guide
The 2420 has incorporated a new call log feature. Each telephone can store up to 100 entries in its
call log. By default, all new calls are logged. Each user is able to change this feature using the
Options feature in the display of their telephone. The following example shows how the log will be
set up for each telephone:
1. Joe Taylor 732-555-4999
2. 41000
3. David Chase 703-555-1212
4. Hope Carrington 202-555-4321
USE < > to scroll
Select entry to view details
Done
Accessing the Call Log
To access the Call Log Summary Screen:
1. Press Log from the Home Screen
2. All incoming call information will be provided with the name and number for each new
call. The system will provide up to 16 characters of information in the display for
logging purposes.
3. All outgoing call information will be provided with the telephone number dialed from
the set. If you are using a speed dial list, both the name and the telephone number
will be added to the log. Your log will capture the name you assigned to the speed
dial number. Note: line 2 above does not have a name associated with it because it
was an outgoing call with no information in the speed dial list for that number
Viewing the Call Log Detail Screen
To access the Call Log Detail Screen:
•Press the associated soft-key for the item in the call log you intend to review (buttons to
the left of each entry are the soft-keys in this case.
•The system will provide you with a detailed record of the call that includes the name, date
telephone number, time, and how the call was treated when logged by your telephone.
•Once the log entry has been accessed, you have the following options:
o Call - Feature allows user to call the number in this log entry
o Delete - Feature allows user to delete this entry from the current log
o Save - Feature allows user to add this entry to the Speed Dial List.
o Done - Press to exit from the Log Detail screen.
See the Call Log Detail Screen on the next page.

2420 Model Telephones - Call Log
2420 Users Guide
Call Log Detail Screen (example)
Additional Call Log Information
Your Call Log records up to 100 calls total. When the log reaches its limit, the log will
automatically replace the oldest call registered with the new telephone call information. This
provides a continuous source of call information for the log.
The total number of current new calls is provided from the Home display screen. Once the user
accesses the call log the counter for tracking is automatically reset to zero (0) on the Home
screen.

2420 Model Telephones - Speed Dial
2420 Users Guide
Speed Dial Overview
Your 2420 digital set provides each user with 104 programmable spaces for speed dial entries.
Each entry can be programmed with up to 20 characters in the actual dial string. To assist in the
personal management of this speed dial list each entry can be labeled with 13 upper and
lowercase letters as well as other characters and numbers for easy dialing information.
Speed Dial Access
Users will access the Speed Dial feature by pressing SPDial from the Home screen on their 2420
set.
Speed Dial Screen
All items programmed in your personal speed dial list will appear in alphabetic order (or numeric
order if you precede your entry with a number for ordering purposes). Eight entries appear on a
single display page (see illustration below) when using the speed dial feature. All items
programmed are stored in your telephone as your personal directory.
01 Charlie 05 Mom
02 Carolyn 06 Anna
03 Ken 07 Jennifer
04 Ron 08 Dave
Select name to CALL or
Choose action below
Add Edit Delete Done
Speed Dial Screen (example)
Please note there is a soft-key the side or at the bottom of each word listed above.
Personal Speed Dial Screen Basics
Additional soft-key features become available once you have accessed the Speed Dial Screen.
You will be given the option to
•Add - You may add new listings to your personal speed dial list
•Edit - This is used to change an existing spped dial entry. Press the key associated with
edit and then press the key associated with the item you wish to change.
•Delete - Use this key to erase an entry that you no longer need.
•Done - Returns you to page 1 of the Home screen when pressed.
Using Your Personal Speed Dial To Call
To call a programmed telephone number:
•Press the soft-key associated with the name you intend to dial in the display. (You may
have to press the < and > to move to the page that contains the name of your choice if
you have more than 8 entries).
•The system will automatically dial the pre-programmed number for the individual you
selected.

2420 Digital Phone Quick Reference Guide
Custom Configurations via the Options Screen
2420 Users Guide
Ring Pattern - Press this
button to choose one of eight
different ring patterns. Use
the > Forward button and the
< Back button to move
between different patterns.
Self Test - Has the phone
perform a self diagnostic of
all display capabilities. A
technician will use this if
necessary. Not
recommended for use.
Display Mode - Switch
between single user and Call
Center Operator Modes. Not
necessary for most
University Staff. Not
recommended for use.
Erase All - This restores
your phone to factory and
system defaults. Not
recommended for use as
you will lose all your
programmed options and
speed dials!
Language - Have your
phone display appear in one
of eight different languages:
English, German, French,
Spanish, Italian, Dutch,
Portuguese, or Japanese.
Contrast - Customize the
contrast of your screen to
display well in the light of
your work environment
Log Setup - Program the
Log to track or not track your
incoming, outgoing, and/or
unanswered calls.
Visual Ring - Program your
phone to make the voicemail
light blink on your phone
when you are receiving a
call.
> Forward - Move forward in
your current screen options
< BACK - Move backward in
your current screen options

2420 Digital Phone Quick Reference Guide
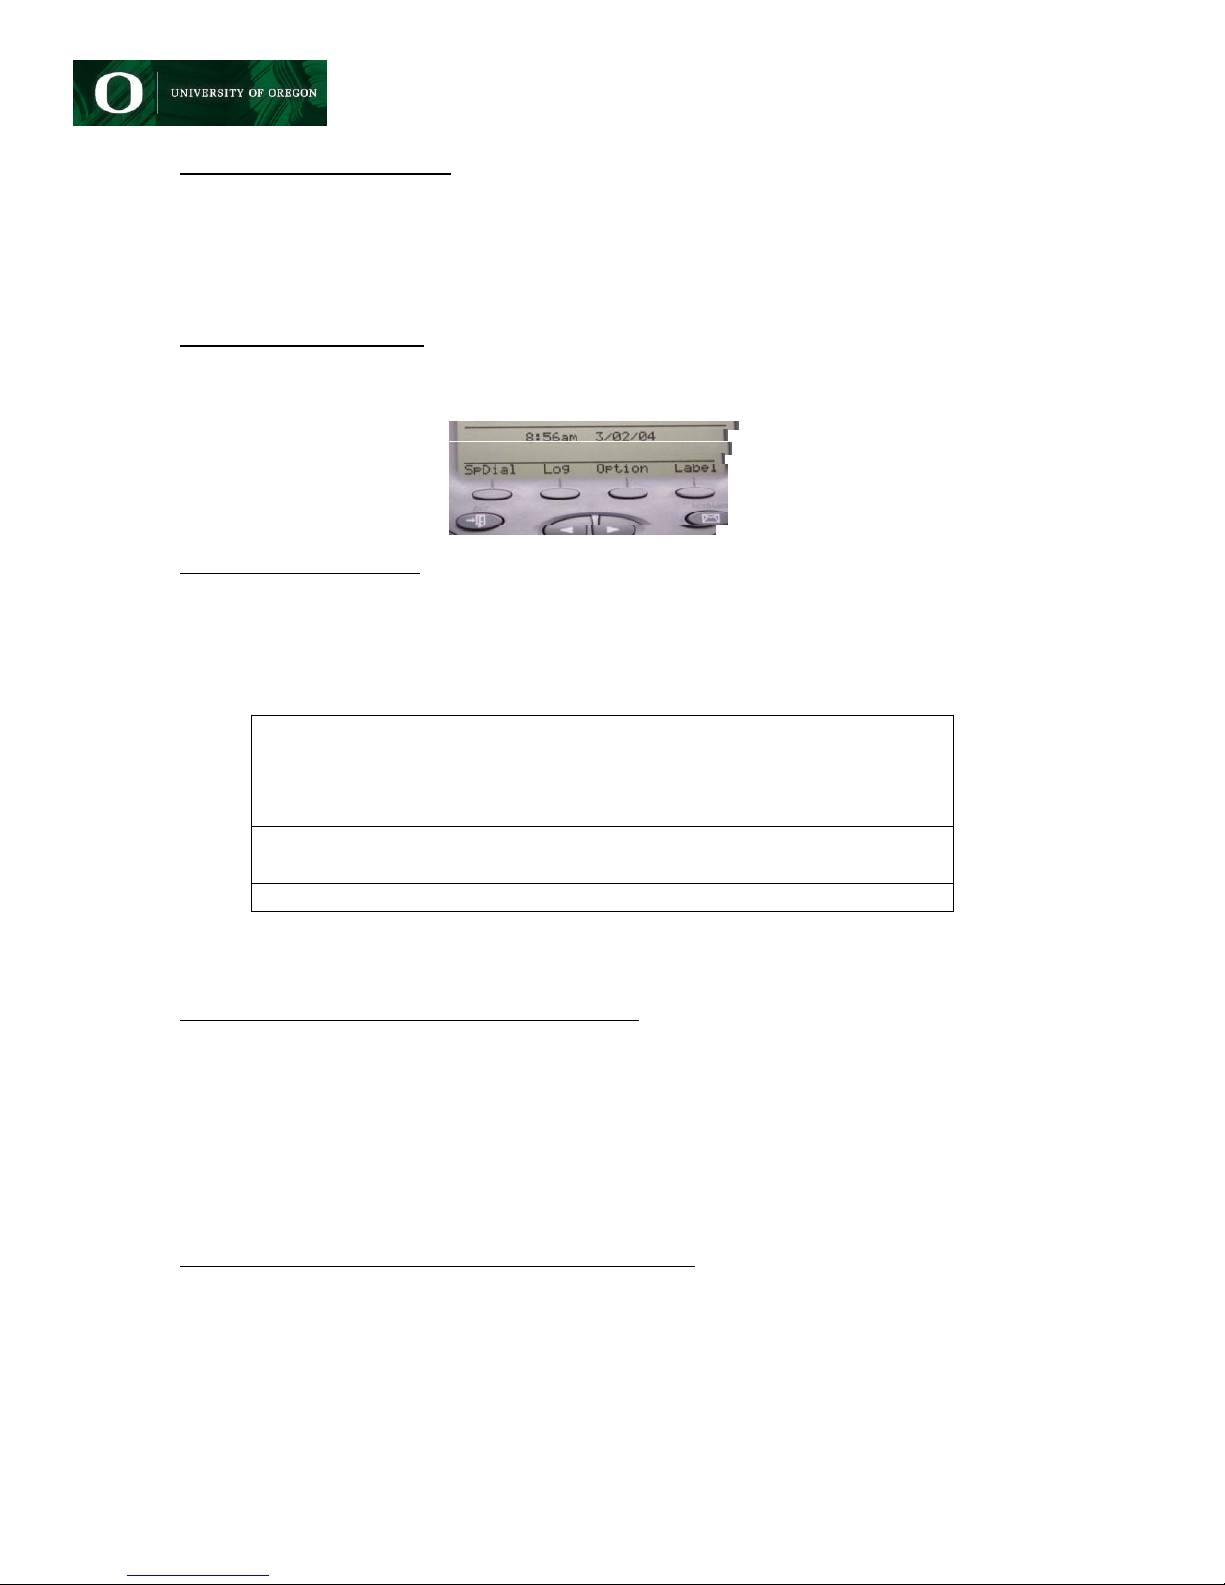
Screen Button Function Guide
2420 Users Guide
SET-ID - Your 2420 is a
multi-line set. You will have
multiple appearances of your
line so that you can receive
more than one call, transfer,
and conference calls
together.
In this example there are
three appearances of
extension 6-3687. The lines
in use will have a small icon
next to them indicating their
in use status. A call coming
in on a line will have a bell
icon next to it.
SD (or AD) - This stands for
Speed Dial and may appear
as AD for Auto Dial also.
This is programmable by you
to dial frequently dialed
numbers.
To program a speed or auto
dial button follow these steps
1. Press * 0 on your phone
2. Press the SD button you
want to program
3. Dial the number you want
it to dial (remember if it is an
off campus number you will
need to start with a 9)
4. When completed entering
the number press #
Tip - See Label Instructions
on this page!
Speed Dials - More
customizable buttons for
your to program. (Please
note that not all phones will
be configured the same
way). The programming is
dependant upon your work
needs.
Send All Calls (SAC) - This
button tells your phone that
you are busy and that all
calls should go straight to
voicemail. You will only have
this button if you have
voicemail on the associated
phone. When the SAC
feature is active you will
have a triangle icon next to
the button.
Call Pickup - If you are a
member of a Call Pick Up
Group this button will allow
you to answer the ringing
phone of other members of
your group.
Speed Dial - This button
takes you to another group
of speed dial buttons that
you can program and use to
save frequently dialed
numbers. These are
programmed using the step
by step instructions provided
on screen.
Option - Takes you to
configuration options like
Ring, Contrast, etc?. which
you can set for your phone.
See Options Programming
Instruction Sheet for more
information
Label - To re-label any
button on the screen so you
can recognize it (works great
with Speed Dial buttons!)
1. Press Label on your
phone.
2. Choose Edit in the sub
menu that will pop up
3. Press the button you just
programmed
4. Using the letters on the
corresponding number keys
to spell out a short easily
recognizable name. (ex. 2
would give you in sequence
A then B, then C)
5. Continue spelling out the
name using the >button to
move to the next letter when
necessary until you have
spelled it out.
Log - This button takes you
to a menu which displays up
to 100 of your incoming and
outgoing calls. These logs
will be overwritten in
sequence after you have
filled up the 100 number
capacity.

2420 Digital Phone Quick Reference Guide
Button Function Guide Quick Reference
2420 Users Guide
REDIAL - Dials the last
number called.
DROP - Drops the call you
are currently on. Works in
conjunction with a headset.
CONFERENCE - Bridges
two or more calls together for
a conference call. When you
are on a call press
conference. You will get
another dial tone. Dial the
number you want to add and
once they answer press
conference again to bridge
the calls. Can conference up
to 5 additional parties.
TRANSFER - Transfers
caller to another extension.
When on a call press
transfer. Dial the number you
wish to transfer the call to.
Once the party answers
press transfer again.
HOLD - Places your active
line on hold so you can
answer another call.
EXIT - Brings you back to
your home screen from
anywhere in the multiple
electronic screens.
SPEAKER - Activates the
speaker phone for hands-
free conversations.
HEADSET - Toggle switch
for activating and
deactivating your headset
without lifting the handset.
MUTE - Allows you to stop
your caller from hearing any
ambient conversation. Works
with handset, headset, and
speaker.
Volume Up and Down -
Allows you to adjust the
volume of the item in use.
If on speaker the speaker
volume will be adjusted.
If on handset the handset
volume will be adjusted.
If nothing active the ringer
volume will be adjusted.
Forward / Back - Takes you
through the three pages of
electronic screens.
> Next Page
< Last Page
MESSAGES - One touch
dialing to the GW Voicemail
System. The red light at the
top of your phone will
indicate when you have a
new voice mail message.
Other manuals for IP OFFICE 2420
21
Table of contents
Other Avaya Telephone manuals

Avaya
Avaya IP Office 9508 User manual

Avaya
Avaya IP Office 1416 User manual

Avaya
Avaya 8410B User manual

Avaya
Avaya T3 Classic User manual

Avaya
Avaya NULL 3711 User manual

Avaya
Avaya IP500 User manual

Avaya
Avaya INDeX 2030 User manual

Avaya
Avaya IP Office D100 Instruction Manual

Avaya
Avaya T7000 User manual

Avaya
Avaya IP Office 9608 User manual

Avaya
Avaya 3725 User manual

Avaya
Avaya IP Office 4406D+ User manual

Avaya
Avaya ETR 6 User manual

Avaya
Avaya 9103 User manual

Avaya
Avaya 6424D+M User manual

Avaya
Avaya H209 Guide

Avaya
Avaya J169 User manual

Avaya
Avaya IP Office 1400 Series Supplement

Avaya
Avaya 9400 series Product manual

Avaya
Avaya 4600 Series Service manual