Axkid Modukid Infant User manual

3
EN
Axkid Modukid Infant
Instruction manual
Baby car seat for children weighing up to 13kg
Read this instruction manual carefully before installing the Axkid Modukid Infant. If in doubt, contact
your retailer who can demonstrate a correct installation. An incorrect installation could endanger
your child..
Do not use a baby car seat in a seating position where an active airbag is fitted. If you still wish to
install the Axkid Modukid Infant in this location the airbag must be switched o according to the
vehicle manufacturers instructions.
Extensive research has shown that the risk of serious injury is five times greater for a young child
when travelling in a forward-facing car seat compared to a rear-facing car seat.
Should you have an accident, no matter how small, your baby car seat should always be replaced.
It may have damage that is undetectable and could seriously jeopardize your child’s safety. For this
reason, Axkid does not recommend purchasing second hand car seats.
Never leave your child unattended in the car.
Ensure any luggage or loose objects are secured in your vehicle as they may cause injuries to
passengers in the event of a collision.
Keep this instruction manual for future reference.
Ensure that the baby car seat is installed in a way where no parts become trapped by movable
seats, car doors, etc.
The Axkid Modukid Infant is suitable for use from newborn up to when the child can sit steadily,
approximately six to nine months of age.
Never use the baby car seat without its textile cover.
This baby car seat may ONLY be installed rear-facing.
Read this instruction manual before installing the Axkid Modukid Infant in your vehicle. For
more information and installation videos visit www.axkid.com.
Thank you for choosing an Axkid product. Our team has over 30 years combined experience within child
safety, and we have done our utmost to make the Axkid Modukid Infant as safe as possible. The Axkid
Modukid Infant is approved according to UN Regulation no 129/02. To maximize your child’s safety, it is
important that you keep the following in mind:
Important information

4
To adjust the handle (A):
• Push both the handle adjustment buttons (I) located close to the handle’s rotation point.
• At the same time, push the handle in the direction of intended movement.
• The handle has three dierent positions (P1, P2, P3).
This position shall be used when carrying the child or when mounting the baby car seat in the
vehicle.
This position shall be used when using the baby car seat as a cradle or when mounted in a
compatible stroller.
This position blocks the cradle function and can be used when you want the cradle function
disabled, for example when feeding your child.
Parts
Adjusting the handle
Contents
Parts
Adjusting the handle
Adjusting the baby car seat to fit your child
Buckle your child in the seat
Allowed and disallowed positioning of the baby car seat
Installation in the car
Base installation
Belt installation
Care and maintenance
Warranty
4
4
5
5-6
6
7
7
7
8
8
AHandle LBeltadjustmentstrap
B Sunscreen cover M Harnessadjustmentbutton
C Release button for stroller adapter N Belt buckle
D Belt guiding hook O Shoulder pads
ECover PHarness
F Belt guiding hook R Headrest insert
G ASIP Bar protective cover S Vehicle belt buckle
H ASIP T Vehicle lap belt
I Handle adjustment button U Vehicle shoulder belt
J Baby insert V Belt height adjustment openings
K Baby cushion
P1
P2
P3

5
Check the belt position in relation to the child. The belt position should be just above the
child´s shoulders. Check this regularly as your child grows. If needed, adjust the belt position
according to steps 2-7.
Create slack on the belt by using the harness adjustment button (M) and pulling the shoulder
Belt (P) at the same time.
Open the harness by pushing the belt buckle button (N) and separating the two connectors.
Open the shoulder pads (O) and pull out the belt with connectors and the shoulder pad strap
through the belt openings (V).
If needed, add the baby insert and cushion (J, K). We recommend using the insert and cushions
if your child is approximately between 0-3 months to ensure an appropriate fit.
Now you can put the shoulder belts and shoulder pad strap in a dierent opening (V) that better
suits your child’s height. To reach the highest belt position, flip open the ASIP bar cover (G).
Close the shoulder pads (O) around belts and attach the connectors into the belt buckle (N).
Make sure that the belts are not twisted.
IMPORTANT: Makesurethatthebelts arenottwisted.
Adjusting the baby car seat to fit your child
1
2
3
4
5
6
7
Buckle your child in the seat
Put the baby car seat on a flat surface. Hold down the belt adjustment button (M) and at the
same time pull the shoulder section of the harness (P) until it is fully pulled out. Fold away the
harness (P) so that they will be easy to reach after you have placed your child in the baby car
seat. Place your child in the baby car seat. Make sure there are no blankets or thick clothing
between the child and the back of the baby car seat.
Place the shoulder belts over your child’s shoulders, as close to the neck as possible.
Lock the harness (P) by pushing the two connectors together and then insert them into the
belt buckle (N).
Pull the belt adjustment strap (L) to tighten the harness (P).
There should be approximately 1 cm of space between the child’s shoulders and the belt.
8
9
10
11
12

6
The Axkid Modukid Infant can be used on any forward-facing passenger seat which has a three-
point seat belt (i) approved to UN/ECE regulation number 16 or other equivalent standard, as long as
there is no active airbag in place. The baby car seat cannot be used with a two-point lap belt (ii).
The Axkid Modukid Infant can also be used together with the Axkid Modukid Base on any forward-
facing passenger seat which has ISOFIX connection points.
IMPORTANT: If you wish to install your Axkid Modukid Infant in a location where an airbag is fitted,
then the airbag must be disconnected at an authorized service center. Some vehicles may be
equipped with a switch which allows you to manually switch the airbag o. It is important to always
check if the vehicle’s indicator light shows that the airbag is turned o.
WARNING: Never use on a seat with an active airbag
WARNING: Never use on rearward or side facing vehicle seats
WARNING: Air bags are designed for adults and can seriously harm your child in a crash
Allowed and disallowed positioning of the
baby car seat
13
14
IMPORTANT:
Allowed and disallowed positioning of the child car seat.
This baby car seat is only allowed to be mounted rear-facing.
Frontpassengerseat(noactive airbag) Yes
Frontpassengerseat(activeairbag) NO
Forwardfacingseatwith3-pointseatbelt Yes
Seatwith2-pointseatbelt NO
Sidefacingseats NO
Rearfacingseats NO
Never install a child restraint in a passenger seat
where an active airbag is fitted.
Whentighteningtheharness, itisimportantthatyouhave thebaby carseatona flat surface. The
child’s positioncouldbeverydierent ifthebabycarseatis angledwhichmaycausethe harnesstobe
insucientlytightened.
Make sure that thebeltisnottwistedinanyway.
Donotuse any other beltroutingthandescribed inthismanual.

7
Base installation
For installation together with base see instruction manual for Axkid Modukid Base.
Belt installation
Make sure that there is space between the baby car seat and the interior of the car.
Start by placing the baby car seat in the correct vehicle seat position, according to (13).
Adjust the handle of the baby car seat to position P1.
Pull out sucient length of vehicle seat belt (T, U) around the baby car seat and buckle the belt
(S).
Guide the vehicle’s lap belt (T) through the hooks (N) on the baby car seat.
Pull the vehicle’s shoulder belt (U) around the seat and fix it in the hooks on the rear side (J) of
the baby car seat.
Push down the baby car seat in the vehicle’s seat and then pull the belt as tight as you can to
make sure that the baby car seat gets the most fixed position possible.
Axkid has equipped the Axkid Modukid Infant with a side impact protection system, ASIP
(Axkid Side Impact Protection). Pull the ASIP (H) towards the door of the car until it locks in its
outer position.
IMPORTANT: Do not use any other vehicle seat belt routing then described in this manual. If so you
are facing a risk of the baby car seat not being properly fastened which can lead to serious injuries.
Installation in the car
15
16
17
18
19
20
21
22

8
Axkid Modukid Infant
Care and maintenance
The seat cover can be removed and washed in a washing machine at 30º C on the “Gentle
Cycle” program. Do not put the cover in a dryer as this can damage the cover and the padding
may separate from the fabric. Visit www.axkid.com to find videos explaining how to remove
and attach the cover.
Any plastic parts of Axkid Modukid Infant can be cleaned with mild detergent and water. Do
not use aggressive chemicals containing solvents etc, as this can cause damage to the plastic
and compromise the safety of the baby car seat.
All materials used in the Axkid Modukid Infant are recyclable and should be recycled as per
your local legislation. Ask your local recycling center for advice when recycling this product.
Do not make any modifications or alterations to the Axkid Modukid Infant other than those
described in this instruction manual. Follow the instructions in this manual carefully. Any repairs
must be carried out by the manufacturer or agent.
If the seat cover needs replacing, ensure only original products from Axkid are used. If other
products are used, the Axkid Modukid Infant’s safety system may be compromised and could
lead to severe injury in case of an accident.
Warranty
The warranty does not cover:
Normal wear and tear
Damage due to incorrect use, neglect or accident
If repairs have been carried out by a third party
All materials used have a very high UV-resistance rating. However, UV-light is very aggressive
and will ultimately lead to fading of the seat cover. This is not covered by our warranty as it is
considered normal wear and tear.
The Axkid Modukid Infant is covered by a 24-month warranty from date of purchase. Ensure you
save your receipt and bring it to your place of purchase if you have any warranty issues.

9
DE
Axkid Modukid Infant
Bedienungsanleitung
Kindersitz für Babys bis 13 kg
Lesen Sie diese Bedienungsanleitung sorgfältig durch, bevor Sie den Axkid Modukid Infant
installieren. Im Zweifelsfall wenden Sie sich bitte an Ihren Händler, der Ihnen die korrekte Installation
vorführen kann. Eine fehlerhafte Installation kann Ihr Kind gefährden.
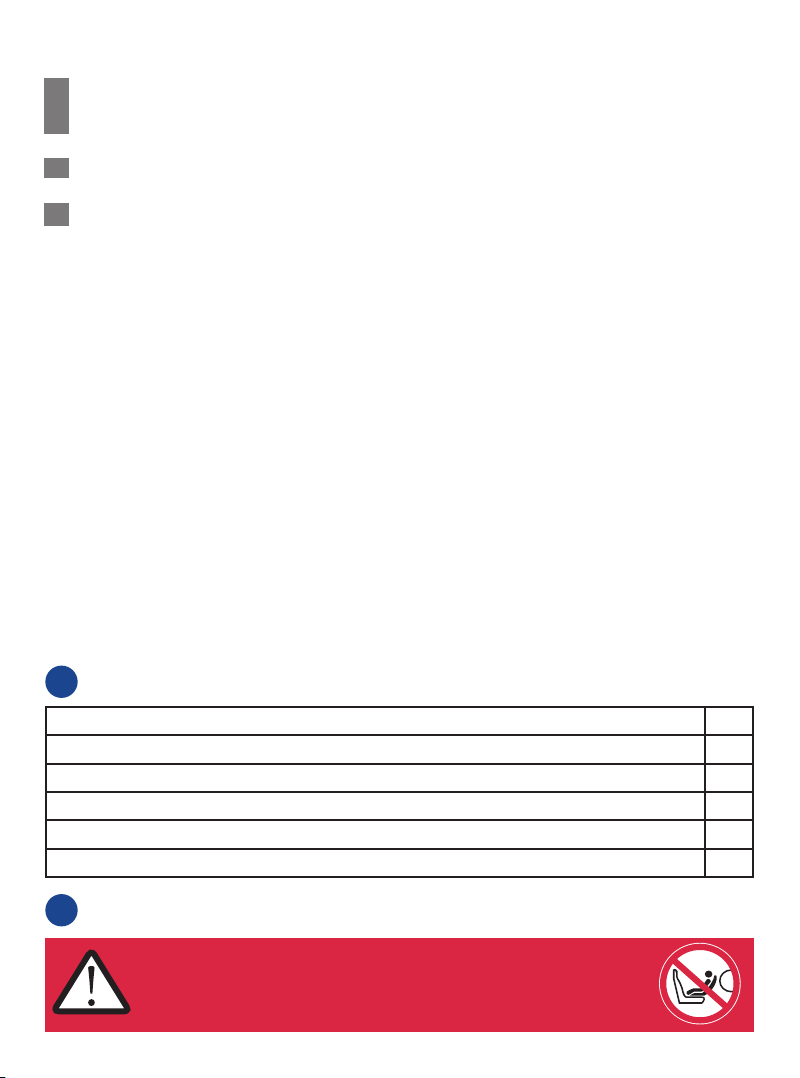
Verwenden Sie Babysitze niemals in einer Sitzposition mit aktiviertem Airbag. Wenn Sie den
Axkid Modukid Infant dennoch an dieser Stelle installieren möchten, muss der Airbag nach den
Anweisungen des Fahrzeugherstellers deaktiviert werden.
Zahlreiche Studien haben gezeigt, dass das Risiko schwerer Verletzungen für ein kleines Kind bei
der Fahrt auf einem vorwärtsgerichteten Kindersitz im Vergleich zu einem rückwärtsgerichteten
Kindersitz um das Fünache erhöht ist.
Ersetzen Sie Ihren Babysitz nach jedem noch so kleinen Unfall. Manche Schäden sind unter
Umständen nicht erkennbar und könnten die Sicherheit Ihres Kindes ernsthaft gefährden. Aus
diesem Grund rät Axkid vom Kauf von gebrauchten Kindersitzen ab.
Lassen Sie Ihre Kinder niemals unbeaufsichtigt im Auto zurück.
Stellen Sie sicher, dass Gepäck oder lose Gegenstände in Ihrem Fahrzeug gesichert sind, da sie bei
einem Zusammenstoß die Passagiere verletzen können.
Bewahren Sie diese Gebrauchsanweisung für ein späteres Nachschlagen auf.
Stellen Sie sicher, dass der Babysitz so installiert ist, dass keine Teile durch bewegliche Sitze,
Autotüren usw. eingeklemmt werden.
Der Axkid Modukid Infant ist für Neugeborene bis zu einem Alter, ab dem sie stabil sitzen können
(ca. 6. bis 9. Lebensmonat), geeignet.
Verwenden Sie den Babysitz nie ohne den zugehörige Textilbezug.
Dieser Babysitz darf AUSSCHLIESSLICH rückwärtsgerichtet installiert werden.
Lesen Sie diese Bedienungsanleitung, bevor Sie den Axkid Modukid Infant in Ihrem
Fahrzeug installieren. Weitere Informationen und Installationsvideos finden Sie unter www.
axkid.com.
Vielen Dank, dass Sie sich für ein Axkid Produkt entschieden haben. Unser Team verfügt über mehr als 30
Jahre Erfahrung auf dem Gebiet der Kindersicherheit, und wir haben keine Mühen gescheut, um den Axkid
Modukid Infant so sicher wie möglich zu machen. Der Axkid Modukid Infant ist nach der UN-Verordnung Nr.
129/02 zugelassen. Um Ihrem Kind größtmögliche Sicherheit zu bieten, sollten Sie Folgendes beachten:
Wichtige Informationen

10
So stellen Sie den Gri (A) ein:
• Drücken Sie die beiden Knöpfe für die Griverstellung (I), die sich in der Nähe des Drehpunktes
des Gries befinden.
• Drücken Sie gleichzeitig den Gri in die gewünschte Richtung.
• Der Gri verfügt über drei verschiedene Positionen (P1, P2, P3).
Diese Position sollten Sie verwenden, wenn Sie Ihr Kind tragen oder wenn Sie den Babysitz im
Fahrzeug installieren.
Diese Position sollten Sie verwenden, wenn Sie den Babysitz als Wiege verwenden oder wenn
er auf einem kompatiblen Kinderwagen montiert ist.
Diese Position blockiert die Wiegenfunktion und kann verwendet werden, wenn Sie die
Wiegenfunktion deaktivieren möchten, z. B. beim Füttern Ihres Kinds.
.
Komponenten
Einstellung des Gris
Inhalt
Komponenten
Einstellung des Gris
Anpassung des Babysitzes an Ihr Kind
Anschnallen des Kinds im Autositz
Erlaubte und nicht erlaubte Positionierung des Babysitzes
Installation im Auto
Installation der Basis
Gurtinstallation
Pflege und Instandhaltung
Garantie
10
10
11
11-12
12
13
13
13
14
14
AGri LZurrriemen
B Sonnenschutz M KnopffürdieSchultergurtjustierung
C Freigabeknopf für Kinderwagenadapter N Gurtschnalle
D Haken für Gurtführung O Schulterpolster
E Bezug P Schultergurt
F Haken für Gurtführung R Einsatz für die Kopfstütze
G Schutzhülle der ASIP-Stange S Schnalle des Fahrzeuggurts
H ASIP T Beckengurt des Fahrzeugs
I Knopf zum Justieren des Gris U Schultergurt des Fahrzeugs
J Babyeinsatz V Önungen für die Justierung der Gurthöhe
K Babykissen
P1
P2
P3

11
Überprüfen Sie, ob sich der Gurt in der für Ihr Kind geeigneten Position befindet. Er sollte knapp
oberhalb der Schultern Ihres Kinds verlaufen. Überprüfen Sie dies regelmäßig, da Ihr Kind
wächst. Bei Bedarf müssen Sie die Gurtposition gemäß den Schritten 2-7 anpassen.
Verringern Sie die Spannung des Gurtes, indem Sie den Knopf zur Schultergurtjustierung (M)
betätigen und gleichzeitig den Schultergurt (P) ziehen.
Önen Sie den Schultergurt, indem Sie den Knopf der Gurtschnalle (N) drücken und die
beiden Gurtzungen trennen.
Önen Sie die Schulterpolster (O) und ziehen Sie den Gurt mit den Zungen und den
Schulterposterriemen durch die Gurtönungen (V) heraus.
Fügen Sie bei Bedarf den Babyeinsatz und das Kissen (J, K) hinzu. Dies wird empfohlen, wenn
Ihr Kind ca. zwischen 0-3 Monaten alt ist, um eine angemessene Passform zu gewährleisten.
Nun können Sie die Schultergurte und den Schulterpolsterriemen in eine andere Önung
(V) einsetzen, die besser zur Größe Ihres Kindes passt. Um an die höchste Gurtposition zu
gelangen, klappen Sie die Schutzhülle der ASIP-Stange (G) auf.
Schließen Sie die Schulterpolster (O) um die Gurte herum und setzen Sie die Zungen in die
Gurtschnalle (N) ein. Achten Sie darauf, dass die Gurte nicht verdreht sind.
WICHTIG : AchtenSiedarauf,dassdie Gurtenichtverdrehtsind.
Anpassung des Babysitzes an Ihr Kind
1
2
3
4
5
6
7
Anschnallen des Kinds im Autositz
Platzieren SiedenBabysitzaufeinerebenen Oberfläche. HaltenSie denKnopffürdieGurtjustierung
(M)gedrücktund ziehenSiegleichzeitig dieSchultergurte (P)vollständig heraus.Falten Siedie
Schultergurte(P) sozurSeite,dassSiesieleichterreichenkönnen, nachdemSieIhr Kindinden
Babysitz gesetzthaben. Setzen SieIhrKindinden Babysitz.Achten Siedarauf,dasssichkeine Decken
oderdickeKleidungzwischendemKindund derLehnedesBabysitzesbefinden.
LegenSiedieSchultergurteüber dieSchulternIhres Kindesund zwar sonah wiemöglichamHals
entlang.
Schließen SiedieSchultergurte(P), indemSiediebeidenZungenzusammendrücken undindie
Gurtschnalle (N)einsetzen.
ZiehenSieden Zurrriemen(L),um dieGurte(P) zu straen.
Zwischenden SchulterndesKindesund demGurtsollteetwa1cmPlatzsein.
8
9
10
11
12

12
Der Axkid Modukid Infant darf nur auf vorwärtsgerichteten Sitzen mit Dreipunkt-Sicherheitsgurt (i)
verwendet werden, die eine Zulassung nach UN/ECE-Verordnung Nr. 16 oder einem gleichwertigen
Standard haben, und bei denen ein eventueller Airbag deaktiviert ist. Der Babysitz darf nicht mit
einem Zweipunkt-Beckengurt verwendet werden (ii).
Der Axkid Modukid Infant kann auch zusammen mit der Axkid Modukid Base auf jedem
vorwärtsgerichteten Beifahrersitz mit ISOFIX-Anschlusspunkten installiert werden.
WICHTIG: Wenn Sie Ihren Axkid Modukid Infant an einer Stelle mit Airbag installieren wollen, müssen
Sie den Airbag in einem autorisierten Servicecenter deaktivieren lassen. Manche Fahrzeuge können
mit einem Schalter ausgestattet werden, mit dem der Airbag manuell ausgeschaltet werden kann.
Überprüfen Sie unbedingt jedes Mal, ob die entsprechende Kontrollleuchte des Fahrzeugs anzeigt,
dass der Airbag ausgeschaltet ist.
WARNUNG: Verwenden Sie das Produkt niemals auf einem Sitz mit aktiviertem Airbag
WARNUNG: Verwenden Sie das Produkt niemals auf einem rückwärtsgerichteten oder zur Seite
gerichteten Sitz
WARNUNG: Airbags sind für Erwachsene konzipiert und können Ihrem Kind bei einem Unfall ernste
Verletzungen zufügen
Erlaubte und nicht erlaubte Positionierung
des Babysitzes
13
14
WICHTIG:
Erlaubte und nicht erlaubte Positionierung des Babysitzes.
Dieser Babysitz darf ausschließlich rückwärtsgerichtet montiert werden.
Beifahrersitz(kein aktiverAirbag) Ja
Beifahrersitz(aktiverAirbag) NEIN
VorwärtsgerichteterSitzmitDreipunkt-Sicherheitsgurt Ja
SitzmitZweipunkt-Sicherheitsgurt NEIN
ZurSeitegerichteteSitze NEIN
RückwärtsgerichteteSitze NEIN
Beim Straen desGurtesisteswichtig,dasssich derBabysitzaufeiner ebenenOberflächebefindet.
EinschrägpositionierterBabysitz kann diePositiondesKindesdeutlich verändern, was dazuführen
kann,dassdieGurtenichtstragenug sitzen.
AchtenSie darauf,dassdieGurtenichtverdrehtsind.
LegenSiedieGurtegenau soan,wiees indieserBedienungsanleitung beschriebenwurde.

13
Installation der Basis
Informationen zur Installation zusammen mit der Basis finden Sie in der Bedienungsanleitung für die
Axkid Modukid Base.
Gurtinstallation
Achten Sie auf einen Freiraum zwischen dem Babysitz und dem Innenraum des Fahrzeugs.
Platzieren Sie zunächst den Babysitz in der korrekten Fahrzeugsitzposition, gemäß (13).
Bringen Sie den Gri des Babysitzes in Position P1.
Ziehen Sie den Sicherheitsgurt des Fahrzeugs (T, U) weit genug heraus, legen Sie ihn um den
Babysitz und schallen Sie ihn an (S).
Führen Sie den Beckengurt des Fahrzeugs (T) durch die Haken (N) am Babysitz.
Ziehen Sie den Schultergurt des Fahrzeugs (U) um den Sitz und fixieren Sie ihn in den Haken
an der Rückseite (J) des Babysitzes.
Drücken Sie den Babysitz in den Fahrzeugsitz und ziehen Sie dann den Gurt so stra wie
möglich, damit der Babysitz möglichst fixiert ist.
Der Axkid Modukid Infant mit einem Seitenaufprallschutzsystem, ASIP (Axkid Side Impact
Protection), ausgestattet. Ziehen Sie das ASIP (H) in Richtung der Fahrzeugtür, bis es in seiner
äußeren Position einrastet.
WICHTIG: Legen Sie die Gurte genau so an, wie es in dieser Bedienungsanleitung beschrieben
wurde. Andernfalls besteht die Gefahr, dass der Babysitz nicht richtig befestigt wird, was zu
ernsthaften Verletzungen führen kann.
Installation im Auto
15
16
17
18
19
20
21
22
Verwenden Sie den Kindersitz niemals auf
Sitzplätzen mit aktiven Airbags.

14
Pflege und Instandhaltung
Der Sitzbezug kann entfernt und in der Waschmaschine (30 °C, Schonwaschgang)
gewaschen werden. Geben Sie den Bezug nicht in einen Trockner, da dies den Bezug
beschädigen und die Polsterung sich vom Sto lösen kann. Auf www.axkid.com finden Sie
Videos, in denen das Entfernen und Anbringen des Bezugs erläutert wird.
Sämtliche Kunststoteile des Axkid Modukid Infant können mit mildem Reinigungsmittel und
Wasser gereinigt werden. Verwenden Sie keine aggressiven Chemikalien, die Lösungsmittel
usw. enthalten, da dies zu Schäden am Kunststo führen und die Sicherheit des Babysitzes
beeinträchtigen kann.
Sämtliche Materialien, die im Axkid Modukid Infant verwendet werden, sind recyclingfähig und
gemäß der lokalen Gesetzgebung zu recyceln. Informationen zum Recycling dieses Produkts
erhalten Sie bei Ihrem lokalen Wertstozentrum.
Nehmen Sie nur solche Änderungen am Axkid Modukid Infant vor, die in dieser
Bedienungsanleitung beschrieben werden. Befolgen Sie sorgfältig die Anweisungen in
diesem Handbuch. Reparaturen müssen vom Hersteller oder dessen Vertreter durchgeführt
werden.
Wenn der Sitzbezug ausgetauscht werden muss, müssen Sie sicherstellen, dass nur
Originalprodukte von Axkid zum Einsatz kommen. Wenn andere Produkte verwendet werden,
wird das Sicherheitssystem von Axkid Modukid Infant möglicherweise beeinträchtigt, was bei
Unfällen ernsthafte Verletzungen zur Folge haben kann.
Garantie
Die Garantie gilt nicht für:
Normalen Verschleiß
Beschädigung aufgrund von fehlerhafter Verwendung, Nachlässigkeit oder Unfall
Nach Reparaturen durch Dritte
Sämtliche verwendeten Materialien bieten eine sehr hohe UV-Beständigkeit. UV-Licht
ist jedoch sehr aggressiv und führt letztlich zum Ausbleichen des Sitzbezugs. Dies gilt als
normaler Verschleiß und fällt somit nicht unter unsere Garantie.
Für den Axkid Modukid Infant gewähren wir eine 24-monatige Garantie ab Kaufdatum. Achten
Sie darauf, dass Sie Ihren Kassenbeleg aufbewahren, damit Sie diesen im Garantiefall am Kaufort
vorlegen können.
Axkid Modukid Infant

15
ES
Axkid Modukid Infant
Manual de instrucciones
Silla infantil para coche para niños con un peso de hasta 13 kg
Lea este manual de instrucciones cuidadosamente antes de instalar la silla para coche Axkid
Modukid Infant. En caso de duda, póngase en contacto con su distribuidor, quien le enseñará cómo
instalarlas correctamente. Una instalación incorrecta podría poner en peligro a su hijo(a).
No utilice una silla de bebés para coche en posición sentada cuando haya instalado un airbag
activo. Si todavía desea instalar el Portabebés Axkid Modukid en ese sitio, se debe desactivar el
airbag de acuerdo con las instrucciones del fabricante del vehículo.
Exhaustivas investigaciones han demostrado que el riesgo de sufrir lesiones graves en un(a)
niño(a) es cinco veces mayor cuando viaja en una silla para coche orientada hacia delante, en
comparación con una silla para coche orientada hacia atrás.
Si tuviese un accidente, por pequeño que fuese, la silla de bebés para coche se debe cambiar
siempre. Puede tener daños indetectables y podría poner en peligro seriamente la seguridad de su
hijo(a). Por este motivo, Axkid no recomienda la compra de sillas para coche de segunda mano.
No deje nunca a su hijo(a) sin vigilar dentro del coche.
Asegúrese de que el equipaje o los objetos sueltos estén fijados en su vehículo, ya que pueden
causar lesiones a los pasajeros en caso de producirse una colisión.
Guarde este manual de instrucciones para consultarlo en el futuro.
Asegúrese de que la silla de bebés para coche esté instalada de manera que ninguna pieza quede
atrapada por asientos móviles, puertas del coche, etc.
La silla de bebés para coche Axkid Modukid Infant es apta para su uso con niños desde recién
nacidos hasta cuando el/la niño(a) pueda sentarse recto(a), aproximadamente 6-9 meses de edad.
No utilicen unca una silla de bebés para coche sin la cubierta textil.
Esta silla de bebés para coche SOLO se puede instalar orientada hacia atrás.
Lea este manual de instrucciones antes de instalar la Axkid Modukid Infant en su vehículo.
Para obtener más información y vídeos sobre la instalación, visite www.axkid.com.
Gracias por elegir un producto de Axkid. Nuestro equipo cuenta en su haber con más de 30 años de
experiencia combinada en el ámbito de la seguridad infantil y nos hemos esforzado al máximo para hacer
que la silla para coche Axkid Modukid Infant sea lo más segura posible. La silla para coche Axkid Modukid
Infant está homologado de acuerdo con el Reglamento n.º 129/02 de la ONU. Con el fin de maximizar la
seguridad de su hijo(a), es importante que tenga lo siguiente en cuenta:
Información importante

16
Para ajustar el asa (A):
• Empuje ambos botones de ajuste del asa (I) ubicados cerca del punto de rotación del asa.
• Al mismo tiempo, empuje el asa en la dirección del movimiento que desee.
• El asa tiene tres posiciones diferentes (P1, P2, P3).
Esta posición se usará cuando transporte al/a la niño(a) o cuando monte la silla de bebés para
coche en el vehículo.
Esta posición se usará cuando utilice la silla de bebé para el coche a modo de cuna o cuando
esté montada en un cochecito compatible.
Esta posición bloquea la función de cuna y se puede utilizar cuando se desee que la función de
cuna esté desactivada, por ejemplo cuando esté dando de comer a su hijo(a).
Partes
Ajuste del asa
Índice
Partes
Ajuste del asa
Ajuste de la silla de bebés para coche en función de su hijo(a)
Abroche a su hijo(a) en la silla
Colocación permitida y no permitida de la silla de bebés para coche
Instalación en el coche
Instalación con la base
Instalación con el cinturón
Cuidado y mantenimiento
Garantía
16
16
17
17-18
18
19
19
19
20
20
AAsa LCorreadeajustedelcinturón
B Cubierta de protección solar M Botóndeajustedelarnés
C Botón de liberación del adaptador del cochecito N Hebilla del cinturón
D Gancho guía del cinturón O Hombreras
E Cubierta P Arnés
F Gancho guía del cinturón R Pieza para el reposacabezas
G Cubierta protectora de la barra del ASIP S Hebilla del cinturón del vehículo
H ASIP T Cinturón ventral del vehículo
I Botón de ajuste del asa U Cinturón de hombro del vehículo
J Pieza para el bebé V Aperturas de ajuste de la altura del cinturón
K Cojín para el bebé
P1
P2
P3

17
Compruebe la posición del cinturón en relación con el/la niño(a). La posición del cinturón debe
estar justo por encima de los hombros del/de la niño(a). Compruebe esto periódicamente a
medida que su hijo(a) crece. Si es preciso, ajuste la posición del cinturón según los pasos 2-7.
Deje holgura en el cinturón con el botón de ajuste del arnés (M) y tirando del cinturón del
hombro (P) al mismo tiempo.
Abra el arnés pulsando el botón de hebilla del cinturón (N) y separando los dos conectores.
Abra las hombreras (O) y extraiga el cinturón con los conectores y la correa de las hombreras a
través de las aperturas del cinturón (V).
Si es preciso, añada la pieza para el bebé y el cojín (J, K). Recomendamos usar la pieza y
los cojines si su hijo(a) tiene aproximadamente entre 0-3 meses para asegurar un ajuste
apropiado.
Ahora puede poner los cinturones de hombro y la correa de las hombreras en una apertura
diferente (V) que se adapte mejor a la altura de su hijo(a). Para alcanzar la posición más alta del
cinturón, abra la cubierta de la barra del ASIP (G).
Cierre las hombreras (O) alrededor de los cinturones y acople los conectores en la hebilla del
cinturón (N). Asegúrese de que los cinturones no estén torcidos.
IMPORTANTE : Asegúresedequeloscinturonesnoesténtorcidos.
Ajuste de la silla de bebés para coche en
función de su hijo(a)
1
2
3
4
5
6
7
Abroche a su hijo(a) en la silla
Coloquela silladebebésparacochesobreunasuperficieplana. Mantenga pulsadoelbotón deajuste
delcinturón(M)y, almismotiempo,tire delaseccióndel hombro delarnés(P) hastaquesalga deltodo.
Pliegueel arnés(P)demaneraquesea fácil dellegara éldespuésdehabercolocado asuhijo(a)enla
sillade bebéspara coche.Coloqueasu hijo(a) enlasilladebebés para coche.Asegúrese dequeno
haya mantasniprendasde ropa gruesasentre el/laniño(a)yla parte posterior delasilla debebéspara
coche.
Coloqueloscinturonesdehombrosobreloshombrosdesuhijo(a),lomás cercaposibledelcuello.
Bloqueeel arnés(P)empujandolos dosconectores juntos yluegoinsértelosenla hebilladelcinturón
(N).
Tiredela correadeajustedelcinturón (L)paraapretarelarnés(P).
Debehaberaproximadamente1cmde espacioentreloshombrosdelniño y elcinturón.
8
9
10
11
12

18
La silla para coche Axkid Modukid Infant se puede utilizar en cualquier asiento de acompañante
orientado hacia delante que tenga un cinturón de seguridad de tres puntos (i) homologado de
acuerdo con el Reglamento número 16 de la CEPE u otra norma equivalente, siempre y cuando no
haya ningún airbag activo. La silla de bebés para coche no se puede utilizar con un cinturón ventral de
dos puntos (ii).
El Axkid Modukid Infant también se puede usar junto con la Axkid Modukid Base en cualquier
asiento de acompañante orientado hacia delante que tenga puntos de conexión ISOFIX.
IMPORTANTE: Si desea instalar su Axkid Modukid Infant en un lugar donde hay instalado un airbag,
entonces el airbag se debe desconectar en un centro de puesta a punto autorizado. Algunos
vehículos pueden estar equipados con un interruptor que le permite desconectar manualmente el
airbag. Es importante comprobar siempre si la luz indicadora del vehículo indica que el airbag está
apagado.
ADVERTENCIA: No la utilice nunca en un asiento con un airbag activo
ADVERTENCIA: No la utilice nunca en asientos del vehículo orientados hacia atrás o hacia un lado
ADVERTENCIA: Los airbags están diseñados para los adultos y pueden dañar seriamente a su
hijo(a) en un accidente
Colocación permitida y no permitida de la
silla de bebés para coche
13
14
IMPORTANTE:
Colocación permitida y no permitida de la silla de bebés para coche.
Esta silla de bebés para coche solo se puede montar orientada hacia atrás.
Asientodelanterodelacompañante(sinairbagactivo) Sí
Asientodelanterodelacompañante(airbagactivo) NO
Asientoorientadohaciadelantecon cinturóndeseguridadde 3 puntos Sí
Asientocon cinturóndeseguridadde2 puntos NO
Asientosorientadoshaciaunlado NO
Asientosorientadoshaciadelante NO
Cuandoaprieteelarnés,es importanteque tenga lasilladebebésparacochesobreunasuperficie
plana. Laposicióndel/de laniño(a)podríasermuy diferentesilasillade bebéspara cocheestá
angulada, loquepuedehacerque elarnésnoestélosuficientementeapretado.
Asegúresedequeel cinturónnoestétorcidodeningunamanera.
Noutilice ningúnotro recorrido para elcinturón queeldescritoen este manual.

19
Instalación con la base
Para la instalación junto con la base, consulte el manual de instrucciones de Axkid Modukid Base.
Instalación con el cinturón
Asegúrese de que haya espacio entre la silla de bebés para coche y el interior del vehículo.
Comience colocando la silla de bebés para coche en la posición correcta del asiento del
vehículo, según (13).
Ajuste el asa de la silla de bebés para coche en la posición P1.
Saque el cinturón de seguridad del vehículo con una longitud suficiente (T, U) alrededor de la
silla de bebés para coche y abroche el cinturón (S).
Pase el cinturón ventral del vehículo (T) a través de los ganchos (N) de la silla de bebés para
coche.
Tire del cinturón de hombro del vehículo (U) alrededor de la silla y fíjelo en los ganchos de la
parte posterior (J) de la silla de bebés para coche.
Empuje hacia abajo la silla de bebés para coche en el asiento del vehículo y luego tire del
cinturón lo máximo que pueda para asegurarse de que la silla de bebés para coche tenga la
posición más fija posible.
Axkid ha dotado al Axkid Modukid Infant de un sistema de protección lateral contra impactos,
ASIP (Axkid Side Impact Protection). Tire del ASIP (H) hacia la puerta del coche hasta que se
bloquee en su posición externa.
IMPORTANTE: No utilice ningún otro recorrido para el cinturón de seguridad del vehículo que el
descrito en este manual. Si lo hace, se enfrenta a un riesgo de que la silla de bebés para coche no
esté debidamente sujeta, lo cual puede desembocar en lesiones graves.
Instalación en el coche
15
16
17
18
19
20
21
22
Nunca instale la silla de seguridad en el asiento de un
vehículo con el airbag activado.

20
Cuidado y mantenimiento
La cubierta de la silla se puede quitar y lavar en la lavadora a 30 °C en el programa «Ciclo
suave». No meta la cubierta en la secadora, ya que ello puede dañarla y el acolchado se
puede desprender de la tela. Visite www.axkid.com para encontrar vídeos que le explican
cómo quitar y colocar la cubierta.
Todas las piezas de plástico del Axkid Modukid Infant se pueden limpiar con detergente suave
y agua. No utilice productos químicos agresivos que contengan disolventes, etc., ya que esto
puede provocar daños en el plástico y poner en peligro la seguridad de la silla de bebés para
coche.
Todos los materiales empleados en la silla de bebés para coche Axkid Modukid Infant son
reciclables y se deberían reciclar siguiendo su legislación local. Asesórese en su centro de
reciclaje local a la hora de reciclar este producto.
No realice modificaciones ni alteraciones en la silla de bebés para coche Axkid Modukid
Infant, excepto las descritas en este manual de instrucciones. Siga atentamente las
instrucciones de este manual. Cualquier reparación la debe realizar el fabricante o el agente.
Si la cubierta de la silla necesita reemplazarse, asegúrese de utilizar únicamente productos
originales de Axkid. Si se utilizan otros productos, el sistema de seguridad del Axkid
Modukid Infant puede verse en peligro y podrían desembocar en lesiones graves en caso de
producirse un accidente.
Garantía
La garantía no cubre:
El desgaste normal
Los daños causados por un uso incorrecto, negligencia o accidente
Si las reparaciones las ha realizado un tercero
Todos los materiales usados tienen una clasificación muy alta de resistencia a los rayos
ultravioleta. Sin embargo, la luz UV es muy agresiva y, en última instancia, hará que la cubierta
de la silla de decolore. Esto no está cubierto por nuestra garantía, ya que se considera un
desgaste normal.
La silla de bebés para coche Portabebés Axkid Modukid está cubierta por una garantía de 24 meses
a partir de la fecha de compra. Asegúrese de guardar su tique y llevarlo al lugar en el que realizó la
compra en caso de tener algún problema con la garantía.
Axkid Modukid Infant

21
FI
Axkid Modukid Infant
Käyttöohje
Turvakaukalo alle 13 kg painaville lapsille
Lue nämä käyttöohjeet huolellisesti ennen kuin kiinnität Axkid Modukid Infant -turvakaukalon
autoon. Jos epäröit, ota yhteyttä jälleenmyyjään, joka voi näyttää oikean kiinnitystavan. Väärin
asennettu istuin voi asettaa lapsesi vaaraan.
Älä käytä turvakaukaloa penkillä, jossa on kytketty turvatyyny. Jos kuitenkin haluat asentaa Axkid
Modukid Infant -turvakaukalon tälle paikalle, turvatyyny on kytkettävä pois päältä ajoneuvon
valmistajan ohjeiden mukaan.
Pidä lapsesi selkä menosuuntaan niin pitkään kuin mahdollista. Tutkimusten mukaan kohtalokkaan
onnettomuuden riski on viisinkertainen, jos lapsesi istuu istuimessa kasvot menosuuntaan.
Turvakaukalo on aina vaihdettava uuteen mahdollisen auto-onnettomuuden sattuessa, vaikka
onnettomuus olisikin pieni. Pienikin onnettomuus saattaa vaurioittaa turvakaukaloa ja vaikuttaa
lapsesi turvallisuuteen. Tästä syystä Axkid ei suosittele käytetyn turvaistuimen ostamista.
Älä koskaan jätä lastasi vartioimatta autoon.
Varmista, että kaikki matkatavarat tai irralliset esineet on kiinnitetty autossa, koska ne voivat
aiheuttaa törmäystilanteessa vammoja matkustajille.
Säilytä tämä ohjekirja myöhempää tarvetta varten.
Varmista, että turvakaukalo on kiinnitetty siten, että mitkään osat eivät jää kiinni siirrettävien istuinten
alle, oven väliin jne.
Axkid Modukid Infant -turvakaukalo sopii vastasyntyneestä siihen asti, kun lapsi osaa istua tukevasti,
noin kuuden tai yhdeksän kuukauden ikäiseksi asti.
Älä koskaan käytä turvakaukaloa ilman kangaspäällistä.
Tämä turvakaukalo voidaan asentaa VAIN selkä menosuuntaan.
Lue nämä käyttöohjeet ennen kuin kiinnität Axkid Modukid Infant -turvakaukalon autoon.
Lisätietojaja kiinnitysvideoita osoitteessa www.axkid.com.
Kiitos, että valitsit Axkid-tuotteen. Työryhmällämme on yli 30 vuotta kokemusta lasten
turvallisuustuotteiden valmistuksesta, ja me olemme tehneet kaikkemme tehdäksemme Axkid Modukid
Infant -turvakaukalosta niin turvallisen kuin mahdollista. Axkid Modukid lasten turvakaukalo on hyväksytty
UNECE-säädöksen nro 129/02 mukaisesti. Lapsesi turvallisuuden maksimoimiseksi on tärkeää huomioida
seuraavat asiat:
Tärkeää tietoa

22
Säätääksesi kahvaa (A):
• Paina kumpaakin kahvansäätöpainiketta (I), jotka ovat lähellä kahvan alaosaa.
• Paina kahvaa samaan aikaan haluttuun suuntaan.
• Kahvalla on kolme eri asentoa (P1, P2, P3).
•
Tätä asentoa käytetään, kun lasta kannetaan kaukalossa tai kun kaukalo kiinnitetään autoon.
Tätä asentoa käytetään, kun turvakaukaloa käytetään sitterinä tai kun se on kiinnitetty
yhteensopiviin rattaisiin.
Tämä asento lukitsee keinumisen, ja se on käytännöllinen, kun et halua istuinta käytettävän
keinuvana sitterinä, esim. syöttämisen aikana.
Osat
Kahvan säätäminen
Sisältö
Osat
Kahvan säätäminen
Turvakaukalon säätäminen lapselle sopivaksi
Lapsen kiinnittäminen turvakaukaloon
Turvakaukalon sallitut ja kielletyt kiinnityspaikat
Kiinnittäminen autoon
Alustan asennus
Vöiden asennus
Hoito-ohjeet
Takuu
22
22
23
23-24
24
25
25
25
26
26
AKahva LVöidensäätöhihna
B Aurinkosuoja M Vöidensäätöpainike
C Rattaiden adapterin vapautuspainike N Vyön lukitus
D Vyön ohjain O Olkapehmusteet
E Päällinen P Valjaat
F Vyön ohjain R Niskatuen pehmuste
G ASIP-sivutörmäyssuojan päällinen S Auton turvavyön lukitus
H ASIP-sivutörmäyssuoja T Auton vyötärövyö
I Kahvan säätöpainike U Auton olkavyö
J Vauvatuki V Vyön korkeudensäätöaukot
K Vauvan tyyny
P1
P2
P3
Table of contents
Languages:
Other Axkid Car Seat manuals

Axkid
Axkid Wolmax User manual

Axkid
Axkid MODUKID INFANT 2 User manual

Axkid
Axkid Duofix User manual

Axkid
Axkid Keezone User manual

Axkid
Axkid Babyfix User manual

Axkid
Axkid Modukid User manual

Axkid
Axkid Duofix User manual

Axkid
Axkid Minikid 3 User manual

Axkid
Axkid ENVIROKID User manual

Axkid
Axkid Nextkid User manual

Axkid
Axkid Modukid User manual

Axkid
Axkid ENVIROBABY User manual

Axkid
Axkid Kidzone User manual

Axkid
Axkid Minikid User manual

Axkid
Axkid Move User manual

Axkid
Axkid Rekid User manual

Axkid
Axkid Grow User manual

Axkid
Axkid Babyfix User manual

Axkid
Axkid GROW ISOFIX BS05-T User manual

Axkid
Axkid Connect User manual