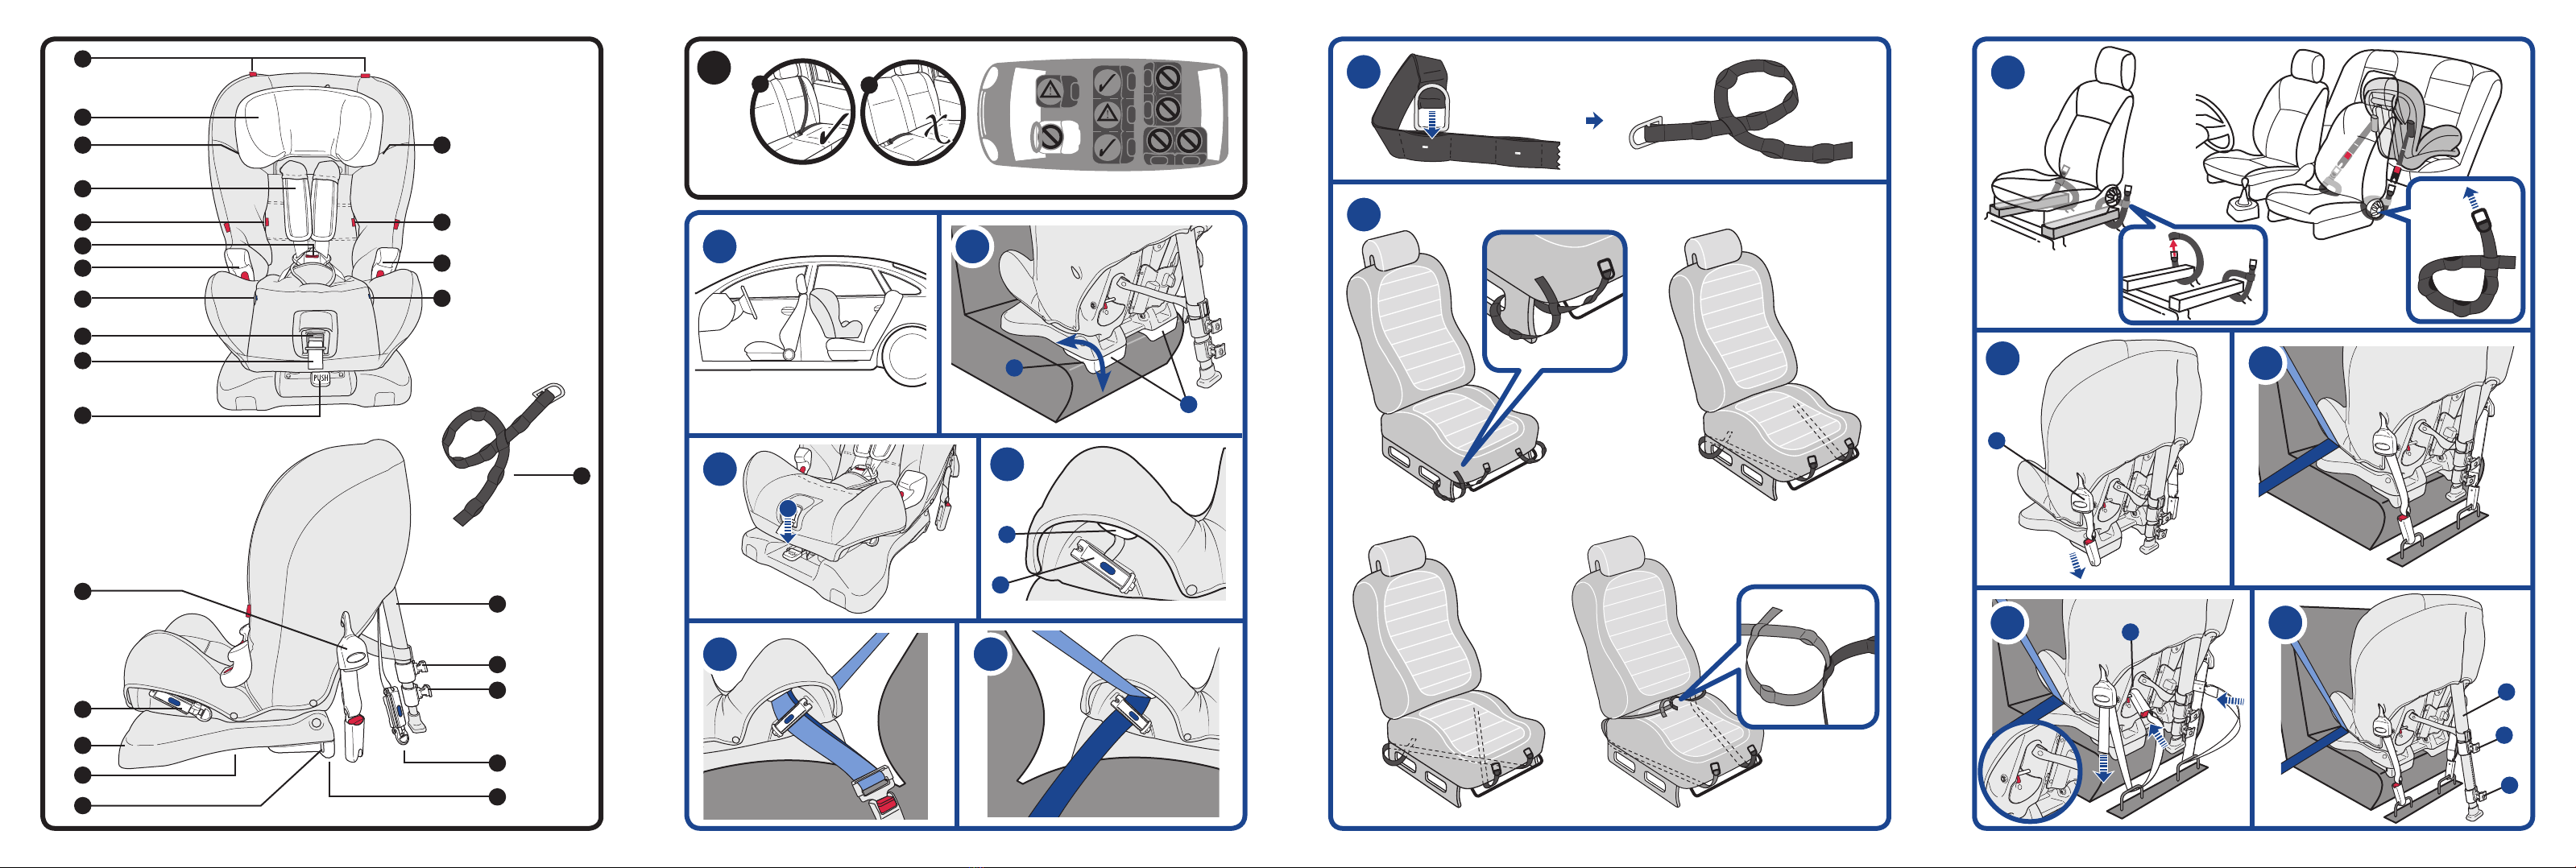
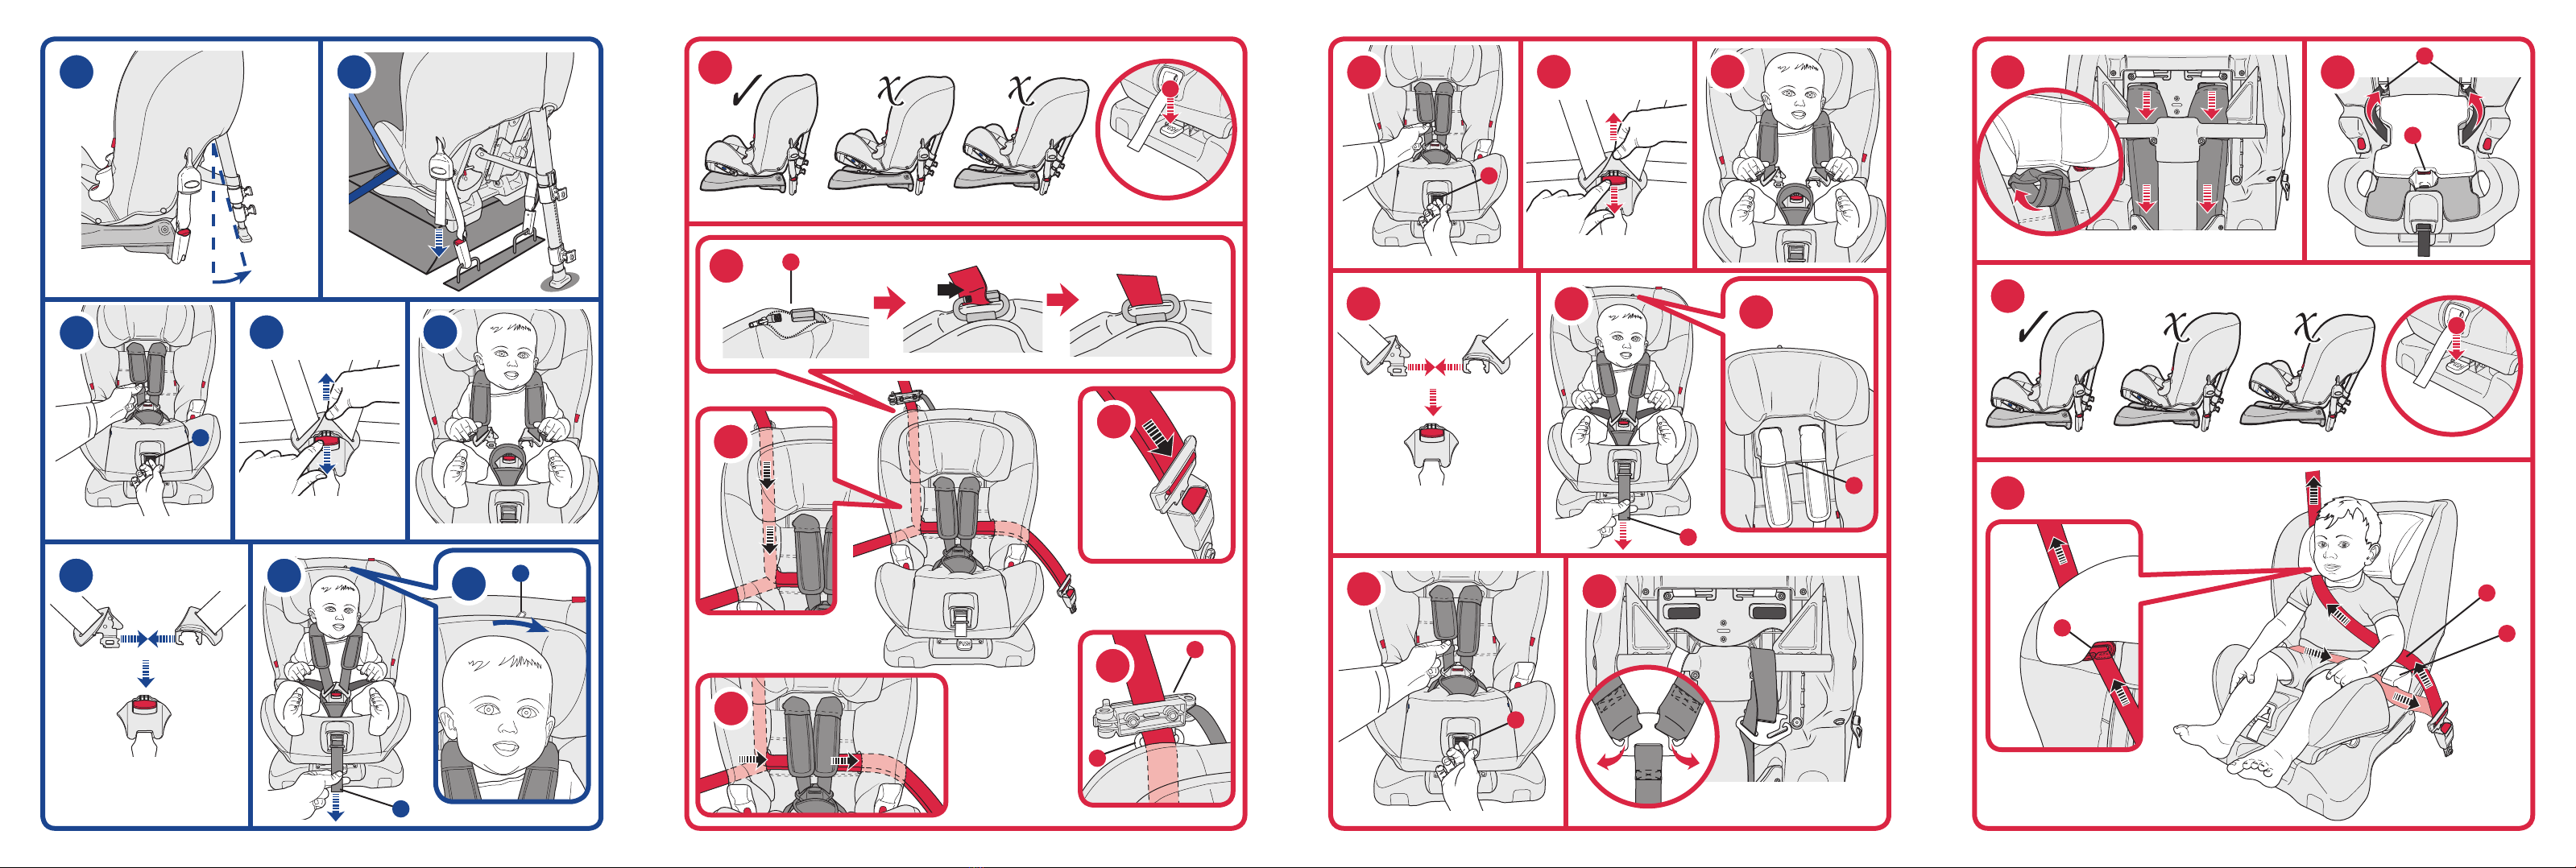
Axkid Kidzone User manual

Axkid Kidzone
Axkid AB, Odinslundsgatan 17, 412 66 Göteborg, Sweden ● www.axkid.com ● [email protected] ● +46 511 760 620
9-25kg
ECE R44/04
9-18kg/15-25kg
3-12
EN
12-20
FR
21-29
ES
30-38
PL
39-47
PT
48-56
SE
57-65
HR
66-74
SI
75-83
CZ
84-91
CN

B
C C
G
F
H
G
H
I
D
E E
J
K
N
M
L
O
P
Q
R
S
T
U
A
V
1
U
P
M
H
iii
2 3
45
67
K
8
9
10
Q
L
R
S
i
11
13
12
14

0° 10°
15 16
17 19
20
18
J
21 22 i
I
28
23
24
i ii iii
A
A
T
K
25
26
27
35 36
29 31
32
30
J
33 34
i
I
I
39
40
i ii iii
37 38
ii
i
C
i
G
K

3
EN
Read this instruction manual carefully before installing the Kidzone child restraint. If in doubt, contact
your retailer who can demonstrate a correct installation. An incorrect installation could endanger
your child.
Do not use a child restraint in a seating position where an active airbag is tted. If you still wish to
install the Kidzone in this location the airbag must be disconnected at an authorised service centre.
Some vehicles may be equipped with a switch which allows you to manually switch the airbag o. It
is important to always check if the vehicle’s indicator light shows that the airbag is turned o.
Keep the child seat rearward-facing for as long as possible. Extensive research has shown that the
risk of serious injury or worse is ve times greater for a young child when in a forward facing restraint
compared to a rearward-facing restraint. In Kidzone your child can travel rearward-facing up to
25kg.
Always use the support leg when installing the Kidzone seat in the rear-facing position. The support
leg is a very important safety feature designed to maximise your child’s safety in an accident.
Should you have an accident, no matter how small, your child restraint should be replaced. It may
have damage that is undetectable and could seriously jeopardize your child’s safety. For this reason
Axkid do not recommend purchasing second hand child restraints.
Never leave your child unattended in the car.
Ensure any luggage or loose objects are secured in your vehicle as they may cause injuries to
passengers in the event of a collision.
Store this instruction manual in the designated pocket (O) on the car seat.
Read this instruction manual before installing the Kidzone child restraint in your vehicle. For
more information and tting videos visit www.axkid.com.
Thank you for choosing an Axkid child seat. Our team has over 30 years combined experience within child
safety, and we have done our utmost to make the Kidzone child seat as safe as possible. The Kidzone child
restraint is approved according to ECE R44/04, the latest European standards for child safety. To maximise
your child’s safety it is important that you keep the following in mind;
Important Information
Kidzone
Instruction Manual
Rear-facing 9-25 kg with vehicle seat belt and tethers
Forward-facing 9-18 kg with vehicle seat belt
Forward-facing 15-25 kg as a booster seat
V9

4
Parts
Contents
Parts 4
Allowed and disallowed positioning of the child car seat 5
Rear-facing 9-25kg with vehicle seat belt and tethers
Thisassemblycan be used forchildrenweighingbetween9-25kg (20-55lb).
6-8
Forward-facing 9-18kg with vehicle seat belt
Thisassembly canbeusedif you wantyourchildtositforwardfacing andtheyweigh between 15-18kg (33-39
lb),andcanbe used in allcar seatswitha three-pointbelt.
8-10
Forward-facing 15-25kg as a booster seat
Once thechildhasbecomelarge enoughtositforwardfacing andusethecar’s three-pointseatbeltitself, you can
useyourKidzoneasaboosterseat.Thisassemblyis suitable forchildrenweighing between15-25kg (33-55 lb).
10-11
Care and maintenance 12
Warranty 12
The Kidzone child restraint is suitable for use from approximately six months of age, or from when
your child can sit up unsupported, up until the age of six. This child restraint can be installed in three
dierent ways depending on your child’s age and size.
ABeltguides-top(1) L Tether straps
B Headrest M Belt lock-o
CBeltguides-headrest(2) NBase
D Integral harness O Pocket for storage of instruction manual
E Seat belt slots (3) P Indented vertical line
F Harness buckle Q Support leg
GBeltguides-lower(2) R Top latch
H Seat belt slots (4) S Lower latch
I Harness adjuster button T Lock-o clip
J Harness adjustment strap U Heels
K Recline adjustment lever V Lower anchor straps (x2)
1. Forwardfacingwith integralharness only
2. Forwardfacingasboosterseat
3. Forward facing installed with seat belt
4. Rear facing installed with seat belt and tethers

5
Thechild restraintcan beused onanyforward facing passenger seatwhichhas a3-pointseatbelt (i),
solong asthereis noactiveairbagin place.Thechild restraint cannotbe usedwith a 2-pointlap belt (ii).
IMPORTANT: If you wish to install your Kidzone in a location where an airbag is tted, then the airbag
must be disconnected at an authorized service centre. Some vehicles may be equipped with a switch
which allows you to manually switch the airbag o. It is important to always check if the vehicle’s
indicator light shows that the airbag is turned o.
WARNING: Never use on a seat with an active airbag.
WARNING: Never use on rearward or side facing vehicle seats
WARNING: Air bags are designed for adults and can seriously harm your child in a crash
Allowed and disallowed positioning of the child car seat.
Allowed And Disallowed Positioning Of The
Child Car Seat
1
Front passenger seat (no activeairbag) Yes
Front passenger seat (activeairbag) NO
Seatwith 3-pointseatbelt Yes
Seatwith 2-pointseatbelt NO
Sidefacingseats NO
Rearfacingseats NO
Never use this child seat in a car that is not equipped with
an ECE Reg 16 approved three-point belt.
For the safety of your child; use rear-facing as long as
possible.
Never install a child restraint in a passenger seat
where an active airbag is tted.

6
Open the belt lock-o clips (M) on both sides of the Kidzone child restraint. Fully lengthen the
seat belt until the lap section of the belt is at least 70-80cm (27-32 inches) long. Feed the seat
belt through the seat belt slot (H), between the seat cover and seat body until the belt comes
out through the seat belt slot on the other side. If you prefer, you can instead feed the seat belt through
the seat belt slot (H), then over the top of the seat belt cover and then through the seat belt slot on the
other side.
Insert the seat belt tongue into the vehicle’s seat belt buckle. Pull the seat belt until all slack is
removed along the seat belt route. Secure both the lap and shoulder belt in the lock-o closest
to the vehicle’s seat belt buckle.
In the lock-o on the opposite side, only the lap belt should be secured.
The easiest way to lift the Kidzone into the vehicle is with its back rst. Place the child restraint in
the vehicle with the back of the restraint facing the front of the vehicle.
The heels (U) should be sitting over the edge of the vehicle seat. The indented vertical line (P)
on the heel should align vertically with the end of the vehicle’s seat. If installing in a small vehicle,
or if your child does not require extra leg room, you can instead place the heel upon the vehicle’s
seat this will also achieve a more reclined position.
Note: When installing Kidzone in the front seat it is possible, but not crucial, for the back of the
restraint to have contact with the dashboard.
To adjust the angle of the child restraint, press the recline adjustment lever (K) to select one of
the three reclining positions. Always choose the most upright position as possible, however
your child must be able to hold their head up on its own, and there should be enough recline
to ensure your child’s head does not fall forward when sleeping. The rule of thumb is that the older
the child grows, the more upright the seat can be installed. Please note that once the installation
of the Kidzone is complete, it will be somewhat more reclined as it sinks into the vehicle’s seat from
tightening seat belts and tether straps.
2
3
4
5
6
7
Fastening The Vehicle Seat Belt
Rear-Facing 9-25 Kg With Seat Belt & Tethers
Placing The Seat In The Vehicle

7
Some vehicles may already be tted with anchorage points at the base of the front seat rails, or, if
installing in the front passenger seat, in front of that seat.
If your vehicle does not have these anchor points, the supplied lower anchor straps must be
used.
When installing Kidzone in the front passenger seat the lower anchor straps must be attached
to the front gliding tracks so the anchor points will be located along the front edge of the
passenger seat.
For installation in the back seat, feed the buckle end of the anchor strap through either the rear
of the front seat rails, or the hinge of the front seat. The anchoring point needs to be as close
to the oor as possible. In doing so you should always insert the buckle of the anchor strap
through the closest appropriate slot in the strap to create a slip knot then pull tight. This needs to be
repeated on both sides to create two anchor points.
Pull out the upper tether strap from the belt housing (L) to an appropriate length.
Clip the anchor attachments directly onto the vehicle anchorage points (or lower anchor straps
if you have used them)...
Alternatively, loop the clip and strap through the anchorage point and then clip the anchor
attachments to the metal pins (i) on the back of the child seat . Repeat on the other side. Tighten
the straps by rmly pulling the end strap.
Unfold the support leg (Q) out to its maximum angle. Pull out the top latch (R) to release the
upper part of the support leg until it reaches the oor. If the support leg does not reach the oor,
repeat with the lower latch (S).
It is important that you check that the support leg is at an angle over 10° from the back of the
seat. You could check this by ensuring that the support leg is further away from the seat than
the vertical line.
Now rmly pull the straps on both sides of the seat to make sure that your seat is fully secured.
If you have installed Kidzone in the back seat you can now move the front seat to a comfortable
position.
Note: The back of the child restraint may, but does not need to be in contact with the back of the front
seat.
Attaching The Tether Straps
8
9
10
11
12
13
14
15
16

8
Placing Your Child In The Seat
Make sure the seat’s angle is in position (i). If not, press the adjustment lever (K) and tilt the seat
forward until it stands straight up.
Place your Kidzone on the car seat. Unzip the seat cover where the top belt guides are (A).
Screw open the nut on the top belt guide. Pull the car’s seat belt and place the shoulder strap
into the top belt guide (A) on the upper side of the seat and close the nut.
Pull the seat belt straight vertically down, on the backside, to the nearest hole in the back of the
seat.
Feed the car’s lap belt and shoulder belt through the rst hole, across the front of the chair
between the seat cover and the seat body and then back through the second hole.
Pull both belts horizontally across chair and fasten the seat belt in the belt buckle.
Pressthe harnessadjusterbutton(I) andpull forward ontheshoulder straps(notthe shoulderpads)to
completelyloosenthe harness.
Pressthe redharnessreleasebuttononthe buckleand unfastenthe harness.
Place your child in the car seat. Put your child’s arms in between the shoulder straps so that the
straps are hanging over the chest and stomach.
Pull the shoulder straps together and insert the harness tongues into the crotch buckle.
Pull the harness adjustment strap (J). It’s important that you always pull the harness straight and
central when you tighten the adjustment strap. This will tighten the harness and the headrest
will automatically slide down to the appropriate height.
17
18
19
20
21
Forward-Facing 9-18 Kg With Seat Belt
Installing The Seat
The headrest on your Kidzone is equipped with a head support brake. This can be used if
you want to keep the headrest in a xed position. To activate the head support brake, pull the
harness adjustment strap until the headrest is at the desired height, you will hear a faint “click”
sound from the headrest as it locks into position. Check that the headrest can not be pulled down any
further and activate the headrest brake by moving the lever (i) across to the right.
WARNING: Do not pull up the headrest with the parking brake activated.
Head Support Brake On Headrest
22
23
24
25
26
27

9
Remove all the slack from the seat belt and secure it with the lock-o clip (T) just above the top
belt guide (A).
Please make sure that the belts haven’t tangled up or been folded anywhere. Also make sure that
both shoulder and lap belt are securely fastened everywhere. Use your own weight to press down on
the chair in order to automatically fasten the seat belt further.
Press the harness adjuster button (I) and pull forward on the shoulder straps (not the shoulder
pads) to completely loosen the harness.
Press the red harness release button on the buckle and unfasten the harness.
Place your child in the car seat. Put your child’s arms in between the shoulder straps so that the
straps are hanging over the chest and stomach.
Pull the shoulder straps together and insert the harness tongues into the crotch buckle.
Pull the harness adjustment strap (J). It’s important that you always pull the harness straight and
central when you tighten the adjustment strap. This will tighten the harness and the headrest
will automatically slide down to the appropriate height.
The headrest must always be drawn down at least 35 millimeters. There is a line (i) in the
headrest which can be detected with your ngers. If the line is behind the seat cover then the
headrest has been pulled down correctly. If the line is still visible as shown (i), then the headrest
has not been pulled down enough.
IMPORTANT: Check that the headrest is locked by pulling the adjustment strap again. If the headrest
does not move then it is locked and safe to use. If the headrest still moves and it is impossible to nd a
locked position, then the seat should be used as a booster seat (see steps 35 to 40).
Placing Your Child In The Seat
28
29
30
31
32
Never install a child restraint in a passenger seat
where an active airbag is tted.
33
34

10
Since you are now going to use the car’s seat belt, you must rst remove the integral harness.
Press the harness adjuster button (I) and pull forward on the shoulder straps (not the shoulder
pads) to completely loosen the harness.
Unhook the shoulder straps from the yoke and pull the two shoulder straps through to the front
of the seat.
Wrap the yoke strap over the top bar and hook the yoke around it’s own strap so that it is neatly
stowed away.
You can either leave the harness pads where they are or feed the harness pads through the
shoulder slots in the seat and pull them out to the back of the seat, where they can be tucked
behind the metal plate at the back.
Remove the crotch pad from the crotch buckle. Release the seat cover at the front of the
seat, pull back the cover and feed the crotch buckle through the slot in the cover. Remove the
polystyrene/foam block and insert the buckle into the space (i). Pull the harness straps and
buckles through the seat cover and then feed them out through the holes to the back of the seat (ii).
The straps can be rolled up and secured with an elastic band to stow them neatly.
Place the cover back over the seat and fasten the cover to the front of the seat base.
Make sure the seat’s angle is in position (i). If not, press the adjustment lever (K) and tilt the seat
forward until it stands straight up.
Place your Kidzone on the car seat and put your child in the child seat. Take the vehicle’s
seat belt and guide the shoulder belt through the red headrest belt guide (C), located on the
headrest just above the child’s shoulder.
Take the seat belt diagonally across your child’s chest to the next red mark (i) above the lower belt
guides (G). You may need to move the chair slightly sideways for the belt to t comfortably in the seat
belt guide.
Place the lap belt across the child’s lap and through the lower belt guides (G) on each side of the
chair and fasten the seat belt in the belt buckle. Ensure the belt isn’t tangled, twisted or folded at any
location and check that the tension is rm along the length of the belt.
35
36
37
38
39
40
Forward-Facing 15-25Kg As A Booster Seat
Converting To A Booster Seat
Placing Your Child In The Booster Seat
Never install a child restraint in a passenger seat
where an active airbag is tted.

11
Care and Maintenance
The seat cover can be removed and washed in a washing machine at 30º C on the
“Gentle Cycle” programme. Do not put the cover in a dryer as this can damage the cover
and the padding may separate from the fabric.
Visit www.axkid.com to nd videos explaining how to remove and attach the cover.
Any plastic parts of Kidzone can be cleaned with mild detergent and water. Do not use
aggressive chemicals containing solvents etc, as this can cause damage to the plastic
and compromise the safety of the child restraint.
All materials used in the Kidzone child restraint are recyclable and should be recycled as
per your local legislation. Ask your local recycling centre for advice when recycling this
product.
Do not make any modications or alterations to the Kidzone child restraint other than
those described in this instruction manual. Follow the instructions in this manual carefully.
Any repairs must be carried out by the manufacturer or agent.
If the seat cover needs replacing ensure only original products from Axon Kids are used.
If other products are used the Kidzone’s safety system may be compromised and could
lead to severe injury or death in case of an accident.
All materials used have a very high UV-resistance rating. However, UV-light is very
aggressive and will ultimately lead to fading of the seat cover. This is not covered by our
warranty as it is considered normal wear and tear.
Warranty
The Kidzone child restraint is covered by a 24 month warranty from date of purchase.
Ensure you save your receipt and bring it to your place of purchase should you have any
warranty issues. The warranty does not cover:
* Normal wear and tear
* Damage due to incorrect use, neglect or accident
* If repairs have been carried out by a third party

12
FR Kidzone
Manuel D’ Instructions
Dos à la route 9-25Kg installé avec la ceinture de sécurité
Face à la route 9-18 Kg avec la ceinture de sécurité du véhicule Face à la
route 15-25 Kg comme siège rehausseur
Lireattentivementlemanuel d’instruction avantd’installer lesiège-auto Kidzone.Sivousavezun doute
n’hésitezpas àcontacter votrerevendeurqui pourra vous montrer lacorrecteinstallation.Unemauvaisemise
enplacepourraitmettreendangervotreenfant.
Ne pas utiliserun siège-autodansun véhicule munid’airbags.Si vous souhaitez toutdemême installer le
Kidzoneà cetendroit,les airbags doivent êtredéconnectésdansun centreagréé. Certainsvéhicules peuvent
être équipésd’un boutonqui vouspermet manuellement dedésactiverles airbags.Ilestimportantdetoujours
vérier si l’indicateur lumineux de votre tableau de bord indique que ceux-ci sont bien désactivés.
Garderl’enfant assisdos àla routele pluslongtemps possible. Denombreuses étudesont montré quele risque
de blessures gravesou pire,estcinq foisplus élevé pourun jeuneenfant quandilfaitface àlaroute comparé à
lorsqu’ilse trouvedos àla route.Dans le Kidzone votreenfantpeut voyagerdosà la route jusqu’à25kg,
Toujoursutiliser lajambe desupport quandvous installezle siègeKidzonedos ala route. Lajambe desupport
est un élément très important, crée spécialement pour maximiser la sécurité de votre enfant en cas d’accident.
Si vous avez unaccident, mêmesans gravité, votre siège-autodevraêtreremplacé. Ila puêtre endommagé,
même sic’estindétectableà l’œil nu, ilpourraitsérieusement mettreen périlla sécurité devotreenfant. Pour
cetteraisonAxkidnerecommandepasl’achatd’unsiège-autod’occasion.
Nejamaislaisser votreenfant sans surveillancedansla voiture.
Assurez-vous quetous lesobjetsou bagagessont attachésetnepeuventpas sedéplacerdans levéhicule,ils
pourraient causésdesblessuresauxpassagersencas de collision.
Conservez ce manuel d’utilisation dans la poche prévu à cet eet (O).
Lire le manuel d’utilisation avant d’installer le siège-auto dans votre véhicule, Pour plus d’informations et de
videos visiter www,akkid,com
Mercid’avoir choisiun siège-autoAxkid.Notre équipeaplus de30 ansd’expériencedansla sécurité desenfants et
nous avons fait toutnotrepossible pourrendre leKidzonesiège-autoleplus sûrpossible. Le siège-auto Kidzone aété
approuvé selonla normeECER44/04 ,ladernièrenorme européenneen matière desécurité enfant.Pourmaximiser
lasécuritéde votre enfantilestimportantquevousgardiezà l’espritles choses suivantes:
Information Importantes

13
Pièces
Sommaire
Le siège-auto Kidzone est utilisable à partir d’environ 6 mois ou à partir du moment où l’enfant peut
se tenir assis tout seul, jusqu’à 6 ans, Ce siège-auto peut être installé de trois manières diérentes
suivant lâge et la taille de l’enfant.
AGuide de ceinture du haut (1) LSangles d'attache du siège
BAppui tête MClamps pour ceinture de sécurité
CGuide de ceinture de l’appui tête (2) NBase
DHarnais intégral OPoche de rangement pour le manuel d'instruction
EInserts pour ceinture de sécurité (3) PLigne d'indication de la verticale
FBoucle de harnais QJambe de support
GGuide de ceinture du bas (2) RLoquet supperieur
HInserts pour ceinture de sécurité (4) SLoquet inferieur
IManette de réglage du harnais TClamps
JSangle d'ajustement du harnais UTalons
KManette d'inclinaison du siège VSangles d'ancrage du bas (x2)
1. Faceà larouteavecseulement leharnaisintégral
2. Face à laroutecommesiège rehausseur
3. Faceà larouteavecla ceinturede sécuritéduvéhicule
4. Dosà la routeinstallé avecla ceinturede sécuritéetlessangles d’attaches
Pièces 13
Positionnement autorisé et interdit du siège-auto 14
Dos à la route 9-25Kg avec ceinture de sécurité et sangles d’attaches
Cetteinstallationpeut êtreutiliséepourlesenfants entre9et25 Kg
15-17
Face à la route 9-18 Kg avec la ceinture de sécurité
Ces indications doivent êtresuiviessi vous voulezque votreenfant soitassisface àlaroute et quesonpoids est entre
9et18Kgetpeutêtreutilisé dans tous les véhicules équipés d’une ceinturede sécurité3points.
17-18
Face à la route 15-25 Kg comme siège rehausseur
Une fois que l’enfant est susamment grand pour s’asseoir face à la route et utiliser la ceinture de sécurité 3 points du
véhicule,vous pouvezutiliserleKidzonecomme siègerehausseur. Cesindicationsconviennentaux enfants entre15
et25 Kg
19
Entretien et maintenance 20
Garantie 20

14
Lesiège autopeut êtreutilisésur n’importequel siègepassagerqui possèdeune ceinturede sécurité
3points (i)du momentqu’il n’y apas d’airbagactif danslevéhicule.Ce siègeautone peutpasêtre utilisé
avecune ceinturedesécurité2 points(ii).
IMPORTANT: Si vous souhaitezinstallerle Kidzonedans unvéhiculemuni d’airbags, lesairbags doivent être
déconnectésdans uncentre agréé.Certainsvéhiculespeuventêtre équipésd’unboutonqui vouspermet
manuellement de désactiver les airbags. Il est important de toujours vérier si l’indicateur lumineux de votre
tableaude bordindique que ceux-cisont biendésactivés.
ATTENTION : Ne jamais utiliser lorsque l’airbag est active
ATTENTION : Ne jamais utiliser face à la route ou face aux cotes
ATTENTION : Les airbags sont conçu pour les adultes et peuvent gravement blesser votre enfant
lors d’un accident
Positionnement autorisé et interdit du siège-auto
Positionnement Autorisé Et Interdit Du
Siège-Auto
1
Siegepassageravant(sansairbagsactifs). Oui
Siegepassageravant(airbagsactif). NON
Dosàlarouteavecuneceinture 3 points. Oui
Installésur un siègeavec une ceintureventrale. NON
Installéde côté. NON
Installéfaceàlaroute. NON
Ne Jamaisutiliser cesiège-autodans un véhicule qui n’est pas
équipé d’une ceinturede sécuritéECEreg 16approuvé.
Pour la sécurité de l’enfant gardez-le assis dos à la route, le plus
longtemps possible.
Ne jamais installer un siège-auto sur un siège
passager où un airbag est activé.

15
Ouvrez les clamps des deux côtés du Kidzone (M) Tirez sur la ceinture de sécurité jusqu’à
ce que la partie ventrale de la centure fasse au moins 70-80 cm de long. Insérer la ceinture
de sécurité par l’insert pour ceinture de sécurité (H) , à travers l’ouverture, entre la housse et
l’armature du siège, jusqu’à l’ouverture de l’autre côté. Si vous préférez vous pouvez aussi faire passer
la ceinture par dessus la housse et la faire passer par l’insert pour ceinture de sécurité de l’autre côté .
Insérer la boucle de la ceinture de sécurité à l’attache habituelle. Ressérrer la ceinture de
sécurité du véhicule . Du coté de la boucle d’attache de la ceinture de sécurité, sécuriser la
ceinture ventrale et diagonale en fermant le clamp prévu à cet eet.
De l’autre côté ne sécuriser que la ceinture ventrale avec le clamp .
La façon la plus simple d’installer le Kidzone dans le véhicule est, de faire rentrer le dos du siège
en premier.
Les talons du siège-auto (U) doivent être sur le rebord du siège du véhicule. La ligne indicative
de la verticale (P) doit être alignée avec le rebord du siège, s’il est installé dans un petit véhicule,
ou si votre enfant n’a pas besoin de beaucoup de place pour ses jambes, vous pouvez à la
place ,mettre les talons du siège -auto sur l’assise ce qui inclinera un peu plus le siège.
Note: Lorsqu’il est installé à l’avant ,le siège Kidzone peut toucher le tableau de bord.
Pour ajuster l’angle du siège, appuyer sur la manette d’inclinaison (K) pour selectionner une des
trois positions d’inclinaison disponible. Choisissez toujours la position la plus droite possible,
Cependant votre enfant doit être capable de tenir sa tête par lui même, mais susement incliné
pour ne pas que sa tête tombe lorsqu’il dort. En règle générale plus l’enfant grandit plus le siège peut
être installé droit, Merci de noter qu’une fois l’installation du Kidzone terminée, une fois les sangles
serrées, le siège s’enfoncera dans le siège du véhicule et se retrouvera un peu plus incliné.
2
3
4
5
6
7
Attacher La Ceinture De Sécurité
Dos À La Route : 9-25 Kg Avec Ceinture De
Sécurité Et Sangles D’attache
Positionner Le Siège-Auto

16
Certains véhicules peuvent déjà être équipé de point d’ancrage à la base des rails du siège avant ou si
installé à l’avant, à l’avant du siège.
Si votre véhicule ne possède pas ces points d’ancrage , les sangles d’attaches du bas inclus,
doivent être utilisées.
Lorsque vous installez le Kidzone sur le siège avant, les sangles d’ancrage du bas doivent être
attachées à l’avant des rails du siège avant.
Pour l’installation sur le siège arrière ,accrocher les sangles d’ancrage du bas autour du rail arrière
du siège avant. Les points d’ancrages doivent être aussi près du sol que possible, pour se faire,
utiliser toujours l’encoche la plus proche pour créer un nœud coulant puis tirer fort an de le serrer.
Cette opération doit être eectuée des deux côtés du siège pour créer deux points d’ancrage.
Sortir les sangles d’attaches du siège (L) jusqu’à une longeur appropriée.
Accrocher les sangles d’accroche directement sur les points d’accroche du véhicule (ou les
sangles du bas si vous les avez utilisées)...
Alternativement, enrouler la sangle et le clip autour du point d’ancrage et attacher le clip à la petite
barre métallique à l’arrière du siège (i). Répéter l’opération de l’autre cote. Resserrer les sangles en
tirant fermement le bout des sangles.
Déplier la jambe de support (Q) en tirant sur le loquet du haut (R), la première partie de la jambe va
se déplier jusqu’à ce qu’elle touche le sol. Si la jambe n’atteint pas le sol, tirer sur le loquet du bas (S)
et déplier la deuxième partie de la jambe.
Il est important de faire attention à ce que la jambe de support fasse un angle suppèrieur à 10°
avec le dos du siège-auto. Vous pouvez vérier cela en vous assurant que la jambe de support est
plus loin que la verticale qu’elle forme avec le siège.
Maintenant, tirer fermement sur les sangles des deux côtés du siège pour s’assurer qu’elles sont
sécurisées.
Si vous avez installé Kidzone sur le siège arrière du véhicule vous pouvez maintenant déplacer le siège
avant jusqu’à une position confortable.
Le dos du siège-auto peut être en contact avec le dos du siège avant, mais pas nécessairement .
Attacher Les Sangles D’attache Du Siège
8
9
10
11
12
13
14
15
16

17
Installer L’enfant Dans Le Siège-Auto
Assurez-vous que l’angle du siège est en position (i). Sinon appuyer sur le levier d’inclinaison (K)
et inclinez le siège en avant jusqu’à ce qu’il soit le plus droit possible.
Placez votre Kidzone sur le siège du véhicule. Dezipper la housse du siège où les guides de
ceinture du haut sont (A) Dévisser le mousqueton. Tirer la ceinture de sécurité du véhicule et
placer la ceinture diagonale du véhicule à travers le mousqueton, revisser le mousqueton.
Tirer la ceinture de sécurité droite, derrière le dos du siège jusqu’au trou le plus près.
Insérer la ceinture ventrale et diagonale à travers le trou, jusqu’ à l’avant du siège puis en
passant entre la ceinture entre la housse du siège auto et le corps du siège jusqu’au deuxième
trou.
Appuyersurla manettede réglageduharnais (I)etdétendreles sangles duharnais.
Appuyersurle boutonrougesurla boucle duharnais pourle détacher.
Installer l’enfant dans le siège , passer ses bras dans le harnais, jusqu’aux épaules, an que
toutes les sangles se rejoignent au niveau de son ventre.
Relier les deux embouts des sangles du harnais et insérez les dans la boucle.
Tirer sur la sangle d’ajustement du harnais (J). Il est important de toujours tirer sur la manette
de réglages lorsque les sangles sont droites et au milieu. En tirant sur la manette l’appui tête va
automatiquement descendre à la hauteur appropriée.
17
18
19
20
21
Face À La Route 9-18 Kg Avec Une Ceinture De
Sécurité
Installer Le Siège
L’appui tête sur votre Kidzone est équipé d’un loquet de sécurité. Cela peut être utilisé pour
xer l’appui tête dans une position. Pour activer ce loquet de sécurité, tirer sur le harnais jusqu’à
ce que l’appui tête soit à la hauteur désirée, vous entendrez un “ clic” lorsque la position sera
sécurisée, assurez vous que l’appui tête ne peut pas redescendre. Activer le loquet de sécurité (i) en
le tournant vers la droite.
ATTENTION: ne pas tirer sur l’appui tête lorsque le loquet de sécurité est activé.
Loquet De Sécurité Sur L’appui Tête
22
23
24
25
26

18
Tirer les deux ceintures horizontalement à travers le deuxième trou et attacher la ceinture de
sécurité à sa boucle habituelle.
Retirer l’excédent de ceinture et sécuriser la ceinture en fermant le clamp (T) se trouvant juste
au-dessus du guide de ceinture du haut (A).
Veuillez, vous assurez que la ceinture n’est pas enroulée, tordu ou coincée quelque part. Assurez-
vous aussi que les deux ceintures : diagonales et ventrales sont sécurisés et attachées partout.
Utiliser votre poids pour appuyer sur le siège pour automatiquement resserrer un peu plus la ceinture
de sécurité.
Appuyer sur la manette de réglage du harnais (I)et détendre les sangles du harnais.
Appuyer sur le bouton rouge sur la boucle du harnais pour le détacher.
Installer l’enfant dans le siège , passer ses bras dans le harnais, jusqu’aux épaules, an que
toutes les sangles se rejoignent au niveau de son ventre.
Relier les deux embouts des sangles du harnais et insérez les dans la boucle.
Tirer sur la sangle d’ajustement du harnais (J). Il est important de toujours tirer sur la manette
de réglages lorsque les sangles sont droites et au milieu. En tirant sur la manette l’appui tête va
automatiquement descendre à la hauteur appropriée.
L’appui tête doit toujours être tiré vers le bas a au moins 35 millimètres. Il y a une ligne (i) dans la
partie basse de l’appui tête qui peut être détectée avec vos doigts. Si la ligne est invisible alors
l’appui tête a été descendu correctement. Si la ligne est toujours visible comme montré (i) alors
l’appui tête n’a pas été susamment descendu.
IMPORTANT: Vérier que l’appui tête est bloqué en tirant encore sur la sangle d’ajustement. Si l’appui
tête ne bouge pas alors il est bloqué, et donc sécurisé pour être utilisé. Si l’appui tête bouge encore et
qu’il est impossible de trouver une correcte position bloquée, alors le siège devra être utilise comme
rehausseur à dossier (voir étapes 35 à 40).
Installer l’enfant dans le siège-auto
27
28
29
30
31
32
Ne jamais installer un siège-auto sur le siège
passager où un airbag est activé.
33
34

19
Comme vous allez maintenant utiliser la ceinture de sécurité du véhicule, vous devez retirer le harnais
intégralement.
Appuyer sur la manette de réglage du harnais (I)et détendre les sangles du harnais.
Décrocher les sangles du harnais du connecteur métallique et tirer les deux sangles du harnais
au niveau des épaules par l’avant. Enrouler la sangle autour de la barre à l’arrière du siège.
Vous pouvez soit laisser les coussins du harnais ou ils sont ou les faire passer à travers les
inserts du harnais et les faire sortir a l’arrière du siège ou ils peuvent être coincé derrière la
plaque métallique de la jambe de support.
Enlever la housse qui protège la boucle du harnais. Détacher la housse du siège à l’avant du
siège. Faites passer la boucle du harnais de l’autre cote. Enlever le carré de polystyrène et
insérer la boucle dedans (i). Tirer les sangles du harnais et sortez-les à l’arrière du siège (ii) Les
sangles peuvent être enroulées et maintenu avec un élastique pour les maintenir en place. Remettre
la housse et la rattacher à l’avant de la base du siège.
35
36
37
38
Face À La Route 15-25 Kg Comme Siège
Rehausseur
Convertir en siège rehausseur
Ne jamais installer un siège-auto sur le siège
passager où un airbag est activé.
Assurez-vous que l’angle du siège est en position (i). Sinon appuyer sur le levier d’inclinaison (K)
et inclinez le siège en avant jusqu’à ce qu’il soit le plus droit possible.
Installer votre Kidzone sur le siège du véhicule et mettez votre enfant dans le siège, prenez
la ceinture de sécurité du véhicule et passer la ceinture diagonale au travers du guide pour
ceinture rouge (C) sur le côté de l’appui tête, au-dessus de l’épaule de l’enfant.
Passer la ceinture en diagonale devant la poitrine de l’enfant jusqu’à la prochaine marque rouge (i) au-
dessus des guide de ceinture du bas (G). Vous pouvez avoir besoin de légèrement bouger le siège
pour que la ceinture se positionne correctement.
Placer la partie ventrale de la ceinture sur les hanches de l’enfant et à travers les guide de ceinture du
bas (G) de chaque côté du siège et attacher la ceinture de sécurité à la boucle habituelle. Assurez-
vous que la ceinture n’est pas tordu, enroulée ou pliée à aucun endroit. Vérier également que la
ceinture est serrée et tendu tout le long de la ceinture.
39
40
Installer l’enfant dans le siège rehausseur
Other manuals for Kidzone
1
Table of contents
Languages:
Other Axkid Car Seat manuals

Axkid
Axkid Bigkid User manual

Axkid
Axkid Minikid User manual

Axkid
Axkid Minikid User manual

Axkid
Axkid Wolmax User manual

Axkid
Axkid ENVIROBASE User manual

Axkid
Axkid Move User manual

Axkid
Axkid SPINKID User manual

Axkid
Axkid Babyfix User manual

Axkid
Axkid ENVIROKID User manual

Axkid
Axkid Babyfix User manual

Axkid
Axkid Grow User manual

Axkid
Axkid Minikid User manual

Axkid
Axkid Keezone User manual

Axkid
Axkid Minikid 3 User manual

Axkid
Axkid ENVIROBABY User manual

Axkid
Axkid Mate User manual

Axkid
Axkid Modukid User manual

Axkid
Axkid One User manual

Axkid
Axkid Rekid User manual

Axkid
Axkid Modukid Infant User manual