Axkid Babyfix User manual


3
EN
The Babyx base has been approved as “semi-universal group 0+” for use with ISO/R1 seats
which are used rearward facing and which are intended for children from birth up to 13kg and is also
approved to ECE R44/04, the latest European standards for child safety.
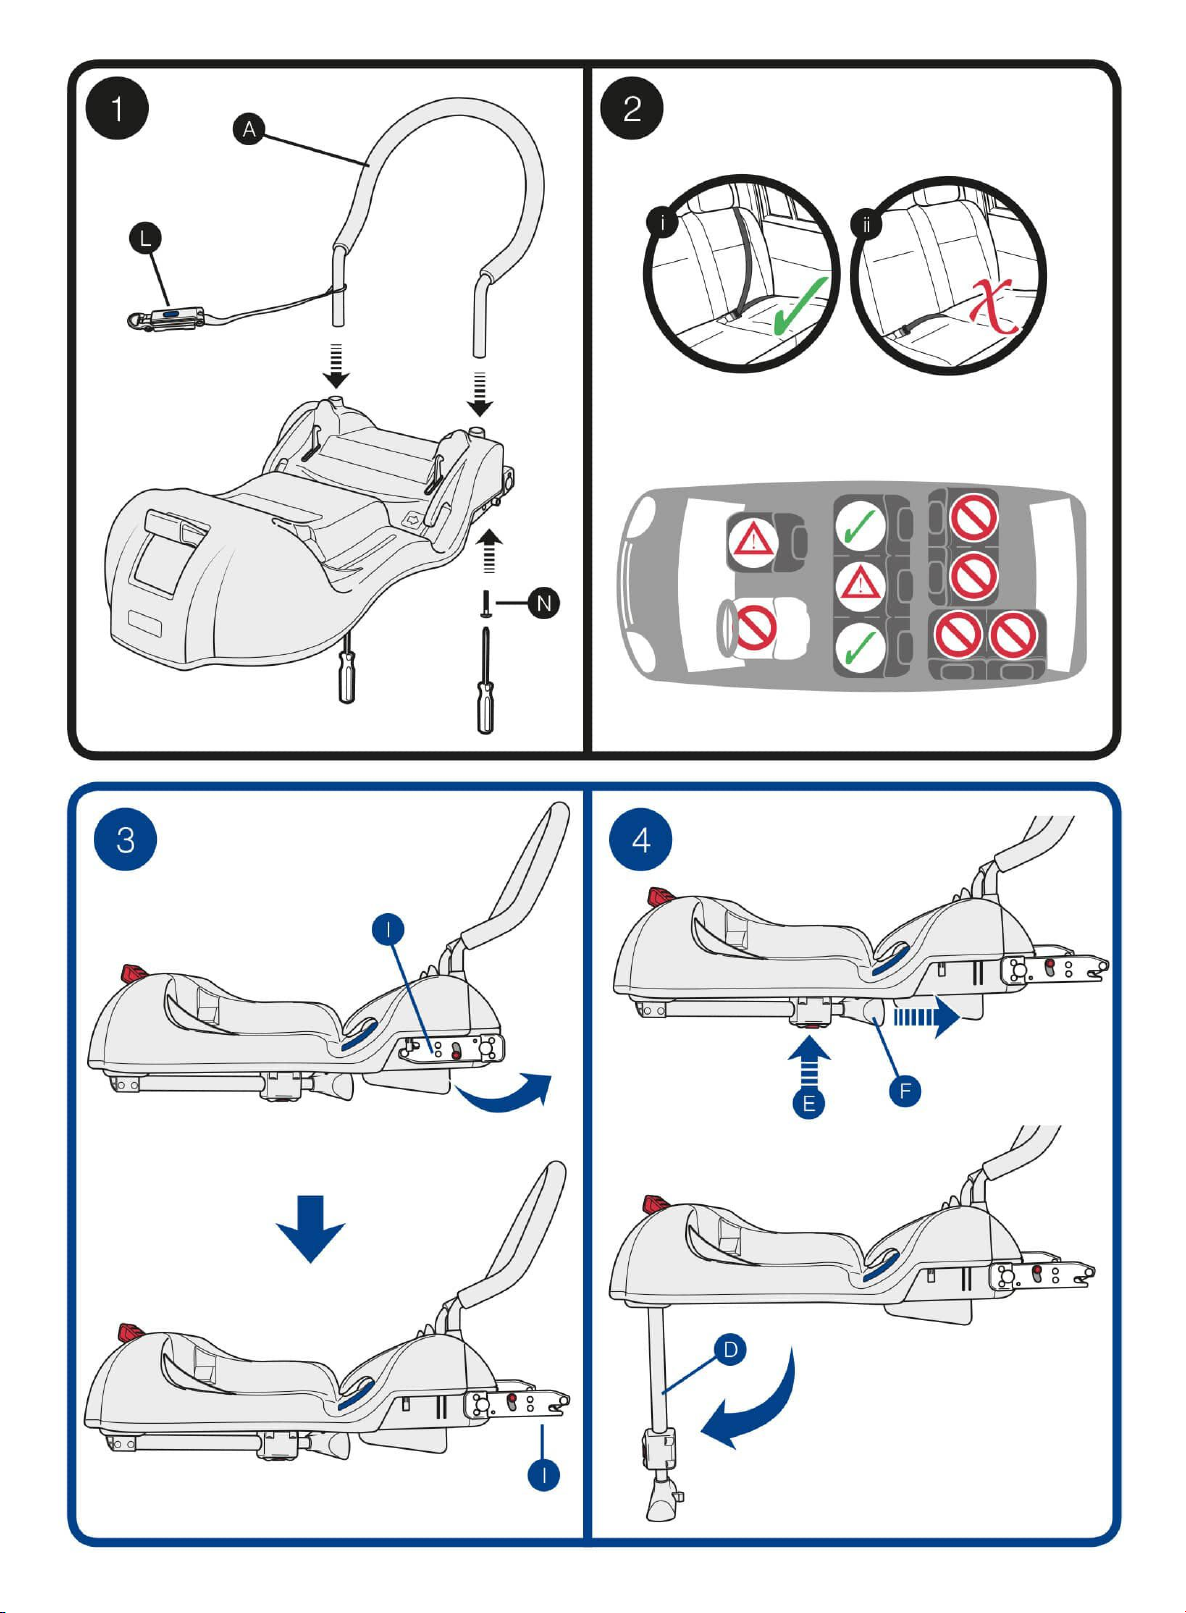
The base can be used in any passenger seat equipped with ISOFIX anchor points but should not be
installed in a seating position where an active airbag is tted.
Do not use a child restraint in a seating position where an active airbag is tted. If you still wish to
install the Babyx base in this location the airbag must be disconnected at an authorised service
centre. Some vehicles may be equipped with a switch which allows you to manually switch the
airbag o. It is important to always check if the vehicle’s indicator light shows that the airbag is turned
o.
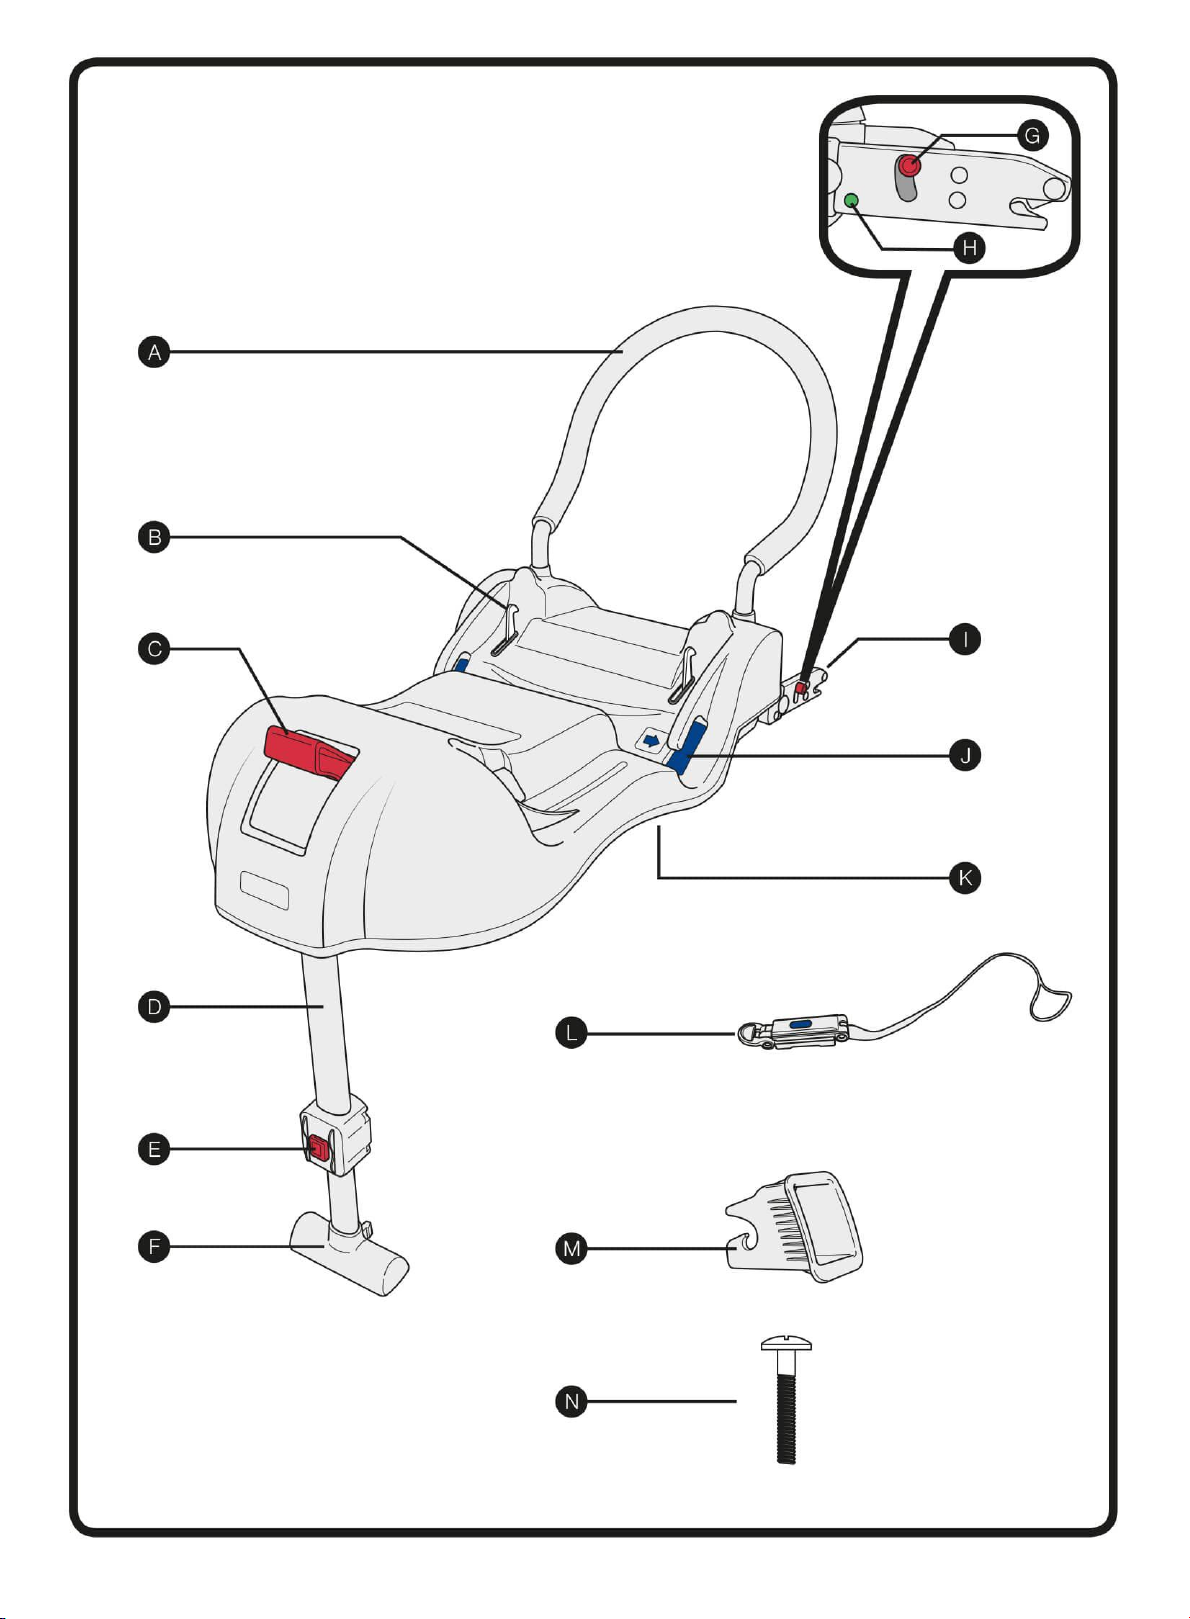
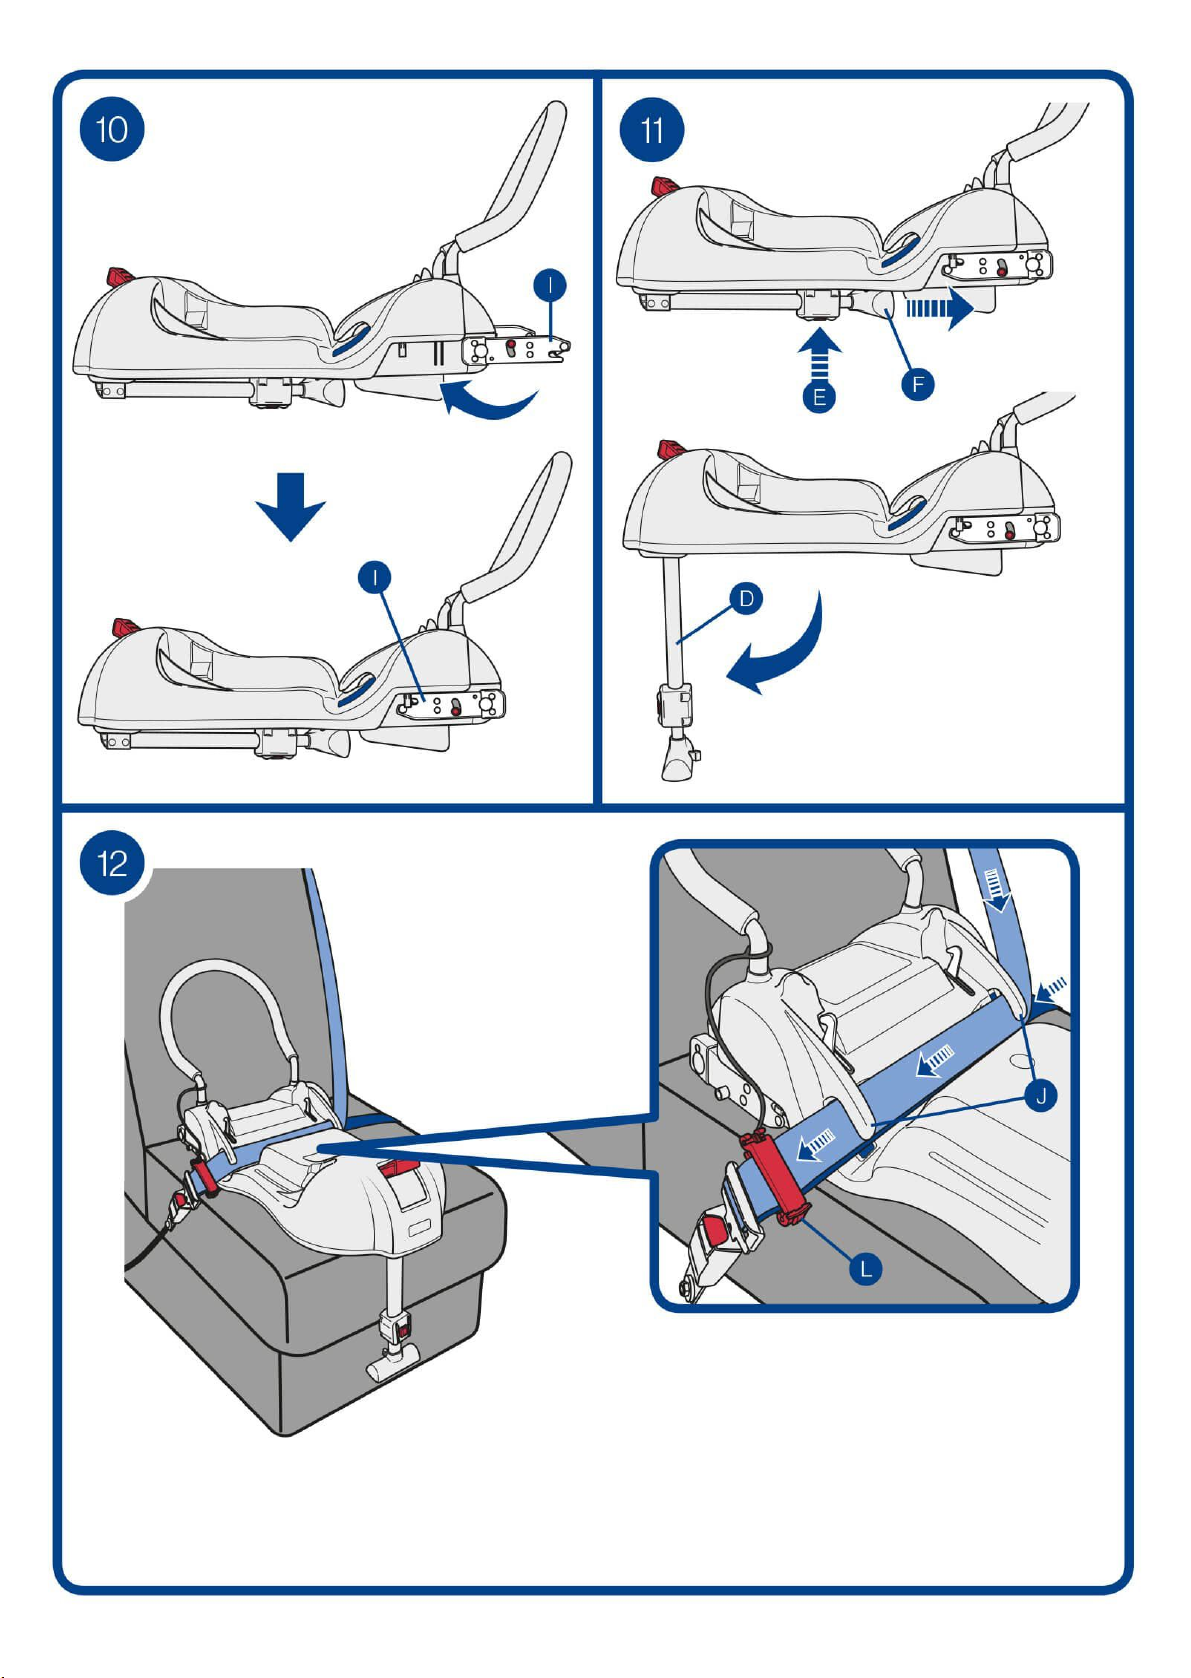
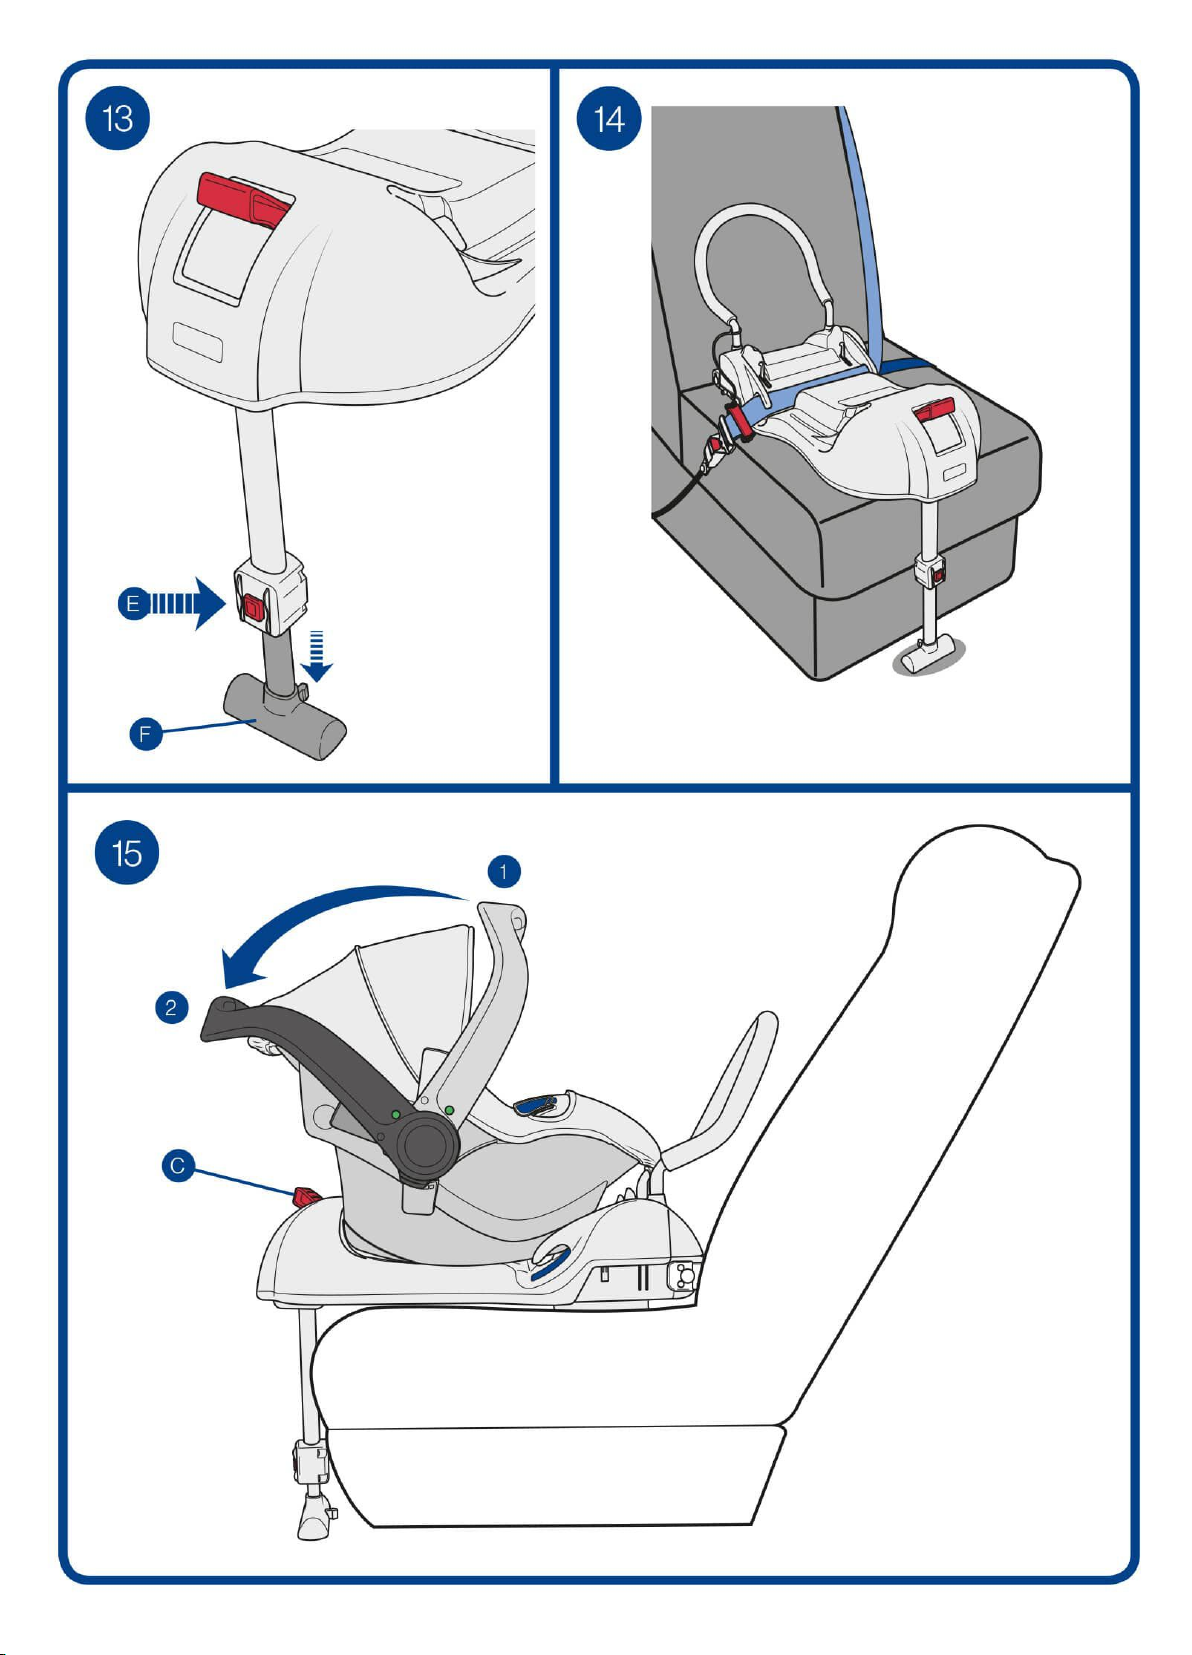
Always use the support leg when installing the Babyx base. The support leg is a very important
safety feature designed to maximise your child’s safety in an accident.
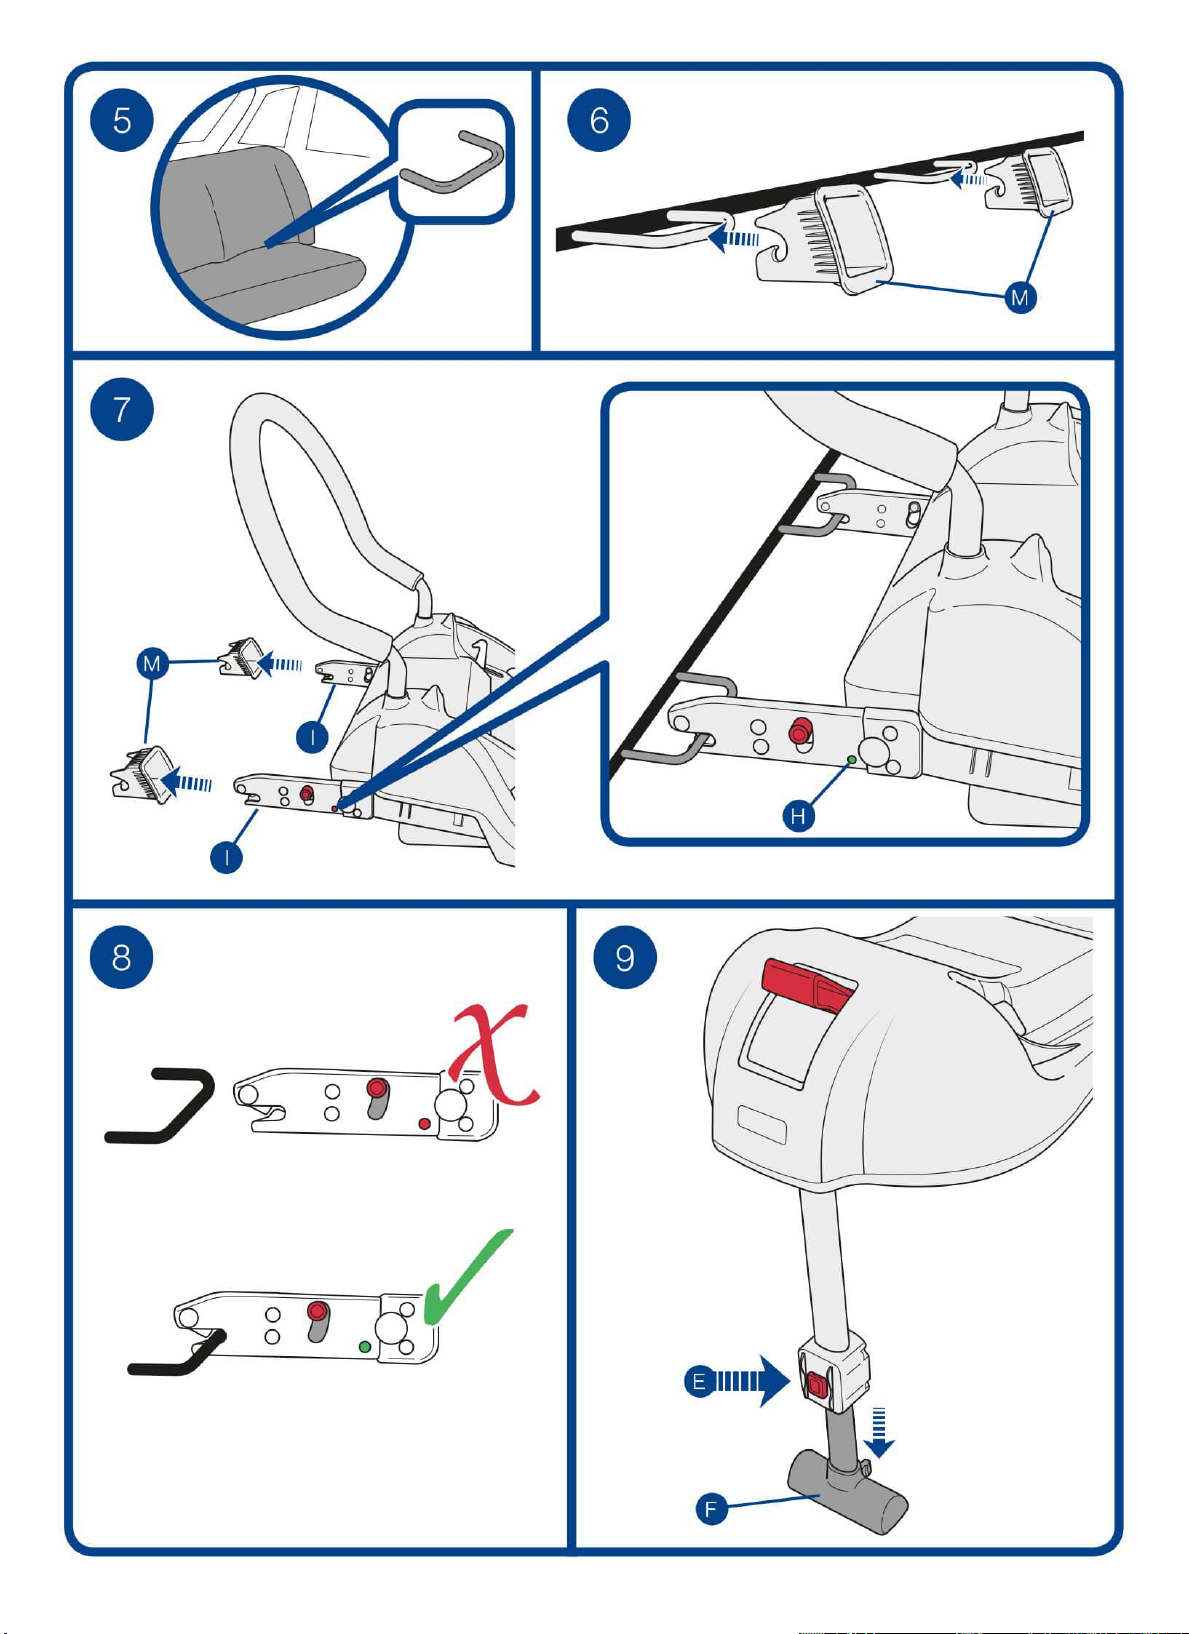
Do not attempt to install the base without using the ISOFIX guides (M). Failure to do so may damage
your car seats and upholstery.
Do not dismantle, modify or add to any part of the Babyx base. Any alterations or modications
could endanger your child or a passenger and will invalidate the warranty.
Read this instruction manual carefully before installing the Babyx base. If in doubt, contact your
retailer who can demonstrate a correct installation. An incorrect installation could endanger your
child.
Store this instruction manual in the designated location (K) on the car seat.
Read this instruction manual before installing the Babyx base in your vehicle. For more
information and tting videos visit www.axkid.com.
Thank you for choosing an Axkid child seat base. Our team has over 30 years combined experience within
child safety, and we have done our utmost to make the Babyx base as safe as possible. This base has
been developed to be used with ISOFIX anchor points or with the vehicle’s seat belt. To maximise your
child’s safety it is important that you keep the following in mind;
Important Information
Babyx ISOFIX Base
Instruction Manual
Rear-facing 0-13 kg with ISOFIX
Rear-facing 0-13 kg with vehicle seat belt
V4

4
Parts
ABackrest HISOFIX indicator
BSeat hooks I ISOFIX arms
C Seat release handle JBelt-hooks
DSupport leg K Instruction manual storage location
E Leg adjustment button LBelt lock-o clip*
FFoot M ISOFIX guides* (x2)
GISOFIX release button NScrews** (x2)
Contents
The Babyx base is designed to be used with the Babyx group 0+ car seat for children from birth up
to 13kg. The base can be istalled in two dierent ways depending on your vehicle.
Parts 4
Assembling the base 5
Allowed and disallowed positioning of the child car seat 5
Installing with ISOFIX anchor points 6
Installing with vehicle seat belt 6-7
Attaching and removing the infant carrier 7
Removing the base 7
Removing the ISOFIX tted base 7
Removing the seat belt tted base 7
Folding away the support leg 7
Care and maintenance 8
Warranty 8
* Style may vary.
** Phillips screwdriver required (not supplied)

5
The Babyx base can be used on any forward facing passenger seat which has ISOFIX brackets or
which has a 3-point seat belt (i), so long as there is no active airbag in place. The child restraint cannot
be used with a 2-point lap belt (ii).
IMPORTANT: If you wish to install your Babyx base in a location where an airbag is tted, then the airbag
must be disconnected at an authorized service centre. Some vehicles may be equipped with a switch which
allows you to manually switch the airbag o. It is important to always check if the vehicle’s indicator light shows
that the airbag is turned o.
WARNING: Never use on a seat with an active airbag
WARNING: Never use on rearward or side facing vehicle seats
WARNING: Air bags are designed for adults and can seriously harm your child in a crash.
Allowed and disallowed positioning of the Babyx base.
Attach the belt lock-o clip (L) to the backrest (A). Insert the two tubing ends of the backrest into the two
holes at the rear of the base. Ensure the backrest is pushed down into the base and then secure the
backrest using screws (N). Tighten the screws using a Phillips screwdriver (not supplied).
2
1
Front passenger seat (no active airbag) Yes
Front passenger seat (active airbag) NO
Forward facing seat with 3-point seat belt Yes
Seat with 2-point seat belt NO
Forward facing seat with ISOFIX brackets Yes
Side facing seats NO
Rear facing seats NO
Allowed And Disallowed Positioning Of The Base
Assembling The Base
Never install a child restraint in a passenger seat
where an active airbag is tted.

6
Release the ISOFIX arms (I) from the plastic clips and fold the arms out fully
Press the leg adjustment button (E) and pull the foot (F) back as indicated to release it from its
storage slot. Unfold the leg (D) until it locks in place.
The ISOx brackets are located between the joint of the backrest and base of the vehicle’s
seat.
The supplied ISOx-guides (M) may assist you in locating these brackets, and they will also
help protecting the vehicle’s upholstery.
Place the base on the passenger seat. Push the ISOx arms (I) through the guides and clip
them onto the brackets. Once there is an audible click and both indicators (H) are green they
are properly secured. To remove the Babyx base, push down both of the release buttons (G).
IMPORTANT: check that both ISOFIX arms have locked in place on to the anchor points and
that both indicators (H) are green.
Press the leg adjustment button (E) and extend the leg until the foot (F) is rmly on the oor of
the car.
The base is now ready for the Babyx car seat to be attached (see step 15)
The ISOFIX arms (I) are not required when installing with the vehicle seat belt. If the arms have been
extended then you will need to fold them away before attempting to t the base.
Rotate both of the ISOFIX arms (I) downwards until they lock away.
Press the leg adjustment button (E) and pull the foot (F) back as indicated to release it from its
storage slot. Unfold the leg (D) until it locks in place.
Place the base on a suitable passenger seat. Pull out enough of the seat belt so that you can
pass both the diagonal and lap sections under the belt-hooks (J) and fasten the buckle. Push
the base down tight on to the seat and pull the seat belt tight, removing all slack. Finally attach
the belt lock-o clip (L) around the seat belt just above the buckle.
Installing With ISOFIX Anchor Points
Installing With Vehicle Seat Belt
3
10
4
11
5
12
6
7
8
9
Never install a child restraint in a passenger seat
where an active airbag is tted.

7
Place the infant carrier onto the base and push down until you hear the child seat click into
place. Pull up on the infant carrier’s handle to check that the child seat is locked in position and
cannot detach from the base. Finally rotate the carry handle from position (1) to position (2) as
shown.
To remove the infant carrier from the base push the seat release handle (C) and lift the child seat from
the base.
WARNING! Always ensure your child is fastened securely in the infant carrier using the integral
harness system before lifting or carrying the infant carrier. Failure to do so may injure your child.
Attaching And Removing The Infant Carrier
Press the leg adjustment button (E) and extend the leg until the foot (F) is rmly on the oor of
the car.
Check that the base is rmly attached and is not able to slip and that there are no twists or slack
in the seat belt.
The base is now ready for the Babyx car seat to be attached (see step 15)
15
13
14
Push down on both ISOFIX release buttons (G) and slide the base out from the ISOFIX guides.
Rotate both of the ISOFIX arms (I) downwards until they lock away.
Removing The Base
16
17
Removing The ISOFIX Fitted Base
Remove the belt lock-o clip (L), unbuckle and remove the seat belt.
18
Removing The Seat Belt Fitted Base
Press the leg adjustment button (E) and push the foot (F) upwards.
Turn the base on its side and push the tab (i) on the foot (F) towards the hole (ii) on the
underside of the base.
Hold down the leg adjustment button (E) and slide the foot (F) in or out, as necessary, so that
the tab on the foot slots into the hole on the underside of the base. Once in the hole release the
leg adjustment button (E) and slide the foot in the direction of the red arrow. The leg should now
be locked into it’s storage position and should not move.
19
20
21
Folding Away The Support Leg

8
Care And Maintenance
Any plastic parts of the Babyx base can be cleaned with mild detergent and water. Do not use
aggressive chemicals containing solvents etc, as this can cause damage to the plastic and
compromise the safety of the ISOFIX base.
All materials used in the Babyx base are recyclable and should be recycled as per your local
legislation. Ask your local recycling centre for advice when recycling this product.
Do not make any modications or alterations to the Babyx base other than those described
in this instruction manual. Follow the instructions in this manual carefully. Any repairs must be
carried out by the manufacturer or agent.
Warranty
The Babyx base is covered by a 24 month warranty from date of purchase. Ensure you save
your receipt and bring it to your place of purchase should you have any warranty issues. The
warranty does not cover:
* Normal wear and tear
* Damage due to incorrect use, neglect or accident
* If repairs have been carried out by a third party

9
SE
Babyx Bas är klassicerad som ”Semi-Universal grupp 0+” för användning tillsammans med ISO/
R1 framåtvänt babyskydd och avsedd för barn från födseln och upp till 13 kg. Den är också godkänd
enligt ECE R44/04, den senaste europeiska standarden för barnsäkerhet.
Basen kan användas i alla passagerarsäten med Isox förankringspunkter men ska aldrig monteras
på ett säte med en aktiv airbag.
Montera aldrig basen på ett säte med aktiv airbag. Om du ändå vill montera Babyx Bas på
platsen måste du koppla ur airbagen hos en auktoriserad verkstad. Vissa bilar har ett manuellt
urkopplingsreglage för airbagen. Det är viktigt att kontrollera att indikeringslampan i bilen visar att
airbagen är urkopplad.
Använd alltid stödbenet när du monterar Babyx Bas. Stödbenet är en mycket viktig säkerhetsdetalj
som är utformad för att maximera barnets säkerhet vid en olycka.
Försök inte montera basen utan att använda Isox-guiderna (M). Det riskerar att skada bilsätet och
klädseln.
Demontera eller ändra inte någon del på Babyx Bas, och lägg inte heller till någon del. Eventuella
ändringar och modieringar kan innebära fara för barnet eller passagerarna, och medför att garantin
slutar gälla.
Läs instruktionerna noga innan du monterar Babyx Bas. Om du är osäker på om du gjort rätt,
kontakta din återförsäljare som kan visa dig korrekt montering. Felaktig montering innebär fara för
ditt barn.
Förvara instruktionsboken i förvaringsckan (K) på basen.
Läs denna instruktionsbok innan du monterar Babyx Bas i bilen. Mer information och
monteringslmer nns på www.axkid.com.
Tack för att du valt en bas för babyskydd från Axkid. Vårt team har över 30 års erfarenhet inom
barnsäkerhet, och vi har gjort vårt yttersta för att Babyx Bas ska bli så säker som möjligt. Basen har
utvecklats för att användas tillsammans med Isox förankringspunkter eller bilens bilbälte. För maximal
säkerhet för barnet är det viktigt att tänka på följande:
Viktig information
Babyx Isox Bas
Instruktionsbok
Bakåtvänd fäst med Isox 0-13 kg
Bakåtvänd fäst med bilbälte 0-13 kg

10
Delar
ARyggstöd HIsox-indikering
BSäteskrokar I Isox-armar
C Frisläppningshandtag för babyskydd JBälteskrokar
DStödben K Förvaringscka för instruktionsbok
E Justeringsknapp för stödben LBältesclips*
FFot M Isox-guider (x 2)
GIsox frisläppningsknapp NSkruvar** (x 2)
Innehåll
Babyx Bas är utformad för att användas tillsammans med Babyx babyskydd (grupp 0+), för barn
från födseln och upp till 13 kg. Basen kan monteras på två olika sätt beroende på hur bilen är utrustad.
Delar 10
Montera basen 11
Tillåten och otillåten placering av bilbarnstol 11
Montera med Isox förankringspunkter 12
Montera med bilbälte 12-13
Fästa och lossa babyskydd 13
Ta bort basen 13
Ta bort bas monterad med Isox 13
Ta bort bas monterad med bilbälte 13
Fälla tillbaka stödbenet 13
Skötsel och underhåll 14
Garanti 14
* Modellen kan variera.
** Phillips skruvmejsel behövs (medföljer inte)

11
Babyx Bas kan användas på alla framåtvända passagerarsäten med Isox-fästen eller
trepunktsbälte (i), under förutsättning att sätet inte har någon aktiv airbag. Basen får inte användas
tillsammans med tvåpunkts höftbälte (ii).
VIKTIGT! Om du vill använda Babyx Bas bilbarnstol på en plats med airbag måste denna kopplas ur på en
auktoriserad verkstad. Vissa bilar har ett manuellt urkopplingsreglage för airbagen. Det är viktigt att kontrollera
att indikeringslampan i bilen visar att airbagen är urkopplad.
VARNING! Använd aldrig på ett säte med aktiv airbag
VARNING! Använd aldrig på bakåt- eller sidovända säten
VARNING! Airbagkuddar är utformade för vuxna och kan skada barn allvarligt vid krock.
Tillåten och otillåten placering av Babyx Bas.
Fäst bältesclipset (L) på ryggstödet (A). För in ryggstödets två rörändar i de båda hålen baktill på basen.
Kontrollera att ryggstödet har tryckts ned ordentligt i basen och skruva sedan fast det med skruvarna
(N). Dra åt skruvarna med en Phillips skruvmejsel (medföljer inte).
2
1
Främre passagerarsäte (utan aktiv airbag) Ja
Främre passagerarsäte (med aktiv airbag) NEJ
Framåtvänt säte med trepunktsbälte Ja
Säte med tvåpunktsbälte NEJ
Framåtvänt säte med Isox-fästen Ja
Sidovänt säte NEJ
Bakåtvänt säte NEJ
Tillåten och otillåten placering av bas
Montera basen
Montera aldrig basen på ett säte där det nns en
aktiv airbag.

12
Lossa Isox-armarna (I) från plastclipsen och fäll ut armarna helt.
Tryck på stödbenets justeringsknapp (E) och dra foten (F) bakåt så som visas på bilden för att
lossa den från förvaringspositionen. Fällt ut benet (D) tills det låser fast i rätt position.
Isox-fästena sitter mellan ryggstödet och själva sätet.
De medföljande Isox-guiderna (M) kan hjälpa dig att hitta fästena, och de skyddar dessutom
bilklädseln.
Placera basen på passagerarsätet. För in Isox-armarna (I) genom guiderna och sätt fast dem
i fästena. När det hörs ett klickljud och båda indikatorerna (H) är gröna sitter de korrekt. När du
sedan vill lossa Babyx Bas trycker du in båda frisläppningsknapparna (G).
VIKTIGT! Kontrollera att båda Isox-armarna har låst fast i förankringspunkterna och att båda
indikatorerna (H) är gröna.
Tryck på stödbenets justeringsknapp (E) och dra ut benet tills foten (F) står stadigt mot
bilgolvet.
Basen är nu klar att användas tillsammans med Babyx babyskydd (se steg 15).
Isox-armarna (I) behöver inte användas när basen fästs med bilbälte. Om armarna fällts ut behöver
du vika tillbaka dem innan du monterar basen.
Vrid båda Isox-armarna (I) nedåt tills de låser fast.
Tryck på stödbenets justeringsknapp (E) och dra foten (F) bakåt så som visas på bilden för att
lossa den från förvaringspositionen. Fäll ut benet (D) tills det låser fast i rätt position.
Placera bilbarnstolen på ett lämpligt säte. Dra ut bilbältet så att du kan föra både den diagonala
delen och höftdelen under bälteskrokarna (J) och fäst spännet. Tryck ned basen tätt mot
sätet och dra åt bilbältet ordentligt, så att det är helt sträckt. Fäst bältesclipset (L) runt bilbältet
ovanför spännet.
Montera med Isox förankringspunkter
Montera med bilbälte
3
10
4
11
5
12
6
7
8
9
Montera aldrig basen på ett säte där det nns en
aktiv airbag.

13
Placera babyskyddet på basen och tryck nedåt tills du hör att det klickar på plats. Dra
babyskyddets handtag uppåt och kontrollera att det låst fast ordentligt och inte kan lossa från
basen. För sedan bärhandtaget från läge (1) till läge (2) så som visas på bilden.
Lossa babyskyddet genom att trycka på babyskyddets frisläppningshandtag (C) och lyft upp det
från basen.
VARNING! Kontrollera alltid att barnet är korrekt fastsatt med babyskyddets bilbälte innan du lyfter
eller bär barnet i babyskyddet. Annars riskerar barnet att skadas.
Fästa och lossa babyskydd
Tryck på stödbenets justeringsknapp (E) och dra ut benet tills foten (F) står stadigt mot
bilgolvet.
Kontrollera att basen sitter fast ordentligt och inte kan glida åt något håll. Kontrollera också att
bilbältet är helt sträckt och inte vridit sig.
Basen är nu klar att användas tillsammans med Babyx babyskydd (se steg 15).
15
13
14
Tryck ned båda frisläppningsknapparna för Isox (G) och dra loss basen från Isox-guiderna.
Vrid båda Isox-armarna (I) nedåt tills de låser fast.
Ta bort basen
16
17
Ta bort bas monterad med Isox
Lossa bältesclipset (L), lossa och ta bort bilbältet.
18
Ta bort bas monterad med bilbälte
Tryck på stödbenets justeringsknapp (E) och dra foten (F) uppåt.
Lägg basen på sidan och tryck den lilla iken (i) på foten (F) mot hålet (ii) på undersidan av
basen.
Tryck in stödbenets justeringsknapp (E) och för in eller ut foten (F) så mycket som behövs för
att iken på foten ska passa in i hålet på undersidan av basen. När iken passat in i hålet släpper
du stödbenets justeringsknapp (E) och för foten i den röda pilens riktning. Benet ska nu vara
fastlåst i förvaringsläge och inte röra sig.
19
20
21
Fälla tillbaka stödbenet
Other manuals for Babyfix
2
Table of contents
Languages:
Other Axkid Car Seat manuals

Axkid
Axkid ENVIROKID User manual

Axkid
Axkid Grow User manual

Axkid
Axkid Mate User manual

Axkid
Axkid MODUKID INFANT 2 User manual

Axkid
Axkid Bigkid 2 User manual

Axkid
Axkid Kidzone User manual

Axkid
Axkid Babyfix User manual

Axkid
Axkid Minikid User manual

Axkid
Axkid Modukid User manual

Axkid
Axkid Move User manual

Axkid
Axkid Nextkid User manual

Axkid
Axkid Babyfix User manual

Axkid
Axkid Wolmax User manual

Axkid
Axkid GROW ISOFIX BS05-T User manual

Axkid
Axkid Modukid User manual

Axkid
Axkid Duofix User manual

Axkid
Axkid Bigkid User manual

Axkid
Axkid Minikid User manual

Axkid
Axkid Rekid User manual

Axkid
Axkid Minikid User manual