Ayudas Dinamicas Eclipse User manual

ECLIPSE
INDEX
1. Introduction............................................... .................................................. ...3
2. Safety information ............................................. ..................................3
2.1. Before driving …………………………………………………… ..3
2.2. While driving ………………………………………………….… ..4
23. Labeling ………………………………………………………. …… ..5
3. The parts of the scooter ............................................ ........................................ 6
4. Operation ………………………………………………………………… .... 7
4.1. How to operate your scooter ………………………………… ... 7
4.2. How to set the parking brake …………………… .13
4.3. Handlebar adjustment …………………………………………………… 14
5. Batteries and charger ……………………………………………………………… 16
5.1. Charge the batteries ………………………………………………… ..16
5.2. Charger …………………………………………………………… ... 18
5.3. Battery ……………………………………………………………… ... 18
6. Inspection and maintenance ………………………………………………… .... 19
6.1. Daily checks …………………………………………………… ..19
6.2. Regular record of reviews …………………………………… ..20
6.3. Battery, brake and tire circuit ………………………… ..20
6.4. Maintenance …………………………………………… .. ………… 21
6.5. Storage ……………………………………………….….… 22
7. Basic troubleshooting ………………………………………… .. …… .22
8. Specifications ………………………………………………………… .......… .24
9. Warranty ……………………………………………………………………….… ..25
10. Tips for safe driving of the scooter …………………. …… ..26
11. User registration ………………………………………………………. …… 30
2

ECLIPSE
1. INTRODUCTION
Thank you and congratulations for purchasing your new mobility scooter from Ayudas
Dinámicas, SL
We are pleased to provide you with safe and comfortable products. Our goal is
to ensure your complete satisfaction. We sincerely hope you enjoy your Mobility
Scooter from Ayudas Dinámicas, SL
Please read the warnings and instructions provided in the instruction manual
carefully before operating the various functions of this Scooter.
This manual includes operating instructions for every aspect of the scooter,
assembly / assembly instructions, as well as a guide and tips for safe use.
This manual is written for your Eclipse only.
The symbols used in this manual are explained below. Read carefully,
especially the parts marked with these symbols
Improper use can cause serious damage.
Warning
Improper use can cause damage.
Caution
Follow these instructions to keep the scooter running
correctly.
Suggestion
Please keep this manual in a safe place for future use.
If someone else uses the scooter, please be sure to provide them with the instruction
manual for the scooter you purchased. The manufacturer reserves the right to make
design modifications without prior notice.
2. SAFETY INFORMATION
2.1 BEFORE DRIVING
You should be familiar with the operation of this scooter before riding it,
therefore keep these safety notices in mind.
The same traffic rules for pedestrians apply to the use of this scooter.
For your safety and that of others, please observe the rules that apply to
pedestrians.
- Ride on the pavement / sidewalk, park paths or pedestrian areas. Only
ride your scooter on the road when crossing or if there are no existing
sidewalks.
- At the end of a sidewalk, be aware of traffic on the road.
3

ECLIPSE
- Be very careful when riding your scooter where there is heavy
traffic and busy pedestrian areas.
- Do not use your scooter after drinking alcohol, when you feel tired or
under medication.
- Do not use your scooter at night.
- Always follow the pedestrian traffic lights.
Practice driving your scooter
Until you are familiar with the operation of your scooter, please practice in a wide,
open area, such as a park. To prevent the possibility of falling off your scooter
while riding, be aware of your physical condition. Be careful when accelerating,
braking, turning, reversing and moving up and down slopes.
- Please set the speed selector to the lowest speed during initial practice.
- Make sure someone accompanies you and watches the traffic when driving for
the first time.
- Make sure you are able to control and operate your scooter
safely and confidently before shifting to a higher gear.
The eclipse is strictly limited to a single passenger.Do not
carry passengers on your scooter, included children.
Do not use this scooter to carry or transport excessively heavy goods.
The maximum weight you can carry is (including goods) 135kg / 300lbs. The
maximum load weight of the basket is 3kg / 6lbs.
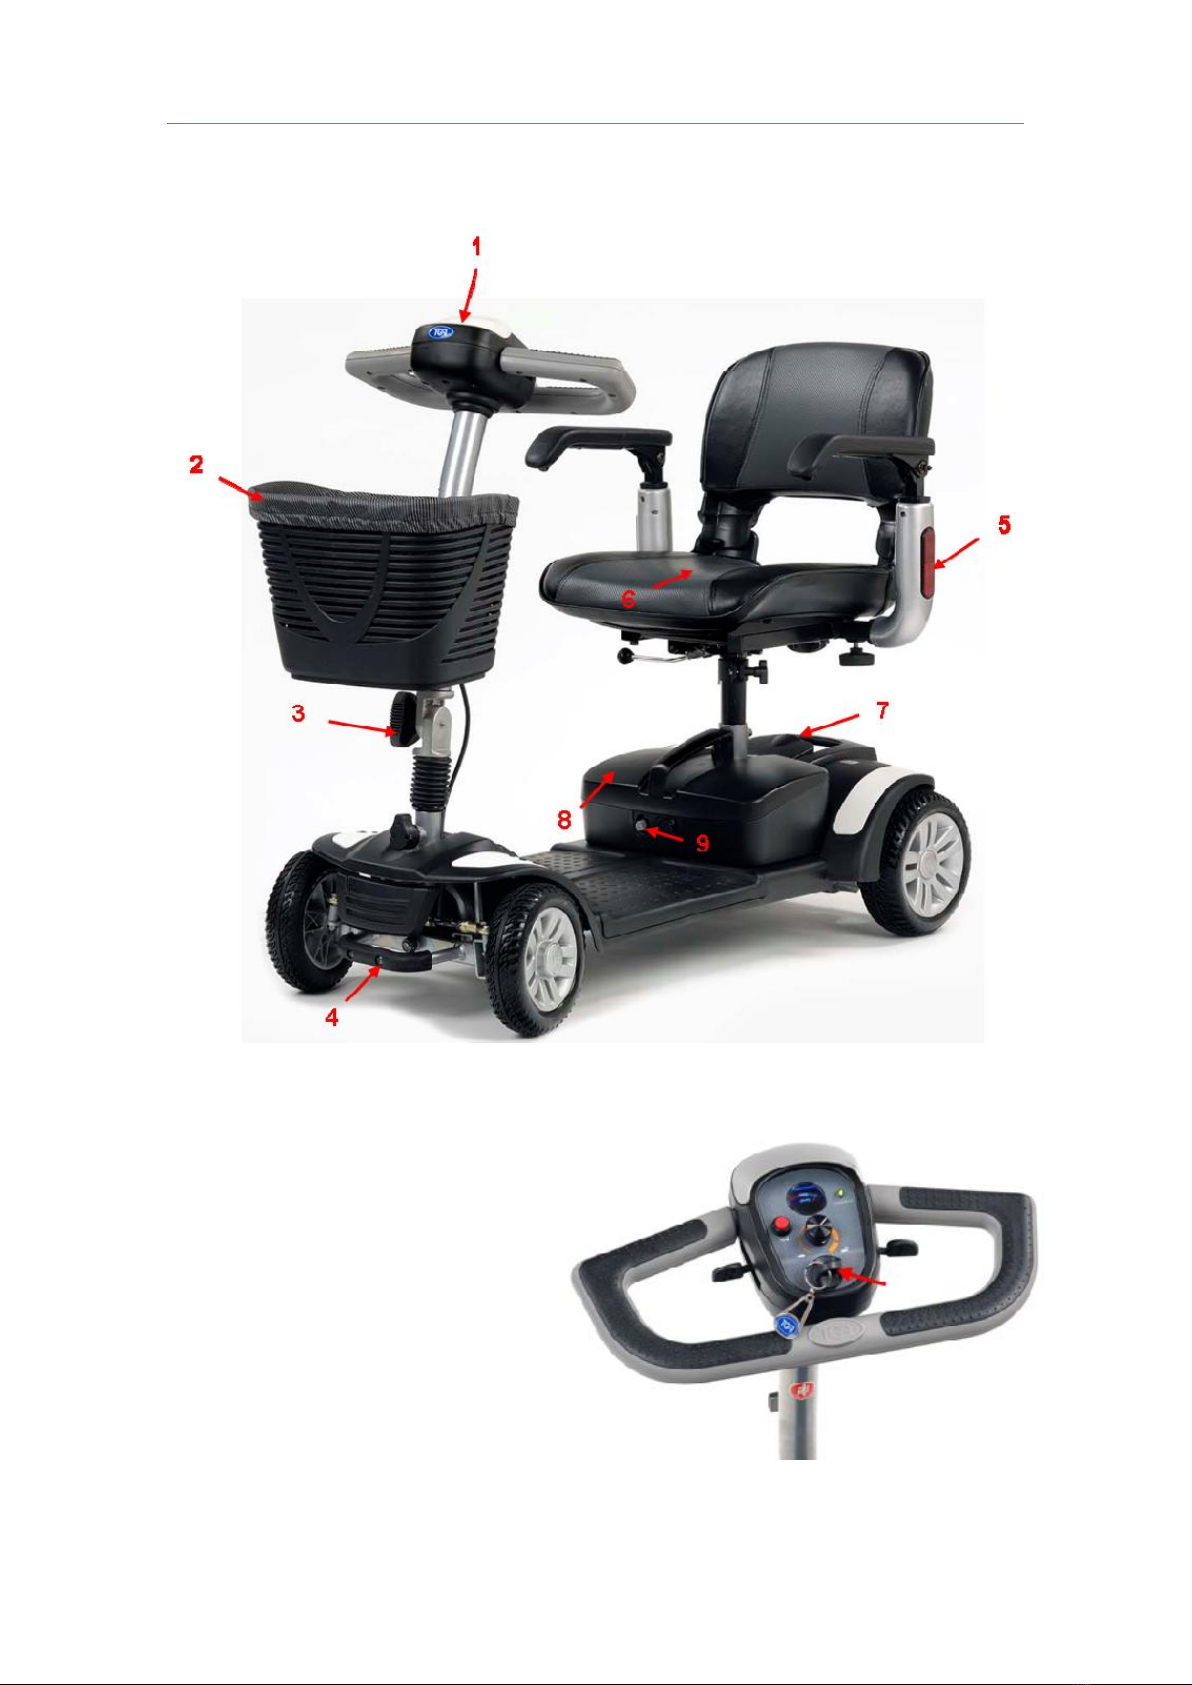
2.2 WHILE DRIVING
Please carry out daily inspections. See the
"daily check" section.
Do not stretch your body off the scooter.
Such action can cause you to lose your balance or be injured. Pay
attention to loose clothing, they could get caught in the wheels.
Use extreme caution in the following circumstances and do not use your
scooter when conditions are too dangerous.
Uneven or shaky ground, for example, mud, loose gravel, potholes, snow, or a
canal.
Avoid holes where the wheels can get caught.
Do not drive at night or during unfavorable weather conditions. Do not make
sharp turns.
4

ECLIPSE
Don't get on an escalator.
Mobile phones and other electrical equipment.
Do not use a mobile phone or other wireless communication device while
driving, although it is always helpful to carry one with you in an
emergency.
Do not charge a mobile phone or other electrical devices from your scooter.
Ramps, slopes and potholes.
Be careful when driving down a steep ramp. See Slope Angle section in section 8
SPECIFICATIONS.
When climbing a sloping road, please drive slowly and carefully. When going
down a hill, do not reverse your scooter, put the speed selector at a low
speed.
Do not drive through holes in the road. See the MAX section. DISTANCE TO
THE GROUND.
Avoid deep water.
Please drive slowly when driving on bumpy roads. Do not make sharp
turns when driving on gravel roads or ramps.
WARNING! Do not put the vehicle in “freewheel” mode
(disengaged) when driving uphill or downhill.
Maximum user weight limit
See section MAX. LOAD WEIGHT in section 8. Overloading the scooter can lead to
a malfunction and is a safety hazard. The warranty does not cover damage due to
overcharging.
2.3 LABELING
Please read all the labeling on the scooter before riding it. For your
future need, do not remove them.
WARNING!
- Do not operate the scooter unless the handlebar column is upright
and locked in place.
- Do not lean against or forward on the handlebars while getting on or off the
motorcycle. Serious damage or injury may occur to you. Rotate the seat and mount
and dismount in a controlled manner.
- The manufacturer disclaims liability for personal injury or material
damage that may occur as a result of improper and unsafe use of the
product.
5

ECLIPSE
IMPORTANT ANNOUNCEMENT
- Make sure the speed control lever is not depressed before starting your
scooter.
- In order to avoid injury or damage to the scooter, the rider must not lean on
or pull the control lever while going up or down a slope.
3. THE PARTS OF THE SCOOTER
1. Control panel 11. Battery meter
2. Basket 12. Horn button
3. Handlebar adjustment 13. Speed dial
4. Handle for lifting by hand 14. Speed control levers
5. Removable folding armrest 15. Diagnostic light and power ON /
OFF OFF
16. Key6. Removable swivel seat with
folding backrest
7. Device connection 17. Handlebar grips
8. Battery 18. “Freewheel” mode lever
(clutch)
19. Anti-tip wheels9. Charging plug
10. Handlebar lock
6

ECLIPSE
4. OPERATION
4.1 HOW TO USE YOUR SCOOTER
Ignition switch
Turn the key to turn ON or OFF:
OFF:
Unit turns on Unit
turns off
7

ECLIPSE
Forward, backward and braking.
- Push the speed control lever on your right forward with your right
thumb and the scooter will move forward.
- Push the speed control lever of your left lever forward with your left
thumb and the scooter will move backwards.
- If desired, you can hold the handlebar with your right and use your left
hand to pull the lever towards you to move forward.
- If you wish, you can hold the handlebar with your left and use your right
hand to pull the lever towards you to go backwards.
- The horn will beep when the scooter is in reverse.
- If you release the speed control lever in either direction, forward or
backward, the electromagnetic engine brake will activate and stop the
scooter.
- Your scooter can be adapted to allow a left-handed steering wheel. If
this has been done, ignore points 1 and 2. The left thumb will control
the forward movement and the reverse movement of the right thumb.
Horn button
The horn is activated when the button is pressed, release the button, and the sound
will stop.
Braking
Electromagnetic brake: Release the throttle lever, the electromagnetic brake
will be activated.
WARNING!
Never try to drive, or even sit in your vehicle while it is
"freewheeling" (disengaged) (automatic engine brake off). The braking
electronics will be disabled and the vehicle could roll uncontrollably.
Seat
The seat can be rotated 90 degrees. Pull the swivel seat lever to rotate the seat.
The seat has 4 height adjustments.
After adjusting the height to the desired position for the seat, secure it with the
safety pin.
8

ECLIPSE
CAUTION!
Make sure the seat is locked straight ahead before driving.
Handlebar lock
The scooter has a handlebar lock function, press and turn the handlebar lock
button to lock it, see fig. 4.1.1. Turn the knob to the left to unlock the handlebar,
see fig. 4.1.2. This is only to be used when the scooter is disassembled, either for
transport or storage.
Fig. 4.1.1 Lock mode. 4.1.2 Unlock mode
CAUTION!
Never ride the scooter with the handlebar in the locked position.
Parts
The scooter can be disassembled into five parts: the seat, the front, the basket,
the battery, and the rear section.
9

ECLIPSE
- Place the scooter in an area where you have enough space to move
the parts around. You may need help removing some of the
components from the scooter.
- See "Specifications" for individual component weights.
- No tools are required to disassemble or assemble your scooter. It
can always be disassembled or mounted on a level, dry surface with
enough room to work and move around your scooter. Note that the
sections removed from the scooter take up more space than those
mounted on the scooter.
CAUTION!
Lifting weight beyond your physical capacity can result in personal injury.
Ask for help when necessary when disassembling or assembling your
scooter.
Disassembly
1. Turn the key to "OFF".
2. Rotate the handlebar lock to the locked position.
3. The handlebar column can be tilted downwards (see Fig. 4.
1.3).
4. Make sure the wheel “Freewheel” (clutch) mode lever is in the drive
position (automatic engine brake engaged).
5. Pull up on the rotary release lever to remove the seat from the
seat tube.
6. Lift the battery and remove it from the scooter. (See Fig. 4.1.3)
7. After pushing the connecting device up, pull the front part forward.
(Fig. 4.1.4 and Fig. 4.1.5)
10

ECLIPSE
Assembly / assembly
Note: Raise the handlebars before getting back on the bike.
1. Make sure the “Freewheel” (clutch) mode lever is in the drive
position.
2. Fit the rear section at the top and make sure the front section hook is
connected to the rear section shaft. (See figure 4.1.6).
eleven

ECLIPSE
3. Adjust the front and rear sections (See figure 4.1.7)
4. Put the battery in the scooter and make sure it is in the correct
position.
5. Adjust the seat on the anchor tube until the steering lock clicks.
6. Turn the key to "ON", make sure the battery indicator has sufficient
charge.
CAUTION!
- Make sure that all the parts are fitted well.
- Turn off the switch with your scooter's key and remove the key to avoid
accidents before disassembling or assembling the scooter.
- Be very careful and take precautions to avoid entrapment of fingers
during assembly.
- Make sure all parts are fully and correctly installed before riding.
Battery meter
When the key is "ON", the battery indicator shows the
battery charge capacity by indicating red, yellow and
green areas,
respectively.
12

ECLIPSE
The green zone indicates a full battery charge. The red color indicates the low
load zone.
The remaining energy indicated by the indicator may vary by time and type of
driving. Repeated starts, stops or rises consume energy more quickly.
SUGGESTION
- It is recommended to charge the battery immediately when the
battery indicator is in the red zone.
- After charging or replacing a new battery, drive the scooter for 2-3
minutes to ensure that the battery capacity is sufficient.
- In winter the battery may take longer to charge and the travel distance may
be shortened.
When driving on an incline, the battery indicator light may turn from
green to red, this is normal, please don't worry.
Even if the battery is used correctly, it is natural for the battery capacity to
deteriorate over time, thus resulting in a shortened travel distance
compared to a new battery. So, when you see that the travel distance is only
about 50% of the travel distance of a new battery, it is time for a
replacement. Please go to your dealer and request replacement. Continuing
to use the battery when its useful life has expired could result in a decrease
in travel distance.
Travel distance is shortened when driving frequently on slopes, as
this leads to higher energy consumption.
4.2 HOW TO SET FREE WHEEL MODEDriving mode
Push the “Freewheel” (clutch) lever of the scooter towards the rear of the
motorcycle and the scooter will be driven by the motor.
Freewheel mode (disengaged)
(Fig. 4.2.2): Push the Freewheel lever forward of the scooter and the scooter
can be pushed manually.
13

ECLIPSE
Fig. 4.2.1 Driving mode
(clutched)
Fig. 4.2.2 Freewheel mode
(disengaged)
4.3 ADJUSTING THE HANDLEBAR
The handlebar can be adjusted with the following steps.
1. Turn the thread counterclockwise to loosen it (Fig. 4.3.1).
2. Adjust the angle of the handlebar to the desired position, turn the steering wheel
clockwise to tighten it.
Fig. 4.3.1
14

ECLIPSE
Driving his scooter
1. Make sure the seat is installed correctly and in a straight line.
2. Make sure the steering column is in a comfortable and secure
position as described above.
3. Make sure the electromagnetic brake is in drive mode as
described above.
4. Make sure the handlebar lock is in the unlocked position
'(figure 4.1.2).
5. Make sure the speed control lever is not accidentally
depressed and turn the key to "ON".
6. Check the battery meter to see if there is enough power for your trip.
If you have doubts about the remaining charge, please charge the
battery before departure.
7. Set the scooter to a safe speed with the speed dial.
8. Be aware of traffic and pedestrians and make sure it is safe to ride.
CAUTION!
- Do not press both the right and left hand on the side speed control levers,
this can lead to a loss of control of your scooter.
- Do not put it in the highest speed in closed areas.
- Do not adjust the speed selector while driving, the sudden change
in speed can be dangerous and cause your scooter to malfunction.
- Do not place magnetic devices near the scooter operation controller
area, this could affect the operation unit of your scooter.
- When backing up, pay attention to people or objects behind you.
About driving speed.
The speed scale is printed on the dial label, and ranges from 1 to 10. The "10"
scale means that the speed is maximum; please refer to the paragraph "MAX.
SPEED" in section 8.
fifteen

ECLIPSE
SCALE OF
SPEED SPEED RECOMMENDATIONS
Speed equivalent to walking slowly.
- Use it when driving on steep or steep slopes.
- Use when driving indoors or in tight spaces
Speed equivalent to walking at a medium pace.
- Use it when riding outdoors on firm, smooth ground.
1-3
4-6
Speed equivalent to walking briskly.
- Use it when driving in an open space without risk.More than 7
Parking lot
1. Release the speed control lever fully and the scooter will naturally brake
and stop.
2. Turn the key to OFF. Then remove the key (only after stopping).
CAUTION!
- The stopping distance will vary according to your speed, the weight of the
user and the inclination of the plane, please start braking as soon as
possible.
- While parking your scooter, make sure you park on level ground and then
turn the key to "OFF".
5. BATTERIES AND CHARGER
The batterys that incorporates the scooter Eclipse, are from 21A / H, offering a
greater range.
5.1 CHARGING THE BATTERY
Be sure to follow the procedures listed below in sequence.
1. Turn the scooter key to "OFF".
2. Open the cover of the charging connector on the scooter cover,
and then connect the plug of the charger to the charging socket.
3. Connect the charger cable to the electrical outlet.
16

ECLIPSE
4. The charger LED light will be orange at the start of a charge. The
duration of the charge is at least 6 - 8 hours, but this varies depending on
the condition of the battery and factors such as temperature.
5. The orange LED will turn green when charging is complete.
6. Disconnect the cable and remove the round connector from the charging socket.
SUGGESTION
1. Do not disconnect the charger cable if charging is not completed. Battery
life will be shortened if the battery is used repeatedly without being fully
charged. Therefore, be sure to fully charge the battery at all times.
2. Keep charging until the green LED is on. NEVER stop charging before
charging is complete.
3. Unplug the power cord when charging is complete.
4. If your scooter is not used for a long period of time, it should be charged
at least every 6 to 8 weeks to keep the battery in optimal condition.
5. Charging time will be affected by ambient temperature so it will take
longer in winter.
17

ECLIPSE
CAUTION!
Please follow the following rules to avoid accidents during charging.
- Please use only the supplied charger and fully charge the battery each
time. The battery could be damaged if an incompatible charger is used.
- Never disassemble or tamper with the charger.
- Do not charge in a space that is directly exposed to sunlight. Do not charge
in a space where there is moisture, in the rain or morning dew.
- Do not cover the scooter with any waterproof cloth or other objects
while it is charging.
- Do not charge at temperatures below -10 ° or above 50 °, the charger
may not work properly and the battery may be damaged.
WARNING!
- Stay away from flammable objects while charging the battery.
- Do not smoke while charging. Always charge the battery in a well-
ventilated space.
- Do not connect or disconnect the plug or cord with wet hands.
5.2 THE CHARGER
The red LED on the charger will light up when you plug it into the outlet. The
orange LED will turn green when charging is complete.
5.3 BATTERY
Do not expose the battery to temperatures below -10 ° C or above 50 ° when charging or
storing the motorcycle.
Exceeding the specified temperature ranges can lead to overheating or freezing
of the battery. This could possibly damage the batteries and shorten their life.
The type of battery used in your scooter is sealed and maintenance free.
18

ECLIPSE
SUGGESTION
- Do not use the battery to charge any other equipment.
- Battery capacity depends on external conditions, driving distance will be
shorter during winter.
- If the scooter is not going to be used for a long time, please recharge the
battery every 6 to 8 weeks and always fully charge it before putting it into
storage.
- There are two batteries inside the battery box, always replace the two
batteries at the same time, with batteries of the same brand and
specification.
- For best results and extend battery life,
try to drain / discharge the battery by at least 50% before recharging
And, in addition, it is always best to cycle one full charge at a time.
- To get the best results from your batteries you really need to cycle full
discharges and recharges for the first 10-15 charges. This means
discharging the battery as much as you can safely and then giving it a full
charge. Until these cycles are carried out, it will not function at full
capacity. You will notice that the distance the Eclipse can travel will
gradually increase during the first few weeks of use, as the batteries reach
their optimum level of efficiency after approximately 12 discharge and
recharge cycles.
6. INSPECTION AND MAINTENANCE
6.1 DAILY CHECKS
Check the following items before driving. If you find anything abnormal, go or
call your dealer for an inspection before use.
ITEM CONTENT INSPECTION
Is it well attached?
Can it be rotated smoothly?Handlebar
Speed dial Can it be adjusted and does it work well?
Does the scooter move when you press the lever? Does
the scooter stop when you release the lever?
Speed control lever
19

ECLIPSE
Is there any abnormal noise from the engine?
Does the electromagnetic brake work well?Motor
Does the “Freewheel” (clutch) mode lever work
properly?
Lever "Freewheel"
(clutch)
Does the indicator move to green when turned ON
after a full charge? Is the remaining energy sufficient
for your trip?
Battery indicator
Horn button Does the horn work?
Is the seat properly seated? Can the seat
be rotated smoothly?Seat
Are there cracks or other damage to the tires?
Check the tire treadWheels
Is there any abnormal noise?
Is there an oil leak from the gearbox?Others
6.2 REGULAR RECORD OF REVIEWS
To make sure your scooter is in good condition, go to your dealer for regular
maintenance and keep a record of them. It is always advisable to have your
machine serviced at least once a year.
SUGGESTION
Even if you do not use the scooter for a long time, the scooter should be
checked regularly.
6.3 BATTERY, BRAKE CIRCUIT AND TIRESBattery
See section 5 "BATTERIES AND CHARGER".
Fuses
There are two fuses on your scooter. One is located inside the operation
panel, the other is on the battery.
SUGGESTION
Ask your dealer for help inspecting or replacing the fuse, (as the
battery has to be removed first for fuse replacement).
twenty
Table of contents