Thank you for purchasing the AZDEN PRO VHF Wireless Microphone System. The following will show you the contents
of your system:
WHX-PRO
1 x WR-PRO VHF Receiver
1 x WM/T-PRO VHF Transmier/Handheld Microphone
WLX-PRO+i
1 x WR-PRO VHF Receiver
1 x WM-PRO VHF Belt-Pack Transmier
1 x EX-503 Lavalier Microphone
WMS-PRO or WMS-PRO+i
1 x WR-PRO VHF Receiver
1 x WM-PRO VHF Belt-Pack Transmier
1 x EX-413T Wired Handheld Microphone
1 x EX-503 Lavalier Microphone
The AZDEN PRO systems operate in a low-interference VHF band and have 2 switchable frequencies: 169.445 MHz (F1)
and 170.245 MHz (F2). Two frequencies are provided so users have the opon of switching to avoid interference.
These systems cannot operate on both frequencies simultaneously. The systems conform to Part 90 of the FCC rules.
Contact the FCC office for possible locaon restricons.
WR-PRO RECEIVER
1. Loading Baery
Open the baery compartment lid by sliding it down and rising the lid. Insert a 9-volt baery into the baery
compartment with the correct polarity. Direcons are on the inside of the baery compartment. Do no force the
baery compartment lid to close. If it does not close easily, turn the baery around and try again.
2. Power/Frequency Selector Switch
This 3-posion sliding switch is used to turn the unit on and off as well as to select frequency. When not using the
WR-PRO, turn the switch to OFF.
3. Signal Indicator
This LED light will either shine RED or GREEN when the Power/Frequency Selector Switch is moved to F1 or F2 . RED
indicates that the unit is on and the baery has good voltage but there is no signal detected on the selected
frequency. GREEN indicates the the unit is receiving signal on the selected frequency. No light indicates that the
baery is dead, not installed, or the unit is off.
4. Shoe Mount
If your camera has a standard accessory shoe, you can use the included shoe mount to mount the receiver to your
camera. If your camera does not have a standard accessory shoe, you can mount the receiver with the included
hook-and-loop fastening tape.
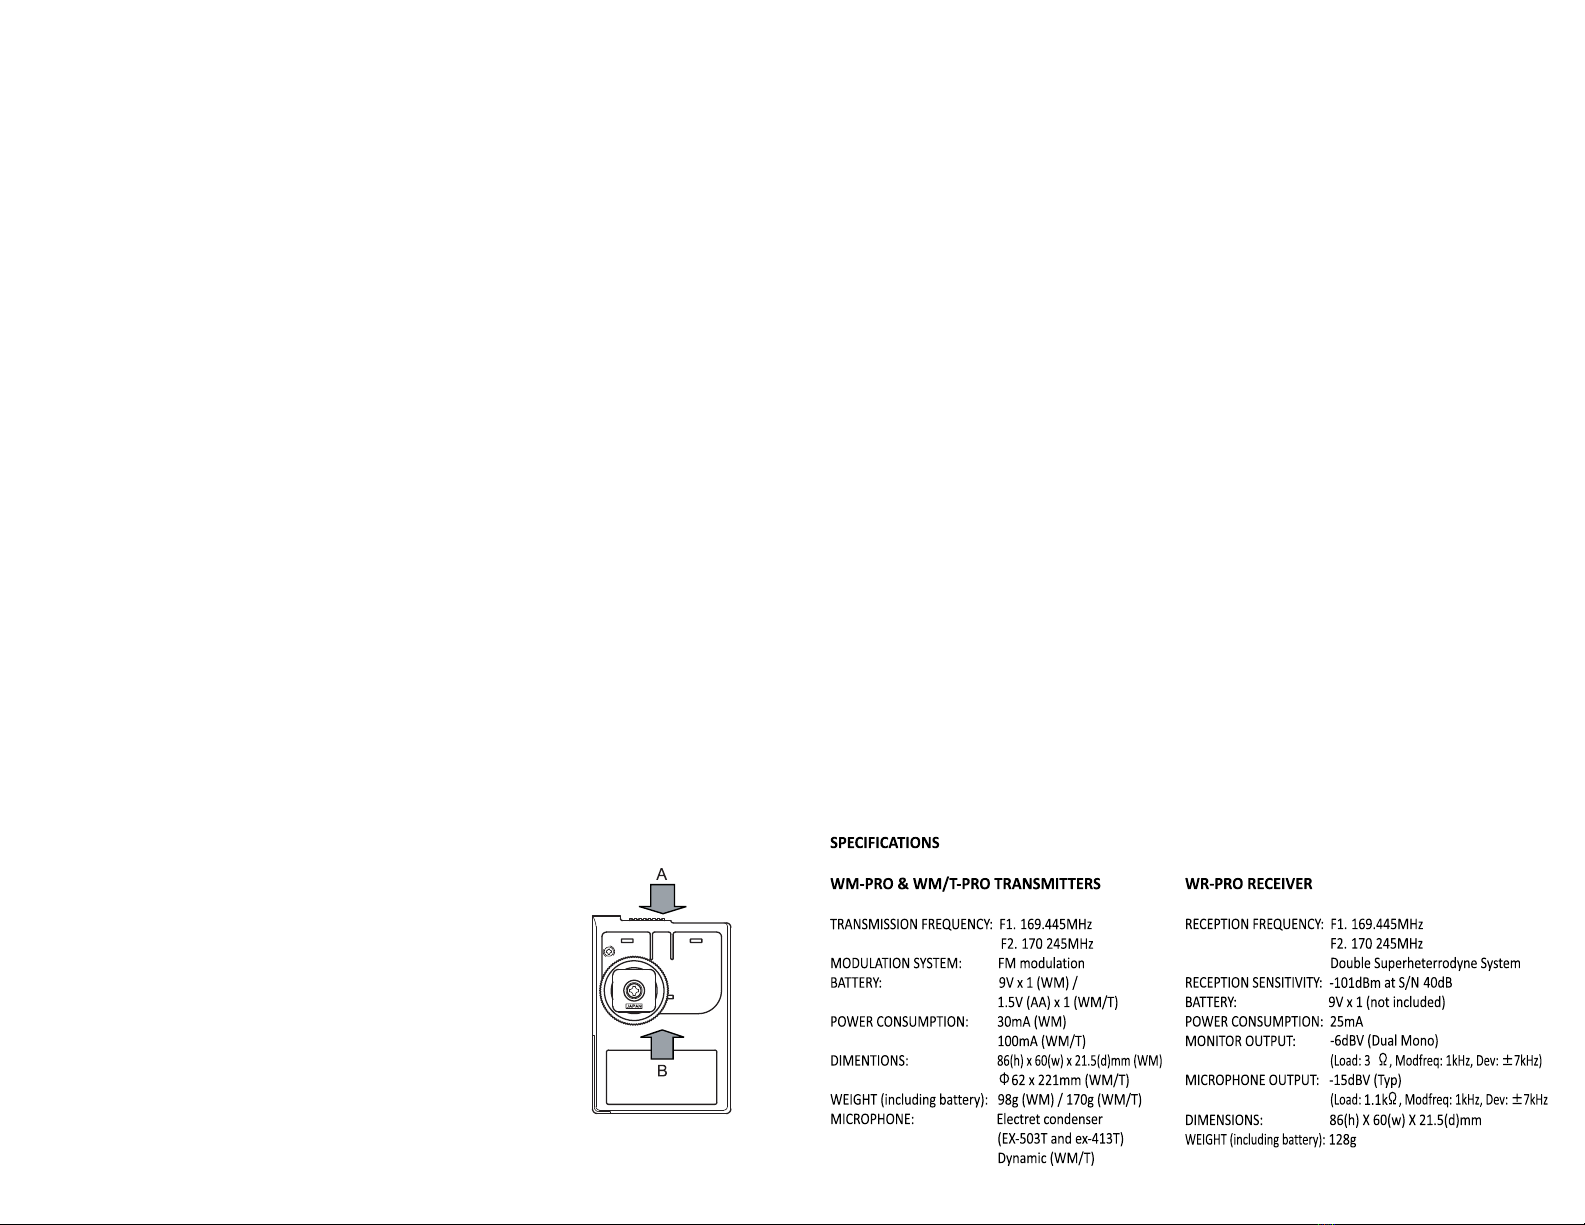
To install the shoe mount on the receiver: align the 3 pegs on the shoe mount to the
corresponding holes on the back of the WR-PRO and slide the mount upward (arrow B
in the illustraon) unl you hear a click. To detach the mount, slide the mount
downward (A).
5. Audio Output Cable
Plug one end of the cable into the receiver’s OUT jack and the other end into your
camera’s mini-jack microphone input. The receiver may be connected to other
devices in this manner (ie: portable audio recorder, mixer, etc.) so long as the input is
a 3.5 mm size audio jack and is explicitly labeled as a microphone input (not line
level).
6. Telescopic Antenna
Fully extend the antenna for the best recepon.
7. Headphone Jack
Plug headphones into this output jack to monitor audio coming from the transmier.
WM/T-PRO TRANSMITTER/MICROPHONE
1. Loading Baery
The baery cover is the handle of the microphone. Turn the boom half of the microphone body counterclockwise
unl the cover is completely off. Insert one AA baery into the compartment. Make sure the polarity is correct or
the unit will not operate. Replace the baery cover and turn it clockwise unl snug. DO NO OVER TIGHTEN.
2. Frequency Selecon
The Frequency Selector Switch can be accessed by removing the baery cover and is a small switch located at the
top of the baery compartment. The unit is factory pre-set to F1. You can change the frequency by sliding the switch
to the F2 posion. Make sure to set the receiver to the same frequency selecon before use.
3. Three-Posion Power Switch
The boom posion Is OFF, the top is ON and the middle is STANDBY. In the STANDBY posion the unit is on but the
microphone is muted. This allows the microphone to be passed around noiselessly. Remember to set this switch to
the ON posion before speaking. When not using the WM/T-PRO turn this switch to OFF.
4. Power Indicator
This LED light will shine RED when the Power Switch is pushed to the ON or STANDBY posion. No light indicates
that the baery is dead, not installed, or the unit is off.
WM-PRO TRANSMITTER
1. Loading Baery
The WM-PRO takes one 9-volt baery. Loading the baery is the same as for the WR-PRO receiver.
2. Microphone
Plug the EX-503 lavalier mic or EX-413T handheld mic into the MIC jack. Extend the cord as much as possible since it
doubles as the transmier’s antenna.
3. Power/Frequency Selector Switch
This 3-posion sliding switch is used to turn the unit on and off as well as to select frequency. When choosing F1 or
F2, make sure the receiver is set to the same. When not using the WM-PRO, turn the switch to OFF.
4. Power Indicator
This LED light will shine GREEN when the Power/Frequency Selector Switch is pushed to F1 or F2. No light indicates
that the baery is dead, not installed, or the unit is off. (Note: if your unit was manufactured before 2019, this light
will be RED instead of GREEN.)
5. Mounng
The WM-PRO Transmier can be aached to a belt using the clip provided or placed in a pocket.
Accessories Included
1 x Audio Output Cable
1 x Transmier Belt Clip
1 x Receiver Shoe Mount
1 x Hook and Loop Fastening Tape
1 x TRRS mobile adapter cable (+i versions only)
2


