Azkoyen PALMA H-70 User manual

User manual / Manuel de l’Usager
Spiral vending machine for packaged products
Distributeur automatique de produits emballés et en sachet
«PALMA H/HZ»
MANUAL REFERENCIA: 81036830; EDICIÓN 03-2015
AZKOYEN

User Manual/Manuel de l’Usager
- 2 -

User Manual/Manuel de l’Usager
- 3 -
CAUTIONS ................................................................................................................................................. 5
Chapter 1. General Characteristics........................................................................................................... 6
1.1
Products sold.................................................................................................................................. 6
1.2
Operation control........................................................................................................................... 6
1.3
Selection keyboard......................................................................................................................... 6
1.4
Refrigeration.................................................................................................................................. 6
Chapter 2. Installation and starting.......................................................................................................... 7
2.1
Electrical specifications................................................................................................................. 7
2.2
Choosing placement....................................................................................................................... 7
2.3
Starting........................................................................................................................................... 7
2.4
Initial product loading.................................................................................................................... 7
2.5
Loading returners........................................................................................................................... 7
2.6
Initial programming....................................................................................................................... 7
2.7
Running machine........................................................................................................................... 7
Chapter 3. Description of a service. .......................................................................................................... 8
3.1
Service ........................................................................................................................................... 8
3.2
Machines with product release detection (idetect) ........................................................................ 8
Chapter 4. Machine description ................................................................................................................ 9
4.1
Refrigerator.................................................................................................................................... 9
4.2
Product container shelf .................................................................................................................. 9
4.2.1
Loading products ........................................................................................................................... 9
4.3
Acceptance mechanism and coin return ...................................................................................... 10
4.4
Loading returners......................................................................................................................... 10
Chapter 5. Programming ......................................................................................................................... 11
5.1
What is programming? ................................................................................................................ 11
5.2
What do you program with? ........................................................................................................ 11
5.3
Basic menu................................................................................................................................... 12
5.4
Configuration of Basic Menu ...................................................................................................... 12
5.5
Rapid access to a function ........................................................................................................... 12
5.6
List of configurable functions...................................................................................................... 12
Chapter 6. Solving problems and maintenance ..................................................................................... 20
6.1
Complete breakdown. Machine is out of order. .......................................................................... 20
6.2
Partial Breakdowns...................................................................................................................... 20
6.3
Problems during a service............................................................................................................ 20
6.4
Changing Spirals.......................................................................................................................... 20
6.4.1
Changing spiral............................................................................................................................ 21
6.4.2
Assembly of the double spiral ..................................................................................................... 21
6.5
Adjustment of shelf heights......................................................................................................... 21
6.6
Changing the space between spirals ............................................................................................ 21
6.7
Changing prices ........................................................................................................................... 22
6.8
Exterior cleaning.......................................................................................................................... 22
6.9
Coin mechanism cleaning............................................................................................................ 22

User Manual/Manuel de l’Usager
- 4 -
RECOMMANDATIONS ......................................................................................................................... 23
Chapitre 1. CARACTÉRISTIQUES GÉNÉRALES............................................................................ 24
1.1 -
Produits en vente.......................................................................................................................... 24
1.2 -
Contrôle de l’opération................................................................................................................ 24
1.3 -
Clavier de sélection...................................................................................................................... 24
1.4 -
Réfrigération................................................................................................................................ 24
CHAPITRE 2. INSTALLATION ET MISE EN MARCHE ............................................................... 25
2.1 -
Spécifications électriques ............................................................................................................ 25
2.2 -
Élection de l’emplacement .......................................................................................................... 25
2.3. -
Mise en marche............................................................................................................................ 25
2.4 -
Charge initiale de produit ............................................................................................................ 25
2.5 -
Charge des restituteurs................................................................................................................. 25
2.6. -
Programmation initiale ................................................................................................................ 25
2.7 -
Machine en service ...................................................................................................................... 25
CHAPITRE 3. Description d’un service................................................................................................ 26
3.1
Service ......................................................................................................................................... 26
3.2
Machines avec détection de sortie de produit (idetect) ............................................................... 26
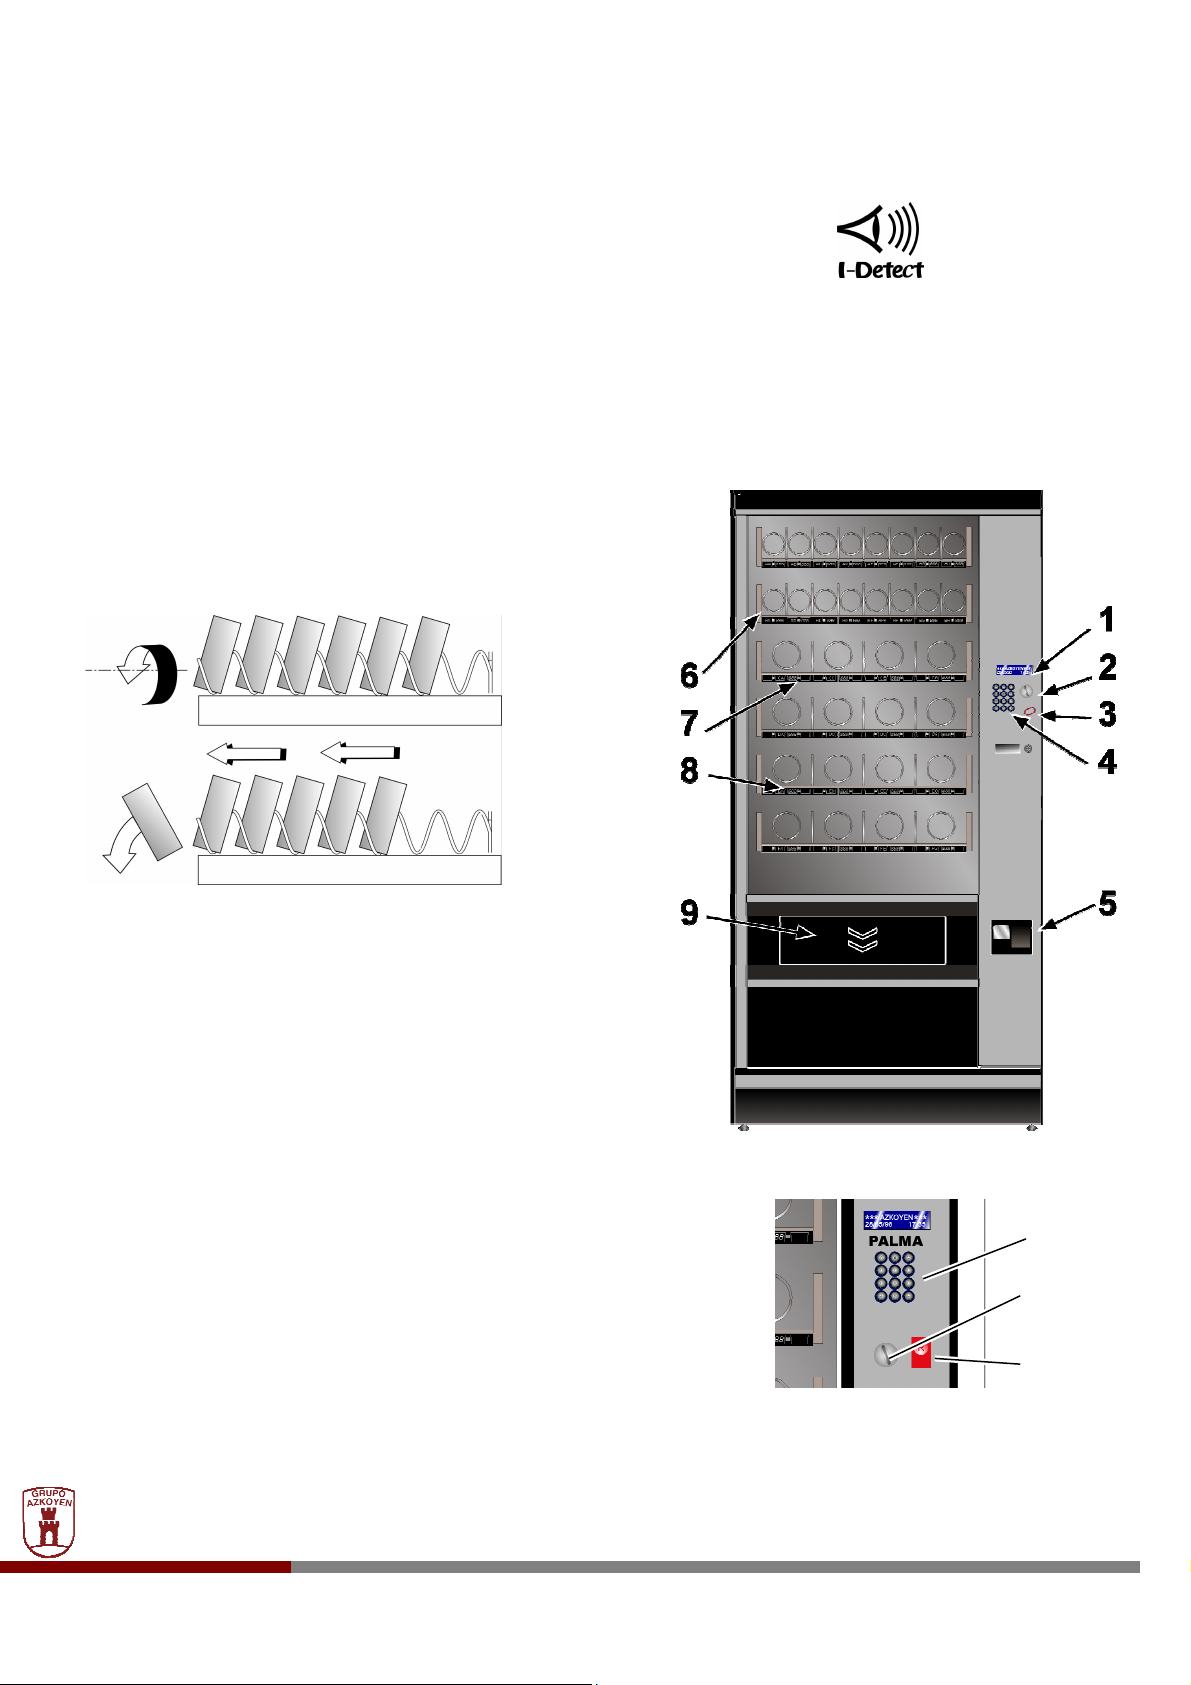
CHAPITRE 4. Description de la machina.............................................................................................. 26
4.1 -
Réfrigérateur................................................................................................................................ 27
4.2 -
Étagerès contenant de produit...................................................................................................... 27
4.2.1. - Charge de produits..................................................................................................................... 27
4.3 -
Mécanisme de pièces de monnaie................................................................................................ 28
4.4 -
Charge des restituteurs................................................................................................................. 28
CHAPITRE 5. Programmation.............................................................................................................. 29
5.1 -
Qu’est-ce que la programmation?................................................................................................ 29
5.2 -
Comment programme-t-on?......................................................................................................... 29
5.2.1 Bouton de VALIDATION....................................................................................................... 29
5.3
Menu «Basique».......................................................................................................................... 30
5.4. Configuration du «Menu Basique».................................................................................................. 30
5.5
Accès rapide à une fonction......................................................................................................... 30
5.6
Listes de fonctions configurables ................................................................................................ 30
CHAPITRE 6. Contrôle Des Défaillances Et Entretien....................................................................... 39
6.1 -
Pannes totales. Machine hors service ......................................................................................... 39
6.2 -
Défaillances partielles.................................................................................................................. 39
6.3
Incidences au cours d’un service................................................................................................. 39
6.4 -
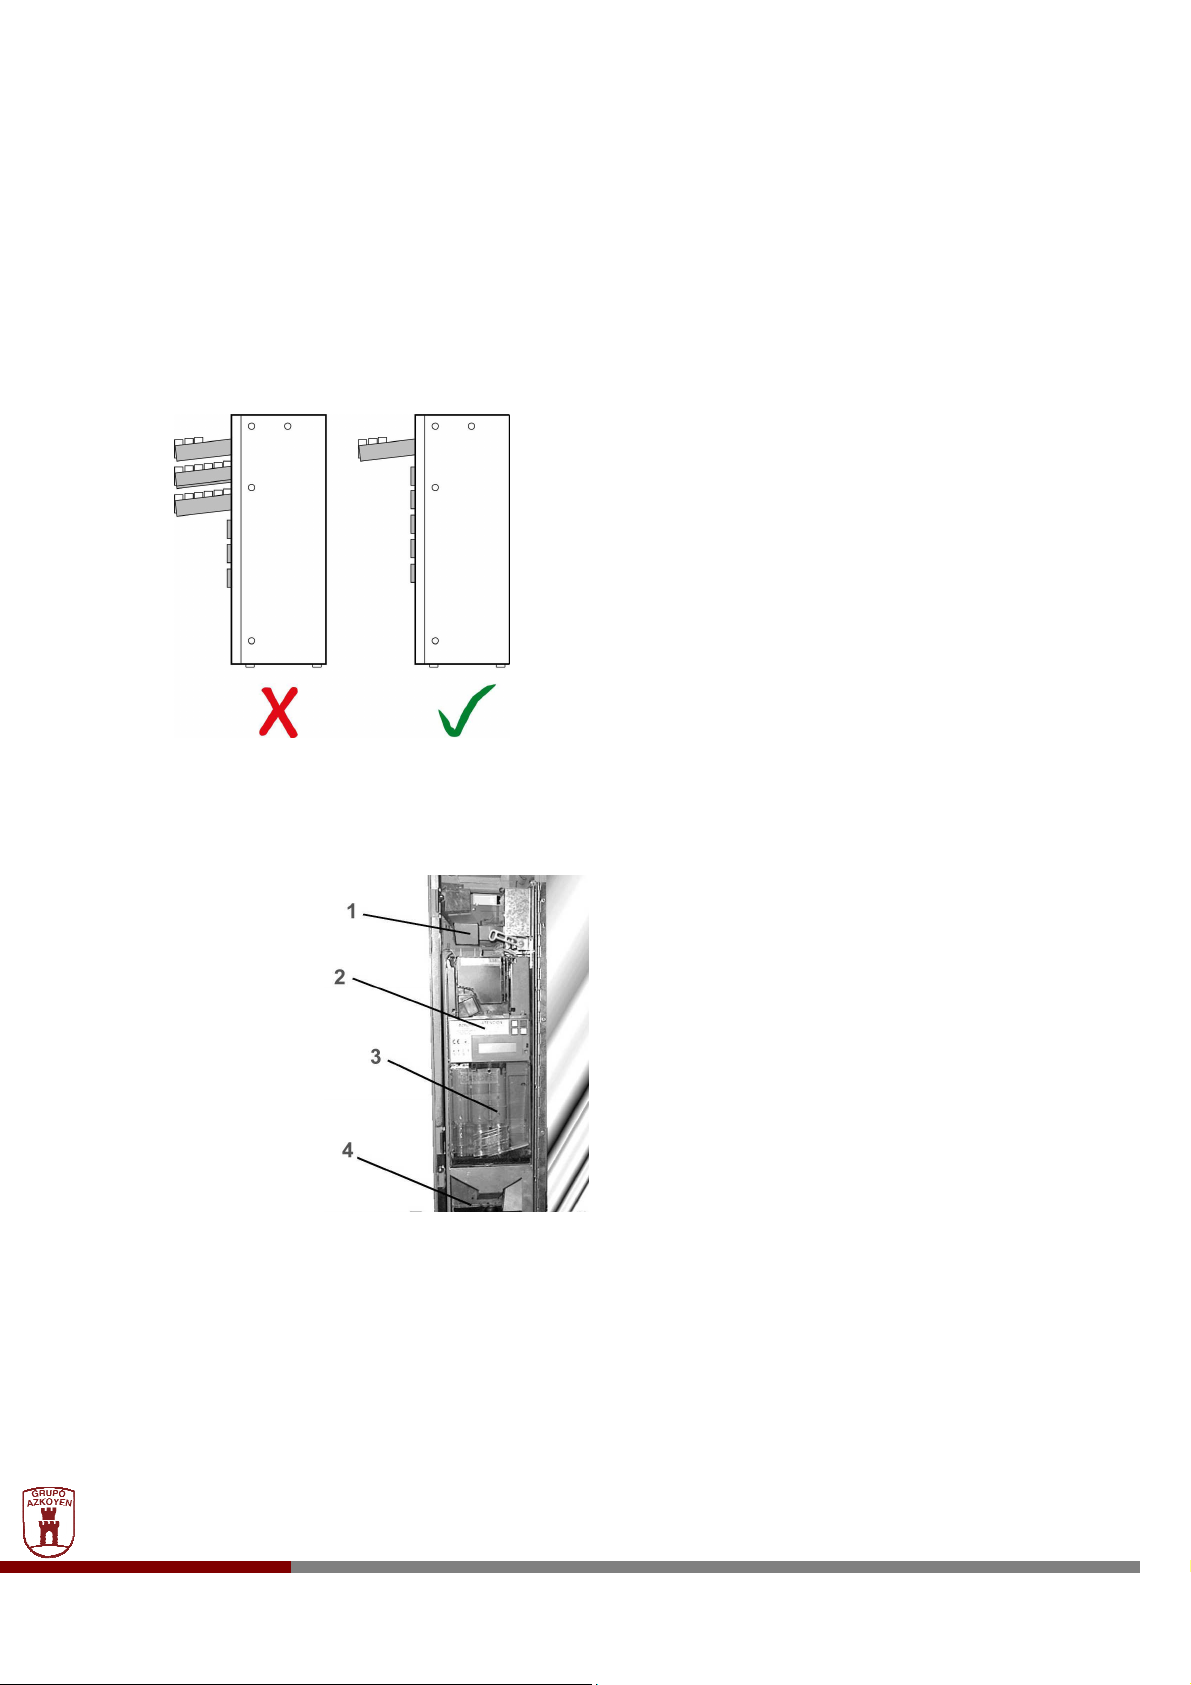
Remplacement des Broches......................................................................................................... 39
6.4.1. - Changement de broches.............................................................................................................. 40
6.4.2 - Montage de la broche double....................................................................................................... 40
6.5 -
Réglage de la hauteur des............................................................................................................ 40
6.6 -
Changement d’espace entre les.................................................................................................... 41
6.7 -
Changement de prix..................................................................................................................... 41
6.8 -
Nettoyage extérieur...................................................................................................................... 41
6.9 -
Nettoyage du monnayeur............................................................................................................. 41
Annex 1/ Anexe1........................................................................................................................................ 42

User Manual/Manuel de l’Usager
- 5 -
CAUTIONS
General
•BEFORE USING THIS DISPENSER, THIS MANUAL MUST BE READ CAREFULLY.
•This automatic dispenser has been designed and built in accordance with all safety legislation in force.
•AZKOYEN hereby guarantees that these machines comply with the following directives:
oCE Low Voltage Directive DBT 2006/95/CEE and its amendments.
oCE Electromagnetic Compatibility Directive EMC 2004/108/CEE and its amendments.
•The PALMA H machines are designed FOR OUTDOOR USE, but they must not be installed in places that may be
exposed to sprayed water, and they likewise must not be cleaned using sprayed water.
•This document contains private property information protected by legislation on intellectual property. All rights are
hereby reserved. No part of this document may be photocopied, reproduced or translated without the prior written
consent of AZKOYEN.
•AZKOYEN hereby declines all liability for damages caused to persons or things as a result of the following:
oIncorrect installation.
oInadequate electrical installation.
oDeficient cleaning or maintenance.
oIncorrect use of the machine.
oUsing non-original replacement parts or making unauthorised modifications.
•AZKOYEN hereby reserves the right to introduce, without prior notice, all improvements to this model derived from its
constant research.
•Given the characteristics of some food products, these may lead to incorrect operation of the machine if used beyond
the parameters of temperature and relative humidity recommended in this manual.
•If it is necessary to move the machine avoid:
oTipping the machine
oDragging or lifting it with some kind of pulling system (rope, straps, etc.).
oShaking or striking the machine, no matter whether it is in protective wrapping or not.
•The machine must be installed at locations which comply with the recommendations of temperature, electricity and
water installation, weights, etc. given in this manual and must be performed by qualified personnel.
Maintenance
•IMPORTANT: To maintain machine stability, do not extract several trays at the same time
•The user or person responsible for refilling and cleaning the device must follow the instructions set forth in this manual.
•This appliance is not designed to be used by persons (including children) with reduced physical, sensory or mental
capabilities, lack of experience or knowledge, unless they are supervised or have been instructed in its use by
somebody responsible for their safety. Children should be supervised to ensure that they do not play with the
appliance. Section 7.12 of EN60335
•All elements that require tools to be disassembled must only be handled by qualified technical personnel.
•Water must be prevented from freezing in the interior of the machine.
•To move the machine, always keep it upright. NEVER LAY THE MACHINE DOWN.
•Wait at least half an hour after finishing unpacking and installation work before connecting the machine to the electricity
supply.
•The refrigeration circuit needs to settle and could be damaged if this period of time is not observed.
•To ensure correct operation, it is recommended that you do not install the machine in an area exposed to direct
sunlight.
Electrical
•THE MACHINE HAS COMPONENTS THAT OPERATE AT DANGEROUS VOLTAGES. DO NOT DISCONNECT
ANY COMPONENT. ONLY TECHNICAL SERVICE IS AUTHORISED.
•Ensure that the electrical installation, the outlet and the automatic circuit breaker have the appropriate sizes for
machine consumption.
•The plug of the machine has an earth connection. The outlet must be connected to a good earth connection and must
be located in an accessible position once the machine is installed.
Use of this manual
•This manual is an integral part of the machine, and as such, it must always remain inside the same so that it may be
consulted at any time.

User Manual/Manuel de l’Usager
- 6 -
Spiral vending machines for packaged
products
«PALMA H/HZ-70» AND «PALMA
H/HZ-87»
Chapter 1. General Characteristics
1.1 Products sold
The PALMA H/HZ line of machines are designed to sell
and distribute a variety of packaged products which have
not loss of sugar nor other sticky elements. In the
following pages we describe the products that can be sold
in the different types of spirals and the extraction
mechanisms. In any case, you may contact AZKOYEN
about the ideal type of mechanism for each specific
product.
1.2 Operation control
The machine has an alphanumeric LCD type screen on
the door with 2x16 digits to send function messages to
the user and programming messages to the operator.
It also incorporates a keyboard for programming and the
execution of different functions including:
Programming, selling prices of each selection, types
of channels, etc.
Accounting of the total units sold or in each
selection, amount sold, amount stored for return
change, etc...
Self-checks, localising and warning of breakdowns
Connections with the coin mechanisms, with
periphery systems (infrared, RS-232, modems, etc....)
1.3 Selection keyboard
The product selection mechanism consists of an
alphanumeric keyboard where the combination (SHELF-
SPIRAL) of the desired product is introduced.
Thus, it has a switch to recover the introduced money if
there was no sale, or the resulting modifications once
produced. This switch is also used in the programming of
the machine.
1.4 Refrigeration
All the PALMA machines has a thermometer that controls
the interior temperature of the product. All shelves can be
refrigerated at the same temperature or different
temperatures according to the different products being
sold.
1.5 Refrigeration
All the PALMA machines has a thermometer that
controls the interior temperature of the product. All
shelves can be refrigerated at the same
temperature or different temperatures according to
the different products being sold.
1.6 General characteristics
H-70 Hz-70 H-87 Hz-87
Height
(mm) 1830
Width
(mm) 723 888
Depth
(mm) 860 840 875 840
Weight
(kg) 238 272
Nº of
Shelves/Spirals Máx. 7 shelves x 8 spirals
Máx. load x
shelve 12 kg
Optimum
exterior
environment
temperature
> 0º < 32º / > 35% < 65% HR (H)
> 0º < 25º / > 35% < 65% HR (Hz)
Refrigeration
capacity (1) > 3º > 8º > 3º > 8º
Refrigerant R-134ª (No CFC)
Maximum work
gradient 2º in any axes
Voltage
230V +6V/-10V
Sound level
< 70 dB (a)
(1) THESE VALUES ARE NOT VALID IF THE
MACHINE IS EXPOSED TO DIRECT SUNLIGHT

User Manual/Manuel de l’Usager
- 7 -
Chapter 2. Installation and starting
2.1 Electrical specifications
The tension of the electrical installation must correspond
to the voltage indicated in the plaque of characteristics at
the back of the machine. It must never exceed 6% nor go
below 10%.
The power consumed is also indicated on the plaque.
CAUTION: THE MACHINE HAS HIGH VOLTAGE-
DANGEROUS ELEMENTS . DO NOT HANDLE ANY
COMPONENT WITH THIS HIGH VOLTAGE
SYMBOL. ONLY AUTHORISED FOR TECHNICAL
SERVICE.
THE POWER CORD MAY ONLY BE SUBSTITUTED
BY AUTHORISED AZKOYEN PERSONNEL.
2.2 Choosing placement.
Make sure that the electrical installations, plug and
automatic switch are the adequate size for the machine
consumption.
Important: the plug pin of the machine has a ground. It is
necessary for the base to be connected to a good ground,
and the connection to the electric system must be
accessible at all times. The base must be connected to a
good ground. AZKOYEN is not responsible for cases
where these conditions are not met.
REMEMBER: FOR PROPER FUNCTIONING IT IS NOT
RECOMMENDED TO INSTALL THE MACHINE WHERE
IT IS EXPOSED TO DIRECT SUNLIGHT.
Levelling: Have in mind the working inclination
specifications when installing the machine. In any case
the four legs are adjustable and permit proper levelling.
Ventilation: The refrigerator gas is liquefied by a forced
air circulation. The air should not come from a hot source
and it is a good idea to place support caps in addition to a
handle when placing the machine against the wall. This
will leave the minimum space necessary for correct
ventilation.
DO NOT CONNECT THE MACHINE BEFORE
HALF AN HOUR AFTER HAVING FINISHED
ALL THE UNPACKING AND INSTALLATION
OPERATIONS. THE REFRIGERATION CIRCUIT
NEEDS TO SETTLE, IF NOT IT MAY GET
DAMAGED.
2.3 Starting
Once the machine is connected, turn on the
general switch on the lower part of the door.
The refrigerator group will shortly turn on
automatically.
2.4 Initial product loading
Follow the instructions in section 4.2.1.
2.5 Loading returners
Follow the instruction in section 4.4.
2.6 Initial programming
The machine does not work without programming
the selling prices, until which time it will be OUT
OF ORDER. Program the prices of the selections
following the instructions in the Chapter on
programming.
2.7 Running machine
Close the door and press one or various orders for
each selection to check that each spiral is working,
as well as the selection programming and refunds
for all the types of coins. If everything is ok, start
programming and check the accounting, erase it
and put the machine back into service. Close the
door again to start selling.
General switch

User Manual/Manuel de l’Usager
- 8 -
Chapter 3. Description of a service.
3.1 Service
Each selection is identified by a label (7) with a
combination of letters that identify the shelf and extractor
position. The price (8) is marked next to the label.
Once the coin is introduced in the slot (2), the amount
introduced will be shown in the information screen (1) as
the coins are accepted in the coin mechanism. The
rejected coins fall directly into the return box (5) so that
you can recuperate them.
Once product price is reached or exceeded you only have
to press the combination of keys (4) that correspond to
the letters of the selection (in the same order as they
appear) for the extractor to turn once and send the
product to the exit box (9) where you can pick it up.
The coins that exceed the amount are sent to the return
box and collected.
NOTE: you should not press a selection that is
depleted, since the machine will always perform the
extraction whether there is a product or not.
1. Informative screen
2. Coin introduction spot
3. Return button
4. Selection keys
5. Return box
6. Product container shelf
7. Selection label
8. Price label
9. Exit box
3.2 Machines with product release
detection (idetect)
If there is no product for the chosen selection or
the sale cannot be made for some reason, three
attempts are made before the selection is
cancelled and the customer is given the choice
between recovering his/her money or purchasing a
different product.
4
2
3
PALMA “Hz”
PALMA H

User Manual/Manuel de l’Usager
- 9 -
Chapter 4. Machine description
1. Coin mechanism
2. Product container shelves
3. Refrigerator group
4. Heat collector
4.1 Refrigerator
The upper compartment of the machine is a refrigerating
chamber which is isolated by injected polyurethane.
Inside it has been re-coated with stainless steel and
painted to avoid corrosion.
The cooling system us designed so that, if desired, you
can obtain two different temperatures in the machine. The
coldest shelf is the lowest one and the temperature
increases slightly on the way up the machine. If you want
to use this system, contact technical service.
4.2 Product container shelf
This can consist of a maximum of seven independent
shelves (1) which are adjustable in height. Up to eight
extraction spirals (2) can fit on each one and they are
divided by adjustable separators (3). Products are placed
on the spirals to later be extracted. In addition to the
spirals in the machine, there are also other possibilities to
adjust the machine to your needs.
In annex 2 you can see the list with all the spindles and
the number of products you can select.
In addition to these spirals there also are
combinations of simple geared spirals which are
joined and controlled by the same extraction
motor. This system is especially useful to sell large
or problematic products.
4.2.1Loading products
1.
Take out the shelf to begin loading by lifting
slightly and pulling towards you.
2.
Load the desired product into the spiral slots
from the inside out, assuring that there are no
empty spaces.
We recommend that the product lean on the back
spiral, inclined backwards, to improve the fall of
the product.
3.
Once the shelf is loaded, place it back into the
correct position and load the next shelf. For proper
machine stability it is a good idea not to pull out
several shelves at once.
Once finished loading, extract each loaded product
once and check that the next product is in the
correct extracting position. Re-open the machine
and replace the extracted orders.
RECOMMENDATIONS:
1
4
3
2

User Manual/Manuel de l’Usager
- 10 -
1.- Products in bags or in boxes may cause problems if
not placed correctly. Make sure that the stamped border
of the bags and the seals of the packages cannot get
stuck on the spirals. Those products that may be
damaged by falling should be placed on the lower
shelves.
2.- Trays for the sale of bottles or cans. The screws
can sell products with a maximum diameter of 66 mm.
3.- To maintain machine stability, do not extract several
trays at the same time.
4.3 Acceptance mechanism and coin return
1.
Entry coin guide
2.
Coin manager
3.
Change givers
4.
Cash box
The coin selection, coin return and coin storage
mechanisms are on the door. They are made up of a coin
guide that channels the coins to the coin mechanism ,
which sends a message to the machine control system
once the coins are validated. If these coins can be used
for return change they are stored in the returners in the
same coin mechanism. If there are enough coins in the
returners or they are not returnable coins, they are
sent to the machine bank.
If the coin is not valid the coin mechanism refuses
it.
If the user presses refund after the coins have
been introduced, the returners of the coin
mechanism return the equivalent coins to those
introduced.
Azkoyen recommends using their EXECUTIVE or
MDB/ICP type coin mechanisms although any
type of compatible coin mechanism can be used,
as long as it conforms with the European
Regulation EMC 89/336/CEE and its
modifications.
4.4 Loading returners
If your machine has a MDB/ICP coin
mechanism, place the machine in the
programming phase and introduce return change,
in any order, and the coin mechanism will classify
the corresponding tubes. Once the tubes are full,
exit programming.
If your machine has an EXECUTIVE type coin
mechanism, follow the instructions of the coin
mechanism installed.

User Manual/Manuel de l’Usager
- 11 -
Chapter 5. Programming
5.1 What is programming?
The machine can perform a series of functions that can
be configured. We call “programming” the actions that are
performed to determine how to machine will work under
certain functions.
There are two ways to program the machine:
Via the Basic Menu. These are the most common
functions and can be accessed quickly.
Via the personalised access to the rest of the
configurable functions. You can add some of these
functions to the Basic Menu (up to a maximum of 32).
5.2 What do you program with?
The machine has a portable keyboard with
four keys which can control the machine
under normal running as well as when
programming the functions.
5.2.1 VALIDATION button
Some functions require the use of a 5
th
button to validate
what has been programmed. For this purpose, use the
PROGRAMMING BUTTON on the display card (PALMA
HZ) or the RECOVERY pushbutton (PALMA H).
The programming box working under the normal
mode. With the machine running, this keyboard can be
used to:
Key
Function
A Place the machine in the FREE
SERVICE position for one order. Once
the service is finished it returns to normal
functioning.
B By pushing the key for more than 3
seconds you will see the current machine
temperature.
Access to machine programming
C
By pushing the key for more than 3
seconds the screen will ask for the
number of the function to execute
directly.
D
Allows to change the machine
programming via infrared.
By pushing the key for more than 3
seconds we go to the Basic Menu.
If pushed for more than 5 seconds when
the machine is starting, the memory will
be erased.
Programming box functioning in the
programming mode. Once the machine has been
placed in the programming state, you can adjust
the functions mainly with the following edition
modalities:
Numerical edition (or inserting numbers). In
some cases the machine will ask you to insert
numbers (for example, the number of a function or
price). It is done as follows:
Key Function
A Increase by units (0000 + A = 0001)
B Increase by tens (0000 + B = 0010)
C Increase by hundreds (0000 + C = 0100)
D Increase by thousands (0000 + D =
1000)
For example, to obtain the number 3142, you must
press the following keys:
C + D + D (3000)
C (3100)
B + B + B + B (3140)
A + A (3142)
When finished editing the number, press the
RECUPERATION key to validate it and continue
on to the next step.
Alphanumeric edition (or inserting data). In
some cases you will have to insert a text sequence
or words (for example, for a promotional
message).
The set of characters available are shown in
ANNEX 1.
The character to be modified is the one on the
right of the screen, underlined and flashing. To do
this, complete the following:
Key Function
Programming button Recovery button

User Manual/Manuel de l’Usager
- 12 -
A Advances to the next character in the list
B Returns to the previous character in the list
C Erases the flashing character and the one on
its left (in the screen) will begin flashing.
D Validates the flashing character and starts to
do the same with a new one on the right.
RECUPERATION The edition of the message ends and
validates the word or phrase introduced.
Remember that the flashing character is not included in
the message.
Editing options. The machine may offer you to choose
from two options.
Push keys A or B to change from Yes to No.
Pushing key D validates the option that appears on the
screen.
5.3 Basic menu
Accessing and using the Basic Menu. The Basic Menu
has a series of functions that, because of frequent use,
are grouped and are easy and simple to access. The
functions included in the Basic Menu are the following:
110 MONEY/SELECT 210 PULSES
120 TOTAL CASH 420 ADVERT. MESS.
171 COUNT. RESET 510 TIME/DATE
201 PRICES 535 REFRIG. UNIT
NOTE: This set of functions can be modified at will by the
user.
These Basic Menu functions have the following
operations:
Open the machine
Press key C of the programming keyboard. If there were
problems during the service (breakdown, returners empty,
...) these will appear on the screen. Press key C again to
access the Basic Menu (if there were no problems, it is
only necessary to press key C once).
The first function appears
Press key A or RECUPERATION to advance to the next
function of the Basic Menu.
Press B to return to the previous function
Press C to exit programming
Press D to access programming of the function that is on
the screen
The editing mode or programming of the function is
explained in detail in the section called “List of
configurable functions”.
5.4 Configuration of Basic Menu
When other functions are being used frequently,
they can be added to the Basic Menu if wanted.
The maximum number of functions allowed in the
Basic Menu is 32. To program this function, follow
the instructions for the function 440 BASIC MENU
in the “List of configurable functions”.
5.5 Rapid access to a function
If you want to execute a function that is not
available in the Basic Menu, press key C for 3
seconds. Three digits will appear on the screen
which indicate the number of the function that you
wish to execute. Use the numerical editing to
indicate the number of the function and access it.
5.6 List of configurable functions
In the following pages we provide a detailed list of
the different functions of the machine, with a
description of their use as well as how each one
works.
ACTIONS
001EMPTY HOPPER
Manual unloading of the returners with MDB.
Pushing buttons A and B will advance or go back
through the different returner tubes of the MDB payout
unit.
Pushing button D will extract a coin from the selected
tube. The screen shows the count for the extracted
coins.
002 MAN.FILL HOP
Manual re-loading of the returners with MDB.
Introduce the tube coins and the count will be reflected
on the screen.
010 PRINT DATA
Sends data to printer
Sends a list of the accounting data to the RS-232C exit
in ASCII format with lines of 40 columns. More
information in the Printer Kit manual.
050 QUALITY SIGN
Telephone coverage quality of the GSM
modem.
The screen shows the signal quality of the GSM
modem. This signal will change depending on where

User Manual/Manuel de l’Usager
- 13 -
the antenna is directed. The maximum signal quality is
shown as 31.
099 RESET
Complete erasure of the machine
configuration.
By pushing button D, the machine configuration will be
erased. After resetting (see chap. 6), the machine will
use the default configuration.
ACCOUNTING
110 MONEY/SELECT
Amount of each selection sold
111 UNITS/SELECT
All units sold by selection
Press the desired selection and the screen will
show the amount of this selection.
Press a new selection to continue to check the
amounts.
120 TOTAL CASH
Total amount sold
The screen shows the total amount sold.
121 TOTAL UNITS
Total quantity of units sold
141 MON.IN CASH
Existing amount in box or bank
142 MONEY GIVERS
Existing amount in returners
145 MON.G.MAN.
Amount manually returned from the returners
146 MO.NOT GIVEN
Total amount not given through the returners.
147 MON.INCARDS
Amount obtained from prepaid cards.
148 MON.CARD RCH.
Amount obtained from charging prepaid cards
149 MON.INNOTES
Amount in cash box of banknote reader.
The requested data appear on the screen.
150 PRD. NOT SOLD
Products not sold by selection (only
operational in machines with depletion
detection).
Press the desired selection. The number of units
not sold appear for this selection since these
products are not depleted.
162 TOKENS
Takings via MDB tokens.
The data requested appear on the screen.
171 COUNT. RESET
Erases all the accountings
Press key D to erase the accounting of the
machine, except for the returner.
174 RES. GIV. ACC.
Erases all the accounting from the returners
Press key D to erase the accounting of the
returners.
180 P/TOTAL SAL.
Perpetual accounting of the total sales amount.
The function shows the total amount collected since
the last time the RAM memory was erased. This
accounting is not erased with function 171. It can
only be erased by initialising the machine.
183 P/MONEY CASH
Non-erasable amount collected in the box or
coin bin.
184 P/MON.GIVERS
Non-erasable amount gone to return.
185 P/MON.G.MAN.
Non-erasable amount unloaded manually from
the returners.
186 P/M. NOT GIV.
Non-erasable amount not given by the
returners.
187 P/MON./CARDS

User Manual/Manuel de l’Usager
- 14 -
Non-erasable accounts for amount obtained
from pre-paid cards.
188 P/M. CARD REC
Non-erasable accounting of the money collected
from re-loading the pre-paid cards.
189 P/MON./NOTES
Non-erasable accounts for amount in cash box
of banknote reader.
190 P/MON./TOKENS
Continuous accounts of sales made through
direct sale TOKENS.
The data requested from perpetual machine
accounting appears on display (accumulated since
the initialisation).
PROGRAMMING OF PRICES AND SELLING
MODES
201 PRICES
Program the prices of each selection
Press the selection and then, using the numerical
editing, introduce the new price. To program
another selection, you only have to press and
repeat the steps.
Press RECUPERATION to finish.
202PRICES/SELEC
Assign one price to various selections
Program a price using the numerical editing mode.
Press the selections that you want to program with
this price.
Press RECUPERATION to finish.
204 SINGLE PRICE
Assign one price to all the selections
Program a price using the numerical editing mode.
Press RECUPERATION and this price will be
assigned TO ALL THE SELECTIONS that are in the
machine
206 PROGR. TOKEN
Programs the selections which work via minor
access control.
Program each selection to be activated via minor control
or not.
210 PULSES
Program the number of pulses from the
extraction motor for each selection
Press the selection to program. By pressing A, you
program the number of pulses wanted.
The pulse for each type of extraction mechanism
are:
1. Half turn spiral
2. One turn spiral.
9. Deactivate the spiral.
211 DATE LIMITE
Programme the No. of days for which a product
can be sold once loaded.
To access this function, keep key B pressed in for a
few seconds.
Once in the function, press the selection to
programme. To validate, press D.
Programme the number of days using A or B.
Press D to validate and exit the function.
When the programmed time is up, the selection will
be disabled and a fault message indicating product
expiry will be displayed.
To re-enable, programme the No. of days again.
If you programme “0”, then you deactivate the
function for this selection.
213 DATE LIMITE
Eliminate the programming of expiry dates
Press A or B to select ON or OFF. Press D to
validate the choice.
If you choose OFF, you exit the function
If you choose ON, then you delete all the
configurations programmed in function 211
220 FREE VEND
Place the machine in selling mode, that is, all
the selections are free.
Select the option according to the option editing
mode (A or B to decide and D to validate)
221 SIMPLE VEND
Sets the machine to «Simple Sale» or «Multiple
sale». The machine will provide the changes
after finishing each service or can perform
various services and recuperate the changes
after by pressing
Recovery button

User Manual/Manuel de l’Usager
- 15 -
Select the option according to the option editing
mode (A or B to decide and D to validate)
222 FORCED SALE
This places the machine in mandatory sale,
meaning that once credit has been introduced, it
is mandatory to make a purchase in order to get
money back (only with the MDB system).
Select the option according to the option editing
mode (A or B to decide and D to confirm) in order to
program mandatory sale.
223 MAX. CREDIT
Program the maximum amount admissible with
a MDB/ICP coin mechanism installed
According to the numerical editing mode, introduce
the amount of maximum credit that the machine will
accept.
228 AGE TOKEN
Programmes the activation of the use of the MINOR
TOKEN for access control.
It is possible to activate the access control for
minors on the machines by programming the use of
the MINOR TOKEN.
To deactivate the function, press D.
If the token is programmed, when a coin is inserted
the message INTRODUCE TOKEN will appear.
When the token has been introduced, a credit
message with zero CREDIT will appear on the
screen, as it waits to receive coin, note or card
credit.
If the token is not programmed, the machine works
as usual and the token is rejected.
229 CARD TEST
Tests the card reader by making sales which do
not enter accounts.
Press D to start the test and make a number of purchases
with the card.
PROGRAMMING SELECTIONS
301 FAM/PRO.CODE
Program the family and products codes
Program the family and product codes for each
selection. This function allows to assign, using the
numerical editing, two numbers from 0-99 to each
selection to facilitate computer treatment of the
accounting data.
302 GROUP/SELEC.
Allows selections to be associated so they
alternate to make unloading even.
Via this function, selections are associated so that
they serve the product consecutively when any of
the associated selections is pressed.
5 groups can be established and up to 10 selections
can be assigned to each group.
Press A to select the group to which the selection is
to be assigned.
Press D to start associating selections. If the
selection chosen already has other selections
associated to it, then this association is displayed.
Press the desired selection. If it is already
associated, then the association is deleted.
This function is not active (although programmed) if
your machine does not have product exit detection
(iDetect) or detection is deactivated or faulty.
303 PROMOTIONS
Program a selection so that, once sold, it gives a
product from other channels. Maximum of two
channels per selection.
Press the selection that you want to program, the
screen will indicate the selections that are
associated successively. If there are no associated
channels, the screen will indicate NO Column. To
ASSOCIATE a canal to the chosen selection,
program as indicated below:
Use the A or B keys of the programming keyboard
and the character on the left will go forwards or
backwards respectively. Press D to validate and
proceed to program the other character. Once the
derived channel is programmed, press D and this
association will be registered.
If the character on the right is programmed and you
press C, this will validate the value and will go on to
program the character on the left.
To LIBERATE an associated channel, you should
proceed in the same way as in programming, that is,
if you associate a channel that is already associated
to a selection, you will free it.
To edit the channels of other selections, press the
key of this selection.
306 ERASE GROUP
Eliminate all selection associations.
Press A or B to select ON or OFF. Press D to
validate the choice.
If you choose OFF, you exit the function

User Manual/Manuel de l’Usager
- 16 -
If you choose ON, then you delete all the
associations programmed in function 302
309 MOTOR/SELEC
Associate motors so that they work
simultaneously when a selection is pressed. This
function is used to programme the extraction of
products that need two spirals with independent
motors in order to be sold (baguettes,
sandwiches, etc.)
Press the selection you wish to programme.
The screen will show if it has an associated motor or
not. Press D to access.
Choose the motor to work simultaneously with the
desired selection by pressing the selection key. The
motor must be the one that moves the 2nd spiral of
the channel.
MACHINE PROGRAMMING
401 PROG. CODE
Pre-programmed program code for the different
clients with combinations of functions.
Program the program code (4 digits) using the
numerical editing mode.
407 REST M. TIME
This programs the time that the change (the
remaining money after a purchase) is shown on
the display before the machine erases it (only
with the MDB system).
Use the numerical editing mode to program the time,
in seconds, that the remaining money will be shown
on the display before being erased.
408 CRED.M. TIME
This programs the time that the credit (the
money introduced prior to a purchase) is shown
on the display before the machine erases it (only
with the MDB system).
Use the numerical editing mode to program the time,
in seconds, that the credit will be shown on the
display before being erased.
412 ADMIT. COINS
This programs the coins allowed by the MDB
coin system when it IS NOT out of change.
Use the option editing mode (A or B to decide and D
to confirm) in order to admit the coin that appears on
the display.
Every time that programming for a coin is confirmed,
the payout unit will move on to programming for the
next coin admitted. In order to exit the function,
press the RETURN button.
416 MAX.ADM.TYP.
This programs the maximum number of each
type of coin that is admitted before a service
using the MDB coin system.
Use the numerical editing mode to select the number
of each type of coin shown on the display that will be
admitted.
Every time that programming for a coin is confirmed,
the payout unit will move on to programming for the
next coin admitted. In order to exit the function,
press the RETURN button.
418 OUT CH.COINS
This programs the coins that the MDB coin
system admits when it IS out of change.
Use the option editing mode (A or B to decide and D
to confirm) to select whether or not to admit the coin
that appears on the display.
Every time that programming for a coin is confirmed,
the payout unit will move on to programming for the
next coin admitted. In order to exit the function,
press the RETURN button.
419 MIN.COIN.TUB
This programs the minimum number of coins
that must be in each returner tube so that they
are not considered OUT OF CHANGE using the
MDB coin system.
Use the numerical editing mode to select the
minimum number of coins that must be in the
returner tube that appears on the display.
Every time that programming for one of the returner
tubes is confirmed, the payout unit will move on to
programming for the next payout unit tube. In order
to exit the function, press the RETURN button.
420 ADVERT. MESS.
Program a message that will be seen while the
machine is at rest.

User Manual/Manuel de l’Usager
- 17 -
Select if you want to erase the current message. If
you select NO, this message will be edited. Select
YES or NO using the options editing mode.
To change the current message or create a new
one, follow the alphanumeric editing mode.
Remember that the flashing letter will not be
included in the message until validated.
425 TEMPER. MESS.
Program the option to visualise the product
temperature on the screen.
Choose whether to visualise the temperature
message of the product on the screen or not using
the options editing mode.
430 LANGUAGE
Select the language in which the machine
messages will be shown.
Select the language that the machine will use, both
for programming and for service, using the options
editing mode.
The programmable messages do not change, they
must be re-programmed.
431 CURRENCY
Change the name of the country coin
Edit the name of the coins used, using the
alphanumeric editing mode.
432 DECIMALS
Programs no. of decimals used for presentation
of sums of cash.
Programs no. of decimals used by machine using method
for editing numbers. If 0 is programmed, decimal separator
is not used.
440 PERSON MENU
Add or eliminate the available functions of the
Basic Menu.
Press keys A or B to advance or back up in the
function list.
Press key D to include this function in the Basic
Menu or not. The letter P (Programmed) on the left
of the function means that it is programmed.
Press C to end the programming.
452 BEEP YES/NO
Program the buzzer option Yes or No
Choose if you want a beep for each pulse of the
machine, using the options editing mode.
454 CARDREADER
Programs functioning of card reader YES or NO.
455 BILLREADER
Programs functioning of banknotes YES or NO.
If your machine has a banknote or cards reader installed,
use the method for editing options to choose whether this
is to be operative or not.
458 IDETECT
Unable product output selection
Programme the option using Yes/No Editing mode
467 CONF. TEMP.
Select the option of one or two temperature
zones in the machine.
Indicate whether the machine is to have one or two
temperature zones using the options edition mode.
468 REFRIG. UNIT
Program the product temperature
Programming the program temperature is the same
as programming the clock (detailed in the function
510 TIME/DATE).
The temperature parameter is programmed in °C.
If you do not wish for the cold group in your machine
to be activated, merely set the temperature at 50°C.
469 SANIT. TEMPER.
Configuration of the sanitary temperature and
the shelves to be monitored.
Indicate whether or not to monitor the sanitary
temperature of certain shelves, which shelves to
monitor, the maximum time that the machine may be
disconnected (power outages, disconnections, etc.)
and the maximum time that the shelves can remain
above the sanitary temperature.
Program using the options edition mode whether
or not you wish to use this function.
If so, program the shelves to be monitored. If no
shelf is programmed, the screen will indicate
“NO SHELF.” Any shelf in the machine can be
programmed. To program a shelf, proceed in
the following manner:
Use buttons A and B of the programming panel
to select the desired shelf. Press D to confirm.
To deprogram a shelf, simply reprogram it, i.e.,
reprogramming a programmed shelf deprograms
it.

User Manual/Manuel de l’Usager
- 18 -
Pressing RETURN proceeds to
programming
for the maximum time the machine may be
stopped or disconnected in minutes. Program
the time using the numerical edition mode. After
the programmed time, products will be
considered unfit for consumption and
malfunction A-08 will appear.
Program the sanitary temperature in °C in the
same manner.
You should also program the maximum time
that products can be above the sanitary
temperature in minutes. After this time, the
machine will put the monitored shelves out of
service and the screen will display malfunction
A-07.
Remember that if your machine has two temperature
zones, shelves situated above the temperature
separator will not be refrigerated.
470 MACH. NUMBER
Program the number of the machine
Press keys A or B to advance or back up in the list of
numbers from 0 to 9.
Press C to validate the flashing number and go on to
edit the digit on the right.
Press D to validate the flashing number and go on
the edit the digit on the left.
Press RECUPERATION to end programming.
472 OPERATOR COD.
Program the operator code.
Program the operator number (4 digits) using the
numerical editing mode.
The functions 470 and 472 allow the identification between
the operator and the machine to authorise the
computerised treatment of data.
481 INFRAREDCFG.
Configuration of options to communicate by
infrared.
Configure partial or perpetual accounting
transmission.
If you programme Yes, the partial accounting will be
transmitted.
If you programme No, the perpetual accounting will
be transmitted.
483 MODEM CFG.
This programs the modem configuration for data
communications.
Use the option editing mode (A or B to decide and D
to confirm) in order to program whether or not to
have an automat
ic modem response to data calls.
In order to have an automatic response, use the
numerical editing mode to program the number of
RINGS to wait before responding.
Use the option editing mode to program whether or
not communication is going to be by SMS (Short
Message System) or by modem.
Use the option editing mode to program whether or
not a warning is sent in the event the machine is out
of service.
Use the option editing mode to program whether or
not a warning is sent if the machine is broken down.
Use the option editing mode to program the day of
the week on which an automatic call is made to a
programmed telephone. If a day has been
programmed, program the time of day that the call
must be made (following the steps under function
510 DATE/TIME).
Use the alphanumeric editing mode to program the
dialling chain, with the telephone number included,
to be utilised for warnings and programmed calls.
Upon finalising this configuration, the commands to
be saved in the modem and the changes introduced
on the SIM card, if there were any, are sent by
default.
484 BLUETOOTH
Request the access PIN.
If it is valid, assign a identifier to the machine's BT
device so that it can later be recognized.
The identifier will always be “AZK” and the
programmed code in function 401.
485 COM GATEWAY
Configuring the COM GATEWAY
Enable the COM GATEWAY port used for
communications when the machine sets up a
change-giver with MDB protocol. Press A or B to
choose Y / N.
CLOCK
510 TIME/DATE
Adjust the hour and date of the machine clock.
Press keys A or B to advance or back up among the
numbers from 0 to 9.
Press key C to erase the last edited number and
proceed to edit the previous one.

User Manual/Manuel de l’Usager
- 19 -
Press D to validate the flashing number and proceed
to edit the next one
Press RECUPERATION to validate the hour and go
on to edit the date. Edit the day in the same way.
Press RECUPERATION to validate the day and
proceed to edit the month. Edit the month in the
same way.
Press RECUPERATION to validate the month and
proceed to validate the year. Edit the year in the
same way.
520 CLOCK MODES
Allows selection of clock function options.
Using the option editing mode, you may program the
clock that appears on screen, the hour format (24h
or AM/PM) and automatic adjustment for summer
hours.
530 CICLO D.MON.
Programme coin acceptance times.
Programming the times is the same as programming
the clock (described in function 510 DATE/TIME). If
you wish to deactivate the function, simply set the on
and off times to 00:00.
531 CICL.S.MON
Weekly coin acceptance cycle
Press buttons A and B to move forwards and
backwards through the days of the week.
Press D to validate the day which is flashing.
Programming the times is the same as programming
the clock (described in function 510 DATE/TIME). If
you wish to deactivate the function, simply set the on
and off times to 00:00.
533 LIGHT D.CYCL
Program when the machine lighting turns off and
on.
Programming these hours is the same as
programming the clock (detailed in the function 510
TIME/DATE).
If you want to deactivate the function, you only have
to set the hour of turning on and off to 00:00.
534 LIGHT W.CYCL
Program the day and hour to turn on or off the
machine lighting.
Press keys A or B to advance or back up among the
days of the week.
Press D to validate the day programmed.
Hour programming is the same as programming the
clock (detailed in the function 510 TIME/DATE).
To deactivate the function, you only have to set the
hour of turning on and off to 00:00.
535 UNIT D.CYCLE
Outage and operation schedule for cold group.
Programming these hours is the same as
programming the clock (detailed in the function 510
TIME/DATE).
If you want to deactivate the function, you only have
to set the hour of turning on and off to 00:00.
536 UNIT W.CYCLE
Hour and day programming for outage and
operation of cold group.
Press keys A or B to advance or back up among the
days of the week.
Press D to validate the day programmed.
Hour programming is the same as programming the
clock (detailed in the function 510 TIME/DATE).
To deactivate the function, you only have to set the
hour of turning on and off to 00:00.
537 ACCESS CONTROL
Programmes the period during which function
228 will be activated.
Press D in order to programme the function.
Times are programmed in the same way as the clock
function. (510)
TIME ACC MINOR ? 00 00, to programme the time the
token is activated.
TIME NO ACC MINOR ? 00 00, to programme the time the
token is deactivated.
If both times are at zero and the MINOR TOKEN is
programmed, the machine will function with a token 24
hours a day.

User Manual/Manuel de l’Usager
- 20 -
Chapter 6. Solving problems and
maintenance
Reset: If your machine is out of order, it may need to be
reset manually. To do this it is only a matter of entering
and exiting the programming by pressing the C key of the
programming keyboard.
6.1 Complete breakdown. Machine is out of
order.
There are some problems that leave the machine out of
order until the problem is solved. In the following table the
messages are detailed as to their meaning and solution.
F-00 One extractor was rotating by itself
F-01 A return motor was rotating by itself
Reset manually.
If the problem persists, call the Technical Service.
F-02 The EEPROM memory is gone or
damaged
Contact technical service
F-03 There has been a loss in the machine
configuration
F-04 The return motor has not turned correctly.
F-05 The return or programming button (or
both) has been pressed for more than 15
seconds
Reset manually.
If the problem persists, call technical Service.
F-06 Several channels have been assigned to
the same selection with different pulses
Re-program the associated channels.
F-09 The power voltage was lower than the
service minimum
F-10 No temperature sounding has been
detected for 2 consecutive hours in a
refrigerated machine
Reset manually.
If the problem persists, call technical Service.
6.2 Partial Breakdowns
In these cases the screen indicates the breakdown but
continues to function normally, if and when the damaged
element is not called upon. Next we describe these partial
breakdowns:
A-01 No communication with the coin system
Reset manually.
If the problem persists, call Technical Service.
A-02 At least one extraction channel is out of
order
Reset manually.
If the problem persists, call Technical Service.
A-03 One selection key has been pushed for
more than 15 seconds
Reset manually.
If the problem persists, call Technical Service.
A-04 There has been a loss or damage of the
accounting data.
Erase the accounting and start again.
A-06 The real time clock has stopped or is
damaged.
Re-program the date and hour.
If the problem persists, call Technical Service.
A-07 The temperature chamber has exceeded
the “healthy temperature” for a predetermined
period
A-08 The machine was off for more than the
predetermined time.
Revise the condition of the products and reset manually.
If the problem persists, call technical Service.
6.3 Problems during a service
No return change. If the machine has no return
change the screen will show the text.
In this case, and depending on the coin
mechanism installed (MDB / ICP or EXECUTIVE)
orders can be made or the money introduced may
be recuperated.
In case the electricity has failed, when the
current is re-established, the control system will
reinitialise the machine and not complete the
service nor return change.
6.4 Changing Spirals
Although the PALMA H/HZ-70 and PALMA H/HZ-
87 machines are optimally configured to sell any
product, it may be that you wish to sell a special
product or increase the number of selections for a
specific product that requires a special extraction
mechanism.
Next we detail the different modifications that you
can perform with this machine.
PAS DE MONNAIE
This manual suits for next models
3
Table of contents
Languages:
Other Azkoyen Vending Machine manuals
Popular Vending Machine manuals by other brands

AMS
AMS EPIC SENSIT 3 Operation and service manual

Unicum
Unicum Foodbox user manual

Crane Merchandising Systems
Crane Merchandising Systems DN5800 Series manual

WAYFARER
WAYFARER TGX150 Service manual

Westomatic
Westomatic EVOLVE installation guide

N&W Global Vending
N&W Global Vending Canto Plus Instant Installation operation & maintenance