Close
Fermer
Schließen
Cerrado
Chiuso Open
Ouvrir
Önen
Abierto
Aperto
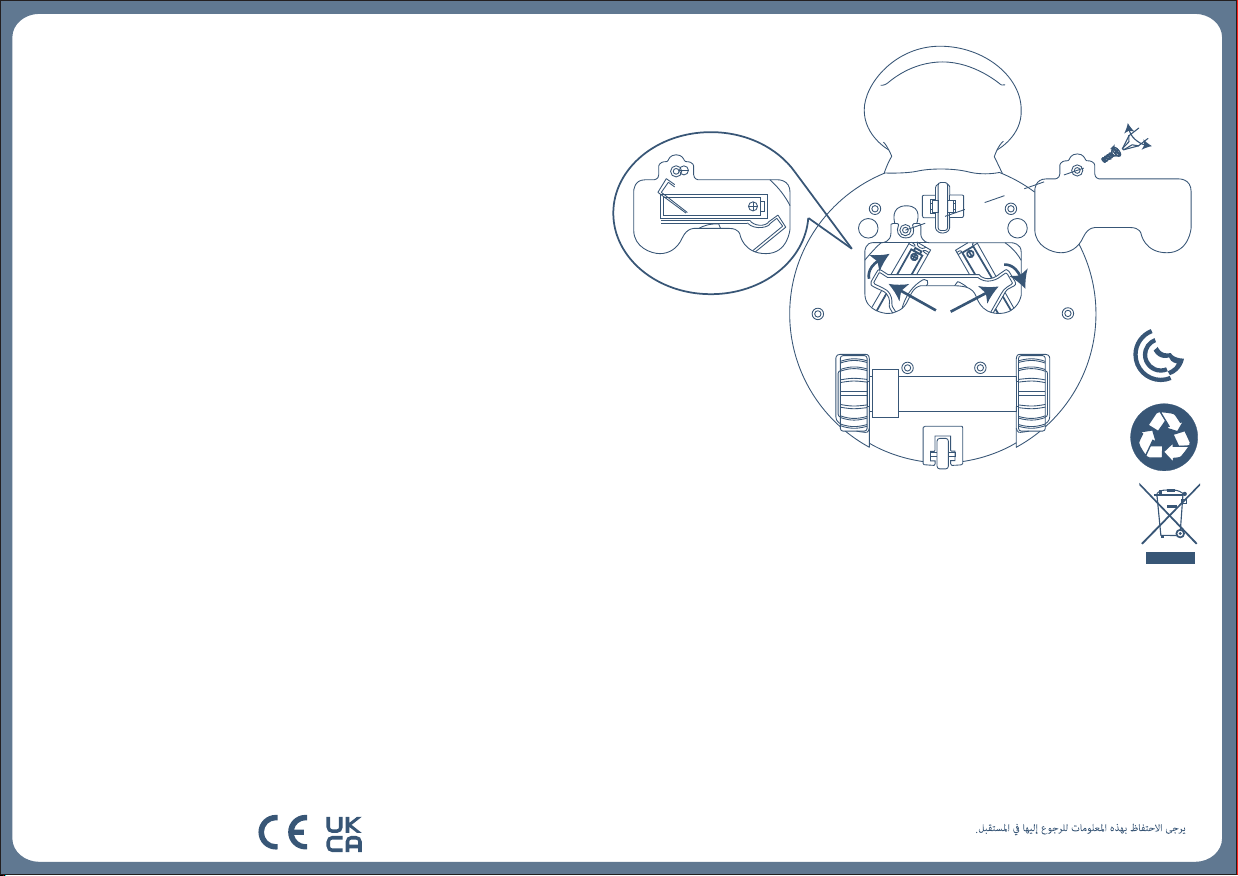
REPLACING BATTERIES
REMPLACEMENT DE PILES
BATTERIEN AUSWECHSELN
CAMBIO DE PILAS
SOSTITUZIONE BATTERIE
(EN): Replace 3 x AAA batteries one by
one by rotating he battery module.
(FR): Remplacez 3 piles AAAun par un
en tournant le module de batterie.
(DE): Ersetzen Sie 3 x AAA-Batterien
eins nach dem anderen durch Drehen
das Batteriemodul.
(ES): Reemplace 3 pilas AAA una por
una girando el módulo de la batería.
(IT): Sostituire 3 batterie AAA una ad
una ruotando il modulo batteria.
(EN): BATTERYADVICE
1) Requires 3 AAA(1.5V) batteries included. 2) Batteries should only be replaced by an adult. 3) Do not mix old and
new batteries. 4) Do not mix alkaline, standard or rechargeable batteries. 5) Do not re-charge non-rechargeable
batteries. 6) Rechargeable batteries are only to be charged under adult supervision. 7) Rechargeable batteries
are to be removed from the product before being charged. 8) Ensure batteries are inserted with the correct
polarity. 9) Exhausted batteries should always be removed. 10) The terminals should not be short circuited.
(FR): CONSEILS D’UTILISATION DES PILES
1) Fonctionne avec 3 pilesAAA (1.5V) piles requises incluses. 2) Les piles ne doivent être remplacées que par un
adulte. 3) Ne pas mélanger piles usagées et piles neuves. 4) Ne pas mélanger les piles de type alcalin, les piles
standard et les piles rechargeables. 5) Ne pas recharger les piles non rechargeables. 6) Recharger les piles
rechargeables seulement en présence d’un adulte qui surveille. 7) Enlever les piles rechargeables du produit avant
de les recharger. 8) S’assurer que les piles sont mises en place en respectant la polarité. 9) Toujours enlever les piles
usées. 10) Ne pas court-circuiter les bornes.
(DE): BATTERIEINFORMATIONEN
1) Benötigt 3 AAA (1.5V) Batterien enthalten. 2) Batterien sollten nur von Erwachsenen ersetzt werden. 3) Alte
und neue Batterien nicht vermischen. 4) Alkalische, normale und aufladbare Batterien nicht vermischen.
5) Nicht aufladbare Batterien nicht wiederaufladen. 6) Wiederaufladbare Batterien nur unterAufsicht eines
Erwachsenen laden. 7) Wiederaufladbare Batterien müssen aus dem Produkt entfernt werden, bevor sie
geladen werden. 8) Batterien müssen mit richtiger Polarität eingelegt werden. 9) Leere Batterien sollten
sofort entfernt werden. 10) Pole sollten nicht kurzgeschlossen werden.
(ES): CONSEJOS DE UTILIZACIÓN DE LAS PILAS
1) Funciona con 3 pilas AAA (1.5V) pilas requeridas - incluidas. 2) Las pilas han de ser reemplazadas por un
adulto. 3) No mezclar las pilas nuevas con las pilas usadas. 4) No mezclar pilas alcalinas con pilas estándar o
con pilas recargables. 5) No recargue pilas no recargables. 6) Las pilas recargables sólo deberán ser
recargadas bajo la supervisión de un adulto. 7) Las pilas recargables deben extraerse del artículo antes de ser
recargadas. 8) Asegurarse de que las pilas están insertadas con la polaridad correcta. 9) Siempre retirar las
pilas gastadas. 10) No cortocircuitar los terminales.
(IT): CONSIGLI PER LA BATTERIA
1) Richiede 3 pile AAA (1.5V) batterie incluse. 2) le pile dovrebbero essere sostituite solamente da un adulto.
3) non mescolare le vecchie pile con le nuove 4) non mescolare pile alcaline, standard o ricaricabili. 5) non
ri-ricaricare pile non-ricaricabili. 6) le pile ricaricabili devono essere ricaricate solamente sotto soprintendenza
adulta. 7) le pile ricaricabili saranno rimosse dal prodotto prima di essere ricaricate. 8) assicurati che le pile
siano inserite con la giusta polarità. 9) Le pile scariche dovrebbero essere sempre rimosse . 10) i terminali non
dovrebbero essere messi in corte circuito.
(NL): INFORMATIE OVER DE BATTERIJEN
1) Gebruik 3 AAA (1.5V) batterijen bijgesloten. 2) Batterijen mogen alleen door een volwassene aangebracht
worden. 3) Oude en nieuwe batterijen niet door elkaar gebruiken. 4) Gebruik geen alkaline, normale of
oplaadbare batterijen door elkaar. 5) Batterijen die niet oplaadbaar zijn niet opladen! 6) Oplaadbare
batterijen mogen alleen onder toezicht van een volwassene worden opgeladen. 7) Oplaadbare batterijen
eerst uit het product halen voordat deze opnieuw worden opgeladen. 8) Batterijen dienen met de goede
polariteit ( + / - ) aangebracht te worden. 9) Lege batterijen dienen onmiddellijk verwijderd te worden.
10) De polen ( b.v. + / +) mogen geen kortsluiting veroorzaken.
(DK): BATTERIERÅDGIVNING
Kræver 3 x AAA (1,5 V). Batterier inkluderet. Ikke-genopladelige batterier må ikke genoplades. Genopladelige
batterier skal ernes fra legetøjet, inden de oplades. Genopladelige batterier oplades kun under opsyn af
voksne. Forskellige batterityper eller nye og brugte batterier må ikke blandes. Der må kun bruges batterier af
samme eller tilsvarende type som anbefalet. Batterier skal indsættes med den korrekte polaritet. Udtjente
batterier skal ernes fra legetøjet. Forsyningsterminalerne skal ikke kortsluttes. OBS: Når modulets funktioner
mister ydeevne, skal du følge instruktionerne omhyggeligt for at installere nye batterier.
(SE): BATTERIANVISNING
Kräver 3 X AAA (1,5 V). Batterier ingår. Icke-uppladdningsbara batterier ska inte laddas. Uppladdningsbara
batterier ska tas bort från leksaken innan de laddas. Uppladdningsbara batterier får endast laddas under
övervakning av vuxna. Olika typer av batterier eller nya och begagnade batterier får inte blandas. Endast
batterier av samma eller motsvarande typ som rekommenderas ska användas. Batterier ska sättas in med
rätt polaritet. Tömda batterier ska tas bort från leksaken. Försörjningsterminalerna får inte kortslutas. OBS!
När modulens funktioner tappar prestanda, följ instruktionerna noggrant för att installera nya batterier.
(PL): WSKAZÓWKI DOTYCZĄCE ZASILANIA/BATERII
Wymaga 3 baterii AAA (1,5 V). Zawiera baterie. Baterii jednorazowego użytku nie należy ładować. Baterie
akumulatorowe należy wyjąć z zabawki przed ładowaniem. Baterie akumulatorowe mogą być ładowane
tylko pod nadzorem osoby dorosłej. Nie należy mieszać różnych typów baterii ani baterii nowych i
używanych. Należy używać tylko baterii tego samego lub równoważnego typu, jak zalecane. Baterie należy
wkładać z zachowaniem właściwej biegunowości. Wyczerpane baterie należywyjąć z zabawki. Nie wolno
zwierać zacisków zasilania. UWAGA: Gdy funkcje modułu stracą wydajność, postępować zgodnie z
instrukcjami, aby zainstalować nowe baterie.
(GR): ΣΥΜΒΟΥΛΕΣ ΜΠΑΤΑΡΙΩΝ
Απαιτεί 3 X AAA (1,5V). Περιλαμβάνονται μπαταρίες. Οι μηεπαναφορτιζόμενες μπαταρίες δεν πρέπει να
επαναφορτιστούν. Οι επαναφορτιζόμενες μπαταρίες πρέπει να αφαιρεθούν απότο παιχνίδι πριν φορτιστούν. Οι
επαναφορτιζόμενες μπαταρίες πρέπει να φορτίζονται μόνο υπότην επίβλεψη ενηλίκων. Δεν πρέπει να αναμειγνύονται
διαφορετικοί τύποι μπαταριών ήνέες και μεταχειρισμένες μπαταρίες. Πρέπει να χρησιμοποιούνται μόνο μπαταρίες του
ίδιου ήισοδύναμου τύπου όπως συνιστάται. Οι μπαταρίες πρέπει να τοποθετηθούν μετη σωστή πολικότητα. Οι
εξαντλημένες μπαταρίες πρέπει να αφαιρεθούν απότο παιχνίδι. Τα τερματικά τροφοδοσίας δεν πρέπει να
βραχυκυκλώνονται. ΠΡΟΣΟΧΗ: Όταν οι λειτουργίες της μονάδας χάσουν την απόδοση, ακολουθήστε προσεκτικά τις οδηγίες
για να εγκαταστήσετε νέες μπαταρίες.
(1.5) AAA x 3 :(AR)
. .
.
. .
: . . .
.
(EN): Please remove all packaging materials before giving to children. (FR): Veuillez retirer tout l'emballage avant de donner le produit
à des enfants. (DE): Vor Übergabe an Kinder bitte sämtliches Verpackungsmaterial entfernen. (ES): Por favor quita todos los materiales
del embalaje antes de darlo a los niños. (IT): Per favore rimuovi tutti i materiali dell’imballaggio prima di darlo ai bambini.
(NL): Verwijder de verpakking voordat het product aan een kind wordt gegeven. (DK): Fjern venligst al emballage før produtet gives
til børn. (SE): Ta bort allt förpackningsmaterial innan du ger till barn.PL): Przed podaniem dzieciom należy usunąć wszystkie
materiały opakowaniowe.(GR): Αφαιρέστε όλα τα υλικά συσκευασίας πριν τα δώσετε σε παιδιά.
Please retain this information for future reference./Veuillez conserver cette information pour référence ultérieure.
Bitte bewahren Sie diese Informationen zum späteren Nachschlagen auf./Por favor, guarde esta información para referencia futura.
Si prega di conservare queste informazioni per riferimento futuro. /Bewaar deze informatie voor toekomstig gebruik.
Opbevar disse oplysninger til fremtidig reference./Spara denna information för framtida referens.
Prosimy o zachowanie tych informacji na przyszłość./∆ιατηρήστε αυτές τις πληροφορίες για μελλοντική αναφορά.
. :(AR)
CAN ICES-3 (B)/NMB-3(B)


