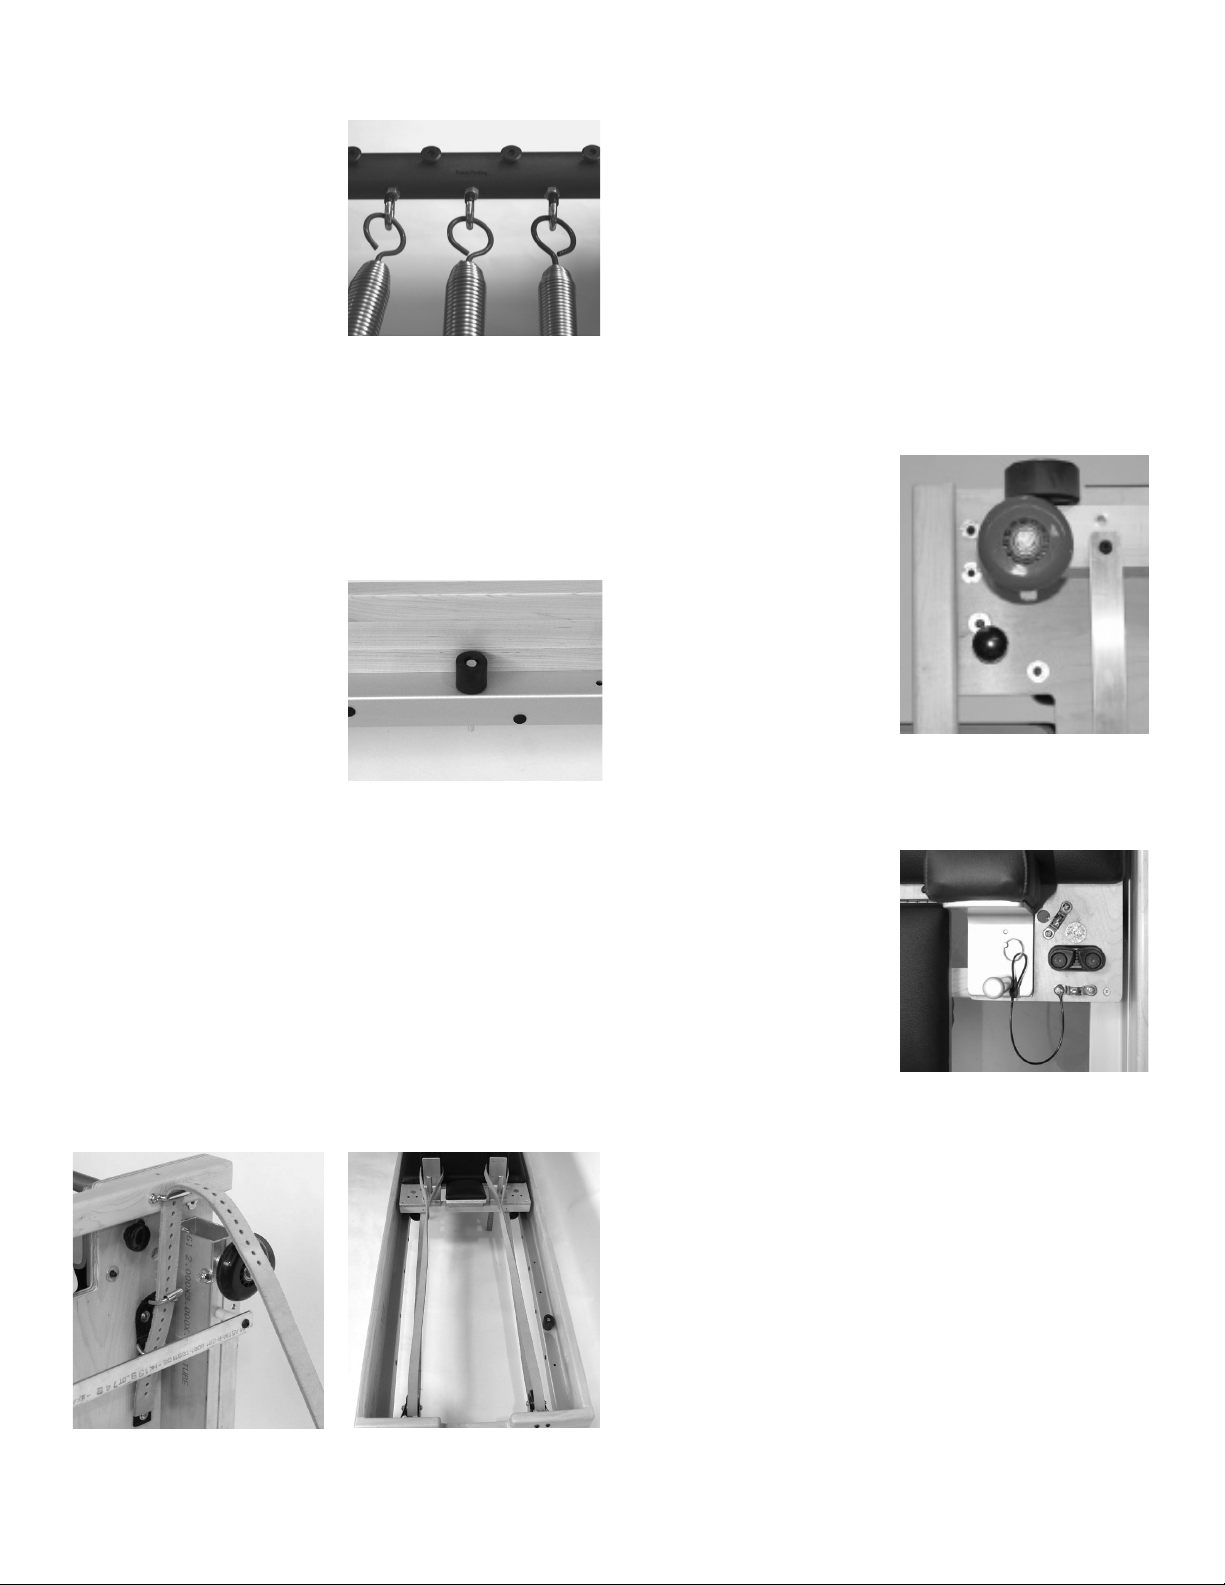
manuals.online logo
Brands
  1. Home
  2. •
  3. Brands
  4. •
  5. Balanced Body
  6. •
  7. Fitness Equipment
  8. •
  9. Balanced Body Legacy Reformer User manual

Balanced Body Legacy Reformer User manual

I M P O R TA N T !
Inspect for Freight Damage
If you see any obvious crate damage, bring it to the attention of
the freight company driver immediately so that you can open it
in his presence to verify any possible damage to the contents.
This would include holes in the crate, damaged corners or any
evidence that the crate has been mishandled.
In case of freight damage
If there is freight damage, make certain you keep all packaging
material. Please call Balanced Body as soon as possible.
UNCRATING
Choose a convenient place where there is room to work all around
the crate. It is often easier to unpack the crate outside and move
the individual parts inside one at a time. Also, it is a good idea to
have a helper in the unpacking and moving of this equipment. It
can be both heavy and awkward to move.
Gently pry off the crate lid. Insert a pry bar or a flat screwdriver
under the plywood lid and gently push the tool downward to lift
the lid up. Work your way around the crate, prying and lifting until
the lid comes loose. It is a good idea to have your helper lift up
on a corner of the plywood as you pry along the sides. This allows
for easy entry of the ply tool; it also controls the lid when it comes
free.
Remember, there are upholstered parts within, so go easy. The lid
will have exposed nails, so use care when handling it. Set the lid
aside with nails facing down to avoid accidentally stepping
on them.
LIFT THE FRAME OUT OF THE CRATE
Remove the protective cardboard layer. Remove the cardboard
box containing the upholstered sitting box. Inside the sitting
box you’ll find the hardware and fittings needed to complete the
setup of your new Legacy Reformer.
Lift the frame from the crate. Remove the shipping screws or
straps that hold the carriage to the bottom of the crate. Lift
out the carriage and carefully set it aside. Inspect each item for
shipping damage. Wipe down all parts of the frame, carriage
and upholstery with a damp cloth. This is a good time to inspect
further for freight damage. Carry the frame to its permanent
location.
INSTALL THE CARRIAGE
Turn the carriage over and clean all the wheels of shipping dust,
etc. Clean the full length of the rail surfaces inside the frame.
Carefully place the carriage into the frame with the headrest
facing away from the footbar.
Carriage
Footbar
Casters
How to assemble your Legacy Reformer
Contact Us
1-800-PILATES | +1-916-388-2838
pilates.com | info@pilates.com
400-117 | 02.14.13
ATTACH THE SPRINGS
The Legacy Reformer comes
with five springs. Take the
open (hooked) end of the
springs and attach them to the
eyebolts on the underside of
the carriage. The hooks on the
springs should be facing down.
Move the carriage toward the
footbar and attach the circular
end of the springs to the hooks
at the foot-end of the frame.
Each spring that is attached
will increase the resistance you
will encounter when moving
the carriage.
INSTALL CARRIAGE BUMPER
The Legacy Reformer includes a
carriage bumper that determines
the length of carriage movement
within the frame. This is easily
installed by taking the doweled
end of the bumper and placing
it through the desired hole above
the carriage on the top of the
frame’s right rail.
ATTACH THE STRAPS
Detach all springs from the carriage. Flip the carriage up so
that the underside of the carriage is facing the head-end of the
frame. If possible, have another person hold the carriage in place
on the rails while adjusting the strap (NOTE: Do not try and rest the
carriage on the rails by itself – it may fall over.)
Take one of the leather straps and feed the “holed” end up and
around the caster at the head end of the frame, through the
footman ring at the top of the carriage and, finally, through the
buckle on the underside of the carriage.
(NOTE: The person holding the carriage may need to lean
the carriage closer to the head end of the frame for easier
adjustment.)
Use the holes on the strap to adjust to the desired length and
then buckle. Pull the excess strap end through the metal ring
below the buckle. Repeat with the other strap. Place the carriage
back into the frame.
Take the loop at the other end of the strap and put it around
the headrest or the post behind the shoulder rest. Repeat the
procedure on the other side with the other strap.
ADJUSTING AND REMOVING SHOULDER RESTS
Your Legacy Reformer comes
with adjustable/removable
shoulder rests. The wider
shoulder rest position is
1” wider than the narrower
position.
If your equipment was ordered
without twin mats, your
shoulders will be locked in
place with a bolt-and-knob
system.
WHEN TO USE THE REMOVABLE LOCKING PIN OPTION
Use the locking pin option
when you want the ability to
remove the shoulder rests
for installation of the mat
conversion, or when you want
the option of adjusting wider/
narrower shoulder rests for
different clients.
To install the locking pins,
remove the bolts, washers and
knobs from the shoulders.
First, unscrew the black knob directly underneath each shoulder
rest. Then, carefully gather the washer and knob as they come off
the bolt. Pull the bolt up out of the hole. Set the parts aside.
Insert the locking pins into the holes from which you removed
the black bolts. The plastic tethers provided with each locking pin
can be affixed to any of the screw heads on top of the carriage
that hold the chromed rope guides. With a Phillips screwdriver,
unscrew the inside metal rope guide screw. Thread the eyelet on
the end of the pin tether through the screw. Replace the screw
and tighten with the screwdriver. Insert the pin into the bolt hole.
Set the hardware aside, but save it in case you want to use it in
the future.
Legacy Reformer springs attached
to the hooks at the foot-end of the
frame
Carriage bumper installed on the rail
Strap going through the footman ring
and into the buckle
Proper strap alignment on the Legacy
Reformer
Locking pin installed . Tether
attached to rope guide screw
Knob under carriage for loosening
shoulder rest
2
To remove the shoulder rests, pull the pins and slide the shoulder
rests toward the carriage until they come off. To adjust to a wider
shoulder rest width, switch the shoulder rests and re-insert the
locking pins.
WHEN TO USE THE PERMANENT BOLT-AND-KNOB
OPTION
If you don’t have a mat conversion and don’t need to adjust your
shoulder rests for wider/narrower widths, then the permanent
bolt-and-knob option is suggested. The bolt-and-knob hold the
shoulder rests firmly in place. If you are using the locking pin option
and feel there is too much movement in the shoulder rests, use the
bolt-and-knob option instead.
NOTE: If you prefer wider shoulder rests using the bolt-and-knob
option, remove the bolts, washers, and knobs from the shoulders,
slide the shoulder rests off, switch the shoulder rests, and replace the
hardware.
HOW TO INSTALL THE PADDED FOOTPLATE
To install the footplate (regular or Jumpus Maximus) on
equipment with a Legacy Revo design, first loosen the two black
knobs located beneath the standing platform at the foot end
of the frame. Place the support bar into the low (bottom) slot.
Position the foot plate with the padded side facing the carriage
and lower the tongue of the foot plate into the bracket on the
inside of the frame. The foot plate will stop with the lower block
of the outer plate (wooden side) resting on the frame. The upper
block will be resting against the raised footbar. Finally, tighten the
two black knobs on the outside of the frame to lock the foot plate
into position.
HOW TO USE THE REVO ADJUSTMENT SYSTEM
The Revo is an efficient and versatile adjustment system for
Balanced Body Studio Reformers and Legacy Reformers.
With the Revo, you can quickly and easily change the distance
between the shoulder rests and the footbar, creating the
ergonomically correct position for each client.
MOVING THE REVO SPRINGBAR AND CARRIAGE
The Revo springbar moves to one of five indexed stop positions.
The springbar is integrated with the carriage – when you move
the springbar, the carriage automatically moves with it.
To move the springbar and carriage:
»Attach one spring to the springbar. You can attach more than
one spring, but additional springs increase the tension and
make the springbar more difficult to move.
»Position yourself at the
side of the Reformer. (If
you are using the Reformer
yourself, you can make the
adjustment from a seated
or straddle position.) Pull
one of the cam handles
upward. The cam hook
must fully engage the metal
plate on the bottom of the
carriage.
»Keeping the cam hook engaged, use your other hand to move
the carriage into the desired position. The springbar will move
with the carriage. When you reach a carriage stop position, you’ll
hear a “click.” There are index markers along the rail that you
can use as a visual reference.
»Release the cam handle so that it drops completely into an
indexed position.
Shoulder rests removed Locking pins and tethers
Proper Positioning of Foot Plate on the Legacy Reformer
To move the carriage, grasp the cam handle and pull up, then move the carriage
backward or forward. You’ll hear a solid “click” when you have reached the next
position.
Sliding the lock into the footbar
support bracket to lock the footbar.
3
LOCKING THE REVO FOOTBAR
The Revo footbar features a sliding lock that keeps the footbar
securely in place.
To lock the Revo footbar:
»Slide the locks away from the footbar support.
»Pull the footbar slightly upward and move the footbar support
into the desired position.
»Slide the locks into the support brackets as far as they will go
to secure the footbar.
PRE-LOADING SPRINGS
You can pre-load springs by attaching them on the posts on top
of the springbar.
CLEANING AND MAINTENANCE
Cleaning
You can extend the life of your upholstery by keeping it clean
and free of dirt, oil and perspiration. After each use, wipe down
the upholstery with a solution of mild soap and water. Then wipe
down with a damp rag and allow to dry.
Boltaflex® upholstery is coated with PreFixx Protective Finish,
which offers antimicrobial/antibacterial protection. If you
want additional disinfection, use any common, off-the-shelf
disinfectant spray or solution, such as Pine Sol®or Lysol®
disinfecting spray. Since these disinfectants will leave a fragrance
residue buildup with repeated use, we recommend wiping down
the disinfected area with clean water on a sponge or soft rag.
Aluminum wheel tracks and wheels should be wiped down
weekly. If you feel a “bump” in the ride, chances are that debris
has become stuck to the wheels and needs to be removed. If
hair becomes wrapped around the wheel axels, use tweezers to
remove it. Regular cleaning will minimize “bumps” and ensure
that your equipment tracks smoothly.
Lubrication
Most Reformers never need silicone, but occasionally a sidewheel
may squeak. If this happens, lightly spray dry silicone on a rag
and wipe the rail with it. “Dry” silicone does not have an oil base.
Oil-based (“wet”) silicones and WD40 attract dirt and should not
be used. If silicone is needed, apply it lightly and wipe off any
excess. Never spray silcone inside the wheels - this can wash the
oil out of the bearings and ruin the wheels. You can purchase dry
silicone at most hardware and auto stores.
Footbar Support
The Legacy footbar will loosen with use. It is important to
remember to tighten the bolts that attach the footbar assembly
to the frame regularly. Frequency will depend on use.
If you have any questions, please call Balanced Body at
1-800-PILATES (1-800-745-2837) or 916-388-2838.
The Revo allows youto adjust the
distance between the shoulder
rests and the footbar, creating the
ergonomically correct position for
clients of all heights. For short to
average height clients, use positions
#1or #2. For taller clients, or those
with a limited range of motion, use
positions #3 - #5. You can also raise
the footbar to create an even shorter
distance between the shoulder rests
and footbar. Conversely, you can lower
the footbar to further lengthen the
distance between the shoulder rests
and footbar.
#1 Carriage Position
#2 Carriage Position #3 Carriage Position
#4 Carriage Position #5 Carriage Position
Contact Us
1-800-PILATES | +1-916-388-2838
pilates.com | info@pilates.com
400-117 | 02.14.13

Other Balanced Body Fitness Equipment manuals

Balanced Body Studio Reformer User manual

Balanced Body

Balanced Body Studio Reformer User manual

Balanced Body CenterLine Reformer User manual

Balanced Body

Balanced Body CenterLine Reformer User manual

Balanced Body Reformer Trapeze Combination Administrator Guide

Balanced Body

Balanced Body Reformer Trapeze Combination Administrator Guide

Balanced Body Metro IQ User manual

Balanced Body

Balanced Body Metro IQ User manual

Balanced Body Tower on the Allegro 2 Instruction Manual

Balanced Body

Balanced Body Tower on the Allegro 2 Instruction Manual

Balanced Body CenterLine Tower Retrofit Instruction Manual

Balanced Body

Balanced Body CenterLine Tower Retrofit Instruction Manual

Balanced Body CenterLine Reformer User manual

Balanced Body

Balanced Body CenterLine Reformer User manual

Balanced Body Allegro 1A Instruction Manual

Balanced Body

Balanced Body Allegro 1A Instruction Manual

Balanced Body Allegro 2 Reformer Programming manual

Balanced Body

Balanced Body Allegro 2 Reformer Programming manual

Balanced Body Pilates IQ Reformer User manual

Balanced Body

Balanced Body Pilates IQ Reformer User manual

Balanced Body Cadillac Trapeze Table Administrator Guide

Balanced Body

Balanced Body Cadillac Trapeze Table Administrator Guide

Balanced Body Exo Chair Guide

Balanced Body

Balanced Body Exo Chair Guide

Balanced Body MOTR Installation instructions

Balanced Body

Balanced Body MOTR Installation instructions

Balanced Body IQ REFORMER User manual

Balanced Body

Balanced Body IQ REFORMER User manual

Balanced Body CoreAlign Quick setup guide

Balanced Body

Balanced Body CoreAlign Quick setup guide

Balanced Body Reformer with Tower Instruction sheet

Balanced Body

Balanced Body Reformer with Tower Instruction sheet

Balanced Body Allegro Reformer Administrator Guide

Balanced Body

Balanced Body Allegro Reformer Administrator Guide

Balanced Body Studio Reformer User manual

Balanced Body

Balanced Body Studio Reformer User manual

Balanced Body Studio Reformer User manual

Balanced Body

Balanced Body Studio Reformer User manual

Balanced Body Allegro 36395 User manual

Balanced Body

Balanced Body Allegro 36395 User manual

Balanced Body Avalon Chair User manual

Balanced Body

Balanced Body Avalon Chair User manual

Balanced Body Tower Bracket Retrofit Kit User manual

Balanced Body

Balanced Body Tower Bracket Retrofit Kit User manual

Balanced Body Trapeze Table (Cadillac) Administrator Guide

Balanced Body

Balanced Body Trapeze Table (Cadillac) Administrator Guide

Balanced Body Allegro Legs Kit Instruction sheet

Balanced Body

Balanced Body Allegro Legs Kit Instruction sheet

Popular Fitness Equipment manuals by other brands

Spokey MURCIA 836507 user guide

Spokey

Spokey MURCIA 836507 user guide

Bodyworx KRX700 manual

Bodyworx

Bodyworx KRX700 manual

DMA clinical pilates portable reformer Assembly

DMA

DMA clinical pilates portable reformer Assembly

Gaiam STAY-N-PLAY Setup, Usage Tips, and Care & Safety Guide

Gaiam

Gaiam STAY-N-PLAY Setup, Usage Tips, and Care & Safety Guide

Hammer Ergometer Cardio XT6 manual

Hammer

Hammer Ergometer Cardio XT6 manual

Maxxus SmartGym H1 Installation & operating manual

Maxxus

Maxxus SmartGym H1 Installation & operating manual

Gaiam restore 05-58273 Setup, Workout Tips and Care & Safety Guide

Gaiam restore

Gaiam restore 05-58273 Setup, Workout Tips and Care & Safety Guide

NordicTrack NTEVEL15016.0 user manual

NordicTrack

NordicTrack NTEVEL15016.0 user manual

PSO-RITE PSO-STICK HOW-TO MANUAL

PSO-RITE

PSO-RITE PSO-STICK HOW-TO MANUAL

PROSOURCEFIT POWER TOWER instruction manual

PROSOURCEFIT

PROSOURCEFIT POWER TOWER instruction manual

Fuel FM-FLPLYO owner's manual

Fuel

Fuel FM-FLPLYO owner's manual

X-pole A-FRAME instruction manual

X-pole

X-pole A-FRAME instruction manual

OXEFIT XS1 user manual

OXEFIT

OXEFIT XS1 user manual

Image Fitness 3326 Slant Board manual

Image Fitness

Image Fitness 3326 Slant Board manual

BH FITNESS EK80TBBBSN - PART LIST AND DIAGRAM parts manual

BH FITNESS

BH FITNESS EK80TBBBSN - PART LIST AND DIAGRAM parts manual

FF Europe HNTLB07 Original operating instructions

FF Europe

FF Europe HNTLB07 Original operating instructions

Gratz Pilates LADDER BARREL Assembly instructions

Gratz Pilates

Gratz Pilates LADDER BARREL Assembly instructions

LesMills SMARTBAR Assembly & instruction manual

LesMills

LesMills SMARTBAR Assembly & instruction manual

manuals.online logo
manuals.online logoBrands
  • About & Mission
  • Contact us
  • Privacy Policy
  • Terms and Conditions

Copyright 2025 Manuals.Online. All Rights Reserved.