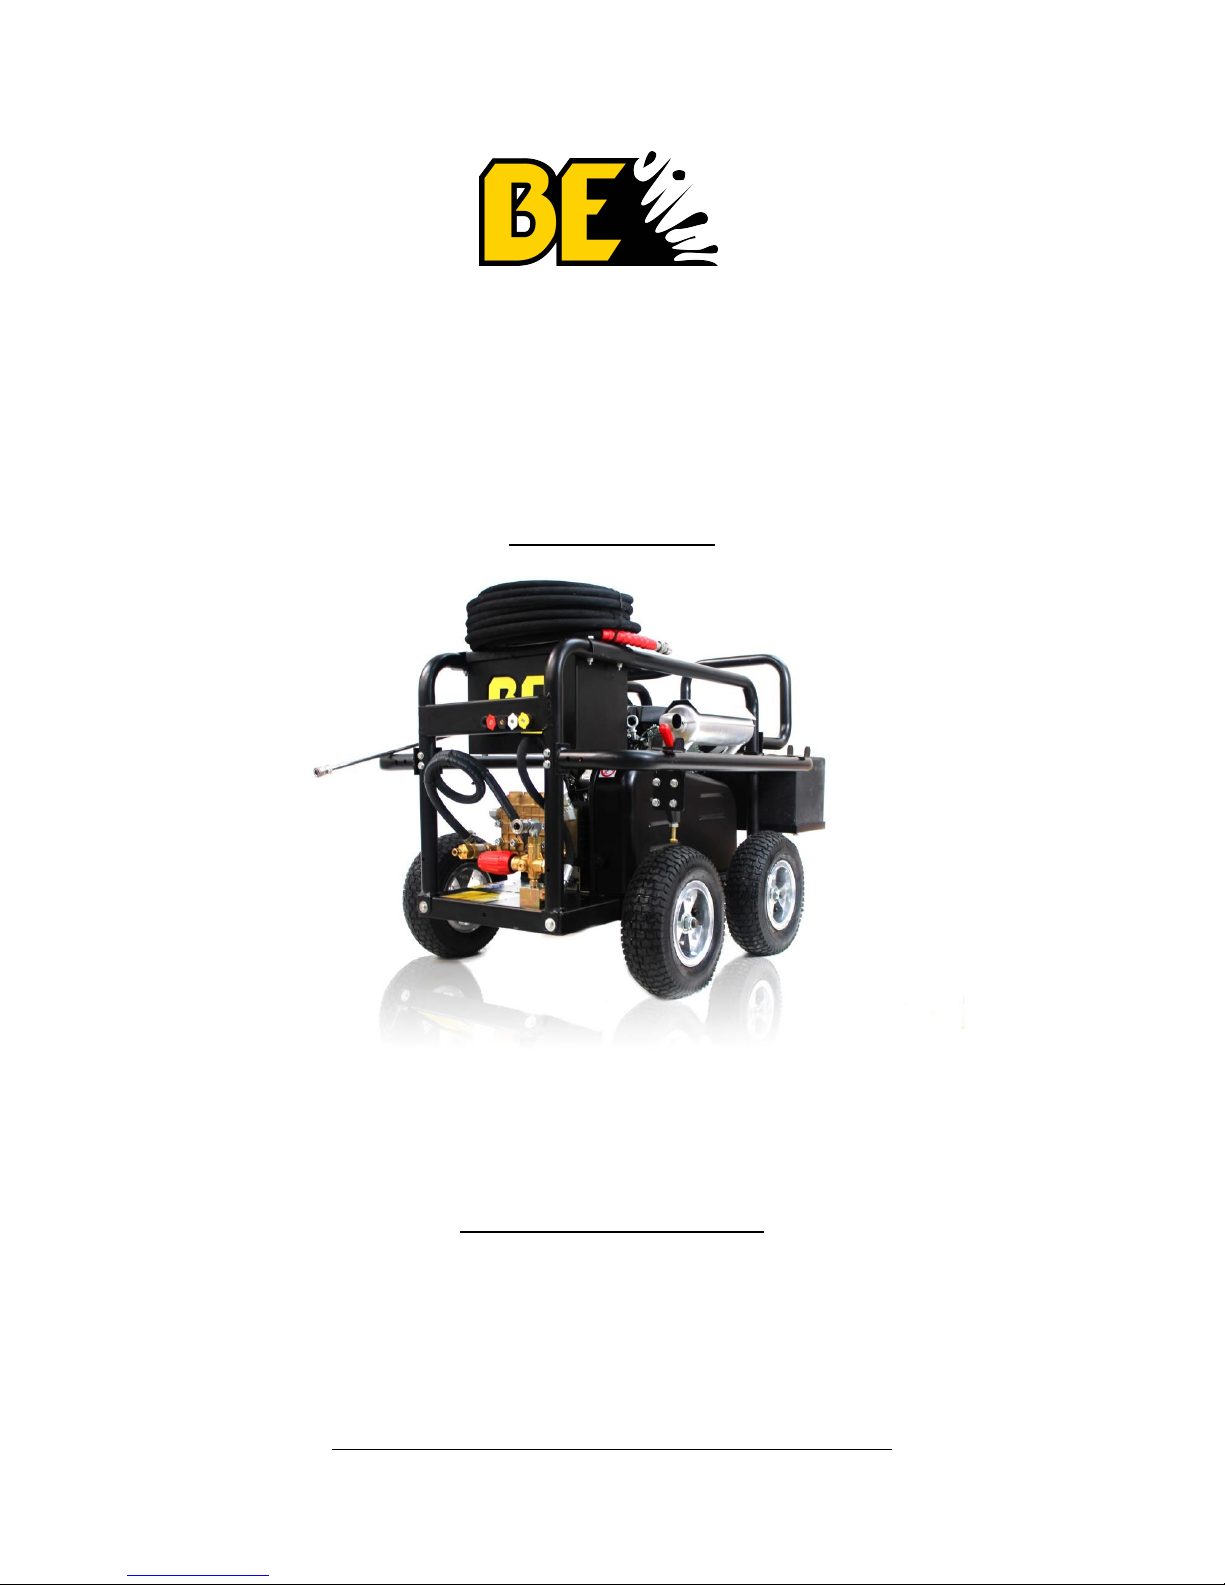
BE B275HA User manual

Licensed by BE Pressure Supply Inc, Canada
PRESSURE WASHERS'
B275HA - B389HA - B2565HA/HAS/HG/HGS
B4013HGS - B4015RA
CD-3513HWBSGEN - PE-4013HWPSGEN
PE-5024HWEBGEN - X-3513HWBGEBCD
USER MANUAL
Model shown PE-5024HWEBGEN
BEFORE USE YOU MUST READ THIS MANUAL COMPLETELY – RETAIN FOR FUTURE

OPERATION NOTES
Do not leave
machine running
longer than 1
minute without
operating the
pressure washer
or pump will
overheat.
Do not let
the machine
freeze.
Always wear eye
protection.
High pressure
sprays can cause
serious bodily
injury.
Use with Caution.
Warranty is void if
you exceed pre-
set pressure
PSI causing severe
damage to gauge
and unloader.
Record of Identification Numbers
Contact aftersales on 01646 687 880 for further information on servicing. Please have the product model
and identification numbers ready.
You will need to locate the model and serial number for the machine and record the information in the
places provided below.
Date of Purchase:
Dealer Name:
Dealer Phone:
Product Identification
Numbers;
Model Number:
Serial Number:
Engine:
Horse Power:
Page 2

CONTENTS
Section Description
Page No/No’s
OPERATION NOTES & RECORD of IDENTIFICATION NUMBERS
2
1. SAFETY
4 - 6
2. SAFE OPERATION
7 - 10
3. MACHINE PARTS
11
4.
MODELS 12
5.
ASSEMBLY 13
6.
PRE-OPERATION CHECKLIST 14
7.
STARTING YOUR MACHINE 15 - 17
8. SPRAY TIPS
17 – 19
9.
SHUTTING DOWN YOUR MACHINE 19
10.
MAINTENANCE 20
11.
TROUBLESHOOTING 20 - 22
12.
WINTER STORAGE 22 - 23
13.
ENVIRONMENTAL DISPOSAL 24
14. SPECIFICATIONS
25
15. GENPOWER CONTACT DETAILS
25
16. DECLARATIONS
26
Page 3

1.2. Some or all of the following PPE, Warning Signs and symbols may appear throughout this manual
and you must adhere to their warning/s. Failure to do so may result in personal injury.
Warning Signs and Symbols – FOLLOW safety messages to avoid or reduce risk of injury or death.
DANGER - indicates a
hazard which if not
avoided could result in
serious injury or death.
WARNING - indicates a
hazard which if not
avoided could result in
serious injury or death.
CAUTION - indicates a
hazard which if not
avoided might result
in minor or moderate
injury.
NOTE - indicates a
situation that could
easily result in
equipment damage.
READ MANUAL
Personal Protective clothing (PPE)
Page 4
1.
1.1.2. The machine should never be left it in a condition which would allow
an untrained or unauthorised person/s to operate this machine.
1.1.3. All due care and diligence should be taken by the operator for the safety of and
with regard to those around whilst using the machine
SAFETY.
1.1. The operator of the machine is responsible for and has a duty of care in making sure that
the machine is operated safely and in accordance with the instructions in this user manual.
Please note the following safety points

1.4. General fuel safety.
1.4.1. Fuel Safety additional information can be obtained from the Health and Safety Executive.
1.4.2. All fuels are Flammable.
1.4.3. Keep away from all ignition sources i.e. heaters, lamps, sparks from grinding or welding.
1.4.4. DO NOT carry out hot work on tanks that have contained fuel is extremely dangerous
and should not be carried out.
1.4.5. Keep work area clean and tidy.
1.4.6. Clean up all spills promptly using correct methods i.e. absorbent granules and a lidded bin.
1.4.7. Dispose of waste fuels correctly.
Page 5
1.3. Carbon Monoxide
1.3.1. Carbon monoxide is a colourless and odourless. Breathing in this gas can cause
death as well as serious long term health problems such as brain damage.
1.3.2. The symptoms of Carbon monoxide poisoning can include the following;
1.3.2.1. Headaches, Dizziness, Nausea, Breathlessness, Collapsing or Loss of
consciousness.
1.3.2.2. Carbon monoxide symptoms are similar to flu, food poisoning, viral infections
and simply tiredness. That’s why it’s quite common for people to mistake this
kind of poisoning for something else.
1.3.3. To avoid Carbon monoxide poisoning DO NOT Use Petrol/Diesel powered
equipment in an enclosed area or a moving vehicle.
1.3.4. If you think you or someone around you has been affected by carbon
monoxide poisoning you must take the following action;
1.3.4.1. Get fresh air immediately.
1.3.4.2. If you have used indoors open doors and windows, turn off machine
and leave the affected area.
1.3.4.3. See your doctor immediately or go to hospital - let them know that you
suspect carbon monoxide poisoning.

1.5. Petrol safety.
1.5.1.1. Always fuel and defuel in well-ventilated area.
1.5.1.2. Always wear correct, suitable and fit for purpose Personal Protective Equipment
(PPE), suggested items are as follows, but are not limited too.
1.5.1.3. Hand protection.
1.5.1.4. Protective clothing.
1.5.1.5. If item 1.5.1.1. Cannot be fulfilled then - Respiratory protective equipment
should be used.
1.5.1.6. When defueling always use a propriety fuel retriever.
1.5.1.7. Always carry fuel in the correct and clearly marked container.
Page 6

2. SAFE OPERATION
A running engine gives off carbon monoxide, an odourless,
colourless, poison gas.
Inhaling carbon monoxide can cause headache, fatigue, dizziness,
vomiting, confusion, seizures, nausea, fainting or death.
2.1. Only operate the pressure washer outdoors in a well-ventilated area.
2.2. You must prevent exhaust gas from entering a confined area through windows, doors, ventilation
intakes, or other openings.
2.3. DO NOT start or run engine indoors or in an enclosed area, even if windows and doors are open.
2.4. You must operate pressure washer from a stable surface.
2.4.1. The cleaning area should have adequate slopes and drainage to reduce the possibility of a
fall due to slippery surfaces.
2.4.2. DO NOT use the pressure washer from a ladder, Use with extreme caution when operating
from scaffolding, or any other similar location.
2.4.3. Take a firm grip of the spray gun with both hands when using the high pressure spray to
avoid injury when spray gun kicks back.
Fuel and its vapours are extremely flammable and explosive.
Fire or explosion can cause severe burns or death.
2.5. When adding or draining fuel.
2.5.1. DO NOT overfill tank. You must allow space for fuel expansion.
2.5.2. Turn the pressure washer OFF and let it cool at least 2 minutes before removing fuel
cap. Loosen cap slowly to relieve pressure in tank.
2.5.3. Only fill or drain fuel tank outdoors.
2.5.4. If any fuel is spilt, wait until it evaporates before starting engine.
2.5.5. You must keep fuel away from sparks, open flames, pilot lights, heat, and other
ignition sources.
2.5.6. DO NOT use near any naked flames, other sources of ignition and lighting cigarettes?
2.6. When starting equipment.
2.6.1. Make sure that spark plug, exhaust, fuel cap, and air cleaner are in place.
2.6.2. DO NOT crank engine with spark plug removed.
Page 7
Use of pressure washer can create puddles and slippery
surfaces.
Kickback from spray gun can cause you to fall.

2.7. When operating machine.
2.7.1. Tipping the machine at an angle may cause fuel to spill.
2.7.2. DO NOT spray flammable liquids.
2.8. When transporting or repairing machine.
2.8.1. Transport/repair with fuel tank EMPTY or with fuel shut off valve
OFF.
2.8.2. Disconnect spark plug wire.
2.9. When storing fuel.
2.9.1. Store away from furnaces, stoves, water heaters, clothes dryers, or other appliances that
have pilot light or other ignition source because they can ignite fuel vapours.
Risk of electrocution.
Contact with power source can cause electric shock or burn.
2.10. Electric shock risk.
2.10.1. NEVER spray near power source.
2.11. Starter cord kickback (rapid retraction)
Starter cord kickback (rapid retraction) can result in bodily injury.
Kickback will pull hand and arm toward engine faster than you can let
go.
It may result in broken bones, fractures, bruises, or sprains.
2.11.1. NEVER pull starter cord without first relieving spray gun pressure.
2.11.2. When starting engine, pull cord slowly until resistance is felt and then pull rapidly to avoid
kickback.
2.11.3. After each starting attempt, where engine fails to run, point the spray gun in safe
direction and squeeze spray gun trigger to release the high pressure.
2.11.4. Take a firm grip of the spray gun with both hands when using the high pressure spray to
avoid injury when spray gun kicks back
2.12. Exhaust.
2.12.1. DO NOT touch hot parts and AVOID hot exhaust gases.
2.12.2. Allow equipment to cool before touching.
2.12.3. Keep at least 5 feet (1.5 m) of clearance on all sides of pressure washer including overhead.
Page 8
2.9.1. DO NOT store the machine with fuel left in the tank.
Contact with exhaust area can result in serious burns.
Exhaust heat/gases can ignite combustibles, structures or damage
fuel tank causing a fire.

Unintentional sparking can result in fire or electric shock.
2.13.1. When adjusting or making repairs to your pressure washer
2.13.1.1. You must disconnect the spark plug wire from the spark plug and place the wire where it
cannot contact spark plug.
2.13.2. When testing for engine spark
2.13.2.1. Use approved spark plug tester.
2.13.2.2. DO NOT check for spark with spark plug removed.
2.14. High pressure water.
The high pressure stream of water that this equipment produces can
cut through skin and its underlying tissues, leading to serious injury
and possible amputation.
Spray gun traps high water pressure, even when engine is stopped
and water is disconnected, which can cause injury.
2.14.1. DO NOT allow CHILDREN to operate pressure washer.
2.14.2. NEVER repair high pressure hose. You must replace damaged hoses.
2.14.3. NEVER repair leaking connections with sealant of any kind. Replace O-ring or seal.
2.14.4. NEVER connect high pressure hose to nozzle extension.
2.14.5. Keep the high pressure hose connected to the pump and spray gun while system is
pressurised.
2.14.6. ALWAYS point spray gun in safe direction and squeeze spray gun trigger, to release high
pressure, every time you stop engine.
2.14.7. NEVER aim spray gun at people, animals, or plants.
2.14.8. DO NOT secure spray gun in open position.
2.14.9. DO NOT leave spray gun unattended while machine is running.
2.14.10. ALWAYS de-pressurise before disconnecting any hoses or hose attachments
2.14.11. NEVER use a spray gun which does not have a trigger lock or trigger guard in place
and in working order.
2.14.12. Always make sure that the spray gun, nozzles and accessories are correctly attached.
2.15. Starting and rotating parts.
The engine and other rotating parts can entangle hands, hair,
clothing, or accessories.
Page 9
2.13. Unintentional sparking.

2.15.1. NEVER operate the pressure washer without protective guards, housing or covers.
2.15.2. DO NOT wear loose clothing, jewellery or anything that may be caught in any rotating
parts .
2.15.3. Tie up long hair and remove jewellery.
2.16. Eye protection.
Risk of eye injury - Spray can splash back or propel objects.
2.16.1. Always wear safety goggles when using this equipment or in vicinity of where equipment is
in use.
2.16.2. Before starting the pressure washer, make sure that you are wearing adequate safety
goggles.
2.16.3. NEVER substitute safety glasses for safety goggles.
2.17. Fragile Items.
High pressure spray can damage delicate items such as glass etc.
2.17.1. DO NOT point spray gun at glass when using red 0° spray tip.
2.17.2. NEVER aim spray gun at plants.
2.18. Improper use and treatment of pressure washer.
The Improper treatment of pressure washer can damage it and shorten its life.
2.18.1. If you have questions about intended use, ask your dealer or contact nearest authorised
dealer.
2.18.2. NEVER operate the machine with broken or missing parts, or without protective guards,
housing or covers.
2.18.3. DO NOT by-pass any safety device on this machine.
2.18.4. DO NOT tamper with governed speed.
2.18.5. DO NOT operate the pressure washer above rated pressure.
2.18.6. DO NOT modify the pressure washer in any way.
2.18.7. Before starting pressure washer in cold weather, check all parts of the equipment to make
sure ice has not formed in the machine. DO NOT use if there is ice present, allow machine
to defrost before use.
2.18.8. Always use the handle provided on machine to move the machine. NEVER move the
machine
by pulling on the hose.
218.9. Check the fuel system for leaks or signs of deterioration, such as chafed or spongy hose,
loose or missing clamps, or damaged tank or cap.
2.18.10. You must correct all defects before operating pressure washer.
Page 10

3. MACHINE PARTS
Generic image showing parts – locations will vary on each model - For engine locations please supplied engine manual.
1
Spray Tips - Detergent,
0°, 15°, and 40°: for
various high pressure
cleaning applications.
Normally mounted on
handle. See 5.2.4.
5
High Pressure Outlet -
Connection for high
pressure hose.
See 7.6.2.
9
Choke Lever - Prepares
a cold engine for
starting.
See engine manual for
location.
13
Engine Switch - Set
switch to “On” for recoil
starting. Set switch to
“Off” to stop a running
engine. N.B. B275 model
has no separate switch it
is combined ON - OFF –
Choke. See engine
manual for location.
2
High Pressure Hose -
Connect one end to
water pump and the
other end to spray gun.
6
Pump - Develops high
pressure.
Directly connected to the
engine.
10
Fuel Valve - Used to
turn fuel supply on and
off to engine.
See engine manual for
location. Not fitted on
model B275.
14
Air Filter - Protects
engine by filtering dust
and debris out of intake
air.
3
Pressure Control Knob -
Varies pressure of high
pressure spray.
Normally in line with the
pressure hose
connection
7
Oil Level Indicator -
Level should be at
halfway.
Not fitted on all models
see engine manual for
location.
11
Recoil Starter - Used for
starting the engine
manually.
See engine manual for
location.
15
Fuel Tank - Fill tank with
regular unleaded fuel.
Always leave room for
fuel expansion.
4
Water Inlet - Connection
for garden hose.
See 7.6.2.
8
Detergent Siphoning
Tube/Filter - Use to
siphon pressure washer
safe detergent into the
low pressure stream.
ONLY use approved
detergents.
Where fitted it feeds into
the high pressure outlet.
12
Throttle Lever - Sets
engine in starting mode
for recoil starter.
See engine manual for
location. N.B. B275
model has no separate
switch it is combined ON
- OFF - Choke
16
Spray Gun Extension
with Quick Connect
Nozzles - Controls the
application of water
onto cleaning surface
with trigger device.
Includes trigger lock.
Allows you to switch
between five different
spray tips.
Page 11

4. MODELS.
B275HA
B389HA
B2565HA
B2565HAS
B2565HG
B2565HGS
B4013HGS
CD-3513HWBSGEN
PE-4013HWPSGEN
PE-5024HWEBGEN
X-3513HWBGENCD
Page 12
B4015RA

5. ASSEMBLY
Your pressure washer requires some assembly and is ready for use after it has been filled with the
recommended oil and fuel. If you have any problems with the assembly of your pressure washer, please
call the pressure washer help line at 01646 687 880. If calling for assistance, please have the model and
serial number from the data tag available.
5.1. Unpack the pressure washer.
5.1.1. Remove the parts bag, accessories, and inserts included with pressure washer.
5.1.2. Open box completely and retain packing in case you need to return for service and/or
repair.
5.1.3. Make sure you have all the included items prior to assembly.
5.2. Attaching the handles (where applicable).
5.2.1. Place handle (A) onto handle supports (B)
connected to main machine.
5.2.2. Make sure holes (C) in handle align with holes on
handle supports.
It may be necessary to move the handle supports from side to side in order to
align the handle so it will slide over the handle supports.
5.2.3. Insert carriage bolts through holes from outside of
machine and attach a plastic thumbwheel from
inside of machine. Tighten by hand, see picture.
5.2.4. Insert multi-coloured quick connect spray tips and
other supplied accessories in spaces provided on
handle.
Page 13

6. PRE-OPERATION CHECKLIST
6.1. Follow the checklist below prior to using the machine each time.
6.1.1. Check that the engine oil is at the proper level.
6.1.2. Use SAE 15W40 Oil
6.1.3. Check the 2 handle thumbwheels making sure that they are tight and will not vibrate
loose.
6.1.4. Add fuel to the petrol tank.
6.1.5. Connect and tighten the garden hose to the water supply inlet connection, you will need a
hose adaptor (supplied).
6.1.6. Water MUST be turned on prior to starting the washer, pull the spray trigger to make sure
that water is moving the through the lines and out the nozzle without any leaks before starting the
machine.
6.1.7. Review the safety guidelines in the manual prior to starting the machine.
6.1.8. If you have any issues operating the pressure washer, call Aftersales on 01646 687880.
Always check the level of the engine and pump oil prior to starting the
washer. Top up oils to correct levels. Failure to do so could cause the
engine to seize if the oil is low or empty.
DO NOT start your pressure washer without the water supply turned on.
Failure to do so will result in damaging the pump from overheating and
void the warranty.
Page 14
6.1.9. The PE-5024HWEBGEN has an Oil Alert system which is designed to prevent engine
damage caused by an insufficient amount of oil in the crankcase. Before the oil level in
the crankcase can fall below a safe limit, the Oil Alert indicator (red) comes on and the
Oil Alert system will automatically stop the engine (the engine switch will remain in the
ON position).
If the engine stops and will not restart, check the engine oil level before
troubleshooting in other areas.

7. STARTING YOUR WASHER
7.1. How to Start Your Pressure Washer.
7.1.1. To start your pressure washer for the first time, follow these instructions step-by-step. This
starting information also applies if you have let the pressure washer sit idle for at least a day.
7.1.2. Place pressure washer near an outside water source capable of supplying water at a flow
rate greater than 14.37 litres per minute and no less than 20 PSI at pressure washer end of
garden hose.
7.1.3. DO NOT siphon supply water.
7.1.4. Make sure machine is in a level position.
7.1.5. Connect garden hose to water inlet on pressure washer pump.
DO NOT run the pump without the water supply connected and turned on.
Damage to equipment resulting from failure to follow this instruction
will void warranty.
7.2. Attach wand extension to spray gun. Tighten by
hand.
7.3. Choose desired spray tip, pull back nozzle extension
collar, insert spray tip and release collar.
7.3.1. Tug on spray tip to make sure it is securely in
place. See Spray Tips.
7.4. Uncoil high pressure hose and attach quick connect
end of hose to base of spray gun.
7.4.1. Pull down on collar of quick connect, slide
onto spray gun and let go of collar.
7.4.2. Tug on hose to be sure of tight connection.
The high pressure stream of water that this equipment produces
can cut through skin and its underlying tissues, leading to serious
injury and possible amputation.
7.5. NEVER connect high pressure hose to nozzle extension.
7.5.1. Keep high pressure hose connected to pump and spray gun while system is pressurized.
7.5.2. Always make sure that the spray gun, nozzles and accessories are correctly attached.
7.6. Similarly, attach other end of high pressure hose to high pressure outlet (A) (Shown on following page)
on pump.
7.6.1. Pull down on collar of quick connect, slide onto pump and let go of collar.
7.6.2. Pull on hose to be sure of tight connection.
Page 15

A = High Pressure Outlet
B = Water Supply Inlet.
Pump Uses 30W Non-Detergent Mineral Oil.
7.7. Turn Water Supply on, point gun in a safe direction and squeeze the trigger to purge the pump of
air and debris.
7.7.1. Do this for at least 30 seconds.
7.8. Take a look at all connections to make sure there are no leaks or loose connections.
IMPORTANT
DO NOT siphon standing water for the water supply.
Use ONLY cold water (less than 100°F).
7.9. Connect the garden hose to the water inlet.
7.9.1. Tighten by hand.
7.10. To start the machine, locate the engine switch on the side of the engine, and switch it to the
ON position. (see component chart to locate switch)
7.10.1. Check to make sure fuel valve is in the ON position and if starting cold apply
the choke. See 7.15 for PE-5024HWEBGEN for fuel system.
7.11. Pull recoil cord slowly until resistance is felt and then pull rapidly to avoid kickback.
7.11.1. Make sure to position yourself in a balanced position.
7.12. DO NOT place hand on engine exhaust for balance, this will result in severe burn.
Page 16
7.13. Electric start model - PE5024HWEBGEN.
7.13.1. Follow instructions from 7.1 to 7.9 & 7.10.1.
7.13.2. Move the throttle lever to MAX position.
7.13.3. Pull the choke out.
7.13.4. Turn key switch clockwise to ON position then to START
position (against spring tension), when the engine is running
release the key. Push the choke in and move the throttle lever to
set the desired speed.
7.13.5. After starting the engine, the elapsed time of the engine
in use will be counted. It will not count the elapsed time
of the engine operation by just turning the engine switch
ON.
7.14. Stopping the machine.
7.14.1. Keep the trigger on the wand pressed, turn the power
switch to OFF, turn off the fuel. On model PE5024HWEBGEN, turn
the key switch to the OFF position.
7.14.2. Once all water pressure has been released you can release
the trigger on the wand.
7.15. The engine of the PE-5024HWEBGEN model is equipped with a fuel-cut off solenoid that allows
fuel to flow to the carburetor main jet when the engine switch is in the ON or START position
and stops the flow of fuel to the main jet when the engine switch is in the OFF position. The
engine must be connected to the battery to energize the fuel-cut off solenoid, allowing the
engine to run. If the battery is disconnected, fuel flow to the carburetor will stop.

With the pressure washer working as normal, it is not advisable to reduce the
pressure on the unloader valve (by twisting adjuster anti-clockwise) for long
periods of time, as this redirects a proportion of the water flow back through
the by-pass system, which increases the temperature of the pump. If the
pressure is too high, it can be reduced slightly by reducing engine speed
marginally (from 3400rpm max to around 2800rpm). If the pressure needs to
be reduced further, it is recommended to use a larger nozzle size to reduce the
pressure.
If the nozzle size is too small, it will reduce the water flow and activate the by-
pass system, which will reduce the pump life, as it will run at a higher
temperature.
The pressure washer pump will move the same volume of water whatever the
pressure. The pressure is created by the size of the nozzle. The smaller the
nozzle the higher the pressure. It is important not to go too small as this will
reduce flow, which reduces cleaning efficiency and pump lifespan.
8. SPRAY TIPS
8.1. How to use spray tips
8.1.1. The quick–connect on the nozzle extension allows you to switch between four different
quick connect spray tips.
8.1.2. The spray tips can be changed while pressure washer is running once spray gun safety
lock is engaged.
8.1.3. The spray tips vary the spray pattern angle as shown above.
The high pressure stream of water that this equipment produces
can cut through skin and its underlying tissues, leading to serious
injury and possible amputation.
8.1.4. NEVER exchange spray tips without the trigger safety lock engaged on the spray gun.
8.1.5. DO NOT twist spray tips while spraying.
Page 17

8.2. Follow these instructions to change spray tips:
8.2.1. Pull back collar on quick–connect and pull current spray tip off.
8.2.2. Store spray tips in holder provided on the handle. Storing nozzles in the designated holder
will help prevent debris clogging the tip.
8.2.3. Select the desired spray tip:
8.2.3.1. For gentle rinse, select the white 40° spray tip.
8.2.3.2. To scour surface, select the yellow 15° or red 0° spray tip.
8.2.3.3. To apply detergent, select the black spray tip.
8.2.4. Pull back on collar, insert new spray tip and release collar.
8.2.4.1. Tug on the spray tip to make sure it is securely in place.
8.3. Usage tips
8.3.1. For most effective cleaning, keep the spray tip from 8 to 24 inches away from cleaning
surface.
8.3.2. If you get spray tip too close, especially using a high pressure spray tip, you may
damage surface being cleaned.
8.4. Using the Black soap nozzle.
8.4.1. To apply detergent, follow these steps:
8.4.1.1. Review use of spray tips.
8.4.1.2. Prepare detergent solution as required by job.
8.4.1.3. Place the small filter end of the detergent siphoning tube into the
detergent container.
Make sure that the filter is fully submerged in detergent while applying
detergent. THIS WASHER WILL ONLY DRAW SOAP WITH THE BLACK SOAPER
NOZZLE. The WHITE, RED, AND YELLOW NOZZLE WILL NOT DRAW SOAP.
8.4.2. Make sure the black spray tip is installed.
8.4.2.1. Make sure the garden hose is connected to the water inlet. Check that the high pressure
hose is
connected to the spray gun and pump.
8.4.2.2. Turn on water.
You must attach all of the hoses before you start the engine.
Starting the engine without all the hoses connected and without the water
turned ON will damage the pump.
Damage to the equipment resulting from failure to follow this instruction will
void warranty.
8.4.3. Start the engine following instructions ‘Starting Your Washer’.
8.4.4. Apply detergent to surface, using long, even, and overlapping strokes.
8.4.5. Allow the detergent to “soak in” for 5 minutes before washing and rinsing. Reapply as
needed to prevent the surface from drying.
8.4.6. DO NOT allow the detergent to dry on the surface being cleaned.
Page 18

IMPORTANT
You must flush the detergent siphoning system after each use by placing the filter into a bucket of
clean water, then run the pressure washer in low pressure for 1-2 minutes.
Contact with chemicals can cause bodily injury and/or property damage.
NEVER use caustic liquid with the pressure washer.
Use ONLY pressure washer safe detergent/soaps.
Follow all of the manufacturer’s instructions.
9. SHUTTING DOWN YOUR MACHINE
Contact with the exhaust area can result in serious burns.
Exhaust heat/gases can ignite combustibles, structures or damage
fuel tank causing a fire.
9.1. How to shut down your pressure washer
9.1.1. Release the spray gun trigger and let the engine idle down.
9.1.2. Turn the engine switch to the OFF position.
9.1.3. ALWAYS point the spray gun in a safe direction, squeeze the spray gun trigger to release
the retained high water pressure.
IMPORTANT
The spray gun traps high water pressure, even when the engine has stopped and water disconnected.
The couplings will not release if they are under pressure. To release hoses and coupling ALWAYS de-
pressurise by operating the trigger.
Page 19

10. MAINTENANCE
Service and maintenance must be performed by an authorised agent.
DO NOT tamper with, or attempt to adjust, the pressure switch or safety
valve. Before moving, or carrying out any maintenance on the machine,
make sure the ignition switch is OFF, and that the tank pressure has been
vented. Allow the machine to cool down for a period of time.
10.1. To keep the engine in good working condition, periodic maintenance is essential.
10.2. Engine.
10.2.1. For all engine maintenance, please refer to the engine manufacturers’ handbook (supplied).
11. TROUBLESHOOTING
11.1. If you are experiencing a problem that is not listed in this chart, or have checked all the
possible cause listed and you are still experiencing the problem, see your authorised dealer.
11.2. Petrol Trouble shooting see supplied Engine manual.
11.2.1. Petrol Engine Model – for further details see engine owner’s manual.
Problem Cause Correction
machine has following
problems: failure to
produce pressure, erratic
pressure, chattering, loss of
pressure, low water volume.
1. Low pressure spray tip installed. 1. Replace with high pressure spray tip.
2. Spray tip is obstructed. 2. Clean spray tip.
3. Spray gun leaks. 3. Replace spray gun.
4. Inadequate water supply. 4. Provide adequate water flow.
5. Clogged inlet hose screen. 5. Check and clean inlet hose screen.
6. Water supply is over 100°F (38°C). 6. Provide cooler water supply.
7. High pressure hose is blocked or
leaks. 7. Clear blocks in outlet hose.
8. Water inlet is blocked. 8. Clear inlet.
9. Inlet hose is kinked or leaking. 9. Straighten inlet hose, patch leak.
10. Pump is faulty. 10. Contact local service facility.
Detergent fails to mix with
spray.
1. Detergent siphoning tube is not
submerged.
1. Insert detergent siphoning tube into
detergent.
2. Detergent siphoning tube/filter is
clogged or cracked.
2. Clean or replace filter/detergent
siphoning tube.
3. High pressure spray tip installed. 3. Replace with low pressure spray tip.
Engine lacks power. 1. Dirty air filter. 1. Replace air filter.
Page 20
http://www.honda-engines-eu.com/
This manual suits for next models
11
Table of contents
Other BE Pressure Washer manuals