BE P2713EN User manual

96673-DG
04.2023
2,700 PSI
OPERATOR'S MANUAL
ELECTRIC PRESSURE WASHER
MANUEL D’UTILISATION DU LAVEUSES PRESSION
MANUAL DEL OPERADOR DE LA LAVADORA A PRESIÓN
P2713EN

2
Congratulations on your purchase of a BE Power Equipment pressure washer. You can be confident
that this pressure washer is constructed and tested with optimum performance and quality in mind.
Reading this manual will help get you the best results for set-up, operation, maintenance and avoid
personal injury or damage to your machine. By knowing how best to operate this machine, you will be
better positioned to show others who may also operate the unit.
All the information in this manual is based on the latest product information available at the time
of printing. BE Power Equipment reserves the right to make changes at any time without notice or
incurring any obligation.
Owner/Operator Responsibility
The owner/operator must have a thorough understanding of the operation, maintenance and dangers
associated with using this machine. It must be understood that it is ultimately up to the owner/operator
to safely use this machine as outlined in this manual.
This manual is considered a part of the machine and needs to be kept in a safe location. If the
machine is resold or given to someone else, this manual needs to be included.
Record Identification Numbers
It is recommended that you record the product identification numbers in this manual. These numbers
are important to have on hand if you need to contact technical support (1-866-850-6662). The model
and serial number can be found on the box and on decal on the machine.
Product Registration
Please register your product online to get the maximum benefit from your warranty. Use the QR code
below or register online at: bepowerequipment.com/product-registration
It is recommended that you record the product identification numbers in this manual. These numbers
are important to have on hand if you need to contact technical support (1-866-850-6662). The model
and serial number can be found on the box and on decal on the machine.
PRODUCT IDENTIFICATION
Model Number: P2713EN
Date of Purchase:
Dealer Name:

3
TABLE OF CONTENTS
SPECIFICATIONS
Model Max PSI
(lbs/sq. in.)
Rated PSI
(lbs/sq. in.)
Max GPM
(Gal/per min)
Rated GPM
(Gal/per min)
Cold
Water
Volts Frequency
(Hz)
Amps Weight
(lbs.)
P2713EN 2700 2150 1.3 1.1 120 60 15 40.8
PRODUCT SPECIFICATIONS
Product Specications...................................................................................................... 3
Package Contents ............................................................................................................. 4
Hardware Contents ........................................................................................................... 4
Safety Information............................................................................................................. 5
Assembly Instructions....................................................................................................... 7
Operating Instructions .....................................................................................................12
Care and Maintenance ................................................................................................... 14
Pump Saver ..................................................................................................................... 15
Troubleshooting............................................................................................................... 16
Limited Warranty............................................................................................................. 17
Replacement Parts List .................................................................................................. 18
4
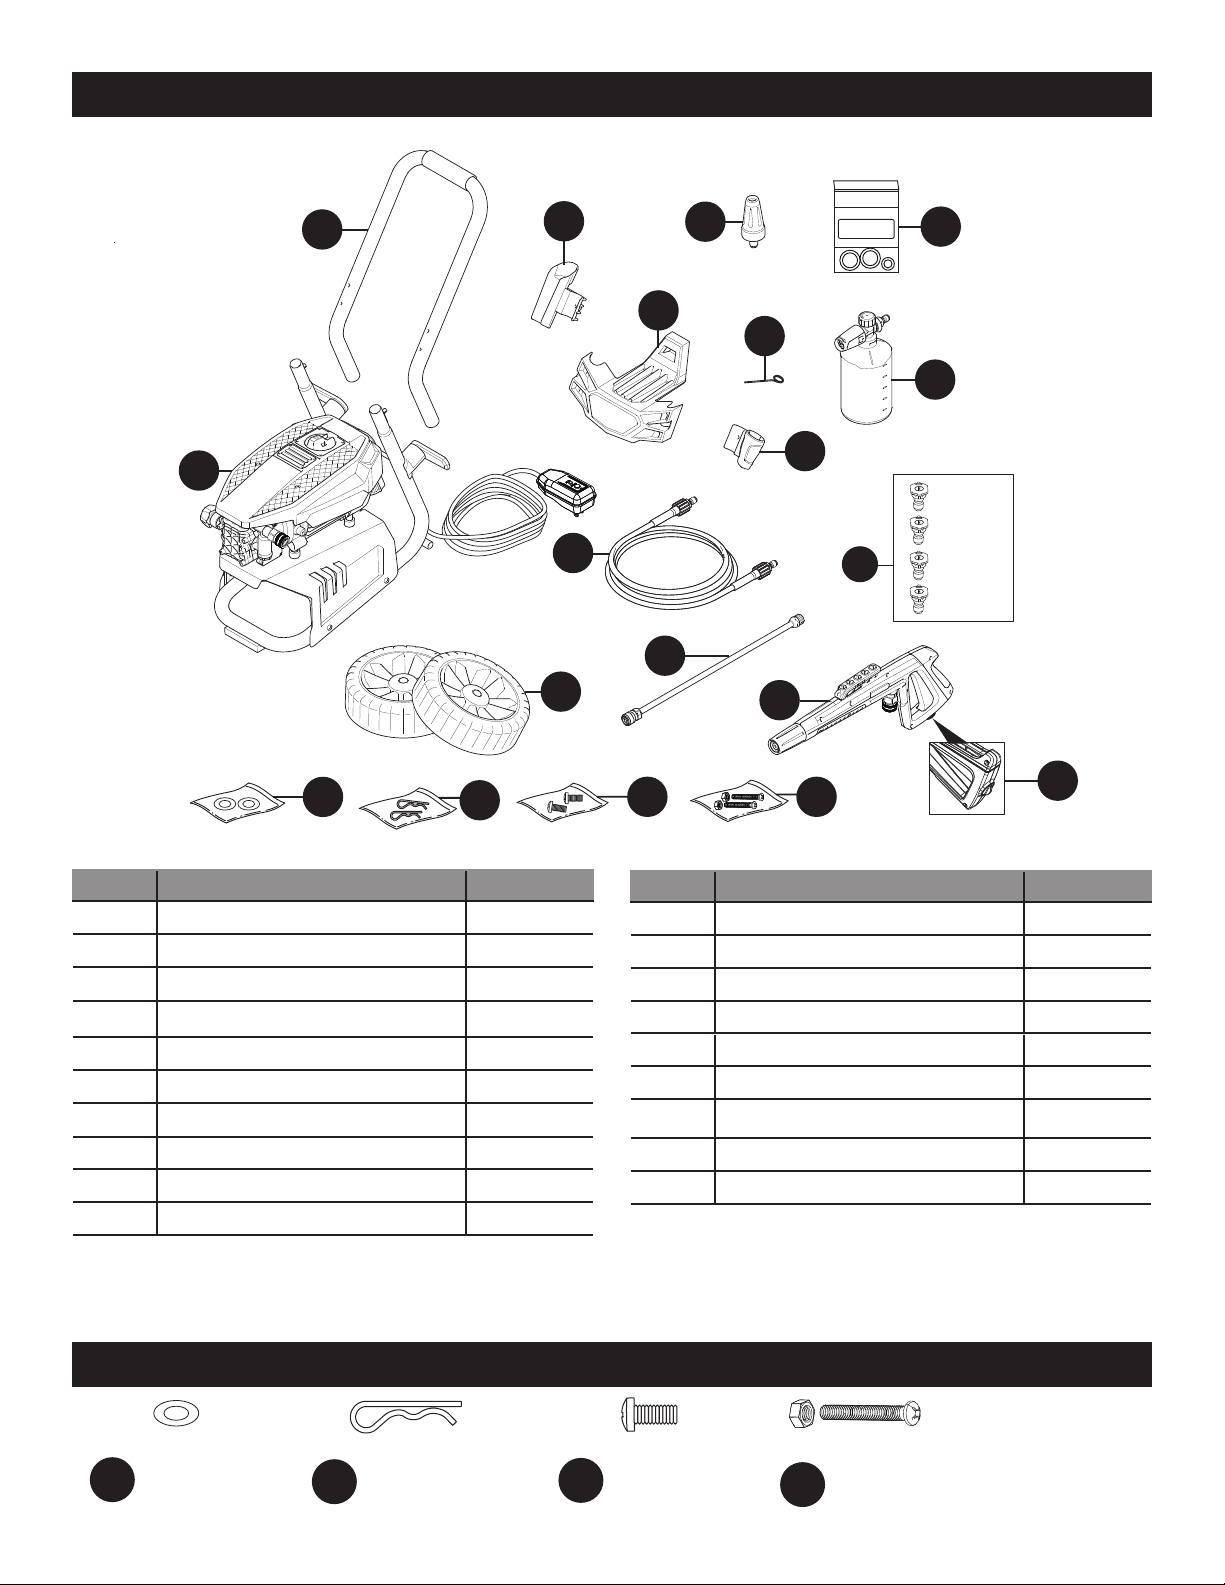
PACKAGE CONTENTSPACKAGE CONTENTS
HARDWARE CONTENTS
PART DESCRIPTION QUANTITY
KSpray Gun 1
LSpray Gun Trigger Lock 1
M Spray Gun Holster 1
NHigh Pressure Hose 1
OHigh Pressure Foam Cannon 1
AA Shims 4
BB Cotter Pins 2
CC Screws 2
DD Screws 2
PART DESCRIPTION QUANTITY
AHose Hook 1
BHandle 1
C Rotary Nozzle 1
DO-Ring Replacement Kit 1
EQuick Connect Nozzles 4
F Power Washer Unit 1
G Rotary Nozzle Holder 1
HNozzle Cleaning Wire 1
I Extension Lance 1
JWheels 2
F
M
A
N
K
J
C
I
L
G
H
AA CC
BB
D
PW95824
O
DD
B
E
25° – Green
40° – White
0° – Red
15° – Yellow
AA CC
BB
Shims
Qty. 4
Screws
Qty. 2
Cotter Pins
Qty. 2 DD Screws
Qty. 2

5
SAFETY INFORMATIONSAFETY INFORMATION
Please read and understand this entire manual before
attempting to assemble and operate the product.
This manual contains information that relates to
PROTECTING PERSONAL SAFETY and PREVENTING
EQUIPMENT PROBLEMS. It is very important to read this
manual carefully and understand it thoroughly before
using the product. The symbols listed below are used to
indicate this information.
DANGER
Potential hazard that will result in serious injury or
loss of life.
WARNING
Hazard that could result in serious injury or loss of
life.
CAUTION
Potential hazard that may result in moderate injury
or damage to equipment.
Note: The word “Note” is used to inform the reader of
something the operator needs to know about the tool.
WARNING
To reduce the risk of injury, the user must read
and understand the instructions before using
this product.
1. Warning – When using this product, basic
precautions should always be followed, including the
following.
2. Read all the instructions before using the product.
3. Know how to stop the product and bleed pressures
quickly. Be thoroughly familiar with the controls.
4. Keep operating area clear of persons.
5. Do not overreach or stand on unstable support. Keep
good footing and balance at all times.
6. Follow the maintenance instructions as specied in
the manual.
7. To avoid personal injury and/or damage to property
and to maximize your power washer experience,
carefully follow all of the safety tips, instructions,
warnings and safeguards and become familiar with
all of the controls. Be sure you know how to quickly
bleed off the pressure from all parts of your power
washer and how to turn off the power washer.
8. This power washer conforms to CSA and other safety
and consumer standards. DO NOT modify or rebuild
any part of your power washer.
9. DO NOT use your power washer when you are under
the inuence of alcohol or drugs. Use this power tool
carefully and only when you are alert.
10. Watch your balance and footing while using your
power washer. Surfaces become slippery when wet
and are extra slippery when using a detergent or
cleaner.
11. NEVER operate the power washer in bare feet,
sandals, or open-toed shoes.
12. When using the power washer near children, make
sure they are closely supervised by an adult to avoid
injury. NEVER let a child use the power washer.
13. Keep ngers, hands, feet and any part of your body
clear of the stream of high pressure water. The
powerful spray can cause blindness or blast holes in
the skin. It can break a window if you are too close
when you pull the trigger on the spray gun.
14. ALWAYS wear eye protection to prevent injury to
eyes when operating the power washer.
15. To avoid mishaps or injury, ALWAYS use the trigger
safety lock when not using the power washer even if
only stopping briey.
16. The power washer is equipped with a Ground Fault
Circuit Interrupter (GFCI) (For US unit only) which
greatly reduces the chance of electric shock while
the unit is in use. If replacement of the plug or cord
is needed, use only identical replacement parts.
17. Point the spray gun in a safe direction when
beginning a power washer session.
18. Warning- NEVER spray directly at a person, animal,
electrical device or the unit itself.
19. When rst using the spray gun, hold the spray gun
and lance with two hands when pulling the trigger
(one hand to pull the trigger and the other to
stabilize the gun assembly) until you get used to the
“kickback” from the spray gun.
20. When you turn the power switch off, water pressure
may remain in the system. To discharge the
pressure, point the spray gun in a safe direction
and pull the trigger.
21. NEVER spray ammable liquids.
22. NEVER use the power washer in areas that contain
combustible dust, liquids or vapors.
23. Avoid contact of the pressure hose with sharp
objects and examine the hose regularly. Replace
if damaged. Due to the high pressure involved, it
cannot be repaired if cut or damaged.
24. Only use detergent specically formulated for power
washers and follow instructions on the detergent’s
label. Dish or laundry soap is too thick and will
clog the nozzle of your foam cannon.
25. Protect eyes, lungs, and skin from exposure to
detergent.
26. Warning-If connection is made to a potable water

6
SAFETY INFORMATIONSAFETY INFORMATION
KEEP THESE INSTRUCTIONS FOR FUTURE REFERENCE.
system, the system Should be protected against
backow.
CAUTION
Store the power washer indoors to prevent the
water in the unit from expanding under freezing
conditions. When the water freezes and
expands,
your power washer will be damaged and become
inoperable. Or, if storing outdoors, it is
recommended you use pump saver (not included)
to protect pumps.
27. NEVER use hot water with your power washer. It will
overheat and damage the high pressure pump.
28. NEVER leave the power washer unattended while it
is powered “ON”.
29. ALWAYS turn the water supply on before turning the
power washer power to on. Running the pump dry
will cause damage to the internal components.
30. NEVER use a water supply to your power washer
that exceeds 150 PSI maximum.
31. NEVER disconnect the high pressure hose from the
power washer while the system is pressurized.
32. NEVER permanently engage the trigger mechanism
on the spray gun.
33. NEVER operate the power washer unless all
components are properly and securely connected.
34. NEVER allow the power washer pump to run for
more than one minute after you have turned off the
water supply. This can cause the motor and pump to
overheat and fail.
35. NEVER use lances or other parts that are not
compatible for this specic AR BLUE MAXX unit.
36. NEVER use an extension power cord since it defeats
the effectiveness of the GFCI (For US unit only) and
increases the chance of electrocuting the operator.
37. NEVER spray any electrical outlet with your power
washer.
38. Inspect the power cord before using. DO NOT use it
if it is damaged.
39. Stay alert - watch what you are doing.
Ground Fault Circuit Interrupter Protection (For US unit
only):
This pressure washer is equipped with a ground-fault
circuit-interrupter (GFCI) built into the plugs of the
power-supply cord. This device provides additional
protection from the risk of electric shock and have
automatic detection function to detect whether
the additional protection function is invalid. Should
replacement of the plug or cord become necessary,
use only identical replacement parts that include GFCI
protection.
This product must be grounded. If it should malfunction
or breakdown, grounding provides a path of least
resistance for electric current to reduce the risk of
electric shock. This product is equipped with a cord
having an equipment-grounding conductor and a
grounding plug. The plug must be plugged into an
appropriate outlet that is properly installed and
grounded in accordance with all local codes and
ordinances.
DANGER – Improper connection of the equipment-
grounding conductor can result in a risk of electrocution.
Check with a qualied electrician or service personnel
if you are in doubt as to whether the outlet is properly
grounded. Do not modify the plug provided with the
product – if it will not t the outlet, have a proper outlet
installed by a qualied electrician. Do not use any type
of adaptor with this product.

7
PREPARATION
Before beginning assembly of product, make sure all
parts are present. Compare parts with package contents
list and hardware contents list. If any part is missing or
damaged, DO NOT attempt to assemble the product.
Please call customer service at 1-866-850-6662.
Replacement parts will be sent no charge.
Estimated Assembly Time: 5 minutes.
Tools Required for Assembly (not included): Phillips
screwdriver.
ASSEMBLY INSTRUCTIONS
PREPARATION
1
AA
AA
J
2
3
1
BB
F
2
B
F
3
2
2
1
Shims
Cotter Pins
x 4
x 2
AA
BB
AA CC
BB
Shims
Qty. 4
Screws
Qty. 2
Cotter Pins
Qty. 2 DD Screws
Qty. 2
AA CC
BB
Shims
Qty. 4
Screws
Qty. 2
Cotter Pins
Qty. 2 DD Screws
Qty. 2
Hardware Used:
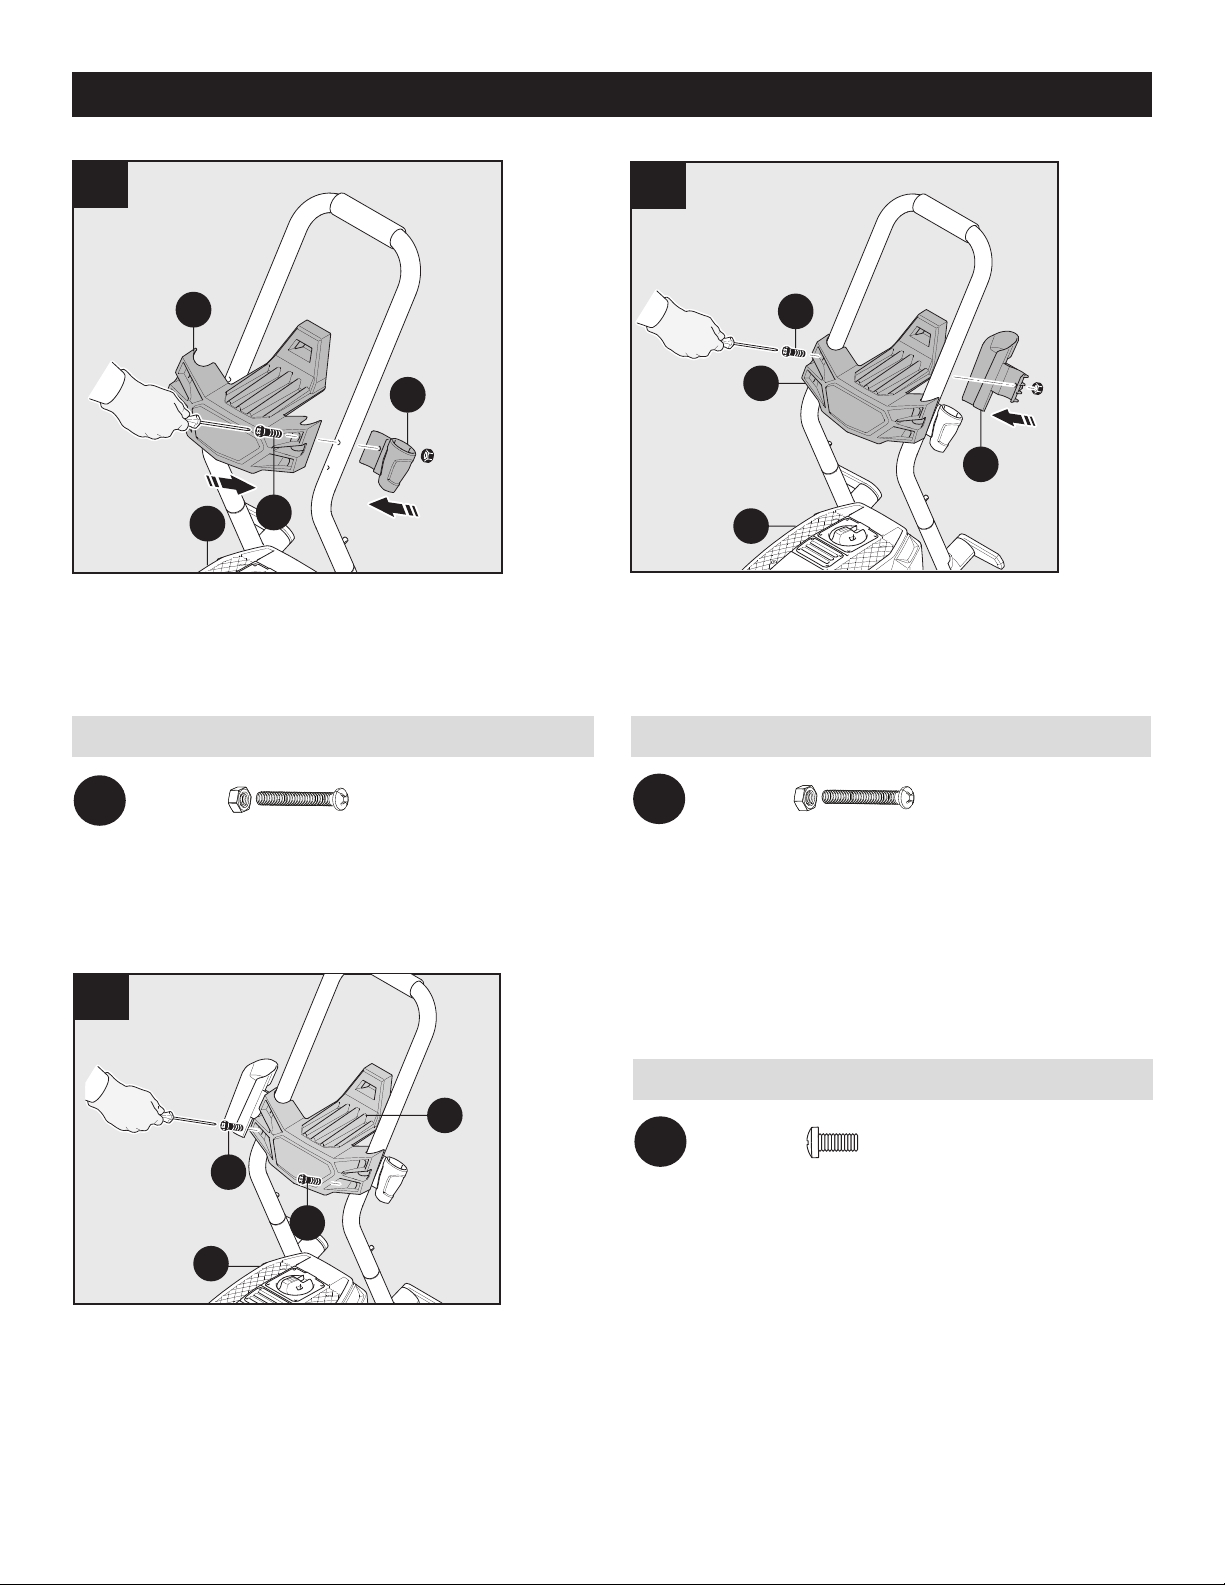
Wheels Assembly
Install shims (AA) and wheels (J) to power washer unit
(F). Secure with cotter pins (BB).
Press buttons on power washer unit (F) and install
handle (B). power washer unit (F) will click when handle
is in proper position.
8
3
G
A
FDD
4
F
A
DD
M
5
CC
F
CC
A
ASSEMBLY INSTRUCTIONS
Install rotary nozzle holder (G) and one side of hose
hook (A) to power washer unit (F). Secure with screw
(DD).
Screw x 1
DD
Hardware Used:
AA CC
BB
Shims
Qty. 4
Screws
Qty. 2
Cotter Pins
Qty. 2 DD Screws
Qty. 2
Install spray gun holster (M) and another side of hose
hook (A) to power washer unit (F). Secure with screw
(DD).
Fix the bottom of hose hook (A) on the power washer
unit (F). Secure with screws (CC).
Screw
Screws
x 1
x 2
DD
CC
Hardware Used:
Hardware Used:
AA CC
BB
Shims
Qty. 4
Screws
Qty. 2
Cotter Pins
Qty. 2 DD Screws
Qty. 2
AA CC
BB
Shims
Qty. 4
Screws
Qty. 2
Cotter Pins
Qty. 2 DD Screws
Qty. 2
9
ASSEMBLY INSTRUCTIONS
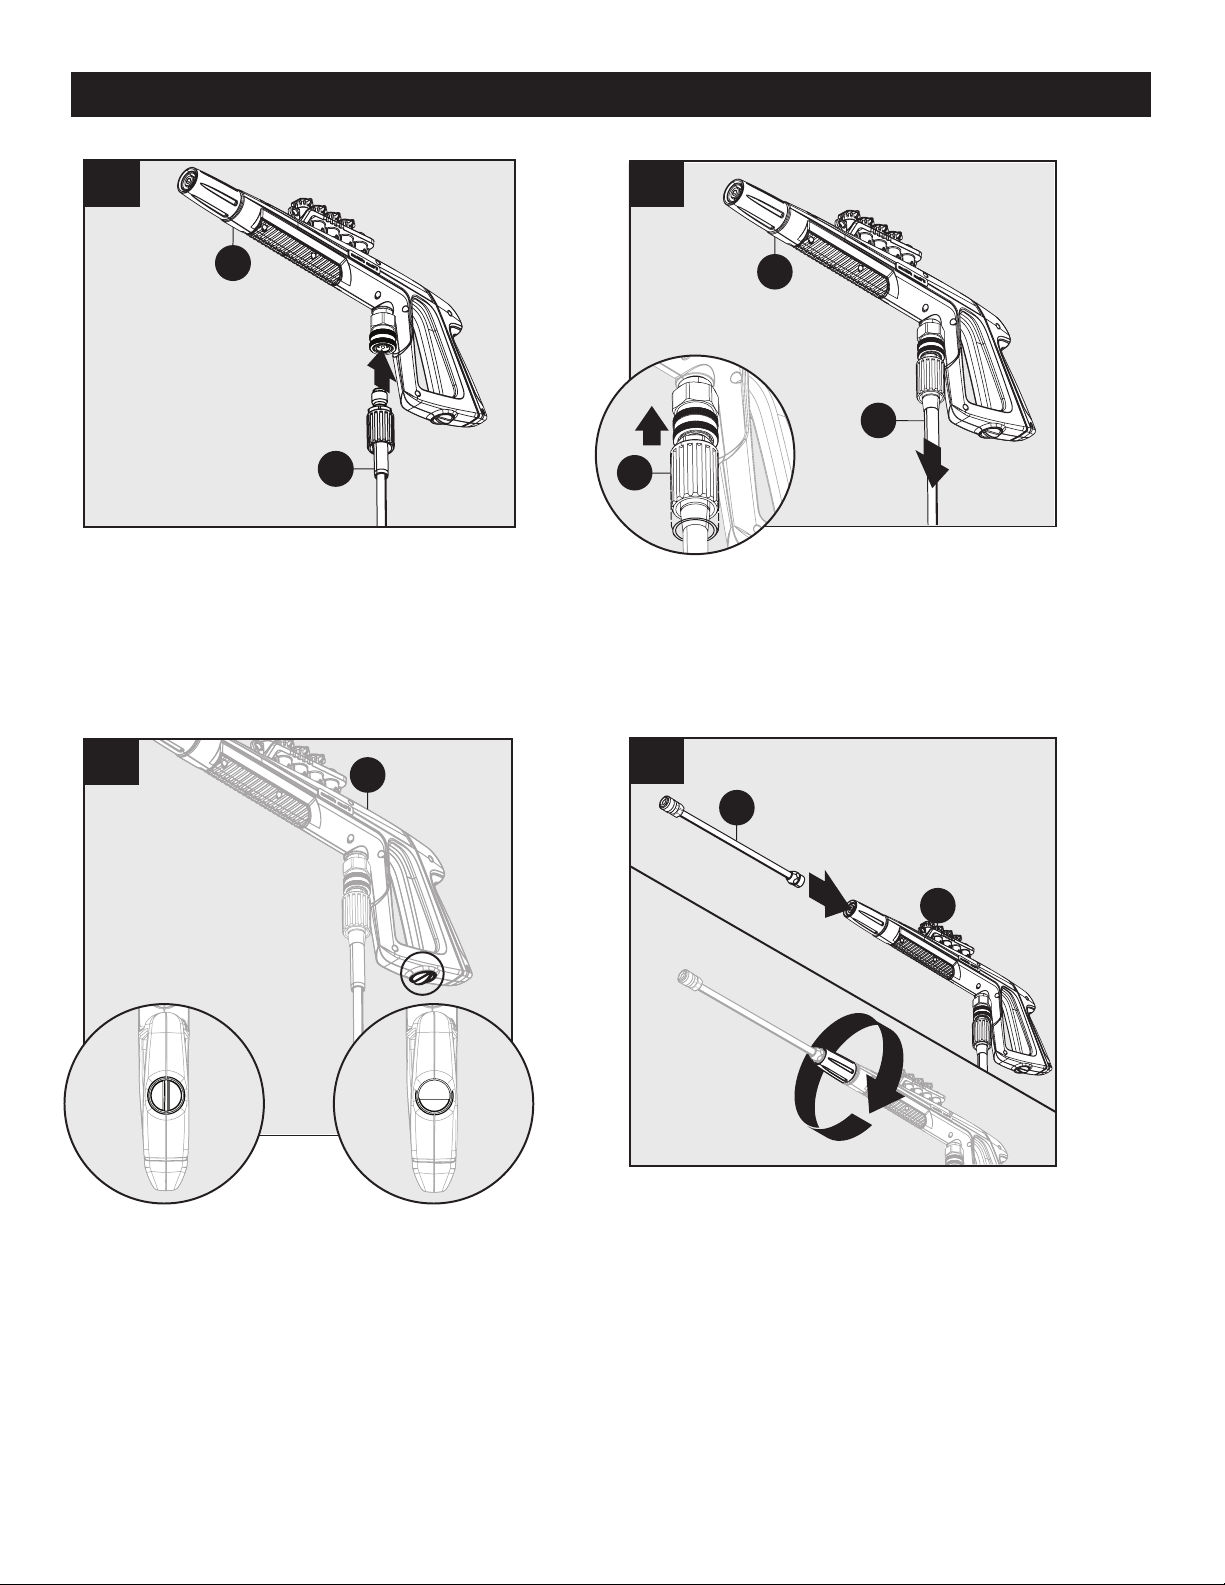
Locking Spray Gun (before Lance installation) To lock
trigger of spray gun (K), point gun away from you and
turn dial to lock (“3” and “9” position). Squeeze or pull
trigger to make sure it is locked. Always leave in locked
position when not in use. This ensures the gun is in
“safe” mode until it is ready for use. Turn dial to unlock
(“12” and “6” position) to release spray gun trigger.
Note: The trigger lock prevents trigger from being
accidentally engaged.
Attach one end of high pressure hose (N) into the
connector of spray gun (K) by pressing the end into
place. It will make a “click” sound when rmly in place.
The hose is now securely attached to spray gun.
To remove the high pressure hose (N), pull back on
collar of spray gun (K) and pull out the hose.
Extension Lance Installation
While spray gun (K) is in the locked position, insert
lance (I) into the end of spray gun by inserting and turn-
ing clockwise until fully in place. To remove, turn coun-
terclockwise.
K
N
67
K
N
2
N
1
8
K
1
Unlocked Locked
I
K
1
2
9
10
ASSEMBLY INSTRUCTIONS
10
I
E
C
1
2
2
1
11
I
E
C
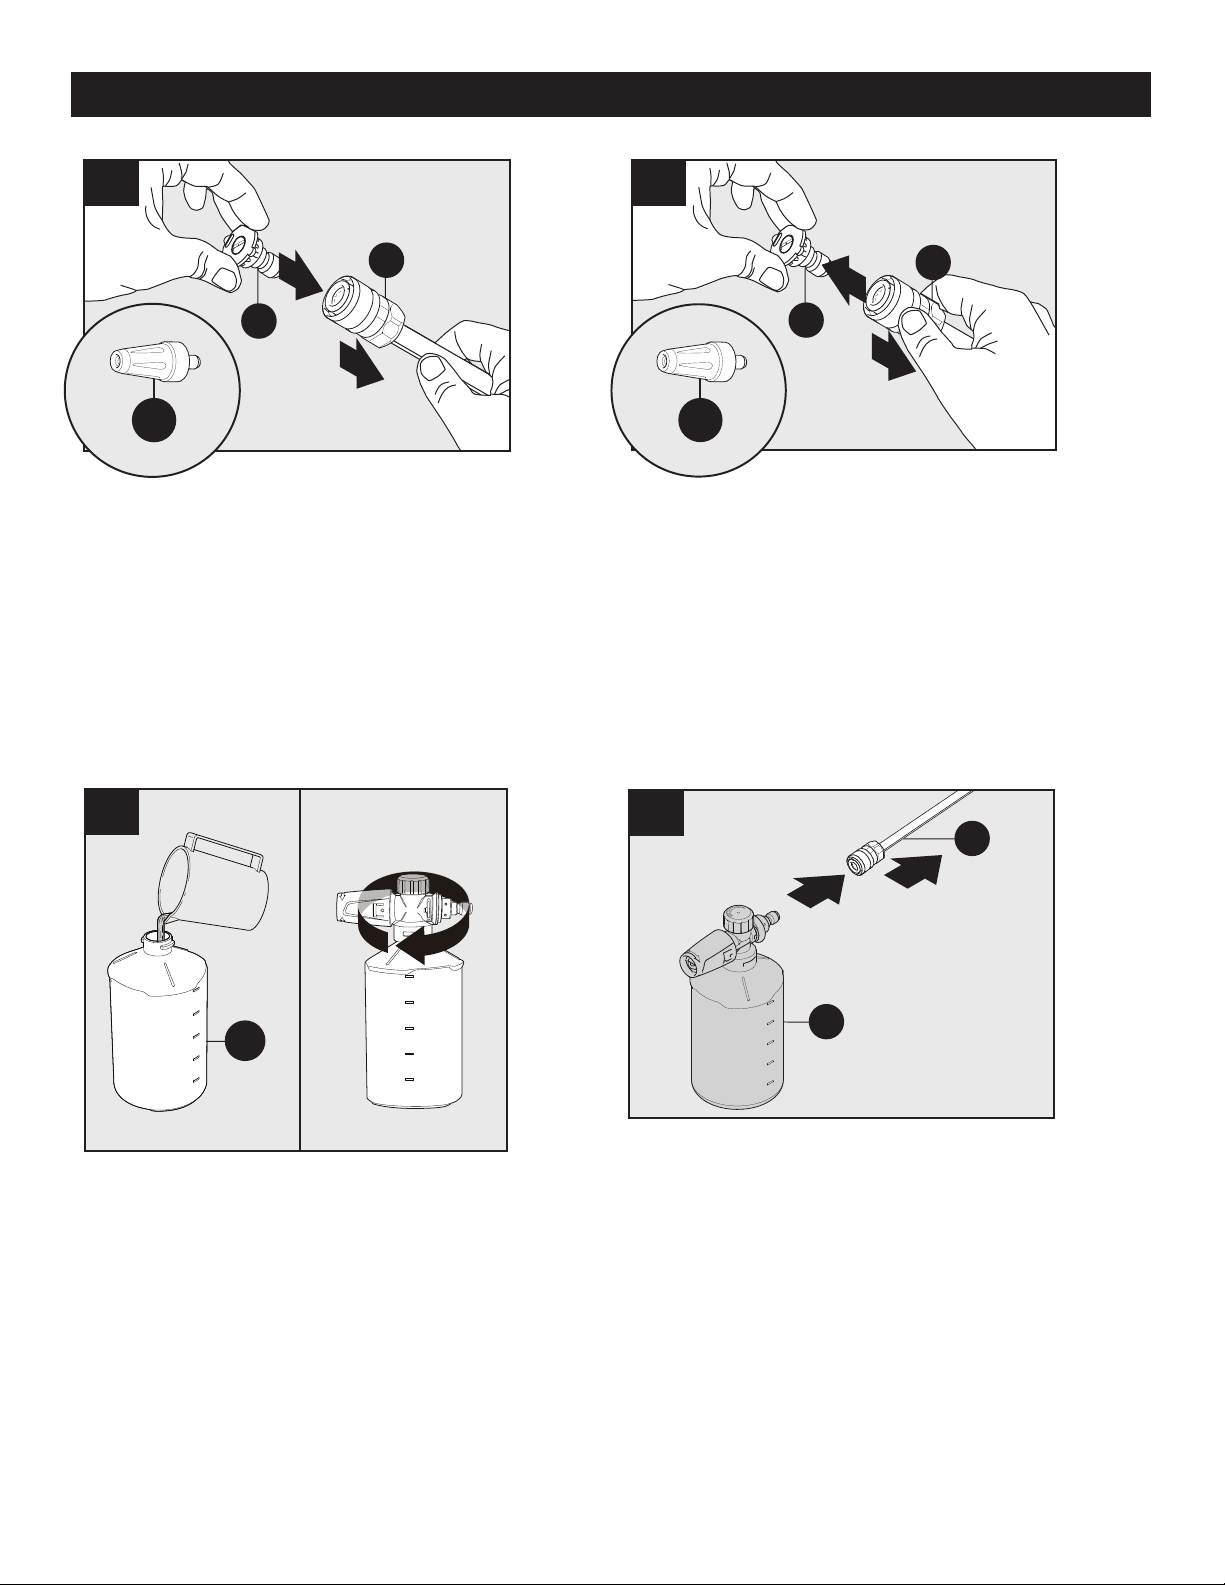
To remove nozzle (E) and Rotary nozzle (C), pull back on
collar of lance (I) and pull out nozzle.
Pull back on collar of lance (I), attach nozzle (E) or ro-
tary nozzle (C) into end of lance (I) by pressing selected
nozzle into place. It will make a “click” sound when
rmly in place.
Note: Always push safety lock button to lock trigger
when changing lances and nozzles to ensure that they
do not accidentally eject with force during removal.
Foam Cannon Installation
The foam cannon (O) comes with a straw which is tted
into high pressure top. If you do not see the straw,
look inside the foam cannon and attach it to the high
pressure top. When using foam cannon, ll it with a
properly formulated detergent or cleaner with a water
ratio according to instructions on the container.
DO NOT use thick or gel-like detergents as they will clog
the foam cannon and can cause damage.
12
1
750ml
600ml
450ml
300ml
150ml
2
O
Pull back on collar of lance (I), attach foam cannon (O)
into end of lance by pressing cannon into place. It will
make a “click” sound when rmly in place.
Note: Always lock spray gun when changing the foam
cannon to ensure it does not eject with force.
When using the foam cannon, ll it with a properly
formulated detergent or cleaner with water ratio
according to instructions on the container.
I
O
13
2
1
Table of contents
Languages:
Other BE Pressure Washer manuals


