BE WHIRL-A-WAY BE-1200WAW User manual

WHIRL-A-WAY
OPERATIONS MANUAL
BE-1200WAW
BE-1600WAW
BE-1800WAW
BE-2000WAWY
BE-2200WAWG
BE-2000WAWS
BE-2400WAWS
DISTRIBUTED BY

16" - 24" SET-UP PROCEDURES
We recommend
that you first fit
the lower por-
tion of the handle
into the mounting
brackets on the
cover and secure
with the bolts or
the pins & clips.
1 2 Next, tighten
the “xed” hose
end into the gun
mounted onto
the upper portion
of the handle.
Use teon tape
on the hose ends
and tighten until
snug. Do not
overtighten.
Once this is com-
plete, join the two
sections of the
handle together
and secure with
the bolt or the
pin & clip.
3
Turn the cover
over and check to
ensure that the
nozzle tips are
securely tightened
and the spray pat-
tern is in line with
the rotary arm.
5
4Next, tighten the
swivel end of the
hose into the top
of the rotary head
until snug.
Inspect the rotary
head to make sure
the rotary arm spray
tips are a minimum
of 1” distance from
the surface being
cleaned.
6
1
NOTES

The Surface Cleaning System you have purchased
connects directly to your high pressure hose and
pressure washer by means of quick couplers, operating
to a maximum of 4000 PSI. Please note that the 12"
Whirl-A-Way connects directly to a 1/4" quick connect
coupler, operating to a maximum of 2500PSI.
This Whirl-a-Way is designed to operate with both hot &
cold water pressure washers up to 180°F.
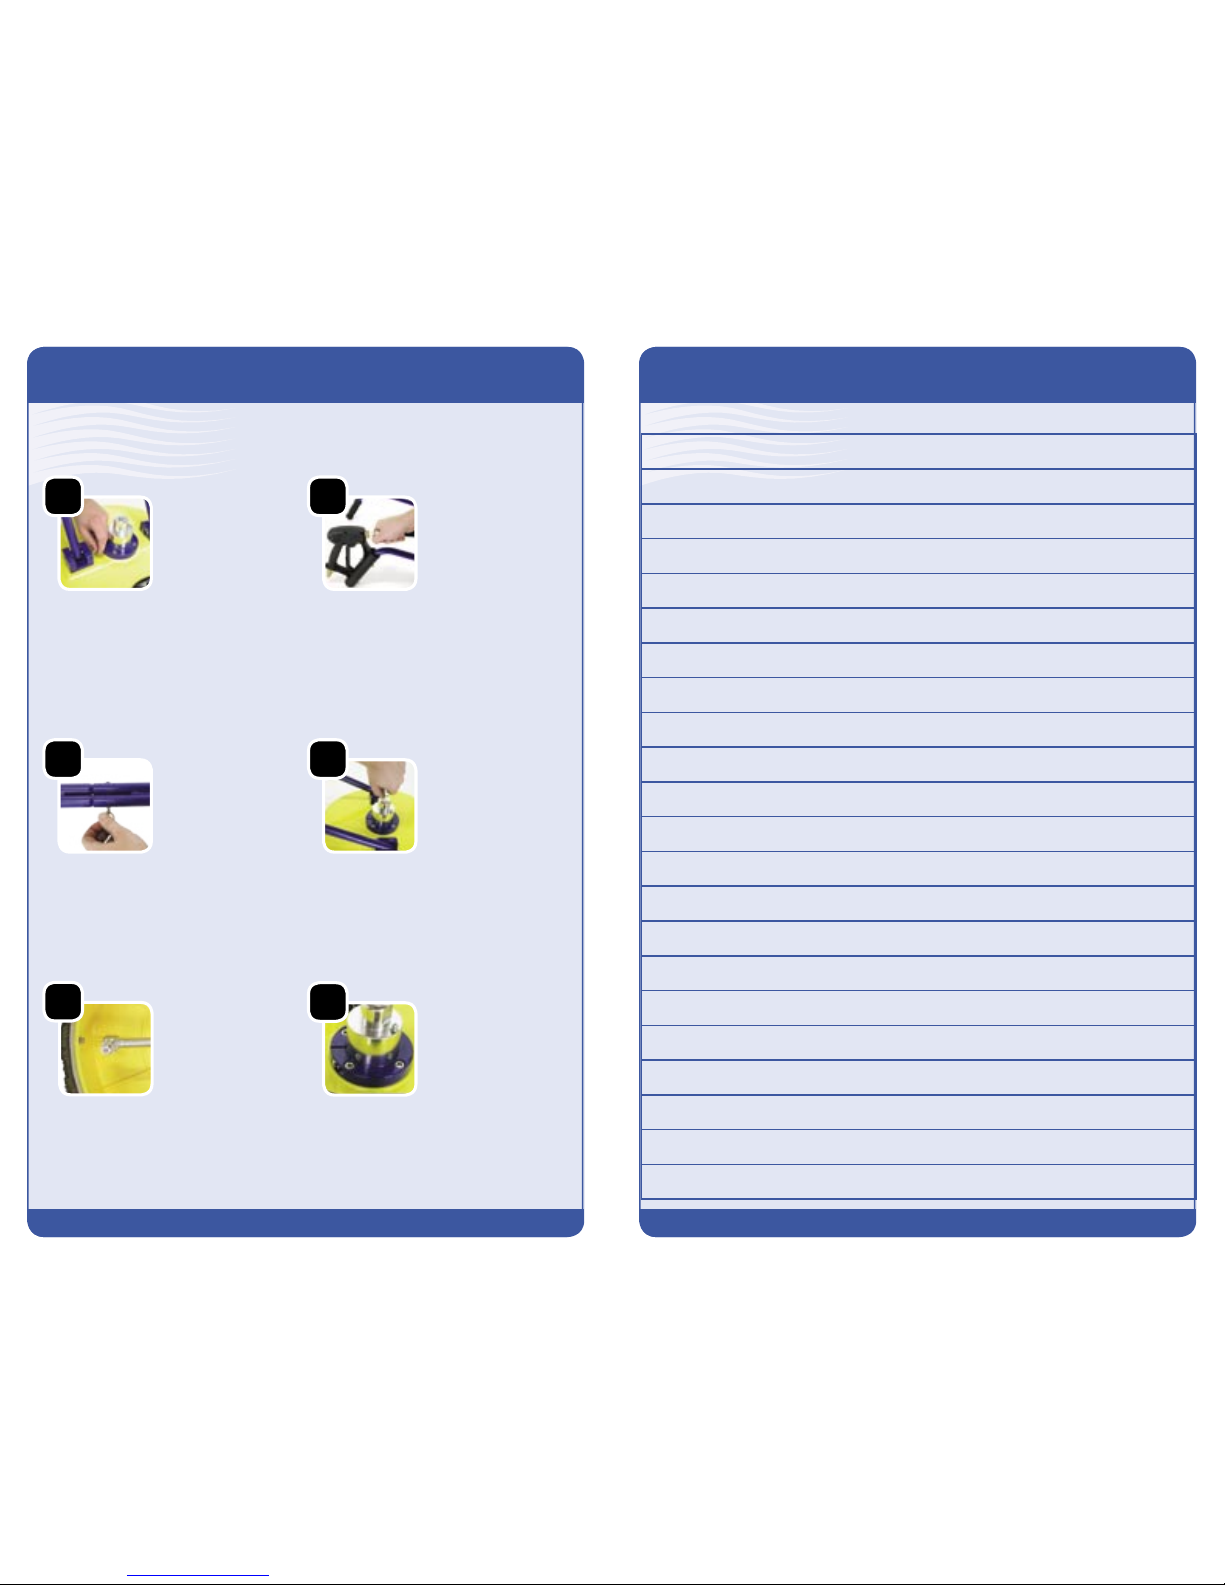
We recommend that you supply grease to the rotary head
every 30 – 40 hours of use. Simply add a small squirt of
automotive grease, do not overll with grease as it will
bog down the rotary head.
During operation, should you experience a buildup of
small stones or other foreign material within the cover,
we recommend that you simply tip the cleaner on its side
at 45° which should expel any foreign materials. This
will give longer wear to your tips and swivel arm, nozzles
and brush skirt (if applicable).
The tips that have been installed on your surface cleaning
system permit the use of your cleaner with a pressure
washer producing up to 7 GPM at 4000 PSI. Please note
that the 12" Whirl-A-Way can only be used with a pressure
washer producing up to 2500 PSI. Periodically check the
tips to ensure they are not plugged by dirt particles. As
this can cause the rotary arm to stop spinning. Or stripping
to be left on the surface being cleaned.
It is very important when operating your Whirl-a-Way,
that you maintain a continuous motion to ensure an even
clean. The distance of the nozzle tips from the surface
can be adjusted by loosening the bolt on the rotary head
mounting collar and adjusting the rotary head up or down.
Be certain the allen head bolt is tightened again to prevent
the rotary head from moving during operation. Please
ensure that your rotary head is adjusted to maintain a
minimum of 1” clearance between the spray tips and the
surface being cleaned.
OPERATING INSTRUCTIONS
13 2
The rotary head has a six-month warranty from
the date of purchase. Should you encounter problems with the
rotary head within that time period, simply return the defective part
for warranty to the place of purchase. If you encounter problems
after the six month period has lapsed, we sell a rotary head repair
kit. You can use this kit to replace the components inside the rotary
head very quickly.
There is no warranty on the nylon brush ring.
All other components of the surface cleaning system have a 90-day
warranty against manufacturer’s defects only.
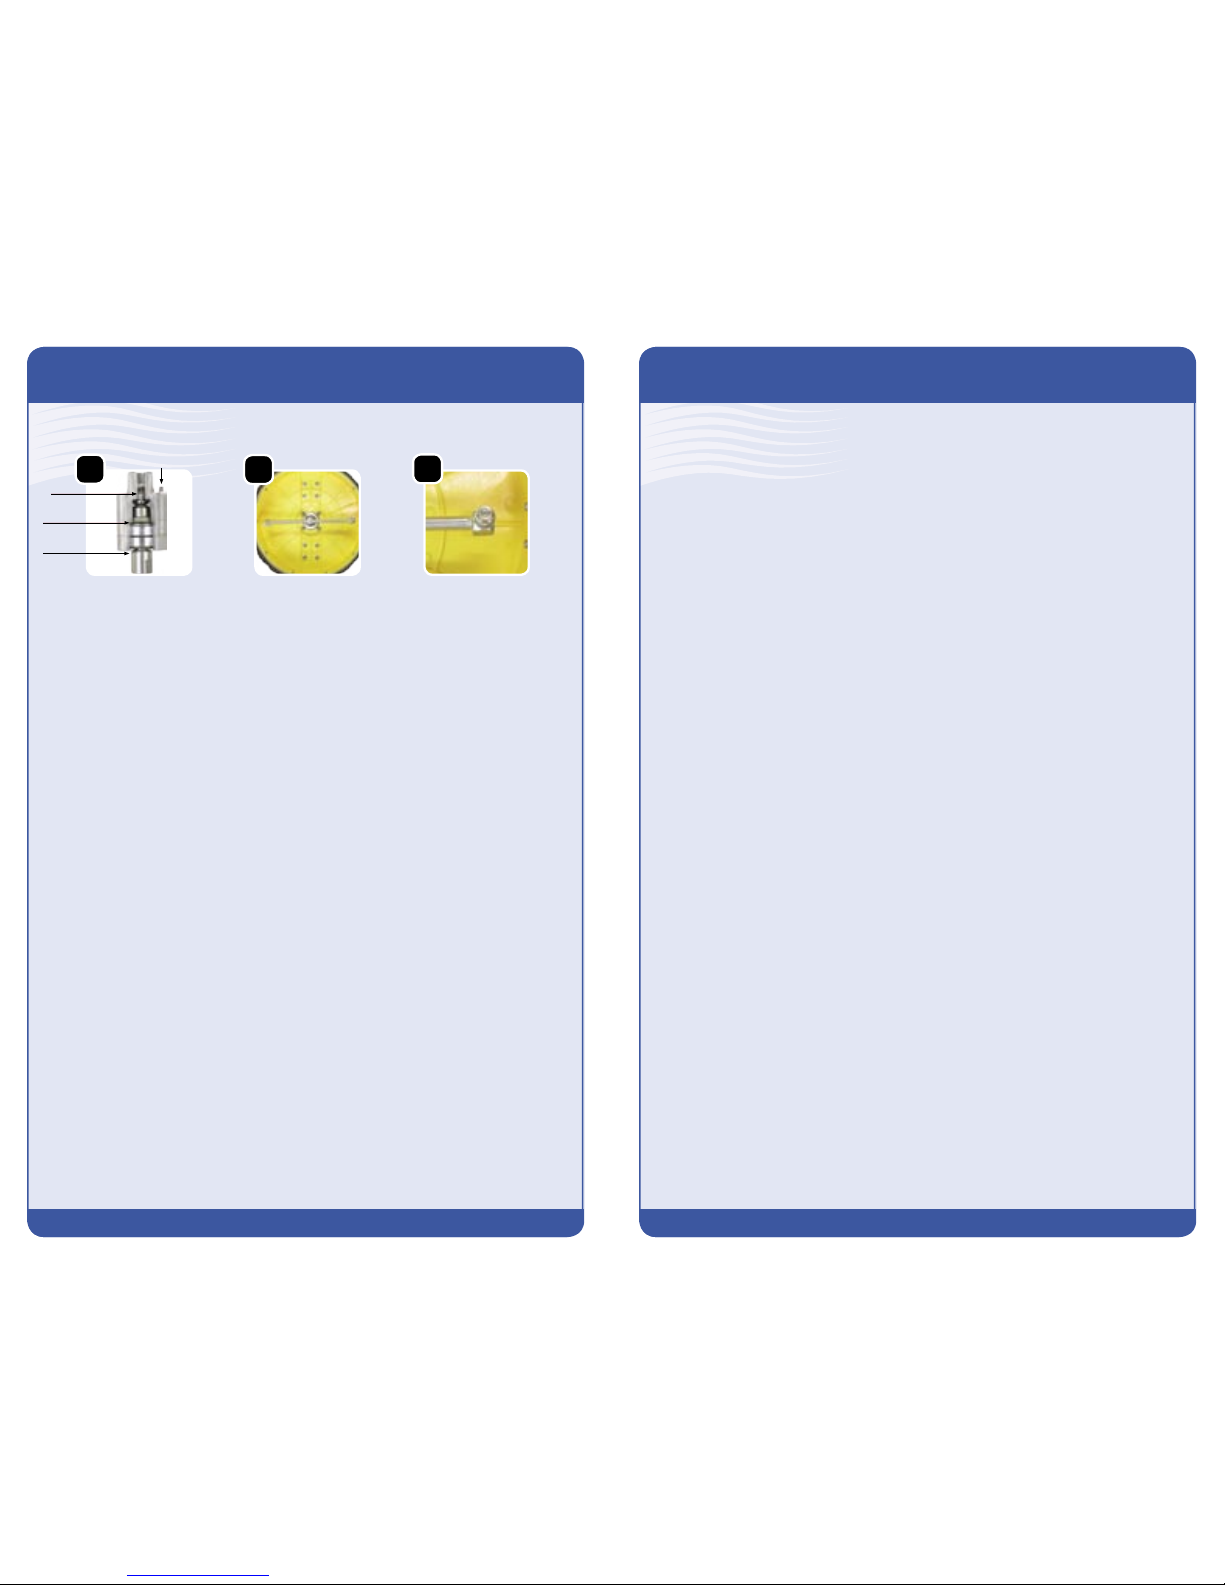
A repair kit for this Whirl-a-Way’s rotary head is
available. If you encounter problems with the rotary
head after the six month warranty has expired, this
repair kit (part #85.790.010) allows you to replace the
inner components very quickly.
The rotary head has a snap ring on the bottom holding
all the bearings inside. By removing the snap ring and
washer, you can tap off the outer shell with a rubber
hammer while the output shaft is held in a vice. The
rotary head repair kit can then be used to replace the
worn items inside the rotary head shell.
ROTARY HEAD REPAIR PARTS
WARRANTY
1) If water is leaking from the bypass port in the bottom of the
rotary head: Inspect the viton O-Ring in the rotary head.
2)Rotary Arm doesn't spin:
•Remove, inspect and clean nozzles. Replace if damaged
•Rotary head may not have been greased.
•Ensure there is no water leaking from the bypass port on the rotary head.
3)Leaves stripping:
•Ensure nozzles aren't damaged or plugged.
•Ensure rotary arms are straight.
123
TROUBLE SHOOTING
14
Bypass Port
Grease nipple
Viton O-Ring
Viton O-Ring

While operating your surface cleaning system, please ensure
that the nylon brush skirt remains in contact with the surface
being cleaned. Do not operate on overhead surfaces. We
strongly recommend that safety eye goggles, gloves and
work boots be worn when operating this Whirl-a-Way. Keep
hands and feet away from the high pressure, high speed
rotating arm that is protected by the plastic cover.
Should your surface cleaner not be used for long periods
of time, it is recommended that you remove the hose from
the top of the rotary head and a vegetable oil be used to
lubricate the swivel head’s internal parts. Manually turn the
rotary arm to allow lubrication of all internal parts before
storing.
You will quickly find your surface cleaning sys-
tem a welcome addition to your pressure washing
applications. It is designed to give you a safe and rapid
method for cleaning hard surfaces, and will save you time
in comparison to using a conventional gun and wand. The
durability of this surface cleaning system is enhanced by
the way it is handled by the operator. Please take care to
ensure that the Whirl-a-Way is not continuously being swung
against buildings, curbs, etc., which can damage the cover,
castors and rotary arms. Also, be aware that the high speed
rotating arm must not come in contact with rigid protruding
objects which can quickly damage or completely break off
the steel or stainless steel arm. Do not apply excessive
weight to the Whirl-A-Way cover to prevent cracks or dents
that could interfere with the rotary arm.
3
OPERATING INSTRUCTIONS PARTS BREAKDOWN
12
BE-2400WAWS
BE-2000WAWS
5
6
9
4
7
13
12
3
10
12
14
8
11

A B C
CONNECTING & RECONNECTING THE M22 HOSE
Before use with gun, lance, or longwand ensure that the M22 is connected properly.
USE WITH A GUN AND LANCE
A B C
Connect to lance using q/c ttings on
the lance and whirl-a-way. Ensure the
M22 hose is connected properly before
use.
12" SETUP & APPLICATIONS
411
PARTS BREAKDOWN
BE-2400WAWS
No#
1
2
3
4
5
6
7
8
9
10
11
12
13
14
Part #
85.791.002
85.790.004
85.419.117
85.238.057
85.202.115
85.300.105S
85.419.036
85.419.035
85.602.005
85.790.019S
85.790.020
85.419.024S
85.791.010S
85.225.020
Description
Bracket, Mounting Head 24"
Rotary Head, 24"
Mounting Blocks
Hose, 62" x 3/8"
Spray Gun
Plug, 3/8" MNPT SS
Handle, Upper 24"
Handle, Lower 24"
Hand Grip
Brush Skirt, 24"
Castor Wheel
Cover, Stainless Steel 24"
Rotary Arm, 24"
Nozzle, 25 Deg. 020
ROTARY HEAD REPAIR PARTS
No#
1
2
3
4
Part #
85.790.010
85.790.001
85.790.002
85.790.011
Description
Rotary Head Rebuild Kit
Inlet Valve
Inlet Valve Viton O-Ring
Outlet Shaft
BE-2000WAWS
No#
1
2
3
4
5
6
7
8
9
10
11
12
13
14
Part #
85.791.002
85.790.004
85.419.117
85.238.057
85.202.115
85.300.105S
85.419.036
85.419.035
85.602.005
85.790.014S
85.790.009
85.419.020S
85.791.012
85.225.020
Description
Bracket, Mounting Head 20"
Rotary Head, 20"
Mounting Blocks
Hose, 62" x 3/8"
Spray Gun
Plug, 3/8" MNPT SS
Handle, Upper 20"
Handle, Lower 20"
Hand Grip
Brush Skirt, 20" Stainless Steel
Castor Wheel
Cover, Stainless Steel 20"
Rotary Arm, 3-Way
Nozzle, 25 Deg. 020

105
A B C
ATTACH TO LONGWAND
USE WITH A SPRAY GUN KIT (OPTIONAL KIT #85.400.066)
The 12" Whirl-A-Way is equipped for use with an
optional spray gun kit P/N#85.400.066). Disconnect
the M22 hose, then assemble the handle and spray
gun as outlined.
B
Attach to a longwand for cleaning hard to reach
surfaces. Connect to longwand using the QC t-
tings on the longwand and Whirl-A-Way. Ensure
the M22 hose is connected properly before use.
PARTS BREAKDOWN
5
6
9
4
7
12
12
3
10
11
13
BE-2200WAWG
No#
1
2
3
4
5
6
7
8
9
10
11
12
13
14
15
Part #
85.791.002
85.790.004
85.419.119
85.238.057
85.202.116
85.300.105
85.419.038
85.419.039
85.602.005
85.790.026
85.419.013
85.791.029
85.225.025
85.419.045
85.790.009
Description
Bracket, Mounting Head
Rotary Head
Mounting Block
Hose, 62" x 3/8"
Spray Gun
Plug, 3/8" MNPT
Upper Handle w/ Threaded Plastic
Lower Handle
Hand Grip
Nylon Brush
22" Cover w/ Molded Brackets
Rotary Arm for 22" - 2 Arm Design
Nozzle, 25 Deg. 025
Castor Bracket
Castor
No#
1
2
3
4
Part #
85.790.010
85.790.001
85.790.002
85.790.011
Description
Rotary Head Rebuild Kit
Inlet Valve w/ O-Ring
Inlet Valve Viton O-Ring
Outlet Shaft
PARTS LIST
ROTARY HEAD REPAIR PARTS
15
8
14
12" SETUP & APPLICATIONS
A

5
4
2
6
BE-1200WAW
No#
1
2
3
4
5
6
7
Part #
85.214.012
85.790.021
85.791.015
85.419.012
85.790.024
85.791.016
85.215.020
Description
Hose, 12" x 1/4"
Rotary Head, 12"
Mounting Bracket
Cover, ABS Nylon Material 12"
Nylon Brush Skirt, 12"
Rotary Arm
Nozzle, 15 Deg. 020
PARTS LIST
PARTS BREAKDOWN
6
9
PARTS BREAKDOWN
BE-1800WAW
5
6
9
4
7
13
1
2
3
12
10
14
No#
1
2
3
4
5
6
7
8
9
10
11
12
13
14
Part #
85.791.001
85.790.006
85.419.116
85.238.057
85.202.115
85.300.105
85.419.041
85.419.040
85.602.005
85.790.007
85.419.023
85.419.019
85.791.007
85.225.025
Description
Bracket, Mounting Head 18"
Rotary Head, 18"
Mounting Blocks
Hose, 62" x 3/8"
Spray Gun
Plug, 3/8" MNPT
Handle, Upper 18"
Handle, Lower 18"
Hand Grip
Castor Wheel
Castor Bracket
Cover, Polypropylene 18"
Rotary Arm
Nozzle, 25 Deg. 025
No#
1
2
3
4
Part #
85.790.010
85.790.001
85.790.002
85.790.011
Description
Rotary Head Rebuild Kit
Inlet Valve w/ O-Ring
Inlet Valve Viton O-Ring
Outlet Shaft
PARTS LIST
ROTARY HEAD REPAIR PARTS
8
11
1
3
No#
1
2
Part #
85.790.023
85.790.022
Description
Viton O-ring for Rotary Head
Rotary Head Repair Kit
ROTARY HEAD REPAIR PARTS
7

7
BE-1600WAW
No#
1
2
3
4
5
6
7
8
9
10
11
12
13
Part #
85.791.003
85.790.004
85.419.116
85.238.057
85.202.017
85.300.105
85.419.044
85.419.042
85.602.005
85.790.012
85.419.021
85.791.009
85.225.025
Description
Bracket, Mounting Head 16" & 20"
Rotary Head, 16"
Mounting Blocks
Hose, 62" x 3/8"
Spray Gun
Plug, 3/8" MNPT
Handle, Upper 16"
Handle, Lower 16"
Hand Grip
Brush Skirt, 16"
Cover, Polypropylene 16"
Rotary Arm, For 16"
Nozzle, 25 Deg. 025
PARTS LIST
BE-2000WAWY
No#
1
2
3
4
5
6
7
8
9
10
11
12
13
Part #
85.791.003
85.790.004
85.419.116
85.238.057
85.202.115
85.300.105
85.419.033
85.419.032
85.602.005
85.790.013
85.419.020Y
85.791.013
85.225.025
Description
Bracket, Mounting Head 16" & 20"
Rotary Head, 20"
Mounting Blocks
Hose, 62" x 3/8"
Spray Gun
Plug, 3/8" MNPT
Handle, Upper 20"
Handle, Lower 20"
Hand Grip
Brush Skirt, 20"
Cover, Polypropylene 20"
Rotary Arm, 20"
Nozzle, 25 Deg. 025
ROTARY HEAD REPAIR PARTS
No#
1
2
3
4
Part #
85.790.010
85.790.001
85.790.002
85.790.011
Description
Rotary Head Rebuild Kit
Inlet Valve w/ O-Ring
Inlet Valve Viton O-Ring
Outlet Shaft
PARTS BREAKDOWN
BE-2000WAWY
BE-1600WAW
5
6
9
4
7
12
1
2
3
10
11
13
8
8
This manual suits for next models
6
Table of contents
Other BE Pressure Washer manuals
Popular Pressure Washer manuals by other brands

Spitwater
Spitwater HP25400DE operating & maintenance manual

PowerWasher
PowerWasher H170 Operator's manual

Parkside
Parkside PHD 110 D1 Translation of the original instructions

Chicago Electric
Chicago Electric 92146 Assembly and operating instructions

Dynaset
Dynaset PPL 200 user manual

Hozelock
Hozelock 7902 user manual