BEAMEX MC6 User manual

Quick-Reference Guide for using the ePG together with other Beamex products - 1
Quick-Reference Guide for using
the ePG together with other
Beamex products
Introduction
This document provides an overview on how to use your MC6 family calibrator
to control the ePG Electric Pressure Pump and Controller in your daily work.
It also describes what to consider when working with Beamex Calibration
Management Software (CMX or LOGiCAL).
Requirements
• MC6 family calibrator (MC6, MC6-WS, MC6-Ex or MC6-T) with firmware
version 4.30 or later and “Pressure controller communication, ePG” option
installed on the calibrator.
Note: Both can be checked in the calibrator’s Settings > About
window.
• ePG firmware version 2.00 or later.
Enable communication between an MC6
family calibrator and the ePG
MC6 family calibrator does not automatically recognize your ePG. You need to
configure the controller communication to pair the devices.
Note: If you have more than one ePG, you can assign each ePG on
a separate Controller Presets channel (maximum 4).

Quick-Reference Guide for using the ePG together with other Beamex products - 2
1. Connect an MC6 family calibrator to your ePG using a USB Type-A to
Type-C communication cable.
2. Power both devices on (ePG will power itself on automatically when the
USB cable is connected to the calibrator).
3. From MC6 Home View, open Settings > Controller Presets.
4. Set the following:
•Connection Inferface: shows the connected ePG’s with their serial
numbers. Select the one you want to communicate with.
•Controller Type: Beamex ePG
•Control Mode: according to your needs (Shut off or Continuous)
•Reference Module: select the pressure module of the MC6 family
calibrator that you want to use as a reference (This can be any internal
or external pressure module that is available). The ePG will not operate if
no reference pressure module is available at all.
Working with an MC6 family calibrator
and the ePG
When MC6 family calibrator is used to control the ePG, the reference pressure
readings are taken from one of the MC6 family calibrator’s internal or external
pressure modules.
The selected reference pressure module range sets the available setpoint range
for the ePG, however not in a way, that the setpoint range would become larger
than normal ePG range. Examples:
• With P6C, the ePG provides the lower setpoint limit (-0.9 bar) and the
pressure module provides the upper limit (6 bar)
• With P60, the pressure module limits the lower setpoint limit to 0 bar and the
ePG provides the upper limit (20 bar)
The selected reference pressure module will be used in all MC6 operational
modes, with one exception: the selected Input Port/Function in Documenting
Calibrator in Controlled mode will permanently override the setting in Controller
Presets.
The selected reference pressure module along with the controller’s name are
visible on all the buttons and dialogues, where the controller can be selected
(see examples below).

Quick-Reference Guide for using the ePG together with other Beamex products - 3
Figure 1: Example 1
Figure 2: Example 2
Settings/Controller Presets: Shut off vs. Continuous
Global setting that is not available in Documenting Calibrator. If needed, change
settings before calibration.
Shut off
Shut off means that once the setpoint is reached, adjustment stops. The ePG
will not try to adjust the pressure even in case of an overshoot. This way the
hysteresis will not be lost.
Continuous
Continuous means that adjustment continues even after the setpoint is reached.
This is useful for compensating small leaks and temperature expansion over a
longer period.
Quick-Reference Guide for using the ePG together with other Beamex products - 4
When an MC6 family calibrator is controlling the ePG, all the push buttons on
the ePG, except for the power button, are disabled. When entering the Home
View, the control is released and manual operation is possible (alternatively
by removing the ePG from the measurement channel by selecting another
function, e.g. other quantity or port, etc.).
Note: When the user returns to the Home View, the ePG will keep
the pressure in the system by closing all the valves.
Venting and Zeroing
The regulator vents when you enter value 0 in Gauge mode. If no other setpoint
is given, Vent leaves the valves open for 1 minute. This gives the user some
time to zero the reference pressure module.
Tip: Zeroing is important – a possible offset in the reference
module can confuse the ePG regulation.
Zeroing is performed as follows:
• enter value 0 in Gauge mode to vent the ePG. The ePG keeps the valves
open for 1 minute
• allow the pressure to stabilize
• press the zeroing button on the MC6 display
Note: MC6 does not accept zeroing if there is pressure in the system.
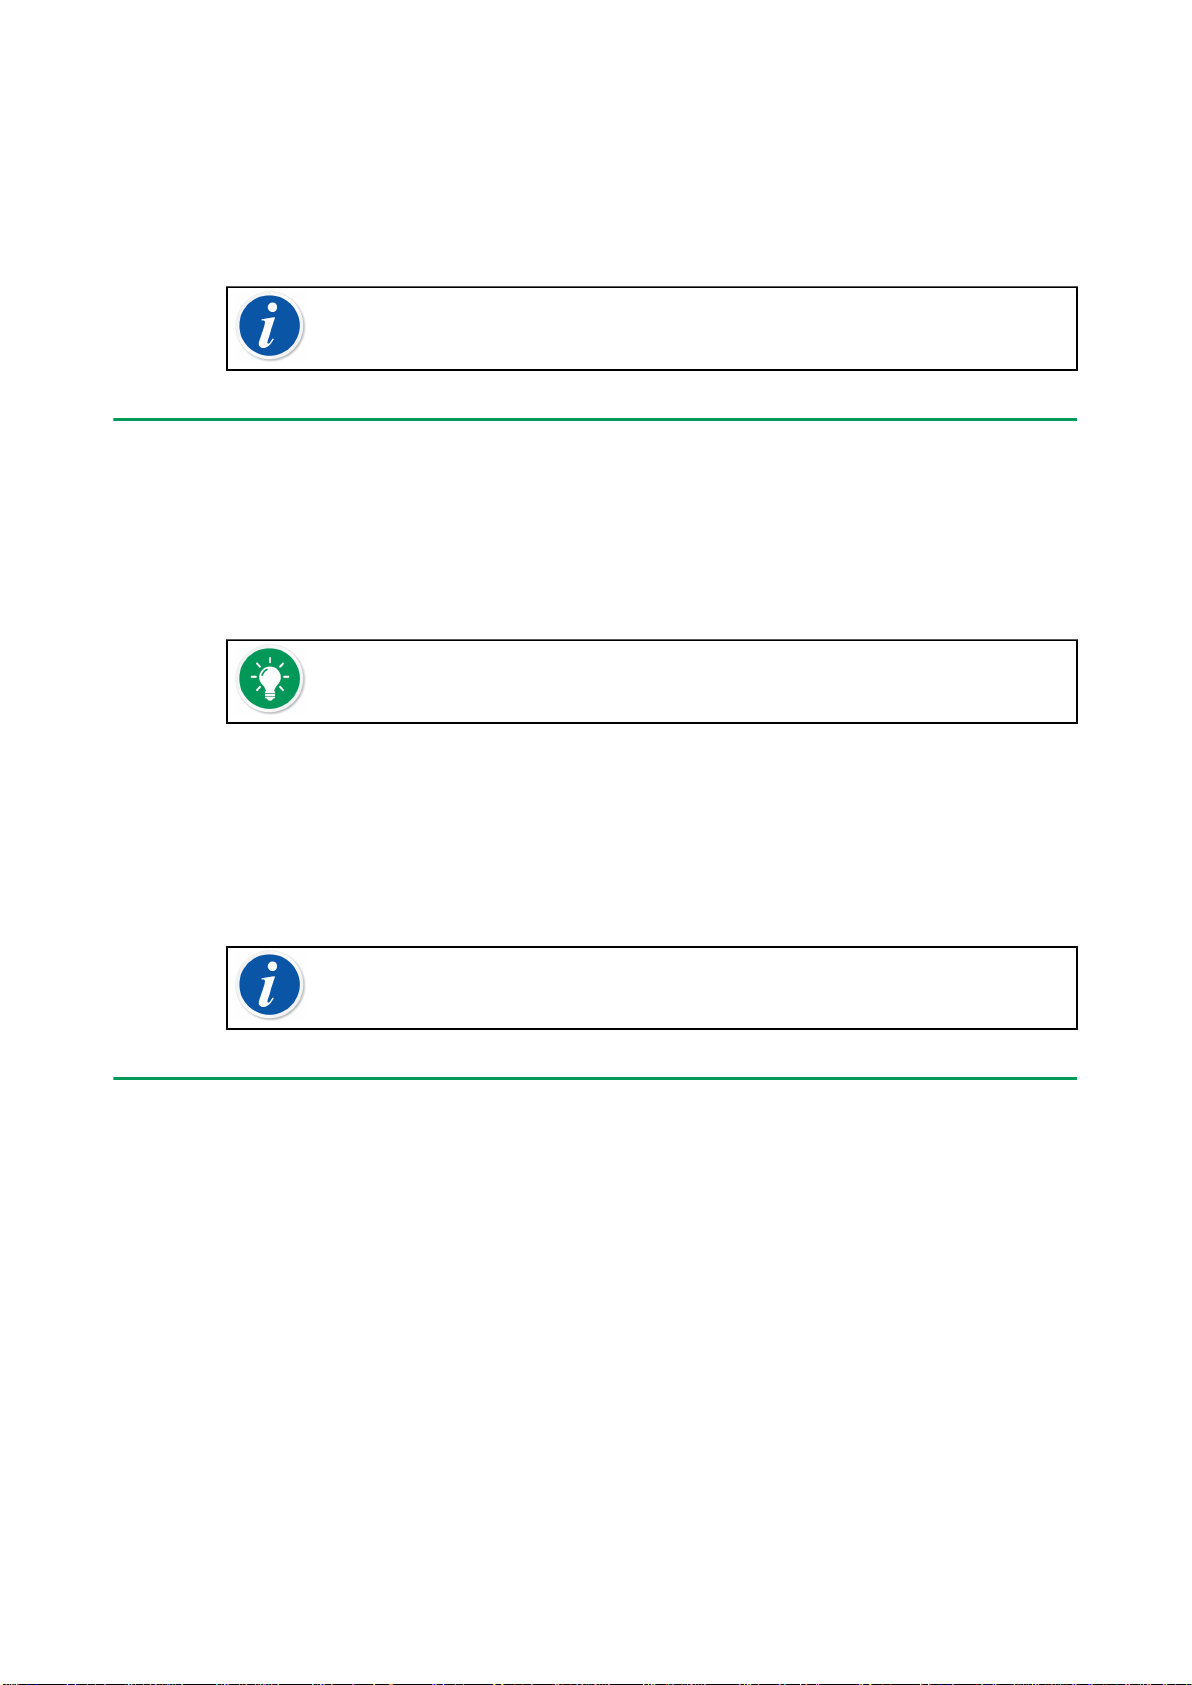
Documenting Calibrator mode
In order for the references to be properly displayed on the calibration
certificates, Documenting Calibrator mode settings have to be configured
properly. When you create instruments in the MC6 family calibrator and plan
to send the results to either CMX or LOGiCAL, create the instrument Input by
following the example instruction below:
Quick-Reference Guide for using the ePG together with other Beamex products - 5
Figure 3: Step 1: Select Quantity for the instrument Input
Figure 4: Step 2: Select Pressure
Figure 5: Step 3: Select an INT or EXT pressure module as a Port/Function

Quick-Reference Guide for using the ePG together with other Beamex products - 6
Figure 6: Step 4: Select controller via Automatic Control
Figure 7: Step 5: Select the ePG
Figure 8: Step 6: The pressure module selected for Port/Function is the
reference. This pressure module will override and change the Reference
Pressure selection in the Controller Presets

Quick-Reference Guide for using the ePG together with other Beamex products - 7
Calibrating Analog gauges
When calibrating pressure gauges (analog indicators), it can be challenging to
interpret the readings between the marks on the pressure gauge. That is why a
cardinal point calibration is usually performed. This means that you adjust the
pressure so that the gauge dial is aligned with a cardinal point, which makes
it easier for you to interpret the reading. You can do this in the Documenting
Calibrator mode as follows:
Figure 9: Cardinal point calibration
If you want to fine-tune the setpoint, press the Pause button and change the
setpoint via the menu (see figure below).
Figure 10: Menu dialog to change the setpoint value
It is possible to go back and forth between the Pause and Play buttons at the
same setpoint.
Quick-Reference Guide for using the ePG together with other Beamex products - 8
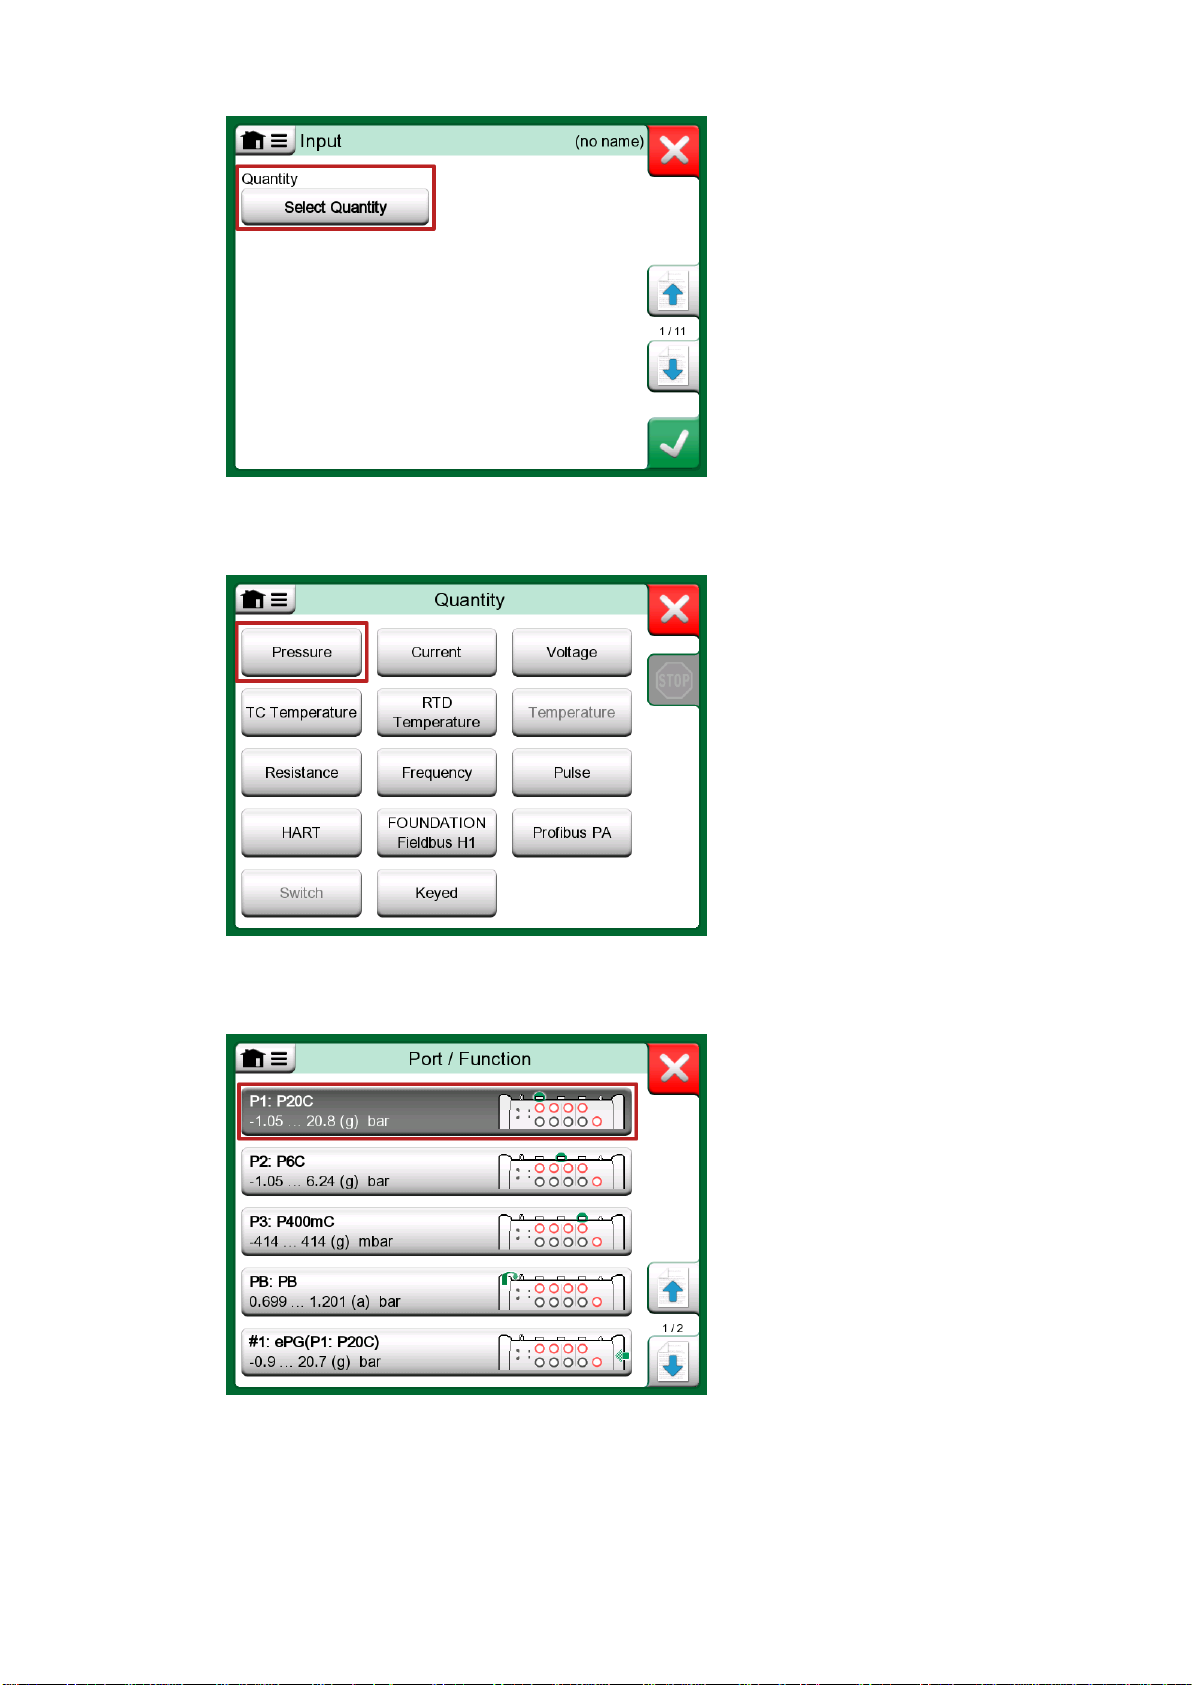
Opening an instrument while the ePG is not connected
If you open an instrument, where controller communication is needed and
the controller is not available, the calibrator will prompt you about a missing
controller. You are still able to access and edit the instrument and when you
connect the pressure controller, calibration can start.
Figure 11: Missing controller notification

Quick-Reference Guide for using the ePG together with other Beamex products - 9
Working with the Calibration Management
Software
The following chapter describes the ePG settings to be taken into consideration
for the Calibration Management Software configuration (CMX or LOGiCAL).
Working with CMX
Requirements
There is no need to upgrade the CMX version in order to start using the ePG.
The only requirement is that your MC6 family calibrator is able to communicate
with your CMX version.
Table 1: MC6 family calibrator and CMX version compatilibility
MC6 family calibrator (with
firmware version 4.30 or later)
CMX version from which calibrator
communication is supported
MC6 2.7
MC6-WS 2.7
MC6-Ex 2.11.2
MC6-T150 2.12.2
MC6-T660 2.12.1
Configuration
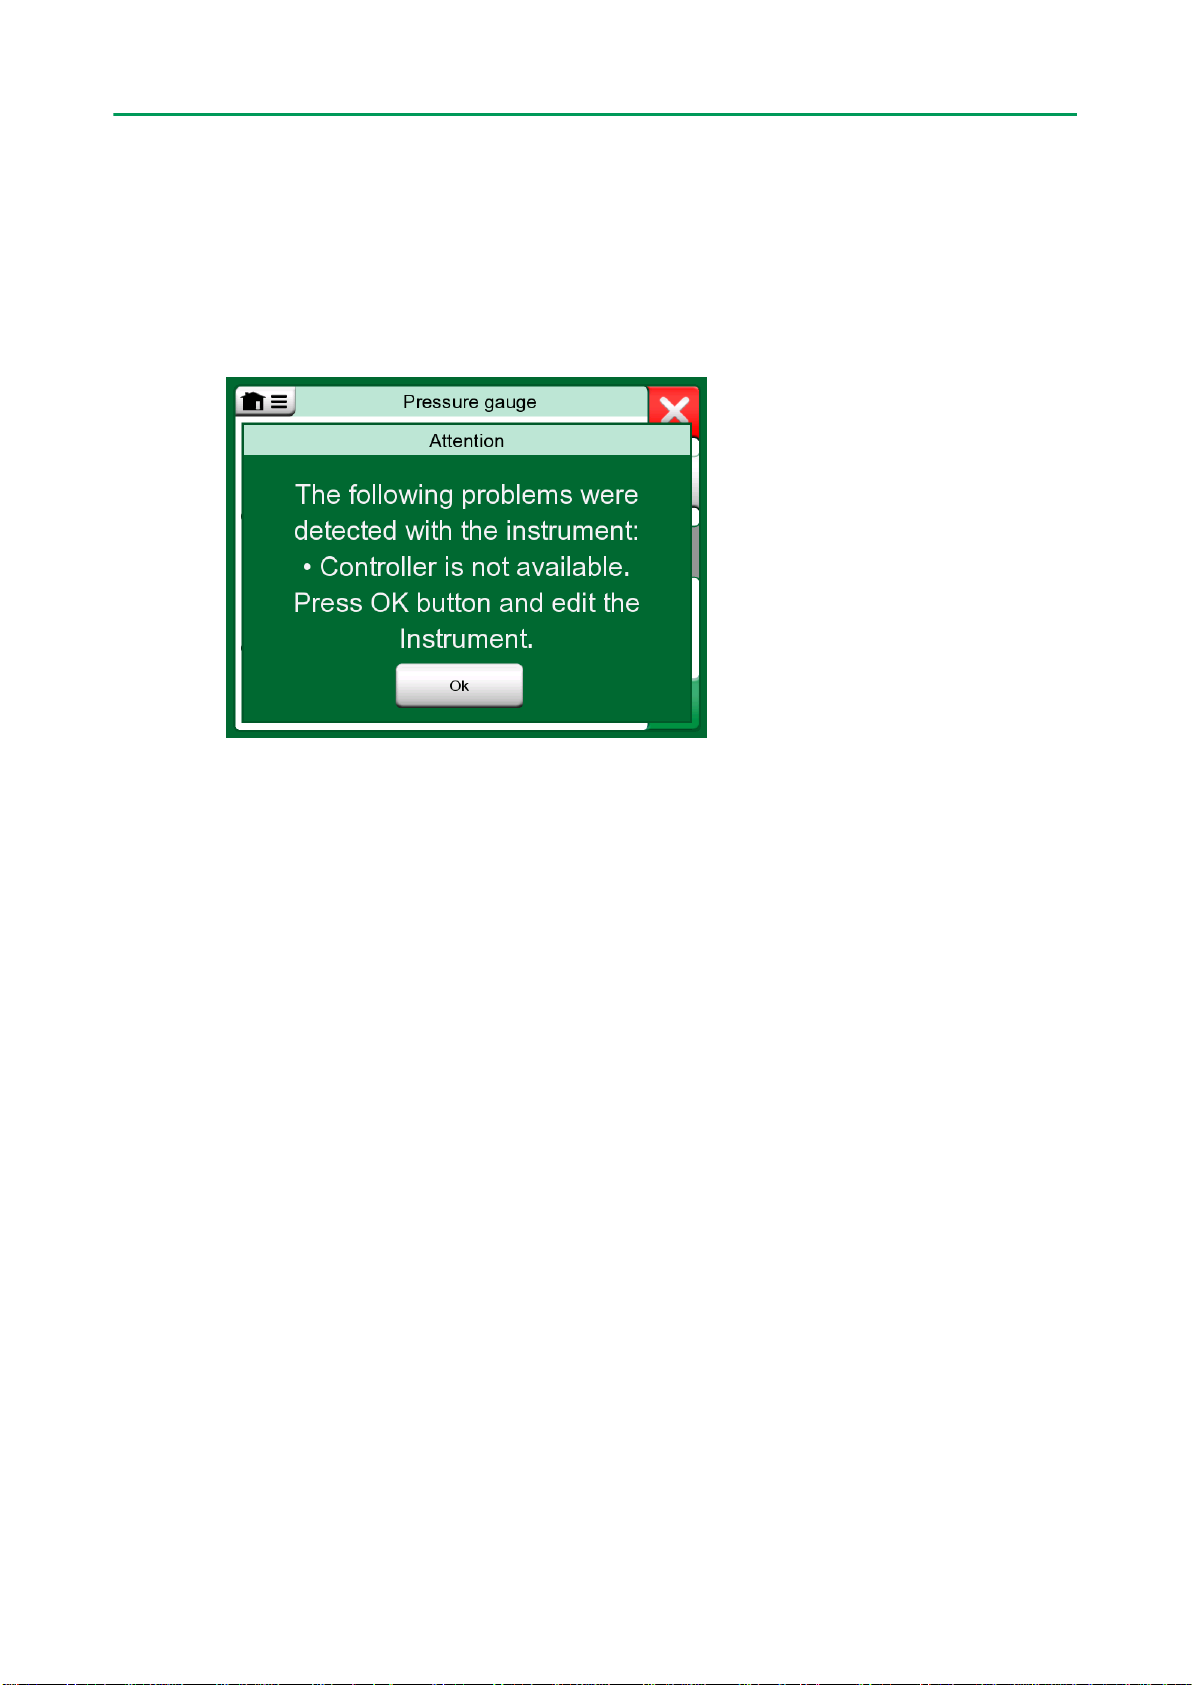
A minor configuration change is needed for the pressure instruments, when you
want to use the MC6 to control the ePG to generate the pressure. If you have
previously been using hand pumps to generate the input pressure, you have set
the Input method in the function window as Measured.
Now, when working with the ePG, the Input method needs to be changed to
Controlled, which means that the external controller (ePG) only generates the
setpoints. The pressure generated by the ePG is measured by the MC6 using a
separate internal or external pressure module.
Quick-Reference Guide for using the ePG together with other Beamex products - 10
If you want the calibrator to automatically accept the calibration points, make
sure you have the following configurations in the procedure window:
•Acceptance set to automatic
•Max Deviation sets a range around the setpoint (in % of span). When the
Input is within the set range, the calibration point can be automatically
accepted, even though the exact setpoint has not been reached.
•Calibration Point Delay defines the time (in seconds) how long the calibrator
waits after the Input is stable before the readings are accepted.

Quick-Reference Guide for using the ePG together with other Beamex products - 11
If you occasionally need to use a hand pump to calibrate the instrument, it is
possible to configure CMX so that the user can change the Input method in
the calibrator and perform the calibration. When transferring results from the
calibrator to CMX, the user will be notified that the instrument differs, but it is
possible to transfer the results without affecting the instrument. This setting can
be found in CMX settings/Calibration tab:

Quick-Reference Guide for using the ePG together with other Beamex products - 12
Working with LOGiCAL
When you check out the instrument for calibration, set the Input method in the
function tab as Controlled.
On the procedure tab, you can configure the following settings to make the
calibration points automatically accepted:
•Point acceptance: set to automatic
•Max Deviation sets a range around the setpoint (in % of span). When the
Input is within the set range, the calibration point can be automatically
accepted, even though the exact setpoint has not been reached.
•Calibration Point Delay defines the time (in seconds) how long the calibrator
waits after the Input is stable before the readings are accepted.

Quick-Reference Guide for using the ePG together with other Beamex products - 13
The chosen method can also be changed in the calibrator and the ePG will not
be a part of the traceability chain.
Troubleshooting
Table 2: Troubleshooting
I cannot choose ePG from the
Controller Presets
Check that the Requirements to
communicate with the ePG are fulfilled
I cannot generate 20 bar pressure Make sure you have selected a
reference pressure module that is
capable of measuring 20 bar
I don’t see the pressure rising in my
MC6 family calibrator even though
the pump is running
Check your connections. Make sure
you are connected to the correct
pressure module (the one that is
selected as the Reference Module in
Controller Presets)
Pressure generation stops in the
middle of the calibration, pressure
is vented and the ePG switches
itself off
This happens when the ePG battery
runs out. You need to recharge the
ePG battery to continue working
Pressure generation stops in
the middle of the calibration but
pressure is not vented
Check that your cables are connected.
The ePG stops generation if the USB
communication cable is removed
Other manuals for MC6
2
This manual suits for next models
4
Table of contents
Other BEAMEX Test Equipment manuals


