manuals.online logo
Brands
  1. Home
  2. •
  3. Brands
  4. •
  5. BEGA
  6. •
  7. Accessories
  8. •
  9. BEGA 70 821 User manual

BEGA 70 821 User manual

IP 65
!
BEGA Lichttechnische Spezialfabrik
Hennenbusch · D - 58708 Menden
42.15 · Technische Änderungen vorbehalten · Technical amendments reserved · Modications techniques réservées
70 821
Bewegungssensor
Motion sensor
Détecteur de mouvement
Gebrauchsanweisung
Instructions for use
Fiche d’utilisation
110 75
Ø 6,5
N
L
D
35
30
87
10 m 10 m
5 m
10 m
5 m Sensor · Capteur 5 m
110 °
Anwendung
Bewegungssensor für die Aufputzmontage.
Der Bewegungssensor reagiert
auf Temperaturunterschiede durch
Wärmeabstrahlung des menschlichen Körpers -
Funktion PIR (Passivinfrarot).
Bei einer Veränderung sendet der Sensor ein
Signal an den Bus.
Die Verarbeitung der erfassten Bewegung
kann in der Software BEGA-PRO individuell
programmiert werden!
Der Bewegungssensor kann nur als
Systemkomponente mit der BEGA
Lichtsteuerung verwendet werden.
Application
Motion sensor for surface mounting.
The motion sensor reacts to temperature
differences caused by the heat radiating from
the human body - Function through PIR
(Passive Infra Red).
In the event of a change, the sensor sends a
signal to the bus.
The processing of the detected movement
values can be programmed individually with the
BEGA-PRO software!
The light sensor can only be used as a system
component with BEGA light control.
Utilisation
Détecteur de mouvement pour le montage en
saillie.
Le détecteur de mouvement réagit aux
différences de températures provoquées par
la radiation de chaleur du corps humain -
Fonction via IRP (infrarouge passif).
En cas de modication, le capteur envoie un
signal au bus.
Le traitement des informations du mouvement
saisi peut être individuellement programmé
dans le logiciel BEGA-PRO!
Le capteur lumineux ne peut être utilisé que
comme composant du système de gestion
d'éclairage BEGA.
Produktbeschreibung
Gehäuse besteht aus Aluminiumguss und
Edelstahl
35° in allen Richtungen einstellbar
Reichweite max. 10 m
empfohlene Montagehöhe: 2,5 - 3,5 m
2 Befestigungsbohrungen ø 6,5 mm
Abstand 87 mm
2 Leitungseinführungen zur Durchverdrahtung
der Anschlussleitung bis ø 10,5 mm
Anschlussklemmen 2,5@
Schutzleiteranschluss
Sensormodul 220-240V y 50/60Hz
Leistungsaufnahme: 0,4 W
Betriebstemperatur: -25°C bis 40°C
Schutzklasse I
Schutzart IP 65
Staubdicht und Schutz gegen Strahlwasser
c– Konformitätszeichen
Gewicht: 0,5 kg
Product description
Housing made of aluminium alloy and stainless
steel
Adjustable by 35° in all directions
Range max. 10 m
Recommended installation height: 2.5 - 3.5 m
2 xing holes ø 6,5 mm
87 mm spacing
2 cable entries for through-wiring
of connecting cable up to ø 10.5 mm
Connecting terminals 2.5@
Earth conductor connection
Sensor module 220-240V y 50/60Hz
Power consumption: 0.4 W
Operating temperature: -25°C to 40°C
Safety class I
Protection class IP 65
Dust tight and protection against water jets
c– Conformity mark
Weight: 0.5 kg
Description du produit
Boîtier en fonderie d'aluminium et acier
inoxydable
Réglable à 35° dans toutes le directions
Portée 10 m max.
Hauteur d'installation recommandée:
2,5 - 3,5 m
2 trous de xation ø 6,5 mm
Entraxe 87 mm
2 entrées de câble pour branchement en
dérivation d’un câble de raccordement
jusqu’à ø 10,5 mm
Bornier 2,5@
Raccordement de mise à la terre
Module du capteur 220-240V y 50/60Hz
Puissance absorbée: 0,4 W
Température de service: -25°C à 40°C
Classe de protection I
Degré de protection IP 65
Etanche à la poussière et protégé contre les
jets d'eau
c– Sigle de conformité
Poids: 0,5 kg
Sicherheit
Für die Installation und für den Betrieb
dieses Ergänzungsteils sind die nationalen
Sicherheitsvorschriften zu beachten.
Der Hersteller übernimmt keine Haftung für
Schäden, die durch unsachgemäßen Einsatz
oder Montage entstehen.
Werden nachträglich Änderungen an dem
Ergänzungsteil vorgenommen, so gilt derjenige
als Hersteller, der diese Änderungen vornimmt.
Safety indices
The installation and operation of this accessory
are subject to national safety regulations.
The manufacturer is then discharged from
liability when damage is caused by improper
use or installation.
If any accessory is subsequently modied, the
persons responsible for the modication shall
be considered as manufacturer.
Sécurité
Pour l’installation et l’utilisation de cet
accessoire, respecter les normes de sécurité
nationales.
Le fabricant décline toute responsabilité
résultant d'une mise en œuvre ou d'une
installation inappropriée du produit.
Toutes les modications apportées à cet
accessoire se feront sous la responsabilité
exclusive de celui qui les effectuera.
Montage
Sensorgehäuse öffnen. Netzanschlussleitung
durch die Leitungs-einführung in das
Sensorgehäuse führen. Sensorgehäuse mit
beiliegendem oder anderem geeigneten
Befestigungsmaterial am Montagegrund
befestigen. Dabei unbedingt beiliegende
Dichtungen verwenden.
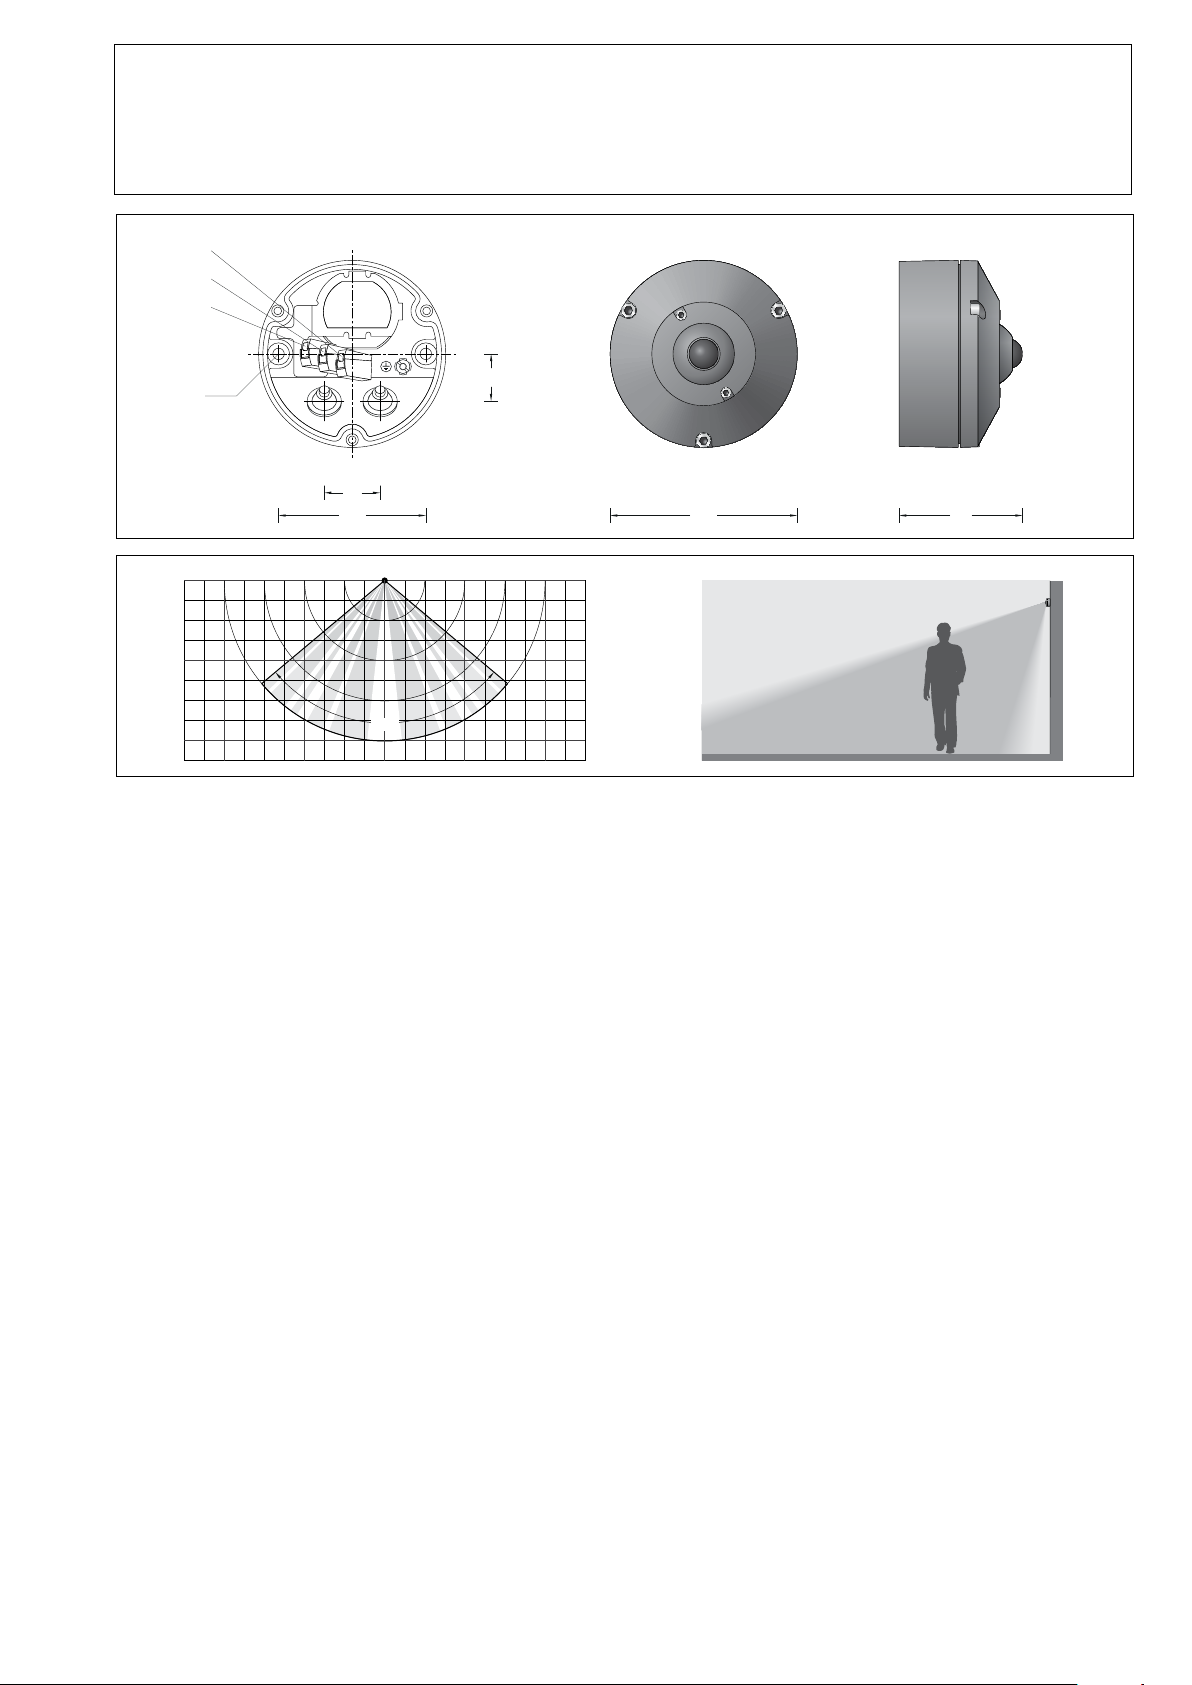
Um eine optimale Erfassung zu erreichen,
empfehlen wir, den Sensor seitlich zur
Bewegungsrichtung zu montieren.
- siehe Skizze Seite 1 -
Empfohlene Montagehöhe: 2,5 - 3,5 m.
Schutzleiterverbindung herstellen und
elektrischen Anschluss von L, N und D
entsprechend der Sensorbeschriftung
vornehmen. Bei der Inbetriebnahme
mit der Software BEGA-PRO kann eine
eindeutige Zuordnung des Sensors über die
Seriennummer erfolgen, die auf dem Sensor
verklebt wurde. Nach dem Anschluss wird der
Bewegungssensor automatisch erkannt und
wirkt auf die Taste B4 (in der Software BEGA-
PRO). Das Modul sendet nach dem Anschluss
automatisch Binärsensor-Statusmeldungen.
Kontrollieren können Sie den Wert im
Statusfenster der Systemsoftware BEGA-PRO
- siehe Abbildung -. Wenn ein Objekt erfasst
wird, sendet das angeschlossene Sensormodul
das LANG-Kommando aus. Das LANG-
Kommando wird nur 1x gesendet, selbst wenn
die Bewegung sehr lange andauert. 4s nach
Ende der Bewegung löst der Bewegungssensor
das LOS-Kommando aus. Wenn die Bewegung
länger dauerte, kommt das LOS-Kommando 8s
nach der letzten Bewegung.
Installation
Open sensor housing. Lead mains supply cable
through the cable entry into the sensor housing.
Fix the sensor housing with enclosed or any
other suitable xing material onto the mounting
surface. It is essential that the enclosed gaskets
should be used.
To achieve optimum detection, we recommend
installing the sensor laterally with respect to the
direction of motion. - see sketch on Page 1 -.
Recommended installation height: 2.5 - 3.5 m.
Establish an earth conductor connection and
connect L, N and D electrically according to the
sensor labelling.
During start-up with the BEGA-PRO software,
unambiguous assignment of the sensor can
be carried out via the serial number enclosed
with the sensor. After connection, the motion
sensor is automatically detected and acts on
the key B4 (in the BEGA-PRO software). After
connection, the module automatically transmits
binary sensor status messages. You can check
the value in the status window of the BEGA-
PRO system software - see Fig.
When an object is detected, the connected
sensor module transmits the LONG command.
The LONG command is only transmitted 1 x,
even if the motion lasts for a very long time.
4s after the end of the motion, the motion
sensor triggers the RELEASE command.
If the motion lasts for a longer period of time,
the RELEASE command comes 8s after the
last movement.
Installation
Ouvrir le boîtier du capteur.
Introduire le câble d'alimentation dans le boîtier
du capteur en passant par l'entrée de câble.
Fixer le boîtier du capteur sur la surface de
montage avec le matériel de xation fourni ou
tout autre matériel de xation approprié.
Utiliser dans tous les cas les joints fournis.
Pour une détection optimale, nous
recommandons d'installer le capteur
latéralement par rapport à la direction du
mouvement. - voir le schéma page 1 -.
Hauteur d'installation recommandée:
2,5 - 3,5 m.
Mettre à la terre et procéder au raccordement
électrique des conducteurs L, N et D
conformément au marquage gurant sur le
capteur.
Après le raccordement, le détecteur de
mouvement est détecté automatiquement et
agit sur la touche B4 (dans le logiciel BEGA-
PRO).
Le module envoie automatiquement des
messages d'état de capteur binaire après le
raccordement. Vous pouvez contrôler la valeur
dans la fenêtre d'état du logiciel BEGA-PRO
- voir l'illustration -.
Lorsqu'un objet est détecté, le module de
capteur raccordé envoie la commande LONG.
La commande LONG n'est envoyée qu'1 fois,
même si le mouvement dure très longtemps.
4 s après la n du mouvement, le détecteur de
mouvement déclenche la commande PARTI.
Si le mouvement a duré longtemps, la
commande PARTI est déclenchée 8 s après le
dernier mouvement.
Ersatzteile
Bezeichnung Bestellnummer
Sensormodul 610879
Bewegungssensor 610884
Dichtung 830462
Spares
Description Part no
Sensor module 610879
Motion sensor 610884
Gasket 830462
Pièces de rechange
Désignation No de commande
Module du capteur 610879
Détecteur de mouvement 610884
Joint 830462

Other BEGA Accessories manuals

BEGA 13 567 User manual

BEGA

BEGA 13 567 User manual

BEGA 71 096 User manual

BEGA

BEGA 71 096 User manual

BEGA 70 635 User manual

BEGA

BEGA 70 635 User manual

BEGA 71 190 User manual

BEGA

BEGA 71 190 User manual

BEGA 71 100 User manual

BEGA

BEGA 71 100 User manual

BEGA 10 713 User manual

BEGA

BEGA 10 713 User manual

BEGA 71190 User manual

BEGA

BEGA 71190 User manual

Popular Accessories manuals by other brands

Z-Wave HSD-200Z user manual

Z-Wave

Z-Wave HSD-200Z user manual

Endress+Hauser Oxymax H COS21D operating instructions

Endress+Hauser

Endress+Hauser Oxymax H COS21D operating instructions

BOMANN KSG 237 instruction manual

BOMANN

BOMANN KSG 237 instruction manual

Aspilos AT 600 quick start guide

Aspilos

Aspilos AT 600 quick start guide

NuTone LA226WH Installation & operating instructions

NuTone

NuTone LA226WH Installation & operating instructions

ATEN VS92A quick start guide

ATEN

ATEN VS92A quick start guide

Axor Massaud Flower Vase 42274000 Dimensions

Axor

Axor Massaud Flower Vase 42274000 Dimensions

ASATech signolux manual

ASATech

ASATech signolux manual

3B SCIENTIFIC 1000568 instruction sheet

3B SCIENTIFIC

3B SCIENTIFIC 1000568 instruction sheet

Carefree ALTITUDE Service manual

Carefree

Carefree ALTITUDE Service manual

Manitowoc B-0320 installation instructions

Manitowoc

Manitowoc B-0320 installation instructions

Sygonix 2336766 operating instructions

Sygonix

Sygonix 2336766 operating instructions

Carrier CAS181 Series Installation, Start-Up and Service Instructions

Carrier

Carrier CAS181 Series Installation, Start-Up and Service Instructions

Tait T860 Series II Service manual

Tait

Tait T860 Series II Service manual

Chess Mymesh mini BLC 4DI Installation instruction

Chess

Chess Mymesh mini BLC 4DI Installation instruction

Rebel POWER URZ1226-2 user manual

Rebel

Rebel POWER URZ1226-2 user manual

Denon DHT-T110 manual

Denon

Denon DHT-T110 manual

GEM PBT-010 Specification sheet

GEM

GEM PBT-010 Specification sheet

manuals.online logo
manuals.online logoBrands
  • About & Mission
  • Contact us
  • Privacy Policy
  • Terms and Conditions

Copyright 2025 Manuals.Online. All Rights Reserved.