Beijer Electronics GN-9372 User manual
Quick Start Guide
IP address, Subnet & Gateway, G-series I/O
SUEN00389A –
How to set IP address, Subnet Mask and Gateway on
GN-9372

GN-9372 - IP address, Subnet and Gateway Setting SUEN00389A 2020-09
2 (12)
Normal.dotm, 2020-09-09
1Function and area of use
In this document we show how to set IP address, Subnet Mask and Gateway for
programmable I/O module GN-9372.
2About this Startup document
This Startup document should not be considered as a complete manual. It is an aid to be able
to Startup a normal application quickly and easily.
This Start Up document should not be considered as a complete manual. It is an aid to be
able to start up a normal application quickly and easily.
Use the following software and drivers in order to obtain a stable application:
In this document we have used following hardware and software
•GN-9372 Programmable I/O
•BootpServerVer1000_Beijer Link to BootP
•Windows 10 64 bit
For further information we refer to
•GN-9372 Manual Link
•Beijer Electronics knowledge database, HelpOnline
This document and other Startup documents can be obtained from our homepage.
Start documents.
Copyright © Beijer Electronics, 2023
This documentation (below referred to as ‘the material’) is the property of Beijer Electronics. The holder
or user has a non-exclusive right to use the material.
The holder is not allowed to distribute the material to anyone outside his/her organization except in cases
where the material is part of a system that is supplied by the holder to his/her customer.
The material may only be used with products or software supplied by Beijer Electronics.
Beijer Electronics assumes no responsibility for any defects in the material, or for any consequences that
might arise from the use of the material.
It is the responsibility of the holder to ensure that any systems, for whatever applications, which is based
on or includes the material (whether in its entirety or in parts), meets the expected properties or
functional requirements.
Beijer Electronics has no obligation to supply the holder with updated versions.

GN-9372 - IP address, Subnet and Gateway Setting SUEN00389A 2020-09
3 (12)
Normal.dotm, 2020-09-09
3Table of Contents
1Function and area of use.........................................................................................2
2About this Startup document....................................................................................2
3Table of Contents..................................................................................................3
4Setup Network address in PIO (GN-9372) .....................................................................4
Network setting (default) .................................................................................4
Set the IP address (network) to default setting .......................................................4
Set the IP address (network) using the built-in Web Server .........................................5
BOOTP server................................................................................................6
5About Beijer Electronics ....................................................................................... 12
Contact us ................................................................................................. 12
GN-9372 - IP address, Subnet and Gateway Setting SUEN00389A 2020-09
4 (12)
Normal.dotm, 2020-09-09
4Setup Network address in PIO (GN-9372)
Network addresses can be set with BOOTP, Web or DHCP server.
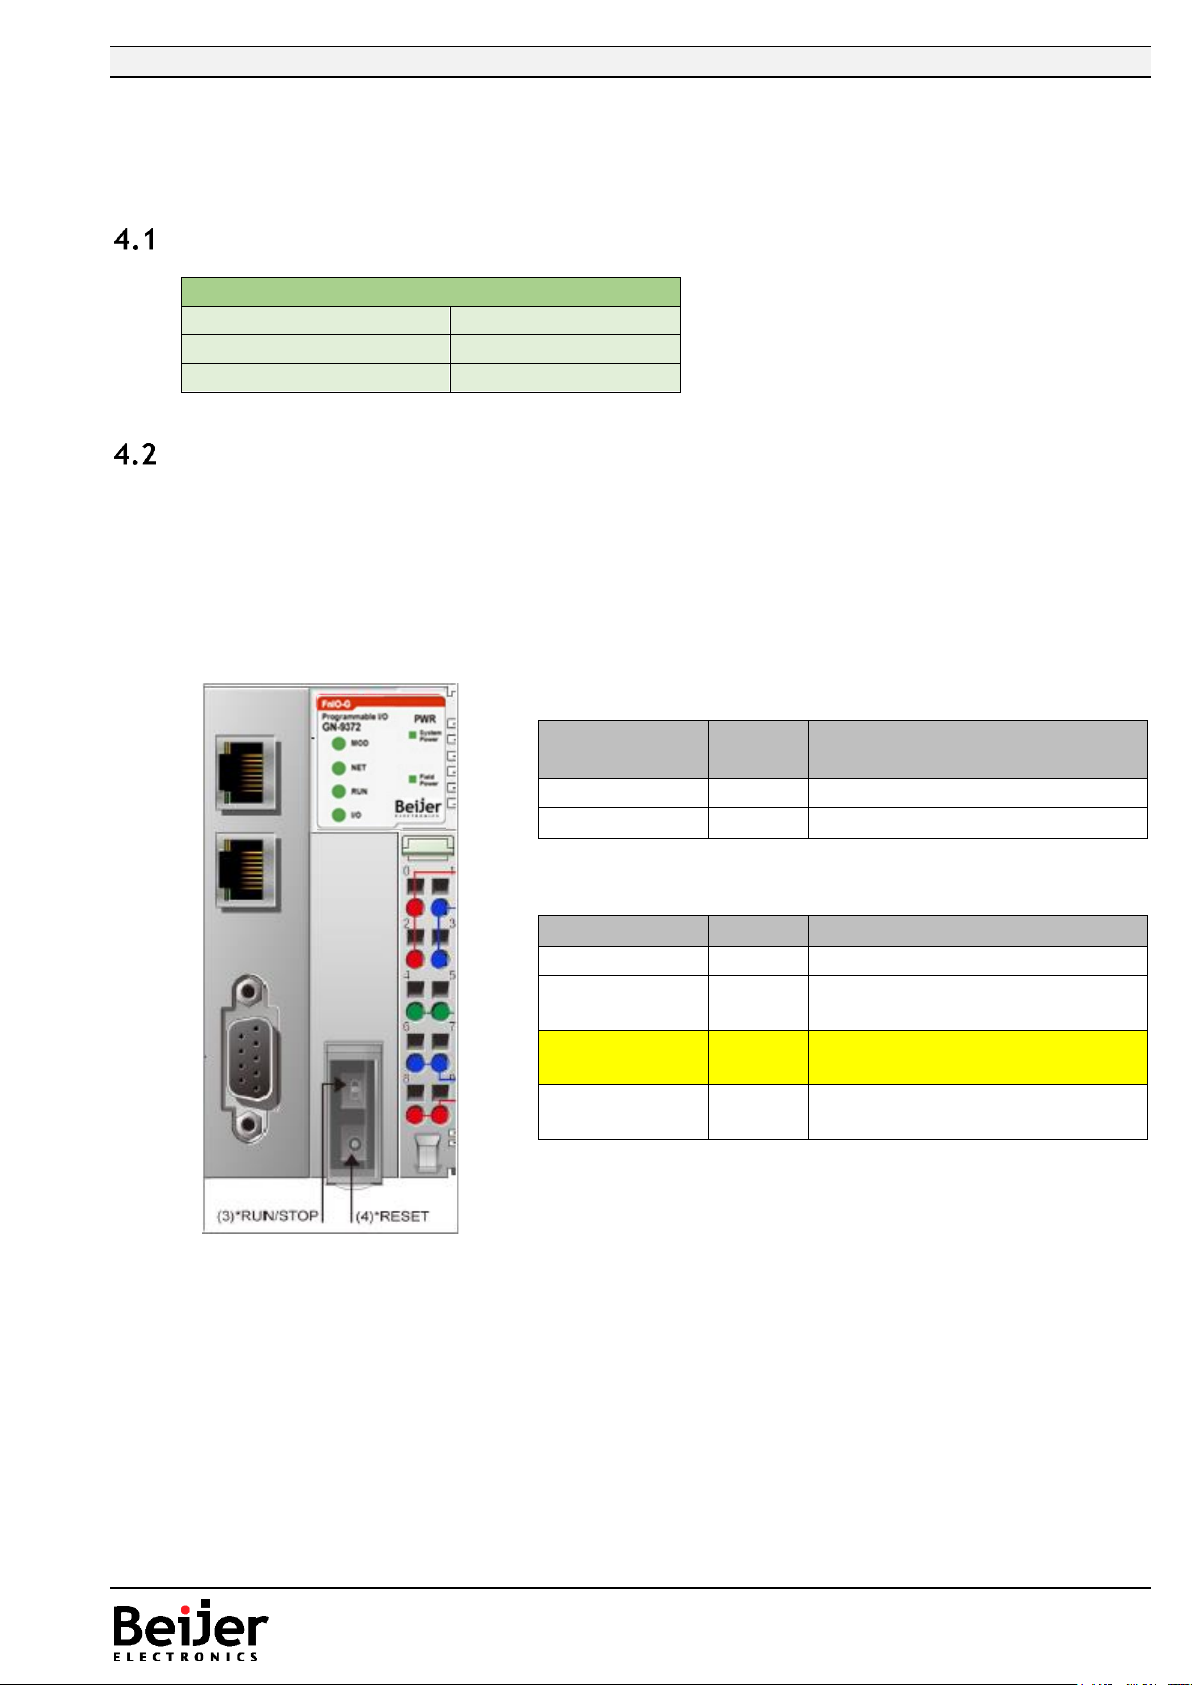
Network setting (default)
Set the IP address (network) to default setting
•Power ON the PIO and push the Reset button in front of PIO
•The switch should be pushed for minimum 20 second. All LED should flash Green/Red.
•PIO will be set into the factory default mode
- PLC program will be erased
- PLC Parameters will be erased
•Restart the PIO
Default Setting
IP Address
192.168.1.50
Subnet Mask
255.255.255.0
Gateway
0.0.0.0
Toggle
Switch
Status
M
od
ul
e
is
Description
UP
R
U
N
PLC Run
DOWN
S
T
O
P
PLC Stop
Push
Button
M
od
ul
e
is
Description
Press and
detach
R
es
et
Reset the PLC and then stop
Push for 5
sec and
power
Reset
P
L
C
R
es
et
Erase PLC user program and
Retain memory
Push for 20
sec and
power
reset
Fa
ct
or
y
de
fa
ult
Erase PLC user program and
PLC parameter reset
Hold down
and reset
the power
IA
P
m
od
e
Available for firmware
download using FireFox

GN-9372 - IP address, Subnet and Gateway Setting SUEN00389A 2020-09
5 (12)
Normal.dotm, 2020-09-09
Set the IP address (network) using the built-in Web Server
Easiest way to configure the PIO is to use the built-in Web Server.
Default IP address as seen below.
•Make sure the PC are on the same IP segment as the PIO.
In example the PIO have 192.168.1.50
•Type Ip-address (default) “192.168.1.50/setup.htm” in web browser.
•In Network Setting, you have the choice to Change/Set a new IP address
•Change the network parameter (IP, Subnet, Gateway)
•Press button ”Set IP”
•Press button ”Reset Power” to enable new settings
•Test the new IP-setting by log in to the new ip-address
GN-9372 - IP address, Subnet and Gateway Setting SUEN00389A 2020-09
6 (12)
Normal.dotm, 2020-09-09
BOOTP server
BOOTP is a standard protocol that can be used to configure the network settings on a GL-
9089 and GN-9289.
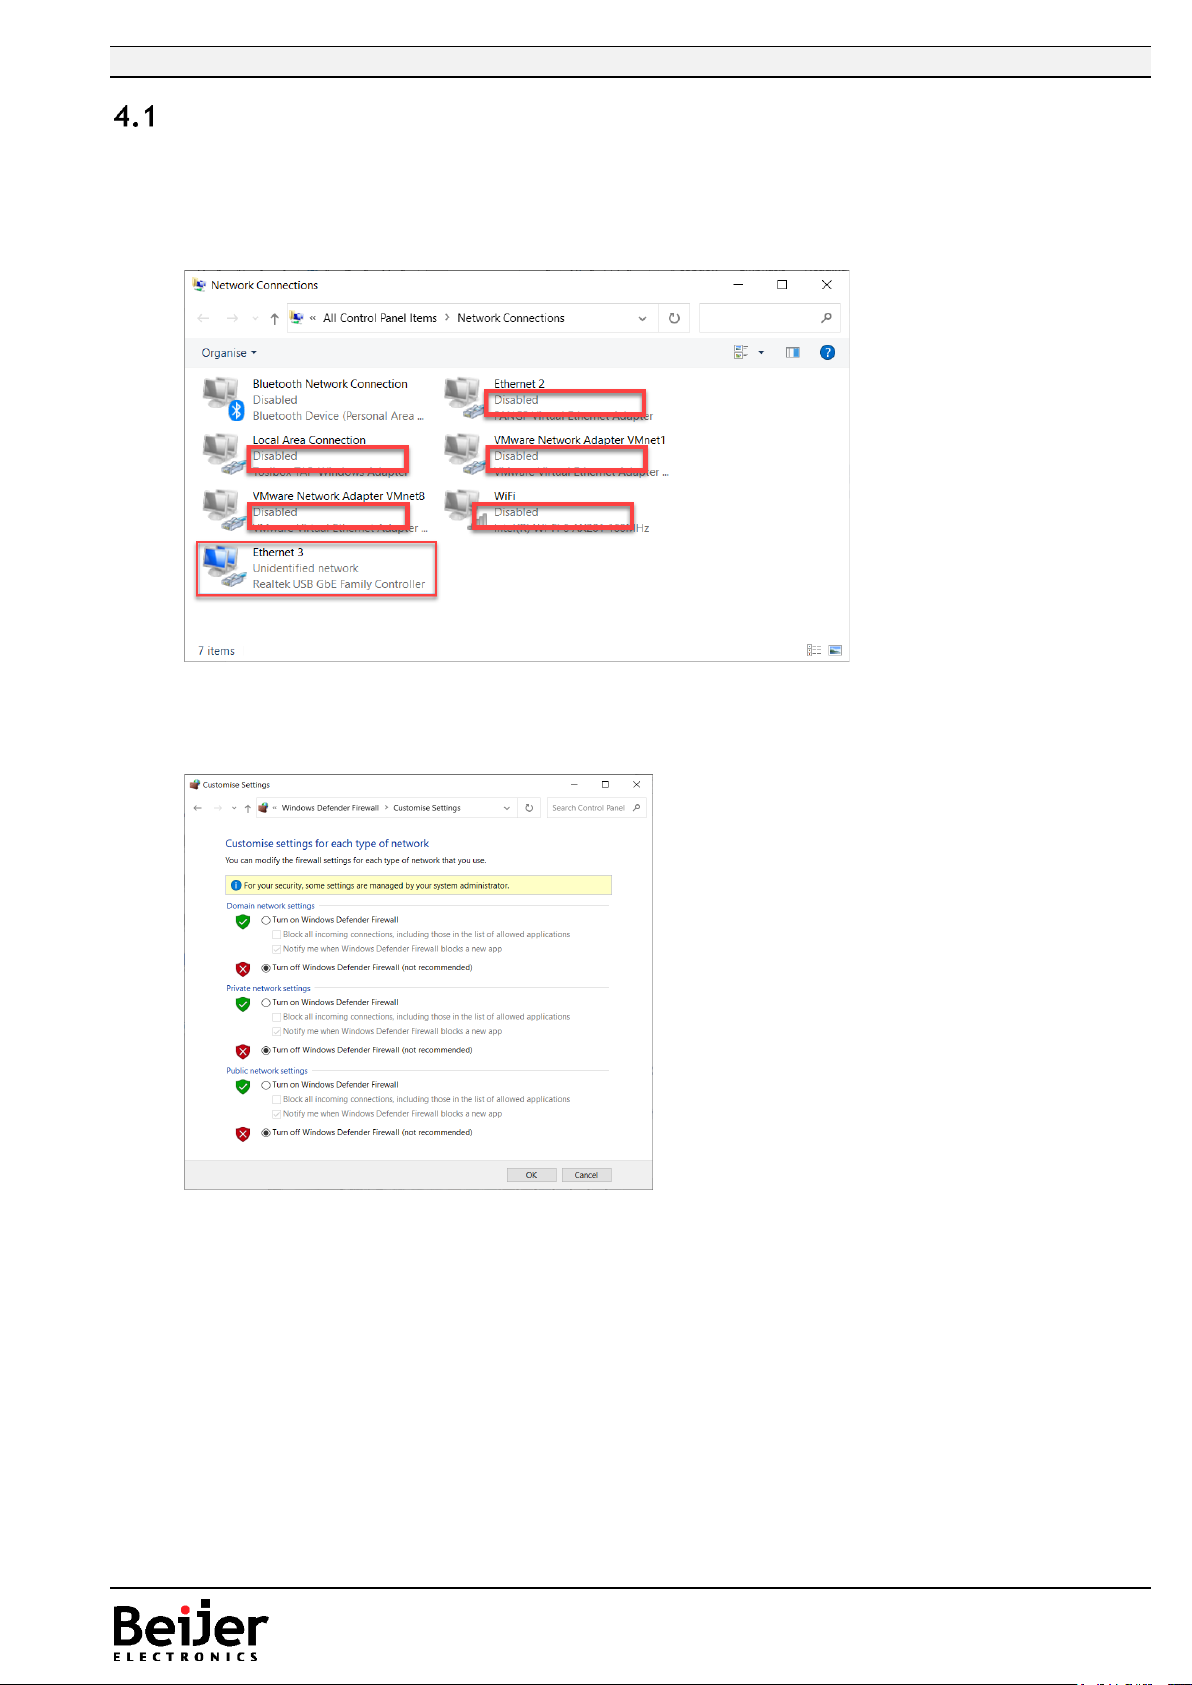
Sometimes it’s required to disable all other network devices besides the one being used to
configure the GL-9089/GN-9289.
In some rare case the firewall needs to be disabled, select “Turn off…” on all networks and push
“OK”.
Remember to reactivate the firewall after the IP address setting is done!
There could be security software (like antivirus programs) that might need to be temporarily disabled.
In some cases when cycling the power of the network adapter, without using a switch between the PC
and network adapter, the BOOTP application will loose its reference to the ethernet port. The best
and recommended way is to use a switch between the PC and the device.
Active

GN-9372 - IP address, Subnet and Gateway Setting SUEN00389A 2020-09
7 (12)
Normal.dotm, 2020-09-09
Use BOOTP server when IP address is unknown, method 1
1. Connect the PC with the GL-9089/GN-9289 over Ethernet.
2. Set a fixed IP address on the PC, same subnet as the GL-9089/GN-9289 is to be changed to. The
IP address for the PC should not be assigned automatically (DHCP).Se section 4.2. part 1.
3. Always use the latest version of Beijer BOOTP server (included in IOGuidePro or extracted tool).
4. Run IOGuidePro, and select menu Tools > Bootp Server, or start the BOOTP tool from folder.
Alternative run the BOOTP server separately (BootpSvr.exe).
5. When the BOOTP Server is launched and to allow G-series device in present version of
IOGuidePro. Make sure that option ”Show Beijer device only” is unchecked!
Push the “Add New Device” button and enter the MAC address and desired IP address, subnet
and gateway. Select the network interface that the GL-9089/GN-9289 is connected to.
Push “Ok” and “Start Bootp”.

GN-9372 - IP address, Subnet and Gateway Setting SUEN00389A 2020-09
8 (12)
Normal.dotm, 2020-09-09
6. Power OFF the GL-9089/GN-9289 and set DIP switch 9 to ON (BOOTP).
7. Power on the GL-9089/GN-9289 device, and the device will get the new IP address from the
BootP server, it appears in the upper window.
8. “Stop Bootp” and reset DIP switch 9 to OFF, and reboot the GL-9089/GN-9289 device.
9. If the IP is set to a different subnet then change the IP address of your computer accordingly.
10. Try to ping the device with new IP address.
Close the BOOTP Server.

GN-9372 - IP address, Subnet and Gateway Setting SUEN00389A 2020-09
9 (12)
Normal.dotm, 2020-09-09
Use BOOTP server when IP address is unknown, method 2
1. Connect the PC with the GL-9089/GN-9289 over Ethernet.
2. Set a fixed IP address on the PC, same subnet as the GL-9089/GN-9289 is to be changed to. The
IP address for the PC should not be assigned automatically (DHCP). Se section 4.2. part 1.
3. Always use the latest version of the Beijer BOOTP server included in IOGuidePro or extracted
tool.
4. Run IOGuidePro and select menu Tools > Bootp Server, or start the BOOTP tool from folder. /
Alternative run the Bootp server separately (BootpSvr.exe).
5. When the BootP Server is launched and to allow M-series device in present version of
IOGuidePro, make sure that ”Show Beijer device only” is unchecked!
6. Press “Start Bootp”.
7. Power OFF the GL-9089/GN-9289 and set DIP switch 9 to ON (BOOTP).

GN-9372 - IP address, Subnet and Gateway Setting SUEN00389A 2020-09
10 (12)
Normal.dotm, 2020-09-09
8. Power on the GL-9089/GN-9289 device, and the device will be shown in the BootP server.
Double click on one of the marked rows above.
The MAC address is default entered, type required IP address, Subnet and Gateway. Select the
correct “Interface”, PC:s Ethernet connection to the GL-9089/GN-9289 and push “Ok”.
9. Now press “Stop BootP”.
10. Reset the DIP switch 9 to OFF, and reboot the GL-9089/GN-9289 device.
11. If the IP is set to a different subnet then change the IP address of your computer accordingly.

GN-9372 - IP address, Subnet and Gateway Setting SUEN00389A 2020-09
11 (12)
Normal.dotm, 2020-09-09
12. Try to ping the device with new IP address.
Close the BOOTP Server.

GN-9372 - IP address, Subnet and Gateway Setting SUEN00389A 2020-09
Beijer Electronics AB −a Beijer Electronics Group company
Head Office Subsidiaries
Beijer Electronics AB Click here for details
P.O. Box 426, Stora Varvsgatan 13a
SE-201 24 Malmö, SWEDEN
Telephone +46 40 35 86 00
Reg no. 556701-4328 VAT no SE556701432801 www.beijerelectronics.com info@beijerelectronics.com
12 (12)
Normal.dotm, 2020-07-01
5About Beijer Electronics
Beijer Electronics is a multinational, cross-industry innovator that connects people and
technologies to optimize processes for business-critical applications. Our offer includes
operator communication, solution engineering, digitalization and communication, and support.
As experts in user-friendly software, hardware and services for the Industrial Internet of
Things, we empower you to meet your challenges through leading-edge solutions.
www.beijergroup.com
Contact us
Global offices and distributors
This manual suits for next models
2
Table of contents
Other Beijer Electronics Gateway manuals

Beijer Electronics
Beijer Electronics X2 extreme 15 SL HP User manual

Beijer Electronics
Beijer Electronics G Series Installation manual

Beijer Electronics
Beijer Electronics Korenix JetWave 4110L User manual

Beijer Electronics
Beijer Electronics BoX2 extreme User manual

Beijer Electronics
Beijer Electronics korenix JetWave 3220v3 Series User manual

Beijer Electronics
Beijer Electronics Korenix JetWave 4110L User manual

Beijer Electronics
Beijer Electronics Korenix JetWave 2310 Series User manual


