Beko SPA 9230 C User manual

SPA 9130 B
SPA 9230 C
EN - FR - ES - RO - IT - PL - NL - RU
01M-8818473200-2322-11
01M-8913193200-2322-11
User Manual
Steam Iron

2
CONTENTS
ENGLISH 8-17
FRANÇAIS 18-28
ESPAÑOL 29-40
ROMÂNĂ 41-54
ITALIANO 55-66
POLSKI 67-79
NEDERLANDS 80-90
РУССКИЙ 91-108

3
1
2
36
8
9
10
11
12
7
4
5

4
Dry
Ironing
Steam
Ironing
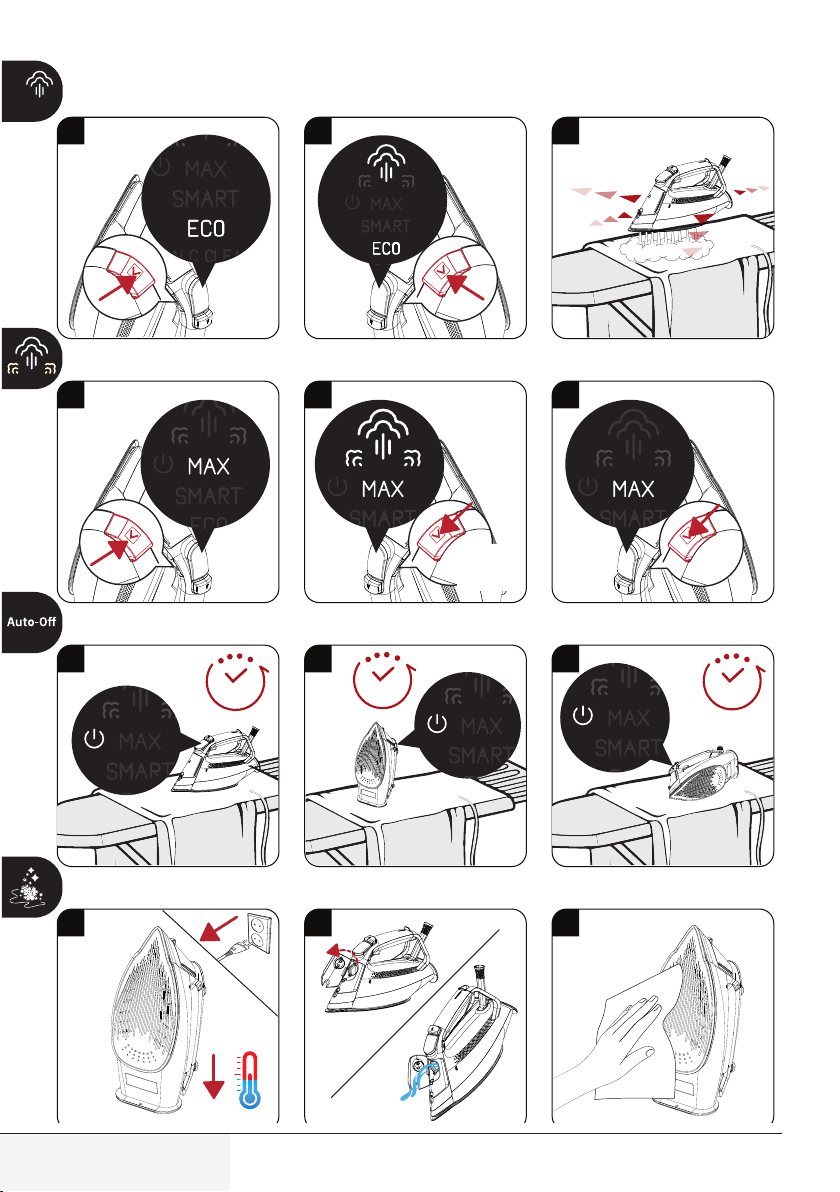
EN FIRST USE SHOCK STEAM DRY IRONING STEAM IRONING
FR PREMIÈRE
UTILISATION FONCTION PRESSING REPASSAGE À SEC REPASSAGE À LA
VAPEUR
ES PRIMER USO DESCARGA DE VAPOR PLANCHADO EN
SECO
PLANCHADO CON
VAPOR
RO PRIMA UTILIZARE JET DE ABUR CĂLCARE USCATĂ CĂLCARE CU ABUR
IT USO INIZIALE PULIZIA E MANUTENZIONE STIRATURA A SECCO STIRATURA A VAPORE
PL PIERWSZE UŻYCIE UDERZENIE PARY PRASOWANIE NA
SUCHO
PRASOWANIE
PAROWE
NL EERSTE GEBRUIK SCHOK STOOM DROOG STRIJKEN STOOM STRIJKEN
RU ПЕРВОЕ
ВКЛЮЧЕНИЕ УДАР ПАРОМ СУХАЯ ГЛАЖКА ПАРОВАЯ
ГЛАЖКА
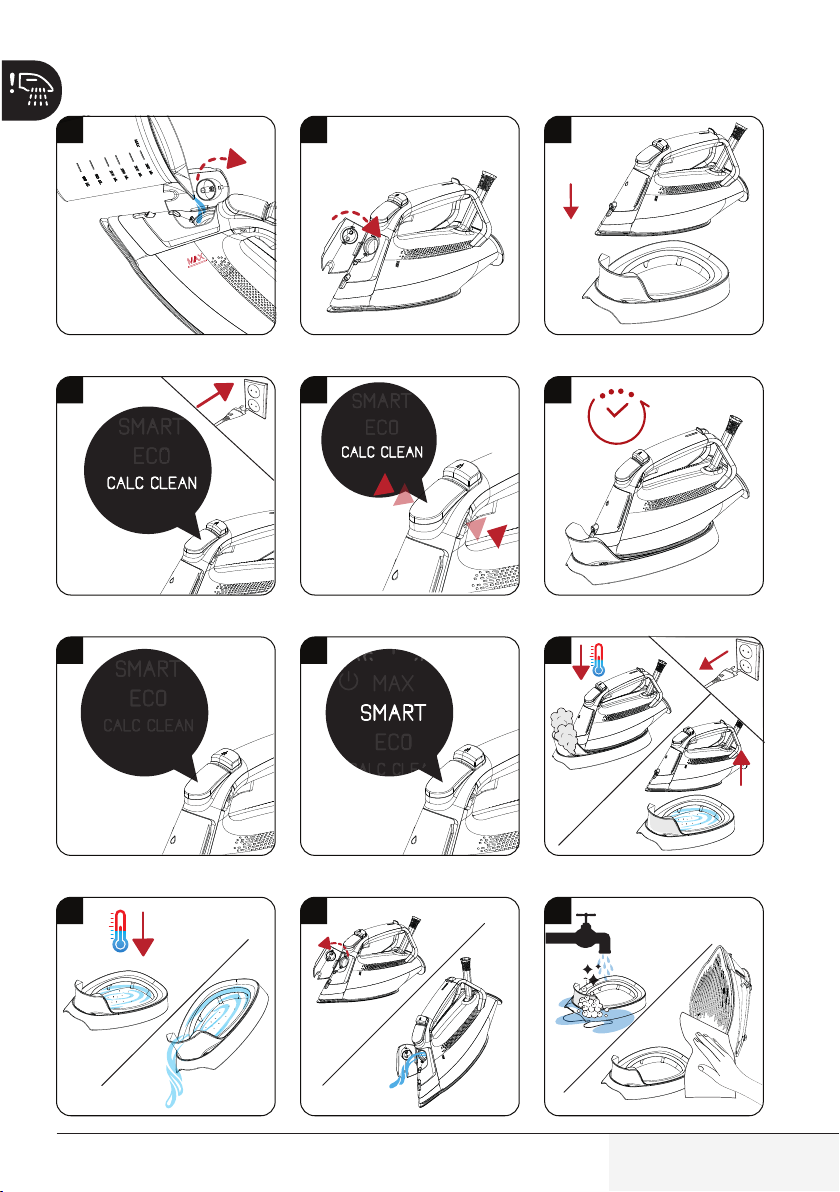
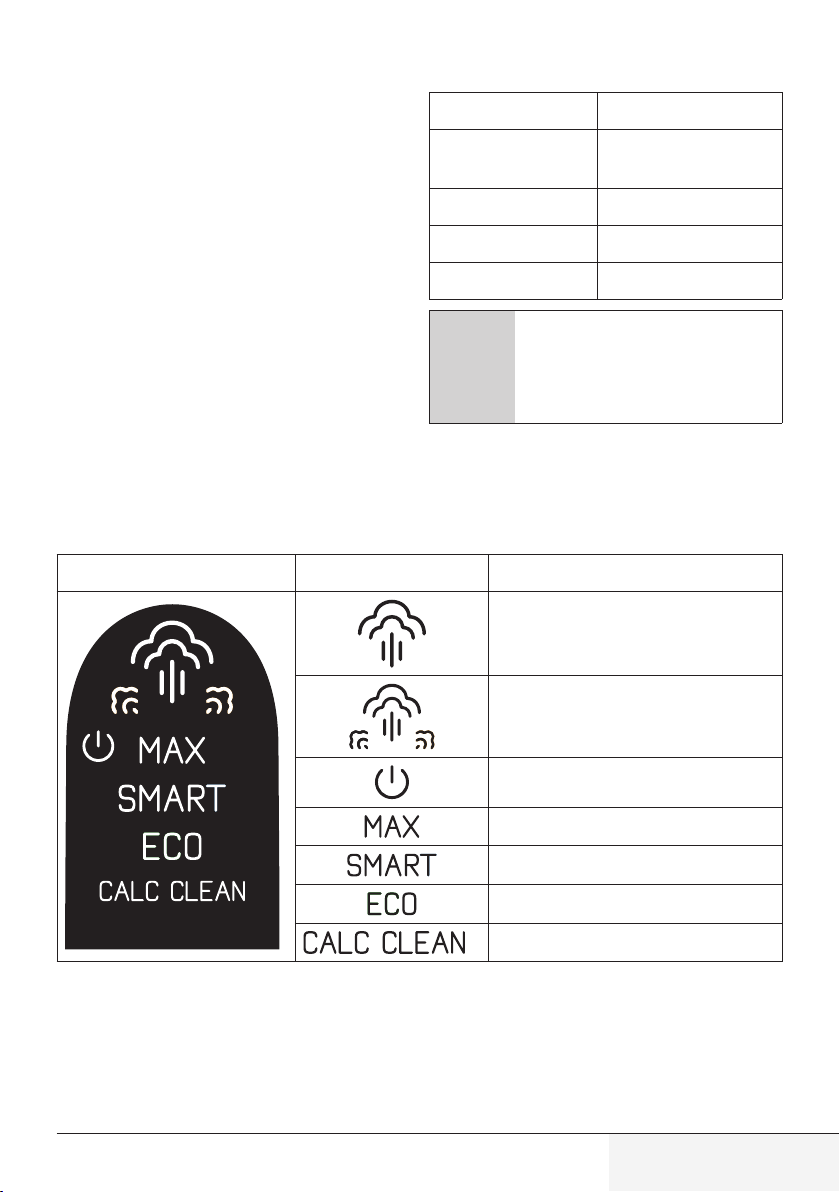
EN TURBO STEAM AUTOMATIC SHUTDOWN CLEANING AND CARE SELF-CLEAN
FR VAPEUR TURBO ARRÊT AUTOMATIQUE NETTOYAGE ET
ENTRETIEN AUTO-NETTOYAGE
ES TURBO VAPOR APAGADO AUTOMÁTICO LIMPIEZA Y
CUIDADOS AUTOLIMPIEZA
RO JET DE ABUR OPRIRE AUTOMATĂ CURĂ AREA ȘI
ÎNGRIJIREA AUTOCURĂȚARE
IT TURBO VAPORE SPEGNIMENTO
AUTOMATICO PULIZIA E CURA AUTOPULITURA
PL PARA TURBO AUTOMATYCZNE
WYŁĄCZANIE
CZYSZCZENIE I
KONSERWACJA SAMOCZYSZCZENIE
NL TURBOSTOOM AUTOMATISCHE
UITSCHAKELING
REINIGING EN
ONDERHOUD ZELFREINIGING
RU ТУРБО ПАР АВТОМАТИЧЕСКОЕ
ОТКЛЮЧЕНИЕ
ОЧИСТКА И
УХОД САМООЧИСТКА

5
Dry
Ironing
1 2 3
4 5 6
7
8
9
8 9 10
1
2
beep!
X2
beep!
beep!
After the “beep”,
the iron is ready.
After the “beep”,
the iron is ready.

6
11 12 13
14 15 16
17 18 19
1 2 3
Steam
Ironing
beep! beep!
After the
“beep”,
the iron
is ready.
After the
“beep”,
the iron
is ready.
beep!
30 sec. 8 min. 8 min.
1
2
O
press
twice

7
1 2 3
4 5 6
7 8 9
10 11 12
beep!
3 min.
1
2
3x beep! Press for
5 sec.
2
3
1

Please read this manual first!
Dear Customer,
Thank you for preferring this Beko product. We hope that you get the best results from your product
which has been manufactured with high quality and state-of-the-art technology. Therefore, please read
this user manual and all other accompanying documents carefully before using the product and keep
it as a reference for future use. If you handover the product to someone else, give the user manual as
well. Follow all warnings and information in the user manual.
Meanings of the symbols
Following symbols are used in the various sections of this manual:
CImportant information and useful hints about
usage.
AWARNING: Warnings against dangerous sit-
uations concerning the security of life and
property.
WARNING: Warning for hot surfaces.
WARNING: Risk or burning and scalding due
to steam.
Conforms to the WEEE Directive.
This product has been manufactured in environmental friendly modern plants without giving any harm to the nature.
It does not contain PCB.

Steam Generator / User Manual 9 / EN
Control and parts
1. Water spray nozzle
2. Water refill lid
3. LED display
4. Water spray button
5. Thermostat indicator and Auto-Off light
6. Shock steam button
7. Temperature setting button
8. Water tank
9. Soleplate
10. Calc-clean reservoir
11. Steam adjustment button
12. Cable winding bay
Technical data
Voltage 220-240V~50-60Hz
Power
consumption 2520-3000W
Shock steam 280 g*
Continuous steam 63 g/min
Insulation class I
C*Measured at maximum tempera-
ture level, when shock steam is ap-
plied with 3-second intervals for an
operating period of 30 minutes.
Rights to make technical and design changes are
reserved.
LED display;
Control panel Symbols Remarks
Steam mode
Turbo-steam mode
Auto-Off indicator
Maximum temperature mode
Smart mode
Eco mode
Calc-clean warning/mode
The values which are declared in the markings affixed on your appliance or the other printed documents supplied with it represent
the values which were obtained in the laboratories pursuant to the pertinent standards. These values may vary according to the
usage of the appliance and ambient conditions.

10 / EN Steam Generator / User Manual
Button descriptions
Water spray
button (4);
You can remove tough
wrinkles with ease.
Steam boost
button (6);
It provides steam
boost feature in all
modes.
Temperature
adjustment
button (7);
Select the SMART
mode applicable for
each fabric type or
ECO or MAX modes for
professional use with
temperature
adjustment button.
Steam setting
button (11);
You can iron with or
without steam.

Steam Generator / User Manual 11 / EN
This section contains safety in-
structions that will help protect
from risk of personal injury or
property damage.
Failure to follow these instructions
invalidates the granted warranty.
1.1 General safety
•This appliance complies with the
international safety standards.
•This appliance is intended to be
used in household and similar
applications such as:
– Staff kitchen areas in shops,
offices and other working en-
vironments;
– Farm houses
– By clients in hotels, and other
residential type environ-
ments;
– Bed and Breakfast type envi-
ronments.
It is not fit for industrial use.
•This appliance may be used by
children who are at the age of
8 or over and the people whose
physical, perceptive or mental
skills are impaired or who are
inexperienced or not knowl-
edgeable about the appliance as
long as they are supervised or
informed and made understood
the safe use of the appliance
and the encountered dangers.
Children should not play with
the appliance. Cleaning and
user maintenance procedures
should not be performed by chil-
dren unless they are controlled
by their elders.
•Do not leave the product unat-
tended while it is plugged in.
•Unplug the product before filling
the water reservoir with water.
•Operate and store the appliance
on a stable surface.
•When the appliance is placed
on its base plate, ensure that
the surface beneath the plate is
level.
1 Important safety and environmental
instructions

12 / EN Steam Generator / User Manual
•Do not use the appliance if the
power cable or the appliance
itself is damaged. Contact an
authorised service.
•If the appliance is dropped or
leaks water or has other failures,
contact the authorised service.
Do not use the appliance until it
is repaired.
•When the appliance is not in use
or left to cool down keep the ap-
pliance and power cable out of
reach of children under 8 years
old.
•The appliance is not suitable for
using outdoors.
•Only use the original parts or
parts recommended by the
manufacturer.
•Do not attempt to dismantle the
appliance.
•Your mains power supply should
comply with the information
supplied on the rating plate of
the appliance.
•The mains supply of the appli-
ance must be secured with a
minimum 16 A fuse.
•Use the appliance with a
grounded outlet only.
•Do not use the appliance with
an extension cord.
•Do not pull the power cable
when unplugging the appliance.
•Unplug the appliance before
cleaning it.
•Do not wrap the cable around
the appliance. Wrap the cable
around the cable wrapping sec-
tion provided at the rear of the
appliance only.
•Do not touch the appliance or
its plug with wet or damp hands
when the appliance is plugged
in.
•The soleplate and its surround-
ing area can be extremely hot.
Contacting hot surfaces may
cause burns. Therefore while or
just after using the appliance,
pay attention not to touch the
hot surfaces.
•Never use the appliance in or
near to combustible or inflam-
mable places and materials.
1 Important safety and environmental
instructions

Steam Generator / User Manual 13 / EN
•If you keep the packaging mate-
rials, store them out of the reach
of children.
•Do not open the water filling
cover during use.
1.2 Compliance with WEEE
Directive and Disposing of the
Waste Product
This product complies with EU WEEE Directive
(2012/19/EU). This product bears a classification
symbol for waste electrical and electronic equip-
ment (WEEE).
This symbol indicates that this product
shall not be disposed with other
household wastes at the end of its ser-
vice life. Used device must be returned
to offical collection point for recycling
of electrical and electronic devices. To find these
collection systems please contact to your local au-
thorities or retailer where the product was pu-
chased. Each household performs important role
in recovering and recycling of old appliance.
Appropriate disposal of used appliance helps pre-
vent potential negative consequences for the envi-
ronment and human health.
1.3 Compliance with RoHS
Directive
The product you have purchased complies with EU
RoHS Directive (2011/65/EU). It does not contain
harmful and prohibited materials specified in the
Directive.
1 Important safety and environmental
instructions
1.4 Package Information
Packaging materials of the product are
manufactured from recyclable materials
in accordance with our National
Environment Regulations. Do not dispose of the
packaging materials together with the domestic or
other wastes. Take them to the packaging material
collection points designated by the local authori-
ties.

14
2.1 Intended use
This appliance is intended only for household use
and ironing; it is not suitable for professional use.
2.2 Initial use
Remove the protective film on the LED screen (3).
During initial use, fill the water reservoir and va-
porize the water to remove the manufacturing
residues. Meanwhile, use shock steam button (6)
frequently.
C
You can smell a mild odour or see
white sediments coming out of the
soleplate holes during initial use.
After performing vaporizing process
twice, such odours and sediments
will disappear. Also water droplets
may form within the water reservoir;
this is normal.
2.3 Refilling the water reservoir
A
WARNING: Do not fill the water
reservoir (8) with perfume, vinegar,
laundry starch, calc-cleaners or oth-
er products or chemicals which can
facilitate the ironing process.
C
Your appliance is suitable for using
with tap water. If your tap water is
excessively hard, we recommend
you to use a mixture of tap water
and potable water.
2 Operation
2.4 Temperature setting and dry
ironing
When setting the temperature of the appliance,
consider the following table.
Fabric
Type Temperature
Setting Steam
Setting
Silk ECO-SMART With/Without
Steam
Wool SMART With/Without
Steam
Cotton SMART-MAX With/Without
Steam
Linen-
Jean SMART-MAX With/Without
Steam
AWARNING: Take the ironing instruc-
tions specified on the label of the
fabric into consideration for ironing.
C
•Your appliance starts in “SMART”
mode when it is switched on.
•You can safely iron all fabrics suit-
able for ironing in “SMART” mode.
•If you don’t know the fabric of your
garment, first iron an invisible part
of your garment and determine a
correct ironing temperature for it.
•In order to prevent the bright
stains that may form on the syn-
thetic fabrics such as silk, iron on
the reverse side of the fabric. Do
not use the water spraying feature
in order to prevent the stain for-
mation.

Steam Generator / User Manual 15 / EN
2.5 Steam ironing
A
WARNINGS
•When you set the appliance to
steam mode, it will not give out
steam unless you move it.The ap-
pliance will give out steam when
you move it.Appliance is equipped
with a movement sensor.
•Noise coming from the appliance
may increase if the water level in
the water tank decreases. In this
case, fill the tank up to the “MAX”
level.
2.6 Turbo-steam
You can use the turbo steam function when the
temperature is set to “MAX” position.
CUse turbo steam function to obtain
higher amounts of steam and for
fast ironing on thick fabrics.
A
WARNING: When you set the appli-
ance to steam mode, it will not give
out steam unless you move it. The
appliance will give out steam when
you move it. Appliance is equipped
with a movement sensor.
2.7 Shock steam
You may use the shock steam feature in all modes.
A
WARNINGS
•Wait for a few seconds before
pressing the shock steam button
(6) again. If you keep pressing the
shock steam button (6) repeatedly,
water may come through the sole-
plate (9) together with steam.
•At the beginning of ironing, iron
may not produce shock-steam
during first couple of trials.
AWARNING: Thermostat indicator
light (5) must go out in order to be
able to use the shock steam func-
tion.
WARNING: Never direct the steam
to people or pets.
A
WARNING: If the thermostat indica-
tor light (5) turns on during ironing,
wait for the light (5) to go out before
proceeding with the shock steam
process.
2.8 Spraying water
C
•Make sure that there is sufficient
water in the reservoir (8) before
spraying water.
•You can easily remove creases
using the water spraying feature.
2.9 Anti-dripping system
The appliance is equipped with an anti-dripping
system Iron stops vaporization automatically when
the temperature is too low in order to prevent wa-
ter coming out of the soleplate (9).
Anti-dripping system allows for ironing even the
most delicate fabrics.
2.10 Auto-Off
C
•If the iron is switched off automat-
ically, symbol flashes.
•It may take around 60 seconds
for the soleplate (9) to reach the
previous temperature level.
•If the appliance is moved in hori-
zontal position it will be switched
on.
2 Operation

16
3.1 Cleaning
A
WARNINGS
•Do not use gasoline, solvent or
abrasive cleaning agents or hard
brushes to clean the appliance.
•Never put vinegar, descaling
agent, laundry starch, perfume or
other auxiliary products that help
ironing into the appliance.
•Do not wash your appliance under
running water or do not soak it in
water or other liquids.
•Do not use abrasive cleaning
agents to clean the soleplate (9).
3.2 Auto calc-clean
•This process allows for cleaning the calc parti-
cles that accumulate in the appliance.
•Use this feature when “CALC-CLEAN” warning
appears on the display.
•Fill the water reservoir until (8) MAX level.
C
•Do not move the appliance during
cleaning. In such a case, cleaning
procedure must be repeated.
•You may perform this procedure
by following the same steps
without waiting for the “CALC-
CLEAN” warning.
WARNINGS
•As the descaling reservoir (10)
shall heat up and as hot condens-
ing water shall be collected during
operation, do not touch the reser-
voir and the iron, and drain when
it is cooled down.
•A high amount of steam shall
come out the appliance and the
descaling reservoir during the
descaling procedure.
CSelf-cleaning function removes the
dirt inside the soleplate. We recom-
mend using this feature every 10-15
days.
3.3 Storage
•If you do not intend to use the appliance for a
long time, store it carefully.
•Before lifting the appliance unplug it and then let
it cool completely.
•Empty the water reservoir.
•Keep the appliance and its accessories in their
original packages.
•Store it in a cool, dry place.
•Always keep the appliance out of the reach of
children.
3.4 Handling and transportation
•During handling and transportation, carry the
appliance in its original packaging. The packag-
ing of the appliance protects it against physical
damages.
•Do not place heavy items on the appliance or on
the packaging.The appliance may get damaged.
•Dropping the appliance may render it non-oper-
ational or cause permanent damage.
For commissioning, general use and clean-
ing, please observe the instructions on pag-
es 5 - 6 and 7 of this operating manual.
3 Cleaning and care

Steam Generator / User Manual 17 / EN
4 Troubleshooting
Problem Possible reason Solution
Although the appliance is plugged
in, soleplate (9) does not heat up. The plug or power cord of the
appliance may be faulty. Contact the authorized service if
the appliance does not operate
although the appliance is plugged
in.
The appliance does not generate
steam. Amount of the water in the
water reservoir (8) might be
insufficient.
Fill the water reservoir (8) with wa-
ter up to MAX level.
Operate the appliance in steam
mode.
Sediments and residues fall of
from the base (9) while ironing. If the water you use for your
appliance is too limy, such
sediments may form.
Fill the water reservoir of the appli-
ance by mixing the tap water and
drinking water for your next ironing
operations.
Use the auto descaling feature
more frequently if the water in your
area is hard.
There are stains at the soleplate
(9). Wet clothes are ironed / scale
stains have occurred on the
base (9).
Wipe the sediments and residues
with a lightly dampened cloth after
the appliance is cooled down ad-
equately.
The “CALC CLEAN” symbol flash-
es on the LED display (3). The time for descaling has
been reached. Perform the descaling procedure.
Icons on the led screen (3) are not
clear. Protective film on the led
screen may be still on. Remove the protective film on the
led screen (3).
Noise from the appliance. Water level in the water tank
(8) may be reduced. Noise
occurrence due to decrease
in the water tank is normal.
Fill the water up to MAX line in the
water tank (8).

Avant toute chose, veuillez lire ce manuel d’utilisation !
Chers clients,
Merci d’avoir choisi les produits Beko. Nous espérons que ce produit, fabriqué dans des installations
modernes et soumis à un processus de contrôle qualité rigoureux, vous offre les meilleures performanc-
es possibles. C’est pourquoi nous vous recommandons, avant d’utiliser ce produit, de lire attentivement
ce manuel et tous les autres documents fournis et de les conserver soigneusement pour toute consul-
tation future. Si vous confiez le produit à quelqu’un d’autre, n’oubliez pas de lui remettre également le
manuel d’utilisation. Veillez à bien respecter les consignes et les instructions figurant dans le manuel
d’utilisation.
Signification des symboles
Les symboles suivants sont utilisés tout au long de ce manuel :
CInformations importantes et conseils utiles
concernant l’utilisation de l’appareil.
AAVERTISSEMENT : Avertissement sur les si-
tuations dangereuses concernant la sécurité
des biens et des personnes.
AVERTISSEMENT : Avertissement en cas de
contact avec une surface chaude.
AVERTISSEMENT : Risque de se brûler et de
s’ébouillanter à cause de la vapeur
Cet appareil est conforme à la directive DEEE.
Ce produit a été fabriqué dans des usines écologiques et modernes.facilities.
Ne contient pas de PCB.
À DÉPOSER
EN MAGASIN À DÉPOSER
EN DÉCHÈTERIE
OU
FRFR
Cet appareil
et ses accessoires
se recyclent

Fer à vapeur / Manuel d’utilisation 19 / FR
Commandes et pièces
1. Buse de pulvérisation d’eau
2. Couvercle du réservoir d’eau
3. Affichage LED
4. Bouton pulvérisateur d’eau
5. Indicateur du thermostat et voyant d’arrêt
automatique
6. Bouton jet de vapeur
7. Bouton de réglage de la température
8. Réservoir à eau
9. Semelle
10. Réservoir Calc-clean
11. Bouton de réglage de la vapeur
12. Compartiment d’enroulement de câble
Les valeurs indiquées sur les inscriptions apposées sur votre appareil ou les autres documents fournis avec le produit sont des
valeurs obtenues en conditions de laboratoire, conformément aux normes en vigueur. Ces valeurs peuvent varier selon l’utilisation
de l’appareil et les conditions ambiantes.
Affichage LED ;
Panneau de commande Symboles Remarques
Mode vapeur
Mode vapeur turbo
Indicateur Arrêt automatique
Mode Température maximale
Mode Smart
Mode Éco
Avertissement / mode Calc-clean
Caractéristiques techniques
Tension 220-240V~50-60Hz
Consommation
d’énergie 2520-3000 W
Jet de vapeur 280 g*
Quantité de vapeur
continue 63 g/min
Classe d’isolement I
C
*Mesuré à un niveau de température
maximal, lorsque les jets de vapeur
sont appliqués à des intervalles de
3 secondes pour une période de
fonctionnement de 30 minutes.
Droits de modifications techniques ou de concep-
tion réservés.

20 / FR Fer à vapeur / Manuel d’utilisation
Descriptions des boutons
Bouton de pulvérisa-
tion d’eau (4) :
Vous permet d’enlever
facilement les plis
tenaces.
Bouton vapeur
boost (6) :
Il assure la fonction
de vapeur haute
puissance dans
tous les modes.
Bouton de réglage de
la température (7) :
Sélectionnez le mode
SMART applicable pour
chaque type de tissu ou
les modes ECO ou MAX
pour un usage profes-
sionnel à l’aide du bouton
de réglage de la tempé-
rature.
Bouton de réglage
de la vapeur (11) :
Vous pouvez
repasser avec ou
sans vapeur.
This manual suits for next models
1
Table of contents
Languages:
Other Beko Iron manuals

Beko
Beko SGA6124D User manual

Beko
Beko SGA 8328 B User manual

Beko
Beko BKK 2133 User manual

Beko
Beko SIM7124B User manual

Beko
Beko SPA 9130 B User manual

Beko
Beko BKK 2304 User manual

Beko
Beko BKK 2174 User manual

Beko
Beko SGA8328D User manual

Beko
Beko 01M-8833003200-2417-04 User manual

Beko
Beko BKK 2132 K User manual

Beko
Beko DIM 4504 P User manual

Beko
Beko BKK 2141 User manual

Beko
Beko SIM 3126 R User manual

Beko
Beko SIM 3122 T User manual

Beko
Beko 01M-8816573200-2519-01 User manual

Beko
Beko 01M-8911013200-4921-03 User manual

Beko
Beko SPA7131P User manual

Beko
Beko BKK 2174 User manual

Beko
Beko SIM4126B User manual

Beko
Beko SIM 3122 T User manual