SECTION 503-601-101
3.17 Install
H4DB
handset cord by inserting end
of cord having
tapered
plug into
handset
and square end into jack
on
bottom of set. Spring
locking tab should face away from wall
at
bottom
of
set
(Fig.
4).
t
Care
should
be
taken
that
contact
suda'ces
of
plugs
on
cord
mate
with
those
of
handset
and
telephone
set
jacks
since
the
plugs
can
be
inserted
in
the
reverse
position.
Caution:
Cord
should
be
z·emoved from
jack
in
bottom
of
set
anytime
chassis
assembly
must
be
put
in
lowe1·ed
position.
3.18 Where conditions warrant, the
G3A6
or G
12A
handset
supplied with
these
sets
can be
replaced with other types as follows:
e For impaired hearing-G6-type
e For weak speech-G7-type
e For noisy location-GS-type or
D-180413
Refer
to Division
501
for
connections of
these
handsets. When either of these handsets
is
used,
an H4CJ or equivalent handset cord must
be
used.
3.17
Installation
of
Spade-Tipped
Handset
Cords In Eal'/y
Production
Set
Equipped
With
G12A
Handset
(Fig.
17):
To
install
spade-tipped
handset
cord (H4CJ or equivalent)
remove P-376819 J Hook Stayband from the cord.
Cut
back
and
remove cord
sheath
to
stayband
marks. Thread spade-tipped conductors through
plug 840217590 (ordered separately) (spade tips
must be bent to clear cord entrance). Pull cord
until about 1/4-inch of cord sheath
is
in
the central
cavity of the plug. Separate the conductors into
two groups and tie an overhand knot, pulling the
knot to the cord sheath. Pull cord from plug until
strain relief position
is
attained by knot entering
sheath and resting against plug. Feed spade-tipped
conductors
straight
through
jack P-22F620 and
connect to proper terminals. Insert plug
in
jack.
Page 10
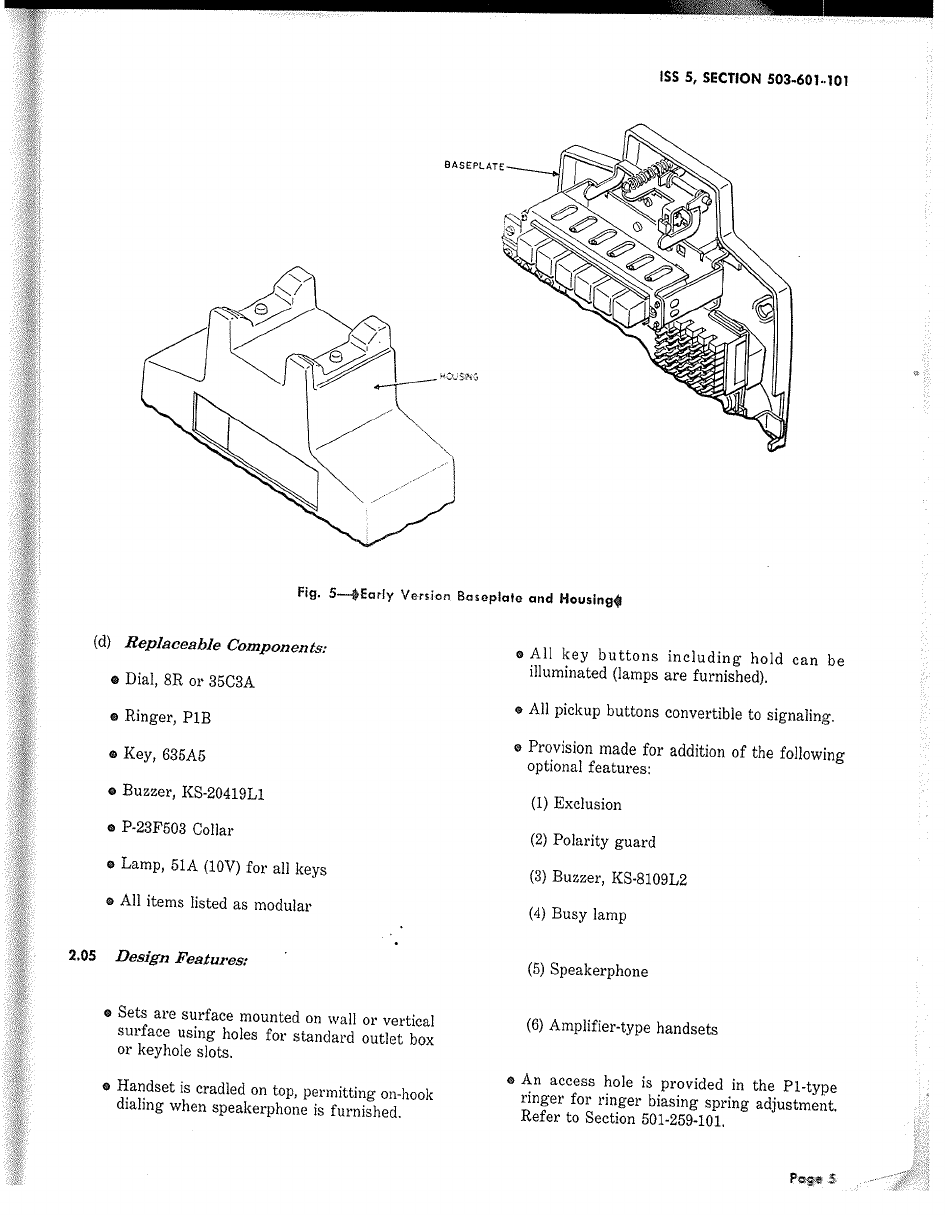
3.20
To
install
housing:
(1)
Refer to
5.05.
(2)
If
chassis assembly
is
in
lowered position,
raise and fasten
in
place with two captive
screws.
(3)
Install collar
on
key.
(4)
Withdraw the two mounting screws until
they are held
in
the housing by their threads.
With both line switch plungers fully lifted, move
the housing directly into position around
the
telephone
set
(if
an
exclusion switch
is
installed,
the left plunger
will
be
felt to touch the exclusion
switch
when
the
housing
is
about
3/8-inch
from
the
base).
Depress
both
plungers
to
their
on-hook position. Continue moving the housing
into position against the base. Release plungers.
(5)
Fasten
housing
in
place with two captive
screws.
(6)
Check complete operation of line switch and
exclusion feature.
3.21
Use
a
Form
E-5002-A
or
E-5002-B
as
a
station number card for a TOUCH-TONE
station and Form
E-4203-G
or
E-4204-G
for rotary
sets.
3.22
To
install
faceplate:
(1)
If
installing
2851A
faceplate
(2851-type
telephone set) place station number card
in
from front of faceplate
in
standard manner.
(2)
Insert tabs
on
faceplate into slots of housing.
Use a
KS-16750
type releaser or equivalent
to depress the tab of the faceplate retainer
clip
while
seating
the faceplate.
To
insure proper
positioning of the retainer
clip,
raise the handle
of the releaser
well
above horizontal, as shown
in
Fig.
15,
before withdrawing the tool.
(3)
If
the latching characteristic of the
P-269524
retainer
clip
is
inadequate, replace with a
840155618
clip.
3.23 The 635A5 key
uses
a E-5837 form (key
button designation tabs).
To
install, squeeze
sides of cap to remove from key button and insert
TCI Library: www.telephonecollectors.info