BenQ InstaShow VS10 User manual

User Manual
V 1.00
InstaShow™
VS10

2
Copyright
Copyright © 2023 by BenQ Corporation. All rights reserved. No part of this publication
may be reproduced, transmitted, transcribed, stored in a retrieval system or translated into
any language or computer language, in any form or by any means, electronic, mechanical,
magnetic, optical, chemical, manual or otherwise, without the prior written permission of
BenQ Corporation.
Disclaimer
BenQ Corporation makes no representations or warranties, either expressed or
implied, with respect to the contents hereof and specifically disclaims any warranties,
merchantability or fitness for any particular purpose. Further, BenQ Corporation reserves
the right to revise this publication and to make changes from time to time in the contents
hereof without obligation of BenQ Corporation to notify any person of such revision or
changes.
This user manual aims to provide the most updated and accurate information to
customers, and thus all contents may be modified from time to time without prior notice.
Please visit www.BenQ.com for the latest version of this manual.
The illustrations and the images in this guide are for your reference.
Statement regarding hyperlinks and
third-party websites
BenQ is not responsible for the content of the websites or of similar resources, which are
maintained and controlled by third parties, that may be linked from this product. Providing
links to those websites or to similar resources does not mean that BenQ makes any
warranty or representation to their content by expression or by implication.
Any third party content or service preinstalled in this product is provided "as is". BenQ does
not, by expression or by implication, make any warrant to the content or to the services
provided by third parties. BenQ does not warrant or guarantee that the content or services
provided by third parties are accurate, effective, most up-to-date, legal, or complete.
Under no circumstances shall BenQ be liable for the content or services provided by third
parties including their negligence. Services provided by third parties may be terminated
temporarily or permanently. BenQ does not warrant or guarantee that the any content or
services provided by third parties are in good condition at any time, and is not liable for
the termination of the said content and services. In addition, BenQ is not involved in any
transactions you conduct in the websites or similar resources maintained by third parties.
You should contact the content or service providers for any questions, concerns, or
disputes.

3
BenQ ecoFACTS
BenQ has been dedicated to the design and development of greener product as part of its
aspiration to realize the ideal of the “Bringing Enjoyment 'N Quality to Life” corporate vision
with the ultimate goal to achieve a low-carbon society. Besides meeting international
regulatory requirement and standards pertaining to environmental management, BenQ
has spared no efforts in pushing our initiatives further to incorporate life cycle design in
the aspects of material selection, manufacturing, packaging, transportation, using and
disposal of the products. BenQ ecoFACTS label lists key eco-friendly design highlights of
each product, hoping to ensure that consumers make informed green choices at purchase.
Check out BenQ's CSR Website at http://csr.BenQ.com/ for more details on BenQ's
environmental commitments and achievements.

Table of Contents
Copyright ............................................................................................................... 2
Disclaimer.............................................................................................................. 2
Statement regarding hyperlinks and third-party websites ................................. 2
BenQ ecoFACTS .................................................................................................... 3
Introduction ........................................................................................................... 6
Product features .................................................................................................................... 7
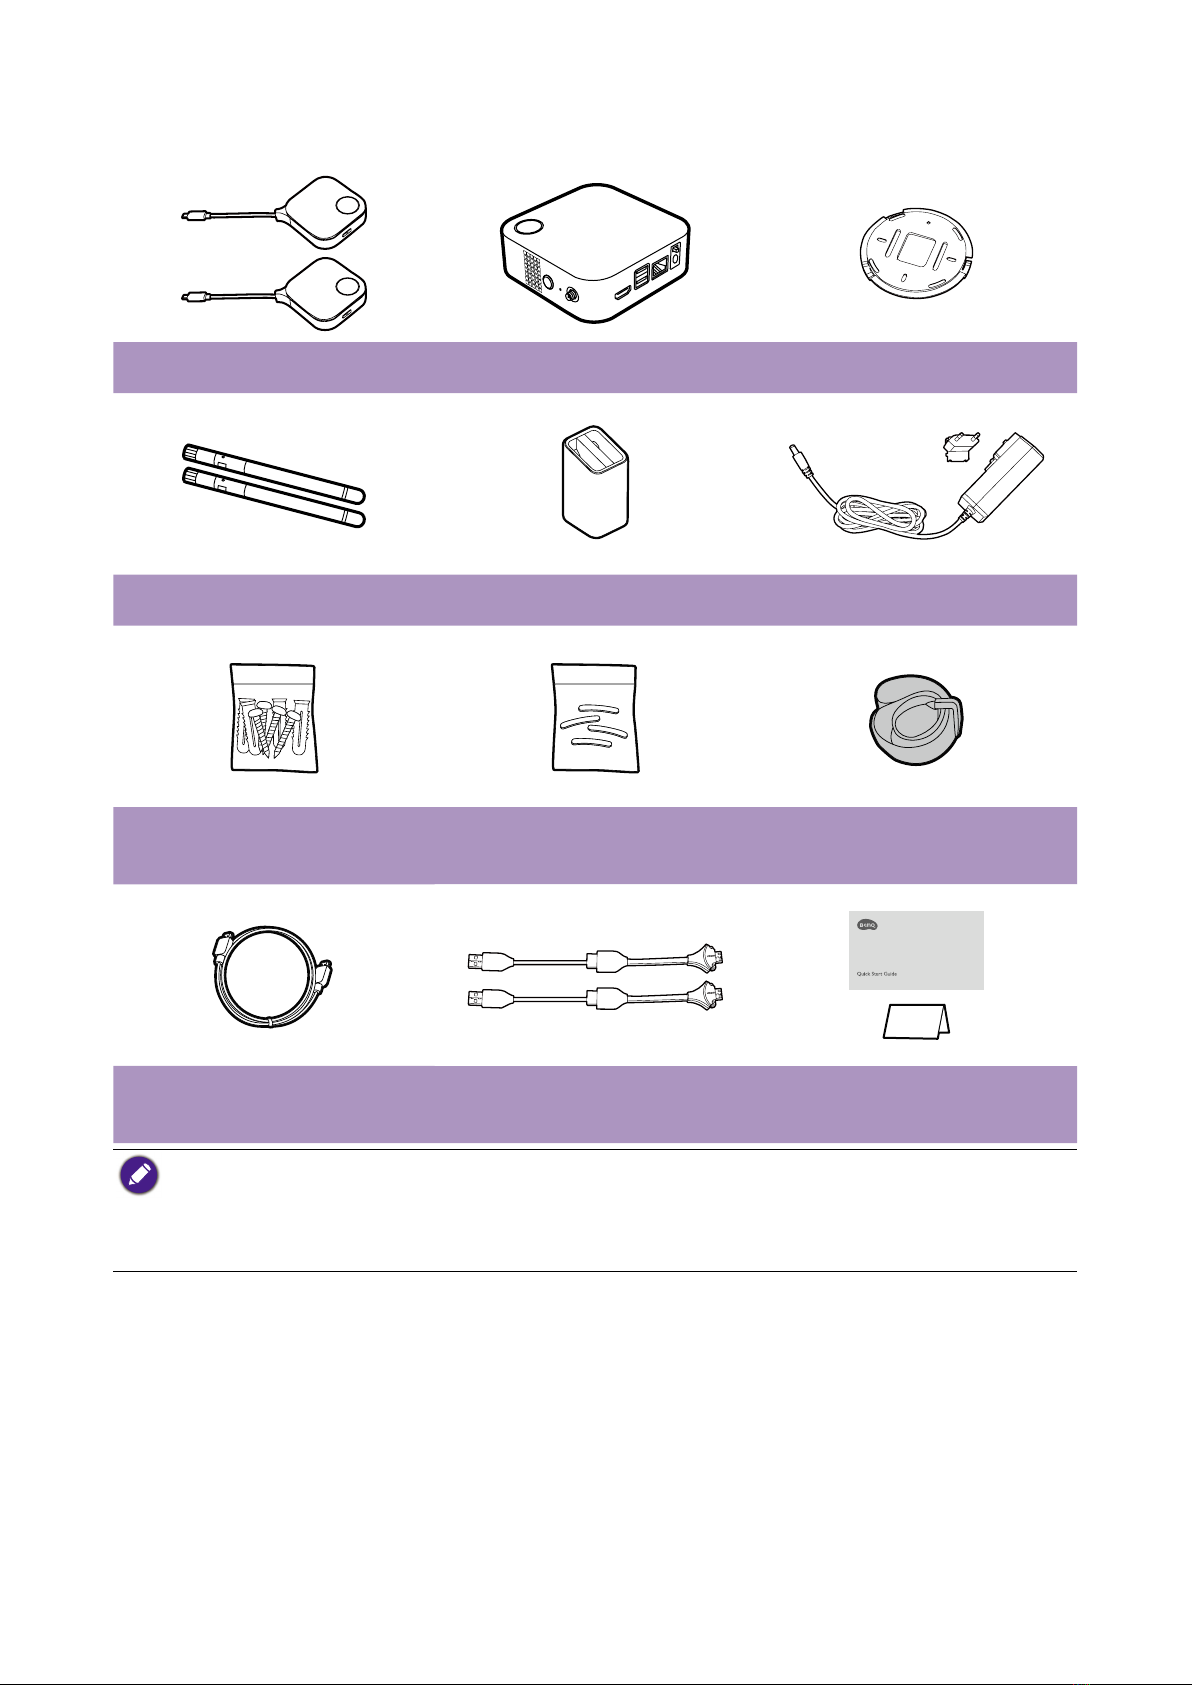
Package content.................................................................................................................... 8
Product specifications .......................................................................................................... 9
Overview...............................................................................................................................11
Button..............................................................................................................................11
Host.................................................................................................................................11
LED indicators of the Button and the Host ...................................................................12
Installation........................................................................................................... 14
Environment check..............................................................................................................14
Assembling the Host...........................................................................................................15
Setting up the Host..............................................................................................................15
Attaching the Host to the ceiling...................................................................................15
Attaching the Host to a ceiling mount ..........................................................................16
Placing the Host on a table ...........................................................................................16
Positioning the Host antennas ...........................................................................................19
For ceiling installation....................................................................................................19
For ceiling mount installation........................................................................................19
For table placement .......................................................................................................20
Connecting the HDMI cable and power .............................................................................21
Assembling the adapter.................................................................................................21
Connecting the HDMI cable...........................................................................................22
Power supply via a power adapter................................................................................22
LAN connection..............................................................................................................23
Wi-Fi connection.............................................................................................................23
Switching to the Button HDMI cable ..................................................................................24
Setting up and powering a Button ......................................................................................25
Pairing a Button and Host...................................................................................................28
When the Host is placed on a table ..............................................................................28
Storing Buttons and USB cable in the cradle .....................................................................30
Resetting a Host ..................................................................................................................31
Resetting a Button...............................................................................................................32
Enabling network standby mode ........................................................................................33
Starting and stopping presentations ................................................................. 34
Getting ready........................................................................................................................34
Starting presentation...........................................................................................................34
Idle presentation..................................................................................................................35
Split screen presentations ..................................................................................................36
Starting a split screen presentation..............................................................................36
Switching from a split screen to a full screen presentation........................................37
Presenting with mobile devices..........................................................................................37
Touch back...........................................................................................................................38
Using InstaShow in hybrid meetings ................................................................. 39
Setting up a videoconference ............................................................................................39
Using an external webcam .................................................................................................43
Using a single InstaShow Button as a microphone...........................................................45

2023/09/20
Using multiple InstaShow Buttons as microphones .........................................................46
Web management............................................................................................... 48
Accessing the web management interface .......................................................................48
Logging into the web management interface via direct connection ..........................48
Logging into the web management interface via LAN ................................................51
Logging into the web management interface via a wireless network ........................51
Getting started.....................................................................................................................53
Top command buttons ..................................................................................................53
Function bar....................................................................................................................53
Main column...................................................................................................................53
Information..........................................................................................................54
WAN ....................................................................................................................57
Wireless Network.................................................................................................58
Peripheral Setting................................................................................................63
Pairing.................................................................................................................66
Display ................................................................................................................69
Advance Setting ..................................................................................................70
Scheduling ..........................................................................................................72
Tools ...................................................................................................................73
Legal Announcement ...........................................................................................86
Troubleshooting .................................................................................................. 87
Error code ............................................................................................................ 89

6
Introduction
Instashow VS10 is a wireless conferencing solution that supports BYOM in your
organization. You can use your own device to host a video conference. All you have to do
is few clicks on your VS Assist App. Your presenters can use the VS10 buttons to share
presentation with simple plug and play.
A standard product set consists of an InstaShow™ VS10 Host (or “Host” in this document)
and two InstaShow™ VS10 Buttons (or “Buttons” in this document). Depending on the
location where you buy the product, the software of the base unit can be different. You can
buy additional InstaShow™ VS10 Button kits if needed.
• "InstaShow™" will hereinafter be referred to as "the product" in this document.
• "InstaShow™ Host" will hereinafter be referred to as "Host" in this document.
• "InstaShow™ Button/Buttons" will hereinafter be referred to as "Button"/"Buttons" in this document.
Your product complies with the local wireless regulations and the warranties are valid in the country/
region where the product is purchased. Using the product outside the purchased country/region does
not guarantee the wireless functionalities. And modification of any part of the product will void the
warranties.
The InstaShow™ is considered networked equipment with high network availability (HiNA
equipment with HiNA functionality) as it provides wireless network access for wireless
InstaShow™ Buttons. The detailed operations of standby please refer to Enabling network
standby mode on page 33 for more information.

7
Product features
The product is equipped with the following features:
Features Description
Router based WIFI Brings a stable Wi-Fi connection and security features that benefit
the system.
Auto Channel
Selection The product automatically selects the best wireless channel upon
bootup, ensuring smooth presentations in any environment.
Wireless Conferencing
InstaShow Button
Microphone for a
wireless extendable
mic system*
Lightly equipped meeting rooms with a VS10 Host with VS20
Buttons will have a clear and uniform voice quality from any
corner in the room.
USB ports Connect VC devices and join meeting via cloud.
Wireless Presentation
True Plug & Play Simply connect the product into your USB-C port (or USB-A
and HDMI ports), then press the Button to start presenting
immediately.
No Software The product doesn't need any software installation or execution.
There's no setup, configuration, or waiting for pop-ups to launch.
Just plug into your PC or Mac and start presenting immediately.
Split Screen
Presentations
Up to two users can simultaneously project their screen via the
product in a dual-screen configuration, so that you can view and
reference multiple documents/videos at the same time during
your presentation.
Touch Back
When the Host is connected to a touchscreen display via its USB
ports, you can use the touchscreen to control the screen of the
PC that is presenting, allowing you to actively engage with the
content that is being presented.
Screen Casting for
Mobile Devices Project your mobile device’s screen wirelessly via the
screencasting capabilities of your mobile device.
Video and Audio The product's HDMI output supports up to 60Hz DCI 1080 video
and stereo sound without cable clutter or complicated driver
selection.
Assured Performance Peace of mind for consistent wireless presentation performance
without relying on your PC.
Extended Desktop Keep your presenter view, notes, and backup data on your laptop
screen while presenting to the wireless screen with extended
desktop in both Windows and OS X.
* Only when used in tandem with VS20 Buttons.
• Touch back via USB port is only supported for Windows-based PCs, Macs, and Chromebooks. Mobile
devices cannot be controlled via touch screens.
• Transmission distance depends on actual environment. Stated distance is based on line-of-sight
measurement. Structures constructed of steel, wood, concrete, or brick may decrease transmission
distance.
• According to regulatory restrictions in different regions of the world, Wi-Fi channels cannot be used
in countries outside the purchased region.

8
Package content
InstaShow™ Buttons InstaShow™ Host Lid
2 Antennas Cradle Adapter & Plugs
Screws and Screw Anchors Rubber Feet Velcro Strap
Cable: HDMI A(M) to A(M) 2 Button HDMI Cables Quick Start Guide &
Safety Statement
• The plug provided with the adapter will vary by region.
• Available accessories and the pictures shown here may differ from the actual contents and the
product supplied for your region.
• Use original accessories to ensure compatibility.
• Always keep the product and accessories out of reach of children.

9
Product specications
General Features
Model name VS10
Color Black
Interface HDMI Out + RJ45 (Ethernet) + 2 x USB 2.0 (Type-A)
Host HDMI-output resolution
HDMI 1.4 (Complies with HDCP 1.4): 1920x1200P60, 1920x1080P60,
1920x1080P50, 1920x1080P30, 1920x1080P24, 1280x720P60,
1280x720P50, 720x480P60, 640x480P60
Mode Split screen mode(on/off)
Simultaneous connections 32 pcs
Wi-Fi standard • IEEE 802.11ac, 5G, 2T2R , 4T4R
• IEEE 802.11n, 2.4GHz 5GHz, 2T2R
Maximum data rate Up to 867Mbps + 300Mbps (at 5GHz + 2.4GHz at 802.11n)
Frequency band 2.4GHz, 5GHz
WiFi authentication WPA2 (WPA2-PSK (Pre-Shared key) (AES128bit) / WPA2 enterprise
(AES256bit)
WAN 1Gbps
Support platform • Wireless presentation: Windows, Linux, MAC, Chrome
• Wireless conferencing: Windows
Supported mobile display Supporting IOS wireless communication
Temperature range Operating: 0°C to +40°C (+32°F to +104°F)
Storage: -10°C to +60°C (+14°F to +140°F)
Humidity Storage: 5% to 90% relative humidity, non-condensing
Operation: 10% to 80% relative humidity, non-condensing
Environmental
Reach distance Up to 20m**
Power consumption Host: 6W/15W (Typical/Max)
Standby power consumption <5W
Weight(Net) 212g
Temperature range Operating: 0°C to +40°C (+32°F to +104°F)
Storage: -10°C to +60°C (+14°F to +140°F)
Humidity Storage: 5% to 90% relative humidity, non-condensing
Operation: 10% to 80% relative humidity, non-condensing

10
InstaShow™ Button
Cable USB Type C Power supply DC 5V±10%, 0.9A
Reset button x1 LED Red/Green/Blue/
White*
Present key x1 Split screen key x1 (Share with
Pairing Key)
Weight 95g
Power consumption Up to 4.5W / 3.5W (Operating) / 2.5W (Standby)
Wireiess transmission
protocol IEEE 802.11 ac, 5GHz, 2T2R
Data rate wireless Up to 867Mbps (at 5GHz for 802.11ac)
Frequency Band 5GHz
InstaShow™ Host
Standby button x1 RJ45 x1
Power button x1 Kensington lock x1
Power DC jack x1 USB x2 (USB Type-A)
Noise Level Normal: 24dBA Video HDMI output: x1
LED Red/Green/Blue/White* Power supply DC 12V±10%, 2A
Dimension (WxDxH) 110 x 110 x 43 mm Power consumption Host: 6W/15W
(Typical/Max)
Weight 212g
Cradle
Dimensioin (WxDxH) 85 x 98 x 170 mm Weight 630g
Package contents
InstaShow Button x2 Velcro Strap x1
InstaShow Host x1 Quick Start Guide x1
Cradle x1 Safety Statement x1
HDMI Cable x1 Screws Yes
Antenna x2 (Black) Power Adapter x1
Button Spare HDMI Cable x2
* See LED indicators of the Button and the Host on page 12 for more information on LED behavior.
** Wireless connection speed and available maximum range depends on wireless environment.

11
Overview
Button
1
2
3
4
Bottom of a Button
1. Present key with LED indicator
Press to start or stop presenting.
2. Split screen key
Press to enable split screen presentations.
3. USB-C connector
Connect to a computer or laptop.
4. Reset
Poke the reset hole to reset the device if the
device stops responding. Refer to Resetting a
Button on page 32 for more information.
Host
93
1
7
46
8
25
3
1. PAIRING key
Press to pair with a Button.
2. RESET
Poke the RESET hole to reset the device if the
device stops responding. Refer to Resetting a
Host on page 31 for more information.
3. Fixture parts for the Antennas
Refer to Assembling the Host on page 15
for more information.
4. HDMI OUT port
Connect to a display using an HDMI A(M) to
A(M) cable.
5. USB 2.0 ports
• Connect to a webcam, microphone, and/or
speakers for video conferencing.
• Connect a touchscreen display to control
the screen of the presenter's device via
touch gestures.

12
93
1
7
46
8
25
3
Alignment hole
10 Lid of the Host
6. WAN port
Allows the following connections:
• Connect the Host to a network for Internet
access.
• Connect the Host to a laptop to access the
Host's web management interface.
7. DC 2A port
Connect to the supplied adapter extender
power cable and adapter to power the Host.
8. Power switch
Slide to power on or off the Host.
9. Standby button with LED indicator
Press to turn the Host on and off.
10. Lid
Refer to Attaching the Host to the ceiling on
page 15 for more information.
LED indicators of the Button and the Host
Please refer to the tables below for detailed indicator and status descriptions for the
Button and the Host.
LED indicator on the Button Status Description
Static blue The device is presenting.
Flashing blue The device is pairing.
Flashing green • The device is starting up and connecting to the Host.
• The device is downloading the firmware.
Static green The device is in standby mode and working normally.
Flashing red The device is unable to connect to a Host.
Off The device is powered off.
Quick flashing green The device is upgrading the firmware.
Static white The device is powering up.

13
LED indicator on the Host Status Description
Static blue The connected device is presenting.
Flashing blue The device is pairing.
Flashing green • The device is starting up.
• The device is upgrading the firmware.
Static white • The device is powering up.
• The device is in network standby mode.
Static green The device is ready for presenting.
Off The device is powered off.

14
Installation
This section will guide you on how to prepare the unit before its initial use.
Environment check
Before installing your InstaShow™ kit, check the environmental conditions.
1.Do not install the device near heat sources like radiators or direct sunlight, or in a site
with excessive dust or humidity.
2.Ambient temperature conditions are listed as below. Maximum ambient temperature
should be +40°C or 104°F. Minimum ambient temperature should be +0°C or 32°F.
Storage temperature should be -10°C to +60°C (14°F to 140°F).
3.Humidity conditions are listed as below. For storage, the relative humidity should be 5%
to 90% (non-condensing). For operation, the relative humidity should be10% to 80% (non-
condensing).
As the product works with different displays, the steps required to complete the installation
may vary according to the actual environment and your display specifications. Follow the
procedures below and refer to the specified sections for details.
1.Assemble the Host with the antennas. See Assembling the Host on page 15 for
details.
2.Connect the Host to the display and power properly. See Connecting the HDMI cable and
power on page 21 for details. Four installation methods are provided.
• Attaching the Host to the ceiling
• Attaching the Host to a ceiling mount
• Placing the Host on a table
• Installing the Host on the wall or trolley
3.Connect the Buttons to the desired devices and power properly. See Setting up and
powering a Button on page 25 for details.
4.Make sure that all the connected devices have been powered on. Press the source
button of the display and make sure that the HDMI source has been transmitted. See
Pairing a Button and Host on page 28 for details.

15
Assembling the Host
Assemble the Host with two antennas by turning the antennas clockwise to fasten them
tightly.
Setting up the Host
You are provided with four different ways to position the Host. The total weight of the Host
Unit varies by model. See the specifications for the weight of your product.
Attaching the Host to the ceiling
1.Place the lid on the ceiling so that the alignment icon on the lid is oriented to where you
want the front of the Host to point after installation.
2.Use the screw anchors and screws provided to lock the lid to the ceiling.
3.Lock the first hole (1).
4.Follow the instruction in the illustration below to lock the other holes (2-4).
5.Align the lock mark on the Host to the lock mark on lid and then mount the Host onto the
lid.
6.Rotate the Host counterclockwise to affix the Host to the lid.
2
1
4
3
Alignment icon
Lock mark
Lock mark
• Please only use the screws (M3*16 tapping screw) and screw anchors provided with the kit to mount
the Host to the ceiling.
• Please see Positioning the Host antennas on page 19 for guidelines on positioning the antenna to
maximize signal reception.

16
Attaching the Host to a ceiling mount
If the display is mounted on the ceiling:
1.Attach the Host to the ceiling mount using the provided velcro strap.
2.Fix the Host to the mounting holder.
3.Use the supplied velcro to fix the mounting holder and the Host to the ceiling mount as
shown in the illustration.
• Please only use the velcro strap (300(L)mm*25(W)mm) provided with the kit to mount the Host to a
ceiling mount.
• Please see Positioning the Host antennas on page 19 for guidelines on positioning the antenna to
maximize signal reception.
Placing the Host on a table
If your display is placed on a table, first attach the lid to the Host by following the process
described below:
1.Orient the lid over the bottom of Host so that the OPEN and LOCK print on the lid is
aligned with the triangle mark on the Host, then insert the lid into the lid compartment.

17
2.Turn the lid counter-clockwise until it clicks into place.
3.When the lid is correctly installed on the Host the OPEN and LOCK print on the lid should
be pointed to the rear side of the Host.
4.Attach the rubber feet to the recesses on the base of the lid and put the Host right next
to the display.
• Please only use the rubber foot provided with the kit to attach to the Host.
• Please see Positioning the Host antennas on page 19 for guidelines on positioning the antenna to
maximize signal reception.

18
You can also place the Host on a mobile display trolley. See the illustration.

19
Positioning the Host antennas
Once you have properly installed the Host, follow the guidelines below to position the
antennas to maximize signal reception:
For ceiling installation
Position the antennas so that they are both pointed downwards at an angle roughly
perpendicular to the ceiling:
For ceiling mount installation
• Position the antennas so that they are both pointing either upwards or downwards
roughly parallel to the ceiling mount:
• If you encounter bad signal reception after initial use of the Host you can manually
adjust the antennas so that they tilt at a slight angle to maximize signal reception. When
doing so, avoid tilting the antennas toward the ceiling mount:

20
• Avoid positioning the antennas in a horizontal manner, this may result in a weak signal
reception:
• If the Host is attached to a metallic ceiling mount ensure that the antennas are at least 3
cm away from the metal portion of the ceiling mount:
3 cm3 cm
For table placement
Position the antennas so that they are both pointed upwards roughly perpendicular to the
table:
Table of contents
Other BenQ Projector Accessories manuals

BenQ
BenQ InstaShow X User manual

BenQ
BenQ InstaShare User manual

BenQ
BenQ LX710 User manual

BenQ
BenQ WDC10 InstaShow Quick reference guide

BenQ
BenQ RS232 Commands User manual

BenQ
BenQ 0.3 Wall Mount User manual

BenQ
BenQ 0.3 Wall Mount-WM03G2 User manual

BenQ
BenQ 0.4 Wall Mount-WM04G3 User manual

BenQ
BenQ ScreenBar User manual

BenQ
BenQ PointWrite User manual

BenQ
BenQ InstaShow S User manual

BenQ
BenQ InstaShow WDC10TC User manual

BenQ
BenQ Ceiling Mount-CM00G2 User manual

BenQ
BenQ PT01 User manual

BenQ
BenQ PointWrite PT20 User manual

BenQ
BenQ PointWrite PW31U User manual

BenQ
BenQ LH856UST User manual

BenQ
BenQ WM04G4 User manual

BenQ
BenQ PointWrite User manual

BenQ
BenQ InstaShow WDC10R User manual