Beper P102FRU200 User manual

Cod.: P102FRU200
SET FRULLATORE A IMMERSIONE 4IN1
4IN1 HAND BLENDER SET
SET DE MIXEUR À IMMERSION 4 EN 1
4IN1 STABMIXER-SET
JUEGO DE BATIDORA DE INMERSIÓN 4 EN 1
ΣΕΤ ΜΠΛΕΝΤΕΡ ΧΕΙΡΌΣ 4 ΣΕ 1
SET BLENDER DE MÂNĂ 4IN1
RUČNÍ MIXÉR 4V1
4 IN 1 STAAFMIXER SET
4-VIENĀ ROKAS BLENDERA KOMPLEKTS
SET ROČNIH MEŠALNIK 4V1
IT
EN
FR
DE
ES
GR
RO
CZ
NL
LV
SL
For further information and/or for instructions for use in other languages, please visit: beper.com
pag. 2
pag. 7
pag. 11
pag. 16
pag. 21
pag. 26
pag. 31
pag. 35
pag. 40
pag. 45
pag. 49
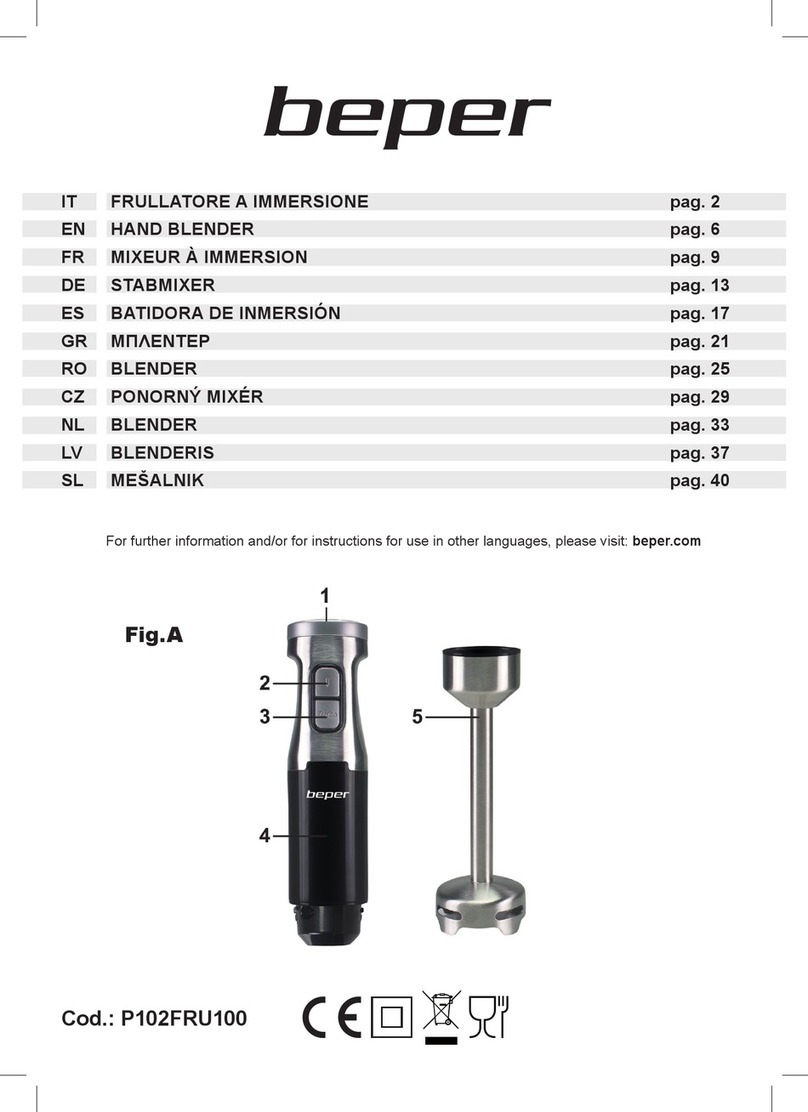
Fig.A
1 5
6
78
9
10
2
3
4

Set frullatore a immersione 4in1 Manuale di istruzioni
2
Avvertenze generali
Leggere queste istruzioni prima di usare l’apparecchio.
Prima e durante l’uso dell’apparecchio è necessario seguire alcune
precauzioni elementari.
Dopo aver tolto l’imballaggio assicurarsi dell’integrità dell’apparec-
chio. In caso di dubbio non utilizzare l’apparecchio e rivolgersi a per-
sonale professionalmente qualicato. Gli elementi dell’imballaggio
(sacchetti di plastica, polistirolo, ecc.) non devono essere lasciati alla
portata dei bambini, in quanto potenziali fonti di pericolo.
Assicurarsi sempre che la tensione di rete elettrica sia uguale a quel-
la indicata nell’etichetta dati tecnici e che l’impianto sia compatibile
con la potenza dell’apparecchio.
Non tirare mai il cavo per scollegarlo dalla presa di corrente elettrica.
Assicurarsi che il cavo non sia in contatto con superci calde o ta-
glienti.
Non utilizzare l’apparecchio con il cavo danneggiato.
Se il cavo di alimentazione è danneggiato, esso deve essere sostitu-
ito dal Costruttore o dal suo Servizio Assistenza Tecnica o comunque
da una persona con qualica similare, in modo da prevenire ogni
rischio.
Collegare l’apparecchio esclusivamente ad una presa di corrente
elettrica alternata.
In generale è sconsigliabile l’uso di adattatori, prese multiple e/o pro-
lunghe. Qualora il loro uso si rendesse indispensabile è necessario
utilizzare solamente adattatori e prolunghe conformi alle vigenti nor-
me di sicurezza.
Questo apparecchio dovrà essere destinato solo all’uso per il quale
è stato espressamente concepito. Ogni altro uso è da considerarsi
improprio e quindi pericoloso, nonché far decadere la garanzia. Il
costruttore non può essere considerato responsabile per eventuali
danni derivati da usi impropri, erronei ed irragionevoli.
Per evitare surriscaldamenti pericolosi si raccomanda di svolgere in
tutta la sua lunghezza il cavo di alimentazione e di staccare la spina
dalla rete di alimentazione elettrica quando l’apparecchio non è uti-
lizzato.
Prima di effettuare qualsiasi operazione di pulizia o di manutenzione,
disinserire l’apparecchio dalla rete di alimentazione elettrica.
Non immergere mai l’apparecchio in acqua o in altri liquidi.

Set frullatore a immersione 4in1 Manuale di istruzioni
IT
3
Non tenere l’apparecchio vicino a fonti di calore (es. termosifone).
Questo apparecchio non deve essere utilizzato da persone (compre-
si i bambini) con capacità siche, sensoriali o mentali ridotte; da per-
sone che manchino di esperienza e conoscenza dell’apparecchio, a
meno che siano attentamente sorvegliate o ben istruite relativamente
all’utilizzo dell’apparecchio stesso da parte di una persona responsa-
bile della loro sicurezza.
Assicurarsi che i bambini non giochino con l’apparecchio.
Allorché si decida di smaltire come riuto questo apparecchio, si rac-
comanda di renderlo inoperante.
Si raccomanda inoltre di rendere innocue quelle par-
ti dell’apparecchio suscettibili di costituire un peri-
colo. Questo apparecchio non deve essere utilizza-
to dai bambini. Tenere l’apparecchio ed il suo cavo
fuori dalla portata dei bambini.
Avvertenze d’uso
Prima di utilizzare il frullatore ad immersione vericare la sua integrità
e del cavo di alimentazione.
Porre molta attenzione alla lama tagliente in particolare quando la
spina è inserita nella presa di corrente.
Prima di rimuovere gli ingredienti, che in fase di lavorazione si sono
attaccati alla lama, staccare la spina dalla presa di corrente.
Non mantenere il frullatore ad immersione in funzione per più di 30
secondi, per evitare il surriscaldamento, ed attendere almeno 5 minu-
ti prima di utilizzarlo successivamente.
Utilizzare il frullatore ad immersione su un piano orizzontale, asciutto
e sicuro.
Non immergere l’unità principale in acqua o in altri liquidi.
Non utilizzare il frullatore ad immersione con le mani bagnate e/o i
piedi nudi.
Prima di assemblare o disassemblare, pulire il frullatore ad immersio-
ne staccare la spina dalla presa di corrente.
Prima di usare il frullatore ad immersione lasciare raffreddare gli in-
gredienti (temperatura massima 60°C).

Set frullatore a immersione 4in1 Manuale di istruzioni
4
Descrizione del prodotto g.A
1. Tasto velocità I
2. Tasto velocità turbo
3. Unità principale
4. Fusto removibile
5. Attacco per frusta removibile
6. Frusta in acciaio
7. Bicchiere graduato
8. Coperchio per contenitore tritatutto
9. Lame tritatutto
10. Contenitore tritatutto
Istruzioni per l’uso
Assemblaggio del frullatore ad immersione
Inserire il fusto nell’unità principale del frullatore, esercitare l’avvitamento delle parti.
Per disassemblare il fusto svitarlo dall’unità principale e separare le due componenti.
Funzionamento del frullatore ad immersione
Dopo aver assemblato il frullatore ad immersione e vericato che sia correttamente assemblato, inserire il cavo
di alimentazione nella presa di corrente elettrica.
Per accendere il prodotto premere il tasto della velocità che si desidera.
La lama in acciaio permette di sminuzzare nemente gli ingredienti all’interno di un recipiente.
Per ottenere un migliore risultato, è opportuno mantenere il frullatore ad immersione in movimento rotatorio
all’interno del recipiente degli ingredienti.
Allo stesso tempo è importante mantenere la lama in acciaio completamente immersa negli ingredienti, per
evitare schizzi.
Se durante la lavorazione, la normale rotazione della lama viene bloccata o ostruita dal cibo, spegnere il frulla-
tore e scollegare il cavo di alimentazione dalla presa di corrente elettrica. Liberare la lama dal cibo e riprendere
la lavorazione.
I cibi possono essere lavorati direttamente nel bicchiere graduato facendo attenzione a non riempirlo oltre al
limite di 700ml.
Assemblaggio e funzionamento della frusta in acciaio
Inserire l’attacco per frusta nell’unità principale, esercitare l’avvitamento delle parti. Inserire poi la frusta in ac-
ciaio.
Per disassemblare l’attacco, svitare il meccanismo di assemblaggio e separare le due componenti.
Vericato il corretto assemblaggio della la frusta in acciaio, inserire il cavo di alimentazione nella presa di corren-
te elettrica e procedere all’accensione del prodotto.
La frusta in acciaio permette mescolare, sbattere e montare.
Dopo l’utilizzo staccare il cavo di alimentazione dalla presa di corrente elettrica, smontare la frusta e l’attacco.
Assemblaggio e funzionamento del tritatutto
Posizionare il contenitore su un piano stabile e orizzontale.
Inserire la lama in acciaio e mettere gli alimenti da lavorare nel contenitore.
Posizionare il coperchio sopra il contenitore e bloccarlo.
Vericato il corretto assemblaggio del tritatutto, inserire il cavo di alimentazione nella presa di corrente elettrica
ed azionare il prodotto.
Il tritatutto è ideale per tritare, sbriciolare, sminuzzare un’ampia varietà di alimenti: carne, pane, frutta, formaggio
e verdura.
Per ottenere l’alimento ben sminuzzato, cremoso e ne, distribuire uniformemente il cibo all’interno del conte-
nitore.
Inserire nel contenitore pezzi di carne di 10-20 mm di spessore, senza ossa o muscoli.
Non tritare alimenti duri come cibi surgelati, ghiaccio, cereali, spezie e caffè.
Dopo l’utilizzo staccare il cavo di alimentazione dalla presa di corrente elettrica, sbloccare il corpo motore dal
coperchio. Rimuovere il coperchio dal contenitore.
Togliere la lama prendendola dall’estremità superiore facendo attenzione a non tagliarsi. Prelevare il cibo dal
contenitore.

Set frullatore a immersione 4in1 Manuale di istruzioni
IT
5
Il simbolo del cestino barrato riportato sull’apparecchio indica che il prodotto, alla ne della propria vita
utile, dovendo essere trattato separatamente dai riuti domestici, deve essere conferito in un centro di
raccolta differenziata per apparecchiature elettriche ed elettroniche oppure riconsegnato al rivenditore
al momento dell’acquisto di una nuova apparecchiatura equivalente.
L’adeguata raccolta differenziata per l’avvio successivo dell’apparecchio al riciclaggio, al trattamento e allo smal-
timento ambientalmente compatibile contribuisce ad evitare possibili effetti negativi sull’ambiente e sulla salute
e favorisce il recupero dei materiali di cui è composto.
L’utente è responsabile del conferimento dell’apparecchio a ne vita alle appropriate strutture di raccolta. Per
informazioni più dettagliate inerenti i sistemi di raccolta disponibili, rivolgersi al servizio locale di smaltimento
riuti, o al negozio dove è stato effettuato l’acquisto.
Chiunque abbandona o cestina questo apparecchio e non lo riporta in un centro di raccolta differenziata per riuti
elettrici-elettronici è punito con la sanzione amministrativa pecuniaria prevista dalla normativa vigente in materia
di smaltimento abusivo di riuti
Pulizia del frullatore ad immersione
Prima di pulire il frullatore ad immersione, scollegare il cavo di alimentazione dalla presa di corrente.
Il corpo del frullatore ad immersione può essere pulito con un panno morbido, inumidito con acqua calda.
Mai pulire con dei diluenti, prodotti abrasivi in genere, detersivi per plastica, vetro o simili; potrebbero danneg-
giare il frullatore ad immersione.
Fare attenzione a non fare penetrare liquidi nel frullatore ad immersione.
Non immergere l’unità principale in acqua o altri liquidi, non risciacquarlo sotto l’acqua.
Pulire il fusto sotto l’acqua corrente.
Fare attenzione alla lama in acciaio, è molto aflata e tagliente.
Dati tecnici
Potenza: 300-400W
Alimentazione: 220-240V ~ 50-60Hz
In un’ottica di miglioramento continuo Beper si riserva la facoltà di apportare modiche e migliorie al
prodotto in oggetto senza previo preavviso.

Set frullatore a immersione 4in1 Manuale di istruzioni
6
CERTIFICATO DI GARANZIA
La garanzia di applicazione è valida 24 mesi dalla data di acquisto per difetti di materiale o di fabbricazione.
La garanzia è valida unicamente presentando il certicato di garanzia e il documento di acquisto (scon-
trino scale) che certichi la data di acquisto e il nome del modello dell’apparecchio acquistato.
Se l’apparecchio dovesse richiedere assistenza tecnica rivolgersi al venditore o presso la nostra sede. Questo
per conservare inalterata l’efcienza del vostro apparecchio e per NON invalidare la garanzia. Eventuali ma-
nomissioni dell’apparecchio da parte di personale non autorizzato invalideranno automaticamente la garanzia.
CONDIZIONI DI GARANZIA
Se ci sono guasti a causa di difetti di materiale e/o fabbricazione durante il periodo di garanzia, garantiamo la
riparazione del prodotto gratuitamente.
Non sono coperte dalla garanzia tutte le parti che dovessero risultare difettose a causa di:
a. Danni da trasporto o da cadute accidentali,
b. Errata installazione o inadeguatezza impianto elettrico,
c. Riparazioni o modiche operate da personale non autorizzato,
d. Mancata o non corretta manutenzione e pulizia,
e. Prodotto e/o parti di prodotto soggette a usura e/o consumabili (es.: lampade, batterie, lame)
f. Mancata osservanza delle istruzioni per il funzionamento dell’apparecchio, negligenza
o trascuratezza nell’uso.
L’elenco di cui sopra è a titolo meramente esemplicativo e non esaustivo, in quanto la presente garanzia è
comunque esclusa per tutte quelle circostanze che non possono farsi risalire a difetti di fabbricazione dell’ap-
parecchio.
La garanzia è inoltre esclusa in tutti i casi di uso improprio dell’apparecchio ed in caso di uso professionale.
Beper Srl declina ogni responsabilità per eventuali danni che possano direttamente o indirettamente derivare a
persone, cose ed animali domestici in conseguenza della mancata osservanza di tutte le prescrizioni indicate
nell’apposito “Libretto Istruzioni ed avvertenze” in tema di installazione, uso e manutenzione dell’apparecchio.
Per assistenza e/o informazioni tecniche scrivere a:
assistenza@beper.com

4in1 Hand Blender Set Use instructions
EN
7
Precautions
Read the following instructions carefully, since they give you
useful safety information about installation, use and maintenan-
ce and help you avoid mishaps and possible accidents.
Remove the packing and make sure that the appliance is intact, with
special attention to the supply cable.
The elements of the packing (plastic bags, polystyrene, etc) do not
have to be accessible to the children, in order to preserve them from
danger sources. It is recommended not to throw these packing ma-
terial in the domestic waste, but to deliver them to the appropriate
station of collection or destruction refusals, asking eventually infor-
mation to the manager of the Sanitation Department of your own mu-
nicipality.
If the supply cord is damaged, it must be replaced by the manufac-
turer, its service agent or similarly qualied persons in order to avoid
a hazard.
Before connecting the appliance make sure that the mains voltage
corresponds to the data specied on the label.
The appliance can be damaged if the voltage is not correct.
If the plug does not suit the socket, let it be replaced with another
suitable plug by qualied personnel only, which shall also ensure that
the section of the socket cables is suitable for your appliance power
absorption.
Generally, the use adaptors multiple plugs and/or extensions is not
recommended; should they be necessary, please use only simple or
multiple adaptors and extensions in compliance with the safety rules
in force, making sure that the capacity absorption limit marked on the
simple adaptors and the extensions and the maximum power limit
marked on the multiple adaptor are not exceeded.
Do not use the appliance if the cable or the plug shows any damages.
Do not use the appliance after a possible irregular working. In this
case, switch it off and do not break it open. Refer to an authorized
Beper after-sale service for repair and require original spare parts
only. Failing to follow these instructions may impair the safety of your
appliance.
This appliance is to be destined to its special purpose only. Any other
use is to be considered as improper and thus dangerous. The manu-
facturer cannot be responsible for any damages deriving from impro-
per, wrong or incautious use.

4in1 Hand Blender Set Use instructions
8
This appliance is for household use only.
To protect against electric shock, do not immerse cord, plug or any
parts of the appliance into water or other uids.
Do not use the appliance near explosives, highly ammable mate-
rials, gases or burning ames.
Do not allow children, disabled people or every pe-
ople without experience or technical ability to use
the appliance if they are not properly watched over.
Close supervision is necessary when any appliance
used by or near children.
Warnings for use
Before using the hand blender check the integrity of the appliance and cord
supply.
Be careful when using the hand blender, the blade is very sharp.
Before removing the ingredients from the blade, unplug the appliance from
the socket.
Do not keep the hand blender on for more than 30 seconds, to avoid overhe-
ating, and wait at least for 5 minutes before using it again.
Use the hand blender on a horizontal, dry and stable surface.
Do not immerse the main unit into water or other liquid.
Do not use the hand blender with wet hands and/or bare feet.
Before assembly, disassembly or clean, unplug the appliance from the so-
cket.
Before using the hand blender, allow the ingredients to cool (maximum tem-
perature 60 ° C).
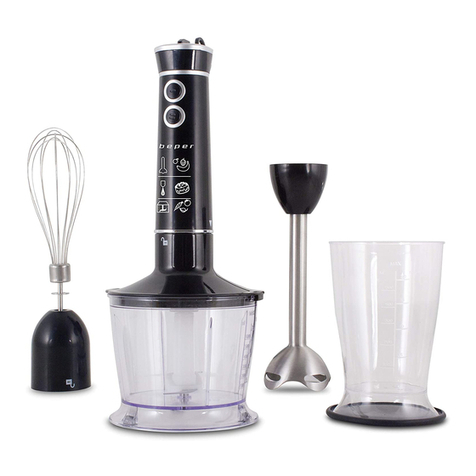
Description Fig. A
1. Speed selector I
2. Turbo speed selector
3. Main unit
4. Removable shaft
5. Removable whisk attachment
6. Stainless steel whisk
7. Graduated baker
8. Food chopper lid
9. Food chopper blades
10. Food chopper canister
Instruction for use
Assembly the hand blender
Insert the shaft on the main unit, and screw.
To remove the shaft, unscrew from the motor and separate the two components.

4in1 Hand Blender Set Use instructions
EN
9
How to use the hand blender
After assembly the hand blender and check it is correctly assembled, connect the power cord to the socket.
To turn on the product, press the button of the desired speed.
The stainless steel blade allows to chop the ingredients into the container.
To get better results, it is necessary to give to the hand blender a rotating movement into the container. For a
correct functioning of the blades it is necessary to have a liquid part. At the same time it is necessary to keep the
blade completely immerse into the ingredients to avoid splash.
If during blending, the normal rotation of the blade is blocked or obstructed by food, turn off the blender and
unplug the power cord from the electrical outlet. Free the blades from the food and resume processing.
Foods can be processed directly in the measuring cup, taking care not to ll it over the 700ml limit.
Assembly and operation of the stainless steel whisk
Insert the whisk attachment into the main unit, screw the parts together. Then insert the stainless steel whisk.
To disassemble the attachment, unscrew the assembly mechanism and separate the two components.
After checking the correct assembly of the steel whisk, insert the power cable into the electrical socket and pro-
ceed with switching on the product.
The stainless steel whisk allows you to mix, beat and whip.
After use, disconnect the power cord from the electrical outlet, remove the whisk and the attachment.
Assembly and operation of the chopper
Place the container on a stable and horizontal surface.
Insert the stainless steel blades and put the food to be processed in the container.
Place the lid over the container and lock it.
Checked the correct assembly of the chopper, insert the power cable into the electric socket and operate the
product.
The chopper is ideal for mincing, crumbling and shredding a wide variety of foods: meat, bread, fruit, cheese
and vegetables.
To obtain well-chopped, creamy and ne food, distribute the food evenly inside the container.
Insert 10-20 mm thick pieces of meat into the container, without bones or muscles.
Do not chop hard foods such as frozen foods, ice, grains, spices and coffee.
After use, disconnect the power cord from the electrical outlet, unlock the motor body from the cover. Remove
the lid from the container.
Remove the blade by taking it from the upper end, being careful not to cut yourself. Remove the food from the
container.
Cleaning
Before cleaning the hand blender, unplug the cord supply from the socket.
The motor unit can be cleaned with a soft cloth and hot water.
Do never use thinners, abrasive detergent in general, detergent for plastic, glass or other, that could damage
the hand blender.
Do not put liquids into the hand blender.
Do not immerse the main unit into water or other liquids, do not rinse with water.
Clean the blending attachment with running water.
Be careful to the stainless blade that is very sharpen and cutting.
Technical data
Power: 300-400W
Power supply : 220-240V ~ 50-60Hz
For any improvement reasons, Inside reserves the right to modify or improve the product without any
notice.

4in1 Hand Blender Set Use instructions
10
The European directive 2011/65/EU on Waste Electrical and Electronic Equipment (WEEE), requires
that old household electrical appliances must not be disposed of in the normal unsorted municipal
waste stream. Old appliances must be collected separately in order to optimize the recovery and
recycling of the materials they contain, and reduce the impact on human health and the environment.
The crossed out “wheeled bin” symbol on the product reminds you of your obligation, that when you
dispose of the appliance, it must be separately collected.
GUARANTEE CERTIFICATE
This appliance has been checked in the factory. From the date of original purchase a 24 month guarantee ap-
plies to material and production defects. The purchase receipt and the guarantee certicate must be submitted
together in case of claim to guarantee.
The guarantee is valid only with a guaranty certicate and proof of purchase (scal receipt) indicating
the date of purchase and the model of the appliance
For any technical assistance, please contact directly the seller or our head ofce in order to preserve the applian-
ce’s efciency and NOT TO void the guarantee. Any intervention on this appliance by non-authorized persons
will automatically void the guarantee.
GUARANTEE CONDITIONS
If the appliance shows defects as a result of faulty material and/or production during the period of guarantee, we
guarantee repair free of charge on condition that:
- The appliance has been used properly and for the purpose for which it has been intended.
- The appliance has not been tampered with, otherwise it is not maintainable.
- The purchase receipt shall be presented.
- The appliance showing a fair wear and tear shall not be covered by this guarantee.
Therefore, any part that could be accidentally broken or having visible signs of use in consumable products
(such as lamps, batteries, heating elements…) the aesthetic parts are excluded from the guarantee, and any
defect whatsoever resulting from non-respect of the rules for use, negligence in usage and/or maintenance of
the appliance, carelessness, wrong or improper installation, damage during transport and any other damage not
attributable the supplier.
For every defect that could not be repaired within the guarantee period, the appliance will be replaced free of
charge.
In any case, if the part to be replaced for defect, breakage or malfunction is an accessory and/or a detachable
part of the product, Beper reserves the right to replace only the very part in question and not the entire product
Contact your distributor in your country or after sales department Beper.
E-mail assistenza@beper.com which will forward your enquiries to your distributor.

ES
11
Set de mixeur à immersion 4 en 1 Manuel d’instructions
FR
Lire attentivement les instructions suivantes avant la premiere
utilisation de l’appareil.
Avant et durant l’utilisation de cet appareil il est nécessaire de suivre
précautions élémentaires suivantes.
Après avoir enlever l’emballage, s’assurer de l’intégrité de l’appareil.
En cas de doute ne pas utiliser l’appareil et s’adresser à un pro-
fessionnel qualié. Les éléments d’emballage (sachets plastique,
polystyrène, etc.) ne doivent pas être laissés à la portée des enfants,
car potentiellement dangereux.
Il est recommandé de ne pas jeter les éléments d’emballage dans les
déchets ménagers, mais de les déposer dans les centres de traite-
ment des déchets appropriés, en demandant éventuellement conseil
au gérant du centre de sa commune de résidence.
Toujours s’assurer que la tension électrique soit la même que cel-
le indiquée sur l’étiquette des données techniques et que le réseau
électrique soit compatible avec la puissance de l’appareil.
En cas d’incompatibilité entre la prise électrique murale et celle de
l’appareil faire changer la prise de l’appareil par un professionnel
qualié. Ce dernier devra s’assurer que la section des câbles de la
prise soit adaptée à la puissance absorbée par l’appareil.
Ne jamais tirer sur le câble d’alimentation pour débrancher la prise
électrique.
S’assurer que le câble n’entre pas en contact avec des supercies
chaudes ou coupantes.
Ne pas utiliser l’appareil si le câble d’alimentation est abîmé.
Si le câble d’alimentation est endommagé, pour éviter tout risque, il
devra être substitué par le constructeur, par son service d’assistance
technique ou toute autre personne de même qualication.
Brancher l’appareil exclusivement sur une prise de courant alterné.
Il est en général déconseiller d’utiliser des adaptateurs, prises mul-
tiples et/ou rallonges. En cas de nécessité, utiliser seulement des
adaptateurs ou rallonges conformes aux normes de sécurité en vi-
gueur.
Cet appareil ne devra être utilisé que pour l’usage pour lequel il a été
conçu.
Tout autre usage sera considéré comme inapproprié et donc dange-
reux, et engendrera l’annulation de la garantie. Le constructeur ne
peut être tenu pour responsable en cas de dommages causés par
une utilisation incorrecte, inappropriée et déraisonnable.

12
Set de mixeur à immersion 4 en 1 Manuel d’instructions
Pour éviter tout risque d’échauffement il est recommandé de dérouler
entièrement le câble d’alimentation et de débrancher l’appareil de la
prise de courant en cas d’inutilisation.
Avant d’effectuer toute opération de nettoyage ou entretien, débran-
cher l’appareil de la prise de courant électrique.
Ne jamais immerger l’appareil dans l’eau ou d’autres liquides.
Ne pas toucher l’appareil avec les mains et pieds mouillés ou humi-
des.
Ne pas utiliser l’appareil si vous êtes pieds nus.
Ne pas laisser l’appareil exposé aux agents atmosphériques comme
la pluie, le soleil …
Ne pas laisser l’appareil près d’une source de chaleur (ex. Radiateur)
Ne pas laisser les enfants, les personnes avec des capacités physi-
ques, sensorielles ou mentales réduites, ou manquant d’expérience
ou de connaissance technique, utiliser cet appareil sans surveillance
S’assurer que les enfants ne jouent pas avec cet appareil.
Dès lors que l’appareil doit être détruit, il est recom-
mandé de couper le câble d’alimentation, et de reti-
rer toutes les parties susceptibles de présenter un
quelconque danger, en particulier pour les enfants
qui pourraient utiliser cet appareil comme un jeu.
Les précautions d’utilisation
Avant d’utiliser le mixeur à immersion vérier son intégrité et celle du
câble d’alimentation.
Faire très attention à la lame coupante en particulier lorsque la prise est
branchée sur le courant électrique.
Avant de retirer les ingrédients, qui se sont accrochés à la lame lors de
la préparation, débrancher la prise de courant électrique.
Ne pas garder le mixeur à immersion en marche pendant plus de 30 se-
condes, pour éviter un surchauffement, et attendre au moins 5 minutes
avant de l’utiliser à nouveau.
Utiliser le mixeur à immersion sur une surface horizontale.
Ne pas immerger le moteur dans l’eau ou d’autre liquide.
Ne pas utiliser le mixeur à immersion avec les mains mouillées et/ou
pieds nus. Avant d’assembler, démonter ou nettoyer le mixeur débran-
cher-le de la prise de courant.
Avant d’utiliser le mixeur, laissez refroidir les ingrédients (température
maximale 60° C).

ES
13
Set de mixeur à immersion 4 en 1 Manuel d’instructions
FR
Les éléments Fig.A
1. Touche de vitesse I
2. Clé de vitesse turbo
3. Unité principale
4. Fût amovible
5. Fixation pour fouet amovible
6. Fouet en acier
7. Gobelet gradué
8. Couvercle pour récipient à broyer
9. Lames broyées
10. Récipient à broyer
Instructions d’utilisation
Assemblage du mixeur à immersion
Insérer la tige dans l’unité principale du mélangeur, exercer le vissage des pièces.
Pour désassembler le fût, le dévisser de l’unité principale et séparer les deux composants.
Fonctionnement du mixeur à immersion
Après avoir assemblé le mélangeur à immersion et vérié qu’il est correctement assemblé, insérer le câble d’a-
limentation dans la prise de courant électrique.
Pour allumer le produit, appuyez sur la touche de vitesse que vous voulez.
La lame en acier permet de hacher nement les ingrédients à l’intérieur d’un récipient.
Pour obtenir un meilleur résultat, il convient de maintenir le mixeur à immersion en mouvement rotatoire à
l’intérieur du récipient des ingrédients.
Dans le même temps, il est important de garder la lame en acier complètement immergée dans les ingrédients,
pour éviter les éclaboussures.
Si, pendant le traitement, la rotation normale de la lame est bloquée ou obstruée par la nourriture, éteindre le
mixeur et débrancher le câble d’alimentation de la prise d’alimentation. Libérer la lame de la nourriture et re-
prendre le traitement.
Les aliments peuvent être transformés directement dans le verre gradué en veillant à ne pas le remplir au-delà
de la limite de 700ml.
Montage et fonctionnement du fouet en acier
Insérez l’accessoire fouet dans l’unité principale, en vous exerçant à visser les pièces ensemble. Puis insérez
le fouet en acier.
Pour démonter l’accessoire, dévissez le mécanisme d’assemblage et séparez les deux composants.
Une fois le fouet en acier correctement assemblé, insérez le cordon d’alimentation dans la prise électrique et
allumez le produit.
Le fouet en acier permet de mélanger, battre et fouetter. Après utilisation, débranchez le cordon d’alimentation
de la prise électrique, démontez le fouet et l’accessoire.
Montage et fonctionnement du broyeur
Placez le conteneur sur une surface stable et horizontale. Insérez la lame en acier et placez les aliments à traiter
dans le récipient.
Placez le couvercle sur le conteneur et verrouillez-le. Une fois que vous avez vérié que le robot culinaire a
été correctement assemblé, branchez le cordon d’alimentation dans la prise électrique et mettez le produit en
marche.
Ce robot est idéal pour hacher, émietter et émincer une grande variété d’aliments: viande, pain, fruits, fromage
et légumes.
Pour que les aliments soient bien hachés, crémeux et ns, répartissez-les uniformément à l’intérieur du récipient.
Placez des morceaux de viande de 10 à 20 mm d’épaisseur, sans os ni muscle, dans le récipient.
Ne hachez pas les aliments durs comme les aliments congelés, la glace, les céréales, les épices et le café.
Après utilisation, débranchez le cordon d’alimentation de la prise de courant, libérez le corps du moteur du cou-
vercle. Retirez le couvercle du récipient.
Retirez la lame en saisissant l’extrémité supérieure, en veillant à ne pas vous couper. Retirez les aliments du
récipient.

14
Set de mixeur à immersion 4 en 1 Manuel d’instructions
Le produit en n de vie doit être détruit selon les normes en vigueur relatives à l’élimination des
déchets et ne peut être traité comme simple déchet ménagé.
Le produit doit être détruit dans un centre d’élimination des déchets adapté ou être restitué au reven-
deur dans le cas d’une substitution avec un autre produit équivalent neuf.
Le fabricant prendra à sa charge les frais occasionnés pour la destruction du produit selon les termes
de la loi en vigeur.
Le produit est composé de pièces non biodégradables et substances qui peuvent polluer l’environnement si
détruites de façon inapropriée . Par ailleurs, certaines parties de ces matières peuvent être recyclées évitant ain-
si toute pollution pour l’environnement. Il est de votre et notre devoir de préserver la santé de l’environnement.
Le symbole indique que le produit répond aux normes requises par les nouvelles
directives introduites en faveur de l’environnement (2011/65/EU) et que le produit doit être détruit de façon ap-
propriée au terme du cycle de vie.
Si besoin, informez-vous auprès des autorités locales compétentes en matière d’élimination des déchets de
votre commune.
Toute personne qui ne tiendra pas compte de ces règles d’élimination des déchets indiquées dans ce para-
graphe en répondra selon la loi en vigueur.
Nettoyage du mixeur à immersion
Avant de nettoyer le mélangeur à immersion, débranchez le cordon d’alimentation de la prise de courant.
Le corps du mixeur à immersion peut être nettoyé avec un chiffon doux humidié à l’eau chaude.
Ne nettoyez jamais avec des diluants, des produits abrasifs en général, des détergents pour plastique, verre
ou similaires ; ils pourraient endommager le mixeur plongeant.
Veillez à ce que les liquides ne pénètrent pas dans le mélangeur à immersion.
Ne pas immerger l’unité principale dans l’eau ou dans d’autres liquides, ne pas la rincer sous l’eau.
Nettoyez le tambour sous l’eau courante.
Faites attention à la lame en acier, elle est très tranchante et coupante.
Données techniques
Puissance: 300-400W
Alimentation: 220-240V ~ 50-60Hz
Dans un soucis d’amélioration permanent Beper se réserve le droit d’apporter des modications et
améliorations au produit sans aucun préavis.

ES
15
Set de mixeur à immersion 4 en 1 Manuel d’instructions
FR
CERTIFICAT DE GARANTIE
La garantie d’application est valable pour 24 mois à partir de la date d’achat pour des défauts de matériel ou de
fabrication.
La garantie est valable uniquement en présentant le certicat de garantie et le document d’achat (ticket
de caisse) qui certie la date d’achat et le nom du modèle de l’appareil acheté
Si l’appareil devrait demander l‘assistance technique s’adresser au vendeur ou auprès de notre siège. Ceci pour
conserver inaltérée l ‘efcacité de votre appareil et pour NON invalider la garantie. Des éventuelles manipula-
tions de l’appareil de la part du personnel non autorisé invalident automatiquement a garantie.
CONDITIONS DE GARANTIE
S’il y a des pannes à cause des défauts de matériel et/ou de fabrication pendant la période de garantie, nous
garantissons la réparation du produit gratuitement.
Elles ne sont pas couvertes de la garantie toutes les parties qui devraient résulter défectueuses à cause de :
a. Dommages de transport ou de chutes accidentelles,
b. Installation erronée ou inadaptation de l’installation électrique,
c. Réparations ou modications effectuées par un personnel non autorisé,
d. Manque ou incorrect entretien et nettoyage,
e. Produit et/ou parties du produit relevant de l’usure et/ou consommables (ex : lampes piles, lames)
f. Manque d’observation des instructions pour le fonctionnement de l’appareil, négligence dans l’utilisation
La liste indiquée ci-dessus est à titre purement exemplaire et non exhaustif, car la présente garantie est donc
exclue pour toutes les circonstances qui ne peuvent pas dériver des défauts de fabrication de l’appareil.
En outre la garantie est exclue dans tous les cas d’usage impropre de l’appareil et en cas d’usage professionnel.
Beper S.R.L. décline chaque responsabilité pour des éventuels dommages qui peuvent directement ou indi-
rectement dériver à des personnes, des choses et des animaux domestiques, en conséquence au non-respect
de toutes les prescriptions indiquées dans le « livret des instructions et des précautions » approprié, en thème
d’installation, d’utilisation et d’entretien de l’appareil.
Le service après-vente est effectué par votre revendeur ou par l’importateur/distributeur des produits Beper.
Écrivez un e-mail au assistenza@beper.com pour connaitre le centre service agrée Beper le plus proche de
chez vous.

4in1 Stabmixer-Set Betriebsanleitung
16
Allgemeine warnhinweise
Lesen sie diese anleitung, bevor sie das gerät in betrieb nehmen.
Vor und während des Gebrauchs des Gerätes ist es notwendig, eini-
ge grundlegende Vorsichtsmaßnahmen zu beachten. Vergewissern
Sie sich nach dem Entfernen der Verpackung, dass das Gerät intakt
ist. Verwenden Sie das Gerät im Zweifelsfall nicht und wenden Sie
sich an fachlich qualiziertes Personal. Verpackungselemente (Pla-
stiktüten, Polystyrol, etc.) dürfen nicht in Reichweite von Kindern blei-
ben, da sie potenzielle Gefahrenquellen darstellen.
Vergewissern Sie sich immer, dass die Netzspannung mit der auf
dem technischen Datenschild angegebenen übereinstimmt und dass
das System mit der Leistung des Geräts kompatibel ist.
Ziehen Sie niemals am Kabel, um es von der Steckdose zu trennen.
Achten Sie darauf, dass das Kabel nicht mit heißen oder scharfen
Oberächen in Berührung kommt.
Verwenden Sie das Gerät nicht, wenn das Kabel beschädigt ist.
Bei Beschädigung des Netzkabels muss dieses durch den Hersteller
oder seinen Technischen Kundendienst oder in jedem Fall durch eine
Person mit ähnlicher Qualikation ersetzt werden, um ein Risiko zu
vermeiden.
Schließen Sie das Gerät nur an eine Wechselstrom- Steckdose an.
Im Allgemeinen wird die Verwendung von Adaptern, Mehrfach-
steckdosen und/oder Verlängerungskabeln nicht empfohlen. Wenn
ihre Verwendung unerlässlich wird, verwenden Sie nur Adapter und
Verlängerungskabel, die den geltenden Sicherheitsnormen entspre-
chen.
Dieses Gerät darf nur für den Zweck verwendet werden, für den es
ausdrücklich konzipiert wurde. Jede andere Verwendung ist als unsa-
chgemäß und damit gefährlich anzusehen und führt zum Erlöschen
der Garantie. Der Hersteller haftet nicht für Schäden, die durch un-
sachgemäßen, fehlerhaften oder ungeeigneten Gebrauch entstehen.
Um eine gefährliche Überhitzung zu vermeiden, wird empfohlen, das
Netzkabel über die gesamte Länge abzuwickeln.
Trennen Sie das Gerät vom Stromnetz, bevor Sie das Zubehör we-
chseln oder reinigen.
Lassen Sie das Gerät nicht Witterungseinüssen (Regen, Sonne,
etc.) ausgesetzt.
Halten Sie das Gerät nicht in der Nähe von Wärmequellen (z.B.
Heizkörpern).

4in1 Stabmixer-Set Betriebsanleitung
DE
17
Dieses Gerät darf nicht von Personen (einschließlich Kindern) mit ein-
geschränkten körperlichen, sensorischen oder geistigen Fähigkeiten
verwendet werden; von Personen, denen die Erfahrung und Kenntnisse
über das Gerät fehlen, es sei denn, sie werden von einer für ihre Si-
cherheit verantwortlichen Person sorgfältig überwacht oder gut in die
Bedienung des Geräts eingewiesen.
Achten Sie darauf, dass Kinder nicht mit dem Gerät spielen.
Wenn Sie sich entscheiden, dieses Gerät als Abfall zu entsorgen, wird
empfohlen, es außer Betrieb zu setzen.
Es wird auch empfohlen, teile des gerätes, die eine
gefahr darstellen können, sicher zu entsorgen. Dieses
gerät darf nicht von kindern benutzt werden. Bewah-
ren sie das gerät ausserhalb der reichweite von kin-
dern auf.
Sicherheitshinweis
Vor dem Gebrauch Unversehrtheit und Stromkabel des Geräts über-
prüfen.
Beachten Sie auf das Edelstahlmesser insbesondere wenn der Netzste-
cker an der Steckdose angeschlossen ist.
Vor der Entfernung der Zutaten von dem Edelstahlmesser ziehen Sie
den Netzstecker aus der Steckdose.
Um die Überhitzung des Geräts zu vermeiden, betreiben Sie das Gerät
nicht länger als 30 Sekunden und warten Sie mindestens 5 Minuten vor
dem folgenden Gebrauch.
Stabmixer auf eine horizontale Arbeitsäche benutzen.
Motorgehäuse niemals ins Wasser und andere Flüssigkeiten tauchen.
Stabmixer mit nassen Händen bzw. barfuß benutzen.
Vor dem Zusammenbau bzw. der Reinigung des Geräts ziehen Sie den
Netzstecker aus der Steckdose.
Lassen Sie die Zutaten abkühlen, bevor Sie den Stabmixer verwenden
(maximale Temperatur 60 ° C).

4in1 Stabmixer-Set Betriebsanleitung
18
Bestandteile Fig.A
1. Geschwindigkeitstaste I
2. Taste für Turbogeschwindigkeit
3. Hauptgerät
4. Abnehmbarer Stab
5. Abnehmbarer Schneebesenaufsatz
6. Stahlschlagbesen
7. Messbecher
8. Deckel für Häckselbehälter
9. Blätter
10. Behälter zum Zerkleinern
Gebrauchsanweisung
Zusammenbau des Stabmixers
Setzen Sie den Stab in die Haupteinheit des Mixers ein und Schrauben Sie die Teile zusammen.
Um den Stab zu demontieren, schrauben Sie ihn vom Hauptgerät ab und trennen Sie die beiden Teile.
Betrieb des Stabmixer
Nachdem Sie den Stabmixer zusammengebaut und auf korrekte Montage überprüft haben, stecken Sie das
Netzkabel in die Steckdose.
Um das Produkt einzuschalten, drücken Sie die Taste für die gewünschte Geschwindigkeit.
Mit der Stahlklinge können Sie die Zutaten in einem Behälter fein zerkleinern.
Für beste Ergebnisse ist es ratsam, den Stabmixer in einer rotierenden Bewegung im Behälter mit den Zutaten
zu halten.
Dabei ist es wichtig, dass die Stahlklinge vollständig in die Zutaten eingetaucht bleibt, um Spritzer zu vermeiden.
Wenn während der Verarbeitung die normale Drehung der Klinge durch Lebensmittel blockiert oder behindert
wird, schalten Sie den Mixer aus und ziehen Sie das Netzkabel aus der Steckdose. Entfernen Sie die Lebensmit-
telreste von der Klinge und setzen Sie die Verarbeitung fort.
Lebensmittel können direkt im Messglas verarbeitet werden, wobei darauf zu achten ist, dass es nicht über die
700ml-Grenze hinaus gefüllt wird.
Montieren und Bedienen des Stahlbesen
Setzen Sie den Schneebesenaufsatz in das Hauptgerät ein und schrauben Sie die Teile zusammen. Setzen Sie
dann den Stahlschneebesen ein.
Um den Aufsatz zu demontieren, schrauben Sie den Montagemechanismus ab und trennen Sie die beiden
Komponenten.
Wenn der Stahlschneebesen korrekt zusammengebaut ist, stecken Sie das Netzkabel in die Steckdose und
schalten Sie das Produkt ein.
Der Stahlschneebesen ermöglicht das Mischen, Schlagen und Aufschlagen.
Ziehen Sie nach dem Gebrauch das Netzkabel aus der Steckdose, demontieren Sie den Schneebesen und den
Aufsatz.
Montage und Betrieb der Küchenmaschine
Stellen Sie den Behälter auf eine stabile und waagerechte Fläche.
Setzen Sie die Stahlklinge ein und geben Sie das zu verarbeitende Lebensmittel in den Behälter.
Setzen Sie den Deckel auf den Behälter und verschließen Sie ihn.
Nachdem die korrekte Montage der Küchenmaschine überprüft wurde, stecken Sie das Netzkabel in die
Steckdose und nehmen Sie das Produkt in Betrieb.
Die Küchenmaschine ist ideal zum Hacken, Zerbröseln, Zerkleinern einer Vielzahl von Lebensmitteln: Fleisch,
Brot, Obst, Käse und Gemüse.
Um die Lebensmittel gut zerkleinert, cremig und fein zu bekommen, verteilen Sie die Lebensmittel gleichmäßig
im Inneren des Behälters.
Legen Sie 10-20 mm dicke Fleischstücke ohne Knochen und Muskeln in den Behälter.
Zerkleinern Sie keine harten Lebensmittel wie z. B. Tiefkühlkost, Eis, Getreide, Gewürze und Kaffee.
Ziehen Sie nach Gebrauch den Netzstecker aus der Steckdose, lösen Sie das Motorgehäuse vom Deckel.
Nehmen Sie den Deckel vom Behälter ab.
Entfernen Sie die Klinge, indem Sie sie am oberen Ende anfassen und darauf achten, sich nicht zu schneiden.
Entnehmen Sie das Lebensmittel aus dem Behälter.

4in1 Stabmixer-Set Betriebsanleitung
DE
19
Die WEEE-Richtlinie (von engl.: Waste Electrical and Electronic Equipment; deutsch: (Elektro- und
Elektronikgeräte-Abfall) ist die EG-Richtlinie 2011/65/EU zur Reduktion der zunehmenden Menge
an Elektronikschrott aus nicht mehr benutzten Elektro- und Elektronikgeräten. Ziel ist das Vermei-
den, Verringern sowie umweltverträgliche Entsorgen der zunehmenden Mengen an Elektronikschrott
durch eine erweiterte Herstellerverantwortung.
Ihr Gerät enthält wertvolle Rohstoffe, die wieder verwertet werden können.
Bringen Sie das Gerät zur Entsorgung zu einer Sammelstelle Ihrer Stadt oder Gemeinde.
Elektro- und Elektronikgeräte mit folgender Kennzeichnung versehen und dürfen nicht mehr über Restmüll,
sondern nur noch über die öffentlichen Entsorgungsträger und anschließende Rückgabe an die Hersteller und
Importeure entsorgt werden.
Reinigung des Stabmixers
Bevor Sie den Stabmixer reinigen, ziehen Sie den Netzstecker aus der Steckdose. Das Gehäuse des Stabmi-
xers kann mit einem weichen, mit warmem Wasser angefeuchteten Tuch gereinigt werden.
Reinigen Sie niemals mit Verdünnern, Scheuermitteln im Allgemeinen, Reinigungsmitteln für Kunststoff, Glas
oder Ähnlichem; sie könnten den Stabmixer beschädigen.
Achten Sie darauf, dass keine Flüssigkeiten in den Stabmixer gelangen.
Tauchen Sie das Hauptgerät nicht in Wasser oder andere Flüssigkeiten, spülen Sie es nicht unter Wasser ab.
Reinigen Sie den Stab unter ießendem Wasser.
Seien Sie vorsichtig mit der Stahlklinge, sie ist sehr scharf.
Technische Daten
Leistung: 300-400W
Spannungsversorgung: 220-240V ~ 50-60Hz
In Hinblick auf eine Verbesserungsperspektive behält sich Beper das Recht vor, das betreffende Produkt
ohne Voranmeldung zu ändern bzw. umzubauen.

4in1 Stabmixer-Set Betriebsanleitung
20
GARANTIESCHEIN
Die Gewährleistung gilt 24 Monate ab Kaufdatum für Material- und Herstellungsfehler.
Die Garantie gilt nur wenn der Garantieschein vom Kaufbeleg (Quittung), mit Kaufdatum und Name des
gekauften Gerätemodells, begleitet wird.
Sollte das Gerät einmal technische Unterstützung benötigen, wenden Sie sich bitte an dem Verkäufer oder
an unserem Firmensitz. Dies um die Efzienz des Gerätes aufrechtzuerhalten und damit die Garantie NICHT
erlischt. Bei eventuellen Beschädigungen des Gerätes durch nicht autorisierte Personen, erlischt die Garantie
automatisch.
GARANTIEBEDINGUNGEN
Sollte es zu Funktionsstörungen aufgrund von Fehlern in Material und / oder Verarbeitung während der Garan-
tiezeit kommen, garantieren wir die Reparatur des Produkts kostenlos.
Alle Teile die nicht durch Garantie gedeckt sind, sind die, die sich als defekt erweisen aufgrund von:
a. Transportschäden oder Stürze,
b. Falscher Installation oder ungeeigneter elektrischer Anlage,
c. Reparaturen oder Änderungen durch nicht autorisierte Personen,
d. Fehlender oder falscher Wartung und Reinigung,
e. Produkt und / oder Teile des Produkts, die dem Verschleiß unterliegen und / oder Verbrauchsmaterial (z. B.:
Lampen, Batterien, Klingen) darstellen
f. Nicht befolgen der Gebrauchsanweisungen des Gerätes, Fahrlässigkeit oder unvorsichtigem Gebrauch.
Die obige Liste ist beispielhaft und nicht erschöpfend, da diese Garantie für all jene Situationen ausgeschlossen
ist, den keinem Produktionsfehler zuzuweisen sind.
Die Garantie ist auch in allen Fällen von missbräuchlichen Verwendung des Gerätes und im Falle vom berui-
chen Einsatz ausgeschlossen.
Beper Srl übernimmt keine Verantwortung für Schäden, die direkt oder indirekt Personen, Gegenstände und
Haustieren betreffen könnten, als Folge der Nicht-Einhaltung aller in der Broschüre „Gebrauchsanweisungen
und Warnungen” enthaltenen Anweisungen in Bezug auf Installation, Bedienung und Wartung.
Treten sie bitte in verbindung mit ihren händler in ihrem land oder post sales abteilung von fa. Beper.
E-mail assistenza@beper.com die ihren händler nennen wird
Table of contents
Languages:
Other Beper Blender manuals

Beper
Beper P102FRU300 User manual

Beper
Beper BP.654 Quick guide

Beper
Beper BP.601 Quick guide

Beper
Beper P102FRU500 User manual

Beper
Beper P102FRU150 User manual

Beper
Beper 90316 Quick guide

Beper
Beper 90.455 Quick guide

Beper
Beper BP.630 Quick guide

Beper
Beper BP.650H Operating and maintenance manual

Beper
Beper 90.318 Quick guide

Beper
Beper BP.602 Quick guide

Beper
Beper 90.437 Quick guide

Beper
Beper P102FRU003 User manual

Beper
Beper BC.300 Quick guide

Beper
Beper P102FRU100 User manual

Beper
Beper 90.450 Quick guide

Beper
Beper 90.435A Quick guide

Beper
Beper 90.435H Quick guide

Beper
Beper P102FRU001 Quick guide

Beper
Beper 90.436H Operating and maintenance manual