BIELMEIER BHG 601 User manual

D
D
5
WICHTIGE HINWEISE
Um Schäden und Gefahren durch nicht ord-
nungsgemäßen Gebrauch zu vermeiden, ist die
Gebrauchsanleitung zu beachten und sorgfältig
aufzubewahren. Bei Weitergabe des Gerätes an
andere Personen, ist sie mit zu übergeben. An-
dere Arbeiten als die hier beschriebenen, dürfen
mit dem Gerät nicht durchgeführt werden. Es ist
nur für die Verwendung im Haushalt bestimmt
und nicht für gewerbliche Nutzung. Bei zweck-
fremdem Einsatz erlischt der Garantieanspruch.
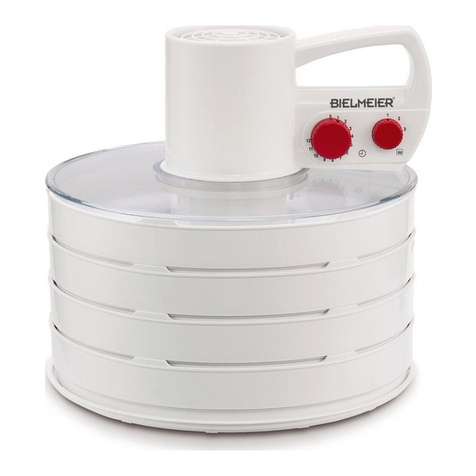
DÖRRAUTOMAT BHG 601
Dieses Gerät entspricht den Richt-
linien Nr. 89 / 336 / EWG für elektro-
magnetische Verträglichkeit (EMV),
sowie der Niederspannungsrichtlinie
73 / 23 EWG.
WICHTIGE SICHERHEITSHINWEISE
Die Sicherheit von BIELMEIER-Elektrogeräten
entspricht den anerkannten Regeln der Technik
und den gesetzlichen Bestimmungen. Dennoch
müssen wir Sie und die Mitbenutzer auf folgende
Hinweise aufmerksam machen:
BITTE LESEN SIE DIESE GEBRAUCHSANWEISUNG
VOR DER INBETRIEBNAHME SORGFÄLTIG UND
BEWAHREN SIE DIESE AUF.
Gerät nur an Wechselstrom – mit Spannung
gemäß Typschild – anschließen.
Schützen Sie das Gerät am Aufstellungsort vor
Spritzwasser und Wassertropfen.
Das Gerät nur in trockenen Räumen betreiben.
Nach Gebrauch, vor Reinigung oder bei evtl.
Störungen während des Betriebes den Netz-
stecker ziehen.
In Betrieb wird das Gerät heiß.
Kinder erkennen nicht die Gefahr, die im Um-
gang mit einem elektrischen Gerät entstehen
kann; deshalb Kinder niemals unbeaufsichtigt
mit dem Gerät lassen.
Das Gerät nicht auf heißen Oberächen oder
in der Nähe von oenen Glasammen abstel-
len und betreiben.
Das Gerät muss während des Betriebes frei
stehen und darf nicht abgedeckt werden, da-
mit Zu- und Abluft nicht behindert werden.
Das elektrische Dörraggregat mit Zuleitung
niemals in Wasser tauchen.
Vor Abnahme des elektrischen Dörraggre-
gates Netzstecker ziehen!
Bei oensichtlichen Schäden an Gerät oder
Zuleitung, das Gerät vom Fachmann oder dem
BIELMEIER-Kundendienst überprüfen lassen.
Bei Zweckentfremdung oder falscher Bedie-
nung wird keine Haftung übernommen.
ALLGEMEINES ZUM DÖRREN
Trocknen und Dörren sind die ältesten dem Men-
schen bekannten Konservierungsverfahren.
Lebensmittel enthalten mehr oder weniger
Wasser. Mittels Dörren wird den Lebensmitteln
Wasser und somit der Nährboden für Fäulnis-
und Schimmelbakterien und Gärprozesse ent-
zogen. Bei richtigem Dörren und Lagern ist das
Gedörrte jahrelang haltbar. Durch Entzug von
Wasser werden die Aromastoe konzentriert,
deshalb ist Gedörrtes oft schmackhafter. Vita-
mine, Nährstoe und Mineralien werden nicht
beeinträchtigt. Schwefel und andere Konser-
vierungsstoe werden vermieden.
Auch wenn Sie bereits einkochen oder einfrieren,
bringt das Dörren eine zusätzliche Bereicherung
für Küche und Gaumen.
Dörren an der Sonne ist in unseren Breitengraden
Glücksache. Das Dörren im häuslichen Backofen
verursacht durch dessen relative Geschlossenheit
und zu geringe Luftzirkulation oft ein Schwitzen,
Kleben oder Tropfen des Dörrgutes und der Back-
ofen ist anschließend mühsam zu reinigen, da er
nicht für das Dörren konstruiert ist.

6
D
DAS DÖRRGERÄT BHG 601
Ihr neues Dörrgerät arbeitet schneller und vor-
teilhafter nach einem physikalisch konsequenten
Sys tem: Der von oben angesaugte Luftstrom wird
von einem speziellen Heizregister gleichmäßig
erwärmt. Dadurch wird die Luft für Feuchtigkeit
sehr aufnahmefähig und unter leichtem Über-
druck gleichmäßig in jede Dörretage einzeln
verteilt und entzieht den dortigen Lebensmitteln
die Feuchtigkeit.
Die feuchtigkeitsgesättigte Luft durchläuft nun
nicht alle weiteren Etagen, sondern wird in jeder
Etage für sich nach außen abgeleitet. Deshalb
hat der BIELMEIER-Dörrautomat keine Siebe
oder Gitter, sondern geschlossene, reinigungs-
freundliche Dörretagen. Krümel und Kräuter kön-
nen nicht durchfallen. Dieses System ermöglicht
ein gleichmäßiges Dörren in allen Etagen, so dass
kein Umsetzen erforderlich ist und das Gerät bis
kurz vor Dörrzeitende unbeaufsichtigt bzw. mit
automatischer Zeitschaltuhr betrieben werden
kann. Eine Prüfung des Dörrgutes ist lediglich ge-
gen Ende der Dörrzeit mit Sicht- und Greifprobe
für die letzten Feinheiten angezeigt. Besonders
Anspruchsvolle können das Dörrgut evtl. sortie-
ren und noch etwas Dörrzeit zugeben.
VORBEREITUNG
Vor der ersten Inbetriebnahme und zu Beginn
jeder Dörr-Saison wird empfohlen, die Dörr-
etagen zu spülen. Nicht scheuern!
Stellen Sie das Gerät an einen Ort, wo es wäh-
rend des gesamten Dörrvorganges nicht stört.
Während des Dörrens kann sich je nach Dörr-
gut ein angenehmer, aromatischer, fruchtiger
oder würziger Geruch verbreiten.
Zur sicheren und appetitlichen Konservierung
sollen alle Güter gut gewaschen werden.
Nur einwandfreie Lebensmittel verarbeiten
bzw. schadhafte Stellen großzügig heraus-
schneiden, ebenso bei Obst das Kerngehäuse
entfernen.
Obst soll reif, jedoch nicht überreif sein.
Im einzelnen wird in der Tabelle die jeweilige
Vorbehandlung empfohlen.
Will man das natürliche Bräunen der Schnitt-
ächen vermeiden, kann man die Früchte
kurz in eine Lösung (1 Eßlöel Zitronensaft in
1 Tasse Wasser) abtupfen. Statt Zitronensaft
kann man auch handelsübliches Vitamin C
verwenden.
Für die meisten Gemüse ist Blanchieren vorge-
sehen (siehe Tabelle). Das vorbereitete Gemü-
se wird mittels einem Drahtkorb oder Sieb in
einen Topf mit kochendem Wasser getaucht.
Von dem Zeitpunkt an, wenn das Wasser wie-
der wallt, wird die Blanchierzeit gemäß Tabelle
gerechnet.
Das Dörrergebnis wird gleichmäßiger, wenn
man etwa gleich große Stücke schneidet.
Dünne Scheiben dörren schneller, denken
Sie jedoch daran, daß die Stücke beim Dörren
wesentlich kleiner werden.
Als etwaigen Anhaltspunkt für das Fassungs-
vermögen kann man pro Dörretage je nach
Sorte ca. 500 g frisches Obst bzw. 200 bis 300
g frisches Gemüse annehmen.
Es empehlt sich, Obststücke aufrecht dicht
aneinanderzustellen. Ungeschältes Obst
grundsätzlich auf die Schale legen mit der
Schnittäche nach oben. Scheibenförmige
Stücke sollen schuppenartig, nicht ach, auf
die Etagen gelegt werden.
Bei Gemüse sollte nur eine einfache Schicht
gefüllt und diese gleichmäßig verteilt werden.
Kräuter besonders schonend dörren!
Wenn ein zu intensiver Geruch entsteht, ist die
Temperaturstufe zu hoch gewählt. Kräuter von
Stängeln befreien, jedoch nicht weiter zerklei-
nern. Blättrige Kräuter sollten zwischendurch
gewendet werden, um ein Zusammenkleben
zu vermeiden, und füllen Sie die Etagen nicht
zu voll, um die Luftzirkulation nicht zu unter-
brechen.
Das elektrische Dörraggregat mit dem Klar-
sichtdeckel wird nun passend auf die oberste
Etage gesetzt.
Temperaturschalter auf die dem Dörrgut ent-
sprechende Stufe (siehe Tabelle) einstellen.
Netzstecker des Gerätes in die Netzsteckdose
einstecken.
Zeitschaltuhr auf die gewünschte Dörrzeit
einstellen. Jetzt ist das Gerät in Betrieb und
schaltet sich nach Ablauf der eingestellten
Zeit automatisch ab.

D
7
DÖRRZEIT
Die Dörrzeit ist sehr von Art, Feuchtigkeit, Reife
und Dicke des Dörrgutes sowie von der Raum-
luft und von der Anzahl der Etagen abhängig. Im
Zweifelsfall wählt man eine kürzere Dörrzeit und
führt gegen Dörrende mehrmals eine Sicht- und
Greifprobe durch.
Dieses Gerät versorgt alle Etagen etwa gleich-
mäßig mit Trockenluft, jedoch können Unter-
schiede des Dörrgutes etwas streuende Ergeb-
nisse bringen. Bei hohen Ansprüchen empehlt
sich ein Sortierdurchgang, indem man die noch
weicheren Teile ca. ½ bis 1 Stunde länger dörrt.
Die zubereiteten Güter sollten unmittelbar ge-
dörrt werden. Eine Unterbrechung des Dörrvor-
ganges sollte nicht erfolgen.
Zu langes Dörren lässt bei Kräutern und ähnlichen
aromatischen Gütern zu viele Geschmackstoe
entweichen. Früchte, die ohne Einweichen als
Snacks verzehrt werden (oder als leichter, platz-
sparender Bergsteigerproviant), sollten nicht zu
sehr getrocknet, d. h. gut kaufähig, nicht brüchig
sein.
Die Greifprobe ist am zuverlässigsten, wenn das
Gedörrte abgekühlt ist. Gedörrtes Gemüse soll
sich kaum noch zäh, eher spröde und brüchig
angreifen. Zwiebeln und Petersilie werden pa-
pierartig.
TEMPERATURSTUFE
Die richtige Temperaturwahl ist sehr wichtig:
Stufe 1 ca. 20°C über Umgebungstemperatur für
Kräuter und Pilze.
Stufe 2 ca. 40°C über Umgebungstemperatur für
sämtliche Gemüse und empndliche Obstsorten.
Stufe 3 ca. 60°C über Umgebungstemperatur für
alle Obstsorten.
LAGERUNG
Das Dörrgut vor dem Verpacken gut abkühlen
lassen. Zur Aufbewahrung sind verschließbare
Gläser am besten geeignet, wie sie heute im
Haushalt als Leergut anfallen. Besonders, wenn
Gedörrtes nach und nach entnommen wird,
eignen sich diese Gläser gut, nicht jedoch Plas-
tiktüten. Folienverschweißte oder vakuumver-
schweißte Portionspackungen sind wiederum
zu empfehlen – für gedörrtes Gemüse ist dies
die beste Aufbewahrungsart.
Gedörrtes kann bei jeder Raumtemperatur, bes-
ser jedoch in trockenen, kühlen, dunklen Räumen
jahrelang aufbewahrt werden. Den optimalen
Geschmack hat es in den darauolgenden Win-
termonaten und im zeitigen Frühjahr. Eine ge-
legentliche Sichtkontrolle wird wie bei anderem
Einmachgut auch hier empfohlen. Pro 10°C tieferer
Temperatur verlängert sich die Lagerzeit um das
Zwei- bis Dreifache. Etiketten mit Inhaltsangabe
und Datum bringen Übersicht und vollenden die
Freude an Ihrem wertvollen Eigenprodukt.
REINIGUNG
Vor jeder Reinigung Zeitschaltuhr auf 0 stellen
und Netzstecker ziehen. Das elektrische Dörr-
aggregat mit dem Klarsichtdeckel verschmutzt
im Gebrauch so gut wie nicht. Hier genügt von
Zeit zu Zeit ein feuchtes Abwischen. Nie in Wasser
tauchen!
Das neue technische System macht auch die
Reinigung der Dörretagen wirklich zur Neben-
sache.
Das Dörrgut kommt normalerweise nicht zum
Tropfen oder Kleben.
Die Dörretagen haben keine ligranen Siebe
oder Gitter.
Die geschlossenen Böden können mit etwas
Spülwasser gefüllt, übereinandergestapelt
eingeweicht werden; so sind sie nach kurzer
Zeit mühelos zu spülen.
Nicht scheuern, sonst werden die späteren
Reinigungen immer schwieriger.
Das Ansaugsieb auf dem Motorteil muss
unbedingt frei sein. Bei Verschmutzungen
bzw. Staubbelag muss das Ansaugsieb mit
Pinsel oder Staubsauger (mit geringem
Sog) gereinigt werden.
Alle verwendeten Bauteile und Materialien sind
für Lebensmittel zugelassen und bestens geeig-
net. Bedingt durch Farbstoe und evtl. Frucht-
säuren im Dörrgut (z. B.Karotten) können sich
die Oberächen der Dörr etagen jedoch farblich
leicht verändern. Dies ist kein Qualitätsmangel!

Sorte Wassergehalt (%) Vorbehandlung bzw. Bemerkung in Zitronen-
wasser tauchen
Dörrstufe Dörrzeit
(Std., ca.)
Apfel 84 großzügig entkernen, Schnitze oder Ringe schneiden ja 3 4 – 8
Aprikose 85 halbieren oder vierteln ja 3 (2) 8 – 12
Ananas 86 schälen, Scheiben schneiden 3 (2) 8 – 12
Bananen 65 gut reif, Scheiben oder Streifen schneiden 3 5 – 8
Beeren 88 außer Heidelbeeren sind Beeren wegen der Kerne
nur in Kombination mit anderen Früchten brauchbar 3 4 – 6
Birnen 83 großzügig entkernen, halbieren oder schnitzen ja 3 (2) 6 – 12
Datteln 23 gut reif 3 4 – 6
Erdbeeren 90 halbieren, kleine Erdbeeren ungeteilt ja 3 (2) 6 – 12
Feigen 78 halbiert 3 4 – 6
Heidelbeeren 83 ganz 3 4 – 6
Kirschen 82 mit Stein, ungeteilt 3 8 – 12
Melonen 81 schälen, entkernen, Scheiben oder Schnitze schneiden 3 8 – 12
Prsich 89 gut reif ja 3 (2) 8 – 12
Paumen /
Zwetschgen
81
87
halbieren und entsteinen,
jedoch auch mit Stein und ungeteilt möglich 3 8 – 14
Weintrauben 81 anschneiden, möglichst kernlose Sorte 3 8 – 14
Zitrusfrüchte – Schnitze, Schalen in Streifen für Aromazwecke 3 (2) 8 – 10
Blanchieren (Min.)
Artischocken 87 säubern und halbe Herzen schneiden 2 – 4 2 4 – 5
Blumenkohl 89 in esslöelgroße Stücke teilen,
½ Stunde in Salzwasser mit 1 EL Essig legen 3 – 4 2 5 – 7
Bohnen, grün 90 Enden und Fäden entfernen, schräg schneiden 3 – 4 2 5 – 6
Brokkoli 89 Vorbehandlung wie Blumenkohl 3 – 4 2 3 – 5
Gurken 95 10 mm dicke Scheiben schneiden – 2 6 – 8
Kohl 92 säubern und in Stücke schneiden (im Dampf) 2 – 3 2 3 – 5
Kohlrabi 85 würfeln oder Scheiben schneiden 3 – 5 2 3 – 5
Möhren / Pastinaken 88 quer oder schräg schneiden 2 – 3 2 4 – 5
Petersilie 55 Stängel entfernen – 2 (1) 2 – 3
Paprika / Peperoni 93 Streifen schneiden – 2 4 – 6
gemischtes Suppengemüse – klein würfeln oder Streifen schneiden 2 2 (1) 3
Spargel 92 schälen , ungeteilt oder 20 mm Stücke 2 – 3 2 4 – 8
Spinat 91 über Dampf blanchieren bis er leicht welkt 1 2 2
Sellerie 94 Scheiben schneiden 2 2 6
Zwiebel 89 Scheiben schneiden – 2 3
Tomaten 94 30 – 45 Sek. in heißes Wasser tauchen, schälen, vierteln – 2 8 – 10
Rhabarber 95 schälen, in Zitronenwasser tauchen,
25 mm Stücke schneiden – 2 3 – 5
Kürbis / Zucchini 92 schälen, entkernen, 8 mm Streifen oder Scheiben – 2 4 – 5
Kräuter – vom Stängel befreien, nicht zerkleinern – 1 ! 2 – 3
Pilze – halbieren, große Pilze in Scheiben schneiden – 1 ! 4 – 6
8
D
ZUBEREITUNG

Sorte Wassergehalt (%) Vorbehandlung bzw. Bemerkung in Zitronen-
wasser tauchen
Dörrstufe Dörrzeit
(Std., ca.)
Apfel 84 großzügig entkernen, Schnitze oder Ringe schneiden ja 3 4 – 8
Aprikose 85 halbieren oder vierteln ja 3 (2) 8 – 12
Ananas 86 schälen, Scheiben schneiden 3 (2) 8 – 12
Bananen 65 gut reif, Scheiben oder Streifen schneiden 3 5 – 8
Beeren 88 außer Heidelbeeren sind Beeren wegen der Kerne
nur in Kombination mit anderen Früchten brauchbar 3 4 – 6
Birnen 83 großzügig entkernen, halbieren oder schnitzen ja 3 (2) 6 – 12
Datteln 23 gut reif 3 4 – 6
Erdbeeren 90 halbieren, kleine Erdbeeren ungeteilt ja 3 (2) 6 – 12
Feigen 78 halbiert 3 4 – 6
Heidelbeeren 83 ganz 3 4 – 6
Kirschen 82 mit Stein, ungeteilt 3 8 – 12
Melonen 81 schälen, entkernen, Scheiben oder Schnitze schneiden 3 8 – 12
Prsich 89 gut reif ja 3 (2) 8 – 12
Paumen /
Zwetschgen
81
87
halbieren und entsteinen,
jedoch auch mit Stein und ungeteilt möglich 3 8 – 14
Weintrauben 81 anschneiden, möglichst kernlose Sorte 3 8 – 14
Zitrusfrüchte – Schnitze, Schalen in Streifen für Aromazwecke 3 (2) 8 – 10
Blanchieren (Min.)
Artischocken 87 säubern und halbe Herzen schneiden 2 – 4 2 4 – 5
Blumenkohl 89 in esslöelgroße Stücke teilen,
½ Stunde in Salzwasser mit 1 EL Essig legen 3 – 4 2 5 – 7
Bohnen, grün 90 Enden und Fäden entfernen, schräg schneiden 3 – 4 2 5 – 6
Brokkoli 89 Vorbehandlung wie Blumenkohl 3 – 4 2 3 – 5
Gurken 95 10 mm dicke Scheiben schneiden – 2 6 – 8
Kohl 92 säubern und in Stücke schneiden (im Dampf) 2 – 3 2 3 – 5
Kohlrabi 85 würfeln oder Scheiben schneiden 3 – 5 2 3 – 5
Möhren / Pastinaken 88 quer oder schräg schneiden 2 – 3 2 4 – 5
Petersilie 55 Stängel entfernen – 2 (1) 2 – 3
Paprika / Peperoni 93 Streifen schneiden – 2 4 – 6
gemischtes Suppengemüse – klein würfeln oder Streifen schneiden 2 2 (1) 3
Spargel 92 schälen , ungeteilt oder 20 mm Stücke 2 – 3 2 4 – 8
Spinat 91 über Dampf blanchieren bis er leicht welkt 1 2 2
Sellerie 94 Scheiben schneiden 2 2 6
Zwiebel 89 Scheiben schneiden – 2 3
Tomaten 94 30 – 45 Sek. in heißes Wasser tauchen, schälen, vierteln – 2 8 – 10
Rhabarber 95 schälen, in Zitronenwasser tauchen,
25 mm Stücke schneiden – 2 3 – 5
Kürbis / Zucchini 92 schälen, entkernen, 8 mm Streifen oder Scheiben – 2 4 – 5
Kräuter – vom Stängel befreien, nicht zerkleinern – 1 ! 2 – 3
Pilze – halbieren, große Pilze in Scheiben schneiden – 1 ! 4 – 6
D
9
BITTE BEACHTEN SIE!
Die angegebenen Dörrzeiten sind nur Richt-
werte und können, je nach Beschaenheit des
Dörrguts stark dierieren.
Frühe Zwetschgen sind mangels Fruchtzucker
nicht zum Dörren geeignet.
Stapeln Sie die Dörretagen sorgfältig überei-
nander. Ein Verrutschen kann die Funktion be-
einträchtigen.
Vergewissern Sie sich, ob der Temperaturschalter
exakt auf der gewählten Schaltstellung steht.
Der Sockel muss immer zuunterst gestellt wer-
den. Nur hiermit ist die richtige Luftführung ge-
währleistet.

10
D
VERWENDUNG VON GEDÖRRTEM
F r ü c h t e können in gedörrtem Zustand als
Snacks verzehrt werden, jedoch auch als ideen-
reiche Zutaten für unzählige Rezepte verwendet
werden.
Sollen gedörrte Früchte ähnlich wie frisches Obst
in Rezepten verwendet werden, müssen sie ein-
geweicht werden, um ihnen wieder das Wasser
zuzufügen, das ihnen beim Dörren entzogen
wurde. Man gibt einem Volumen Früchte dassel-
be Volumen Wasser zu, z. B. 1 Tasse Dörrfrüchte
und 1Tasse Wasser und lässt es ca. 4 Stunden
einwirken. Im Zweifelsfalle: weniger Wasser ver-
wenden und kürzere Einwirkzeit. Sonst werden
die Güter matschig.
Im weiteren können Sie nach Kochbüchern ar-
beiten, die von Land zu Land vielfältige Rezepte
bereithalten.
Hier nur einige Anregungen:
Obstkuchen und andere Backwaren, Früch-
tebrot, Heidelbeertörtchen, abwechslungs-
reicher Ersatz für Rosinen usw.
Kompotte zu Waeln und Pfannkuchen, Auf-
striche für Sandwiches, Desserts, Apfelsoße usw.
Zutaten für manche Fleisch- und Wildgerichte,
Chutneys usw.
Zutaten für Müsli, Pudding, Yoghurt, Schlag-
sahne, Speiseeis, Fruchtsalate, Früchte in Ar-
magnac usw.
Man kann verschiedene Früchte kandieren
oder glasieren, ganz nach Ihrer Phantasie.
Bananen eignen sich gut für Milchdrinks und
als Zutat für Babynahrung, wenn man die ge-
dörrten Bananen pulverförmig mahlt.
Verschiedene Früchte lassen sich gut mit Honig
und Nüssen veredeln. Frische Früchte und ge-
dörrte Früchte nach dem Einweichen lassen sich
stets mischen. Je nach Rezept werden sie ganz
belassen oder mehr oder weniger grob gehackt.
Eine besondere Spezialität aus dem Himalaja
ist das Fruchtleder, welches aus verschiedenen
pürierten Früchten unter Zugabe von Honig,
Nüssen und Gewürzen als ausgewellter Fladen
in rechteckige Happen geschnitten und bis zu
einem zähen Zustand gedörrt wird. Man kann
den Fladen auch füllen, einrollen und in Schei-
ben schneiden.
G e m ü s e wird vor der Kochzubereitung im all-
gemeinen eingeweicht. Man gibt z. B. zu 1Tasse
Dörrgemüse 1 Tasse kaltes bis warmes Wasser zu.
Bitte nie mehr Wasser, als für das Gericht benötigt
wird, zugeben. Auch soll das eingeweichte Ge-
müse vor der Zubereitung nicht zu lange stehen.
Eingeweichtes Gemüse benötigt zum Ko-
chen etwa so lange wie eingefrorenes. Sup-
pengemüse, welches relativ kleingeschnitten
getrocknet wurde, kann ohne Einweichen
direkt in den Kochtopf zugegeben werden.
Für Suppengemüse, Saucenzutaten, Salat-
dressings usw. kann das Gedörrte in der Kü-
chenmaschine auf die gewünschte Korngröße
gehackt und gemischt werden.
Für Babykost, Cremesuppen, Saucen usw.
eignet sich sehr das Mahlen von gedörrtem
Gemüse. Man sollte höchstens einen Monats-
bedarf als Vorrat mahlen, da durch Mahlen die
Haltbarkeitsdauer abnimmt.
Gedörrtes Gemüse kann ebenfalls nach dem
Einweichen ohne weiteres zusammen mit
frisch Geerntetem zubereitet werden.
Kräuter werden unmittelbar beim Würzen
zermahlen oder zerstampft. Achten Sie darauf,
dass keine harten Stängel dazugeraten.
Pilze werden eingeweicht und wie frische ver-
wendet. Für Suppen und Saucen wird ein Teil
davon zermahlen zugegeben.
Paprika und Peperoni können in der Küchen-
maschine zerkleinert oder gemahlen und als
Gewürz in einem luftdichten Glas weiter auf-
bewahrt werden.
Hier noch einige An re gun gen für die unbe-
grenzten Möglichkeiten:
Gemüse suppen wie Minestrone, Eintöpfe
wie Pichelsteiner, Gaisburger Marsch, Franz.
Cassoulet, Ratatouille, Irish Stew, Gemüse-
gulasch, Pilzgulasch usw.
Artischocken in Teig gehüllt und ausgebacken.
Spezielle eigene Kräutermischungen, Kräuter-
tees, Kräuteröle usw.
Selleriesalz, Knoblauchsalz: Gedörrtes mahlen
und 1 : 1 mit Salz gemischt, und vieles andere
mehr nden Sie in Kochbüchern.

D
11
GARANTIE
Für die am Verkaufstag beginnende Garantie gelten innerhalb der Bundesrepublik Deutschland,
Österreich und der Schweiz folgende Bestimmungen:
1. Garantiedauer: 2 Jahre
2. Garantieleistungen:
a) Nach unserer Wahl Reparatur oder Austausch
von Teilen, die nach unserer Überprüfung
Material- oder Fertigungsfehler aufweisen.
b) Die Garantie wird nur bei Vorzeigen dieser
Garantiekarte und der Verkaufsrechnung
geleistet. Die Karte ist nur gültig, wenn
sie am Verkaufstag vollständig ausgefüllt
wurde.
c) Die Garantieleistung gilt nur gegenüber dem
Erstverbraucher.
d) Durch die Reparatur oder den Austausch von
Teilen innerhalb der Garantiedauer wird die
ursprüngliche Garantiezeit weder verlängert
noch erneuert.
e) Transportkosten gehen zu Lasten des Käufers
(gilt nicht für die ersten 6 Monate der Garan-
tiezeit).
f) Sofern der Schaden oder Mangel nicht be-
seitigt werden kann oder die Nachbesserung
von uns abgelehnt oder unzumutbar verzö-
gert wird, wird innerhalb von 6 Monaten ab
Kauf- / Lieferdatum auf Wunsch des Endab-
nehmers entweder kostenfrei Ersatz geliefert
oder der Minderwert vergütet oder das Gerät
gegen Erstattung des Kaufpreises, jedoch
nicht über den marktüblichen Preis hinaus,
zurückgenommen.
3. Die Garantie gilt nicht:
für Kratzer und Flecken am Gerät.
für Motorbürsten.
für leicht zerbrechliche Teile aus Bakelit, Glas,
Plastik und so weiter, es sei denn, es handelt
sich um Materialfehler, die von uns als solche
anerkannt werden.
für Beschädigungen, die durch falsche Instal-
lation oder Befestigung verursacht wurden.
wenn das Gerät an ein Stromnetz mit höherer
Spannung, als auf dem Gerät angegeben, an-
geschlossen wird.
bei falscher oder unsachgemäßer Bedienung.
bei mangelnder Sorgfalt.
bei ungenügender oder falscher Wartung.
bei Fallenlassen des Gerätes oder einzelner
Teile.
bei unsachgemäßem Transport oder unsach-
gemäßer Verpackung für den Transport.
4. Die Garantie erlischt:
wenn das Gerät für andere als für Haushalts-
zwecke eingesetzt wird.
wenn Personen, die nicht von unserer Firma
dazu ermächtigt sind, Reparaturen oder Än-
derungen durchführen.
Stempel und Unterschrift des Verkäufers Verkaufsdatum
Wichtig! Bitte notieren Sie hier den auf
dem Typenschild am Gerät befindlichen
FD-Code:
Modell:
Für dieses Gerät leisten wir 2 Jahre Garantie für Mängel, die auf Fertigungs- oder Materialfehler
zurückzuführen sind. Die Garantiezeit beginnt mit dem Tag der Übergabe und wird nur bei Vorlage
der Garantiekarte und der Verkaufsrechnung gewährt. Weitergehende Ansprüche bestehen nicht.

GB
12
GB
IMPORTANT
To avoid improper use, the instruction manual in
the instruction manual must be followed and the
instruction manual must be kept in a safe place
for future reference. Should you give the appli-
ance to a third person, make sure you give that
person the instruction manual. This appliance is
exclusively for the intended uses described in the
instruction manual. Moreover, it is only intended
for private use and not commercial use. The war-
ranty shall be rendered invalid by use for purpos-
es other than those described herein.
DEHYDRATOR BHG 601
This appliance conforms to the EEC
directive 89 / 336 / EEC for radio inter-
ference level and electromagnetic
compatibility (EMC) as well as the
low voltage directive 73 / 23 EEC.
IMPORTANT SAFETY POINTS
The safety of BIELMEIER electric appliances con-
forms to the recognized technical rules and the
law for the safety of appliances. Even so we would
like to draw your attention and that of others with
you to the following points:
PLEASE READ THIS INSTRUCTION MANUAL CARE
FULLY BEFORE THE FIRST USE AND SAVE THEM.
Connect the appliance to AC only – make sure
the voltage corresponds to the markings on
the appliance.
Protect the appliance from splash water and
water drops at the place of use.
Operate the appliance in dry rooms only.
After use, before cleaning or if there is a prob-
lem during operation – always disconnect the
plug from the power supply.
During operation the appliance becomes hot.
Children are not aware of the dangers re-
sulting from handling an electric appliance,
therefore they should never be left unattend-
ed with one.
Do not place the appliance on hot surfaces or
operate it in the immediate vicinity of open
re.
During operation the appliance should stand
free and must not be covered so that the air
can pass through freely.
Never immerse the electric aggregate of the
appliance and the cord in water.
Disconnect the mains plug before removing
the electrical aggregate of the appliance.
In case of visible signs of damage to the appli-
ance or the mains cable, the appliance should
be examined by trained personnel or by the
BIELMEIER customer service.
We are indemnied from liability for all dam-
ages that may arise if the appliance is used for
purposes other than originally intended or if it
has been used inappropriately.
THE BASICS OF DRYING
Drying and dehydrating are the oldest methods
of conservation known to man.
All food contains water in larger or smaller
measure.
By means of desiccation, water is withdrawn
from food and with it the basis for rotting and
mould as well as fermenting processes. By proper
drying and storing the items will be preserved
for years.
By withdrawing water the aroma becomes
concentrated and the dried items are often
tastier. Vitamins, nutrients and minerals are not
aected. Sulphur and other preserving substanc-
es are avoided.
Even though you may already preserve by
freezing or canning, drying will be a plus to your
kitchen and palate.
Drying in the kitchen oven often causes con-
densation because of its lack of air circulation;
the dripping and sticking of the juices from the
drying items make it hard to clean as it is not
built for drying.

13
GB
THE DESICCATING APPLIANCE BHG 601
Your new drying appliance works faster and more
eciently due to a physically robust system:
The air ow, which is drawn in from above, is
evenly heated by a special heater. This increases
the moisture carrying capacity of the air and
while it spreads over the dierent drying levels
with slight pressure it withdraws moisture from
the items.
Now the saturated air does not ow on through
all the levels before leaving the appliance but
leaves instead at each level. Therefore BIELMEIER
desiccators contain no screens or wire trays but
solid trays which are easy to clean. Crumbs and
herbs cannot fall through. This system makes
an even drying on all levels possible, no repo-
sitioning is necessary and the appliance can be
left unattended until shortly before the drying
time is up.
The dried items need only to be checked visually
and by handling just before the drying time has
elapsed. Those with high standards will be able
to sort the items and possibly dry some of them
a little longer.
PREPARATION
Before the rst use and at the beginning of
each drying season we recommend that the
drying trays be rinsed. Do not scour!
Place the appliance in a place where it is not
in the way during the whole desiccating proc-
ess. During drying a pleasant aromatic, fruity
or spicy odour can be present, depending on
the items to be dried.
For safe and appetizing preserving all the
items should be washed well.
Use only foods in good condition, any ar-
eas with blemishes should be removed. Fruit
should be without cores.
Fruit should be ripe but not over-ripe.
Consult the table for individual preparation.
To avoid the natural browning of the cut
surface you can dip the fruit briey in a mix-
ture (1 tablespoon lemon juice to 1 cup of
water). Instead of lemon juice commercial
vitamin C can be used. Then dab with paper
towel.
Blanching is necessary for most vegetables
(see tables). The vegetables that have been
prepared are dipped into a pot with boiling
water by means of a wire basket or strainer.
The blanching period is reckoned from the
time when the water comes to the boil again.
The drying results are more even if the items
are cut into about equally big pieces. Thin slic-
es dry quicker but remember that the pieces
shrink considerably through drying.
For an approximate guideline you can gure
about 500 grams (1 lb. 5 oz.) of fresh fruit or
200-300 grams (10-14 oz.) of fresh vegetables
per tray, depending on variety.
We suggest to place pieces of fruit in an up-
right position closely together. Always place
unpeeled fruit with the cut surface pointing
upwards. Sliced fruit should be placed on the
tray as overlapping scales like in sh, not at.
Vegetables should only be placed in single
layers, spaced evenly.
Herbs should be desiccated with care! If the
smell is too intense the temperature has been
set too high.
The stems of herbs should be removed but
they need not be chopped further. Leafy
herbs should be turned during the desiccat-
ing process to avoid them sticking together.
The levels should not be overlled to allow the
necessary air circulation.
Now t the electric drying unit with the trans-
parent lid on to the topmost tray.
Set temperature switch to the position corre-
sponding to the goods to be dehydrated (see
table).
Plug in appliance.
Set timer to desired dehydration time.

14
GB
DESICCATING TIME
Desiccating time varies greatly according to the
kind of items to be dried, their moisture content,
ripeness and thickness, as well as the room air
and the number of drying trays. If in doubt select
a shorter drying time and conduct a visual and
hand check towards the end of the drying period.
This appliance evenly supplies all levels with dry-
ing air but dierences in the items to be dried can
cause uneven results. If you adhere to exacting
standards you may want to check the items and
allow the softer pieces to dry for another ½ hour
to 1 hour.
The goods that have been prepared should be
desiccated immediately. The desiccating proc-
ess should not be interrupted. Extended drying
times will reduce the avour of herbs or similar
aromatic goods. Fruit that is intended for dry
snacks without prior soaking in water (or in-
tended for space-saving provision for mountain
climbers) should not be dried until it is brittle but
left so that it is chewable.
Checking the dried goods by feeling them is best
done when the items have cooled o. Desiccat-
ed vegetables should not feel tough but rather
brittle.
TEMPERATURE SETTING
The correct temperature setting
is very important:
Position 1 approx. 20°C above ambient tempera-
ture for all herbs and mushrooms.
Position 2 approx. 40°C above ambient tempera-
ture for all vegetables and delicate kinds of fruit.
Position 3 approx. 60°C above ambient tempera-
ture for all kinds of fruit.
STORAGE
Let the dried items cool o well before storing.
The best containers are clean glass jars that can
be closed, such as can be easily found in any
household today. The jars are especially suitable
if the dried items are to be removed little by lit-
tle over a period of time. Plastic bags are not
suitable in this case. Heat sealed and vacuum-
sealed bags are also recommended, they are the
best method to store dried vegetables.
Desiccated items can be stored at room tem-
perature for years. However dry, cool and dark
rooms are even more suitable. Even so you will
enjoy the best avour in the following winter
months and early the next spring. An occasional
visual check just like with other preserved items
is recommended though. Each 20°F (10°C) of
lower temperature extends the storage time
twofold or threefold. Labels describing contents
provide order and top o the enjoyment of your
precious product.
CLEANING
Prior to every cleaning procedure set timer to0
and disconnect the mains plug. The electric
desiccating aggregate with the transparent lid
will hardly become dirty through use. lt is su-
cient to wipe it o with a damp cloth from time to
time. Never immerse this part in water!
This new system does away with complicated
cleaning of the trays.
There is normally no dripping or sticking of the
items to be dried.
The drying trays contain no screens or wire
netting.
The trays can easily be cleaned like any dish or
soaked in water.
Do not use scouring materials as this will make
all subsequent cleaning eorts more dicult.
The air ow lter on the motor component
must be kept free from dust under all cir-
cumstances. Dirt or dust residues should
be removed with a soft brush or using a
vacuum cleaner (min. suction power).
All materials in the various parts are highly suit-
able and approved for goods. Natural pigments
and possibly fruit acids of food (e. g. carrots) may
cause a slight discoloration in the surfaces of
dessicating trays. This is not a quality defect!

15
GB
HOW YOU USE DRIED FOOD
F r u i t s can be used for snacks, dried as it is
but also as an ingredient for countless recipes.
If dried fruit is to be used in a recipe in the same
way as fresh fruit would be, it must be dehydrat-
ed by soaking in water to add what has been
withdrawn in the desiccating process. The cor-
responding amount of water is added, e.g. one
cup of water to one cup of fruit, leaving this to
soak about
4 hours, if in doubt use a little less water and a
little less time to prevent the items becoming
soggy.
You can also make use of cookbooks which pro-
vide various recipes according to each country.
Here are a few ideas:
Fruit pies and other baked goods, fruit bread,
muns, variations and raisins etc.
Stewed fruit goes well with waes and pan-
cakes, for sandwiches, deserts, applesauce
etc.
Ingredients for some meat and game recipes,
chutneys etc.
Ingredients for granola, pudding, yoghurt,
whipped cream, ice cream, fruit salad etc.
You can candy dierent kinds of fruit or frost
them according to your fancy. Bananas are
highly suitable for milk drinks and as an ad-
ditive to baby food. Grind the dried bananas
into a powder in this case.
Various fruits can be enhanced with honey or
nuts. You can easily mix fresh fruit and dry fruit
that has been dehydrated. Depending on the
recipe you leave them whole or chop them
but not nely.
An extra specialty is fruit leather from the
Himalayas which consists of various pureed
fruits with honey, nuts and spices added,
rolled out and cut into rectangular pieces,
then dried to a chewable consistency. After it
has been rolled out it can also be lled, rolled
up and cut into rolls.
V e g e t a b I e s are generally rehydrated by
soaking before being used. Add about 1 cup of
cold to warm water to a cup of dried vegetables.
Please don‘t add more water than is necessary
for any particular dish. Also, the vegetables that
have been soaked should not be left to stand
overly long.
Dehydrated vegetables need to be cooked
about as long as frozen ones. Vegetables that
are used for soup and that have been cut rela-
tively ne need not be soaked before being
added to the soup. Dried herbs that are to be
used in soups, sauces, salad dressings etc. can
be cut to the desired sizes in a food processor.
Dried vegetables that have been ground are
highly suitable for baby foods, cream soups,
sauces etc. You should not grind more than
you expect to use in a month because grind-
ing reduces usability of the items.
Desiccated vegetables can also be used very
well together with fresh ones. Grind herbs
at the same time you are using them. Please
watch that all stems are removed.
Mushrooms are dehydrated and used just the
same as fresh ones. For soup and sauces add
some that have been ground.
Paprika and chili-peppers can be cut or
ground in a food processor and then stored
in jar for use as a spice.
Here are a few ideas:
Vegetable soups like minestrone, ratatouille,
French cassoulet, Irish stew, vegetable stew,
mushroom stew, etc.
Artichokes wrapped in dough and fried.
Your own herbal blends, herbal teas, herbal
oils, etc.
Celery salt, garlic salt: Mix 1 : 1 milled dried
celery (or garlic) with salt.
You will nd many more uses in cookbooks.
There are practically unlimited applications for
these dried items.

variety water content
(%)
preparation and remarks dip in
lemon juice
desiccating
dial setting
approx. desiccating
time in hours
apples 84% remove core completely; cut rings or slices yes 3 4 – 8
apricots 85% halves or quarters yes 3 (2) 8 – 12
bananas 65% well ripened, cut slices or stripes 3 5 – 8
berries 88% except for blueberries all berries should
always be combined with other fruit 3 4 – 6
blueberries 83% leave whole 3 4 – 6
cherries 82% with stones, whole 3 8 – 12
citrus fruit – sliced, cut peel in stripes 3 (2) 8 – 10
dates 23% well ripened 3 4 – 6
gs 78% sliced in half 3 4 – 6
grapes 81% cut, seedless varieties 3 8 – 14
melons 81% peel, remove seeds, slice rings or squares 3 8 – 12
peaches 89% well ripened yes 3 (2) 8 – 12
pears 83% remove core completely, halves or smaller yes 3 (2) 6 – 12
pineapple 86% peel, slice in rings 3 (2) 8 – 12
plums 81% remove stone, slice in half,
also possible the whole fruit with stone 3 8 – 14
strawberries 90% halves, smaller ones whole yes 3 (2) 6 – 12
blanching time
(in min.)
asparagus 92% peel, leave uncut or cut 20 mm (½ inch) slices 2 – 3 2 4 – 8
artichokes 87% clean, cut hearts in half 2 – 4 2 4 – 5
cauliower 89% tablespoon-size pieces, soak ½ hour
in salt solution with 1 tblsp. vinegar 3 – 4 2 5 – 7
beans, green 90% remove ends and strings, cut diagonally 3 – 4 2 5 – 6
broccoli 89% preparation like cauliower 3 – 4 2 3 – 5
cabbage 92% clean and slice, (with steam) 2 – 3 2 3 – 5
carrots 88% cut squarely or diagonally 2 2 4 – 5
celery roots 94% slice rings 2 2 6
cucumbers 95% cut 10 mm (¼ inch) thick rings – 2 6 – 8
onions 89% slice rings – 2 3
paprika / red pepper 93% cut stripes – 2 4 – 6
parsely 85% remove stems – 2 (1) 2 – 3
rhubarb 95%
peel, dip in lemon juice, cut 20 mm (1 inch) pieces
– 2 3 – 5
spinach 91% blanch over steam untill it withers slightly 1 2 2
squash / zucchini 92% peel, remove seeds,
cut in 8 mm (¼ inch) slices or stripes – 2 4 – 5
tomatoes 94% dip in boiling water for 30 – 45 seconds,
peel and slice in quarters – 2 8 – 10
stern turnips 85% cut in cubes or slices 3 – 5 2 3 – 5
herbs – remove stems, do not chop – 1 ! 2 – 3
mushrooms – slice in half, large rings – 1 ! 4 – 6
PREPARATION
16
GB

variety water content
(%)
preparation and remarks dip in
lemon juice
desiccating
dial setting
approx. desiccating
time in hours
apples 84% remove core completely; cut rings or slices yes 3 4 – 8
apricots 85% halves or quarters yes 3 (2) 8 – 12
bananas 65% well ripened, cut slices or stripes 3 5 – 8
berries 88% except for blueberries all berries should
always be combined with other fruit 3 4 – 6
blueberries 83% leave whole 3 4 – 6
cherries 82% with stones, whole 3 8 – 12
citrus fruit – sliced, cut peel in stripes 3 (2) 8 – 10
dates 23% well ripened 3 4 – 6
gs 78% sliced in half 3 4 – 6
grapes 81% cut, seedless varieties 3 8 – 14
melons 81% peel, remove seeds, slice rings or squares 3 8 – 12
peaches 89% well ripened yes 3 (2) 8 – 12
pears 83% remove core completely, halves or smaller yes 3 (2) 6 – 12
pineapple 86% peel, slice in rings 3 (2) 8 – 12
plums 81% remove stone, slice in half,
also possible the whole fruit with stone 3 8 – 14
strawberries 90% halves, smaller ones whole yes 3 (2) 6 – 12
blanching time
(in min.)
asparagus 92% peel, leave uncut or cut 20 mm (½ inch) slices 2 – 3 2 4 – 8
artichokes 87% clean, cut hearts in half 2 – 4 2 4 – 5
cauliower 89% tablespoon-size pieces, soak ½ hour
in salt solution with 1 tblsp. vinegar 3 – 4 2 5 – 7
beans, green 90% remove ends and strings, cut diagonally 3 – 4 2 5 – 6
broccoli 89% preparation like cauliower 3 – 4 2 3 – 5
cabbage 92% clean and slice, (with steam) 2 – 3 2 3 – 5
carrots 88% cut squarely or diagonally 2 2 4 – 5
celery roots 94% slice rings 2 2 6
cucumbers 95% cut 10 mm (¼ inch) thick rings – 2 6 – 8
onions 89% slice rings – 2 3
paprika / red pepper 93% cut stripes – 2 4 – 6
parsely 85% remove stems – 2 (1) 2 – 3
rhubarb 95%
peel, dip in lemon juice, cut 20 mm (1 inch) pieces
– 2 3 – 5
spinach 91% blanch over steam untill it withers slightly 1 2 2
squash / zucchini 92% peel, remove seeds,
cut in 8 mm (¼ inch) slices or stripes – 2 4 – 5
tomatoes 94% dip in boiling water for 30 – 45 seconds,
peel and slice in quarters – 2 8 – 10
stern turnips 85% cut in cubes or slices 3 – 5 2 3 – 5
herbs – remove stems, do not chop – 1 ! 2 – 3
mushrooms – slice in half, large rings – 1 ! 4 – 6
17
GB
PLEASE NOTE!
The given desiccating time is only an approxi-
mate value.
Depending on the goods the desiccating times
may dier slightly.
Plums which are ripe early in the year content too
little sugar and therefore can not be dehydrated.
The desiccating trays should be securely placed
upon each other.
A tray slippage may cause malfunction.
Make sure that the temperature switch is exactly
on the chosen temperature setting. The desiccat-
ing tray with the xed base should always be the
lowest one. In this way the correct air circulation
can be guaranteed.

GUARANTEE
For the warranty, which begins as of the date of sale of the product, the following conditions
shall apply in Great Britain:
A 2-years warranty is provided for damage caused by defects in material or workmanship. The
warranty period shall begin on the hand-over day and warranty is only granted on presentation
of the warranty card and the purchase receipt. No further claims shall be granted.
1. Warranty period: 2 years
2. Conditions of warranty:
a) Parts, which exhibit defects in material and / or
workmanship after our inspection, will either
be repaired or replaced according to our de-
cision.
b) Warranty is only provided on presentation of
this warranty card and purchase receipt. This
warranty is only valid if it is lled out on date
of sale and in a complete and appropriate
manner.
c) This warranty is only valid for the rst owner
of the device.
d) No change or repair of parts performed within
the warranty period shall provide grounds for
any extension of the original warranty period.
e) Any transportation costs shall be borne by the
purchaser (this shall not apply during the rst
6 months of the warranty).
f)
If the damage or defect cannot be elimina-
ted or if we refuse to repair the defect or in
the event of a delay in our repairing of the
device, then within the rst 6 months after
purchase / delivery of the device, and accor-
ding to the wish of the end user, the device
will be replaced free of charge or its value will
be reimbursed or the device will be taken back
with a refund of the original purchase price
which shall not exceed the usual market price.
3. The warranty shall not apply to:
spots and scratches on the device.
motor brushes.
easily breakable parts (e. g. bakelite, plastic ,
glass), even in case of defects in material
recognized by us.
damage due to improper installation or im-
proper xing.
damage caused by an unsuitable voltage
supply or an unsuitable electricity network.
improper or inappropriate use of the equip-
ment.
unsatisfactory care.
damage caused by incompetent or insucient
maintenance.
damage caused by dropping the equipment
or part thereof.
improper transportation or inappropriate
packaging during the transportation.
4. The warranty shall be deemed void:
in case of use or application of the device other
than its intended use for household purposes.
in case of any servicing or repairing of the device
performed by third parties that have not been
authorized for such purpose by our company.
Stamp and signature of salesperson Date of sale
Important! Please write down the FD-code
located on the rating plate here:
Model:
18
GB

CZ
19
CZ
DŮLEŽITÉ
BEZPEČNOSTNÍ INFORMACE
Abyste předešli způsobení různých škod nebo
jiných nebezpečí nesprávným používáním, pře-
čtěte si pozorně tento návod k obsluze a uscho-
vejte si ho. Přístroj předávejte dalším osobám
pouze s tímto návodem k obsluze. Spotřebič
nesmí být využíván k jiným než uvedeným úče-
lům. Je určen pouze k použití v domácnosti,
nikoliv ke komerčním účelům. Při zjištění neod-
borného zacházení zaniká nárok na záruku.
SUŠIČKA OVOCE BHG 601
Tento spotřebič odpovídá směrni-
ci EG 89 / 336 / EWG o elektromag-
netické kompatibilitě a směrnici
73 / 23 EWG pro nízkonapěťové
systémy.
DŮLEŽITÁ
BEZPEČNOSTNÍ UPOZORNĚNÍ
Bezpečnost elektrospotřebičů BIELMEIER odpo-
vídá obecně uznávaným technickým předpisům
a zákonům o bezpečnosti. Přesto bychom chtěli
Vás i ostatní uživatele upozornit na následující
skutečnosti.
PŘED UVEDENÍM SPOTŘEBIČE DO PROVOZU
SI PŘEČTĚTE PEČLIVĚ NÁVOD K OBSLUZE A
USCHOVEJTE SI HO.
Spotřebič připojte jen ke zdroji střídavého na-
pětí, které odopovídá označení na typovém
štítku spotřebiče.
Po ukončení provozu, před údržbou přístroje
nebo při event. poruše, vytáhněte síťový kabel
z elektrické zásuvky.
Za provozu je spotřebič horký.
Děti neznají nebezpečí, která můžou vznik-
nout při zacházení s elektrickými spotřebiči,
proto je nikdy nenechávejte manipulovat se
spotřebičem bez dozoru.
Spotřebič neodkládejte ani nenechávejte v
provozu na horkém povrchu nebo v blízkosti
otevřeného plynového hořáku.
Spotřebič musí za provozu volně stát a nesmí
být přikryt, aby nebyl zamezen přívod a od-
vod vzduchu.
Elektrickou část spotřebiče s přívodním kabe-
lem neponořujte nikdy do vody.
Spotřebič provozujte jen v suchých místnos-
tech.
Před odnětím elektrické části spotřebiče vy-
táhněte nejdřív přívodní kabel ze zásuvky!
Při zjevném poškození spotřebiče nebo pří-
vodního kabelu nechte spotřebič přezkoušet
u odborníka nebo v příslušném servisu.
Za eventuální škody vzniklé používáním spo-
třebiče k jiným než uvedeným účelům nebo
nedodržením návodu k obsluze, nepřebíráme
odpovědnost.
VŠEOBECNĚ O SUŠENÍ
Sušení a pražení jsou jedny z nejstarších člověku
známých způsobů konzervace.
Potraviny obsahují více či méně vody. Sušením
je odstraněná voda a tím také živná půda pro
vznik hniloby, kvasných procesů a plesnivění. Při
správném sušení a skladování si usušené potra-
viny zachovají trvanlivost po celá léta.
Odstraněním vody dochází k nahromadění aro-
matických látek, proto je usušená potravina často
chutnější. Vitamíny, živiny a minerály zůstávají ne-
poškozené. Vyhnete se také použití síry a ostat-
ních konzervačních látek.
I když potraviny raději zavařujete nebo zamrazu-
jete, přináší sušení další obohacení chutí a využití
v kuchyni.
Sušení na slunci je v naší zeměpisné šířce více
než štěstí. Sušení v domácnosti v uzavřené pečí-
cí troubě s menší možností cirkulace vzduchu je
častou příčinou pocení, lepení nebo odkapávání
št’ávy sušené potraviny. Údržba takto znečiště-
né trouby je velmi náročná, protože není k sušení
zkonstruovaná.

20
CZ
FUNKCE
Vaše nová sučička ovoce pracuje rychleji a
efektivněji na základě fyzikálních principů.
Shora nasávaný proud vzduchu je speciální top-
nou spirálou rovnoměrně ohříván. Tím je vzduch
dobře připraven k vázání vlhkosti a lehkým
přetlakem rovnoměrně rozdělen do každého
jednotlivého sušícího patra, kde odebírá potra-
vinám vlhkost.
Vzduch nasycený vlhkostí neprochází všemi
dalšími patry, ale je odváděn v každém patře
zvlášť příslušnými otovory ven. Proto nemá
sušička žádná síta ani mřížky, ale má uzavře-
ná, snadno omyvatelná patra, kterými malé
kousky ovoce a byliny nemohou propadnout.
Tato soustava umožňuje rovnoměrné sušení ve
všech patrech bez nutnosti jejich přesunování
a spotřebič může být v provozu do krátké doby
před ukončením sušení bez dozoru za použi-
tí automatického časovače. Zda byla docílena
požadovaná jemnost sušené potraviny stačí
vyzkoušet ke konci doby sušení, a to zrakem a
na omak. Zvlášť náročné sušené potraviny se
mohou eventuálně vytřídit a dobu sušení ještě
o něco prodloužit.
PŘÍPRAVA
Před prvním použitím a na začátku sezóny
pro sušení doporučujeme patra umýt, ale ne
drhnout!
Spotřebič postavte na místo, kde nebude po
celou dobu sušení překážet. Během sušení se
může podle druhu sušené potraviny rozšiřovat
příjemná, aromatická, ovocná nebo kořeněná
vůně.
Aby byly suroviny spolehlivě a chutně zakon-
zervovány je třeba je dobře umýt.
Používejte jen potraviny, které jsou nezávad-
né, poškozená místa pečlivě odstraňte. U ovo-
ce odstraňte jádřinec.
Ovoce má být zralé, avšak ne přezrálé.
V jednotlivých případech najdete v tabulce
doporučené zpracování.
Jestliže se chcete vyhnout přirozenému
zhnědnutí řezných ploch, můžete plody krát-
ce namočit do roztoku z jedné polévkové
lžíce citrónové šťávy a jednoho šálku vody,
a následně je pak nechat okapat na utěrce.
Citrónovou šťávu lze nahradit vitamínemC,
který snadno obstaráte v lékárně nebo v ob-
chodě.
Pro většinu zeleniny se hodí blanšírování (viz.
tabulka). Připravená zelenina se ponoří v síti
nebo drátěném koši do hrnce s vařící vodou.
Časové hodnoty v tabulce pro blanšírování
se počítají od chvíle, kdy se voda opět začne
vařit.
Rovnoměrný výsledek sušení dosáhnete
nakrájením ovoce na přibližně stejně velké
kousky. Tenké plátky se suší rychleji, nezapo-
meňte však na to, že se kousky sušením ještě
zmenší.
Orientační objemové množství na jedno patro
(podle druhu ovoce) je cca. 500 g čerstvého
ovoce, případně 200 – 300 g čerstvé zeleniny.
Doporučuje se kousky ovoce ukládat nasto-
jato a těsně vedle sebe. Neoloupané ovoce
pokládejte zásadně slupkou dolů a řeznou
plochou nahoru. Kousky tvaru plátků zarov-
návejte šupinovitě, ne na plocho.
Zeleninu rozložte pravidelně jen v jedné
vrstvě.
Byliny suště velmi šetrně!
Pokud vznikne příliš intenzivní vůně, je nasta-
vená teplota příliš vysoká. Z bylin odstraňte
stonky a dál je nezmenšujte. Listovou zeleninu
během sušení občas obraťte, aby se neslepila.
Patra nepřeplňujte, abyste nenarušili cirkulaci
vzduchu.
Motorovou část sušičky s průhledným víkem
umístěte na horní patro.
Otočný vypínač nastavte dle druhu suroviny
na odpovídající stupeň teploty (viz. tabulka).
Síťový kabel zastrčte do zásuvky.
Časový spínač nastavte na požadovaný čas
sušení. Nyní je spotřebič v provozu a vypne
se automaticky po uplynutí zvolené teploty.

21
CZ
DOBA SUŠENÍ
Doba sušení je závislá na druhu suroviny, ob-
jemu vody, zralosti a síle nakrájených plátků,
stejně tak na pokojové teplotě a počtu pater
sušičky. V případě pochybností lze zvolit kratší
dobu sušení a provést vícekrát kontrolu zrakem
i
na omak.
Tento spotřebič zásobuje suchým vzduchem
všechna patra téměř rovnoměrně, přesto se
však můžou ve výsledku objevit drobné rozdí-
ly. Dle individuální potřeby se mohou kousky,
které ještě nejsou dostatečně suché, ponechat
o 0,5 až 1 hodinu déle sušit. Proces sušení má
následovat bezprostředně po dokončení přípra-
vy surovin k sušení. Celý průběh by měl proběh-
nout bez přerušení.
Příliš dlouhé sušení bylin a podobných aro-
matických surovin způsobuje příliš velký únik
chuťových látek.
Plody, které mají být spotřebovány bez namo-
čení, např. jako občerstvení nebo jako lehká a
skladná svačinka na cesty, by se neměly přesu-
šit. Měly by se dát snadno kousat a neměly by
se lámat.
Provést zkušební ochutnávku je nejspolehlivější
až po vychladnutí potraviny. Sušená zelenina by
měla být na omak spíš ještě tuhá, ne lámavá a
drobivá. Cibule a petržel připomínají papír.
NASTAVENÍ TEPLOTY
Nastavení správné teploty je velmi důležité:
Stupeň 1 asi 20°C přes teplotu okolí pro byliny
a houby
Stupeň 2 asi 40°C přes teplotu okolí pro všechny
druhy zeleniny a choulostivé druhy ovoce
Stupeň 3 asi 60°C přes teplotu okolí pro všechny
ostatní druhy ovoce
SKLADOVÁNÍ
Po ukončení sušení nechte potravinu dobře
vychladnout, teprve pak ji uskladněte. Jako
skladovací nádoby jsou nejlepší umyté skle-
nice se šroubovacím uzávěrem, které se dnes
v domácnosti běžně používají. Pokud budete
odebírat sušené potraviny po částech, jsou
sklenice praktičtější než sáčky. Nejlepší způsob
uskladnění pro sušenou zeleninu je v sáčcích
svařených foliovačkou nebo ve vakuových
sáčcích.
Usušené potraviny mohou být skladovány za
každé pokojové teploty, lépe ale na suchých,
chladných a temných místech po celé roky.
Optimální chuť mají v následujícíh zimních měsí-
cích a časně na jaře. Doporučuje se příležitostná
kontrola stejně jako u zavařovaných potravin.
Při teplotě skladování o 10°C nižší se doba pro-
dlouží 2-3 krát. Nálepky s názvem potraviny a
datem provedení dodají přehled a plně završí
radost z Vašeho vlastního výrobku.
ÚDRŽBA
Před každou údržbou nastavte časový spínač
do polohy 0 a vytáhněte síťový kabel ze zásuv-
ky. Motorovou část sušičky s průhledným víkem
stačí čas od času utřít vlhkým hadříkem. Nikdy
ji neponořujte do vody!
Nový technologický systém sušících plat udělá
z jejich umývání pouze vedlejší činnost.
Sušená potravina za normálních okolností
nekape ani nelepí.
Sušící patra nemají žádná jemná síta ani
mřížky.
Patro je možné naplnit trochou vody, uložit
na sebe a nechat odmočit; po chvíli je lze
bez problémů umýt.
Dbejte na to, abyste patra nepoškrábala,
další čištění by bylo o to obtížnější.
Nasávací mřížka na motorové části musí
být bezpodmínečně čistá. Při znečištění,
např. při nánosu prachu, je nutné mříž-
ku vyčistit štětečkem nebo vysavačem
(s mírnějším stupněm sání).
Všechny použité části a materiály jsou zdravot-
ně nezávadné a doporučené pro styk s potravi-
nami. Odolávají ovocným kyselinám a čistícím
prostředkům, jsou dlouhá léta stabilní a nepod-
léhají stárnutí.

Druh ovoce Obsah
vody v %
Příprava a poznámky Namáčení v
kyselině citrónové
Stupeň sušení Doba sušení
v hod. cca.
Jablka 84 Řezy, kolečka, odstranit jádřinec ano 3 4 – 8
Meruňky 85 Půlky nebo čtvrtky ano 3 (2) 8 – 12
Ananas 86 Oloupat, kolečka 3 (2) 8 – 12
Banány 65 Dobře zralé, kolečka, proužky 3 5 – 8
Angrešt, rybíz 88 V kombinaci s jiným ovocem 3 4 – 6
Hrušky 83 Odstranit jádřinec, plátky ano 3 (2) 6 – 12
Datle 23 Dobře zralé 3 4 – 6
Jahody 90 Půlky, malé v celku ano 3 (2) 6 – 12
Fíky 78 Půlky 3 4 – 6
Borůvky 83 Celé 3 4 – 6
Třešně 82 S peckami, nedělit 3 8 – 12
Melouny 81 Oloupat, plátky 3 8 – 12
Broskve 89 Dobře zralé ano 3 (2) 8 – 12
Blumy / Švestky 81 / 87 Odpeckovat, půlky 3 8 – 14
Hrozny 81 Naříznout, lépe druh bez jader 3 8 – 14
Citrusy – Plátky, kůru na nudličky pro aroma 3 (2) 8 – 10
Blanšírování
v min. cca.
Artyčoky 87 Očistit a krájet srdíčka na půlky 2 – 4 2 4 – 5
Květák 89 Kousky velikosti lžíce,
na 0,5 hod. do slané vody, + 1 lžíce octa 3 – 4 2 5 – 7
Zelené fazolky 90 Konce a vlákna odstranit, krájet šikmo 3 – 4 2 5 – 6
Brokolice 89 Jako květák, +1 lžíce octa 3 – 4 2 3 – 5
Okurky 95 Plátky 1 cm – 2 6 – 8
Kapusta 92 Očistit, proužky (v páře) 2 – 3 2 3 – 5
Kedluben 85 Kostky, proužky 3 – 5 2 3 – 5
Mrkev / Pastyňák 88 Kolečka 2 – 3 2 4 – 5
Petržel 55 Odstranit stonky – 2 (1) 2 – 3
Paprika / Feferonky 93 Proužky – 2 4 – 6
Polévková směs – Kostičky, nudličky 2 2 (1) 3
Chřest 92 Oloupat, vcelku nebo 2 cm kousky 2 – 3 2 4 – 8
Špenát 91 Blanšírovat v páře, až lehce zavadne 1 2 2
Celer 94 Plátky, kostky, nudličky 2 2 6
Cibule 89 Plátky – 2 3
Rajčata 94 na 30 – 45 sekund, do vroucí vody,
oloupat, rozčtvrtit – 2 8 – 10
Rebarbora 95 Oloupat, 2,5 cm kousky,
namáčení v kyselině citrónové – 2 3 – 5
Dýně / Cuketa 92 Oloupat, odstranit jádra, plátky – 2 4 – 5
Byliny – Bez stonků, nezmenšovat – 1 ! 2 – 3
Houby – Plátky – 1 ! 4 – 6
PŘÍPRAVA
22
CZ

Druh ovoce Obsah
vody v %
Příprava a poznámky Namáčení v
kyselině citrónové
Stupeň sušení Doba sušení
v hod. cca.
Jablka 84 Řezy, kolečka, odstranit jádřinec ano 3 4 – 8
Meruňky 85 Půlky nebo čtvrtky ano 3 (2) 8 – 12
Ananas 86 Oloupat, kolečka 3 (2) 8 – 12
Banány 65 Dobře zralé, kolečka, proužky 3 5 – 8
Angrešt, rybíz 88 V kombinaci s jiným ovocem 3 4 – 6
Hrušky 83 Odstranit jádřinec, plátky ano 3 (2) 6 – 12
Datle 23 Dobře zralé 3 4 – 6
Jahody 90 Půlky, malé v celku ano 3 (2) 6 – 12
Fíky 78 Půlky 3 4 – 6
Borůvky 83 Celé 3 4 – 6
Třešně 82 S peckami, nedělit 3 8 – 12
Melouny 81 Oloupat, plátky 3 8 – 12
Broskve 89 Dobře zralé ano 3 (2) 8 – 12
Blumy / Švestky 81 / 87 Odpeckovat, půlky 3 8 – 14
Hrozny 81 Naříznout, lépe druh bez jader 3 8 – 14
Citrusy – Plátky, kůru na nudličky pro aroma 3 (2) 8 – 10
Blanšírování
v min. cca.
Artyčoky 87 Očistit a krájet srdíčka na půlky 2 – 4 2 4 – 5
Květák 89 Kousky velikosti lžíce,
na 0,5 hod. do slané vody, + 1 lžíce octa 3 – 4 2 5 – 7
Zelené fazolky 90 Konce a vlákna odstranit, krájet šikmo 3 – 4 2 5 – 6
Brokolice 89 Jako květák, +1 lžíce octa 3 – 4 2 3 – 5
Okurky 95 Plátky 1 cm – 2 6 – 8
Kapusta 92 Očistit, proužky (v páře) 2 – 3 2 3 – 5
Kedluben 85 Kostky, proužky 3 – 5 2 3 – 5
Mrkev / Pastyňák 88 Kolečka 2 – 3 2 4 – 5
Petržel 55 Odstranit stonky – 2 (1) 2 – 3
Paprika / Feferonky 93 Proužky – 2 4 – 6
Polévková směs – Kostičky, nudličky 2 2 (1) 3
Chřest 92 Oloupat, vcelku nebo 2 cm kousky 2 – 3 2 4 – 8
Špenát 91 Blanšírovat v páře, až lehce zavadne 1 2 2
Celer 94 Plátky, kostky, nudličky 2 2 6
Cibule 89 Plátky – 2 3
Rajčata 94 na 30 – 45 sekund, do vroucí vody,
oloupat, rozčtvrtit – 2 8 – 10
Rebarbora 95 Oloupat, 2,5 cm kousky,
namáčení v kyselině citrónové – 2 3 – 5
Dýně / Cuketa 92 Oloupat, odstranit jádra, plátky – 2 4 – 5
Byliny – Bez stonků, nezmenšovat – 1 ! 2 – 3
Houby – Plátky – 1 ! 4 – 6
23
CZ
DÁVEJTE POZOR!
Uvedené doby sušení jsou jen doporučené a
mohou být podle vlastností sušené suroviny
velmi rozdílné.
Rané švestky jsou chudé na obsah cukru, proto
nejsou k sušení příliš vhodné.
Pečlivě na sebe skládejte sušící patra, špatně
nasazená patra můžou poškodit funkci sušičky.
Přesvědčte se, zda je vypínač otočen přesně na
zvolený stupeň. Nezapomeňte, že patra musí stát
vždy na podstavci! Jedině tak je zaručena správná
cirkulace vzduchu a pracovní deska je chráněna
před vlivem horkého vzduchu.

24
CZ
ÚPRAVA POTRAVIN
O v o c e lze jíst v sušeném stavu jako malé ob-
čerstvení, ale lze ho také použít jako nápaditou
přílohu v nepřeberném množství receptů.
Pokud chcete použít sušené ovoce namísto
čerstvého, musí se nejdříve namočit, aby se
mu vrátila voda, která se sušením odebrala.
Podle objemu ovoce dodáme stejné objemové
množství vody, tedy např. na 1šálek sušeného
ovoce1šálek vody. Pokud si nejste zcela jistí, po-
užijte vody méně a nechte asi 4 hodiny odstát.
Pokud jste i zde na pochybách, můžete nechat
působit kratší dobu, surovina by mohla jinak
rozbřednout.
Dále je možné využít nápadů z kuchařských knih,
které nabízejí velké množství receptů v každé
zemi.
Rady a tipy:
Ovocné koláče a jiné cukrářské a pekařské
výrobky, chléb s kousky ovoce, borůvkové
zákusky, bohatá nabídka jako náhrada za
rozinky atd.
Kompoty k palačinkám nebo vaím, poma-
zánky na chlebíčky, dezerty, jablečné polevy
či omáčky atd.
Přísady do některých masových jídel a divo-
činy, chutneys (ostrá indická směs z ovoce,
bylinek, koření) atd.
Přísada do müsli, pudingů, jogurtů, šlehačky,
zmrzliny, ovocných salátů, koktejlů s alkoho-
lem atd.
Různé druhy ovoce lze kandovat nebo polévat
polevou, zcela podle fantazie. Banány se hodí
k mléčným nápojům a jako přísada do dětské
výživy, pokud jsou v sušeném stavu umleté
na prášek.
Různé druhy ovoce se dají zdokonalit přidá-
ním medu a ořechů. Lze také smíchat čerstvé
plody spolu s usušenými, předem namoče-
nými. Dle receptů je možné ovoce nasekat
nadrobno nebo nahrubo.
Zvláštní specialita z Himalájí je tzv. ovocná kůže,
která se připravuje z různých druhů kašovitého
ovoce za přidání medu, ořechů a koření. Vznik-
lá placka se pak nakrájí třeba na malé čtvereč-
ky, které se nechají usušit a ztuhnout. Hmota
se dá také naplnit, srolovat a lze z ní krájet řezy.
Z e l e n i n u doporučujeme před použitím vždy
namočit. Na 1 šálek sušené zeleniny přidejte
1šálek vody. Nedávejte víc vody než je potřeba
k přípravě celého pokrmu. Namočenou zeleninu
nenechávejte dlouho odstát.
Namočená zelenina potřebuje k uvaření
přibližně stejně dlouhou dobu jako zele-
nina mražená. Zeleninu do polévek, která
se suší nakrájená na nudličkym, nemusíte
předem namáčet. Sušenou zeleninu určenou
do polévek, omáček, zálivek na saláty atd.
můžete rozsekat v kuchyňském robotu na
požadovanou velikost a připravit směs.
K přípravě dětských pokrmů, krémových po-
lévek, omáček atd. je vhodné sušenou zeleni-
nu semlít. Do zásoby melte max. na 1 měsíc
dopředu, protože mletím se zkracuje trvan-
livost.
Sušenou zeleninu můžete po namočení bez
dalších úprav smíchat s čerstvě sklizenou.
Byliny rozemelte nebo rozemněte bezpro-
středně před použitím. Dávejte pozor, abyste
nepřidali tuhé stonky.
Houby namočte a použijte jako čerstvé. Do
polévek a omáček je vhodné část usušených
hub přidat i v rozemletém stavu.
Papriky a feferony je vhodné rozsekat nebo
rozemlít v kuchyňském robotu a uchovávat
jako koření ve vzduchotěsných sklenicích.
A na závěr ještě několik tipů:
zeleninová polévka Minestrone, jídla z jed-
noho hrnce, zeleninový a houbový guláš,
různé speciality mezinárodních kuchyní.
Vlastní směsi bylin, bylinkové čaje, bylinkové
oleje atd.
Celerová nebo česneková sůl (semlít usušenou
zeleninu a smíchat v poměru 1 : 1 se solí).
A spousty dalších nápadů můžete najít v ku-
chařských knihách.
Other manuals for BHG 601
3
Table of contents
Languages:
Other BIELMEIER Kitchen Appliance manuals
