Bioer GenePure Pro NPA-32P User manual

GenePure Pro
Nucleic Acid Purification System
NPA-32P
Users’ Manual
Han gz ho u Bioe r Tec h n o l og y Co. , Ltd .

Caution:
Hangzhou Bioer Technology Co., Ltd. reserves the right to modify this
manual at any time without notice.
This document contains proprietary information protected by copyright. All rights
reserved. Without prior written consent from Hangzhou Bioer Technology Co., Ltd., any
part of the manual shall not be duplicated, reproduced or translated into any other
languages.
Product Technical Requirements No.: Z. H. X. B. No. 20150371
Product record No.: Z. H. X. B. No. 20150371
Document No.:BYQ66260000000 SM
Document Version: July 2017, Version 1.0
Before the initial use of this instrument, please carefully
read this manual!

Operation Manual for Automatic Nucleic Acid Purification System
―I―
Important Notes
1 General Practice
Caution
:
Because of the important information in this column, please read it carefully. Failure to
follow the advice in this column will possibly result in damage or malfunctioning of
the machine.
2 Safety
During the operation, maintenance, or repair of the machine, the following safety measures should be
taken. Otherwise, the guard provided by the machine is likely to be damaged, the rated safety level to
be reduced, and the rated operation conditions to be affected.
Hangzhou Bioer Technology Co. Ltd. shall not be in any way responsible for the consequences
resulted from buyer’s not observing the following requirements.
a) Grounding Considerations
A.C. power’s grounding should be reliable for fear of an electric shock. The 3-pin plug with the
machine’s power line is a safety device that should be matched with a grounded socket. Never let the
third ground pin floating. If the 3-pin plug cannot be inserted, it is recommended to ask an electrician
to install an appropriate power socket.
b) Keep Away from Electric Circuits
The operator is not allowed to open the machine. Changing components or adjusting certain
parameters inside the device must only be accomplished by the certificated professional maintenance
personnel. Do not change elements while the power is still on.
c) A.C. Power Considerations
Before turn on the power, always check and insure that the mains voltage is within the required A.C.
100-240V and insure that the current rating load of the power socket meet the required specification.
d) A.C. Power Line Considerations
As an accessory of the machine, the A.C. power line should be a default one. If it is damaged, the A.C.
power line can not be repaired, but must be replaced with a new one. The power line should be free of
heavy objects during the machine’s operation. Keep the power line away from the place where people
ambulate frequently.
e) Connect the A.C. Power Line
While connect or disconnect the power line, you should hold the 3-pin plug with your hand. Insert the
plug thoroughly into the socket to ensure good contact between the plug and socket. Pull the plug, not
the line, when you need to disconnect to the mains.

Operation Manual for Automatic Nucleic Acid Purification System
―II―
f) Design Environments
The machine should be placed in a low-humidity, dust-free, and good-ventilation room without caustic
gas or powerful magnetic interference. In addition, water sources, such as pools and water pipes,
should be separated a distance from the machine.
Never cover or obstruct the openings of the machine, which are designed for ventilation and to prevent
the device’s interior from being too hot. When a single device is running, the shortest distance between
its openings and the nearest object is 25cm; otherwise, when two devices or above are running at the
same time, the shortest distance is 40 cm. Do not place the device on a soft surface, because that will
result in adverse ventilation near the device’s bottom openings.
Too high temperature will lead to degraded performance or failure of the machine. Therefore, the
device should be protected against any kind of heat sources like sunlight, ovens, or central heating
equipment.
If the machine is set aside for a long time, it is recommended to disconnect the power line to mains and
cover the device with a piece of soft cloth or plastic to prevent dust from entering.
Caution
:
Once one of the following events occurs, you are suggested to disconnect the power
line with mains, and contact the distributor or ask a certificated maintenance worker
for help.
Liquid into the device;
The device sprinkled or drenched;
The device malfunctioning, giving off abnormal sound or odor;
The device falling onto the floor or its shell damaged;
Significant changes in the device’s performance.
3WARRANTY AND SERVICE INFORMATION
a) Warranty
Hangzhou Bioer Technology Co., Ltd. is responsible for the replacement for failures caused by
material and manufacturing defects within 1 month after goods delivery.
Hangzhou Bioer Technology Co., Ltd. is responsible for maintenance of failures caused by material
and manufacturing defects within 12 months after goods delivery. Hangzhou Bioer Technology Co.,
Ltd. is responsible for selectively repairing and replacing instruments with confirmed defects within
warranty period.
Maintained products shall be sent to maintenance department designated by Hangzhou Bioer
Technology Co., Ltd. by the user. The freight incurred thereof shall be borne by the user. Hangzhou
Bioer Technology Co., Ltd. will bear the freight incurred by returning instrument. (For domestic users
only)
For maintenance out of warranty period, Hangzhou Bioer Technology Co., Ltd. will charge for certain
maintenance cost.
b) Warranty Terms
The above warranty is not applicable to defective devices with incorrect use, abnormal operating

Operation Manual for Automatic Nucleic Acid Purification System
―III―
conditions, improper application, and unauthorized maintenance or alteration.
Hangzhou Bioer Technology Co., Ltd. makes no express warranties other than those which are
described herein. Any descriptions in sales promotion under specific conditions shall not create an
express warranty that the goods shall conform to such description.
Caution
:
After unpacking, immediately check the goods against the packing list. In case of
damaged or missed goods, please immediately contact the supplier.
After qualification of acceptance, properly fill in the product acceptance sheet and send
(or fax) the copied sheet to the supplier for filing and maintenance.
After unpacking, the packing box and packing materials shall be well kept for future
repair. For the damage of instrument occurring during transporting to the repair
department due to improper package, Hangzhou Bioer Technology Co., Ltd. shall bear
no liabilities.
All upgrades of the equipment and software shall be operated by the engineer of the
manufacturer. Bioer company shall not be liable for any equipment failure caused by
unauthorized updates and modifications.
After-sale Service Hotline: +86–571-87774558

Contents
Chapter I Introduction............................................................................................................................1
1 Instrument Features.........................................................................................................................1
2 APPLICATIONS.............................................................................................................................. 1
Chapter II Features................................................................................................................................. 2
1. Normal Working Conditions........................................................................................................... 2
2. Transportation and Storage Conditions.........................................................................................2
3 Basic Parameters.............................................................................................................................. 2
4 Basic Performance............................................................................................................................3
5 Software Functions...........................................................................................................................3
Chapter III Preparations........................................................................................................................ 4
1 Structure Diagram............................................................................................................................4
2 Check before Startup....................................................................................................................... 5
3 Placement of 96 deep well plate...................................................................................................... 5
4 Startup............................................................................................................................................... 5
Chapter IV Operation Guide..................................................................................................................6
1 Upper computer operating interface.............................................................................................. 6
Chapter V Fault Analysis and Troubleshooting................................................................................. 17

Operational Manual of
Nucleic Acid Purification System
Hangzhou Bioer Technology Co., Ltd.
1
Chapter I Introduction
This chapter mainly introduces the features and applications of the instrument.
1 Instrument Features
This product adopts a magnetic bead extraction technology to extract and purify nucleic acid
through precision transmission and controlling step motor by single chip microcomputer. It has
features as follows: small volume, light weight, low noise, full-closed workaround; Embedded
real-time operating system; Transparent working chamber facilitating the observation of working
conditions; Large LCD panel, easy to operate. It has powerful functions such like door open protection,
ultra-limit position protection and alarm. It is safer and more reliable for use. It can be used to extract
DNA, RNA from whole blood, cells, and tissues and so on, so as to save time and labor.
2 Instrument Applications
This product can be used for separation and purification of nucleic acid in molecular biology
laboratory and clinical laboratory.
Operation Manual for Automatic Nucleic Acid Purification System
Hangzhou Bioer Technology Co., Ltd.
2
Chapter II Features
This chapter mainly introduces the usage, transportation and storage conditions of the instrument, as
well as its basic parameters, performance and functions.
1. Normal Working Conditions
Ambient temperature: 10C ~ 30C
Relative humidity: 20%-70% without condensation
Power supply: AC100-240V 50-60Hz
Caution:
Before power on, please confirm whether the working conditions meet the above
requirements. Pay special attention to the power line is reliably grounded.
2. Transportation and Storage Conditions
Ambient temperature: -20C+55C
Relative humidity: ≤80%
3 Basic Parameters
Model
Parameters
NPA-32P
Sample size
32pcs/time
Magnetic rod (fixed)
4×8 pcs
Sample range
20~1000μl
Magnetic bead collection
efficiency
>98%
Most suitable size of magnetic
beads
0.2~1.0μm
Overall dimensions mm
430*395*435 (L*W*H)
Net weight
32.5Kg

Operation Manual for Automatic Nucleic Acid Purification System
Hangzhou Bioer Technology Co., Ltd.
3
4Basic performance
Operating temperature: room temperature
Program storage: 20
5 Software functions
File edit, view, modify and delete functions
File run, pause, and stop functions
File import & export by U disk
Voice prompt function
Fault protection and alarm function
UV lamp on and timed off
Upgrade by U disk
Caution:
The above software features are for reference only. Bioer reserves the right to change
the software without notice.

Chapter III Preparations
This chapter mainly describes the structure, the functions of screen and keys on the screen, as well as the
preparations before the startup. Before the first operation of this instrument, please read this chapter carefully
and make sure you are familiar with the contents of this chapter.
1 Structure Diagram
Back view of full automatic nucleic acid extraction and purification system
⑤
①
②
③
④
⑥⑦
⑧
⑨

2 Check before Startup
The following contents should be confirmed before power on:
1 Whether the power supply meets the required voltage of the instrument;(see chapter 2 of this
document for power requirements)
2 Confirm that the power cord plug has been reliably inserted into the power socket;
3 Reliable grounding of power cord;
4 Whether the 96 deep well plates is in place.
3 Placement of 96 deep well plate
a)There are four heating blocks placed on each plate with a limit block on each side to assist in
positioning, and a spring plate on each side to help fix the 96 deep well plate.
b)Note: Make sure the 96 deep well plate is placed evenly before starting up.
4 Startup
Switch on the automatic nucleic acid purification system, and the instrument will conduct self-test.
Self-test takes about 10 seconds. Please wait patiently. If no problem is found in the self-test, the main
menu will appear on the screen, and then the user can edit, review, modify and delete files.
①Case Body
②Display
③Operating room
④Where 96 deep well
plate is placed
⑤Closing cover
⑥Power switch
⑦Standard power
outlet
⑧USB interface
⑨Sticker
Caution: The fuse seat is fitted with a fuse for which the requirement is: F 250V 6A 520.
Fuses must be replaced using products that meet the requirements. Contact the supplier or
manufacturer for fuses.
Chapter IV Operation Guide
This chapter explains in detail how to edit/review/modify/delete files, and how to run/stop files. It also
introduces the meaning of protection interface in the process of file running.
Warning!
If there is any abnormal sound or display after the instrument is switched on, or there is a
fault alarm during the instrument self-testing, please switch off the power immediately
and contact Bioer.
Ready? Let's get started!
1 Upper computer operating interface
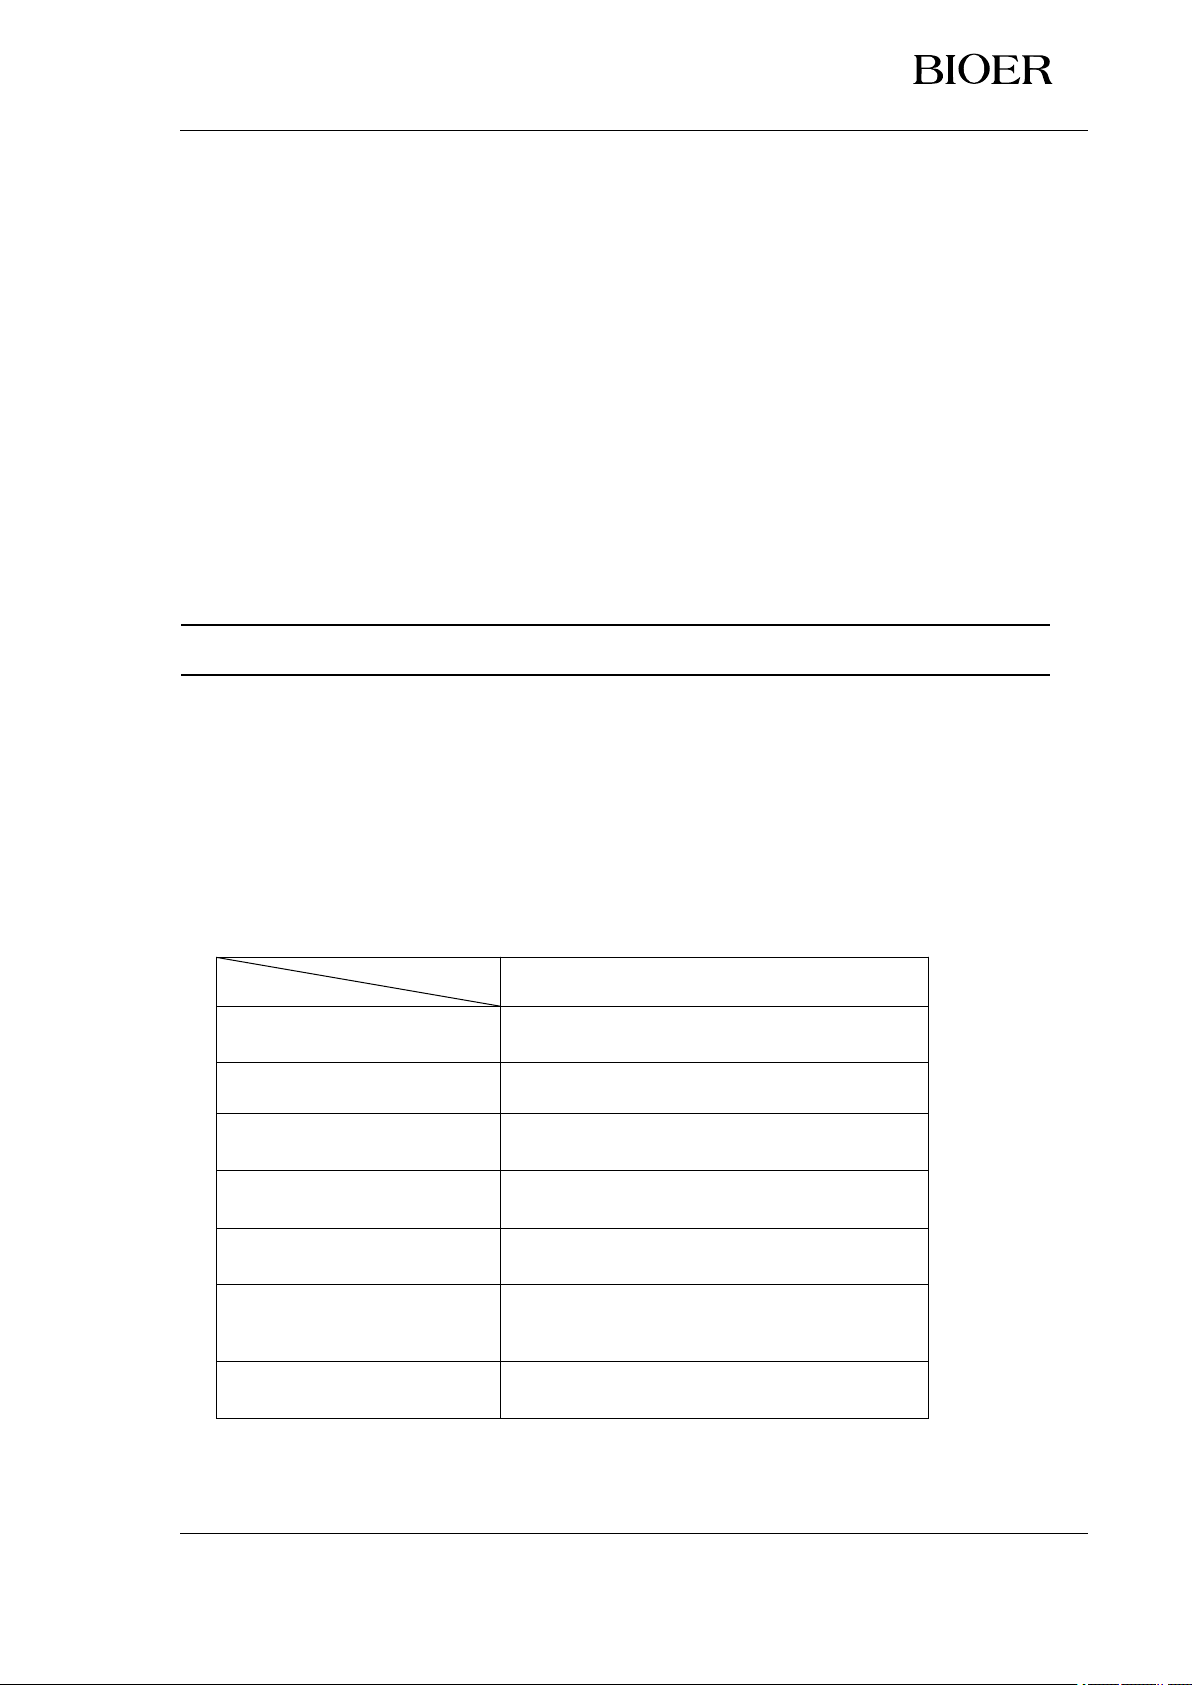
a. Operation main interface
After the system is started, enter the main interface of nucleic acid purification operation, which mainly
has the following functions: Run, New File, Ultraviolet Lamp and System Setting. The interface center displays
the operation state of the instrument. If the instrument is in operation state, click the icon of the center to further
check the detailed operation information. The followings are the idle and runtime main interfaces, respectively.

The bottom four function buttons from left to right are: Run, New File, UV Lamp, and
System Setting.
The middle operation status button and status information are displayed only when the
equipment is in running status. Press the Running button to enter the running state interface to
view the detailed information of the running state.
b. Run
Click run icon on the main interface to enter the file browsing interface. You will see buttons for browsing
menu selection on the left to select files, history or U disk files, information browsing in the middle, function
buttons in the bottom, and main interface icons in the upper left corner to return to the main interface. Select
different browsing menu items, the bottom function button and browsing information will be different.
The following figure shows the file browsing interface.
A list of stored files is in the middle, showing up to 9 files per page and totally 250 files. The current
selected file is displayed in white. Click the current selected file to enter the file editing interface.The page
information and page forward/back button is in the right; the function button is in the bottom, including Export,
Delete, New, Edit, and Run.
Export: Copy the selected file to the default u-disk directory (under the \pcrex\Bioer of u-disk directory).
Delete: Delete the selected file from the instrument.
New: After creating the default file, go to the file editing interface to edit the new file.
Edit: Go to the File Editing Interface to edit the current selected file.
Run: Run the selected file.
The following image shows the history browsing interface.

A list of 9 files that were last edited and run is in the middle. The current selected file is displayed in white.
Click the current selected file to enter the file editing interface. T the function button is in the bottom, including
Clear Record, Edit, and Run.
Clear: Clear history
Edit: Go to the file edit interface to edit the selected file
Run: Run the selected file
The following figure shows the U disk file browsing interface, which can only be displayed when the U
disk is inserted. If the U disk is not inserted, it prompts failure to detect the U disk.
In the center is the ".ebr "file list that conforms to the file name standard in the default directory of U disk
(under the \pcrex\Bioer of u-disk directory) (a legal filename consists of an English letter, a number, and an
underscore, and a filename that does not include a suffix is no longer than 12 characters long). The current
selected file is displayed in white. The page information and page forward/back button are in the right; the
function button is in the bottom, including the import.
Import: Copy the selected file to the instrument

c. New/edit file
User can create new file and edit file the following ways:
Click on the new file on the main interface.
Click on currently selected file of the device file browsing interface.
Click on New button of the device file browsing interface.
Click on Edit button of the device file browsing interface.
Click on the currently selected file on the history browsing interface.
Click on the Edit button in the history browsing interface.
In the center of the interface, all steps of the program are displayed, including well location, step name,
waiting time, mixing time, binding time, volume, mixing mode and binding mode.
Below steps interface are function buttons, including Add, Delete, Temperature, Previous Page, Next Page,
Save/Run; Upper left return and main interface icon are used to return to the previous interface or main
interface.
The currently selected step is displayed in a different color. Click on the unselected step column to select
the specified step. It can save up to 30 steps program, if there are more than 5 steps, the rest of steps are to be
paged by pressing the up/down button. Add or remove steps by clicking on Add or Remove buttons.
Click on the temperature button to display the temperature setting interface.

Set up the lysis temperature, temperature, lysis heating termination step and elution heating termination
step. After setting, click on ok to return to the file editing interface. If the change is to be waived, click on
Cancel.
By clicking on the selected step area, you will enter the step editing interface, as shown in the following
figure.
Set up well positions (1~6), liquid volume, waiting time, mixing mode and binding mode.
Click on the list box beside the name, and the name selection list will pop up.
It allows users to select the appropriate name in a pre-set list of step names to describe the action that the
step performs. See step name management section for how to add or remove preset step names.
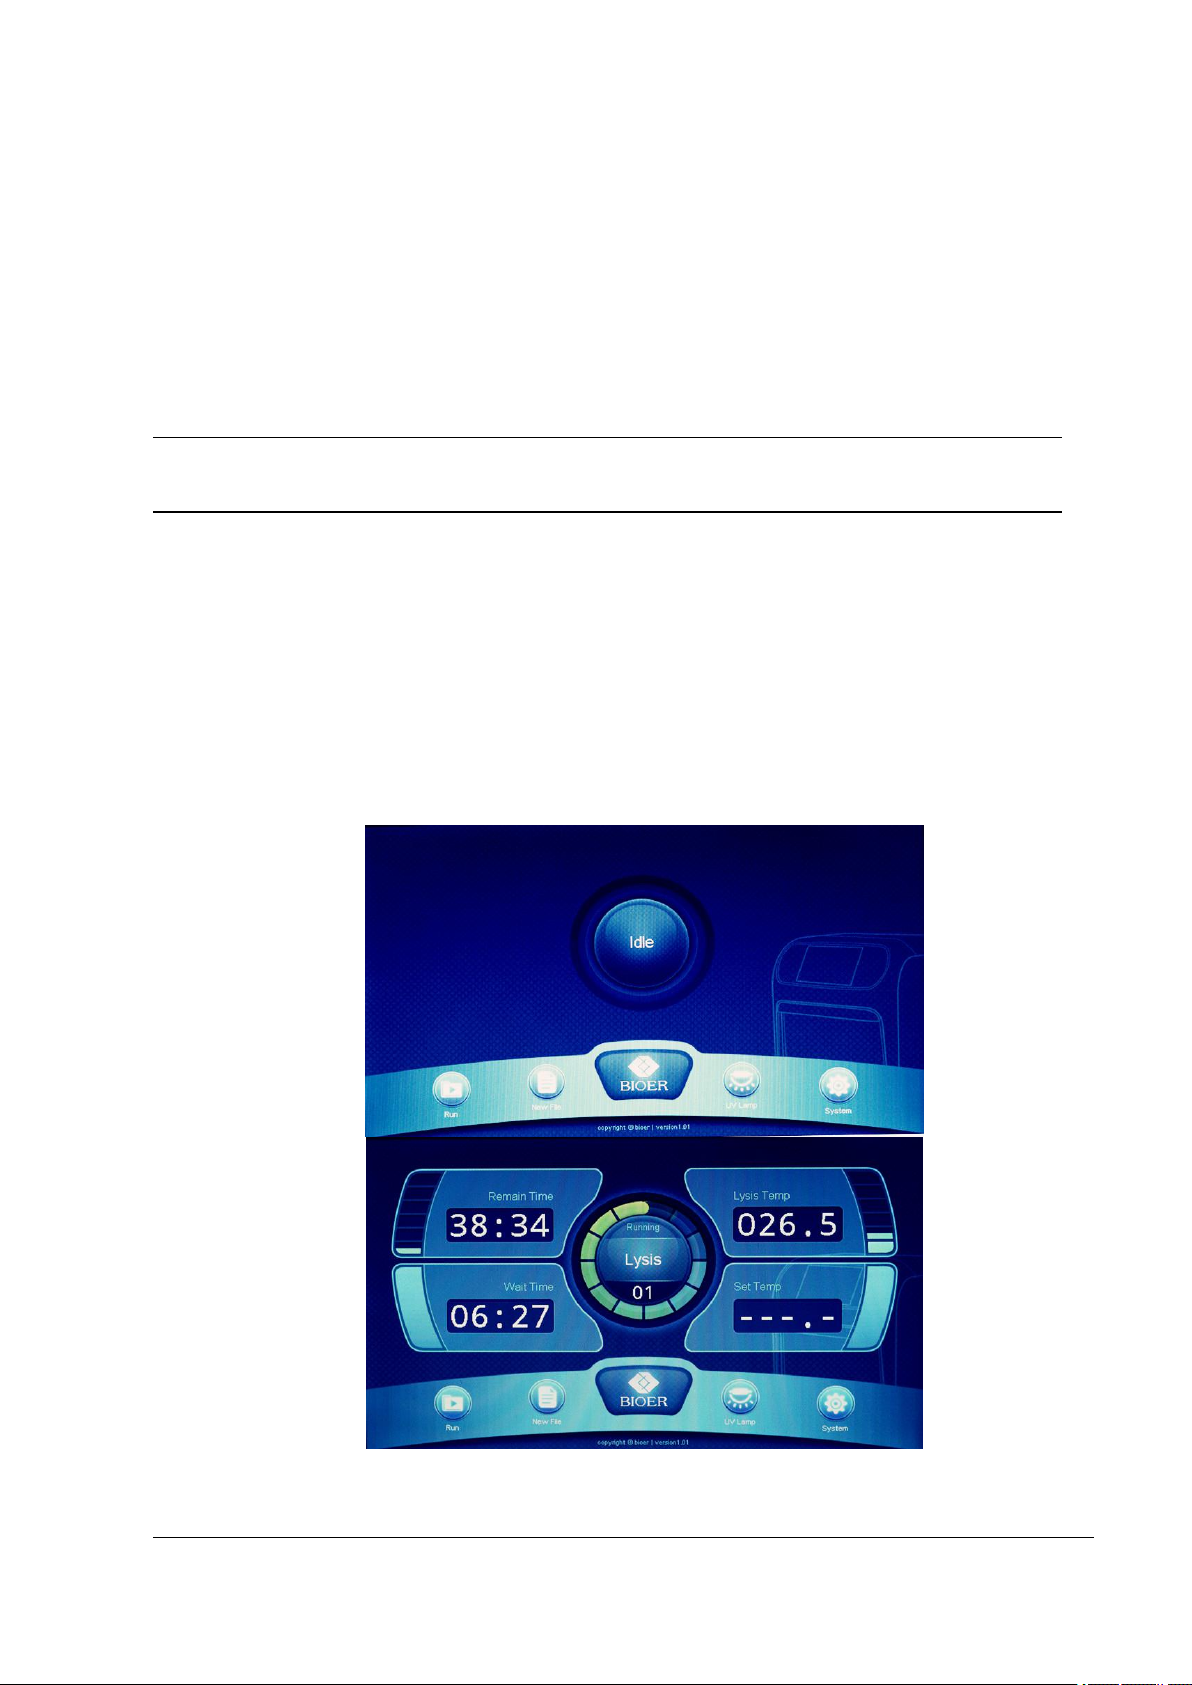
Click on the list box of mixing mode, and the mixing parameter setting will pop up.
The mixing parameter allows user to set up a mixing step for up to three periods. If the mixing step is not
to be used, set the time to 00:00. The mixing speed can be selected from the option list by clicking on the
mixing steps list. See the figure below.
Click on the list box beside the binding mode, and the binding parameter setting will pop up.
Click on the save/run icon to display the file save interface, as shown in the figure below.

A soft keyboard is available for inputting the file name. If the file does not want to be viewed, modified, or
run, you can enter a password.
Run: Run the current edited file.
Save: Save the current edited file.
d. Running files
After editing and saving the program, you can run the it in the following ways:
Click on Run button on the file browsing interface;
Click on Run button in the history browsing interface;
Click on Run button in the file save interface.
The lysis and elution temperatures are displayed on top of the running interface. The lower left side of the
interface shows the steps undergoing, including waiting time, mixing time, binding time, and remaining time.
The bottom right side of the interface shows the number of columns being heated. At the bottom is the function
button, including: Stop, Pause, Pause/Reset.
Stop: Stop the experiment.
Pause: Suspend the experiment.

Pause/Reset: Suspend the experiment and Raise the magnetic rods.
e. UV light setting
In the operation main interface, click ultraviolet lamp setting to enter the ultraviolet lamp setting interface.
After setting ultraviolet lamp turn-on time, click ok to turn to the ultraviolet lamp turn-on time set state
interface or click cancel button to return to the main interface.
f. System setting
Click on the system settings to enter the system settings interface in the operation main interface.
The 8 buttons in the middle correspond to 8 Settings entries. Click the button in the upper right corner to return
to the main interface.
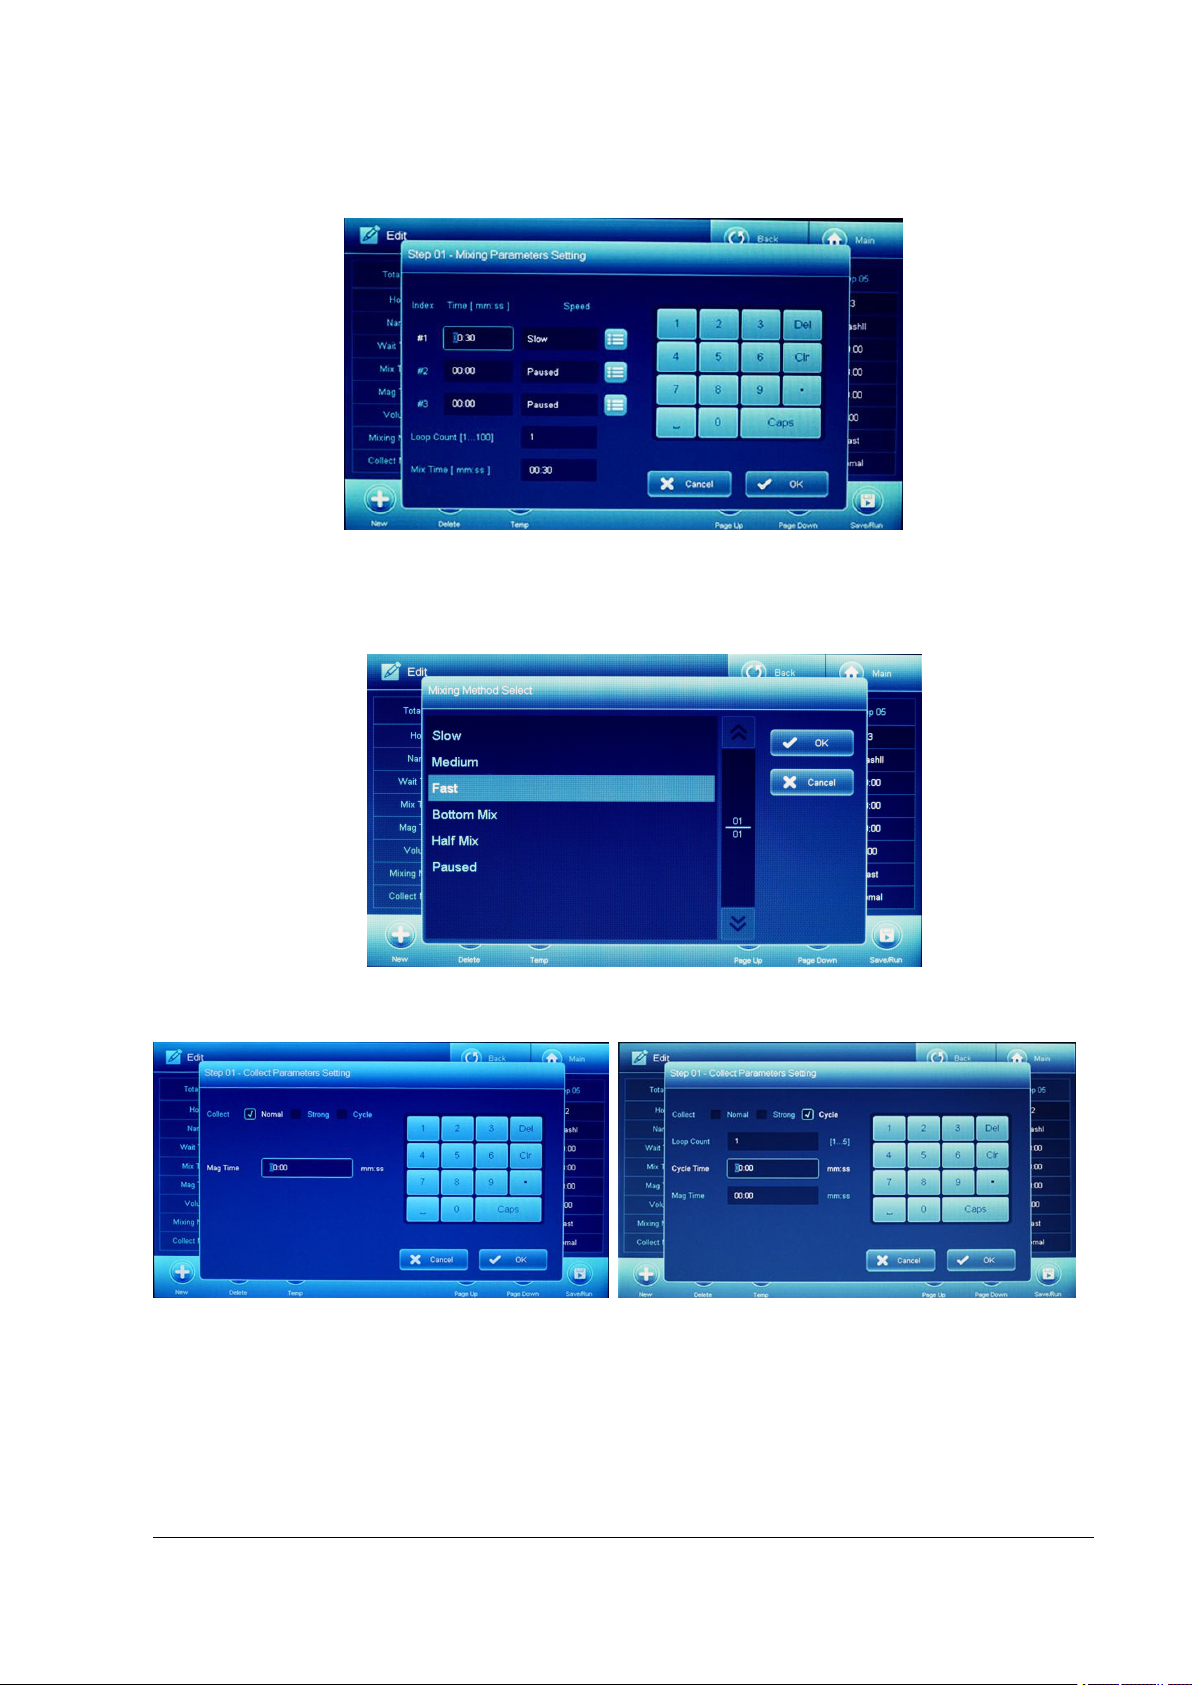
g. Date &Time
Click the Date & Time button in the system setting interface, enter the Date & Time setting interface, and
click ok or cancel button after setting time or date to return to the system setting interface.
h. Language selection
In the system settings interface click language into the language settings interface, select Chinese or
English, click OK or cancel button to return to the system settings interface.
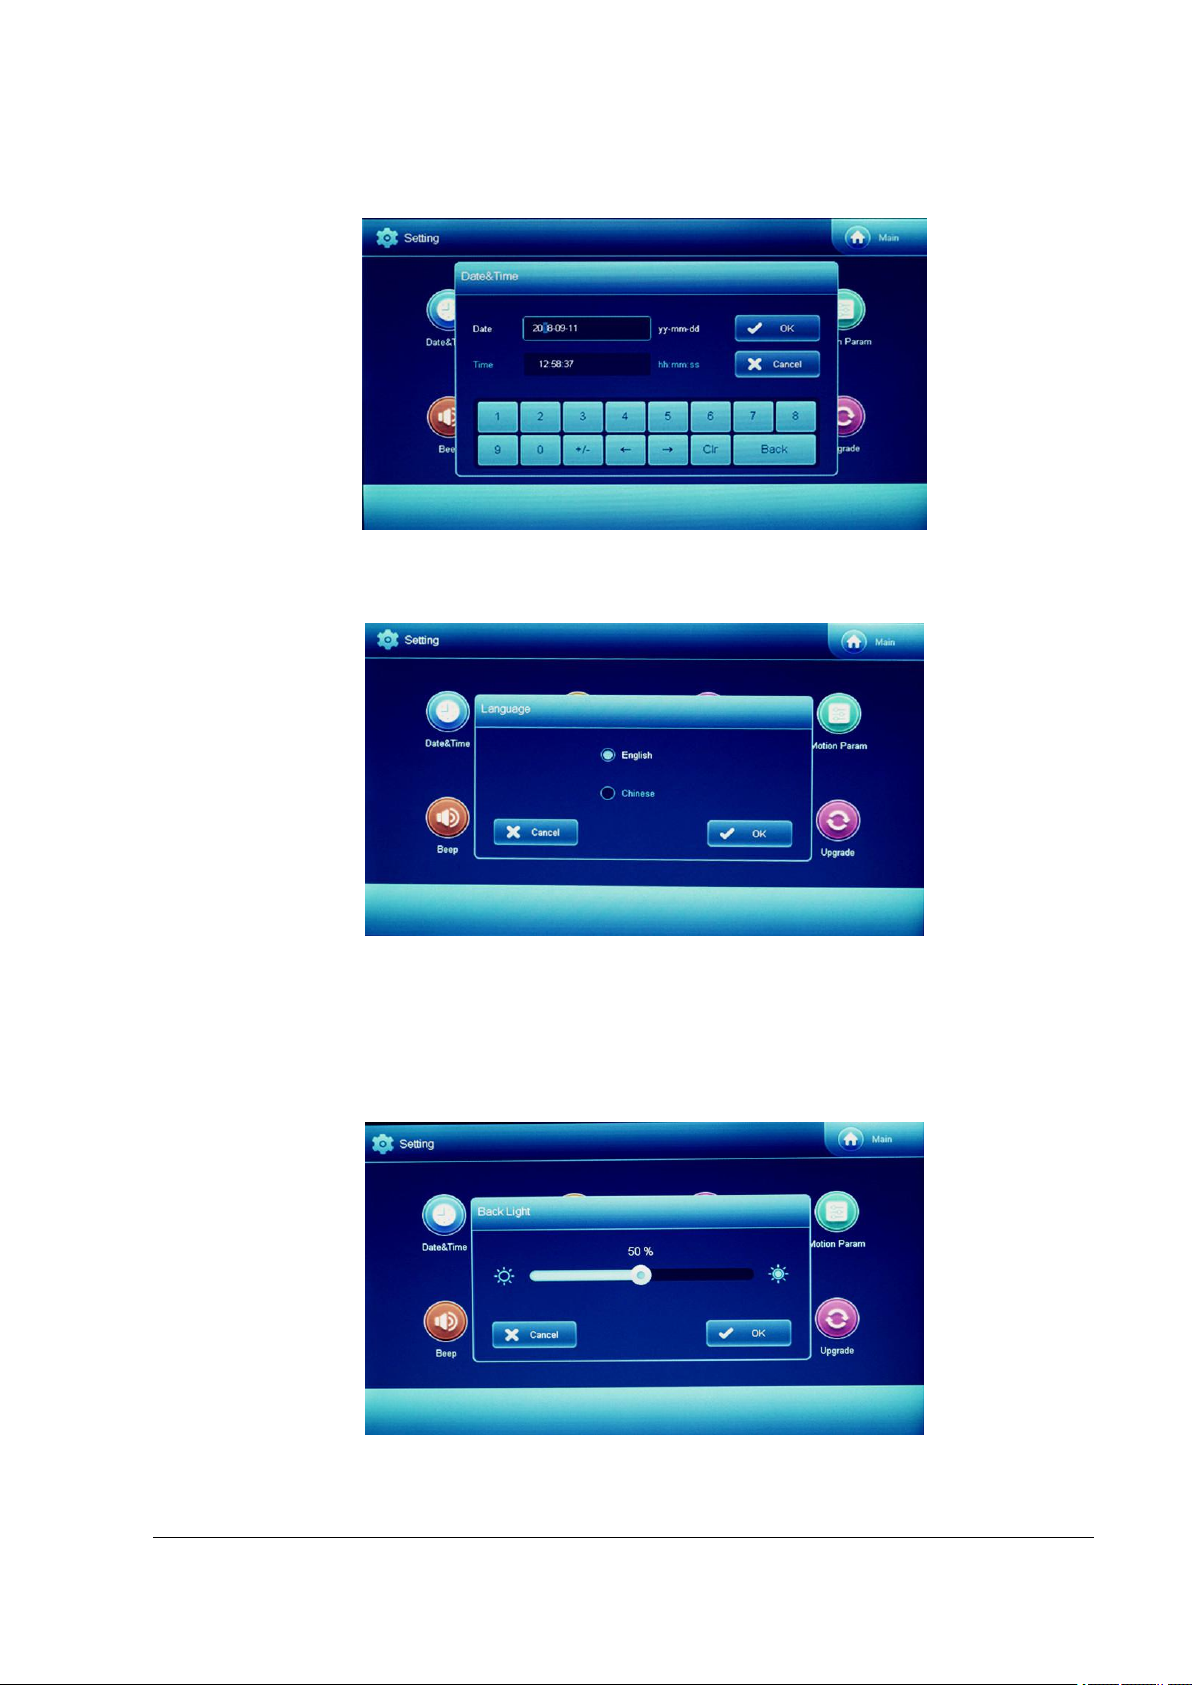
i. Backlight adjustment
Click backlight adjustment on the system setting interface to enter the backlight adjustment interface.
Turn up/down screen brightness by clicking and dragging the scroll bar, or by clicking certain spot in the
horizontal column to modify the position of the indicator sign, and then click ok or cancel to return to the
system setting interface.
Table of contents
Other Bioer Laboratory Equipment manuals


Popular Laboratory Equipment manuals by other brands


PolyScience
PolyScience MX07R-20 Operator's manual

Wassermann
Wassermann Polyquick 160-T120 user manual

Genetix
Genetix ClonePix FL Quick setup instructions

Thermo Scientific
Thermo Scientific Sorvall RC6 Plus instruction manual

Funke Gerber
Funke Gerber ColonyStar manual

NoiseKen
NoiseKen ESS-2000AX instruction manual


