BiOptic Qsep1-Lite User manual

BiOptic Inc.,
4F., No.108-3, Minquan Rd., Xindian Dist., New Taipei City 23141, Taiwan (R.O.C.)
www.bioptic.com.tw
Revolution
Qsep1-LiteOperation Manual
--- Hardware

2
Welcome
Thank you for purchasing Qsep™ Series single channel capillary electrophoresis
system. Now you can experience this high-performance, fully-automated and easy-
to-use system.
Copyright and Trademarks
Copyright © BiOptic Inc.
All rights reserved. Reproduction, adaptation, or translation of this manual is
prohibited without prior written permission of BiOptic Inc., except as allowed under
the copyright laws.
Qsep™ Series and Q-Analyzer™ are registered trademarks of BiOptic Inc.
Microsoft Windows is registered trademarks of Microsoft Corporation.
Product and company names listed are trademarks or trade names of their
respective companies.
Symbols of Qsep Series
Symbol
Description
CE mark for European Conformity.
FCC mark of the United States Federal Communications
Commission.
*FCC ID for RFID Module: 2AUQB

3
Contents
Welcome .............................................................................................................. 2
Copyright and Trademarks .................................................................................... 2
Symbols of Qsep Series........................................................................................... 2
Limitation of Liability ......................................................................................... 5
Applications of Qsep1-Lite ....................................................................................... 5
Packing List........................................................................................................... 5
Cautions ............................................................................................................... 7
1. System Overview...................................................................................... 9
1.1 Qsep1-Lite™ Instrument....................................................................................10
1.1.1 Qsep1-Lite™ Front View .................................................................................10
1.1.2 Qsep1-Lite™ Back View ...............................................................................11
1.1.3 Qsep1-Lite ™ Top View ................................................................................12
1.2 Qsep1-Lite ™Specifications........................................................................................ 12
1.3 System Requirements.............................................................................................. 13
2. Installation Instruction ...................................................................................14
2.1 Environment Requirements............................................................................14
2.2 Power Considerations ....................................................................................15
2.3 Hardware Installation.....................................................................................16
2.3.1 Qsep1-Lite™ Installation ..............................................................................17
2.3.1.1 System Unpacking...................................................................................17
2.3.1.2 System Installation ..................................................................................18
3. Cartridge Kit for Qsep1-Lite™...........................................................................21
3.1 Cartridge Type Recommendation.................................................................21
3.2 Cartridge Specifications................................................................................22
3.3 Cartridge Unpacking ....................................................................................25
3.4 Cartridge Calibration ...................................................................................26

4
4. Operation Instruction..............................................................................29
4.1 L1 High Resolution Cartridge Kit...........................................................29
4.2 L2 Standard Cartridge Kit......................................................................32
4.3 L3 Kilobase Cartridge Kit.......................................................................35
4.4 LR1 RNA Cartridge Kit..........................................................................38
4.5 LQ1 High Resolution Quantitative Cartridge Kit ...................................41
4.6 LQ2 Standard Quantitative Cartridge Kit..............................................44

5
Limitation of Liability
Qsep™ Series Bio-Fragment Analyzer, Q-Analyzer™software, and all related
reagents are designed for the use of electrophoresis analysis in general bio-
chemistry laboratory. If you use it for profit, diagnosis, or other non-research
purposes experiments, the company is not responsible for the accuracy and
reliability of the result and the safety of operation.
BEFORE ATTEMPTING TO OPERATE THE INSTRUMENT, READ ALL PRODUCT
MANUALS AND FOLLOW THE INSTRUCTIONS.
BiOptic Inc. assumes no liability whatsoever for any personal injury, property
damage, or other loss resulting from not complying or familiar with the manuals, or
improper operation of the devices.
Applications of Qsep1-Lite
Genetic Profile Screening
Amplified Fragment Length Polymorphisms
Bacterial/Viral Genotyping and Identification
PCR Product Analysis
Rapid Analysis of Genomic DNA Samples
Low concentration of sample detection
Total RNA Analysis
Packing List
Each Qsep1-Lite™Instrument package comes with the following:
Qsep1-Lite™CE Instrument
Qsep1-Lite™Standard and High resolution cartridge Kit (C105200-L)
Qsep1-Lite™Power Cord with Adapter
Ethernet Cable
Software Key (Basic edition)
Sample Trays (12 and 8 wells)
Qairbox Portable DC Air Pump
Qairbox Power Cord with Adapter
Installation Disc including Qsep1-Lite™Operation Manual

6
*Note: The Software key contains 8GB storage space, Q-Analyzer™for Qsep1-Lite
and Qsep™ Series Operation Manual, including Hardware version and Software
version.

7
Cautions
Qsep™ Series are capillary electrophoresis instruments driven by high voltage.
Carefully read and thoroughly comply with the following instructions to maintain the
integrity of the equipment, the reliability of results, and the safety of operation.
Keep Qsep™ Series away from other electronic device and voltage sources.
1. Only the components and consumables provided by BiOptic Inc. are
suggested to use.
2. DO NOT perform the following actions:
•Disassemble Qsep™ Series instrument and its associated parts
•Bumps or jolts to Qsep™ Series
•Move the instrument or remove any connected external equipment,
such as computers and air pumps, while Qsep™ Series are in action
•Open the sample door or cartridge door while Qsep™ Series are in
action
•Remove the cartridge while Qsep™ Series are in action
•Power off Qsep™ Series before confirming Qsep™ Series are inactived
3. Store the cartridge upright; do not lay the cartridge on a table horizontally
or place it upside down.
4. Store the cartridge in the calm-shell container (Cartridge needs to be
stored in a proper environment as the instructions of cartridge unpacking
guide to maintain its lifetime and quality).
5. Ensure the cartridge is placed at PARK position before shutting down or
disconnecting Qsep™ Series. Failure to do so will cause dryness of the gel at
the cartridge tip, which will damage the cartridge.
6. Before operating Qsep™ Series, ensure the sample tray is placed properly.
7. Ensure that the test sample, alignment marker, cartridge, and buffer have
been removed from the instrument before transporting or shipping.
8. Ensure that the main power of the instrument has been shut down and all
the test materials have been removed before cleaning Qsep™ Series .
9. User can also use N2 gas as an air source to ensure the air quality and
prevent damages to the devices caused by dirty air.
10. Make sure to press the plastic connection ring before pulling the air tube
out from the back of the instrument.
11. Release the condensation water in the external air pump periodically and
check water level before each use to avoid the mist damage the devices of
Qsep™ Series.

8
12. To cut off the power please disconnect the power plug.
13. Please use the MAINS power cord within adequate rating.
14. The conditions of transportation and storage: Temperature of-30 to +60°C
Humidity of 20 to 80% RH, non-condensing.
*Note: Strongly suggest performing this step whenever you start to operate
Qsep™Series.
Warning: Qsep™Series are high-voltage Single-channel electrophoresis
system. Please follow the operation manual and laboratory safety guidelines for
system operation. Do not remove covers. For operation and safety questions,
please contact BiOptic Inc. at the official website or with your local BiOptic
representatives.

9
1. System Overview
Qsep1-Lite™is a fully-automated CE system developed by BiOptic Inc., which uses
pen-shaped disposable gel-cartridges to improve experiment efficiency. Time-
consuming procedures such as gel preparation, sample loading, and capillary
changing are no longer required. Further, the experiment result will be obtained
easily with the fully- automated. Qsep1-Lite™is designed to accommodate 1 to 8
samples.
Qsep1-Lite™’s compact design helps you to set up and operate the instrument
intuitively. The disposable gel-cartridge with integrated pre-programmed test
method makes capillary electrophoresis experiments no longer a painful procedure
that requires well-trained operators. No more worries about operation and human
errors caused by different operators which affect the accuracy and reproducibility of
the results.
The following sections will describe the product overview, the functions of Qsep1-
Lite™instrument and the gel-cartridges. Please read through this section and get
ready to experience the power of Qsep1-Lite™.
Caution: The operator of this instrument is advised that if the equipment is
operated in a manner not specified in this manual, the protection provided by the
equipment may be impaired.

10
1.1 Qsep1-Lite™ Instrument
1.1.1 Qsep1-Lite™Front View
A. Indicator lamp
The green light LED will flash when turn on the power switch and when connect
to the software, the green light LED will breath.
B. Cartridge Door
C. Sample Door and Sample Tray

11
1.1.2 Qsep1-Lite™ Back View
A. Power Connector
B. Main Power switch
C. Air flow Inlet Port:
Connect to an external pump using an 1/8 inch tube.
D. Cable Port
Connect to a computer and the front green light LED will flash.

12
1.1.3 Qsep1-Lite ™ Top View
A. Cartridge door
1.2 Qsep1-Lite ™ Specifications
•Detection: Fluorescence
•Separation Voltage: 1~8 kV
•System Weight: 5.5kg
•Dimension: 24x 21x 30 cm
•System type: 1 channel portable system
•Sample capacity: 1~12 samples

13
1.3 System Requirements
Minimum
Recommended
OS
Windows 10 32 bit
Windows 10 64 bit
CPU
Intel Core i5
Intel Core i7
RAM
8G RAM
16G RAM
HDD
500 GB
1 TB
PORT
RJ45 x 1
RJ45 x 2
Screen Resolution
1280 x 800
1920 x 1080

14
2. Installation Instruction
A suitable operating environment is essential to ensuring the best performance of
Qsep™ Series.
2.1 Environment Requirements
⚫The optimal operating temperature of Qsep™ Series are 18°C~26°C (65°F ~78°F).
⚫The optimal operating humidity of Qsep™ Series are 40%~95% RH, non-
condensing.
⚫The operating altitude of Qsep™ Series are -20m~2000m (-65ft~6500ft).
For proper capillary electrophoresis operation, do not place Qsep™ Series on a
vibrating surface or near vibrating objects. For convenient access for loading and
installation, it is recommended to leave approximately 711 mm (28 inches) clear
space above the counter space or table. Allow approximately 76 mm (3 inches) of
clear space at the rear and to the side of the instrument for proper air ventilation
and electrical connections.
Warning: Do not store, transport, or use Qsep™ Series under conditions which
the temperature fluctuation could cause water condensation inside the instrument.
Condensation may damage electronic devices of the instrument. If the instrument
was transported in cold weather, do not remove the instrument from its original box
immediately because it might cause condensation. Make sure Qsep™ Series have
been warmed up inside the original box before you start unpacking.

15
2.2 Power Considerations
The input voltage of Qsep1-Lite™instrument is 12V DC, and the maximum power is
80W. A suitable power adapter with cord, MEAN WELL GSM90B12-P1M, is included
in the package (100~240V AC, 50~60Hz). The dimensions are
24cm(L)*21cm(W)*30cm(H) and weight of the instrument is 5.5Kg. Connect the air
source within the range of 50psi~65psi.
*Note: Use a surge protector outlet for both Qsep series and the computer to avoid
electromagnetic interferences and damages to the inner electrical devices.

16
2.3 Hardware Installation
Place Qsep1-Lite™instrument on a stable platform, and ensure it is away from water
and any other high-power electronic devices.Qsep1-Lite™need to be operated in a
clean and well-ventilated environment. Remove the power adapter from the
package and attach it with a suitable power cord.
When using the portable air pump as the air source, please pay attention to the
condensation water that might develop inside the portable air pump. If this occurs,
be sure to release the condensation water before using Qsep1-Lite™. If you need to
continuously operate Qsep1-Lite™, check the air pump every 12 hours to avoid the
mist of condensation water damaging the devices of Qsep1-Lite™.
Prepare a computer with Windows operation system (i.e. Windows 10) and install
the operation software, Q-Analyzer™ for Qsep1-Lite™. Qsep1-Lite must use ethernet
cable to connect the computer for the following operation. User should use the
cable to connect the instrument with the computer. Turn on the power, wait 25
second for initialization (Green light flashing). After checking all connections, you are
ready to start using Qsep1-Lite™.

17
2.3.1 Qsep1-Lite™ Installation
2.3.1.1 System Unpacking
18
2.3.1.2 System Installation
Follow the instructions below to install Qsep1-Lite system
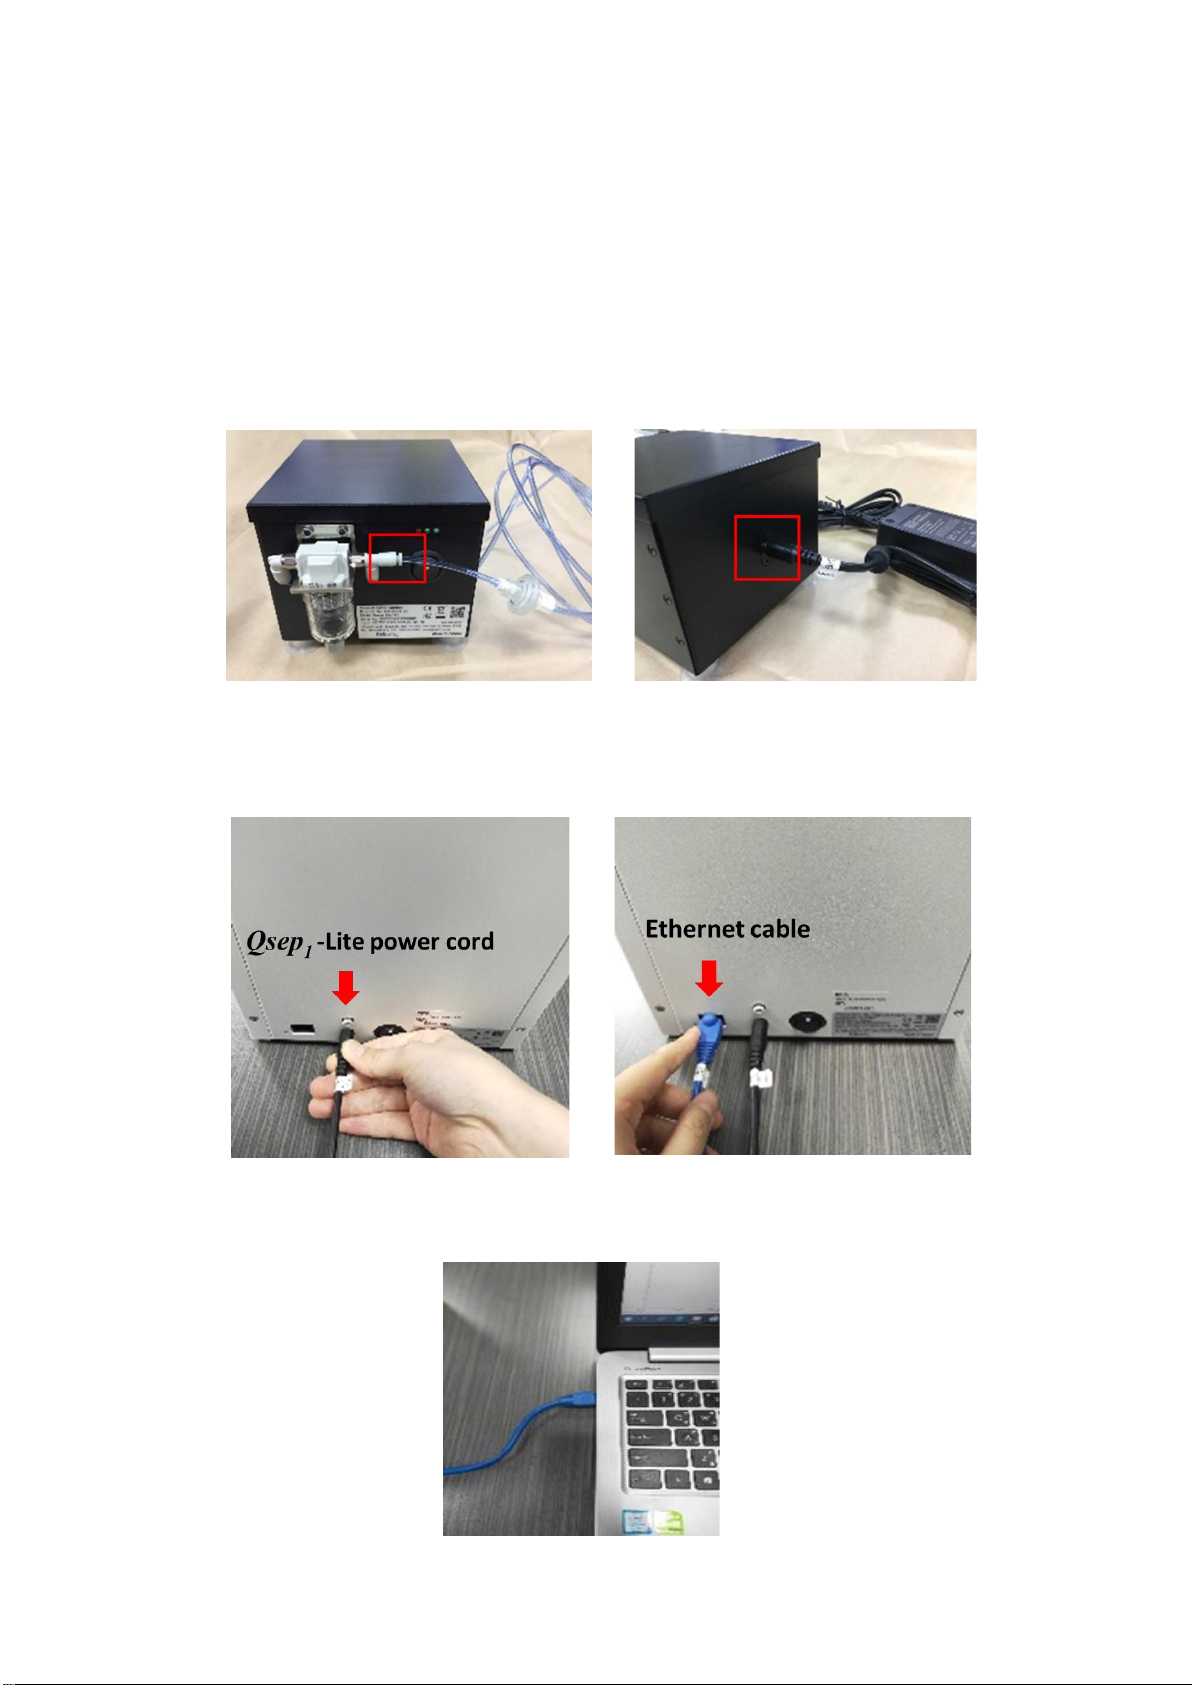
1. Unpack Qairbox. and tighten the air tube with connector and plug power cord
into Qairbox.
* Please check the Qairbox label on the power cord.
2. Unpack Qsep1-Lite. Plug the power cord and Ethernet cable into Qsep1-Lite.
* Make sure the label on the power cord is Qsep1-Lite.
3. Connect the other side of Ethernet cable to the operation computer.
19
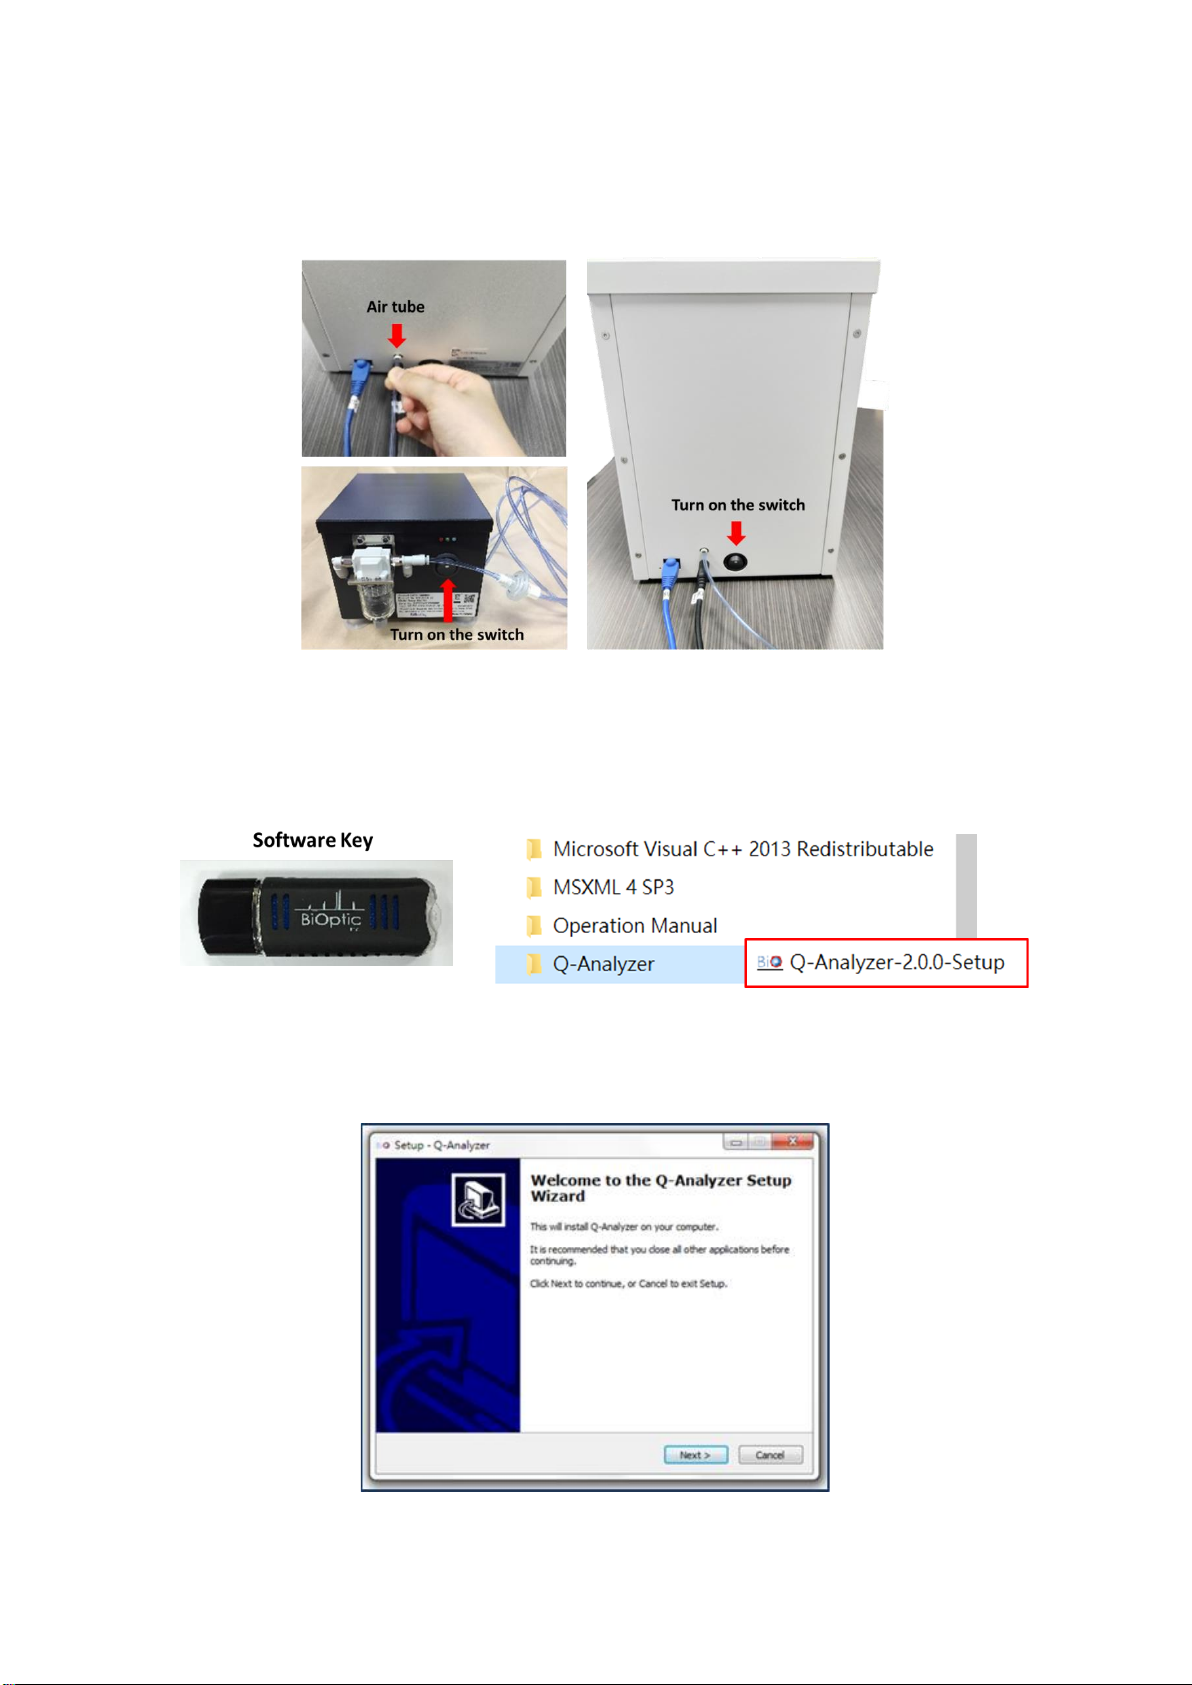
4. Plug another side of air tube into Qsep1-Lite. Turn on the Qairbox and Qsep1-Lite.
5. Insert the software key to the computer. Double click on “Q-Analyzer for Qsep1-
Lite-Setup.exe” in the Q-Analyzer folder to install the software.
*Please install the newest software.
6. Follow the setup wizard to do the installation.
*Register software key
20
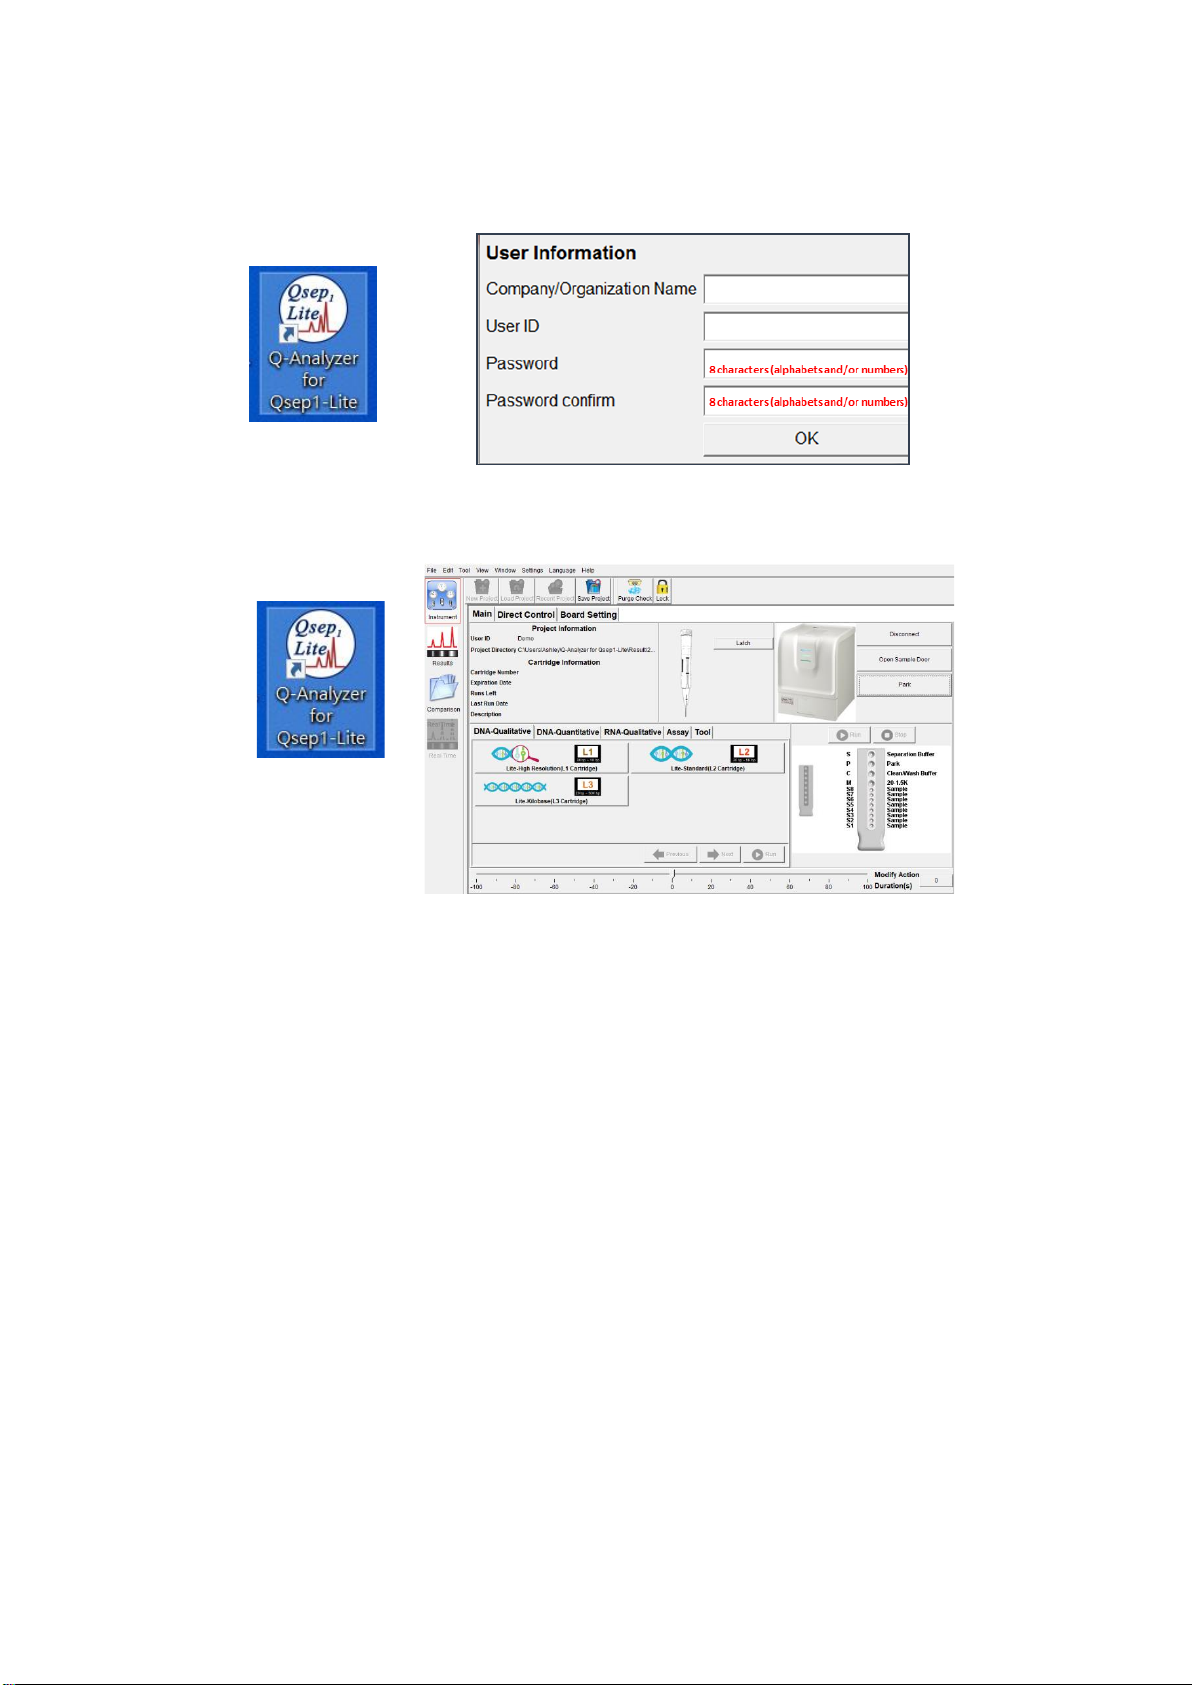
Double click “Q-Analyzer for Qsep1-Lite” icon to open the software. Fill in the user information (set
the password as 8 to 12-character password) and click OK.
7. Double click “Q-Analyzer for Qsep1-Lite” to open the software.
*Computer must be connected with Qsep1-Lite by Ethernet cable or with software key inserted.
8. The software will connect to the instrument automatically.
Qsep1-Lite is ready to use
Table of contents
Other BiOptic Laboratory Equipment manuals


Popular Laboratory Equipment manuals by other brands

Bioer
Bioer GeneExplorer GE-96G Instructions for use

BPC instruments
BPC instruments BPC Blue Operation and maintenance manual

Radia
Radia 5995 Agitar owner's manual

Molecular Devices
Molecular Devices QPix 450 user guide

MRC
MRC DFO-720 Operation manual

Fisher Scientific
Fisher Scientific SterilElite24 user manual


Scinomix
Scinomix SCI-PRINT SOLO user guide

BD
BD CSampler Plus installation guide

Fisher Scientific
Fisher Scientific 150 Homogenizer user manual

Oxford Instruments
Oxford Instruments ANDOR iVac Series Hardware guide

Bright Instruments
Bright Instruments 2212 Starlet manual

Buchi
Buchi ProxiMate Operation manual