BMC 20S User manual

Sleep Apnea Therapy Device and Accessories
RESmart BPAP System
20S/20A/25/25A Model
User Manual
0123

RESmart BPAP 20S/20A/25/25A User Manual V2.2
Table of Contents
1. Introduction ............................................................................................................ 1
1.1 System Contents........................................................................................... 1
1.2 Intended Use................................................................................................ 1
1.3 Warnings, Cautions and Contraindications....................................................... 2
1.3.1 Warnings.......................................................................................... 2
1.3.2 Cautions........................................................................................... 3
1.3.3 Contraindications .............................................................................. 3
1.4 System Overview .......................................................................................... 3
1.5 Glossary....................................................................................................... 5
1.6 Symbol Key .................................................................................................. 6
1.6.1 Control Buttons................................................................................. 6
1.6.2 Device ............................................................................................. 6
2. Device Controls and Displays .................................................................................... 7
3. First Time Setup ...................................................................................................... 8
3.1 Installing the Filter........................................................................................ 8
3.2 Connecting the Breathing Circuit .................................................................... 8
3.2.1 Assembling the Breathing Circuit ........................................................ 8
3.2.2 Adjusting the Breathing Circuit........................................................... 9
3.3 Connect the Power Cord................................................................................ 9
4. Device Operation ................................................................................................... 10
4.1 Starting the Device ..................................................................................... 10
4.2 Using the Ramp Button ............................................................................... 10
4.3 Turning the System OFF .............................................................................. 10
4.4 Change Device Settings............................................................................... 11
5. Troubleshooting ..................................................................................................... 14
6. Accessories ........................................................................................................... 15
6.1 Adding a Humidifier .................................................................................... 15
6.2 Adding Oxygen ........................................................................................... 15
7. Routine Maintenance.............................................................................................. 16
7.1 Cleaning the Filter....................................................................................... 16
7.2 Cleaning the System.................................................................................... 16
7.3 Disinfection of the Humidifier Water Chamber ............................................... 16
7.4 Reordering.................................................................................................. 16
7.5 Traveling with RESmart................................................................................ 17
7.6 Security Stations ......................................................................................... 17
7.7 Checking the Power Cord............................................................................. 17
8. Specifications ........................................................................................................ 17
Appendix A: EMC Requirements .................................................................................. 19
Limited Warranty ....................................................................................................... 24

RESmart BPAP 20S/20A/25/25A User Manual V2.2
1 / 24
1. Introduction
1.1 System Contents
After unpacking the system, make sure you have everything shown here (Different models of
the product contain different components):
No.
Item
Qty.
Notes
1
RESmart BPAP 20S/20A/25/25A
1
2
InH2 Heated Humidifier
1
Optional
3
Power Cord
1
4
Carrying Case
1
5
User Manual
1
6
SD Card
1
Optional
All parts and accessories are not made with natural rubber latex.
The product’s service life shall be five years if the use, maintenance, cleaning and
disinfection are in strict accordance with the User Manual.
IMPORTANT!
• If any of the above parts are missing, contact your home care provider.
Note: If your system includes a humidifier, you will receive additional items with your
package. See the instructions included with your humidifier for more information.
1.2 Intended Use
The RESmart BPAP System is a Bi-level Positive Airway Pressure device, which is intended to
provide non-invasive ventilation for patients with obstructive sleep apnea (OSA), either in the
hospital or at home.
The RESmart BPAP 20S/20A/25/25A is to be used only on the instruction of a licensed health
care professional. Your home care provider will make the correct pressure settings according
to your health care professional’s prescription.
Several accessories are available to make your OSA treatment with the RESmart BPAP
20S/20A/25/25A as convenient and comfortable as possible. To ensure that you receive the
safe, effective therapy prescribed for you, use only BMC accessories.
The RESmart BPAP 20S/20A/25/25A is only used for single patient and must not be re-used
on another person. This is to avoid the risk of cross-infection.
IMPORTANT!
• Read and understand the entire user manual before operating this system. If you have any
questions concerning the use of this system, contact your home care provider or health care
professional.
Adverse Effects
You should report unusual chest pain, severe headache or increased breathlessness to your
physician. An acute upper respiratory tract infection may require temporary discontinuation
of treatment.
The following side effects may arise during the course of therapy:
• drying of the nose, mouth or throat
• bloating
• ear or sinus discomfort

RESmart BPAP 20S/20A/25/25A User Manual V2.2
2 / 24
• eye irritation
• mask-related skin irritations
• chest discomfort
1.3 Warnings, Cautions and Contraindications
1.3.1 Warnings
A warning indicates the possibility for injury to the user or the operator.
WARNINGS!
• The instructions in this manual are not intended to supersede established medical
protocols.
• This device is intended for adult use only.
• This device is not intended for life support.
• Images shown here are indicative only. If there is inconsistency between the image and
actual product, the actual product shall govern.
•Do not bring the device or accessories into a Magnetic Resonance (MR) environment as it
may cause unacceptable risk to the patient or damage to the device or MR medical devices.
The device and accessories have not been evaluated for safety in an MR environment.
•Do not use the device or accessories in an environment with electromagnetic equipment
such as CT scanners, Diathermy, RFID and electromagnetic security systems (metal
detectors) as it may cause unacceptable risk to the patient or damage to the device. Some
electromagnetic sources may not be apparent, if you notice any unexplained changes in the
performance of this device, if it is making unusual or harsh sounds, disconnect the power
cord and discontinue use. Contact your home care provider.
• BPAP devices have the potential to allow rebreathing of exhaled air.
To reduce this potential, observe the following:
- Use BMC circuit accessories.
- Do not wear the mask and headgear for more than a few minutes while the device is not
operating.
- Do not block or try to seal the vent holes in the exhalation port.
As with most BPAP devices: At low BPAP pressures, some exhaled gas (CO2) may remain in
the mask and be rebreathed.
• If the room temperature is warmer than 95˚F (35°C ), the airflow produced by the RESmart
device may exceed 106˚F (41°C ). The room temperature must be kept below 95˚F (35°C )
while the patient uses the device.
• This equipment is not suitable for use in the presence of a flammable anaesthetic mixture
in combination with oxygen or air, or in the presence of nitrous oxide.
• If you notice any unexplained changes in the performance of the RESmart BPAP
20S/20A/25/25A, if it is making unusual or harsh sounds, if it has been dropped or
mishandled, if the enclosure is broken, or if water has entered the enclosure, disconnect the
power cord and discontinue use. Contact your home care provider.
• To avoid electrical shock, disconnect the power cord before cleaning and maintenance. DO
NOT immerse the device in any fluids.
• Contact your health care professional if symptoms of sleep apnea recur.
• Using the RESmart BPAP 20S/20A/25/25A at an incorrect elevation setting could result in
airflow pressures higher than the prescribed setting. Always verify the elevation setting when
traveling or relocating.
•Please contact BMC to buy the SD card if you need it.

RESmart BPAP 20S/20A/25/25A User Manual V2.2
3 / 24
1.3.2 Cautions
Caution indicates the possibility of damage to the device.
CAUTIONS!
• Tobacco smoke may cause tar build-up within the RESmart BPAP 20S/20A/25/25A that
may result in the RESmart BPAP 20S/20A/25/25A malfunctioning.
• This device is restricted to sale by or on the order of a physician.
•If you are using a SD card, make sure that the SD card is properly inserted into the device
before it is powered on.
•In order to avoid impairing SD card or the data saved in it, please do not insert or pull out
the SD card when the device is connected to a power source.
•The patient is an intended operator.
•Cleaning and disinfection can be performed by the patient.
•The device should not be placed in the place where it is difficult to disconnect the power
cord.
•When the device reaches the end of its service life, dispose of the device and packaging in
accordance with local laws and regulations.
•Unplug the power cord can be completely disconnected with the Reachctrl Power.
•Do not pile up the long tubing at the head of the bed, as it may wrap around the head or
neck of the patient during sleep.
•Please use the mask which meets ISO 17510:2015.
Additional warnings and cautions are located throughout this manual as they apply.
1.3.3 Contraindications
The BPAP should not be used if you have an insufficient respiratory drive to endure brief
interruptions in non-invasive ventilation therapy. The BPAP is not a life support ventilator and
may stop operating with power failure or in the unlikely event of certain fault conditions.
If you have any of the following conditions, tell your doctor before using the BPAP:
• acute sinusitis or otitis media.
• conditions predisposing to a risk of aspiration of gastric contents.
• epistaxis causing a risk of pulmonary aspiration.
• hypotension or significant intravascular volume depletion.
• Inability to maintain a patent airway or adequately clear secretions.
• pneumothorax or pneumomediastinum.
• recent cranial trauma or surgery.
1.4 System Overview
Air Outlet
Display Screen
Handle
User Buttons
Humidifier Controller
Humidifier Power
·
Power Indicator
RESmart BPAP 20S/20A/25/25A User Manual V2.2
4 / 24
Handle:
This handle is for lifting up the system.
Display Screen:
All system settings, total operating time, and therapy hours will appear
here.
User Buttons + / -:
These buttons can be used to turn on / off the system and change
some of the system settings.
Power Indicator:
When the device is connected to the power supply, the green indicator
lights up.
Humidifier Controller:
This controller turns the InH2 heated humidifier on / off and allows
the heat setting to be adjusted. The humidifier is an optional accessory that may be
purchased separately.
Air Outlet:
Connect the flexible tubing (coaxial 22 mm) here.
Humidifier Power:
This socket provides the power to the InH2 heated humidifier.
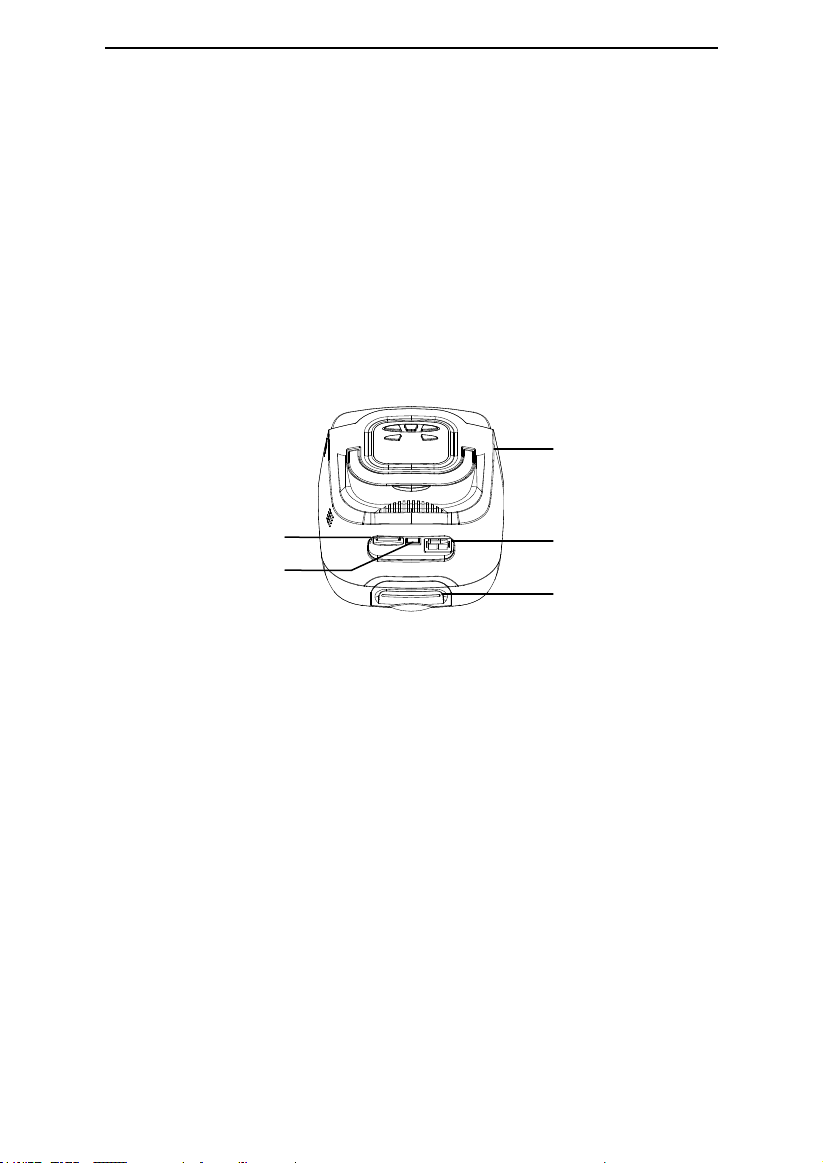
Medical Product Note:
For ease at airport security stations, there is a note on the bottom
of the RESmart BPAP 20S/20A/25/25A stating that it is medical equipment. It may help if you
also take this manual with you when you travel.
AC Inlet:
Connect / disconnect the AC power cord here.
SD Card Slot:
Used to insert the SD card. As a memory medium, the SD card can record
and save all patient treatment data.
Communication Connector:
For clinical use with the Data Management Software.
Connect the communications cable here (This port is for professional maintenance personnel
only, and is not allowed to connect to other devices).
Filter Cap & Filters:
The foam filter screens out normal household dust and pollens. The
filter cap is designed to reduce the noise from the RESmart BPAP 20S/20A/25/25A.
Medical Product
Note (bottom)
AC Inlet
Communication Connector
Filter Cap & Filters
SD Card Slot

RESmart BPAP 20S/20A/25/25A User Manual V2.2
5 / 24
1.5 Glossary
The following terms appear throughout this manual:
Apnea:
A condition marked by the cessation of spontaneous breathing.
Auto S:
A bi-level mode which responds to both your inhalation and exhalation. The
differential pressure of IPAP and EPAP are presetted by home care provider. While working in
auto feature, the device will automatically adjust the IPAP and EPAP if it detects a sleep
apnea.
Backup RR:
Backup Respiration Rate.
BPM:
Breaths Per Minute.
CPAP:
A mode which the device output a constant positive pressure ignoring your inhalation
or exhalation.
EPAP:
Expiratory Positive Airway Pressure.
IPAP:
Inspiratory Positive Airway Pressure.
LED:
Light Emitting Diode.
OSA:
Obstructive Sleep Apnea.
Ramp:
A feature that may increase patient comfort when therapy is started. The ramp
feature reduces the pressure and then gradually increases (ramps) the pressure to the
prescription setting, so you can fall asleep more comfortably.
Rise Time:
The time it takes for the device to change from EPAP to IPAP. You can adjust this
time for your comfort.
RR:
Respiratory Rate. Number of breaths per minute.
S (Spontaneous):
A bi-level mode which responds to both your inhalation and exhalation
by increasing pressure when you start to inhale and decreasing pressure when you start to
exhale. There is no automatic delivery of a breath you do not inhale. IPAP (Inspiratory
Positive Airway Pressure) and EPAP (Expiratory Positive Airway Pressure) are preset by home
care provider. When the apnea is longer than 10 seconds, the device will start Backup
Respiration Rate with a frequency of 10 times per minute to support respire.

RESmart BPAP 20S/20A/25/25A User Manual V2.2
6 / 24
1.6 Symbol Key
1.6.1 Control Buttons
Pressure Start / Stop Button
Ramp Button
Heated Humidifier Button
User Button
User Button
1.6.2 Device
Follow Instructions for Use
Type BF Applied Part (mask)
Class II (Double Insulated)
AC Power
IP21
≥ 12.5 mm Diameter, Drip-Proof, Vertical
Serial Number of the Product
Manufacturer
EC REP
Authorized Representative in the European Community
European CE Declaration of Conformity

RESmart BPAP 20S/20A/25/25A User Manual V2.2
7 / 24
2. Device Controls and Displays
Display Screen:
All device settings will appear here.
Pressure Start / Stop Button :
Use this button to start / stop the airflow. DO NOT start
the airflow until the circuit tubing is connected.
Heated Humidifier Button :
Use this button when the optional InH2 Heated
Humidifier has been prescribed. This button will control the optional heated humidifier’s
output. Follow the instructions of the humidifier.
Ramp Button :
When the device works under CPAP mode and the airflow is turned on,
use this button to restart the ramp cycle (which lowers the airflow pressure and then
gradually increases it). This will allow you to fall asleep more comfortably. When the airflow
is turned off, use this button to access the patient menu.
Note: The ramp feature is not
prescribed for all users.
User Buttons + / -:
These buttons can be used when entering various menus to change
some of the RESmart BPAP 20S/20A/25/25A settings.
IMPORTANT!
• In the Setup Menu, the User Buttons + / - are used to go to the previous / next question
or setting and operate as up and down keys to change the settings, the Ramp Button
is used to confirm the setting change, and the Pressure Start / Stop Button will allow
you to exit the Setup Menu without saving.
Display Screen
User Button
User Button
Heated Humidifier Button
Ramp Button
Pressure Start / Stop Button

RESmart BPAP 20S/20A/25/25A User Manual V2.2
8 / 24
3. First Time Setup
WARNING!
• Do not use the RESmart BPAP 20S/20A/25/25A until an appropriate professional adjusts
the settings! To order any accessories not included with this system, contact your home care
provider.
Note to home care provider: Before beginning setup, be sure that you have available the
RESmart BPAP 20S/20A/25/25A Home Care Provider Setup Instructions. Setup instructions
are not provided in this manual.
WARNING!
• Do not connect any equipment to the RESmart BPAP 20S/20A/25/25A unless
recommended by BMC or your health care provider.
WARNING!
• Do not connect the device to an unregulated or high pressure oxygen source. The pressure
of oxygen source does not exceed the work pressure of the device.
CAUTION!
• If the RESmart BPAP 20S/20A/25/25A has been exposed to either very hot or very cold
temperatures, allow it to adjust to room temperature (approximately 2 hours) before
beginning setup.
3.1 Installing the Filter
CAUTION!
• The foam filter must be in place at all times when the RESmart BPAP 20S/20A/25/25A is
operating.
a. Place the foam filter into the filter area on the back of the RESmart BPAP 20S/20A/25/25A.
b. Attach the filter cap. Position the cap so that the small opening on the cap is facing down.
Insert the cap’s tabs into the filter area opening.
IMPORTANT!
• To remove AC power, disconnect the power cord from the electrical outlet.
WARNING!
• Inspect the power cord often for any signs of damage. Replace a damaged cord immediately.
WARNING!
• The RESmart BPAP 20S/20A/25/25A is powered on for use when the power cord is
connected. The Pressure Start / Stop Button turns the blower on / off.
CAUTION!
• Make sure the RESmart BPAP 20S/20A/25/25A is away from any heating or cooling
equipment (e.g., forced air vents, radiators, air conditioners). Also make sure that bedding,
curtains, or other items are not blocking the filter or vents of the device. Air must flow freely
around the device for the system to work properly.
3.2 Connecting the Breathing Circuit
3.2.1 Assembling the Breathing Circuit
Place the RESmart BPAP 20S/20A/25/25A on a firm, flat surface. To use the system, you will
need the following accessories in order to assemble the recommended circuit.

RESmart BPAP 20S/20A/25/25A User Manual V2.2
9 / 24
• Nasal Mask with integrated exhalation port
• 6 ft. (1.83 m) flexible Tubing
• Headgear (for the mask)
WARNING!
• If multiple persons are going to use the RESmart BPAP 20S/20A/25/25A (e.g., rental
devices), a low-resistance, main flow bacteria filter should be installed in-line between the
RESmart BPAP 20S/20A/25/25A and the circuit tubing. Pressures must be verified by your
home care provider when alternate or optional accessories are in place.
a. Connect the flexible tubing to the air outlet on the front of the RESmart BPAP 20S/20A/25/25A.
b. If you are using a mask with a built-in exhalation port, connect the mask’s connector to
the flexible tubing.
If you are using a mask with a separate exhalation port, connect the flexible tubing to the
exhalation port. Position the exhalation port so that the vented air is blowing away from your
face. Connect the mask’s connector to the exhalation port.
WARNING!
• Do not block or otherwise try to seal the air openings (vent holes) on the exhalation port.
Explanation of the warning: The RESmart BPAP 20S/20A/25/25A is intended to be used with
masks and circuits that have an exhalation port designed to exhaust CO2from the circuit.
When the RESmart BPAP 20S/20A/25/25A is turned on and functioning properly, new air
from the RESmart BPAP 20S/20A/25/25A flushes the exhaled air out through the exhalation
port. When the RESmart BPAP 20S/20A/25/25A is turned off, enough fresh air will not be
provided through the mask, and exhaled air may be rebreathed. Rebreathing of exhaled air
for longer than several minutes can, in some circumstances, lead to suffocation. This
warning applies to most BPAP devices.
WARNING!
•If you are using a full face mask (i.e., a mask covering both your mouth and your nose), the
mask must be equipped with a safety (entrainment) valve.
IMPORTANT!
• Before each use, examine the flexible tubing for any damage or debris. If necessary, clean
the tubing to remove the debris. Replace any damaged tubing.
c. Connect the mask to the headgear, following the instructions included with the headgear.
d. Put on the mask and headgear, and breathe normally through your nose. The airflow
should automatically start when you begin breathing through the circuit. If the airflow does
not start within four breaths, press the Pressure Start / Stop Button on the top of
the RESmart BPAP 20S/20A/25/25A. When operating the system with some mask types or
some circuit configurations, the airflow may NOT automatically start.
3.2.2 Adjusting the Breathing Circuit
Lie down on your bed, and adjust the flexible tubing so it is free to move if you turn in your
sleep. Adjust the mask and headgear until you have a comfortable fit and there are no
airflow leaks into your eyes.
3.3 Connect the Power Cord
Plug the socket end of the power cord into the AC inlet on the back of the RESmart BPAP
20S/20A/25/25A. Plug the pronged end of the power cord into an electrical outlet. System
status will appear on the RESmart BPAP 20S/20A/25/25A screen.

RESmart BPAP 20S/20A/25/25A User Manual V2.2
10 / 24
4. Device Operation
4.1 Starting the Device
Standby
After power on, system status will appear on display screen as below.
Work Mode
P1 P2
06 08
S Mode
Work Mode:
The starting Mode.
P1:
EPAP when device work on Mode S, Default setting is 6 hPa.
P2:
IPAP when device work on Mode S, Default setting is 8 hPa.
4.2 Using the Ramp Button
Pressing the Ramp Button will reduce the air pressure when you are trying to fall
asleep. The air pressure will gradually increase until your prescription pressure is reached. If
your physician prescribed ramp for you, pressing the button will reduce the pressure and
then gradually increase (ramp) the pressure to the therapeutic pressure setting so that you
can fall asleep more comfortably.
Note: The ramp feature is not prescribed for all users.
Press the Ramp Button on the top of the RESmart BPAP 20S/20A/25/25A. You can
use the Ramp Button as often as you wish during the night.
4.3 Turning the System OFF
Remove the mask and headgear. Press the Pressure Start / Stop Button on the top
of the RESmart BPAP 20S/20A/25/25A to stop the airflow. Or, if the Auto Off setting has been
enable, the airflow will automatically turn off.
IMPORTANT!
• The Heated Humidifier Button is active only when an InH2 Heated Humidifier is
connected or when the RESmart BPAP 20S/20A/25/25A is in the Setup Menu. Refer to the
InH2 Heated Humidifier’s instructions for additional information.
Helpful Hints
• If the alert tone sounds, press Pressure Start / Stop Button on the top of the
RESmart BPAP 20S/20A/25/25A to silence the alert tone. Refer to the “Troubleshooting”
Section of the manual for further instructions.
• Make sure that bedding, curtains, or other items are not blocking the filter or vents of the
RESmart BPAP 20S/20A/25/25A. Air must flow freely around the RESmart BPAP
20S/20A/25/25A for the system to work properly.
• If the airflow from the RESmart BPAP 20S/20A/25/25A feels cold, reposition the circuit
tubing so that it runs under your bed covers to reduce heat loss while you sleep.
• If interruption of the power supply occurs during system working, the audible alert (a beeping
sound) will start and continue. Restoration of the power supply will stop the audible alert.
• After interruption and restoration of the power supply, the RESmart BPAP 20S/20A/25/25A
will resume with the working status before interruption automatically.
RESmart BPAP 20S/20A/25/25A User Manual V2.2
11 / 24
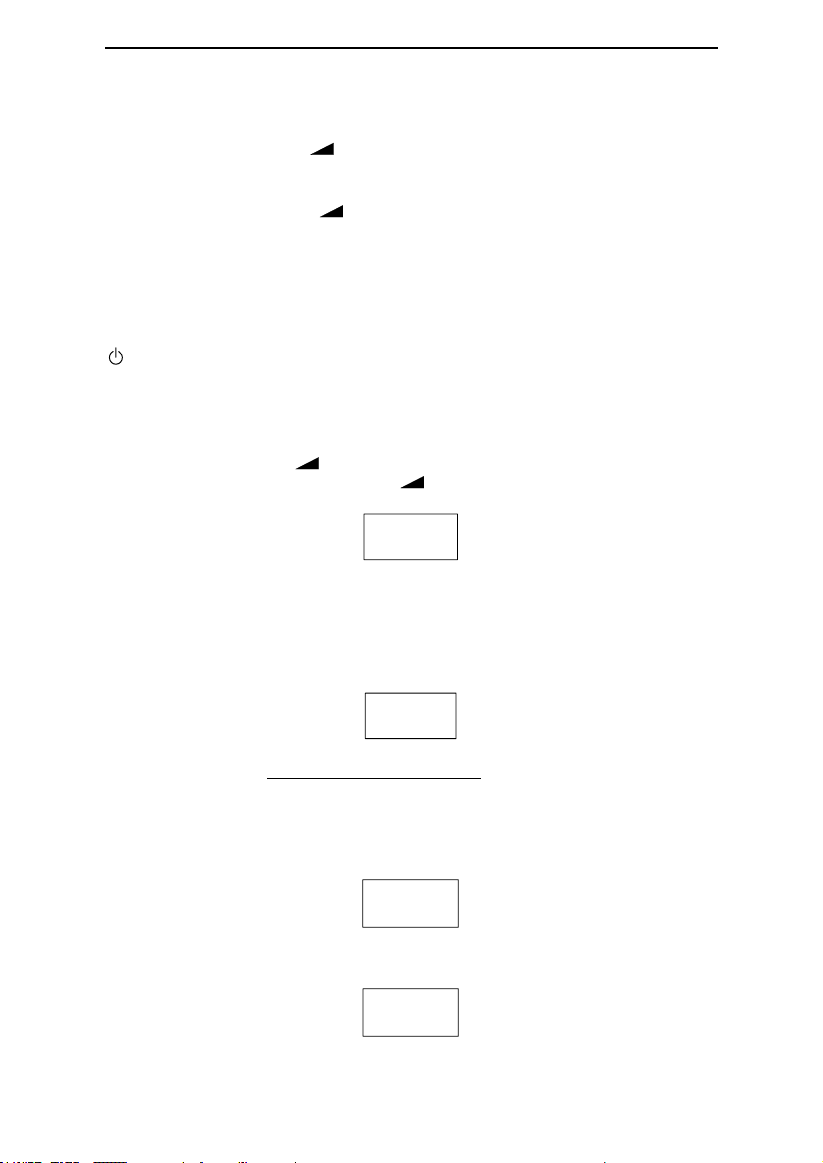
4.4 Change Device Settings
Verify / Change the RESmart BPAP 20S/20A/25/25A settings. To start the setup menu, press
and hold the Ramp Button until the setup menu appears (about 5 seconds) when
system standby (The airflow must be turned OFF).
IMPORTANT!
• Pressing the Ramp Button (when the airflow is turned on) will lower the airflow
pressure, if prescribed, and then will gradually increase it.
WARNING!
• DO NOT use the RESmart BPAP 20S/20A/25/25A if the display is erratic. Contact your home
care provider for further instructions.
IMPORTANT!
• If at any time you wish to exit the setup menu, press the Pressure Start / Stop Button
and the display will go back to the system standby screen.
Setting the Humidifier
a. When the optional InH2 Heated Humidifier is used, this setting can change the
temperature and humidity of airflow between level 0 to 5. Default setting is 3.
IMPORTANT!
• Press the Ramp Button to enter change status and press User Buttons + / - to
change the setting. Press Ramp Button again to confirm the setting. Press User
Buttons + / - to access the next setting.
Heater
3
Setting the Altitude
b. The altitude setting can be changed between level 0 to 2. Default setting is 0.
0 = less than 2,460 ft. (< 750 m)
1 = 2,460 to 4,921 ft. (750 to 1500 m)
2 = 4,924 to 8,202 ft. (1501 to 2500 m)
*over 8,202 ft. = The airflow pressure may not be accurate. Contact your home care
provider to have your pressure setting adjusted.
Altitude
0
IMPORTANT!
RESmart is already with automatic altitude compensation. Even if without setting the altitude,
RESmart still can deliver proper pressure in any altitude worldwide.
Setting Auto ON
c. When the RESmart BPAP 20S/20A/25/25A is standby and wearing mask, your deep breath
will start airflow automatically
(This function is NOT available on certain model).
Default
setting is Enable.
Auto On
Enable
Setting Auto Off
d. When the mask is removed, the RESmart BPAP 20S/20A/25/25A will stop airflow
automatically
(This function is NOT available on certain model).
Default setting is Disable.
Auto Off
Disable

RESmart BPAP 20S/20A/25/25A User Manual V2.2
12 / 24
Setting the LCD Light
e. This setting allows you to adjust the LCD light among Auto, On and Off. Default setting is
Auto.
Auto: LCD light will be turned on when any button pressing and turned off after few seconds.
On: LCD light will be turned ON always.
Off: LCD light will be turned OFF always.
Light
Auto
Setting the Alert
f. This setting allows you to turn on / off the patient disconnect alert. When a large, continuous
air leak (such as mask removal) has been detected in the circuit, this setting enables / disables
the audible alert (a beeping sound). This setting is only effective when the Auto Off setting is
disabled
(This function is NOT available on certain model).
Default setting is Disable.
Alert
Disable
Setting Reslex
g. This setting monitors the inhale and exhale timing in therapy. the pressure will be lower
when exhale so the patient will feel more comfortable. The pressure setting can be changed
between level 0 to 3. 0 means disabled and the default setting is 0 (this setting only available
on 20A/25A model).
Reslex
0
Setting the Delay Off
h. When the optional InH2 Heated Humidifier is used, this setting allows the air flow continue
for about 15 minutes at very low pressure (about 2 hPa) after RESmart BPAP
20S/20A/25/25A is turned off. This will blow off the left vapor and protect the RESmart BPAP
20S/20A/25/25A. Default setting is Enable.
DelayOff
Enable
Setting the Sensitive
i. The Sensitive Setting is only effective when Auto Feature opened. The sensitivity of
automatically pressure adjusting can be set from 1 (soft) to 5 (hard). Default setting is 3.
Sensitiv
3
Setting the RiseTime
j. Rise time settings are adjustable by the patient and the provider from 0 to 3. Rise time
varies from 150 to 400 msec dependent on patient setting and the pressure differential from
IPAP to EPAP. The rise time setting should be adjusted according to the patient comfort level.
Default setting is 2.
Risetime
2
Setting the Date
k. The current date is displayed and can be modified if needed.
Note: Check and confirm this Date Setting frequently to ensure the usage log is correct.
Date
13 01 04

RESmart BPAP 20S/20A/25/25A User Manual V2.2
13 / 24
iCode
l. The “iCode” consists of six separate codes displayed in the patient menu. These codes
include “Last Day”, “Last 7 Days”, “Last 30 Days”, “Last 90 Days”, “Last 182 Days” and “Last
365 Days”. Patient should send these code numbers to your physician when needed. When
the system standbys after power on, or after exit the setup menu, click the Heated
Humidifier Button , the iCode number will appear. To exit the screen, please click any
other button. Default setting is Disable.
iCode
Disable
Use Days
m. The number of nights the RESmart BPAP 20S/20A/25/25A was used for therapy for more
than 4 hours will appear. The number is automatically generated and users can not change it.
This screen is only for reference. Your home care provider may periodically ask you for this
information.
Use Days
0
I Sense
n. This Setting can adjust the trigger sensitivity when patient’s breath switch into inhaling
phase. It makes device work synchronically to patient breath and to make patients feel more
comfortable. Press Ramp Button to end the setup menu. The I sense can be adjusted
from 1 (soft) to 8 (hard) by pressing User Buttons + / -. Press Ramp Button to
confirm the change. Default setting is 6.
I Sense
6
E Sense
o. This Setting can adjust the trigger sensitivity when patient’s breath switch into exhaling
phase. It makes device work synchronically to patient breath and to make patients feel more
comfortable. Press Ramp Button to end the setup menu. The sensitivity can be
adjusted from 1 (soft) to 8 (hard) by pressing User Buttons + / -. Press Ramp Button
to confirm the change. Default setting is 7.
E Sense
7
Setting BKP RR
p. This setting allows you to turn on / off the BKP RR. When turn on this setting, the device
can output an airflow with frequency of 10 and breathing time ration of 1:2 to patient who
can not breath automatically. Press the Ramp Button to enter change status in which
a cursor is blinking and press User Buttons + / - to change the setting. Default setting is
Disable. Press Ramp Button again to confirm the setting (this setting only available
under S mode).
BKP RR
Disable
Exit the Settings
q. The settings are complete. Press the User Button + / - to access the SAVE setting and
Ramp Button to save all changes and exit the settings menu.
Save

RESmart BPAP 20S/20A/25/25A User Manual V2.2
14 / 24
5. Troubleshooting
The table below lists common problems you may have with the RESmart BPAP
20S/20A/25/25A and possible solutions to those problems. If none of the corrective actions
solve the problem, contact your home care provider.
Problem Solution (s)
The pressure being delivered
feels different
Check the altitude setting to be sure it is set to your
altitude. Change the altitude setting if necessary. If
the altitude setting is correct, contact your home care
provider for directions on having the RESmart BPAP
devices serviced. Please have the device’s serial
number ready when you call
The airflow from the RESmart
BPAP 20S/20A/25/25A seems
warm
Replace or clean the filter. Make sure the RESmart
BPAP 20S/20A/25/25A is away from bedding or
curtains that could block the flow of air around the
RESmart BPAP 20S/20A/25/25A. Make sure the
RESmart BPAP 20S/20A/25/25A is away from heating
equipment. (e.g., forced air vents, radiators)
The noise level of the RESmart
BPAP 20S/20A/25/25A has
changed to include unusual or
harsh sounds during operation
Contact your home care provider for directions on
having the RESmart devices serviced. Please have the
device’s serial number ready when you call
The RESmart BPAP
20S/20A/25/25A will not turn on
Make sure that the RESmart BPAP 20S/20A/25/25A is
plugged into a working outlet. Contact your home
care provider for directions on having the RESmart
BPAP devices serviced. Please have the device’s serial
number ready when you call
Pressing the Ramp Button
does not reduce the air
pressure
Contact your home care provider. Ramp may not
have been prescribed for you
The RESmart BPAP
20S/20A/25/25A has been
dropped into water or fluids
have gotten into the enclosure
Discontinue use. Disconnect the power cord from the
AC wall outlet. Contact your home care provider for
directions on having the RESmart BPAP devices
serviced. Please have the device’s serial number
ready when you call

RESmart BPAP 20S/20A/25/25A User Manual V2.2
15 / 24
6. Accessories
6.1 Adding a Humidifier
The InH2 Heated Humidifier is available from your home care provider. The humidifier may
reduce nasal dryness and irritation by adding moisture (and heat if applicable) to the airflow.
WARNING!
• The RESmart unit should only be connected to the humidifiers or accessories specified in
this Manual. Connection of other Items may result in injury or damage to the RESmart unit.
6.2 Adding Oxygen
Oxygen may be added at the mask connection. Please note the warnings listed below when
using oxygen with the RESmart BPAP 20S/20A/25/25A.
WARNING!
• The oxygen supply must comply with the local regulations for medical oxygen.
WARNING!
• Turn the RESmart BPAP 20S/20A/25/25A on before turning the oxygen on. Turn the
oxygen off before turning the RESmart BPAP 20S/20A/25/25A off.
Explanation of Warning: When the RESmart BPAP 20S/20A/25/25A is turned off, but the
oxygen flow is still turned on, oxygen may accumulate within the RESmart BPAP
20S/20A/25/25A enclosure and create a fire risk. Turning the oxygen off before turning the
RESmart BPAP 20S/20A/25/25A off will prevent oxygen accumulation in the RESmart BPAP
20S/20A/25/25A and will reduce the risk of fire. This warning applies to most BPAP devices.
WARNINGS!
• Oxygen accelerates fires. Keep the RESmart BPAP 20S/20A/25/25A and the oxygen
container away from heat, open flames, any oily substance, or other sources of ignition. Do
not smoke in the area near the RESmart BPAP 20S/20A/25/25A or the oxygen container.
• Contact your home care provider for additional information on the accessories available for
the RESmart BPAP 20S/20A/25/25A. When using optional accessories, always follow the
instructions enclosed with the accessories.

RESmart BPAP 20S/20A/25/25A User Manual V2.2
16 / 24
7. Routine Maintenance
7.1 Cleaning the Filter
The foam filter should be cleaned at least once every two weeks under normal usage and
replaced with a new one every six months.
CAUTION!
• Operating the RESmart BPAP 20S/20A/25/25A with a dirty filter may keep the system from
working properly and may cause damage to the device.
(1) Remove the filter cap by gently pressing on its bottom.
(2) Change the filter.
a. Remove the foam filter by gently pulling around the edges of the filter. Rinse the filter in a
steady stream of running water. Squeeze out the water and repeat. Air dries the filter on a
rack for 8 to 12 hours or in a clothes dryer for 15 to 20 minutes.
b. Insert the filter into the filter area on the back of the RESmart BPAP 20S/20A/25/25A.
Replace the filter cap.
CAUTION!
• Never install a wet filter into the RESmart BPAP 20S/20A/25/25A. We recommend that you
clean the filter in the morning and alternate using the filter provided with the system to
ensure enough drying time for the cleaned filter.
7.2 Cleaning the System
Clean the mask and tubing daily.
WARNING!
• To avoid electrical shock, unplug the RESmart BPAP 20S/20A/25/25A before cleaning. Do
not immerse the RESmart BPAP 20S/20A/25/25A in any fluids.
(1) Disconnect the flexible tubing from the RESmart BPAP 20S/20A/25/25A. Gently wash the
flexible tubing in a solution of warm water and a mild detergent. Rinse the tubing thoroughly
and air dry.
(2) Wipe the outside of the RESmart BPAP 20S/20A/25/25A with a cloth slightly dampened
with water and a mild detergent. Let the RESmart BPAP 20S/20A/25/25A dry before plugging
in the power cord.
(3) Inspect the RESmart BPAP 20S/20A/25/25A and all circuit parts for any damage after
cleaning. Replace any damaged parts.
(4) For details on cleaning your mask and accessories, refer to the cleaning instructions
packaged with the accessories.
7.3 Disinfection of the Humidifier Water Chamber
See the Disinfection section of the humidifier user manual for more information on the
disinfection of the water chamber.
7.4 Reordering
Contact your home care provider to order accessories or Replacement filters.

RESmart BPAP 20S/20A/25/25A User Manual V2.2
17 / 24
Service
The RESmart BPAP 20S/20A/25/25A does not require routine servicing.
The RESmart unit contains electrical and / or electronic equipment. When necessary, dispose
of the RESmart and accessories in accordance with local regulations.
WARNING!
• If you notice any unexplained changes in the performance of the RESmart BPAP
20S/20A/25/25A, if it is making unusual or harsh sounds, if it has been dropped or
mishandled, if the enclosure is broken, or if water has entered the enclosure, discontinue use.
Contact your home care provider.
WARNING!
• If the RESmart BPAP 20S/20A/25/25A malfunctions, contact your home care provider
immediately. Never attempt to open the RESmart BPAP 20S/20A/25/25A’s enclosure. Repairs
and adjustments must be performed by BMC authorized service personnel only.
Unauthorized service could cause injury, invalidate the warranty, or result in costly damage.
If necessary, contact your local authorized dealer or BMC Medical Co., Ltd. for technical
support and documents.
7.5 Traveling with RESmart
When you are traveling, the carrying case is for carry-on luggage only. The carrying case will
not protect the system if it is stored as checked baggage.
7.6 Security Stations
For convenience at security stations, there is a note on the bottom of the RESmart BPAP
20S/20A/25/25A stating that it is medical equipment. It may be helpful to bring this manual
along with you to help security personnel understand the RESmart BPAP 20S/20A/25/25A.
7.7 Checking the Power Cord
If you are traveling to a country with a line voltage different than the one you are currently
using, a different power cord or an international plug adapter may be required to make your
power cord compatible with the power outlets of the country to which you are traveling.
Contact your home care provider for additional information.
8. Specifications
Device Size
Dimensions: 220 mm × 194 mm × 112 mm, 313 mm × 194 mm × 112 mm (with InH2
heated humidifier)
Weight: 2.2 kg, 3 kg (with InH2 heated humidifier)
Product Use, Transport and Storage
Operation Transport and Storage
Temperature: 5°C to 35°C -20°C to 55°C
Humidity: ≤ 80% Non-condensing ≤ 93% Non-condensing
Atmospheric Pressure: 700 to 1060 hPa 500 to 1060 hPa
Mode of Operation
Continuous

RESmart BPAP 20S/20A/25/25A User Manual V2.2
18 / 24
Work Mode
Product Model
Pressure (hPa)
Work Mode
20S
4 ~20
S, CPAP
No
Auto
Feature
20A
4 ~20
S, CPAP
Auto S (
Auto
Feature available)
25
4 ~25
S, CPAP
No
Auto
Feature
25A
4 ~25
S, CPAP
Auto S (
Auto
Feature available)
SD Card
The SD card can record patient data and fault information.
AC Power Consumption
100 - 240 V ~2 - 1 A, 50 / 60 Hz
Type of Protection Against Electric Shock
Class II Equipment
Degree of Protection Against Electric Shock
Type BF Applied Part
Degree of Protection Against Ingress of Water
IP21 –≥12.5 mm Diameter, Drip-Proof, Vertical
Pressure Range
For 20S/20A:
IPAP: 4 to 20 hPa (in 0.5 hPa increments)
EPAP: 4 to 20 hPa (in 0.5 hPa increments)
For 25/25A:
IPAP: 4 to 25 hPa (in 0.5 hPa increments)
EPAP: 4 to 25 hPa (in 0.5 hPa increments)
≤40 hPa under single fault conditions.
Pressure Stability
Static Pressure Stability: 4 to 20 / 25 hPa (± 0.5 hPa)
Dynamic Pressure Stability: 4 to 20 / 25 hPa (± 1.0 hPa)
Altitude Compensation
Manually setting, level 0, 1, 2
Automatic altitude compensation
Sound Pressure Level
< 30 dB, when the device is working at the pressure of 10 hPa
Maximum Flow
For 20S/20A:
Test Pressure (hPa)
4
8
12
16
20
Measured Pressure at the Patient
Connection Port (hPa)
3
7
11
15
19
Average flow at the patient connection port
(L/min)
70.1
72.1
72.3
70.1
73.4
For 25/25A:
Test Pressure (hPa)
4
10
15
20
25
Measured Pressure at the Patient
Connection Port (hPa)
3
9
14
19
24
Average flow at the patient connection port
(L/min)
70.1
73.0
64
73.4
74.6
This manual suits for next models
3
Table of contents
Other BMC Medical Equipment manuals


Popular Medical Equipment manuals by other brands


Getinge
Getinge Arjohuntleigh Nimbus 3 Professional Instructions for use

Mettler Electronics
Mettler Electronics Sonicator 730 Maintenance manual

Pressalit Care
Pressalit Care R1100 Mounting instruction

Denas MS
Denas MS DENAS-T operating manual

bort medical
bort medical ActiveColor quick guide

AccuVein
AccuVein AV400 user manual


