manuals.online logo
Brands
  1. Home
  2. •
  3. Brands
  4. •
  5. Bonaldo
  6. •
  7. Indoor Furnishing
  8. •
  9. Bonaldo Youniverse User manual

Bonaldo Youniverse User manual

DCHIAVE A BRUGOLA 5-6
ALLEN KEY 5-6
IMBUSSCHLÜSSEL 5-6
CLE ALLEN 5-6
N°1+1
VITE TSPEI M10X25
M10X25 TSPEI SCREW
SCHRAUBE TSPEI M10X25
VIS TSPEI M10X25
N°4
EA
K   - A  - M - K  
PIEDE
FOOT
FUß
PIED
N°4
ATTENZIONE:
M   
ATTENTION:
M   
ACTUNG:
M   
ATTENTION:
M    
Youniverse design: Mauro Lipparini
Letto Matrimoniale
Double Bed
Doppelbett
Lit Double
scheda montaggio - assembly instruction - Aufbauanleitung - notice de montage 1
ASSEMBLY INSTRUCTION - AUFBAUANLEITUNG - NOTICE DE MONTAGE
SCHEDA MONTAGGIO
B
C
VITE TBEI M8X10
M8X10 TBEI SCREW
SCHRAUBE TBEI M8X10
VIS TBEI M8X10
N°12
VITE TSPEI M8X35
M8X35 TSPEI SCREW
SCHRAUBE TSPEI M8X35
VIS TSPEI M8X50
N°12
Youniverse design: Mauro Lipparini
scheda montaggio - assembly instruction - Aufbauanleitung - notice de montage2
5
1
1 Testata
2 Longoni
3 Pediera
4 Abito giroletto
5 Piedi
6 Piede centrale
7 Staffe regolazione
8 traverso centrale
D   - P  - T - D  
GB DF
I
2
4
3
1 Headboard
2 Frame members
3 Footboard
4 Bed surround
5 Feet
6 Central foot
7 Adjustment brackets
8 Central cross member
1 Kopfteil
2 Seitenelemente
3 Fußende
4 Bettrahmenbezug
5 Füße
6 Zentraler Fuß
7 Bettwinkel
8 Mittelbalken
1 Tête de lit
2 Longerons
3 Pied de lit
4 Cadre du lit
5 Pieds
6 Pied central
7 Équerre de réglage
8 Traverse centrale
2
6
78
YX
XX
Y
1
2
1
2
scheda montaggio - assembly instruction - Aufbauanleitung - notice de montage 3
1
2
GB
D
F
I
GB
D
F
IAprire l’imballo e individuare le parti.
Prendere i longoni e fissare i piedi E sul foro centrale di ogni piastra piastra (fig.1).
Utilizzare le viti C e la chiave D6.
Open the box and identify the parts.
Take the frame members and secure feet E to the central hole in every plate (fig.1).
Use screws C and Allen key D6.
Öffnen Sie die Verpackung und machen Sie sich mit dem Inhalt vertraut.
Nehmen Sie die Seitenelemente und schrauben Sie die Füße E jeweils in das
zentrale Bohrloch der vier Bettwinkel (Abb. 1). Verwenden Sie dazu die Schrauben C
und den Schlüssel D6.
Ouvrir l'emballage et identifier les différentes pièces.
Prendre les longerons et fixer les pieds E sur le trou central de chaque plaque (fig. 1).
Utiliser les vis C et la clé D6.
Disporre a terra i 2 longoni (X) e la pediera (Y) come in fig.1.
Alzando uno alla volta i longoni e la pediera, avvitare senza fissare le viti della piastra
(fig.2). Utilizzare 3+3 viti B e chiave D5.
Dopo aver approntato tutte le viti, fissarle.
Arrange the two frame members (X) and the footboard (Y) on the floor as shown in fig.1.
Raising the frame members and footboard one at a time, screw the screws in the
plate without tightening them fully (fig.2). Use 3+3 screws B and Allen key D5.
Once all the screws are in place, tighten them fully.
Legen Sie die beiden Seitenelemente (X) und das Fußende (Y) wie in Abb. 1
dargestellt auf den Boden.
Heben Sie nun nacheinander jeweils ein Seitenelement und das Fußende an und
drehen Sie die Schrauben in die Bettwinkel, ohne diese jedoch anzuziehen (Abb. 2).
Verwenden Sie dazu 3+3 Schrauben B und den Schlüssel D5.
Nachdem Sie alle Schrauben eingedreht haben, ziehen Sie diese fest an.
Disposer les 2 longerons (X) et le pied de lit (Y) sur le sol, comme indiqué en fig. 1.
Disposer les vis sur la plaque sans les visser complètement en levant le pied de lit et
un longeron à la fois (fig. 2). Utiliser 3+3 vis B et la clé D5.
Terminer le vissage lorsque toutes les vis sont en place.
Youniverse design: Mauro Lipparini
1
2
1
2
scheda montaggio - assembly instruction - Aufbauanleitung - notice de montage4
3
4
GB
D
F
I
GB
D
F
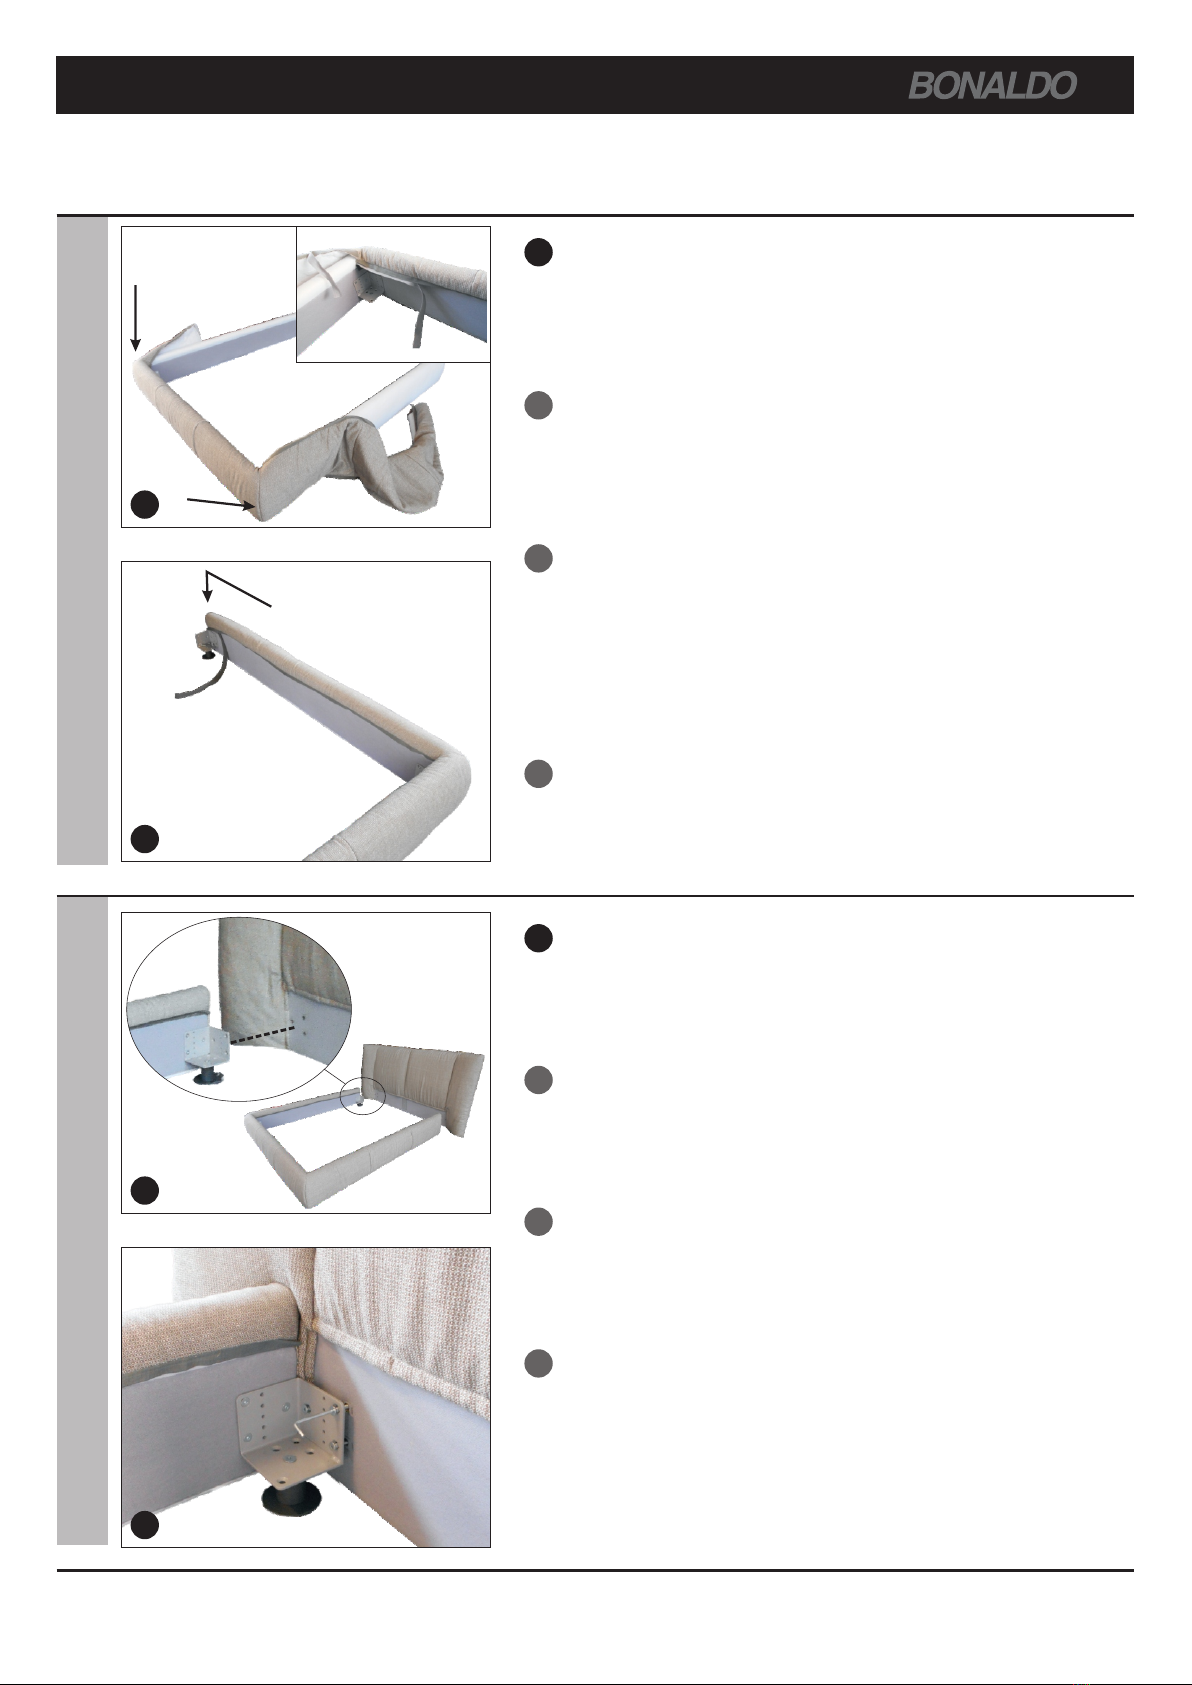
IPrendere il rivestimento del giroletto e disporlo sulle parti montate iniziando dalla
pediera; far coincidere gli angoli sistemando le cuciture (fig.1).
Fissare l’abito alla pediera togliendo il copri velcro prima sopra internamente e poi
sotto; distribuire la morbidezza lungo la pediera.
Continuare in modo analogo lungo i longoni (fig.2) tirando leggermente la testa
dell’abito per inserirlo e distribuendo poi la morbidezza lungo il longone (fig.2).
Take the bed surround upholstery and place it over the assembled parts, starting with
the footboard; make sure you match up the corners and straighten the seams (fig.1).
Secure the upholstery to the footboard, removing first the Velcro cover at the top on
the inside and then underneath; even out the padding all along the footboard.
Continue in the same way along the frame members (fig.2) pulling slightly at the top of the
upholstery to insert it and then evening out the padding along the frame member (fig.2).
Nehmen Sie den Bettrahmenbezug und ziehen Sie ihn, am Fußende beginnend, über
die montierten Elemente. Achten Sie dabei darauf, dass die Ecknähte exakt über die
Ecken laufen (Abb. 1).
Befestigen Sie den Bezug am Fußende. Entfernen Sie dazu zuerst die obere
innenseitige Klettverschlussabdeckung, dann die untere, und verteilen Sie die
Polsterung gleichmäßig über das gesamte Fußende.
Beziehen Sie nun auf dieselbe Weise die Seitenelemente (Abb. 2). Durch leichtes
Ziehen am Kopfende des Bezugs lässt sich dieser vollständig überstreifen. Verteilen
Sie abschließend die Polsterung gleichmäßig über die gesamte Länge (Abb. 2).
Prendre le revêtement du cadre du lit et l'enfiler sur les parties montées en
commençant par le pied de lit ; faire coïncider les angles avec les coutures (fig. 1).
Fixer le revêtement de l'intérieur au niveau du pied de lit à l'aide du velcro, en haut
puis en bas ; équilibrer les épaisseurs tout au long du pied de lit.
Continuer de la même façon le long des longerons (fig. 2) en tirant légèrement l'extrémité
du cadre du lit pour l'enfiler et équilibrer les épaisseurs le long du longeron (fig. 2).
Prendere la testata e avvicinarla al giroletto facendo coincidere i fori di attacco con
quelli sulle piastre dei longoni (fig.1)
Avvitare senza fissare 3+3 viti B con chiave D5 (fig.2).
Fissare le viti.
Take the headboard and bring it up to the bed surround, lining up the attachment
holes with the holes on the frame member plates (fig.1).
Screw 3+3 screws B with Allen key D5 without tightening them fully (fig.2).
Tighten the screws fully.
Nehmen Sie das Kopfteil und positionieren Sie es vor dem Bettrahmen, so dass die
Bohrlöcher des Kopfteils und die Löcher der Bettwinkel passend ausgerichtet sind (Abb. 1).
Drehen Sie 3+3 Schrauben B mit dem Schlüssel D5 ein, ohne diese festzuziehen (Abb. 2).
Ziehen Sie die Schrauben fest an.
Prendre la tête de lit et la rapprocher du cadre du lit en faisant coïncider les trous de
fixation avec ceux situés sur les plaques des longerons (fig. 1).
Introduire 3+3 vis avec la clé D5 sans les visser complètement (fig. 2).
Terminer le vissage.
Youniverse design: Mauro Lipparini
W
1 2
Z
3 4
5
GB
D
F
IIl letto Youniverse è predisposto per diverse regolazioni del
materasso.
Utilizzare la staffa triangolare bassa W per regolazioni più basse
da terra, fig.1-2;
utilizzare la staffa triangolare alta Z per regolazioni più alte da
terra, fig.3-4.
Fissare una staffa per angolo alla medesima altezza, ciascuna con
2 viti A e chiave D5 (fig.1 / 3)
scheda montaggio - assembly instruction - Aufbauanleitung - notice de montage 5
Youniverse design: Mauro Lipparini
The Youniverse bed is designed to accommodate various mattress
settings.
Use the low triangular bracket W for settings closest to the floor,
fig.1-2;
Use the high triangular bracket Z for settings furthest from the
floor, fig.3-4;
Secure one bracket per corner at the same height, each using 2
screws A and Allen key D5 (fig.1 / 3)
Das Bett Youniverse erlaubt unterschiedliche Matratzen-Einlegetiefen.
Verwenden Sie den niedrigen Auflagewinkel W, um die Matratze
tiefer zu legen (Abb. 1–2).
Verwenden Sie den höheren Auflagewinkel Z, um die Matratze
höher zu legen (Abb. 3–4).
Befestigen Sie die Auflagewinkel in allen Ecken auf derselben
Höhe. Verwenden Sie dazu jeweils 2 Schrauben A und den
Schlüssel D5 (Abb. 1 und 3).
Le lit Youniverse est conçu pour s'adapter à différentes hauteurs
de matelas.
Utiliser la plaque triangulaire basse W pour un matelas placé plus
bas, fig. 1-2 ;
utiliser la plaque triangulaire haute Z pour un matelas placé plus
haut, fig. 3-4.
Fixer les équerres à la même hauteur dans les 4 angles à l'aide de
4x2 vis A et de la clé D5 (fig. 1/3).
J
1
2
4
I
GB
D
F
IPer garantire la stabilità della rete montare il piedino centrale al centro della traversa
(fig.1). Seguire le istruzioni nell’apposito kit.
1
Bonaldo Spa
via Straelle, 3 - P.O. Box n.6 - 35010 Villanova Pd Italia
Tel. +39 09 9299011 Fax +39 049 9299000
www.bonaldo.it - [email protected]
Grazie per aver scelto un prodoo BONALDO.
Thank you for choosing a BONALDO product.
Danke dass Sie ein BONALDO produkt gewählt haben.
Merci d’avoir choisi un produit BONALDO.
scheda montaggio - assembly instruction - Aufbauanleitung - notice de montage6
8
GB
D
F
IPrendere la traversa J (fig.1) e fissarla alla piastra centrale della testata e della
pediera alla stessa altezza delle staffe triangolari agli angoli.
Utilizzare 2+2 viti A e chiave D5 (fig.2).
Take cross member J (fig.1) and secure it to the central plate of the headboard and of
the footboard at the same height as the triangular brackets on the corners.
Use 2+2 screws A and Allen key D5 (fig. 2).
Nehmen Sie den Mittelbalken J (Abb. 1) und befestigen Sie ihn an der mittleren
Montageplatte des Kopfteils und des Fußendes auf derselben Höhe wie die
Auflagewinkel.
Verwenden Sie dazu 2+2 Schrauben A und den Schlüssel D5 (Abb. 2).
Prendre la traverse J (fig. 1) et la fixer sur la plaque centrale de la tête et du pied de
lit, à la même hauteur que les plaques triangulaires placées aux 4 coins.
Utiliser 2+2 vis A et la clé D5 (fig. 2).
4
Youniverse design: Mauro Lipparini
To guarantee greater stability for the bedstead, fit the central foot in the middle of the
cross member (fig.1). Follow the instructions provided in the dedicated kit.
Um die Stabilität des Bettenrosts zu gewährleisten, montieren Sie den zentralen Fuß in
der Mitte des Mittelbalkens (Abb. 1). Folgen Sie der Anleitung des entsprechenden Sets.
Pour garantir la stabilité du sommier, monter le pied central au milieu de la traverse
(fig. 1). Suivre les instructions fournies dans le kit correspondant.

Other Bonaldo Indoor Furnishing manuals

Bonaldo Tracks User manual

Bonaldo

Bonaldo Tracks User manual

Bonaldo Vanessa User manual

Bonaldo

Bonaldo Vanessa User manual

Bonaldo PEANUT B User manual

Bonaldo

Bonaldo PEANUT B User manual

Bonaldo SQUARING 180 ISOLA User manual

Bonaldo

Bonaldo SQUARING 180 ISOLA User manual

Bonaldo Twice User manual

Bonaldo

Bonaldo Twice User manual

Bonaldo Prora User manual

Bonaldo

Bonaldo Prora User manual

Bonaldo Adone User manual

Bonaldo

Bonaldo Adone User manual

Bonaldo ART WOOD User manual

Bonaldo

Bonaldo ART WOOD User manual

Bonaldo TRUE User manual

Bonaldo

Bonaldo TRUE User manual

Bonaldo NARCISO User manual

Bonaldo

Bonaldo NARCISO User manual

Bonaldo COLIBRI User manual

Bonaldo

Bonaldo COLIBRI User manual

Bonaldo Art Extension Dining Table User manual

Bonaldo

Bonaldo Art Extension Dining Table User manual

Bonaldo BLABLA User manual

Bonaldo

Bonaldo BLABLA User manual

Bonaldo CROSS 80079 User manual

Bonaldo

Bonaldo CROSS 80079 User manual

Bonaldo OWEN User manual

Bonaldo

Bonaldo OWEN User manual

Bonaldo BASKET AIR User manual

Bonaldo

Bonaldo BASKET AIR User manual

Bonaldo CIRCUS User manual

Bonaldo

Bonaldo CIRCUS User manual

Bonaldo DELTA User manual

Bonaldo

Bonaldo DELTA User manual

Bonaldo Geometric Dining Table User manual

Bonaldo

Bonaldo Geometric Dining Table User manual

Bonaldo FLAME CONSOLE User manual

Bonaldo

Bonaldo FLAME CONSOLE User manual

Bonaldo Sol User manual

Bonaldo

Bonaldo Sol User manual

Bonaldo CURLING User manual

Bonaldo

Bonaldo CURLING User manual

Bonaldo VENUS User manual

Bonaldo

Bonaldo VENUS User manual

Bonaldo GEOMETRIC TABLE User manual

Bonaldo

Bonaldo GEOMETRIC TABLE User manual

Popular Indoor Furnishing manuals by other brands

Ambu Man Service manual

Ambu

Ambu Man Service manual

PADIMAT M1.30 Technical file

PADIMAT

PADIMAT M1.30 Technical file

Safco Scoot 8940 Assembly instructions

Safco

Safco Scoot 8940 Assembly instructions

rst brands ASTER SL-2ST-3 Assembly instructions

rst brands

rst brands ASTER SL-2ST-3 Assembly instructions

Serta HARVARD Assembly instructions

Serta

Serta HARVARD Assembly instructions

Habitat JAK 940/1820 manual

Habitat

Habitat JAK 940/1820 manual

Furniture of America CM6211 Assembly instructions

Furniture of America

Furniture of America CM6211 Assembly instructions

PAIDI 140 913 0 Assembly instructions

PAIDI

PAIDI 140 913 0 Assembly instructions

Romina 7515 Assembly instructions

Romina

Romina 7515 Assembly instructions

Mocka Blair manual

Mocka

Mocka Blair manual

FUFU & GAGA Armoire manual

FUFU & GAGA

FUFU & GAGA Armoire manual

YORKSHIRE CARE equipment LENTO user manual

YORKSHIRE CARE equipment

YORKSHIRE CARE equipment LENTO user manual

Hodedah HIBT70-G Assembly instructions

Hodedah

Hodedah HIBT70-G Assembly instructions

Robern MAIN LINE CABINET Series installation instructions

Robern

Robern MAIN LINE CABINET Series installation instructions

Coaster 700345 Assembly instructions

Coaster

Coaster 700345 Assembly instructions

FMD GENT Assembly instruction

FMD

FMD GENT Assembly instruction

Zanzini 09130203 Assembly instructions

Zanzini

Zanzini 09130203 Assembly instructions

Micasa VIDRIO Vitrine 4011.001 Assembly instruction

Micasa

Micasa VIDRIO Vitrine 4011.001 Assembly instruction

manuals.online logo
manuals.online logoBrands
  • About & Mission
  • Contact us
  • Privacy Policy
  • Terms and Conditions

Copyright 2025 Manuals.Online. All Rights Reserved.