Bosch MUM58224 User manual

Register your new Bosch now:
www.bosch-home.com/welcome
MUM58...
en Instruction manual
pl Instrukcja obsługi
cs Návod k použití
sk Návod na obsluhu
sl Navodila za uporabo
hr Uputa za uporabu
sr Uputstvo za upotrebu
sq Udhëzuesi i përdorimit
hu Használati utasítás
ro Instrucţiuni de utilizare
bg Ръководство за употреба
ar ﻡاﺩﺧﺗﺳﻻاﺕاﺩﺎﺷرﺇ
126_MUM58224_250_8001027211.indb 1 10.12.2015 12:31:38

en English 3
pl Polski 16
cs Čeština 31
sk Slovak 44
sl Slovenščina 57
hr Hrvatski 70
sr Srpskilatinica 83
sq Shqiptar 96
hu Magyar 109
ro Română 123
bg Български 137
arةيبرعلا 164
126_MUM58224_250_8001027211.indb 2 10.12.2015 12:31:38

3
en
Foryoursafety
Congratulationsonthepurchaseofyour
newBoschappliance.
Youcanndfurtherinformationaboutour
productsonourwebpage.
Contents
Foryoursafety............................................3
Safetysystems...........................................5
Overview.....................................................6
Operatingpositions.....................................6
Operation....................................................7
Cleaningandservicing.............................10
Storage..................................................... 11
Troubleshooting........................................ 11
Applicationexamples................................12
Disposal....................................................13
Guarantee.................................................13
Optionalaccessories................................14
For your safety
Beforeuse,readtheseinstructionscarefullyinordertobecome
familiarwithimportantsafetyandoperatinginstructionsforthis
appliance.Iftheinstructionsforcorrectuseoftheapplianceare
notobserved,themanufacturer’sliabilityforanyresultingdamage
willbeexcluded.Thisapplianceisdesignedforprocessingnormal
householdquantitiesinthehomeorsimilarquantitiesinnon-in-
dustrialapplications.Non-industrialapplicationsincludee.g.use
inemployeekitchensinshops,ofces,agriculturalandother
commercialbusinesses,aswellasusebyguestsinboarding
houses,smallhotelsandsimilardwellings.Usetheappliancefor
processingnormalquantitiesoffoodandfornormalamountsof
timefordomesticuse.Donotexceedpermittedmaximumquantities
(see“Application examples”).Thisapplianceissuitableformixing,
kneadingandbeatingfood.Itmustnotbeusedforprocessingother
objectsorsubstances.Otherapplicationsarepossibleiftheacces-
soriesapprovedbythemanufacturerareused.Usetheappliance
withoriginalaccessoriesonly.Whenusingtheaccessories,follow
theenclosedoperatinginstructions.Pleasekeeptheoperating
instructionsinasafeplace.Ifpassingontheappliancetoathird
party,alwaysincludetheoperatinginstructions.
General safety instructions
WRisk of electric shock!
Theappliancemustnotbeusedbychildren.Theapplianceandits
powercordmustbekeptawayfromchildren.Appliancescanbe
usedbypersonswithreducedphysical,sensoryormentalcapabil-
itiesorlackofexperienceandknowledgeiftheyhavebeengiven
supervisionorinstructionconcerninguseoftheapplianceinasafe
wayandiftheyunderstandthehazardsinvolved.
126_MUM58224_250_8001027211.indb 3 10.12.2015 12:31:38

4
en
Foryoursafety
Childrenshallnotplaywiththeappliance.Cleaninganduser
maintenancemustnotbeperformedbychildrenunlesstheyare
supervised.
Donotleavetherunningapplianceunattended.Connectand
operatetheapplianceonlyinaccordancewiththespecicationson
theratingplate.Onlyusetheapplianceindoorsatroomtemperature
andupto2000mabovesealevel.
Alwaysdisconnecttheappliancefromthesupplyifitisleftunat-
tendedandbeforeassembling,disassemblingorcleaning.
Donotplacethepowercordoversharpedgesorhotsurfaces.
Donotusetheapplianceifthepowercordand/orapplianceare
damaged.Topreventinjury,adamagedpowercordmustbe
replacedbythemanufacturerorhiscustomerserviceorasimi-
larlyqualiedperson.Onlyourcustomerservicemayrepairthe
appliance.
Safety instructions for this appliance
WRisk of injury!
WRisk of electric shock!
Donotinsertthemainspluguntilallpreparationsforworkingwith
theappliancearecomplete.Whentheapplianceisnotinuse,pull
outthemainsplug.Beforeeliminatingafault,pulloutthemains
plug.Neverimmersethebaseunitinliquidorholdunderrunning
water.Donotuseasteamcleaner.Useonlytherotaryswitchto
switchtheapplianceonoroff.
WRisk of injury from the rotating tools!
Beforereplacingaccessoriesoradditionalparts,whichmoveduring
operation,switchofftheapplianceanddisconnectfromthepower
supply.Whentheapplianceisswitchedoff,thedrivecontinues
runningbrieyandstopsinthetoolchangeposition.Donotadjust
theswivelarmwhiletheapplianceisswitchedon.Waituntilthe
drivehascometoastandstill.
Keephandsclearofrotatingparts.Whiletheapplianceisoperating,
neverplacengersinthemixingbowl.Donotreachintothefeed
tube.Donotoperatetheappliancewithoutthelid.
Forreasonsofsafetytheappliancecannotbeoperatedunless
unuseddrivesarecoveredwithdriveguards.
WRisk of injury from sharp blades!
Donotgripthesharpbladesoredgesofthecuttingdiscs.Takehold
ofcuttingdiscsbytheedgeonly.Donottouchblenderbladeswith
barehands.
126_MUM58224_250_8001027211.indb 4 10.12.2015 12:31:39

5
en
Foryoursafety
WRisk of injury from sharp blades/rotating drive!
Neverplacengersintheattachedblender!Operatetheassembled
blenderonlyandwiththelidattached.
WRisk of scalding!
Ifprocessinghotliquids,steamescapesthroughthefunnelinthe
lid.Addamaximumof0.5litresofhotorfrothingliquid.
WImportant!
Usetheappliancewithoriginalaccessoriesonly.Whenusingthe
accessories,followtheenclosedoperatinginstructions.Useonly
onetooloraccessoryatanyonetime.
WExplanation of the symbols on the appliance or accessory
iFollowtheinstructionsintheoperatinginstructions.
YCaution!Rotatingblades.
WCaution!Rotatingtools.
Donotplacengersinthefeedtube.
WImportant!
Itisessentialtocleantheappliancethoroughlyaftereachuseor
afterithasnotbeenusedforanextendedperiod.X“Cleaning and
servicing” see page 10
Safety systems
Start lock-out
See“Operatingpositions”table.
Theappliancecanbeswitchedonin
pos.1and3only:
■ whenthebowl(11)hasbeeninsertedand
turneduntilitlocksintoplace
and
■ theblenderdrivecoverhasbeen
attached(8).
Restart lock-out
Ifthepowerisinterrupted,theappliance
remainsswitchedonbutthemotordoes
notstartrunningagainwhenthepower
isrestored.Toswitchtheapplianceon
again,turntherotaryswitchtoP,then
switchon.
Overload protection
Ifthemotorswitchesitselfoffwhilethe
applianceisbeingused,theoverload
protectionfeaturehasbeenactivated.A
possiblecausemaybethattoomuchfood
wasprocessedatonetime.
If a safety system is activated, see
“Troubleshooting”.
Theoperatinginstructionsdescribeseveral
models,seealsooverviewofmodels
(Fig. M).Theappliancerequiresno
maintenance.
126_MUM58224_250_8001027211.indb 5 10.12.2015 12:31:39

6
en
Overview
Overview
Pleasefoldouttheillustratedpages.
Fig. A:
Base unit
1 Release button
2 Swivel arm
“EasyArmlift”functiontosupportthe
upwardmovementofthearm(see
“Workpositions”).
3 Rotary switch
Whentheappliancehasbeenswitched
off(positionP),theapplianceruns
automaticallytotheoptimumpositionfor
changingthetools.
MUM52..:
P=Stop
M=Instantaneousswitchingat
maximumspeed,holdswitchfor
requiredblendingduration.
Settings1-4,Operatingspeed:
1=lowspeed–slow,
4=highspeed–fast.
MUM54../MUM55../MUM56../MUM58..:
P=Stop
M=Instantaneousswitchingat
maximumspeed,holdswitchfor
requiredblendingduration.
Settings1-7,Operatingspeed:
1=lowspeed–slow,
7=highspeed–fast.
4 On/Off display
(MUM54../55../56../58..)
Islitwhiletheapplianceisoperating
(rotaryswitchonMor1-7).Flashesif
theappliancehasbeenoperatedincor-
rectly,theelectronicfusehastrippedor
theapplianceisdefective–seesection
“Troubleshooting”.
5 Drive cover
Toremovethedrivecover,pressonthe
rearareaandremovecover.
6 Drive for
–Continuous-feed shredder and
–Citrus press(optionalaccessory*)
Whennotinuse,attachthedrivecover.
7 Drive for tools(stirrer,whisk,kneading
hook)and mincer(optionalaccessory*)
8 Blender drive cover
9 Drive for blender(optionalaccessory*)
Whennotinuse,attachtheblender
drivecover.
10 Cord store
MUM52../MUM54../MUM58..:
Stowthecordinthecordstore
MUM55../MUM56..:
Automaticcordwinder
Bowl with accessories
11 Stainless steel stirring bowl
12 Lid
Tools
13 Stirrer
14 Whisk
15 Kneading hook with dough deector
16 Accessories bag
Forstorageofthetoolsandcutting
discs.
Continuous-feed shredder
17 Pusher
18 Cover with lling shaft
19 Cutting discs
a Reversibleslicingdisc–thick/thin
b Reversibleshreddingdisc–
coarse/ne
c Gratingdisc–medium-ne
20 Disc holder
21 Housing with outlet opening
Blender*
22 Blender jug
23 Lid
24 Funnel
*Ifanaccessoryisnotincludedinthe
productpackage,itcanbepurchasedvia
thetradeorcustomerservice.
Operating positions
Fig. B:
Attention!
Beforeoperatingtheappliance,attachthe
tool/accessorytothecorrectdriveand
inthecorrectpositionandplaceinthe
operatingpositionaccordingtothistable.
Theswivelarmmustbeengagedinevery
operatingposition.
126_MUM58224_250_8001027211.indb 6 10.12.2015 12:31:39

7
en
Operation
Note
Theswivelarmfeaturesan“EasyArmlift”
functionwhichsupportstheupwardsmove-
mentoftheswivelarm.
Selecting the operating position:
■ PresstheReleasebuttonandmovethe
swivelarm.Supportmovementwithyour
hand.
■ Movetheswivelarmuntilitengagesin
therequiredposition.
Position Drive MUM52.. MUM
54/55/
56/58..
17
1-4 1-7
1-4 1-7
1-2 1-3
27 * – –
36
2-4 3-7
2-3 3-5
4
93-4 5-7
73-4 5-7
*Insert/removewhisk,stirrerorkneading
hook.Addlargequantitiesofingredients.
Operation
W Risk of injury!
Donotinsertmainspluguntilallprepa-
rationsforworkingwiththeapplianceare
complete.
Attention!
Donotoperatetheappliancewithoutan
accessory/toolintheoperatingposition.Do
notoperatetheapplianceempty.Donot
exposeapplianceoraccessoriestoheat
sources.Partsarenotmicrowave-safe.
■ Beforeoperatingtheapplianceand
accessoriesforthersttime,cleanthor-
oughly;see“Cleaningandservicing”.
Important information
Intheseinstructionsforusetherecom-
mendedreferencevaluesfortheoperating
speedrefertoapplianceswitha7-setting
rotaryswitch.Forapplianceswitha
4-settingrotaryswitchyoucanndthe
valuesinbracketsafterthevaluesfora
7-settingrotaryswitch.
Theseoperatinginstructionscontaina
stickerwithreferencevaluesfortheoper-
atingspeedoftheappliancewhenusing
thetoolsoraccessories.Werecommend
attachingthisstickertotheappliance
(Fig. C).
Preparation
■ Placethebaseunitonasmooth,clean
surface.
■ Pulloutthepowercord(Fig. D).
MUM52../MUM54../MUM58..
Cordstore:
Pulloutcabletotherequired
length.
MUM55../MUM56..
Automaticcordwinder:
Pulloutthecordinonegoto
therequiredlength(max.
100cm)andslowlyrelease;
thecordislocked.
Reducingthecordlength:
Pullgentlyonthecordandallowittoroll
uptotherequiredlength.Thengentlypull
thecordagainandslowlyrelease;the
cableislocked.
126_MUM58224_250_8001027211.indb 7 10.12.2015 12:31:39

8
en
Operation
Warning!
Donottwistthecordwheninsertingit.If
theappliancefeaturesanautomaticcord
winder,donotinsertthecordmanually.If
thecordjams,pulloutthecordalltheway
andthenallowittowindup.
■ Insertthemainsplug.
Bowl and tools
W Risk of injury from the rotating tools
Whiletheapplianceisoperating,never
placengersinthemixingbowl.Attachthe
cover(12)beforeoperatingtheappliance!
Donotchangetoolsuntilthedrivehas
cometoastandstill–whentheappliance
isswitchedoff,thedrivecontinuesrunning
brieyandstopsinthetoolchangeposition.
Donotmovetheswivelarmuntilthetool
hascometoastandstill.
Forreasonsofsafetytheappliancemay
onlybeoperatedwhenunuseddriveshave
beencoveredwithdriveguards(5,8).
Attention!
Usebowlwiththisapplianceonly.
Stirrer (13)
forstirringdough,e.g.cakemixture
Whisk (14)
forwhiskingeggwhites,creamand
lightdough,e.g.spongemixture
Kneading hook (15)
forkneadingheavydoughand
mixinginingredientsthatoughtnot
becut(e.g.raisinsandchocolate
chips)
Working with the bowl and the tools
Fig. E:
■ PresstheReleasebuttonand
movetheswivelarmto
position2.
■ Insertthebowl:
Tiltthebowlforwardsandthensetit
down.Turnanti-clockwiseuntilitlocks
intoplace.
■ Dependingontheprocessingtask,insert
thestirrer,whiskorkneadinghookuntilit
locksintoposition.
Note:
Ifusingthekneadinghook,rotatethedough
deectoruntilthekneadinghookcanlock
intoposition(Fig. E-4b).
■ Puttheingredientstobeprocessedinto
thebowl.
■ PresstheReleasebuttonand
movetheswivelarmto
position1.
■ Attachthecover.
■ Settherotaryswitchtothedesired
setting.
Our recommendation:
– Stirrer:
rststirinatsetting1(1),thenselect
setting7(4)
– Whisk:
setting7(4),mixinatsetting1(1)
– Kneading hook:
rststirinatsetting1(1),kneadat
setting3(2)
Adding more ingredients
■ Switchofftheappliancewiththerotary
switch.
■ Addmoreingredientsthroughthefeed
tubeinthecover.
or
■ Removelid.
■ PresstheReleasebuttonand
movetheswivelarmto
position2.
■ Addingredients.
After using the appliance
■ Switchofftheappliancewiththerotary
switch.
■ Removemainsplug.
■ Removelid.
■ PresstheReleasebuttonand
movetheswivelarmto
position2.
■ Takethetooloutofthedrive.
■ Removethebowl.
■ Cleanallparts,see“Cleaningand
servicing”.
126_MUM58224_250_8001027211.indb 8 10.12.2015 12:31:39

9
en
Operation
Continuous-feed shredder
W Risk of injury
Donotgripthesharpbladesoredgesofthe
cuttingdiscs.Takeholdofcuttingdiscsby
theedgeonly.Beforeattaching/removing
thecontinuousfeedshredder,waituntilthe
drivehascometoastandstillandpullout
themainsplug.Donotreachintothefeed
tube.
Warning!
Thecontinuous-feedshreddermustbe
completelyassembledbeforeuse.Never
assemblethecontinuous-feedshredderon
thebaseunit.Operatethecontinuous-feed
shredderintheindicatedoperatingposition
only.
Predetermined breaking point
Fig. F:
Thebuilt-inpredeterminedbreakingpoint
protectsthedriveoftheappliance.Ifan
overloadoccurs,thedriveshaftofthe
continuous-feedshredderbreaks.However,
thedriveshaftcaneasilybereplaced.A
newdischolderwithdriveshaftisavailable
fromcustomerservice.
Reversible slicing disc –
thick / thin
forslicingfruitandvegetables.
Processatsetting5(3).
Designationonthereversibleslicingdisc:
“1”forthethickslicingside
“3”forthethinslicingside
Warning!
Thereversibleslicingdiscisnotsuitablefor
slicinghardcheese,bread,rollsorchoco-
late.Sliceboiled,waxypotatoesonlywhen
theyarecold.
Reversible shredding disc –
coarse / ne
forshreddingvegetables,fruitandcheese,
exceptforhardcheese(e.g.Parmesan).
Processingatsetting3(2)or4(3).
Designationonthereversibleshredding
disc:
“2”forthecoarseshreddingside
“4”fortheneshreddingside
Warning!
Thereversibleshreddingdiscisnotsuitable
forshreddingnuts.Shredsoftcheesewith
thecoarsesideonlyatsetting7(4).
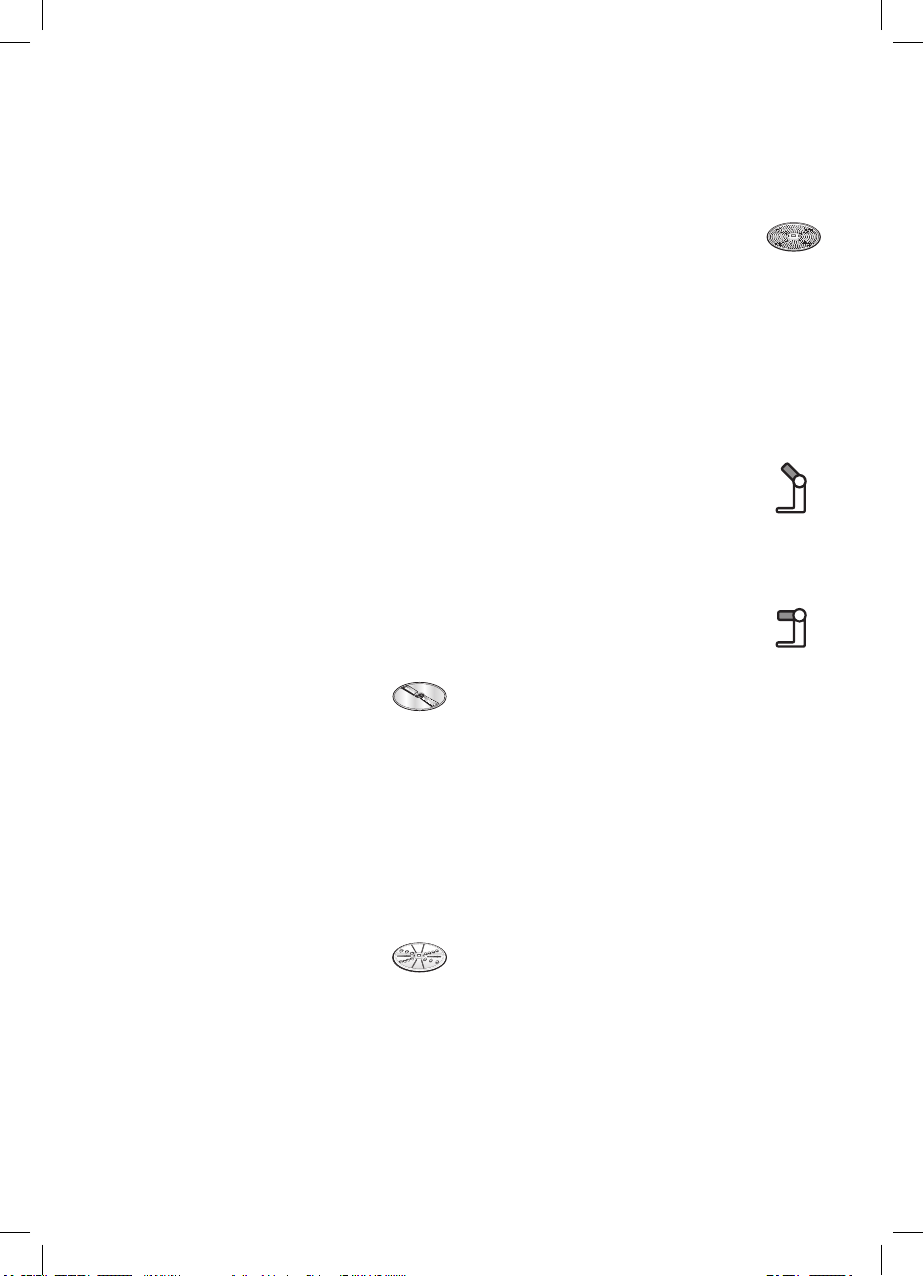
Grating disc – medium-ne
forgratingrawpotatoes,hard
cheese(e.g.Parmesan),cooledchocolate
andnuts.
Processatsetting7(4).
Warning!
Thegratingdiscisnotsuitableforgrating
softcheeseandcheeseslices.
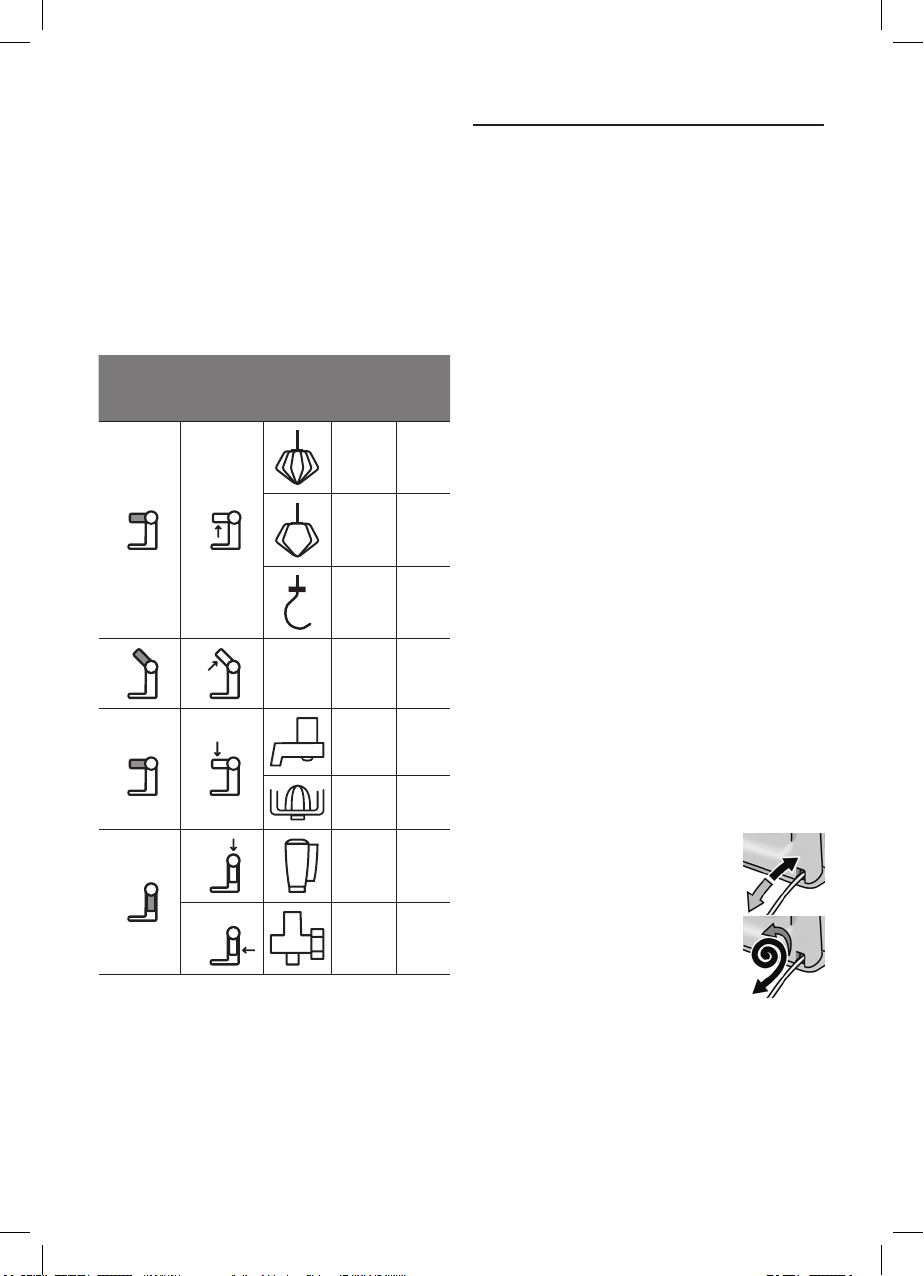
Working with the continuous-feed
shredder
Fig. G:
■ PresstheReleasebuttonand
movetheswivelarmto
position2.
■ Insertthebowl:
Tiltthebowlforwardsandthensetit
down.Turnanti-clockwiseuntilitlocks
intoplace.
■ PresstheReleasebuttonand
movetheswivelarmto
position3.
■ Removedrivecoverfromthedriveofthe
continuous-feedshredder(Fig. G-5a).
■ Holddischolderatthelowerend,
ensuringthatthetwotipsarefaceup.
■ Carefullyplacetherequiredslicingor
shreddingdiscontothetipsofthedisc
holder(Fig. G-6a).
Inthecaseofreversiblediscs,ensure
thattherequiredsideisfaceup.
■ Gripdischolderattheupperendand
insertintothehousing(Fig. G-6b).
■ Attachthecover(notemark)andturnall
thewayinaclockwisedirection.
■ Placecontinuous-feedshredderonthe
driveandrotateallthewayinaclockwise
direction,asillustratedinFig. G-8.
■ Turnrotaryswitchtorecommended
setting.
■ Putfoodtobeprocessedinthefeedtube
andpushdownwiththepusher.
Warning!
Preventthecutingredientsfrombuildingup
intheoutletopening.
126_MUM58224_250_8001027211.indb 9 10.12.2015 12:31:40

10
en
Cleaningandservicing
Tip:Toensureevencuttingresults,process
thiningredientsinbunches.
Note:Ifthefoodtobeprocessedsticksin
thecontinuous-feedshredder,switchfood
processoroff,pulloutmainsplug,waituntil
thedrivecomestoastandstill,remove
coverfromthecontinuous-feedshredder
andemptyfeedtube.
After using the appliance
■ Switchofftheappliancewiththerotary
switch.
■ Rotatethecontinuous-feedshredderin
ananti-clockwisedirectionandremove.
■ Rotatethelidinananti-clockwisedirec-
tionandremove.
■ Removedischolderwithdisc.Todothis,
pressngerfrombelowagainstthedrive
shaft(Fig. H).
■ Cleanparts.
Blender
W Risk of injury from sharp blades /
rotating drive!
Neverplacengersintheattachedblender!
Donotremove/attachtheblenderuntilthe
driveisatastandstill!Operatetheassem-
bledblenderonlyandwiththelidattached.
W Risk of scalding!
Ifprocessinghotliquids,steamescapes
throughthefunnelinthelid.Adda
max.0,5litresofhotorfrothingliquid.
Warning!
Blendermaybedamaged.Donotprocess
deep-frozeningredients(excepticecubes).
Donotoperateblenderwhenempty.
Working with the blender
Fig. J:
■ Pressthereleasebuttonand
movetheswivelarmto
position4.
■ Removetheblenderdrivecover.
■ Attachblenderjug(markonthehandle
onmarkonthebaseunit)andturnallthe
wayinananti-clockwisedirection.
■ Addingredients.
Maximumamountofliquid=1.25litres;
maximumamountoffrothingorhot
liquids=0.5litres;
Optimalprocessingcapacity–
solids=50-100g;
■ Attachthecoverandturnanti-clockwise
allthewayintotheblenderhandle.The
covermustbelockedinposition.
■ Settherotaryswitchtothedesired
setting.
Adding more ingredients
Fig. J-8:
■ Switchofftheappliancewiththerotary
switch.
■ Removethelidandaddingredients
or
■ removethefunnelandgraduallyaddsolid
ingredientsthroughtherellopening
or
■ pourliquidingredientsthroughthefunnel.
After using the appliance
■ Switchofftheappliancewiththerotary
switch.
■ Rotatetheblenderinaclockwisedirec-
tionandremove.
Tip:Itisrecommendedtocleantheblender
immediatelyafteruse.
Cleaning and servicing
Attention!
Donotuseabrasivecleaningagents.
Surfacesmaybedamaged.
Cleaning the base unit
W Danger of electric shock!
Neverimmersethebaseunitinwateror
placeunderrunningwater.Donotusea
steamcleaner.
■ Removemainsplug.
■ Wipethebaseunitanddrivecoverwith
adampcloth.Ifrequired,usealittle
detergent.
■ Thendrythebaseunit.
126_MUM58224_250_8001027211.indb 10 10.12.2015 12:31:40

11
en
Storage
Cleaning the bowl and tools
Thebowlandtoolsaredishwasher-proof.
Donotwedgeplasticpartsinthedish-
washer,astheycouldbepermanently
deformedduringthewashingprocess!
Cleaning the continuous-feed
shredder
Allpartsofthecontinuous-feedshredder
aredishwasher-proof.
Tip:Toremovetheredlmafterprocessing
e.g.carrots,pouralittlecookingoilon
aclothandrubthelmoffthecontinu-
ous-feedshredder(notthecuttingdiscs).
Thenrinsethecontinuous-feedshredder.
Cleaning the blender
W Risk of injury from sharp blades!
Donottouchblenderbladeswithbare
hands.
Theblenderjug,lidandfunnelare
dishwasher-proof.
Tip: Afterprocessingliquids,itisoftensuf-
cienttocleantheblenderwithoutremoving
itfromtheappliance.Pouralittlewaterand
washing-upliquidintotheattachedblender.
Switchontheblenderforseveralseconds
(settingM).Pouroutthewaterandrinseout
theblenderwithclearwater.
Important information
Ifrequired,cleanaccessoriesbag.Follow
careinstructionsinthebag.
Storage
W Risk of injury!
Whentheapplianceisnotinuse,pullout
themainsplug.
Fig. K:
■ Storetoolsandcuttingdiscsintheacces-
soriesbag.
■ Keepaccessoriesbaginthebowl.
■ Tostoreintheoriginalpackaging,see
Fig. L.
Troubleshooting
W Risk of injury!
Beforeeliminatingafault,pulloutthemains
plug.
Important information for
MUM54../MUM55../MUM56../MUM58..
TheOperatingindicatorashesiftheappli-
ancehasbeenoperatedincorrectlyorthe
electronicfusehastrippedortheappliance
isdefective.
The swivel arm must be engaged in
every operating position.
Initiallytrytoeliminatetheproblemwhich
hasoccurredwiththehelpofthefollowing
information.
Fault
Appliancedoesnotstart.
Remedial action
■ Checkthepowersupply.
■ Checkthemainsplug.
■ Checkswivelarm.Correctposition?
Engaged?
■ Screwonblenderorbowlasfaras
possible.
■ Attachtheblendercoverandscrewonas
faraspossible.
■ Attachdrivecovertounuseddrives.
■ Thesafetylockisactive.Switch
appliancetoPandthenbacktothe
requiredsetting.
Fault
Applianceswitchesoffduringuse.The
overloadprotectionfeaturehasbeen
activated.Toomuchfoodwasprocessedat
onetime.
Remedial action
■ Switchofftheappliance.
■ Reduceprocessingquantity.
■ Donotexceedpermittedmaximumquan-
tities(see“Applicationexamples”).
Fault
Whilethedrivewasrunning,therelease
buttonwasinadvertentlypressed.The
swivelarmmovesup.Thedriveswitches
off,butdoesnotstopinthetoolchange
position.
126_MUM58224_250_8001027211.indb 11 10.12.2015 12:31:40

12
en
Applicationexamples
Remedial action
■ SettherotaryswitchtoP.
■ Moveswivelarmtoposition1.
■ Switchonappliance(setting1).
■ Switchoffapplianceagain.
Toolstopsintoolchangeposition.
Fault
Blenderdoesnotstartworkingorstopsduring
use,thedriveis“humming”.Bladeisblocked.
Remedial action
■ Switchofftheapplianceandpulloutthe
mainsplug.
■ Detachtheblenderandremovethe
obstruction.
■ Re-attachtheblender.
■ Switchontheappliance.
Important information
Ifthefaultcannotbeeliminated,please
contactcustomerservice.
Application examples
Whipped cream
– 100g-600g
■ Whipcreamwiththewhiskfor
1½to4minutesatsetting7(4)
dependingonthequantityandproperties
ofthecream.
Egg white
– 1to8eggwhites
■ Beateggwhitewiththewhiskfor
4to6minutesatsetting7(4).
Sponge mixture
Basic recipe
– 2eggs
– 2-3tbs.hotwater
– 100gsugar
– 1packetofvanillasugar
– 70gour
– 70gcornour
– Bakingpowderifrequired
■ Beattheingredients(exceptourand
cornour)withthewhiskforapprox.
4-6minutesatsetting7(4)untilfrothy.
■ Rotateswitchtosetting1(1)andspoon
inthesiftedourandcornourwithin
approx.½to1minute.
Maximum quantity:2xbasicrecipe
Cake mixture
Basic recipe
– 6eggs
– 500gsugar
– 1pinchofsalt
– 2packetsofvanillasugarorpeelfrom
½lemon
– 500gbutterormargarine
(roomtemperature)
– 1000gour
– 1packetofbakingpowder
– 250mlmilk
■ Mixtheeggs,sugar,saltandvanilla
sugarorlemonpeelwiththestirrerfor
approx.10secondsatsetting1(1).
■ Settosetting5(3)andprocessfor
approx.120seconds.
■ Addbutterandprocessforapprox.
60secondsatsetting3(2).
■ Addourandbakingpowderandprocess
forapprox.2minutesatsetting1(1).
■ Settosetting3(2)andgraduallyaddthe
milkwithin2minutes.
Maximum quantity:1xbasicrecipe
Short pastry
Basic recipe
– 125gbutter
(roomtemperature)
– 100-125gsugar
– 1egg
– 1pinchofsalt
– Alittlelemonpeelorvanillasugar
– 250gour
– Bakingpowderifrequired
■ Usingthestirrer,processallingredients
forapprox.½minuteatsetting1(1),then
forapprox.2-3minutesatsetting6(3).
From500gour:
■ Kneadtheingredientswiththekneading
hookforapprox.½minuteatsetting1(1),
thenforapprox.3-4minutesatsetting
3(2).
Maximum quantity:2xbasicrecipe
126_MUM58224_250_8001027211.indb 12 10.12.2015 12:31:40

13
en
Disposal
Yeast dough
Basic recipe
– 500gour
– 1egg
– 80gfat(roomtemperature)
– 80gsugar
– 200-250mllukewarmmilk
– 25gfreshyeastor1packetofdried
yeast
– Peelof½lemon
– 1pinchofsalt
■ Processallingredientsforapprox.
½minuteatsetting1,thenforapprox.
3-6minutesatsetting3(2)usingthe
kneadinghook.
Maximum quantity:2xbasicrecipe
Pasta dough
Basic recipe
– 300gour
– 3eggs
– 1-2tbs.(10-20g)coldwaterasrequired
■ Processallingredientsforapprox.
3-5minutesatsetting3(2)untiladough
forms.
Maximum quantity:1,5xbasicrecipe
Bread dough
Basic recipe
– 1000gour
– 3packetsofdryyeast
– 2tsp.salt
– 660mlwarmwater
■ Processallingredientsforapprox.
½minuteatsetting1,thenforapprox.
4-5minutesatsetting3(2)usingthe
kneadinghook.
Mayonnaise
– 2eggs
– 2tsp.mustard
– ¼loil
– 2tbs.lemonjuiceorvinegar
– 1pinchofsalt
– 1pinchofsugar
Ingredientsmustbeatthesame
temperature.
■ Processtheingredients(excepttheoil)in
theblenderforseveralsecondsatsetting
3(2)or4(3).
■ Switchtheblendertosetting7(4)and
slowlypourtheoilthroughthefunneland
mixuntilthemayonnaiseemulsies.
Eat the mayonnaise immediately, do not
store.
Disposal
J Disposeofpackaginginanenviron-
mentally-friendlymanner.This
applianceislabelledinaccordance
withEuropeanDirective2012/19/EU
concerningusedelectricaland
electronicappliances(wasteelectrical
andelectronicequipment–WEEE).
Theguidelinedeterminestheframe-
workforthereturnandrecycling
ofusedappliancesasapplicable
throughouttheEU.Pleaseaskyour
specialistretaileraboutcurrent
disposalfacilities.
Guarantee
Theguaranteeconditionsforthisappliance
areasdenedbyourrepresentativeinthe
countryinwhichitissold.Detailsregarding
theseconditionscanbeobtainedfrom
thedealerfromwhomtheappliancewas
purchased.Thebillofsaleorreceiptmust
beproducedwhenmakinganyclaimunder
thetermsofthisguarantee.
Changesreserved.
126_MUM58224_250_8001027211.indb 13 10.12.2015 12:31:41

14
en Optionalaccessories
Optional accessories
MUZ5ZP1
Citruspress
Forsqueezingoranges,lemonsandgrapefruits.
MUZ5CC1
Dicer
Forcuttingfruitandvegetablesintoequallysizedcubes.
MUZ5FW1
Mincer
Forcuttingfreshmeatforsteaktartareormeatloaf.
MUZ45LS1
Perforated
discset
ne(3mm),
coarse(6mm)
ForthemincerMUZ5FW1.
Finediscforpastiesandspreads,coarsediscfor
sausagesandbacon.
MUZ45SV1
Viennesewhirl
attachment
ForthemincerMUZ5FW1.
Withmetaltemplatefor4differentpastrymoulds.
MUZ45RV1
Grater
attachment
ForthemincerMUZ5FW1.
Forgratingnuts,almonds,chocolateanddriedbread
rolls.
MUZ45FV1
Juicer
attachment
ForthemincerMUZ5FW1.
Forpressingsoftfruit,exceptraspberries,tomatoesand
rosehips,toapulp.Atthesametimee.g.currantsare
automaticallystemmedandpitted.
MUZ45PS1
Chipperdisc
Forthecontinuous-feedshredderMUZ5DS1.
Forslicingrawpotatoesforchips.
MUZ45AG1
Asian
vegetabledisc
Forthecontinuous-feedshredderMUZ5DS1.
SlicesfruitandvegetablesintonestripsforAsian
vegetabledishes.
126_MUM58224_250_8001027211.indb 14 10.12.2015 12:31:41

15
en Optionalaccessories
MUZ45RS1
Gratingdisc
coarse
Forthecontinuous-feedshredderMUZ5DS1.
Forgratingrawpotatoes,e.g.forpotatopancakesor
dumplings.
MUZ45KP1
Potatofritter
disc
Forthecontinuous-feedshredderMUZ5DS1.
Forgratingrawpotatoesforrostisandpotatofritters,for
cuttingfruitandvegetablesintothickslices.
MUZ5ER2
Stainlesssteel
stirringbowl
Upto750gofourplusingredientscanbeprocessedin
thebowl.
MUZ5KR1
Plasticmixing
bowl
Upto750gofourplusingredientscanbeprocessedin
thebowl.
MUZ5MX1
Plasticblender
attachment
Forblendingdrinks,forpureeingfruitandvegetables,for
preparingmayonnaise,forcuttingfruit,nuts,forcrushing
icecubes.
MUZ5MM1
Multi-mixer
Forchoppingherbs,vegetables,applesandmeat,for
shreddingcarrots,radishesandcheese,forgratingnuts
andcooledchocolate.
Ifanaccessoryisnotincludedintheproductpackage,itcanbepurchasedviathetradeor
fromcustomerservice.
126_MUM58224_250_8001027211.indb 15 10.12.2015 12:31:41

16
pl
Dlawłasnegobezpieczeństwa
SerdeczniegratulujemyPaństwuzakupu
nowegourządzeniamarkiBosch.
Dalszeinformacjedotyczącenaszychpro-
duktówznajdąPaństwonanaszejstronie
internetowej.
Spis treści
Dlawłasnegobezpieczeństwa.................16
Systemyzabezpieczające........................19
Opisurządzenia........................................19
Pozycjerobocze.......................................20
Obsługa....................................................21
Czyszczenieipielęgnacja........................24
Przechowywanie.......................................25
Usuwaniedrobnychusterek.....................25
Przykładyzastosowania...........................26
Ekologicznautylizacja..............................28
Gwarancja................................................28
Akcesoriadodatkowe...............................29
Dla własnego bezpieczeństwa
Przedużyciemurządzenianależystarannieprzeczytaćniniejszą
instrukcjęobsługi,abyzapoznaćsięzewskazówkamibezpieczeń-
stwaiobsługi.Niezastosowaniesiędowskazówekprawidłowego
korzystaniazurządzeniawykluczaodpowiedzialnośćproducentaza
wynikłeszkody.
Tourządzeniejestprzeznaczonedoprzygotowywaniamałych
ilościproduktunaużytekdomowylubwwarunkachzbliżonychdo
domowych,dozastosowańniekomercyjnych.Warunkizbliżonedo
domowychobejmująnaprzykładzastosowaniewkuchniachdla
pracownikówsklepów,biurach,gospodarstwachrolnychiinnych
małychrmach.Urządzeniemożebyćtakżeużywaneprzezgości
wpensjonatach,małychhotelachipodobnychobiektachmieszkal-
nych.Używaćtylkodlatakiejilościproduktówiczasuprzygotowa-
nia,któresątypowedlagospodarstwadomowego.Nieprzekraczać
maksymalniedopuszczalnejilościproduktów(patrz„Przykłady
zastosowania”)!
Niniejszeurządzenienadajesiędomieszania,zagniataniaoraz
ubijaniaproduktówspożywczych.Niewolnoużywaćurządzenia
doprzetwarzaniainnychprzedmiotówlubsubstancjioprócztych
zaleconychprzezproducenta.Przystosowaniuwyposażenia
dozwolonegoprzezproducentamożliwesądalszezastosowania.
Urządzenieeksploatowaćtylkozoryginalnymwyposażeniem.
Przystosowaniuwyposażeniaprzestrzegaćwskazówekzawartych
winstrukcjachobsługidołączonychdowyposażenia.Instrukcję
obsługiproszęstarannieprzechowywać.Proszęprzekazaćinstruk-
cjęwrazzurządzeniemewentualnemukolejnemuwłaścicielowi.
126_MUM58224_250_8001027211.indb 16 10.12.2015 12:31:41

17
pl
Dlawłasnegobezpieczeństwa
Ogólne wskazówki bezpieczeństwa
WNiebezpieczeństwo porażenia prądem!
Niewolnodzieciomobsługiwaćtegourządzenia.Urządzeniewraz
zelektrycznymprzewodemzasilającymnależyprzechowywać
zdalaoddzieci.Urządzeniamogąbyćobsługiwaneprzezosoby
oograniczonychzdolnościachzycznych,czuciowychlubumysło-
wychalbonieposiadającychodpowiedniegodoświadczenia/wiedzy
tylkopodkontroląosobyodpowiadającejzabezpieczeństwoosoby
obsługującejurządzenielubpodokładnympouczeniuwobsłudze
urządzeniaorazpozrozumieniuzagrożeńwynikającychzobsługi
urządzenia.Dzieciomniewolnobawićsięurządzeniem.Niewolno
dzieciomprzeprowadzaćjakichkolwiekpraczwiązanychzczyszcze-
niemlubkonserwacjąurządzeniabeznadzoru.
Niepozostawiaćwłączonegourządzeniabeznadzoru.
Urządzenienależypodłączyćiużytkowaćzgodniezparametrami
podanyminatabliczceznamionowej.Urządzeniewolnoużywać
tylkowpomieszczeniach,wtemperaturzepokojowejinawysokości
niewiększejniż2000mn.p.m.
Zawszewyłączaćurządzenie,gdyjestbeznadzoru,przedmonta-
żemidemontażemorazprzedczyszczeniem.
Niewolnoocieraćelektrycznegoprzewoduzasilającegooostrekra-
wędzieanigorącepowierzchnie.Urządzeniamożnaużywaćtylko
wtedy,gdyelektrycznyprzewódzasilającyisamourządzenieniesą
uszkodzone.Abyuniknąćzagrożeńwprzypadkuuszkodzeniaprze-
woduzasilającegonależyzlecićjegowymianęwyłącznieproducen-
towialbojegoautoryzowanemuserwisowilubosobieopodobnych
kwalikacjachiodpowiednichuprawnieniach.Naprawyurządzenia
możeprzeprowadzićtylkonaszautoryzowanypunktserwisowy.
Wskazówki bezpieczeństwa dla pracy z niniejszym
urządzeniem
WNiebezpieczeństwo zranienia!
WNiebezpieczeństwo porażenia prądem!
Włożyćwtyczkędogniazdkasieciowegodopierowtedy,gdywszyst-
kieprzygotowaniadopracyzurządzeniemzostałyzakończone.
Proszęwyjąćwtyczkęzgniazdkasieciowego,jeżeliurządzenienie
jestużywane.Przedprzystąpieniemdousuwaniaustereknależy
zawszenajpierwwyjąćwtyczkęzgniazdkasieciowego.
Korpusuurządzenianigdyniezanurzaćwcieczachanimyćpod
bieżącąwodą.Niewolnostosowaćurządzeńczyszczącychstru-
mieniempary.Urządzeniewłączaćiwyłączaćtylkoprzełącznikiem
obrotowym.
126_MUM58224_250_8001027211.indb 17 10.12.2015 12:31:41

18
pl
Dlawłasnegobezpieczeństwa
WNiebezpieczeństwo skaleczenia obracającymi się
narzędziami!
Przedwymianąelementówwyposażenialubczęścidodatkowych,
któreznajdująsięwruchupodczaspracyurządzenia,należykoniecz-
niewyłączyćurządzenieiwyjąćwtyczkęzgniazdkasieciowego.Po
wyłączeniuurządzenianapędpracujejeszczekrótkąchwilęizatrzy-
mujesięwpozycjiwymianynarzędzi.Niezmieniaćpołożeniaramienia
urządzenia,jeżeliurządzeniejestwłączone.Zaczekać,ażnapędcał-
kowiciesięzatrzyma.Niezbliżaćrąkdowirującychczęści.Podczas
pracyurządzenianiewolnowkładaćrąkdomiski.Niewkładaćpalców
dootworuwsypowego.Pracowaćtylkozzałożonąpokrywą!Zewzglę-
dówbezpieczeństwamożnawłączaćurządzenietylkowtedy,gdy
nieużywanenapędysązasłoniętepokrywamiochronnymi.
WNiebezpieczeństwo zranienia ostrymi nożami!
Niedotykaćostrychnożyikrawędzitarczrozdrabniających.Tarcze
rozdrabniającechwytaćtylkozabrzeg!Nożymikseraniechwytać
gołymirękoma.
WNiebezpieczeństwo skaleczenia ostrymi nożami /
obracającym się napędem!
Nigdyniewkładaćrąkdozałożonegomiksera!Miksermożna
włączaćtylkokompletniezmontowanyizzałożonąpokrywą.
WNiebezpieczeństwo poparzenia!
Podczasprzetwarzaniagorącychproduktówprzezlejekwpokrywie
wydostajesiępara.Wlewaćmaksymalnie0,5litragorącychlubpie-
niącychsiępłynów.
WUwaga!
Urządzenieeksploatowaćtylkozoryginalnymwyposażeniem.
Przystosowaniuwyposażeniaprzestrzegaćwskazówekzawartych
winstrukcjachobsługidołączonychdowyposażenia.Wtymsamym
czasieużywaćtylkojednegonarzędzialubwyposażenia.
WObjaśnienie symboli na urządzeniu lub wyposażeniu
iProszęprzestrzegaćwskazówekzawartychwinstrukcji
obsługi.
YOstrożnie!Obracającesięnoże.
WOstrożnie!Obracającesięnarzędzia.
Niewkładaćrąkdootworuwsypowego.
WUwaga!
Urządzenienależykoniecznieczyścićpokażdymużyciulubpo
dłuższymokresienieużywania.X „Czyszczenie i pielęgnacja” patrz
strona 24
126_MUM58224_250_8001027211.indb 18 10.12.2015 12:31:41

19
pl
Systemyzabezpieczające
Systemy zabezpieczające
Blokada włączenia
Patrztabela„Pozycjerobocze“.
Urządzeniedajesięwłączaćwpozycjach1
i3tylkowtedy:
■ gdymiska(11)jestzałożonaiprzekrę-
conaażdozatrzasku
oraz
■ gdypokrywaosłaniającanapędmiksera
(8)jestzałożona.
Zabezpieczenie przed ponownym
włączeniem
Wprzypadkuprzerwywdopływieprądu,
urządzeniepozostajewłączone,leczsilnik
niezaczynieponowniepracować,gdy
zasilaniezostanieprzywrócone.Wcelu
ponownegowłączeniaurządzeniaustawić
przełącznikobrotowynaP;następnie
włączyćurządzenie.
Zabezpieczenie przed
przeciążeniem
Jeżelipodczaspracyurządzeniasilnik
wyłączysięsamoczynnie,oznaczato,że
włączyłsięsystemzabezpieczeniaprzed
przeciążeniem.Możliwąprzyczynąmoże
byćzbytdużailośćproduktówspożywczych
przetwarzanychnaraz.
Sposób postępowania w przypadku
zadziałania któregoś systemu zabez-
pieczającego opisany jest w rozdziale
„Usuwanie drobnych usterek“.
Instrukcjaobsługiopisujerożnewersje
urządzenia,patrzprzeglądmodeli(rys.M).
Urządzenieniewymagaprzeglądówani
konserwacji.
Opis urządzenia
Proszęotworzyćskładanekartki
zrysunkami.
Rysunek A:
Korpus urządzenia
1 Przycisk zwalniający
2 Ramię urządzenia
Funkcja„EasyArmlift“wspierająca
poruszaniesięramieniaurządzenia
wgórę(patrz„Pozycjerobocze“).
3 Przełącznik obrotowy
Powyłączeniu(położenieP)
urządzeniepracujejeszczechwilę
izatrzymujesięautomatyczniewpozycji
optymalnejdowymianynarzędzi.
MUM52..:
P=stop
M=włączeniechwiloweznajwyższą
prędkościąobrotową,przytrzymać
przełącznikprzezpotrzebnyokres
miksowania.
Zakresy1-4,prędkośćpracy:
1=niskaprędkośćobrotowa–wolna,
4=wysokaprędkośćobrotowa–
szybka.
MUM54../MUM55../MUM56../MUM58..:
P=stop
M=włączeniechwiloweznajwyższą
prędkościąobrotową,przytrzymać
przełącznikprzezpotrzebnyokres
miksowania.
Zakresy1-7,prędkośćpracy:
1=niskaprędkośćobrotowa–wolna,
7=wysokaprędkośćobrotowa–szybka.
4 Wskaźnik pracy
(MUM54../55../56../58..)
Świecisiępodczaspracy(przełącznik
obrotowynaMlub1–7).Migaprzy
błędnejobsłudzeurządzenia,przy
uruchomieniuelektronicznego
zabezpieczenialubprzyuszkodzeniu
urządzenia,patrzrozdział„Usuwanie
drobnychusterek“.
5 Pokrywa osłaniająca napęd
Wceluzdjęciapokrywyosłaniającej
napędnacisnąćnatylnączęśćpokrywy,
anastępniezdjąćją.
6 Napęd dla
– rozdrabniacza oraz
–wyciskarki do owoców cytrusowych
(wyposażeniedodatkowe*)
Jeżelinapędniejestużywany,należy
nałożyćpokrywęosłaniającą.
7 Napęd dla narzędzi
(końcówkadomieszania,do
ubijania,hakdozagniatania)oraz
dla przystawki do mielenia mięsa
(wyposażeniedodatkowe*)
8 Pokrywa osłaniająca napęd miksera
126_MUM58224_250_8001027211.indb 19 10.12.2015 12:31:41

20
pl
Pozycjerobocze
9 Napęd miksera(wyposażenie
dodatkowe*)
Jeżelimikserniejestużywany,tonależy
nałożyćpokrywęosłaniającąnapęd
miksera.
10 Schowek na przewód elektryczny
MUM52../MUM54../MUM58..:
Umieścićprzewódwschowku
MUM55../MUM56..:
Automatycznezwijanieprzewodu
Miska z wyposażeniem
11 Miska do mieszania ze stali
nierdzewnej
12 Pokrywa
Narzędzia
13 Końcówka do mieszania
14 Końcówka do ubijania
15 Hak do zagniatania z odgarniaczem
ciasta
16 Torba na akcesoria
Doprzechowywanianarzędziitarcz
rozdrabniających.
Rozdrabniacz
17 Popychacz
18 Pokrywa z otworem wsypowym
19 Tarcze rozdrabniające
a Dwustronnatarczadokrojenia
naplasterki–grubo/cienko
b Dwustronnatarczadotarciana
wiórki–grubo/drobno
c Tarczadotarcia–średnio
20 Uchwyt tarcz
21 Obudowa z otworem wyrzutowym
Mikser*
22 Pojemnik miksera
23 Pokrywa
24 Lejek
*Jeżelijakiśelementwyposażenianie
należydozakresudostawy,możnago
dokupićwsklepachlubzapośrednictwem
naszegoserwisu.
Pozycje robocze
Rysunek B:
Uwaga!
Urządzeniewłączaćtylkowtedy,gdy
narzędzie/wyposażeniejestzamocowane
jakpokazanowtabelinaodpowiednim
napędzie,wewłaściwejpozycjiiustawione
wpołożeniupracy.Ramięurządzeniamusi
zaskoczyćwkażdejpozycjiroboczej.
Wskazówka
Ramięurządzeniajestwyposażone
wfunkcję„EasyArmlift“wspierającąporu-
szaniesięramieniawgórę.
Ustawianie pozycji roboczej:
■ Nacisnąćprzyciskzwalniającyblokadę
iprzekręcićramięurządzenia.Wspoma-
gaćrękąruchramieniaurządzenia.
■ Przesunąćramięurządzeniadożądanej
pozycjiażdozatrzaśnięcia.
Pozycja Napęd MUM
52..
MUM54/
55/56/58..
17
1-4 1-7
1-4 1-7
1-2 1-3
27 * – –
36
2-4 3-7
2-3 3-5
4
9 3-4 5-7
73-4 5-7
*Wkładanie/wyjmowaniekońcówkidoubi-
jania,domieszaniaihakadozagniatania,
dodawaniewiększejilościproduktów.
126_MUM58224_250_8001027211.indb 20 10.12.2015 12:31:42
Table of contents
Languages:
Other Bosch Food Processor manuals

Bosch
Bosch MultiTalent MC812-G Series User manual

Bosch
Bosch MUM56320CH User manual

Bosch
Bosch MCM68840 User manual

Bosch
Bosch MUM58 Series User manual

Bosch
Bosch MUZ9RV1 User manual

Bosch
Bosch 3 User manual

Bosch
Bosch MCM20 Series User manual

Bosch
Bosch MUM57 SERIES User manual

Bosch
Bosch MUM86W1 User manual

Bosch
Bosch MUM50 Series User manual

Bosch
Bosch MUM46A1GB User manual

Bosch
Bosch MUM52 series User manual

Bosch
Bosch MUM48RE User manual

Bosch
Bosch MUM58234 User manual

Bosch
Bosch Professional MUM57B224 User manual

Bosch
Bosch MUZ45 Series User manual

Bosch
Bosch MUM XL...GB User manual

Bosch
Bosch MUM5 User manual

Bosch
Bosch MUM54 series User manual

Bosch
Bosch MUM58 Series User manual