Deutsch | 9
Bosch Power Tools 2 609 006 717 | (26.11.13)
Deutsch
Sicherheitshinweise
Lesen Sie alle Sicherheitshinweise und Anwei-
sungen. Versäumnisse bei der Einhaltung der Si-
cherheitshinweise und Anweisungen können
elektrischen Schlag, Brand und/oder schwere
Verletzungen verursachen.
Bewahren Sie alle Sicherheitshinweise und Anweisungen
für die Zukunft auf.
Halten Sie Ihren Arbeitsbereich sauber und gut be-
leuchtet.UnordnungoderunbeleuchteteArbeitsbereiche
können zu Unfällen führen.
Arbeiten Sie mit dem Elektrowerkzeug nicht in explosi-
onsgefährdeter Umgebung, in der sich brennbare Flüs-
sigkeiten, Gase oder Stäube befinden. Elektrowerkzeu-
ge erzeugen Funken, die den Staub oder die Dämpfe
entzünden können.
Der Anschlussstecker des Elektrowerkzeuges muss in
dieSteckdosepassen.DerSteckerdarfinkeinerWeise
verändert werden. Verwenden Sie keine Adapterste-
cker gemeinsam mit schutzgeerdeten Elektrowerkzeu-
gen.Unveränderte Stecker und passendeSteckdosen ver-
ringern das Risiko eines elektrischen Schlages.
Halten Sie das Gerät von Regen oder Nässe fern. Das
Eindringen von Wasser in ein Elektrowerkzeug erhöht das
Risiko eines elektrischen Schlages.
Zweckentfremden Sie das Kabel nicht, um das Elektro-
werkzeugzutragen,aufzuhängenoderumdenStecker
aus der Steckdose zu ziehen. Halten Sie das Kabel fern
von Hitze, Öl, scharfen Kanten oder sich bewegenden
Geräteteilen. Beschädigte oder verwickelte Kabel erhö-
hen das Risiko eines elektrischen Schlages.
Wenn Sie mit einem Elektrowerkzeug im Freien arbei-
ten, verwenden Sie nur Verlängerungskabel, die auch
für den Außenbereich zugelassen sind. Die Anwendung
eines für den Außenbereich geeigneten Verlängerungska-
bels verringert das Risiko eines elektrischen Schlages.
Wenn der Betrieb des Elektrowerkzeuges in feuchter
Umgebung nicht vermeidbar ist, verwenden Sie einen
Fehlerstromschutzschalter. Der Einsatz eines Fehler-
stromschutzschalters vermindert das Risiko eines elektri-
schen Schlages.
BenutzenSiekeinElektrowerkzeug,dessen Schalter de-
fekt ist. Ein Elektrowerkzeug, das sich nicht mehr ein- oder
ausschalten lässt, ist gefährlich und muss repariert werden.
Beaufsichtigen Sie Kinder. Damit wird sichergestellt,
dass Kinder nicht mit dem elektrischen Farbroller spielen.
Kinder und Personen, die aufgrund ihrer physischen,
sensorischenoder geistigen FähigkeitenoderihrerUn-
erfahrenheit oder Unkenntnis nicht in der Lage sind,
den elektrischen Farbroller sicher zu bedienen, dürfen
diesen elektrischen Farbroller nicht ohne Aufsicht
oderAnweisungdurcheineverantwortlichePersonbe-
nutzen. Andernfalls besteht die Gefahr von Fehlbedie-
nung und Verletzungen.
Überprüfen Sie vor jeder Benutzung die Basiseinheit,
Kabel und Stecker. Benutzen Sie die Basiseinheit
nicht, sofern Sie Schäden feststellen. Öffnen Sie die
Basiseinheit nicht selbst und lassen Sie es nur von qua-
lifiziertem Fachpersonal und nur mit Original-Ersatz-
teilen reparieren. Eine beschädigte Basiseinheit und be-
schädigte Kabel und Stecker erhöhen das Risiko eines
elektrischen Schlages.
Verwenden Sie nur Anstrichmittel, die im bestim-
mungsgemäßen Gebrauch angegeben sind. Nicht zuge-
lassene Anstrichmittel (wie z.B. Lacke, Ölfarben etc.) kön-
nen den elektrischen Farbroller beschädigen.
Geben Sie acht auf etwaige Gefahren des Anstrich-
mittels. Beachten Sie die Herstellerinformationen des
Anstrichmittels. Den Herstelleranweisungen ist Folge zu
leisten, um das Risiko von Verletzungen zu verringern.
Führen Sie den Förderschlauch immer von sich weg
und arbeiten Sie insbesondere nicht auf Leitern oder
Gerüsten. Ein Stolpern über den Förderschlauch kann zu
Verletzungen führen.
Reinigen Sie nur mit Materialien auf der Basis von Was-
ser. Leichtflüchtige verdunstende Lösemittel schaffen ei-
ne explosive Umgebung und können den elektrischen
Farbroller beschädigen
Symbole
Die nachfolgenden Symbole können für den Gebrauch Ihres
Elektrowerkzeugs von Bedeutung sein. Prägen Sie sich bitte
die Symbole und ihre Bedeutung ein. Die richtige Interpretati-
on der Symbole hilft Ihnen, das Elektrowerkzeug besser und
sicherer zu gebrauchen.
Symbol Bedeutung
Warten Sie bis der Rotor komplett
zum Stillstand gekommen ist. Das
BerühreneinessichdrehendenRotors
kann zu Verletzungen führen.
Höhenverstellbare Farbeimerkopplung
an die Höhe des Farbeimers anpassen:
Basiseinheit muss immer eben auf dem
Boden stehen.
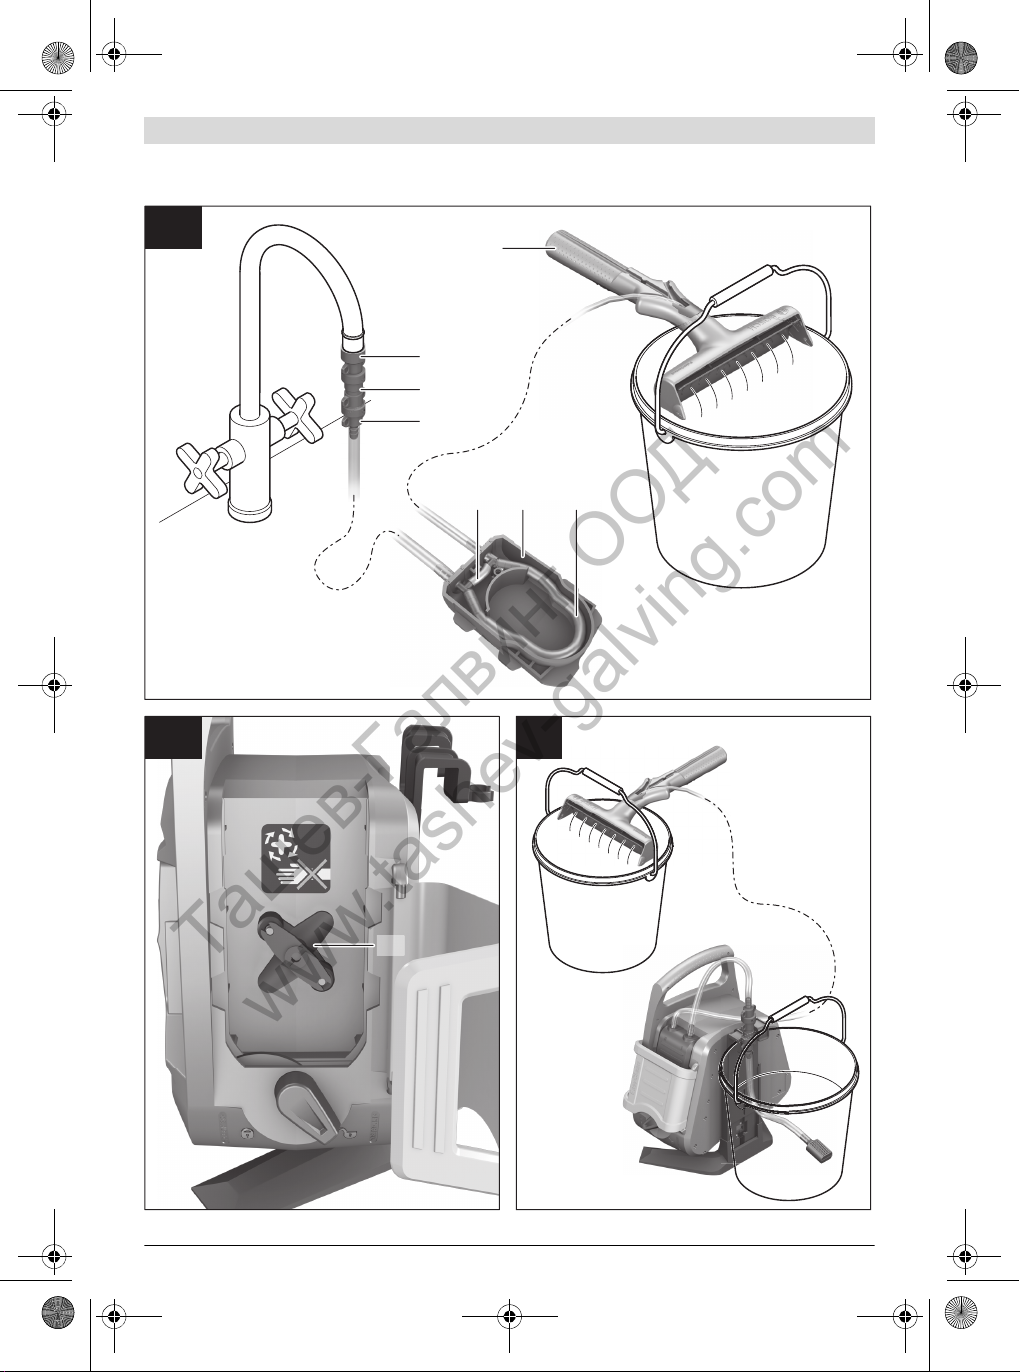
links
Pumpenverriegelung geschlos-
sen(Pumpfunktionnurindieser
Stellung möglich)
rechts
Pumpenverriegelung geöffnet
OBJ_BUCH-1513-004.book Page 9 Tuesday, November 26, 2013 4:07 PM
Ташев-Галвинг ООД
www.tashev-galving.com