Bosch PSP 260 User manual

Bedienungsanleitung
Operating instructions
Instructions d’emploi
Instrucciones de servicio
Manual de instruções
Istruzioni d’uso
Gebruiksaanwijzing
Betjeningsvejledning
Bruksanvisning
Brukerveiledningen
Käyttöohje
Οδηγία χειρισµού
Kullan∂m k∂lavuzu
Deutsch
English
Français
Español
Português
Italiano
Nederlands
Dansk
Svenska
Norsk
Suomi
Eλληvικά
Türkçe
* Des idées en action.
PSP 260
mikosoft praha s.r.o.

12
mikosoft praha s.r.o.

1
2
3
4
5
D2
16 87 9 10 11
mikosoft praha s.r.o.

Deutsch–1
1 609 929 F37 • (03.08) T
Bitte die Bestellnummer Ihres Gerätes beachten, die
Handelsbezeichnungen einzelner Geräte können vari-
ieren.
Messwerte ermittelt entsprechend EN 50 144.
Der A-bewertete Schalldruckpegel des Gerätes be-
trägt typischerweise 81 dB(A). Der Geräuschpegel
beim Arbeiten kann 85 dB(A) überschreiten.
Gehörschutz tragen!
Die Hand-Arm-Vibration ist typischerweise niedriger
als 2,5 m/s
2
.
Bitte klappen Sie die Ausklappseite mit der Darstellung
des Gerätes auf, und lassen Sie diese Seite aufge-
klappt, während Sie die Bedienungsanleitung lesen.
Die Nummerierung der Geräteelemente bezieht sich
auf die Darstellung des Gerätes auf der Grafikseite.
1
Düse
2
Feststellschraube
3
Regulierknopf
4
Ein-Aus-Schalter
5
Farbbecher
6
Saug-Druck-Ventil
7
Pumpenteil
8
Kolbenöffnung
9
Feder
10
Pumpenkolben
11
Motorgehäuse
12
Messbecher
Abgebildetes oder beschriebenes Zubehör gehört teil-
weise nicht zum Lieferumfang.
Das Gerät ist bestimmt zum Zerstäuben von Flüssig-
keiten wie Farben, Lacke, Öle, Holzschutz-, Impräg-
nierungs-, Desinfektions- und Pflanzenschutzmitteln.
Gefahrloses Arbeiten mit dem Ge-
rät ist nur möglich, wenn Sie die
Bedienungsanleitung und die Si-
cherheitshinweise vollständig le-
sen und die darin enthaltenen An-
weisungen strikt befolgen.
Zusätzlich müssen die allgemeinen
Sicherheitshinweise im beigefüg-
ten Heft befolgt werden.
■
Schutzbrille tragen.
■
Farbnebel und Lösungsmitteldämpfe sind gesund-
heitsschädlich: Immer einen Atemschutz tragen
und nur in gut gelüfteten Räumen oder vor statio-
nären Absauganlagen arbeiten.
■
Explosionsgefahr!
Im Arbeitsbereich darf sich
keine offene Flamme befinden.
Rauchen verbo-
ten!
■
Leicht brennbare oder explosive Flüssigkei-
ten (z.B. Benzin, Spiritus) weder spritzen noch
zur Reinigung verwenden. Lacke und Lö-
sungsmittel (Verdünnung) müssen einen
Flammpunkt von über 21 °C haben.
■
Keine Flüssigkeiten mit unbekannten Gefahren ver-
arbeiten. Herstellerhinweise beachten.
■
Wird bei der Arbeit das Netzkabel beschädigt oder
durchtrennt, Kabel nicht berühren und sofort den
Netzstecker ziehen. Gerät niemals mit beschädig-
tem Kabel benutzen.
■
Geräte, die im Freien verwendet werden, über ei-
nen Fehlerstrom(FI)-Schutzschalter mit maximal
30 mA Auslösestrom anschließen. Das Gerät nicht
bei Regen oder Nässe verwenden.
■
Sprühstrahl nie auf Personen oder Tiere richten.
Das Spritzgut tritt unter hohem Druck aus. Verlet-
zungs- und Infektionsgefahr!
■
Kabel immer nach hinten vom Gerät wegführen.
■
Niemals Kindern die Benutzung des Gerätes ge-
statten.
■
Bosch kann nur dann eine einwandfreie Funktion
des Gerätes zusichern, wenn das für dieses Gerät
vorgesehene Original-Zubehör verwendet wird.
Gerätekennwerte
Spritzpistole PSP 260
Bestellnummer 0 603 260 4..
Nennaufnahmeleistung [W] 60
Förderleistung (Wasser) [g/min] 260
Druck max. [bar] 160
Viskosität Spritzgut max. [DIN-s] 80
Becherinhalt ca. [l] 0,75
Gewicht ohne Netzkabel ca. [kg] 1,2
Schutzklasse /
II
Geräusch-/Vibrationsinformation
Geräteelemente
Bestimmungsgemäßer Gebrauch
Zu Ihrer Sicherheit
mikosoft praha s.r.o.

Deutsch–2
1 609 929 F37 • (03.08) T
Achten Sie beim Kauf von Farben, Lacken und Spritz-
mitteln auf deren Umweltverträglichkeit (z.B. Aus-
zeichnung mit dem blauen Umweltzeichen).
Spritzgut vorbereiten
Das Spritzgut darf für den Spritzvorgang nicht zu dick
sein, d.h. den maximalen Viskositätswert für das Gerät
nicht überschreiten.
Im Handel erhältliche Farben und Lacke sind meist vor
allem zum Streichen geeignet. Zum Spritzen müssen
sie auf den benötigten Verdünnungsgrad (Viskositäts-
wert) verdünnt werden.
Spritzgut und Verdünnung müssen zueinander pas-
sen. Informationen über die passende Verdünnung
(Wasser, Lösungsmittel) jeweils den Herstelleranga-
ben zum Spritzgut entnehmen. Bei Verwendung der
falschen Verdünnung entstehen Klumpen, die das Ge-
rät verstopfen. Kunstharzlacke nie mit Nitroverdün-
nung mischen.
Zunächst Spritzgut gründlich durchmischen und auf
mittlere Raumtemperatur (20–22 °C) bringen. Die Vis-
kosität nicht durch zusätzliches Erwärmen verändern.
Den mitgelieferten Messbecher
12
mit dem Spritzgut
randvoll schöpfen. Den Messbecher aus dem Spritz-
gut herausheben und die Flüssigkeit auslaufen lassen
(siehe Bild ). Die Durchlaufzeit in Sekunden messen,
bis der Strom der Flüssigkeit abreißt. Man nennt diese
Zeit „DIN-Sekunden (DIN-s)“.
Bei zu hohem Wert das zum Spritzgut passende Ver-
dünnungsmittel in geringen Mengen schrittweise zufü-
gen und gut mischen. Die DIN-Sekunden erneut mes-
sen. Den Vorgang so lange wiederholen, bis die in der
Tabelle angegebenen Werte erreicht werden.
Die folgende Tabelle zeigt Materialbeispiele und DIN-
Richtwerte:
* Körnige/körperhaltige Fabrikate dürfen nicht ge-
spritzt werden. Deren schmirgelnde Wirkung verkürzt
die Lebensdauer von Pumpe und Ventil.
Dann entfällt der Reparatur-/Ersatzanspruch auf diese
Teile.
Spritzfläche vorbereiten
Die Spritzfläche muss sauber, trocken und fettfrei sein.
Glatte Flächen aufrauen, danach den Schleifstaub ent-
fernen.
Der Sprühnebel kann das Umfeld verunreinigen. Des-
halb die Umgebung der Spritzfläche gründlich abde-
cken.
Spritzarbeiten am Rand von Gewässern oder auf be-
nachbarten Flächen im unmittelbaren Einzugsbereich
sind nicht zulässig.
Netzspannung beachten!
Die Spannung der Stromquelle muss mit den Angaben
auf dem Typenschild des Gerätes übereinstimmen.
Mit 230 V gekennzeichnete Geräte können auch an
220 V betrieben werden.
Zur
Inbetriebnahme
Regulierknopf
3
entgegen dem
Uhrzeigersinn ganz nach links drehen. Ein-Aus-Schal-
ter
4
drücken.
Den Regulierknopf
3
im Uhrzeigersinn drehen, bis der
Spritzkegel die gewünschte Breite hat und der Spritz-
nebel regelmäßig, fein und ohne Tröpfchen ist (siehe
Bild ).
Zum
Ausschalten
Ein-Aus-Schalter
4
loslassen.
Vor jedem erneuten Einschalten Regulierknopf
3
ganz
nach links drehen.
Spritzvorgang
Vor dem Spritzvorgang das gleiche Mittel, das als Ver-
dünnung verwendet wurde, kurz in einen Auffangbe-
hälter spritzen.
Das vorbereitete Spritzmaterial durch das Trichtersieb
(Zubehör) in den Becher
5
einfüllen.
Den Becher
5
immer gut am Pumpenteil
7
festschrau-
ben.
Gerät nicht über der Spritzfläche ein- und ausschalten.
Das Gerät immer aufrecht halten. Gegebenenfalls Dü-
senverlängerung (Zubehör) verwenden und Düse in
die gewünschte Richtung biegen.
Probespritzung auf Pappe oder Papier durchführen.
Der Abstand der Düse zum Werkstück ist abhängig
vom Spritzmaterial (ca. 20 bis 35 cm Spritzabstand je
nach Spritzkegel und gewünschtem Materialauftrag).
Die jeweils zweckmäßige Entfernung zur Spritzfläche
durch einen Versuch ermitteln. Zuerst bei einer größe-
ren Distanz beginnen.
Vor der Inbetriebnahme
Spritzmaterial Durchlaufzeit
(in DIN-s)
Autolack 16–20
Bronze 25–30*
Grundierung 25–30*
Acryl-/Kunstharzlack 25–30
Holzimprägnierung 25–30
Lasur 25–30
Hammerschlaglack 30–35*
Dispersionsfarbe 40–80
A
Inbetriebnahme
Arbeitshinweise
B
mikosoft praha s.r.o.

Deutsch–3
1 609 929 F37 • (03.08) T
Auf einen gleichmäßgen Abstand zur Spritzfläche und
gleichmäßige Bewegung achten (siehe Bild ).
Zuerst werden Ecken oder kleine Verzierungen mit
kleinen Spritzstößen gespritzt. Danach den eigentli-
chen Spritzvorgang durchführen.
Den Spritzvorgang ca. 10 cm außerhalb der Spritzflä-
che beginnen und auch ca. 10 cm außerhalb been-
den. Von der Kante zur Mitte spritzen, dann die Fläche
im Kreuzgang bearbeiten (siehe Bild ). Eine einheit-
lich verlaufende Fläche entsteht, wenn sich die Bah-
nen um 4 bis 5 cm überlappen.
Danach die Fläche im Kreuzgang ein zweites Mal sprit-
zen.
Beim Spritzen auf senkrechte Flächen können sich
Tropfen bilden. Zuerst aus etwas größerer Entfernung
vorspritzen und das Spritzgut antrocknen lassen.
Becher nie leerspritzen.
Das Saugrohr muss immer
in Flüssigkeit getaucht sein. Der Sprühnebel bricht
sonst ab, und dickere Tropfen werden gespritzt.
Düsenwahl
(Abbildung des Zubehörs siehe letzte Seite dieser An-
leitung.)
■
Vor allen Arbeiten am Gerät Netzstecker ziehen.
■
Gerät stets sauber halten, um gut und sicher zu ar-
beiten.
Generelle Wartungs- und Reinigungshinweise
Die Reinigung des Gerätes und des Bechers
5
erfolgt
immer mit dem zum Spritzgut passenden Verdün-
nungsmittel.
■
Nie das ganze Gerät in Reinigungsmittel tauchen!
Das Gerät zur Reinigung mit dem Verdünnungsmittel
bzw. bei wasserlöslichen Materialien mit Wasser
durchspritzen (Auffangbehälter verwenden).
Nach der Reinigung oder dem Gebrauch mit
Wasser das Gerät zum Korrosionsschutz kurz
mit harz- und säurefreiem Öl (z.B. Nähmaschi-
nenöl) durchspritzen, da sich sonst der Kolben
durch Rostbildung festsetzen kann.
Spezielle Reinigungshinweise (siehe Bild )
1. Feststellschraube
2
abschrauben.
2. Das Motorgehäuse
11
vom Pumpenteil
7
trennen.
Dazu Abbildung beachten.
3. Die Düse
1
abschrauben und das Saug-Druck-
Ventil
6
aus dem Pumpenteil
7
nehmen. Pumpen-
kolben
10
zusammen mit Feder
9
aus dem Pum-
penteil
7
nehmen.
Keine Gewalt anwenden!
4. Festsitzende Ventilkugel durch die Kolbenöffnung
8
mit Hilfe eines Kupfer- oder Messingstiftes gang-
bar machen.
5. Sämtliche Teile in das entsprechende Verdün-
nungsmittel legen und reinigen.
Nie harte Gegenstände zum Reinigen verwen-
den!
Der Kolben
10
muss sich leicht im Pumpen-
gehäuse bewegen lassen.
6. Teile in umgekehrter Reihenfolge wieder montie-
ren.
Bei Funktionsstörungen Düse
1
und Saug-Druck-Ven-
til
6
überprüfen und gegebenenfalls austauschen.
Nach der Reinigung das Gerät zum Korrosionsschutz
kurz mit harz- und säurefreiem Öl (z.B. Nähmaschi-
nenöl) durchspritzen.
Düse Verwendung
Rundstrahldüse:
– Ø 0,6 mm
(mitgeliefert) sämtliche Farben, Lacke
– Ø 0,4 mm dünnflüssiges Spritzgut
(Wasser, Lösungsmittel)
– Ø 0,8 mm dickflüssiges Spritzgut
Flachstrahldüse:
– FD5 feine Lackarbeiten
– FD7 Dispersionsfarbe
(Airless-Qualität)
Reinigungsdüse dünner, harter Strahl
Düsenverlängerung Spritzen nach oben oder
unten (biegsam bis 90°)
C
C
1
2
3
4
Wartung und Reinigung
D
D
mikosoft praha s.r.o.

Deutsch–4
1 609 929 F37 • (03.08) T
Materialentsorgung
Nach Gebrauch und anschließender Reinigung des
Gerätes Verdünnungs- bzw. Reinigungsmittel einsam-
meln und umweltgerecht entsorgen.
Umweltschädliche Chemikalien dürfen nicht ins Erd-
reich, ins Grundwasser oder in Gewässer gelangen.
Material nie in die Kanalisation schütten.
Farben, Lacke und Lösungsmittel sind Sondermüll, die
entsprechend entsorgt werden müssen. Die örtlichen
Vorschriften dazu müssen beachtet werden.
Die Entsorgungshinweise des Herstellers beachten.
Sollte das Gerät trotz sorgfältiger Herstell- und Prüf-
verfahren einmal ausfallen, ist die Reparatur von einer
autorisierten Kundendienststelle für Bosch-Elektro-
werkzeuge ausführen zu lassen.
Bei allen Rückfragen und Ersatzteilbestellungen bitte
unbedingt die 10-stellige Bestellnummer laut Typen-
schild des Gerätes angeben.
Rohstoffrückgewinnung statt Müllentsorgung
Gerät, Zubehör und Verpackung sollten einer umwelt-
gerechten Wiederverwertung zugeführt werden.
Diese Anleitung ist aus chlorfrei gefertigtem Recycling-
Papier hergestellt.
Zum sortenreinen Recycling sind Kunststoffteile ge-
kennzeichnet.
In Deutschland können nicht mehr gebrauchsfähige
Geräte zum Recycling beim Handel abgegeben oder
(ausreichend frankiert) direkt eingeschickt werden an:
Recyclingzentrum Elektrowerkzeuge
Osteroder Landstr. 3
37589 Kalefeld
Explosionszeichnungen und Informationen zu Ersatz-
teilen finden Sie unter:
www.bosch-pt.com
.
www.powertool-portal.de
, das Internetportal für
Heimwerker und Gartenfreunde
www.dha.de
, das komplette Service-Angebot der
Deutschen Heimwerker Akademie
Deutschland
Robert Bosch GmbH
Servicezentrum Elektrowerkzeuge
Zur Luhne 2
37589 Kalefeld
✆Service:. . . . . . . . . . . . . . . . . . . 01 80/3 35 54 99
Fax . . . . . . . . . . . . . . . . . . . + 49 (0) 55 53/20 22 37
✆Kundenberater: . . . . . . . . . . . . . 01 80/3 33 57 99
Österreich
ABE Service GmbH
Jochen-Rindt-Straße 1
1232 Wien
✆Service:. . . . . . . . . . . . . . . . . . +43 (0)1/61 03 80
Fax . . . . . . . . . . . . . . . . . . . . . +43 (0)1/61 03 84 91
✆Kundenberater: . . . . . . . . +43 (0)1/7 97 22 30 66
E-Mail: [email protected]
Schweiz
✆Service:. . . . . . . . . . . . . . . . . +41 (0)1/847 16 16
Fax . . . . . . . . . . . . . . . . . . . . . . +41 (0)1/847 16 57
✆Kundenberater . . . . . . . . . . . . . . 0 800 55 11 55
Wir erklären in alleiniger Verantwortung, dass dieses
Produkt mit den folgenden Normen oder normativen
Dokumenten übereinstimmt:
EN 50 144 gemäß den Bestimmungen der Richtlinien
89/336/EWG, 98/37/EG.
Robert Bosch GmbH, Geschäftsbereich Elektrowerkzeuge
Änderungen vorbehalten
Umweltschutz
Service und Kundenberater
Konformitätserklärung
Dr. Egbert Schneider
Senior Vice President
Engineering
Dr. Eckerhard Strötgen
Head of Product
Certification
mikosoft praha s.r.o.

English–1
1 609 929 F37 • (03.08) T
Please observe the order number of your machine.
The trade names of the individual machines may vary.
Measured values determined according to EN 50 144.
Typically, the A-weighted sound pressure level of the
product is 81 dB(A). The noise level when working can
exceed 85 dB(A).
Wear ear protection!
The typical hand-arm vibration is below 2.5 m/s2.
Please open the foldout page with the illustration of the
tool and leave it open while you read these operating
instructions.
The numbering of the machine elements refers to the
illustration of the machine on the graphic page.
1Nozzle
2Attachment knob
3Regulating knob
4ON/OFF switch
5Paint container
6Suction/pressure valve
7Pump unit
8Piston opening
9Spring
10 Pump piston
11 Motor housing
12 Metering cup
Not all the accessories illustrated or described are in-
cluded in standard delivery.
The machine is intended for the spraying of fluids such
as paints, lacquers and oils as well as wood protec-
tion, impregnation, disinfection and plant protection
agents.
Working safely with this machine is
possible only when the operating
and safety information are read
completely and the instructions
contained therein are strictly fol-
lowed.
In addition, the general safety
notes in the enclosed booklet must
be observed.
■Wear safety glasses.
■Paint mist and solvent vapours are detrimental to
health: Always wear breathing protection and work
only in a well ventilated room or in front of a station-
ary extraction system.
■Danger of explosion! No open flames should be
located in the working area. No smoking.
■Do not spray easily combustible or explosive
fluids (e.g. benzene, alcohol) or use them for
cleaning. Lacquer and solvents (thinner) must
have a combustion point of over 21 °C.
■Do not work with fluid with unknown dangers. Fol-
low manufacturers instructions.
■If the cable is damaged or cut through while work-
ing, do not touch the cable but immediately pull the
mains plug. Never use the machine with a dam-
aged cable.
■Connect machines that are used in the open via a
residual current device (RCD) with an actuating
current of 30 mA maximum. Do not operate the
machine in rain or moisture.
■Never direct the spray at persons or animals. The
sprayed material is emitted with high pressure.
Danger of injury and infection!
■Always direct the cable to the rear away from the
machine.
■Never allow children to use the machine.
■Bosch is able to ensure flawless functioning of the
machine only if the original accessories intended
for it are used.
Product Specifications
Spray Gun PSP 260
Order number 0 603 260 4..
Rated input power [W] 60
Delivery rate (water) [g/min] 260
Pressure max. [bar] 160
Viscosity of spray material
max. [DIN-s] 80
Container capacity ca. [l] 0.75
Weight without mains cable
approx. [kg] 1.2
Protection class / II
Noise/Vibration Information
Product Elements
Intended Use
For Your Safety
mikosoft praha s.r.o.

English–2
1 609 929 F37 • (03.08) T
When buying paints, lacquers and spraying agents,
pay attention to environmental compatibility (for exam-
ple, marked with the blue environmental seal).
Preparing the Spray Material
The spray material should not be too thick, that is, not
exceed the maximum viscosity value of the machine.
Most commercially available paints and lacquers are
primarily suited for applying with a brush. For spraying,
they must be thinned to the required viscosity value.
The spray material and the thinner must be compati-
ble. Information concerning the suitable thinner (wa-
ter, solvent) for each spray material is to be taken from
the manufacturers information. When the wrong thin-
ner is used, lumps can form that clog the machine.
First, mix the spray material thoroughly and bring to a
average room temperature (20–22 °C). Do not change
the viscosity by additional heating.
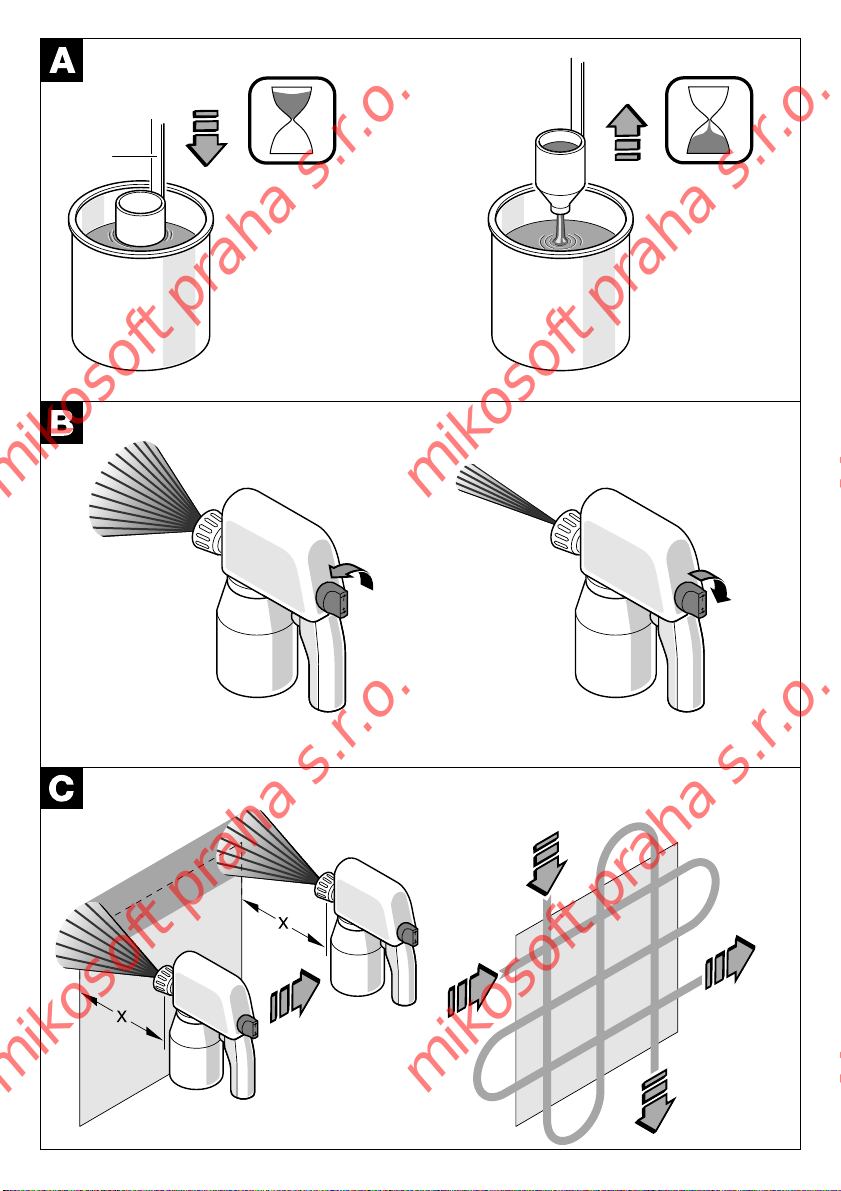
Dip the metering cup 12 provided into the spray mate-
rial until it is brim full. Lift the metering cup out of the
spray material and allow the fluid to run out (see Fig.
). Measure the time required in seconds until the
flow is no longer continuous. This time is called the
“DIN-seconds (DIN-s)”.
When the value is too high, add the thinning agent that
is suitable for the spray material in steps and mix well.
Again measure the DIN-seconds. Repeat the process
until the value given in the table is reached.
The table below gives examples of materials and DIN
standard values:
* Products containing granules or particles must not
be sprayed. These act abrasively and shorten the
service life of the pump and valve.
In this case, claims for repair/replacement of these
parts are voided.
Preparing the Surface to be Sprayed
The surface to be sprayed must be clean, dry and free
of grease. Roughen smooth surfaces and then re-
move the sanding dust.
The spraying mist can soil the surroundings. There-
fore, adequately cover the surroundings of the surface
to be sprayed.
Spraying work on the banks of lakes or streams or in
the surrounding areas of their immediate feeding zone
is not allowed.
Ensure that the mains voltage is correct!
The voltage of the power source must agree with the
value given on the nameplate of the machine. Ma-
chines designated for 230 V can also be operated with
220 V.
To Put into Operation, turn the regulating knob 3
counterclockwise completely to the left. Press the
on/off switch 4.
Turn the regulating knob 3in the clockwise direction
until the spray cone has the desired width and the
spray mist is uniformly fine and without drops (see
Fig. ).
To Switch off, release the on/off switch 4.
For each repeated switching on, turn the regulating
knob 3completely to the left.
Spraying Operation
Before the spraying procedure, briefly spray the same
material that is used for thinning into a collection basin.
Fill the prepared spray material into the container 5
through the funnel strainer (accessory).
Always screw the container 5firmly onto the pump
unit 7.
Do not switch the machine on and off over the surface
to be sprayed.
Always hold the machine upright. As necessary, use a
nozzle extension (accessory) and bend the nozzle in
the desired direction.
Make a trial spraying onto cardboard or paper.
The distance of the nozzle to the work piece is de-
pendent on the spray material (approx. 20 to 35 cm
spraying distance depending on the spray cone and
the desired material application). Determine the ap-
propriate distance to the surface to be sprayed in each
case by a trial. Start with a greater distance.
Before Use
Spray Material Flow-through
Time (in DIN-s)
Car body enamel 16–20
Bronze 25–30*
Primer 25–30*
Acrylic/synthetic-resin varnish 25–30
Wood preservation 25–30
Scumble glaze 25–30
Hammered effect enamel 30–35*
Dispersion paint 40–80
A
Putting into Operation
Working Instructions
B
mikosoft praha s.r.o.

English–3
1 609 929 F37 • (03.08) T
Take care to maintain the same distance to the surface
to be sprayed and make uniform movement (see Fig.
).
First, spray the corners or small decorative parts with
short spray bursts. Then perform the actual spraying
procedure.
Begin the spraying pass approx. 10 cm outside the
surface to be sprayed and also end it approx. 10 cm
beyond the surface. Spray from the edge to the mid-
dle, then work the surface in a crosswise manner (see
Fig. ). A uniform application is achieved when the
passes overlap by 4 to 5 cm.
Then spray the surface a second time in the crosswise
manner.
When spraying on a vertical surface, drops can form.
First, spray from a somewhat greater distance and al-
low the sprayed material to partially dry.
Never spray until the container is empty. The suc-
tion tube must always be immersed in the fluid. Oth-
erwise, the spray mist is interrupted and thick drops
are sprayed.
Selecting Nozzles
(For illustrations of the accessories, see the last page
of these instructions.)
■Before any work on the machine itself, pull the
mains plug.
■Always keep the machine clean so that it functions
properly and accurately.
General Maintenance and Cleaning Instruc-
tions
The cleaning of the machine and the container 5al-
ways takes place with the thinning agent suitable for
the spray material.
■Never immerse the complete unit in cleaning agent!
For cleaning, spray through the machine with the thin-
ning agent or with water for water soluble material (use
the collecting basin).
After cleaning or use with water, briefly spray
resin- and acid-free oil (for example, sewing ma-
chine oil) through the machine for corrosion pro-
tection. Otherwise, the piston could become
blocked by rust.
Special Cleaning Instructions (see Fig. )
1. Screw out the attachment knob 2.
2. Separate the motor housing 11 from the pump unit
7. See Fig. for this purpose.
3. Unscrew the nozzle 1and remove the suction/
pressure valve 6from the pump unit 7. Remove
the pump piston 10 together with the spring 9from
the pump unit 7. Do not use force!
4. Make a tightly fitting valve ball passable through
piston opening 8with the aid of a copper or brass
pin.
5. Place all parts in the appropriate thinning agent and
clean.
Never use hard objects for cleaning! The
pump piston 10 must be free to move easily in the
pump housing.
6. Reassemble the parts in the reverse order.
For malfunctions, check the nozzle 1and the suc-
tion/pressure valve 6and replace as necessary.
After cleaning, briefly spray resin- and acid-free oil (for
example, sewing machine oil) through the machine for
corrosion protection.
Nozzle Application
cylindrical spray
nozzle:
– Ø 0.6 mm
(supplied) all paints, varnishes
– Ø 0.4 mm liquid spray material
(water, solvents)
– Ø 0.8 mm viscous spray material
flat-spray nozzle:
– FD5 fine varnishing work
– FD7 dispersion paint
(airless quality)
cleaning nozzle thin, hard jet
nozzle extension spray, upwards or down-
wards (flexible 90°)
C
C
1
2
3
4
Maintenance and Cleaning
D
D
mikosoft praha s.r.o.

English–4
1 609 929 F37 • (03.08) T
Disposing of materials
After use and subsequent cleaning of the machine,
collect the thinning and cleaning agents and dispose
of in a environmentally correct manner.
Chemicals detrimental to the environment must never
enter the ground, ground water or lakes and streams.
Never pour material into the sewage system.
Paints, varnishes and solvents are special category
waste and must be disposed of accordingly. You
should comply with the relevant national and local reg-
ulations.
Follow the manufacturer’s waste disposal instructions.
WARNING
Important instructions for connecting a new 3-
pin plug to the 2-wire cable.
The wires in the cable are coloured according to the
following code:
Do not connect the blue or brown wire to the earth ter-
minal of the plug.
Important: If the plug on the cable of this machine
must be replaced, dispose of the old plug to prevent
misuse.
If the machine should fail despite the care taken in
manufacture and testing, repair should be carried out
by an authorised customer services agent for Bosch
power tools.
For all correspondence and spare parts orders, always
include the 10-digit order number of the machine.
Recycle raw materials instead of disposing as
waste.
The machine, accessories and packaging should be
submitted for environment-friendly recycling.
These instructions are printed on recycled paper man-
ufactured without chlorine.
The plastic components are labelled for categorised
recycling.
Exploded views and information on spare parts can be
found under: www.bosch-pt.com.
Great Britain
Robert Bosch Ltd. (B.S.C.)
P.O. Box 98
Broadwater Park
North Orbital Road
Denham-Uxbridge
Middlesex UB 9 5HJ
✆Service . . . . . . . . . . . . . . +44 (0) 18 95/83 87 82
✆Advice line. . . . . . . . . . . . +44 (0) 18 95/83 87 91
Fax . . . . . . . . . . . . . . . . . . . +44 (0) 18 95/83 87 89
Ireland
Beaver Distribution Ltd.
Greenhills Road
Tallaght-Dublin 24
✆Service . . . . . . . . . . . . . . . . + 353 (0)1/414 9400
Fax . . . . . . . . . . . . . . . . . . . . . + 353 (0)1/459 8030
Australia
Robert Bosch Australia L.t.d.
RBAU/SBT2
1555 Centre Road
P.O. Box 66 Clayton
3168 Clayton/Victoria
✆. . . . . . . . . . . . . . . . . . . . . +61 (0)1/800 804 777
Fax . . . . . . . . . . . . . . . . . . . . +61 (0)1/800 819 520
www.bosch.com.au
E-Mail: [email protected]
New Zealand
Robert Bosch Limited
14-16 Constellation Drive
Mairangi Bay
Auckland
New Zealand
✆. . . . . . . . . . . . . . . . . . . . . . . +64 (0)9/47 86 158
Fax . . . . . . . . . . . . . . . . . . . . . . +64 (0)9/47 82 914
We declare under our sole responsibility that this prod-
uct is in conformity with the following standards or
standardization documents:
EN 50 144 according to the provisions of the direc-
tives 89/336/EEC, 98/37/EC.
Robert Bosch GmbH, Geschäftsbereich Elektrowerkzeuge
Specifications subject to change without notice
Environmental Protection
Strain relief
Live = brown
Neutral = blue
To be fitted
by qualified
professionals only
Service and Customer Advice
Declaration of Conformity
Dr. Egbert Schneider
Senior Vice President
Engineering
Dr. Eckerhard Strötgen
Head of Product
Certification
mikosoft praha s.r.o.

Français–1
1 609 929 F37 • (03.08) T
Faire attention au numéro de référence de l’appareil.
Les désignations commerciales des différents
appareils peuvent varier.
Valeurs de mesures obtenues conformément à la nor-
me européenne 50 144.
La mesure réelle (A) du niveau sonore de l’outil est
81 dB(A). Le niveau sonore en fonctionnement peut
dépasser 85 dB(A).
Se munir d’une protection acoustique !
La vibration de l’avant-bras est inférieure à 2,5 m/s2.
Dépliez le volet sur lequel l’outillage est représenté de
manière graphique. Laissez le volet déplié pendant la
lecture de la présente notice d’instructions.
La numérotation des éléments de l’appareil se rappor-
te aux figures représentant l’appareil sur la page des
graphiques.
1Buse
2Vis d’immobilisation
3Bouton régulateur
4Commutateur de Marche/Arrêt
5Godet à couleurs
6Vanne aspirante refoulante
7Base de la pompe
8Orifice du piston
9Ressort
10 Piston de pompe
11 Carter moteur
12 Gobelet gradué
Les accessoires reproduits ou décrits ne sont pas tous
compris dans les fournitures.
Cet appareil a été conçu pour la pulvérisation de liqui-
des tels des peintures, des laques, des huiles, des
produits de protection du bois, d’imprégnation, de dé-
sinfection ou des produits phytosanitaires.
Pour travailler sans risque avec cet
appareil, lire intégralement au
préalable les instructions de servi-
ce et les remarques concernant la
sécurité. Respecter scrupuleuse-
ment les indications et les consi-
gnes qui y sont données.
Respecter en plus les indications
générales de sécurité se trouvant
dans le cahier ci-joint.
■Porter des lunettes de protection.
■Les brouillards de peinture et les vapeurs de sol-
vants sont nuisibles à la santé: toujours porter un
masque respiratoire protecteur. Ne travailler que
dans des locaux bien aérés ou face à une installa-
tion d‘aspiration stationnaire.
■Risque d’explosion! Aucune flamme nue ne doit
se trouver dans la zone de travail. Défense de fu-
mer!
■Ne pas pulvériser de liquides pouvant facile-
ment prendre feu ou exploser (essence, alco-
ol, par exemple). Ne pas non plus utiliser de
telle substance pour nettoyer l’appareil. Les
peintures et les solvants (diluants) mis en
oeuvre doivent posséder un point d’inflamma-
tion (point éclair) supérieur à 21 °C.
■Ne pas utiliser de liquides dont les risques ne sont
pas parfaitement connus. Tenir compte des remar-
ques et consignes d’utilisation du fabricant.
■Si le câble d’alimentation électrique est endomma-
gé ou rompu pendant le travail, ne pas y toucher.
Retirer immédiatement la fiche du câble d’alimen-
tation de la prise électrique. Ne jamais utiliser un
appareil dont le câble d’alimentation est endom-
magé.
■Brancher les appareils qui sont utilisés à l’extérieur
sur un disjoncteur différentiel avec un courant de
déclenchement maximal de 30 mA. Ne pas utiliser
l’appareil par temps de pluie ni dans un endroit hu-
mide.
■Ne jamais diriger le jet sur une personne ou sur un
animal. Le produit pulvérisé sort sous haute pres-
sion. Risque d’ingestion, de blessures et d’infec-
tion!
■Toujours ramener les câbles à l’arrière de l’appa-
reil.
■Ne jamais laisser des enfants utiliser cet appareil.
■Bosch ne peut garantir un fonctionnement impec-
cable que si les accessoires Bosch d’origine pré-
vus pour cet appareil sont utilisés.
Caractéristiques techniques
Pistolet pulvérisateur PSP 260
Référence 0 603 260 4..
Puissance nominale
absorbée [W] 60
Débit de refoulement (eau) [g/min] 260
Pression max. [bar] 160
Viscosité max. du produit à
pulvériser [DIN-s] 80
Contenu du godet env. [l] 0,75
Poids sans cordon
d’alimentation, env. [kg] 1,2
Classe de protection / II
Bruits et vibrations
Eléments de l’appareil
Utilisation conforme
Pour votre sécurité
mikosoft praha s.r.o.

Français–2
1 609 929 F37 • (03.08) T
Faites attention quand vous achetez des peintures, la-
ques ou autres produits de pulvérisation à ne prendre
que des produits non polluants (par ex. marqués du si-
gle bleu de compatibilité avec l’environnement).
Préparer le produit à pulvériser
Le produit à pulvériser ne doit pas être trop épais pour
pouvoir être correctement pulvérisé, cad que la valeur
de viscosité maximale supportée par l’appareil ne doit
en aucun cas être dépassée.
Les peintures et laques couramment en vente dans le
commerce sont le plus souvent prévue pour être ap-
pliquées au pinceau. Pour les pulvériser, il faut les di-
luer jusqu’au degré de dilution (valeur de viscosité) né-
cessité.
Le produit de dilution doit être compatible avec le
produit de pulvérisation en question. Consulter les in-
dications données par le fabricant du produit de pul-
vérisation pour déterminer le produit de dilution cor-
respondant (eau, solvant). L’utilisation d’un diluant non
approprié provoque la formation de grumeaux bou-
chant l’appareil. Ne jamais diluer de laques à résine
synthétique avec des diluants pour laque cellulosique.
D’abord bien homogéniser le produit à pulvériser puis
l’amener à la température de la pièce (20–22 °C). Ne
pas chercher à abaisser la viscosité en chauffant le
produit.
Remplir le gobelet gradué joint 12 plein à ras bord de
produit à pulvériser. Sortir le gobelet du liquide et lais-
ser le liquide s’écouler (cf. figure ). Mesurer le temps
d’écoulement en secondes jusqu’à ce que le flux de
liquide soit interrompu. Ce temps est nommé
« secondes DIN (DIN-s) ».
Quand la valeur est trop élevée, ajouter peu à peu du
diluant correspondant au produit pulvérisé et bien mé-
langer. Mesurer à nouveau les secondes-DIN. Répé-
tez cette procédure jusqu’à ce que la valeur indiquée
dans le tableau soit atteinte.
Le tableau ci-après montre la durée d’écoulement de
certaines matières et des valeurs DIN indicatives:
* Les produits granuleux/contenant des corps solides
ne doivent pas être pulvérisés. Leur effet abrasif rédui-
rait la durée de vie de la pompe et de la vanne.
Leur utilisation a une annulation de la garantie pour
conséquence.
Préparation de la surface à pulvériser
La surface à pulvériser doit être propre, sèche et
exempte de gras. Rendre rugueuses les surfaces lis-
ses, les nettoyer de la poussière de ponçage.
Le brouillard de pulvérisation peut salir les objets avoi-
sinants. Nous vous conseillons de couvrir tout ce qui
entoure la surface à pulvériser.
Il est strictement interdit d’effectuer des travaux de
pulvérisation au bord de cours d’eau ou sur des ter-
rains directement attenant à ceux-ci.
Tenir compte de la tension du secteur !
La tension de la source de courant doit correspondre
aux indications figurant sur la plaque signalétique de
l’appareil. Les appareils fonctionnant sous 230 V peu-
vent également être utilisés sous 220 V.
Pour la mise en service, tourner le bouton régulateur
3à fond dans le sens contraire des aiguilles d’une
montre vers la gauche. Appuyer sur le commutateur
Marche/Arrêt 4.
Tourner le bouton régulateur 3dans le sens des
aiguilles d’une montre jusqu’à ce que le cône de pul-
vérisation ait la largeur souhaitée et que le brouillard de
pulvérisation soit régulier, fin et sans gouttelettes (cf. fi-
gure ).
Pour arrêter, relâcher le commutateur Marche/Arrêt
4.
Tourner le bouton régulateur 3à fond sur la gauche
avant chaque remise en route.
Avant la mise en service
A
Produit à pulvériser Durée d’écoulement
(en DIN-s)
Laque automobiie 16–20
Laque à bronzer 25–30*
Peinture d’apprêt 25–30*
Laque acrylique/
à la résine synthétique 25–30
Produit d’imprégnation
du bois 25–30
Glacis 25–30
Laque à effet martelé 30–35*
Peinture à dispersion 40–80
Mise en service
B
mikosoft praha s.r.o.

Français–3
1 609 929 F37 • (03.08) T
Procédure de pulvérisation
Avant de commencer la pulvérisation, pulvériser briè-
vement un peu du produit utilisé pour la dilution dans
un bac collecteur.
Remplir le produit à pulvériser correctement dilué dans
le godet 5en utilisant l’entonnoir filtre (accessoire en
option).
Toujours bien visser le godet 5à la base de la pompe
7.
Ne pas mettre l’appareil en marche ni l’arrêter au des-
sus de la surface à pulvériser.
Toujours tenir l’appareil droit. Le cas échéant, utiliser
un prolongement de buse (accessoire en option) et
plier la buse dans la direction souhaitée.
Exécuter un test sur un carton ou un papier.
La distance entre la buse et la pièce à pulvériser dé-
pend du produit utilisé (env. 20 à 25 cm d’écartement
suivant le cône de pulvérisation et l’épaisseur souhai-
tée de la couche pulvérisée). Déterminer la distance à
maintenir en faisant un test. Commencer d’abord par
une distance plus éloignée.
Faire attention à toujours rester à la même distance de
la surface à pulvériser et à un mouvement régulier (cf.
figure ).
Commencer par les coins et les petits ornements en
pulvérisant par légers à-coups. Exécuter ensuite la
pulvérisation en soi.
Commencer la pulvérisation à env. 10 cm à l’extérieur
de la surface à pulvériser et la terminer également à
env. 10 cm à l’extérieur de la surface pulvérisée. Pul-
vériser du bord vers le milieu puis continuer en bandes
se croisant (cf. figure ). Pour une surface bien unie,
faire se chevaucher les bandes de 4 à 5 cm. Repasser
ensuite une deuxième fois en croisant comme décrit
plus haut.
Des gouttes peuvent se former quand on pulvérise
une surface verticale. Pulvériser d’abord une première
couche à partir d’une distance plus éloignée puis lais-
ser un peu sécher.
Ne jamais pulvériser jusqu’à ce que le godet à
couleurs soit complètement vidé. Le tuyau d’aspi-
ration doit toujours être plongé dans le liquide. Sinon,
le brouillard de pulvérisation sera interrompu et des
gouttes plus épaisses se formeront.
Sélection de la buse
(Illustration des accessoires, voir dernière page de cet-
te notice d’emploi)
■Avant toute intervention sur l’appareil proprement
dit, toujours retirer la fiche du câble d’alimentation
de la prise électrique.
■Pour obtenir un travail satisfaisant et sûr, toujours
maintenir cet appareil en parfait état de propreté.
Consignes générales de maintenance et de
nettoyage
Le nettoyage de l’appareil et du godet 5doit toujours
être effectué au moyen du diluant correspondant au
produit pulvérisé.
■Ne jamais plonger l’ensemble de l’appareil dans un
solvant de nettoyage.
Pulvériser du diluant, le cas échéant de l’eau, jusqu’à
ce que l’appareil soit complètement rincé (utiliser un
bac collecteur).
Une fois le processus de nettoyage terminé, pul-
vériser brièvement une huile exempte de résine
ou d’acide (huile de machine à coudre par ex.)
afin d’éviter une corrosion du piston, ce qui le fe-
rait coincer.
Instructions d’utilisation
C
C
Buse Utilisation
Buse à jet rond:
– Ø 0,6 mm (jointe) Toutes peintures, laques
– Ø 0,4 mm Produit à pulvériser peu
visqueux (eau, solvants)
– Ø 0,8 mm Produit à pulvériser vis-
queux
Buse à jet plat:
– FD5 Laquages de précision
– FD7 Peinture à dispersion
(Qualité Airless)
Buse de nettoyage Jet mince et dur
Rallonge de buse Pulvérisation vers le haut
ou le bas, (rallonge flexible
à 90°)
Maintenance et nettoyage
1
2
3
4
mikosoft praha s.r.o.

Français–4
1 609 929 F37 • (03.08) T
Consignes spécifiques de nettoyage
(cf. figure )
1. Dévisser la vis d’immobilisation 2.
2. Enlever le carter moteur 11 de la base de la pompe
7. Prenez compte à cet effet de la figure .
3. Dévisser la buse 1et enlevez la vanne aspirante re-
foulante 6de la base de la pompe 7. Enlevez le pis-
ton 10 et le ressort 9ensemble de la base de la
pompe 7. Ne pas forcer !
4. Introduire une tige en cuivre ou en laiton par l’orifice
du piston 8pour débloquer la bille de vanne si elle
est coincée.
5. Mettre toutes ces pièces dans un bain du diluant
approprié et les nettoyer.
Ne jamais utiliser d’objets durs pour le net-
toyage ! Le piston 10 doit avoir un jeu aisé dans le
boîtier de la pompe.
6. Remonter les pièces détachées dans l’ordre inver-
se.
En cas de perturbation de fonctionnement, contrôler la
buse 1et la vanne aspirante refoulante 6et les rempla-
cer le cas échéant.
Une fois le processus de nettoyage terminé, pulvériser
brièvement une huile exempte de résine ou d’acide
(huile de machine à coudre par ex.) afin d’éviter toute
corrosion.
Elimination du produit
Après utilisation et nettoyage de l’appareil, collecter
les produits de nettoyage, les diluants utilisés pour les
éliminer d’une manière non polluante.
Les produits chimiques polluants ne doivent pas cou-
ler dans la terre, les nappes phréatiques ou les cours
d’eau. Ne jamais jeter ces produits à l’égout.
Les peintures, laques et diluants sont des déchets
spéciaux devant être éliminés en conséquence. Res-
pecter la réglementation correspondante.
Respecter les consignes d’élimination indiquées par le
fabricant.
Si, malgré tous les soins apportés à la fabrication et au
contrôle de l’appareil, celui-ci devait avoir un défaut, la
réparation ne doit être confiée qu’à une station de ser-
vice après-vente pour outillage Bosch agréée.
Pour toute demande de renseignement ou commande
de pièces de rechange, nous préciser impérativement
le numéro de référence à dix chiffres de l’appareil.
Récupération des matières pre-
mières plutôt qu’élimination des
déchets
Les appareils, comme d’ailleurs leurs
accessoires et emballages, doivent
pouvoir suivre chacun une voie de re-
cyclage appropriée.
Ce manuel d’instructions a été fabriqué à partir d’un
papier recyclé blanchi en l’absence de chlore.
De même, nos pièces plastiques ont été marquées en
vue d’un recyclage sélectif des différents matériaux.
Vous trouverez des vues éclatées ainsi que des infor-
mations concernant les pièces de rechange sous :
www.bosch-pt.com.
France
Information par Minitel 11
Nom : Bosch Outillage
Localité : Saint Ouen
Département : 93
Robert Bosch France S.A.
Service Après-vente Outillage
B.P. 67-50, Rue Ardoin
93402 St. Ouen Cedex
✆Service conseil client. . . . . . . . . . . 0143 11 90 02
Numéro Vert . . . . . . . . . . . . . . . . . 0800 05 50 51
Belgique
✆. . . . . . . . . . . . . . . . . . . . . . . +32 (0)2/525 51 43
Fax . . . . . . . . . . . . . . . . . . . . . . +32 (0)2/525 54 20
E-mail: [email protected]
Suisse
✆. . . . . . . . . . . . . . . . . . . . . . . +41 (0)1/847 16 16
Fax . . . . . . . . . . . . . . . . . . . . . . +41 (0)1/847 16 57
✆Service conseil client. . . . . . . . . . 0 800 55 11 55
Nous déclarons sous notre propre responsabilité que
ce produit est en conformité avec les normes ou do-
cuments normalisés :
EN 50 144 conformément aux termes des réglemen-
tations 89/336/CEE, 98/37/CE.
Robert Bosch GmbH, Geschäftsbereich Elektrowerkzeuge
Sous réserve de modifications
D
D
Instructions de protection
de l’environnement
Service Après-Vente
Déclaration de conformité
Dr. Egbert Schneider
Senior Vice President
Engineering
Dr. Eckerhard Strötgen
Head of Product
Certification
mikosoft praha s.r.o.

Español–1
1 609 929 F37 • (03.08) T
Preste atención al nº de pedido de su máquina. Las
denominaciones comerciales en ciertas máquinas
pueden variar.
Determinación de los valores de medición según nor-
ma EN 50 144.
El nivel de la presión de sonido típico del aparato de-
terminado con un filtro A corresponde a 81 dB(A).
El nivel de ruido, con el aparato trabajando, podrá so-
brepasar circunstancialmente 85 dB(A).
¡Usar protectores auditivos!
El nivel de vibraciones típico en la mano/brazo es me-
nor de 2,5 m/s2.
Despliegue la solapa con la representación del apara-
to y manténgala abierta mientras lee estas instruccio-
nes de manejo.
La numeración de los elementos del aparato está re-
ferida a su imagen en la página ilustrada.
1Boquilla
2Tornillo de sujeción
3Botón regulador
4Interruptor de conexión/desconexión
5Depósito de pintura
6Válvula
7Unidad de bombeo
8Alojamiento del émbolo
9Muelle
10 Émbolo de la bomba
11 Carcasa motor
12 Copa viscosimétrica
Los accesorios ilustrados o descritos pueden no
corresponder al material suministrado de serie con el
aparato.
El aparato ha sido diseñado para pulverizar líquidos
como pintura, barniz, aceite, productos para la con-
servación de la madera, impregnación, desinfectantes
y productos fitosanitarios.
Vd. solamente puede trabajar sin
peligro con el aparato si lee ínte-
gramente las instrucciones de ma-
nejo y las indicaciones de seguri-
dad, ateniéndose estrictamente a
las indicaciones allí comprendidas.
Adicionalmente deberán respetar-
se las instrucciones de seguridad
generales comprendidas en el fo-
lleto adjunto.
■Llevar gafas de protección.
■Las partículas de pintura y los vapores de disolven-
te son nocivos para la salud: llevar siempre una
protección respiratoria y trabajar sólo en recintos
con buena ventilación o frente a equipos aspirado-
res estacionarios.
■¡Peligro de explosión! En la zona de trabajo no
deben existir llamas libres. ¡Prohibido fumar!
■No pulverizar o emplear para su limpieza lí-
quidos fácilmente combustibles o explosivos
(p.ej. gasolina, alcohol). El punto de inflama-
ción de las lacas, barnices y los disolventes
(diluyentes) debe ser superior a los 21 °C.
■No trabajar líquidos cuya peligrosidad desconoz-
ca. Atenerse a las indicaciones del fabricante.
■Si llega a dañarse o cortarse el cable de red duran-
te el trabajo, no tocar el cable, sino extraer inme-
diatamente el enchufe de red. No usar jamás el
aparato con un cable deteriorado.
■Conectar los aparatos utilizados en la intemperie a
través de un fusible diferencial con una corriente de
disparo máxima de 30 mA. No exponer el aparato
a la lluvia o humedad.
■No dirigir el chorro contra personas o animales. El
material sale con una presión elevada. ¡Peligro de
lesión e infección!
■Mantener el cable siempre detrás del aparato.
■Jamás permita que niños utilicen el aparato.
■Bosch solamente puede garantizar el funciona-
miento correcto del aparato si se utilizan los acce-
sorios originales previstos.
Características técnicas
Pistola de pintar PSP 260
Número de pedido 0 603 260 4..
Potencia absorbida nominal [W] 60
Caudal (agua) [g/min] 260
Presión máx. [bar] 160
Viscosidad máx. del material [DIN-s] 80
Capacidad del depósito
aprox. [l] 0,75
Peso sin cable, aprox. [kg] 1,2
Clase de protección / II
Información sobre ruido y
vibraciones
Elementos del aparato
Utilización reglamentaria
Para su seguridad
mikosoft praha s.r.o.

Español–2
1 609 929 F37 • (03.08) T
Comprar pinturas, barnices y demás productos para
pulverizar que no sean contaminantes (p.ej. productos
dotados con distintivos ecológicos).
Preparar el material a pulverizar
El material a pulverizar no deberá de ser demasiado
espeso, es decir, o sea, que no deberá rebasar la vis-
cosidad máxima admisible para el aparato.
Las pinturas y barnices que se adquieren en el comer-
cio vienen preparadas generalmente para aplicarse a
pincel. Para poder pulverizarlas, es necesario rebajar-
las con disolvente para obtener la viscosidad desea-
da.
El disolvente empleado deberá ser compatible con el
producto a pulverizar. Las informaciones al respecto
se detallan en la indicaciones del fabricante del pro-
ducto a pulverizar. En caso de emplear un disolvente
inadecuado se forman grumos que pueden provocar
una obstrucción en el aparato. Jamás mezclar pintu-
ras a base de resina sintética con nitrodiluyentes.
En primer lugar mezclar bien el material a pulverizar y
atemperarlo a una temperatura ambiente normal (20–
22 °C). No alterar la viscosidad del material exponién-
dolo a una temperatura mayor.
Sumergir la copa viscosimétrica 12 en el material lle-
nándola hasta el borde. Sacar la copa viscosimétrica
para dejar salir el líquido (ver figura ). Contar los se-
gundos que tarda en salir el material de la copa. Este
tiempo se denomina “Segundos DIN (DIN-s)”.
Si este valor fuese demasiado alto, ir agregando en
pasos sucesivos pequeñas cantidades de diluyente
adecuado al material, mezclándolo bien. Contar nue-
vamente los segundos DIN. Repetir este procedimien-
to hasta lograr el valor correspondiente indicado en la
tabla.
La tabla siguiente incluye ejemplos de material y los
valores orientativos DIN:
* Los productos con material en grano o de relleno no
deben pulverizarse con la pistola. Su efecto abrasivo
acorta la vida útil de la bomba y la válvula.
Ello anula el derecho a la reparación o sustitución de
dichas partes.
Preparación del área a pintar
El área a pintar deberá estar limpia, seca y libre de gra-
sa. Si la superficie es lisa, lijarla para hacerla más ás-
pera, y limpiarla a continuación.
El material pulverizado puede llegar a manchar las
áreas circundantes. Por ello, cubrir minuciosamente el
entorno del área de trabajo.
No es admisible pulverizar en las orillas o proximida-
des de aguas naturales.
¡Cerciorarse de que la tensión de la red sea
correcta!
La tensión de la fuente de energía debe coincidir con
las indicaciones en la placa de características del apa-
rato. Los aparatos marcados con 230 V pueden fun-
cionar también a 220 V.
Para la puesta en marcha girar completamente, en
sentido contrario a las agujas del reloj, el botón regu-
lador 3. Presionar el interruptor de conexión/desco-
nexión 4.
Ir girando en el sentido de las agujas del reloj el botón
regulador 3, hasta que el cono de pulverización tenga
el tamaño deseado y el chorro pulverizado sea fino y
regular, sin que se formen gotas (ver figura ).
Para la desconexión soltar el interruptor de co-
nexión/desconexión 4.
Antes de volver a conectar el aparato girar completa-
mente hacia la izquierda el botón regulador 3.
Pintado por pulverización
Antes de comenzar a pulverizar el material, pulverizar
brevemente dentro de un recipiente el mismo material
empleado como diluyente.
Llenar el depósito 5colando por el embudo con tamiz
(accesorio especial) el material preparado.
Siempre enroscar firmemente el depósito 5en la uni-
dad de bombeo 7.
No conectar ni desconectar el aparato si éste se en-
cuentra orientado contra el área a pintar.
Siempre mantener el aparato en posición vertical. Si
fuese preciso, emplear el prolongador de boquillas
(accesorio especial) y doblarlo correspondientemente
para orientar la boquilla hacia la dirección deseada.
Comprobar la pulverización obtenida sobre cartón o
papel.
La separación entre la boquilla y la pieza de trabajo
depende del material a pulverizar (entre 20 y 35 cm
aprox., dependiendo del tamaño del cono ajustado y
de la cantidad de material). Probar en cada caso la se-
paración más adecuada, comenzando con una sepa-
ración grande.
Antes de la puesta en marcha
Material a pulveriza Tiempo de salida
(en DIN-s)
Pintura para automóviles 16–20
Bronce 25–30*
Imprimación 25–30*
Pintura acrílica/
a base de resina sintética 25–30
Impregnante para madera 25–30
Esmalte 25–30
Martelé 30–35*
Pintura de dispersión 40–80
A
Puesta en funcionamiento
Indicaciones de trabajo
B
mikosoft praha s.r.o.

Español–3
1 609 929 F37 • (03.08) T
Prestar atención a que sea uniforme la separación de
la boquilla y la velocidad de desplazamiento (ver figura
).
Primeramente se pintan las esquinas o pequeños
adornos accionando brevemente la pistola. Seguida-
mente se realiza el proceso de pintado en sí.
Comenzar a pulverizar aprox. unos 10 cm antes del
área a pintar, sobrepasándola también aprox. 10 cm
tras haber alcanzado el final. Guiar la pistola desde el
borde hacia el centro, y seguidamente tratar la super-
ficie de manera que las franjas se vayan cruzando (ver
figura ). La aportación de material es uniforme si las
franjas de material se solapan unos 4 a 5 cm.
Seguidamente pintar una segunda vez la superficie
cruzando las franjas.
Al pintar superficies verticales pueden llegar a formar-
se gotas. Por ello, se recomienda pintar primero a una
mayor distancia, y esperar un momento a que se se-
que el material.
Nunca vaciar completamente el depósito. El tubo
de aspiración deberá estar sumergido siempre en el lí-
quido. En caso contrario se interrumpe el chorro y se
forman gotas.
Selección de la boquilla
(las figuras de los accesorios se muestran en la última
página de estas instrucciones.)
■Antes de cualquier manipulación en el aparato ex-
traer el enchufe de red.
■Mantener limpio siempre el aparato para trabajar
con eficacia y seguridad.
Instrucciones generales de mantenimiento y
limpieza
Siempre limpiar el aparato y el depósito 5 con el dilu-
yente adecuado al material pulverizado.
■¡No sumergir jamás el aparato completamente en
productos de limpieza!
Limpiar el aparato pulverizando el diluyente, o bien
agua, si se trata de materiales solubles en agua (em-
plear un recipiente para recoger el material).
Tras la limpieza o el uso con agua, como medida
de protección anticorrosiva, pulverizar con el
aparato un poco de aceite libre de resina y áci-
dos (p.ej. aceite de máquinas de coser) para evi-
tar que el émbolo se agarrote por oxidación.
Indicaciones de limpieza especiales
(ver figura )
1. Desenroscar el tornillo de fijación 2.
2. Separar la carcasa 11 de la unidad de bombeo 7.
Ver figura .
3. Desenroscar la boquilla 1y desmontar la válvula 6
de la unidad de bombeo 7. Retirar el émbolo de la
bomba 10 junto con el resorte 9de la unidad de
bombeo 7. ¡No proceder con brusquedad!
4. Si la bola de la válvula está atascada, liberarla in-
sertando una espiga de cobre o latón a través del
orificio del émbolo 8.
5. Sumergir todas las piezas en el diluyente adecuado
y limpiarlas.
¡Jamás limpiar empleando objeto duros! El
émbolo 10 deberá deslizar fácilmente en el aloja-
miento de la carcasa de la bomba.
6. Montar las piezas siguiendo los pasos en orden in-
verso.
En caso de un funcionamiento deficiente inspeccionar
la boquilla 1y la válvula 6y sustituirlas si procede.
Tras la limpieza del aparato, como medida de protec-
ción anticorrosiva, pulverizar con el aparato un poco
de aceite libre de resina y ácidos (p.ej. aceite de má-
quinas de coser).
Boquilla Empleo
Boquilla de chorro circular:
– Ø 0,6 mm
(adjunta) Todas las pinturas,
barnices
– Ø 0,4 mm Material poco viscoso
(agua, disolvente)
– Ø 0,8 mm Material más viscoso
Boquilla chorro plano:
– FD5 Trabajos delicados
– FD7 Pintura de dispersión
(calidad Airless)
Boquilla de limpieza Chorro fino, impacto fuerte
Prolongador de
boquillas Para orientar el chorro ha-
cia arriba o abajo (puede
doblarse hasta 90°)
C
C
1
2
3
4
Mantenimiento y limpieza
D
D
mikosoft praha s.r.o.

Español–4
1 609 929 F37 • (03.08) T
Eliminación del material
Tras el uso y la subsiguiente limpieza del aparato reco-
ger el diluyente, o bien el producto de limpieza, y eli-
minarlos ecológicamente.
Los productos químicos nocivos para el medio am-
biente no deberán acceder a la tierra, aguas subterrá-
neas o aguas naturales. Jamás eliminar el material de
manera que acceda al alcantarillado.
Las pinturas, lacas o disolventes están considerados
como residuos especiales que deberán eliminarse co-
rrespondientemente. Respétense las disposiciones lo-
cales vigentes al respecto.
Prestar atención a las indicaciones del fabricante para
la eliminación del producto.
Si a pesar del cuidadoso proceso de fabricación y
control la máquina sufriera un fallo, la reparación de-
berá encargarse a un punto de Servicio Técnico auto-
rizado para herramientas eléctricas Bosch.
Siempre que efectúe una consulta o solicite piezas de
repuesto, es imprescindible indicar siempre el número
de pedido de 10 cifras.
Recuperación de materias primas en lugar de
producir desperdicios.
El aparato, los accesorios y el embalaje debieran so-
meterse a un proceso de recuperación que respete el
medio ambiente.
Estas instrucciones se han impreso sobre papel reci-
clado sin la utilización de cloro.
Para efectuar un reciclaje selectivo se han identificado
las piezas de plástico.
Los dibujos de despiece e informaciones sobre las
piezas de repuesto las encontrará en internet bajo:
www.bosch-pt.com.
España
Robert Bosch España, S.A.
Departamento de ventas
Herramientas Eléctricas
C/Hermanos García Noblejas, 19
28037 Madrid
✆Asesoramiento al cliente . . . . . + 34 901 11 66 97
Fax . . . . . . . . . . . . . . . . . . . . . . . + 34 91 327 98 63
Venezuela
Robert Bosch S.A.
Final Calle Vargas. Edf. Centro Berimer P.B.
Boleita Norte
Caracas 107
✆. . . . . . . . . . . . . . . . . . . . . . . +58 (0)2/207 45 11
México
Robert Bosch S.A. de C.V.
✆Interior: . . . . . . . . . . . . . . +52 (0)1/800 250 3648
✆D.F.: . . . . . . . . . . . . . . . . . . +52 (0)1/5662 8785
E-Mail: [email protected]
Argentina
Robert Bosch Argentina S.A.
Córdoba 5160
1414 Buenos Aires (Capital Federal)
Atención al Cliente
✆. . . . . . . . . . . . . . . . . . . . . +54 (0)810/555 2020
E-Mail: [email protected]
Perú
Autorex Peruana S.A.
República de Panamá 4045,
Lima 34
✆. . . . . . . . . . . . . . . . . . . . . . . +51 (0)1/475-5453
E-Mail: [email protected]
Chile
EMASA S.A.
Irarrázaval 259 – Ñuñoa
Santiago
✆. . . . . . . . . . . . . . . . . . . . . . . +56 (0)2/520 3100
E-Mail: [email protected]
Declaramos bajo nuestra sola responsabilidad que
este producto está en conformidad con las normas o
documentos normalizados siguientes: EN 50 144 de
acuerdo con las regulaciones 89/336/CEE, 98/37/CE.
Robert Bosch GmbH, Geschäftsbereich Elektrowerkzeuge
Reservado el derecho de modificaciones técnicas
Protección del medio ambiente
Asesoramiento y asistencia al
cliente
Declaración de conformidad
Dr. Egbert Schneider
Senior Vice President
Engineering
Dr. Eckerhard Strötgen
Head of Product
Certification
mikosoft praha s.r.o.

Português–1
1 609 929 F37 • (03.08) T
Por favor observar o número de encomenda da sua
máquina. A designação comercial de diversas máqui-
nas pode variar.
Valores de medida de acordo com EN 50 144.
O nível de pressão acústica avaliado A do aparelho é
tipicamente de 81 dB(A). O nível de ruído durante o
trabalho pode exceder 85 dB(A).
Utilize protectores acústicos!
A vibração do braço e da mão é tipicamente inferior a
2,5 m/s2.
Por favor abra a página basculante com a ilustração
do aparelho e deixe esta página aberta enquanto esti-
ver lendo a instrução de serviço.
A numeração dos elementos do aparelho refere-se à
apresentação do aparelho na página de gráficos.
1Bico
2Parafuso de fixação
3Botão de regulação
4Interruptor Ligar/Desligar
5Copo de tinta
6Válvula de aspiração e de pressão
7Unidade da bomba
8Abertura do êmbolo
9Mola
10 Êmbolo da bomba
11 Carcaça do motor
12 Copo graduado
Acessórios ilustrados ou descritos não estão total-
mente abrangidos no fornecimento.
O aparelho é destinado para pulverizar líquidos como
tintas, vernizes, óleos, produtos de protecção para
madeiras, produtos de impregnação, desinfectantes e
inseticidas.
Um trabalho seguro com o apare-
lho só é possível após ter lido aten-
tamente as instruções de serviço e
as indicações de segurança e após
observar rigorosamente as indica-
ções nelas contidas.
Adicionalmente deverá seguir as
indicações gerais de segurança
que se encontram no caderno em
anexo.
■Usar óculos de protecção.
■Neblina de tinta e vapores de solventes são noci-
vos à saúde: Usar sempre uma protecção respira-
tória e só trabalhar em locais arejados ou com
equipamentos de aspiração estacionários.
■Perigo de explosão! Não deve encontrar-se ne-
nhuma chama aberta no local de trabalho. É proi-
bido fumar!
■Não pulverizar nem utilizar para a limpeza,
líquidos inflamáveis ou explosivos (p.ex. ga-
solina, álcool). Vernizes e solventes devem ter
um ponto de inflamação acima de 21 °C.
■Não trabalhar líquidos com perigos descohecidos.
Observar as indicações do fabricante.
■Caso o cabo de rede for danificado ou cortado du-
rante o trabalho, não toque no cabo. Tire imediata-
mente a ficha da tomada. Jamais utilizar o aparelho
com um cabo danificado.
■Aparelhos utilizados ao ar livre devem ser conecta-
dos através de um interruptor de protecção contra
corrente residual com uma corrente de activação
de no máximo 30 mA. Não utilizar o aparelho na
chuve ou em ambientes húmidos.
■Jamais aponte o jacto em direcção de outras pes-
soas ou animais. O material pulverizado sai sob
alta pressão. Perigo de lesões e infecções!
■Sempre conduzir o cabo para trás da máquina.
■Jamais permitir que crianças utilizem o aparelho.
■A Bosch só pode assegurar um funcionamento
perfeito do aparelho, se para este aparelho foram
utilizados acessórios originais previstos para tal.
Dados técnicos do aparelho
Pistola de pulverização PSP 260
Número de encomenda 0 603 260 4..
Potência de consumo
nominal [W] 60
Capacidade de transporte
(água) [g/min] 260
Pressão máx. [bar] 160
Máx. viscosidade do material
a ser pulverizado [DIN-s] 80
Conteúdo aprox. do copo de
tinta [l] 0,75
Peso sem cabo de rede
aprox. [kg] 1,2
Classe de protecção / II
Informações sobre ruído e
vibrações
Elementos do aparelho
Utilização conforme as disposições
Para sua segurança
mikosoft praha s.r.o.
Table of contents
Languages:
Other Bosch Paint Sprayer manuals

Bosch
Bosch PFS 3000-2 User manual

Bosch
Bosch PFS 1000 User manual

Bosch
Bosch 2 608 190 048 User manual

Bosch
Bosch 0603206200 User manual

Bosch
Bosch PFS 105 E User manual

Bosch
Bosch PFS 3000-2 User manual

Bosch
Bosch PFS 3000-2 User manual

Bosch
Bosch PFS 1000 User manual

Bosch
Bosch PFS 5000E User manual

Bosch
Bosch PFS 3000-2 User manual

Bosch
Bosch PFS 55 User manual

Bosch
Bosch PFS 1000 User manual

Bosch
Bosch PFS 105 E WALLPaint User manual

Bosch
Bosch PFS 55 User manual

Bosch
Bosch PPR 250 User manual

Bosch
Bosch PFS 3000-2 User manual

Bosch
Bosch 0603207200 User manual

Bosch
Bosch PFS 65 User manual

Bosch
Bosch PFS 55 User manual

Bosch
Bosch PFS 65 User manual