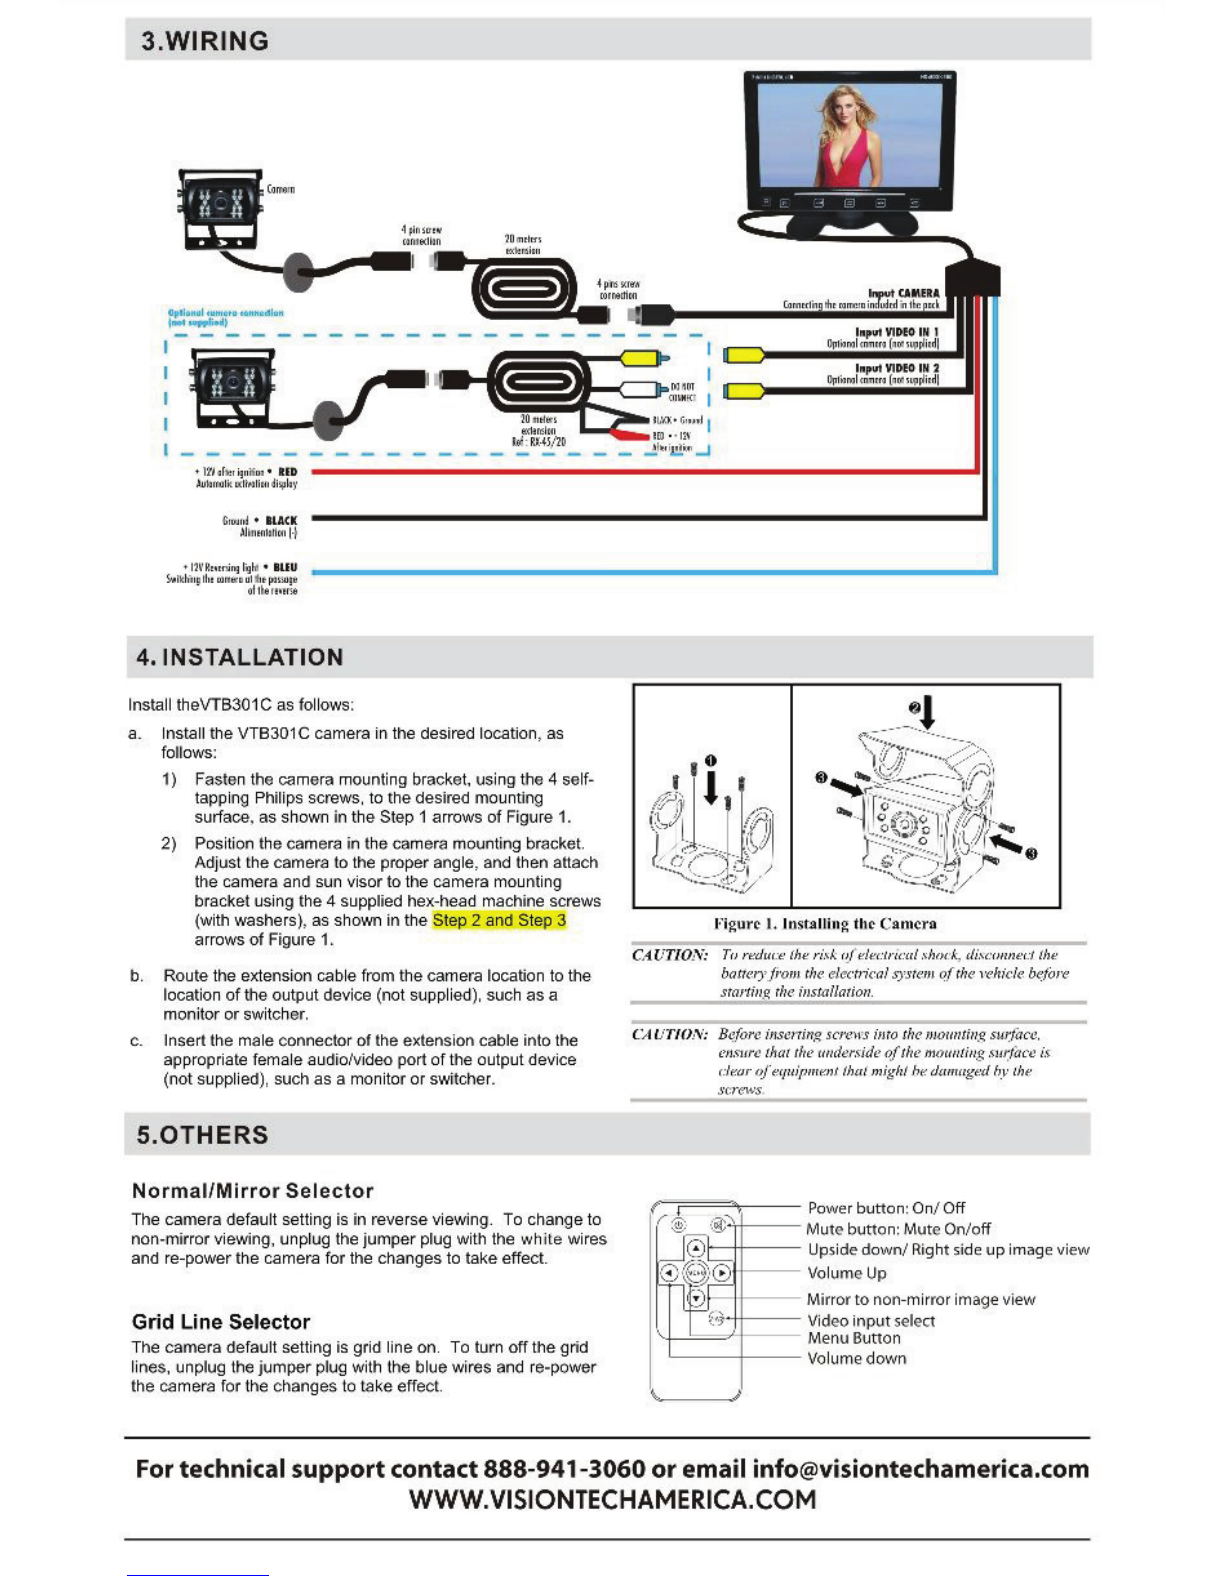
manuals.online logo
Brands
  1. Home
  2. •
  3. Brands
  4. •
  5. Boyo
  6. •
  7. Automobile Accessories
  8. •
  9. Boyo VTC307M User manual

Boyo VTC307M User manual

Other Boyo Automobile Accessories manuals

Boyo VTC404R User manual

Boyo

Boyo VTC404R User manual

Boyo VTC461 R User manual

Boyo

Boyo VTC461 R User manual

Boyo VTM43FL User manual

Boyo

Boyo VTM43FL User manual

Boyo VTL17AI User manual

Boyo

Boyo VTL17AI User manual

Boyo VTR50M User manual

Boyo

Boyo VTR50M User manual

Boyo VTX400 User manual

Boyo

Boyo VTX400 User manual

Boyo VTK501HD User manual

Boyo

Boyo VTK501HD User manual

Boyo VTK601HD User manual

Boyo

Boyo VTK601HD User manual

Boyo VTC464RB User manual

Boyo

Boyo VTC464RB User manual

Boyo VTL17LTJ User manual

Boyo

Boyo VTL17LTJ User manual

Boyo VTB44MCP-CR User manual

Boyo

Boyo VTB44MCP-CR User manual

Boyo VTX400 User manual

Boyo

Boyo VTX400 User manual

Boyo VTM3600 User manual

Boyo

Boyo VTM3600 User manual

Boyo VTX3600 User manual

Boyo

Boyo VTX3600 User manual

Boyo VTR24M User manual

Boyo

Boyo VTR24M User manual

Boyo Carrobot HUD User manual

Boyo

Boyo Carrobot HUD User manual

Boyo VTL275HDL User manual

Boyo

Boyo VTL275HDL User manual

Boyo VTC525R User manual

Boyo

Boyo VTC525R User manual

Boyo VTM73FL User manual

Boyo

Boyo VTM73FL User manual

Boyo Keyfree Touch User manual

Boyo

Boyo Keyfree Touch User manual

Boyo VTC464RB User manual

Boyo

Boyo VTC464RB User manual

Boyo VTM43ML User manual

Boyo

Boyo VTM43ML User manual

Boyo VTB100TJ User manual

Boyo

Boyo VTB100TJ User manual

Boyo VTC461R User manual

Boyo

Boyo VTC461R User manual

Popular Automobile Accessories manuals by other brands

James Baroud Odyssey user guide

James Baroud

James Baroud Odyssey user guide

Motorola i50sx owner's manual

Motorola

Motorola i50sx owner's manual

Yakima 9MM STANDARD BIKE MOUNT instructions

Yakima

Yakima 9MM STANDARD BIKE MOUNT instructions

Feniex T3 instruction manual

Feniex

Feniex T3 instruction manual

Kia E8300-4D000 manual

Kia

Kia E8300-4D000 manual

Brink 756843 installation instructions

Brink

Brink 756843 installation instructions

Whispbar K085W Fitting instructions

Whispbar

Whispbar K085W Fitting instructions

v.link CI-VL2-PC-HSD manual

v.link

v.link CI-VL2-PC-HSD manual

Viking Stack-Rack Assembly and use instructions

Viking

Viking Stack-Rack Assembly and use instructions

Aries 203015 installation manual

Aries

Aries 203015 installation manual

Choetech AT0005 user manual

Choetech

Choetech AT0005 user manual

ZZ2 ZZAIR-PRO instruction manual

ZZ2

ZZ2 ZZAIR-PRO instruction manual

Holman 4A80L installation guide

Holman

Holman 4A80L installation guide

Thule 2075 parts manual

Thule

Thule 2075 parts manual

Motorola T325 quick start guide

Motorola

Motorola T325 quick start guide

TAUBENREUTHER 16-3950 FITTING INSTRUCTION

TAUBENREUTHER

TAUBENREUTHER 16-3950 FITTING INSTRUCTION

DV8 FBJL-02 Product installation manual

DV8

DV8 FBJL-02 Product installation manual

Prorack K1163 manual

Prorack

Prorack K1163 manual

manuals.online logo
manuals.online logoBrands
  • About & Mission
  • Contact us
  • Privacy Policy
  • Terms and Conditions

Copyright 2025 Manuals.Online. All Rights Reserved.

BOYlJ
'!
$f.
H
Re-ar
VI
ew
Camero
1.
BILL
OF
MATERIAL
Monitor
Manual
Dash
Mount
Bracket Remote
2.
SPECIFICATION
Monitor
Screen Type:7" Di
gita
lT
FT
LCD
2 Video Input a
nd
1cam
er
a i
npu
t
Bui
lt-
in
Speaker
Display F
orm
at: 16:9
Power:SW
+
Power supply: 12VDC -15V
Reverse
trigger
wi
re
PA
.L
/ N
TSC
auto
sw
itc
h
Pi
xel
:800x480
Sl
im
and
Sl
e
ek
De
si
gn
Contrast:
3S0:1
Di
me
nsion:7"
0/'J)
x
4.
75" (H) x 0
.5
"
(D
)
Camera
Weatherproof and water reistant
• Mirror/ Non-Mirror image
se
lectable switch
Wide-angle le
ns
170<
360-degree adjustab
le
mounting angle
\
USER'S
MANUAL
Model:
VTC307M
7"
MONITOR
AND
HEAVY
DUTY
CAMERA
RCA
Adapter
Cable4pin
-,v
.-
v,-
·H
-
:Y
"'
~,.
---
"
.-.
Windshield
Mount
PowerWire Camera
20M
Cable
@ P
owe
r bu
tton
:
Open/
sleepi
ng
mode
El
Volume
-
Adjust
-
M
en
u: param eter-ad
jus
t
@)
Menu
EJ
Volu
me
a
dju
s
t+
Menu:
parameter
-
adjust
B
Short
Press
forvi
deo
i
nput
select
Long Press
fo
r
up,
down,
righ
t,
l
eft
image
view
m
ode
s
I
nfr
ared light
fo
r impr
ov
ed image quality
in
low-light
situations
•
Ni
ghtvision distance
of
approx8M
20M Extensi
on
Cable Included
Auto-iris lens that automatically adjusts to light conditions
3.WIRING
_
_,----,
L bHlll
-'---'
,-
·
on
M
!.<
f
• l2'hb:1
it11
iio1•
liD
.luiiiMik.ll(
li
lll
li!ndilpl
l)'
&tV
JUI
•
llAO(
;\hJ
ifRi
lll<t•H
• 11\'tlotcinJ li]
lt
•
IUU
S...i
1t
li
11p
dt!
Ull
t&:
t>
ull•t jiH!UJ-'
ollb
w•
-
fl111<
4.1NSTALLATION
Install theVTB301C as follows:
a.
Install theVTB301c camera in the desired location, as
fo
ll
ows:
1) F
as
ten the
cam
era mounting bracket.
us
ingthe 4 self-
tappi
ng
Phili
ps
screws. to the desired mounting
su
rf
ace. as shown in the Step 1 arrows
of
Figure 1.
2)
Position the
ca
mera
in
the camera
mo
unting bracket.
Adjust the
carm
era to the proper angle, and then attach
the camera and sun visor to the camera mou
nt
i
ng
bracket using the 4 supplied hex-head machine screws
(with washers}, as shown in the Step 2 and Step 3
arrows
of
Figure 1.
b. Route the extension cable fr
om
the
ca
mera location to the
location
of
theou
tp
ut d
ev
ice (not supplied), such
as
a
mo
nitoror switcher.
c. Insert the male connector
of
the extens
io
n cable into the
appropriate femal-e audio/vi
deo
port
of
the output device
(notsupplied), such as a monitor or
sw
it
cher.
5.0THERS
Normal/Mirror
Selector
The
ca
mera default
se
tting is in reversevi
ew
ing. To change to
non-mirror viewing,u
np
lug the
jumper
plug with the white wires
and re-power the camera
fo
r the changesto take effec
t.
Grid Line Selec
tor
The
ca
mera default
sett
ing is
gr
id line on. To
tur
n
off
thegrid
lines. unplug the
ju
mper
plug with the bluewires and re-power
the camera for the changes to take effect.
fig
ure
J. J
ust
alliJ•g the
Cau
tcra
C4l/Tl0
;
'\i:
To
r
ed
ctc~:
lh
~:
ri
sk
of electrical sluu.k, tli.,c
om
u:cllhe
ba
twry.fi·om
th<~
(.
?/c
ctn
'
<:
alS)'J
'U'JJJ
q.fthe
l
'ehici<~
b
<~!O
r<!
s
rarting
rh~..
~
installmion.
C4
l/
TIO.
·
V:
B~(ore
i
nsenifl~
s
cr<.
nt
'Simo
th<>
JW.J
untiup,
su~{Gce.
t•
tJSifre that
th
e•
t
md
ersi(/t•
of
tlu.>
mounting.su
t;(a
ce is
di!tH
ofe
qulpuumllhaf
m
ig
ht
he
dw
n
ag~:d
by
t
h~
scre
ws
'
(~
.
·:
~'
'~
1"':'\.r~~
·
~i!E
;,
t·~
#
Power button:
On/
O
ff
Mute button: MuteOn/o
ff
Up
sided
own/
Rig
ht sideup image view
Volu
me
Up
Mirror
to
non-mirr
or
im
age vi
ew
Vi
deo i
npu
t select
Me
nu Button
Volume
down
Fortechnical
support
contact888-941-3060
or
email [email protected]
WWW.
VISIONTECHAMERICA.COM