manuals.online logo
Brands
  1. Home
  2. •
  3. Brands
  4. •
  5. Bristan
  6. •
  7. Plumbing Product
  8. •
  9. Bristan CR SHXDIVFF C (D7) Wiring diagram

Bristan CR SHXDIVFF C (D7) Wiring diagram

2
1
Isolation 2
Remove the concealingRemove the concealing
cap from the shroud.cap from the shroud.
Operation
5
Identify the
required positition of
the valve and prepare
the water supply pipes.
Supply pipes should be
150mm apart.
Using the backplate
supplied with the
wallmount, mark and
drill holes.
Secure the isolatorSecure the isolator
onto the backplateonto the backplate
ensuring the olive isensuring the olive is
positioned over thepositioned over the
pipework correctly.pipework correctly.
Push shrouds to thePush shrouds to the
back of the wall outlet,back of the wall outlet,
securing them againstsecuring them against
the rubber fixing platethe rubber fixing plate
4
3
IMPORTANT
1
Pack Contents
150mm
Centres
1.0
5.0
Pressure
BAR
0.2
4.0
2.0 3.0
Pressure
BAR
1.0
5.0
0.2
4.0
2.0 3.0 60°C
65°C
Specifications
Maximum Static Pressure: 10.0 bar
Inlet Water Temperature
15mm
Compression
Inlet Connections
Min: 0.2 bar Max: 5.0 bar
Working Pressures
The inlet hot water must
be at least 10°C above the
required blend temperature.
Factory pre-set
42°C
Inlet Dimensions
5°C
25°C
Cold Water Supply
Min: 5°C Max: 25°C
Hot Water Supply
Tools You’ll need
Flat head Screwdriver Cross head Screwdriver Hexagonal Keys Socket SpannerPipe CutterPencil Drill Spanner
Installation Instructions
& User Guide
Please leave these instructions
with the end user
Product Code: CR SHXDIVFF C (D7)
All products manufactured and supplied by Bristan are safe to use provided that
they are installed, operated and receive regular maintenance in
accordance with these instructions.
This product needs to be installed in accordance with, and meet the
requirements of the Water Supply (Water Fittings) Regulations 1999 and
current by-laws. For full Installation Requirements & Notes (IRN) please
visit wras.co.uk/directory.
Isolation valves must be fitted to the inlet water supplies to ensure ease of future
maintenance.
Before installing this product the water supply must be thoroughly flushed in
order to remove any swarf, solder etc.
This product must not be modified in any way as this will invalidate the
guarantee.
Full access must be made available for future maintenance/servicing purposes.
Before drilling into walls, check that there are no hidden electrical wires,
cables or water supply pipes. This can be checked with the aid of an
electronic detector.
If power tools are used do not forget to:
- Wear eye protection
- Unplug equipment after use
If in doubt, contact a registered plumber or your Local Water Authority or
the Secretary of the Institute of Plumbing, address as follows:-
The Institute of Plumbing,
64 Station Lane,
Hornchurch,
Essex,
RM12 6NB, Tel: 01708 472791
Prior to Installation
Installation
60-65°C Recommended
REMEMBER
hot on the left,
cold on the
right
150mm Centres
Secure the rubber backplateSecure the rubber backplate
and backplate into place.and backplate into place.
Secure the shower toSecure the shower to
the wall mount.the wall mount.
21mm21mm
REMEMBER
To service
your
product!
HotHot
ColdCold
HandsetHandset
Fixed HeadFixed Head
x1
x2
x2
x1
x1
x1
x1
x1
x1
x2
Rotate the shroud untilRotate the shroud until
the opening aligns withthe opening aligns with
the isolation screw.the isolation screw.
Turn the screw to isolateTurn the screw to isolate
the water. Reverse thethe water. Reverse the
process when turningprocess when turning
the water back on.the water back on.
Attach handset and fixed head. To adjust the riser pull
the top cap up and use a hexagonal spanner to loosen
the nut. Pull rail to desired position then tighten the
nut and pull cap back down.
7
4
4
2
1
Turn flow handle to ‘on’
position, letting temperature
stablise.
Turn cartridge spindle clockwise
to decrease the temperature.
Turn cartridge spindle
anti-clockwise to increase the
temperature.
3
5
2
Using the wall
mount, isolate
both shower inlets
before carrying out
any maintenance.
To remove thermostatic cartridge
remove temperature stop and insert
cartridge tool (not included) and use
an adjustable spanner to unscrew the
retaining nut.
Troubleshooting
To reduce the build up of
limescale and to ensure this
shower works to its maximum
performance we recommend
this shower is serviced every
6-12 months depending on the
hardness of your water.
To replace any spare parts for
your shower why not scan the
below QR Code and search for
your product.
Spare Parts
Servicing Intervals
Temperature Setting
Maintenance - Cartridge Cleaning
3
1
6
Symptom Cause Remedy
No flow or
low flow rate
partially closed isolation valve. Open isolation valve.
Instantaneous water heater cycles on and o
as flow rate or pressure is too low.
Increase water flow rate or
pressure through system.
Head of water is below the
minimum distance required.
2 meters minimum required.
Hot or cold water being drawn o elsewhere
causing pressure changes or instantaneous
boiler temperature changes.
Do not use other water outlets when using the taps.
Airlock or partial blockage in the supply
pipework.
Flush through pipework to ensure removal of debris and
any airlocks.
Water
dripping
from shower
This is normal for a short time after using the
shower.
This is caused by residual water tension, the build up of
water in the shower.
If water continues to drip,
possibly due to the cartridge
Remove cartridge and clean, refer to 'Maintenance' section
before starting any maintenance.
Shower does
not turn on
Closed isolation valve. Open isolation valve.
Mains water supply turned o. Turn on mains water supply.
REMEMBER
To service
your
product!
At Bristan, we want to make things as easy as possible for our customers. That’s why we oer solid guarantees on
all our products, eective from the date of purchase, to give you peace of mind.
To start your free guarantee simply scan the QR code and register your product.
Alternatively visit www.bristan.com/register.
For any other queries, please call our Customer Service on 0330 026 6273 where our expert team of advisors
will be able to oer you any help and advice.
For full guarantee terms and conditions visit www.bristan.com/guarantees.
34
5
Remove
temperature and
flow handles
Remove O-rings and soak all
components in de-scaler and
wash o in clean water. Examine
all seals and replace if needed.
Use WRAS approved silicon
based grease on all seals.
Reverse steps 5-2 to
reinstall the valve,
cartridge and handles.
Turn the water
supply to the
shower back on.
Remove cartridge
retainers and
cartridges
Remove
temperature
handle
Replace
temperature
handle
4
1
56
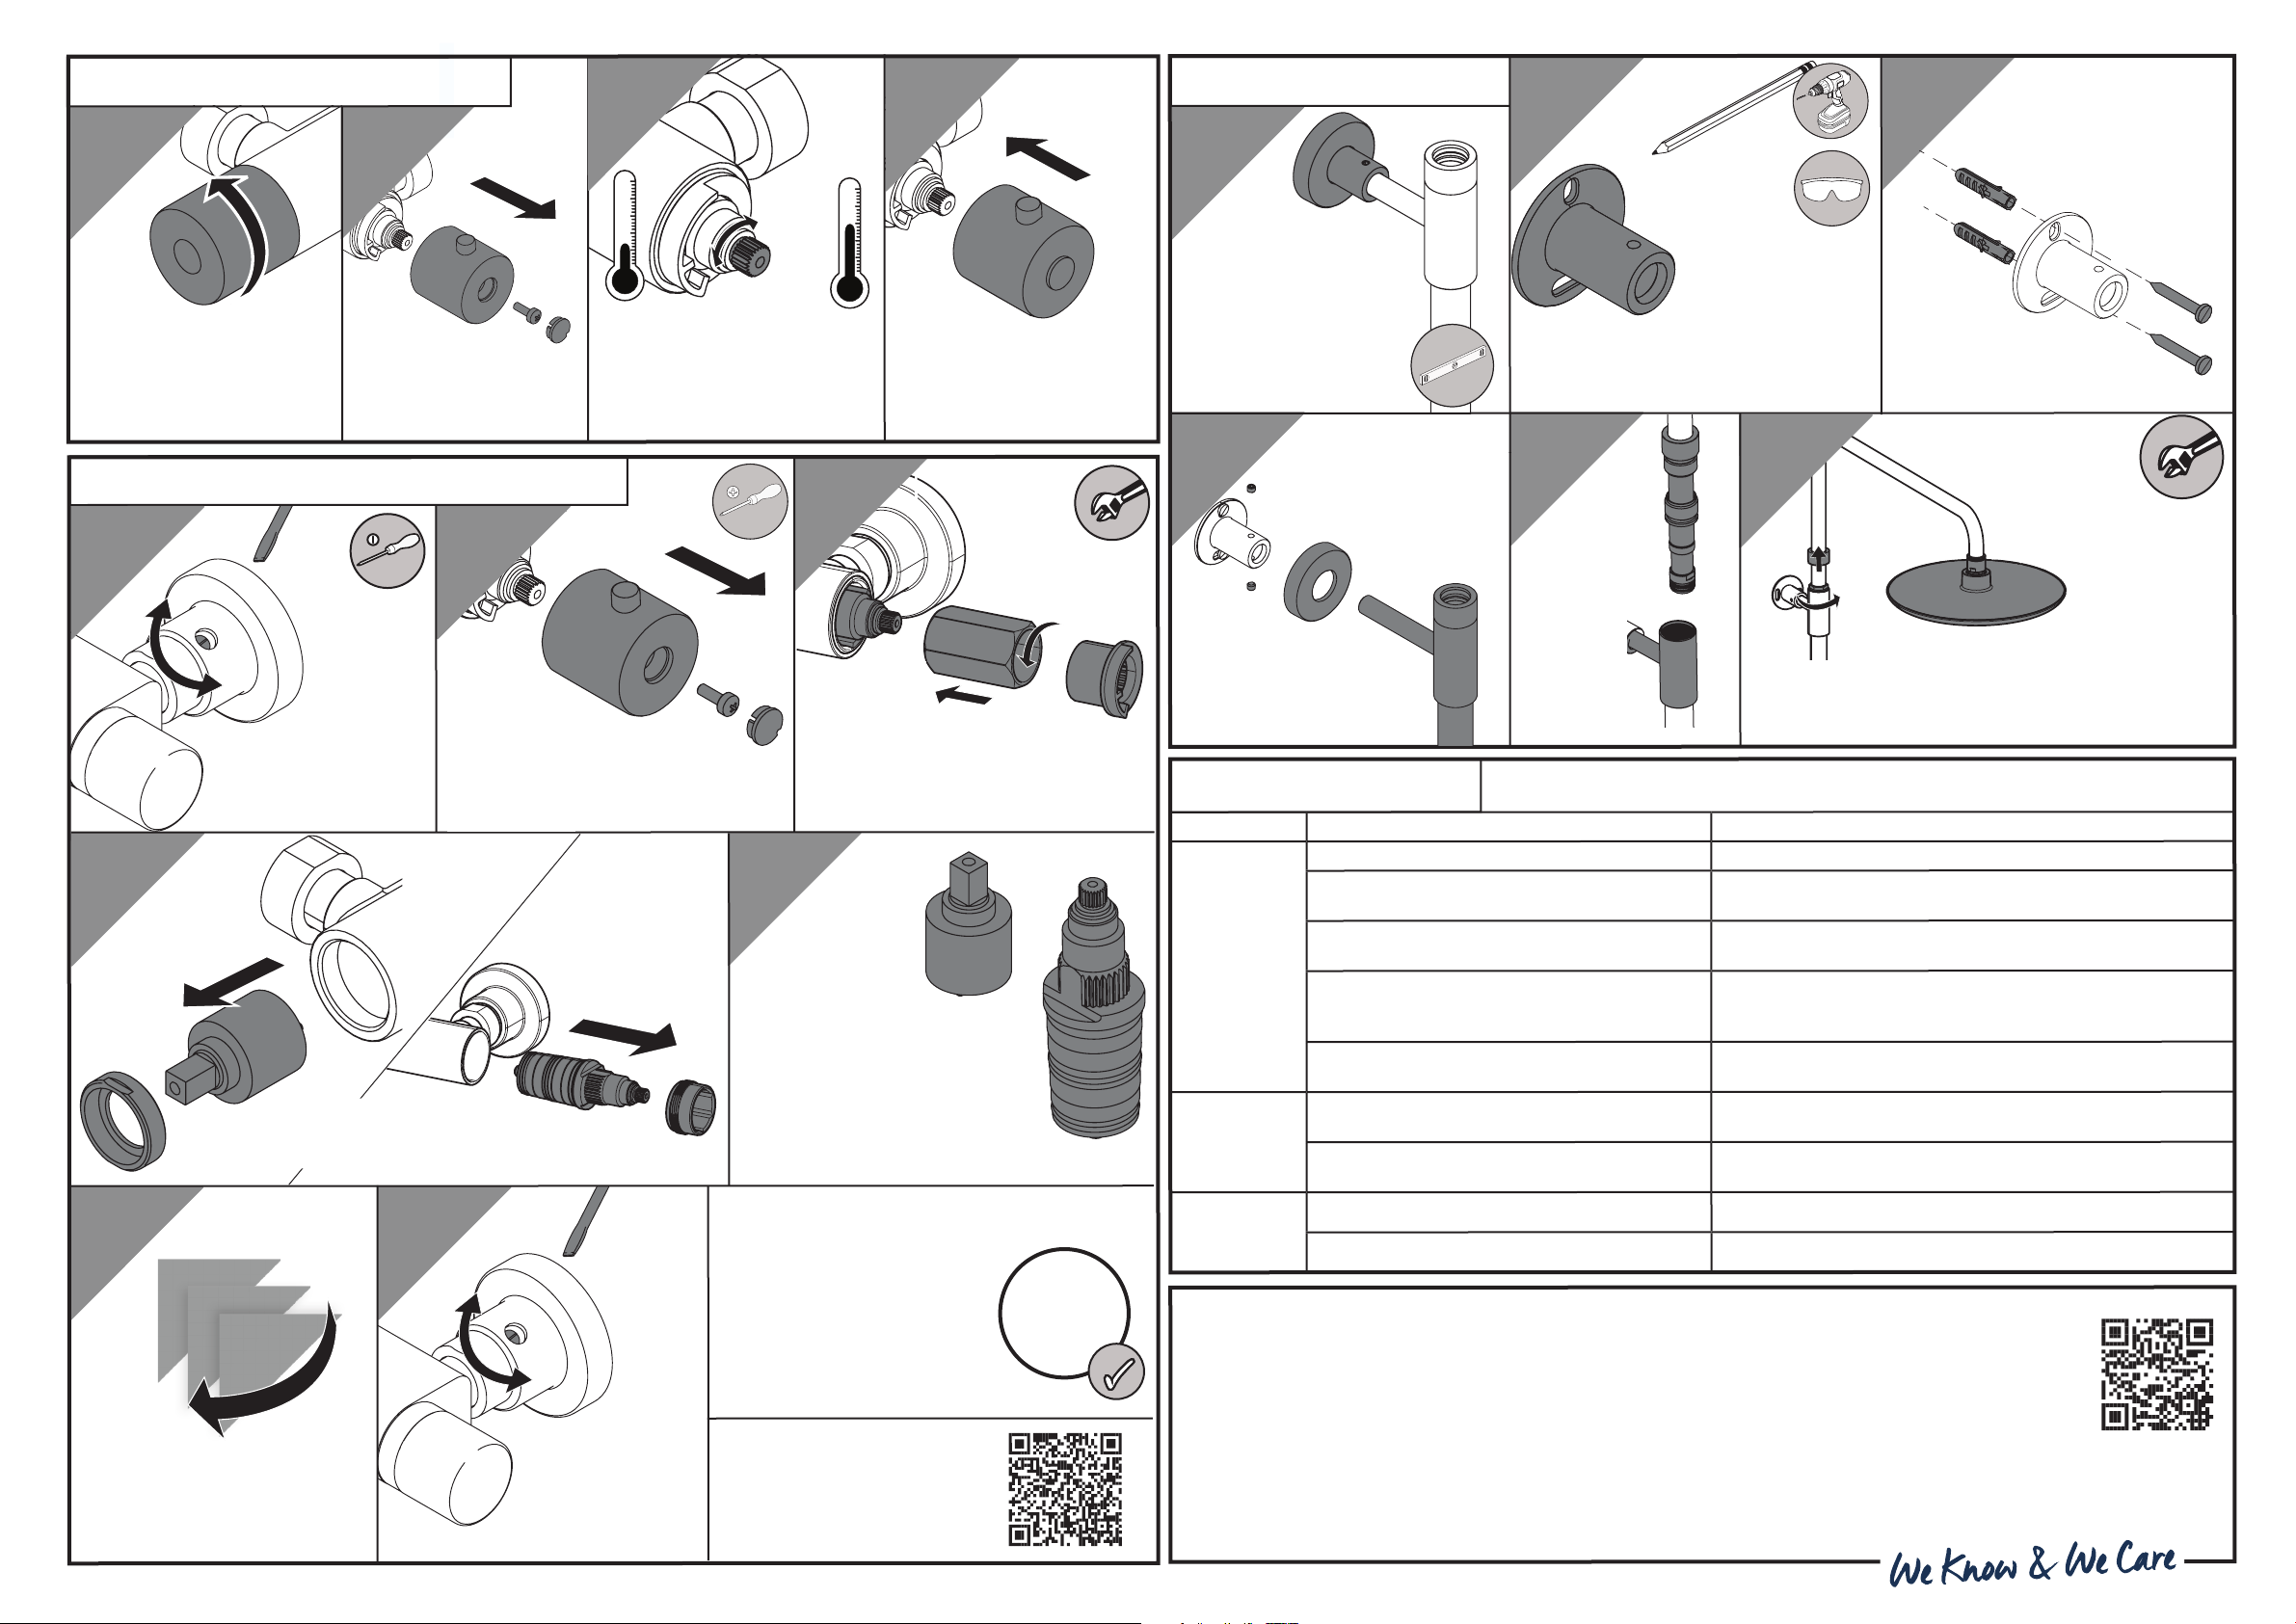
Riser Installation 23
Attach shroud and
secure riser to bracket by
tightening grub screws.
Secure bracket to wall
using screws and plugs
provided.
Disassemble bracket,
align on the wall in the
correct position and
mark location of holes
to be drilled.
Using a spirit level
to ensure the riser is
positioned correctly,
use the assembled
riser to mark the
desired position of the
brackets.
Push the
riser rail
into the
bracket
and screw
to tighten.
Customer Service: +44330 026 6273
Web: www.bristan.com
Email: enquire@bristan.com
A Masco Company
Bristan Group Ltd.
UK: Bristan Group, B78 1SG.
EU: Masco Europe S.à.r.l., 14 Rue Strachen
6933 Mensdorf, Luxembourg.

Other Bristan Plumbing Product manuals

Bristan PS2 BAS C D2 Wiring diagram

Bristan

Bristan PS2 BAS C D2 Wiring diagram

Bristan SQR KIT01 BLK D2 Wiring diagram

Bristan

Bristan SQR KIT01 BLK D2 Wiring diagram

Bristan FHC CTRD01 C User manual

Bristan

Bristan FHC CTRD01 C User manual

Bristan Jute JU BF C User manual

Bristan

Bristan Jute JU BF C User manual

Bristan CAP2 SHUAR C Mounting instructions

Bristan

Bristan CAP2 SHUAR C Mounting instructions

Bristan W BASIN13 C Wiring diagram

Bristan

Bristan W BASIN13 C Wiring diagram

Bristan WMNT11 C Mounting instructions

Bristan

Bristan WMNT11 C Mounting instructions

Bristan Regency R BSM C User manual

Bristan

Bristan Regency R BSM C User manual

Bristan PM2 SHCDIV C Wiring diagram

Bristan

Bristan PM2 SHCDIV C Wiring diagram

Bristan PIV BAS C User manual

Bristan

Bristan PIV BAS C User manual

Bristan JAVA J THBSMVO C Wiring diagram

Bristan

Bristan JAVA J THBSMVO C Wiring diagram

Bristan PM2 SHCDIV BLK (D2) Wiring diagram

Bristan

Bristan PM2 SHCDIV BLK (D2) Wiring diagram

Bristan CAP2 SHXAR C (D6) Wiring diagram

Bristan

Bristan CAP2 SHXAR C (D6) Wiring diagram

Bristan DSC 3HBF C User manual

Bristan

Bristan DSC 3HBF C User manual

Bristan Opac Series Mounting instructions

Bristan

Bristan Opac Series Mounting instructions

Bristan RO2 SHXAR C Mounting instructions

Bristan

Bristan RO2 SHXAR C Mounting instructions

Bristan WASTES W BATH09 C Wiring diagram

Bristan

Bristan WASTES W BATH09 C Wiring diagram

Bristan GLL FLEXSNK C (D1) Wiring diagram

Bristan

Bristan GLL FLEXSNK C (D1) Wiring diagram

Bristan W SNK6 C User manual

Bristan

Bristan W SNK6 C User manual

Bristan Options Bath User manual

Bristan

Bristan Options Bath User manual

Bristan Liquorice Kitchen Sink Tap Wiring diagram

Bristan

Bristan Liquorice Kitchen Sink Tap Wiring diagram

Bristan K 1/2 C Wiring diagram

Bristan

Bristan K 1/2 C Wiring diagram

Bristan W BATH05 C Wiring diagram

Bristan

Bristan W BATH05 C Wiring diagram

Bristan IRBS1-CP Mounting instructions

Bristan

Bristan IRBS1-CP Mounting instructions

Popular Plumbing Product manuals by other brands

Moen SANI-STREAM 8797 manual

Moen

Moen SANI-STREAM 8797 manual

Grohe Allure Brilliant 19 784 manual

Grohe

Grohe Allure Brilliant 19 784 manual

Cistermiser Easyflush EVO 1.5 manual

Cistermiser

Cistermiser Easyflush EVO 1.5 manual

Kohler Triton Rite-Temp K-T6910-2A installation guide

Kohler

Kohler Triton Rite-Temp K-T6910-2A installation guide

BEMIS FNOTAB100 Installation instruction

BEMIS

BEMIS FNOTAB100 Installation instruction

Hans Grohe ShowerTablet Select 700 13184000 Instructions for use/assembly instructions

Hans Grohe

Hans Grohe ShowerTablet Select 700 13184000 Instructions for use/assembly instructions

Akw Stone Wash Basin Installation instructions manual

Akw

Akw Stone Wash Basin Installation instructions manual

Enlighten Sauna Rustic-4 user manual

Enlighten Sauna

Enlighten Sauna Rustic-4 user manual

Moen ShowHouse S244 Series quick start guide

Moen

Moen ShowHouse S244 Series quick start guide

Sanela SLWN 08 Mounting instructions

Sanela

Sanela SLWN 08 Mounting instructions

Franke 7612982239618 operating instructions

Franke

Franke 7612982239618 operating instructions

Heritage Bathrooms Granley Deco PGDW02 Fitting Instructions & Contents List

Heritage Bathrooms

Heritage Bathrooms Granley Deco PGDW02 Fitting Instructions & Contents List

Tres TOUCH-TRES 1.61.445 instructions

Tres

Tres TOUCH-TRES 1.61.445 instructions

STIEBEL ELTRON WS-1 Operation and installation

STIEBEL ELTRON

STIEBEL ELTRON WS-1 Operation and installation

Miomare HG00383A manual

Miomare

Miomare HG00383A manual

BELLOSTA revivre 6521/CR1 quick start guide

BELLOSTA

BELLOSTA revivre 6521/CR1 quick start guide

American Standard Heritage Amarilis 7298.229 parts list

American Standard

American Standard Heritage Amarilis 7298.229 parts list

BorMann Elite BTW5024 quick start guide

BorMann

BorMann Elite BTW5024 quick start guide

manuals.online logo
manuals.online logoBrands
  • About & Mission
  • Contact us
  • Privacy Policy
  • Terms and Conditions

Copyright 2025 Manuals.Online. All Rights Reserved.