Bruno ELITE SRE-2010 User manual

SRE-2010 ELITE
Straight Rail Stairlift
OPERATOR’S MANUAL
P/N 2010-O
08 FEBRUARY 2019
Please contact your Bruno dealer with any questions or service concerns, using
the contact information shown below:
(Dealer: Place contact information below.)
Dealer Name:
Address:
Telephone No.:
(Español 19-36)
(Français 37-56)

©Bruno Independent Living Aids, Inc.®SRE-2010 OPERATOR 02-08-2019
2
Product Registration Form
Please print in
capital
letters.
*First Name ______________________________________________________ M.I._____
*Last Name _______________________________________________________________
*Street Address________________________________________________ Apt. No._____
*City _____________________________________________ *State/Province _________
*Zip/Postal Code ___________________________________________________________
Email Address _____________________________________________________________
Telephone No. _____________________________________________________________
Date of Purchase (mm/dd/yy) _________________________________________________
Dealer: Locate the Model No. and Serial
No. decal on the decal sheet
shipped with the unit and
place it here.
Model No.___________
*Serial No._________________
Please be assured that Bruno does not share or sell the information you provide.
©2014,2005 Bruno Independent Living Aids, Inc.®
Please rate your satisfaction with your Bruno dealer:
excellent good average poor
Please rate your satisfaction with your Bruno product:
excellent good average poor
Bruno reserves the right to use information indicated on this form in its online, video, audio and printed
materials. Names will be abbreviated to ensure the privacy and anonymity of the individual.
Online registration available at http://www.bruno.com/warranty.html
P/N PROD REG STD
Rev. 04-17-2014
* = required eld
End-User: For faster registration,
please go to the website
shown above.
SAMPLE
PRODUCT REGISTRATION FORM
Bruno is pleased to provide you with this
mobility-enhancing product.
The Product Registration Form is shipped
in a plastic bag with this manual. It is very
important that you ll out and return this form
at your earliest convenience so that we may
complete the warranty registration process for
your unit.
The serial number is found on labels afxed
to the manual, as well as on the unit itself.
Serial and model numbers must be provided
when ling a warranty claim, requesting service
or ordering parts. We encourage you to keep
this information readily available at all times.
Please Note:
The warranty for the SRE-2010 Stairlift
is rendered null and void if the unit is
installed or maintained by anyone other
than an authorized Bruno dealer.

©Bruno Independent Living Aids, Inc.®SRE-2010 OPERATOR 02-08-2019
3
Regulatory Information and Specications ................................4
Safety..........................................................5
Circuit Breaker....................................................6
Seating.........................................................6
Operation ....................................................7-12
Standard Swivel Seat ............................................7
Optional Power Swivel Seat .......................................8
Optional Power Footrest..........................................9
Optional Folding Rail ...........................................10
Optional Power Folding Rail ................................... 11-12
Diagnostic Codes .................................................13
Charging.......................................................13
Battery Charger ..................................................14
Maintenance/Transmitter Battery Replacement and Interference ................15
Troubleshooting ..................................................16
Vacation and Long-Term Storage ......................................17
Warranty.......................................................18
TABLE OF CONTENTS

©Bruno Independent Living Aids, Inc.®SRE-2010 OPERATOR 02-08-2019
4
This lift is intended to be installed in accordance with the current edition of:
• EN 81-40:2008 Safety rules for the construction and installation of lifts - Special lifts for the
transport of persons and goods - Part 40: Stairlifts and inclined lifting platforms intended for
persons with impaired mobility
• ASME A18.1:2017 Safety Standard for Platform Lifts and Stairway Chairlifts - Units with
overspeed assembly
• ASME A18.1:2014 Safety Standard for Platform Lifts and Stairway Chairlifts - Units without
overspeed assembly
• CAN/CSA-B613-00 (R2005) - Private Residence Lifts for Persons With Physical
Disabilities
• ASME A17.5/CSA B44.1 - 2014 Elevator and Escalator Electrical Equipment
• NFPA 70: National Electrical Code®
• CSA C22.1 Canadian Electrical Code
Veriy applicable local codes with the appropriate regulatory authorities.
SPECIFICATIONS
Weight Capacity: 400 lbs. (181 kg)
Control: constant pressure (armrest and two remotes)
Maximum Incline: 45 degrees
Seat Swivel: 0, 60 and 90 degrees at the top; (optional) 45 degrees at the bottom
Battery Charger: 24VDC battery charger powered by 120V wall outlet
COMPONENTS OF THE SRE-2010
4004689 4004689
REGULATORY INFORMATION and SPECIFICATIONS
armrest
folding footrest
with obstruction sensors
swivel
release
folding seat
in riding position
UP / DOWN
rocker
switch

©Bruno Independent Living Aids, Inc.®SRE-2010 OPERATOR 02-08-2019
5
SAFETY
FOR YOUR SAFETY
• Read and understand the operating instructions, and all safety precautions prior to
using the SRE-2010.
• Be sure stairs are clear of objects before operating the stairlift.
• Always be aware of the surface onto which you are stepping as you get on and off the
stairlift.
• Avoid carrying items with you on the stairlift which could hinder movement of the
stairlift up and down the stairs.
• Do not wear LOOSE clothing that could interfere with stairlift movement.
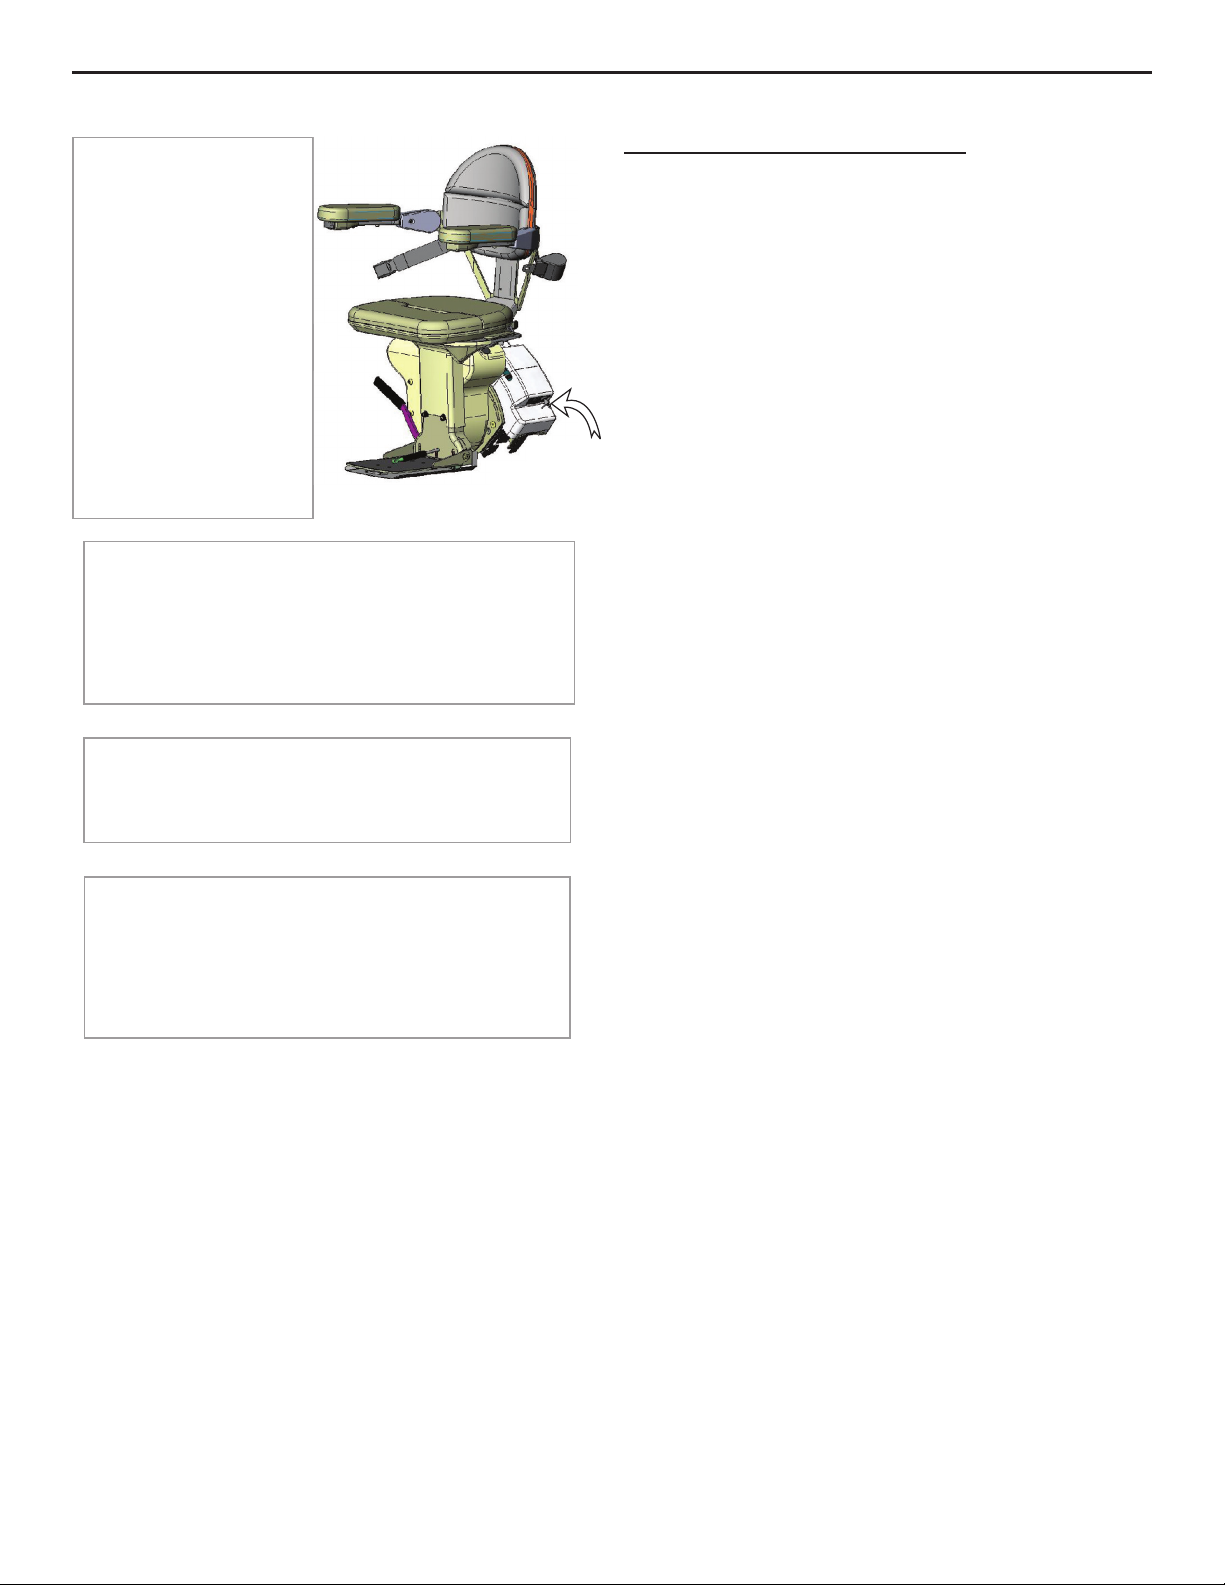
• Fasten your positioning belt before operating the stairlift.
• Make sure the seat is locked in the correct riding position.
• Be sure that the seat swivel path is clear before swiveling in or out of the ride position,
and before repositioning the seat.
• Be certain the seat swivel is locked in place before attempting to get on or off the
stairlift.
• Make certain that there are no obstacles that would prevent complete raising/lowering
of the optional power footrest (if unit is so equipped).
• NON-AMBULATORY USERS: Bruno recommends carrying a cellular or cordless
telephone or an emergency communication device when riding the stairlift while alone
in the house.
Each stairlift is designed to travel down the stairway at a slightly slower speed than is
the case when travelling UP.
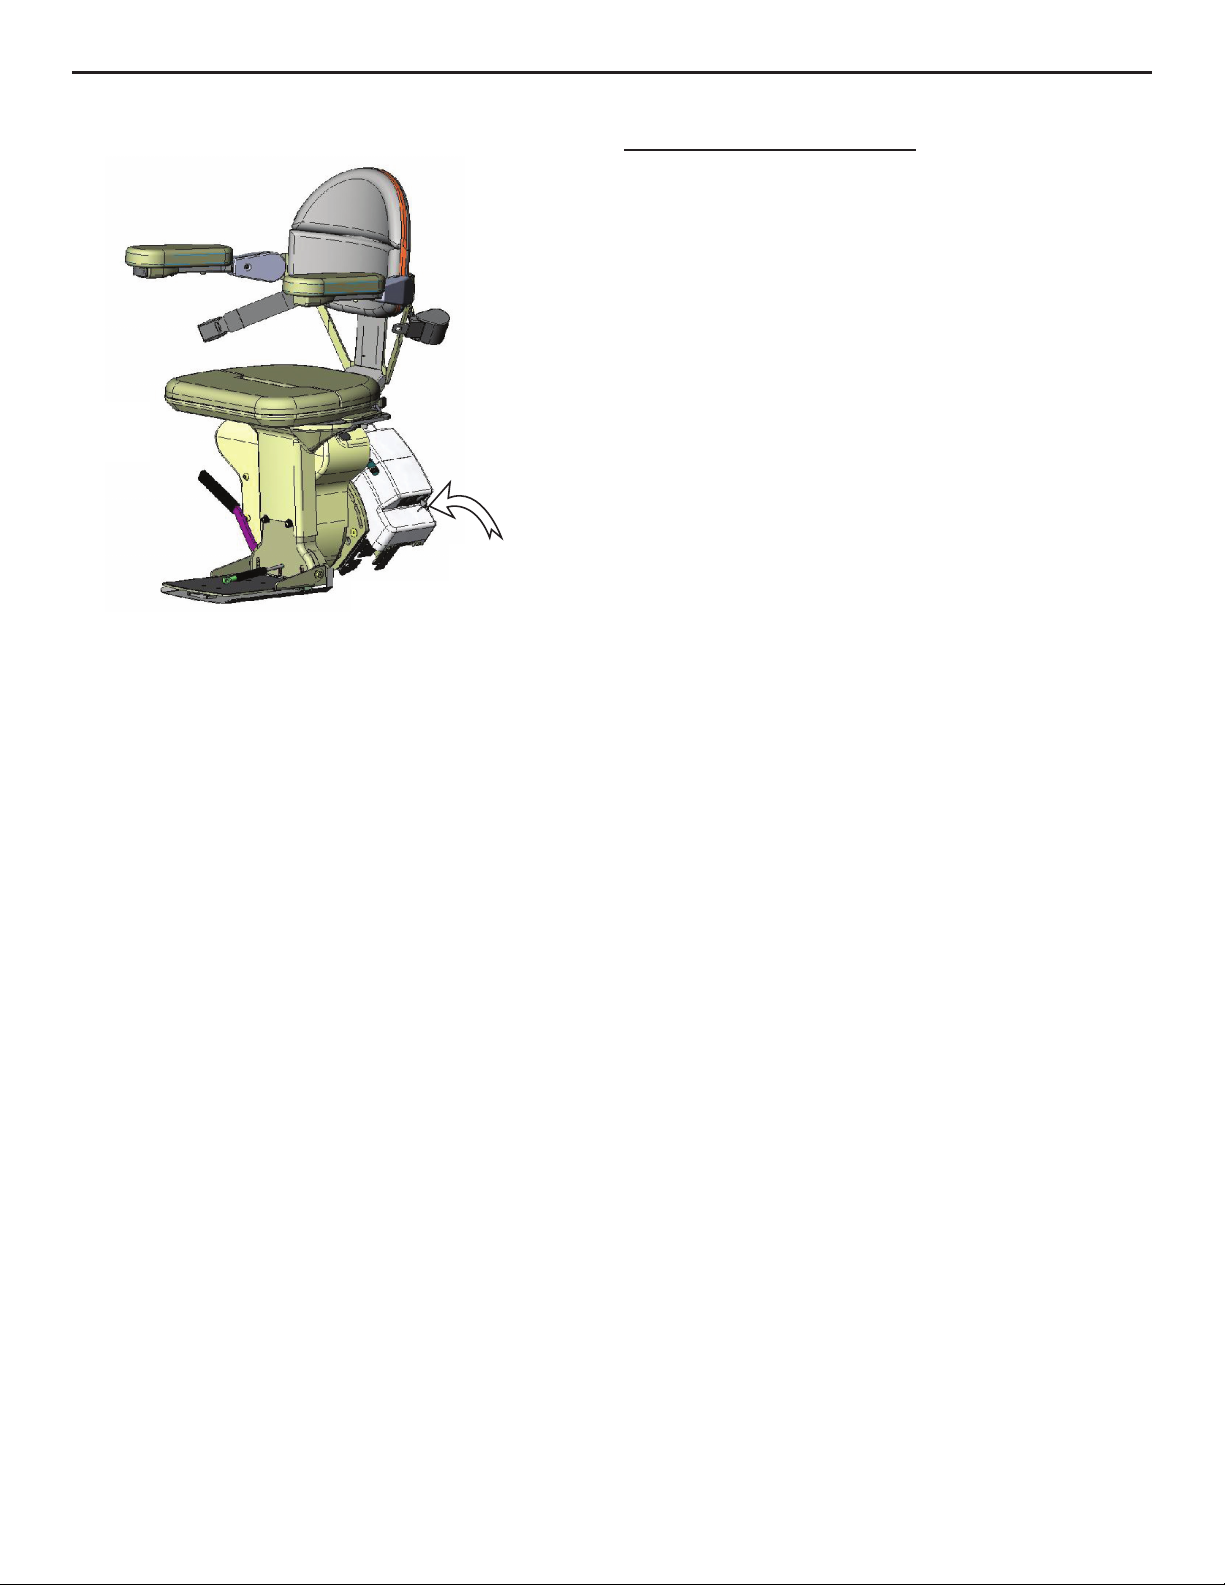
The footrest is equipped with obstruction sensors which stop the carriage if an obstacle
is encountered on the stairs.
If this should occur, press the opposite side of the UP/DOWN rocker control switch (on
the armrest) to run the carriage in the opposite direction. Clear the obstacle from the
stairway or rail then resume travel in the desired direction.
Your SRE-2010 is battery powered and will continue to operate for some time during a
power outage. The length of operation will depend on the battery condition, the length of
the stairs and the weight of the rider.
Only in the event of a prolonged power outage (more than one hour) will it be necessary
to turn the power off (circuit breaker switch on the carriage) and turn off or unplug the
charger from the wall outlet to conserve battery charge.
The power swivel seat option is equipped with current overload sensing to prevent
further seat swivel if a jam is detected.
The power footrest option is equipped with current overload sensing that will cause
the footrest to return to its last position if a jam is detected.
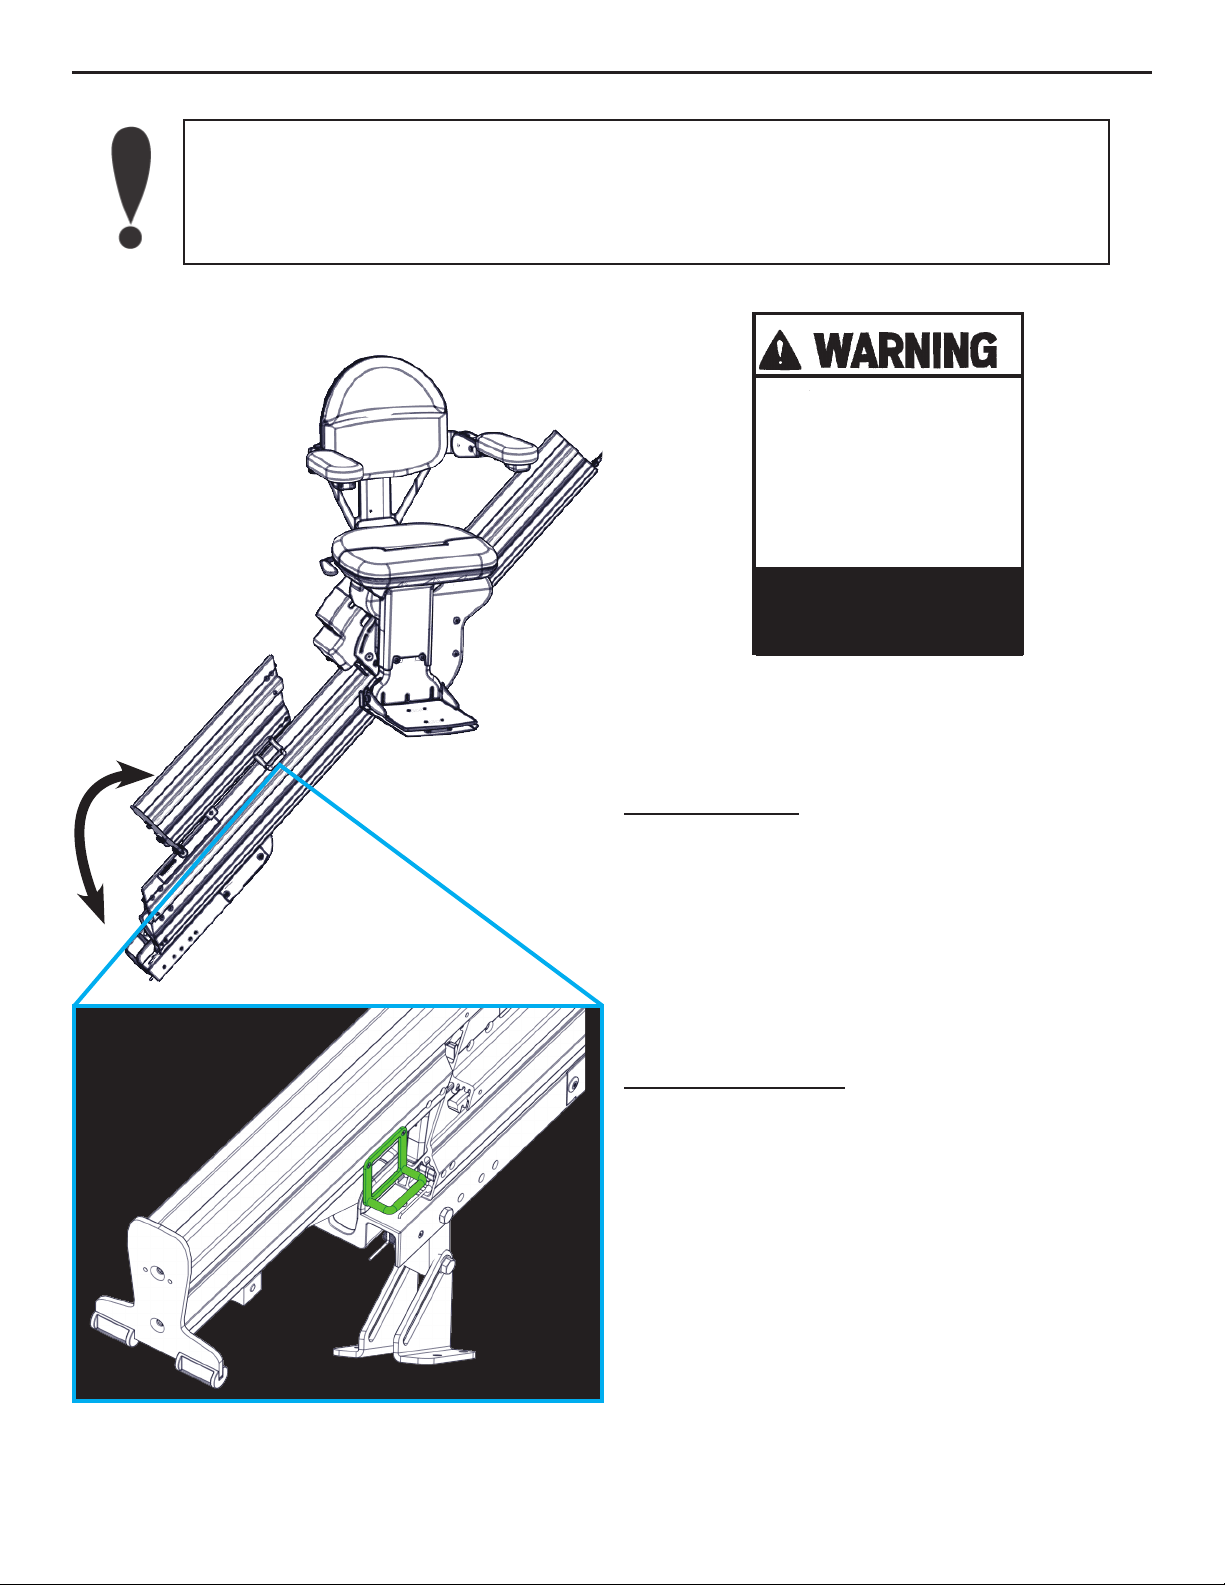
The power folding rail option is equipped with current overload sensing to prevent
damage if an obstruction or jam is detected.

©Bruno Independent Living Aids, Inc.®SRE-2010 OPERATOR 02-08-2019
6
The SRE-2010 includes a circuit breaker
with a built-in ON/OFF switch located on
the back side of the carriage.
The circuit breaker protects the battery,
controller and motor circuits in the stairlift
carriage.
It is unlikely that this circuit breaker will trip
during normal use. However, if the stairlift
becomes inoperative, check the circuit
breaker as a rst troubleshooting step. Reset
it, if necessary.
Possible causes of circuit breaker tripping:
• foreign object jamming the rail or gear
rack;
• exceeding the rated weight capacity of
the stairlift.
CIRCUIT BREAKER and SEATING
The seat assembly on the SRE-2010 is
designed to swivel 90 degrees (with standard
armrests), and to lock in one of the following
positions:
0, 60, and 90 degrees at the top,
and (optional) 45 degrees at the
bottom*.
Pull up on either the right- or left-side
swivel lever located under the seat to
swivel the seat to a convenient position for
transferring into or out of the seat.
Once you release the swivel lever, the seat
will lock in the closest of the three positions
indicated above.
To lower the seat assembly from a folded-up
position, simply push down on the seat
cushion to lower it to the riding position.
* If you have the power swivel option, the
seat will swivel from 0-90 degrees only
at the top of the stairway.
seat swivel lever
(one on each armrest)
UP/DOWN
rocker switch
SEATING

©Bruno Independent Living Aids, Inc.®SRE-2010 OPERATOR 02-08-2019
7
OPERATION
The SRE-2010 includes
a “soft-start” feature
which prevents the
unit from moving
abruptly the instant
the UP/DOWN switch
is pressed.
Press and hold the
switch for a moment
to begin the gentle
acceleration of the
stairlift to operating
speed.
STANDARD SWIVEL SEAT
1. Turn the carriage keyswitch to ON.
2. At the top of the stairs, swivel the seat.
a. Position yourself in the seat.
b. Fasten the positioning belt.
c. Rotate the seat so that you are at
right angles to the rail (with your
back to the stairway wall).
A safety switch prevents operation
of the SRE-2010 unless the seat is
locked in position at right angles
to the rail (the “riding” position).
3. Position both feet securely on the footrest
and place your arms on the armrest
cushions.
4. Press and hold the rocker switch (located
on the front edge of one of the armrests)
to travel UP / DOWN the rail.
5. Once you have reached the top or bottom
landing, and the unit has stopped, release
the rocker switch.
6. Swivel the seat to prepare for exiting the
unit.
7. Unbuckle the positioning belt and carefully
exit the seat.
8. Swivel the empty seat back to its locked
position.
Depressing and holding the rocker
switch will cause the carriage to move
until the carriage stops
automatically at the upper or lower
end of the stair rail, or until the switch
is released.
keyswitch
Two (2) remote transmitters enable
you to move the carriage to or from
either end of the stair rail.
Remote transmitters are designed to
call / send an empty seat only!
The transmitters are NOT designed to
move a seat with a person on board.

©Bruno Independent Living Aids, Inc.®SRE-2010 OPERATOR 02-08-2019
8
POWER SWIVEL SEAT
1. Turn the carriage keyswitch to ON.
2. At the top of the stairs, swivel the seat.
a. Position yourself in the seat.
b. Fasten the positioning belt.
c. Rotate the seat so that you are at
right angles to the rail (with your
back to the stairway wall).
A safety switch prevents operation of
the SRE-2010 unless the seat is locked
in position at right angles to the rail
(the “riding” position).
3. Position both feet securely on the footrest
and place your arms on the armrest cushions.
4. Press and hold the rocker switch (located
on the front edge of one of the armrests)
to travel UP / DOWN the rail.
5. Once you have reached the top or bottom
landing, release the rocker switch.
6. To rotate the seat at the top landing,
press the rocker switch again on the
same side.
7. Release the rocker switch when you have
fully rotated out.
8. Unbuckle the positioning belt and carefully
exit the seat.
NOTES:
• You may use the remote transmitters to
return the rotated power seat back to
the ride position.
• If the unit stops unexpectedly while
traveling, check for obstructions or
excessive loading. You will only be able
to run the unit in the opposite direction
until the overload is cleared.
keyswitch
OPERATION: power swivel seat (optional)

©Bruno Independent Living Aids, Inc.®SRE-2010 OPERATOR 02-08-2019
9
OPERATION: power footrest (optional)
POWER FOOTREST
If your unit is equipped with an optional
power footrest, follow the operating
instructions indicated below.
1. Raise the seat to raise the footrest to its
stored position.
2. Lower the seat to lower the footrest to
the ride position.
NOTES:
• Do not try to manually raise or lower the
footrest. Always raise/lower the footrest
by raising/lowering the seat. Failure to
follow this instruction could damage the
unit.
• If a jam occurs while raising or low-
ering the footrest, the footrest will
attempt to return to its last position.
This will produce a sequence error.
To restore normal footrest operation:
◊ ▫ Clear the jam.
◊ ▫ Move the seat up and down until
the footrest moves again.
◊ ▫ If normal footrest operation is not
restored, contact a Bruno Service
Representative.

©Bruno Independent Living Aids, Inc.®SRE-2010 OPERATOR 02-08-2019
10
To fold rail UP:
1. Using the handle, gently pull up and toward
the top of the rail.
2. Using the handle, gently lower the folding
rail section to the position shown to the
right.
To fold rail DOWN:
1. Using the handle, gently pull up and toward
the bottom of the rail.
2. Using the handle, gently lower the folding
rail section to the ground.
When folding the rail UP, the carriage MUST be either at the mid-park position
or parked at the top position!
Damage to the carriage WILL occur if the carriage is below the mid-park
position when the rail is folded up.
OPERATION: MANUAL folding rail (optional)
PINCH POINT!
Make sure the areas above and
below the folding rail are clear
before operating the
folding rail.
Keep children and pets at a safe
distance.
Failure to observe this warning
could result in injury or
damage to equipment.

©Bruno Independent Living Aids, Inc.®SRE-2010 OPERATOR 02-08-2019
11
OPERATION: POWER folding rail (optional)
Riding the stairlift:
If you are at the top of the staircase,
press the armrest switch to ride down the
rail until you contact the mid-stop, then
release the switch. Look down the staircase
to be sure there are no obstructions to
prevent the rail from lowering!
Press the armrest switch again, in the
down direction. The folding rail will lower.
The stairlift will not move down until the
rail folds down completely and touches the
ground. Release the armrest switch once
the rail reaches the ground.
Once the rail is folded down, press and
hold the armrest switch again until you
reach the bottom of the staircase.
If you are at the bottom of the staircase,
ride up until you contact the mid stop, then
release the armrest switch. Look down the
staircase to be sure there are no obstructions
to prevent the rail from folding up!
Press the armrest switch again, in the up
direction. The rail will rise up. The stairlift
will not continue up until the folding rail is
completely folded up.
When the rail is in its fully up position,
release the UP armrest switch, then press
it again to travel the rest of the way up the
staircase.
PINCH POINT!
Make sure the areas above and
below the folding rail are clear
before operating the
folding rail.
Keep children and pets at a safe
distance.
Failure to observe this warning
could result in injury or
damage to equipment.
Note
You will hear a continuous beep whenever
the folding rail is in motion. This is to warn
people nearby of rail operation.
In addition, the yellow LED on the control
panel ashes.
The power folding rail is very similar to the manual folding rail
except it has a motorized actuation built into the rail hinge to
automatically raise and lower the folding section of the rail.
The power folding rail includes a mid-travel stop position.
• If you are above this stop, the rail should always be folded up.
• If you are below this stop the rail should be folded down.
Do not attempt to manually fold the power rail!
Using power from the carriage, fold or unfold the rail:
• by riding the stairlift, or
• by using the remote transmitters
1. DISABLE/
POWER OFF
DEC-00616
disable
switch
LED

©Bruno Independent Living Aids, Inc.®SRE-2010 OPERATOR 02-08-2019
12
OPERATION: POWER folding rail (optional)
Using the transmitters:
If you are at the bottom of the staircase, use the transmitter to power the stairlift
down.
If the stairlift is above the mid-stop position, the folding rail will not lower
until the chair contacts the mid-stop position.
Once the stairlift has reached the mid-stop position, press the transmitter DOWN
button again to unfold the rail.
Be sure to stand clear of the rail as it unfolds!
If you are at the bottom of the staircase and want to store the stairlift with the rail
folded up, use the transmitter to send the stairlift up to the mid-stop position. Then
press the transmitter UP button again to raise the rail.
Be sure to stand clear of the rail while it folds up!
The power folding rail is equipped with safety features to reduce the chance of injury to
people and pets, as well as damage to property.
If the power folding rail detects an obstruction,
the rail will stop and briey reverse direction.
To resume operation in the desired direction,
1. clear the obstruction,
2. press the armrest switch or transmitter
button in the opposite direction,
3. press the armrest switch again, in the
desired direction.
Disable switch
The control panel includes a disable switch.
Pressing this switch ON prevents the rail from
folding up or down. You would use this
function if you wished to keep the rail folded
down for an extended period of time.
Be sure to press the switch to OFF allow the
rail to fold and unfold correctly under power!
IN AN EMERGENCY ONLY!
Should you need to raise or lower the power
folding rail, and you are unable to do so with
the armrest switch or the transmitter, switch
the disable switch to OFF. Manually, and GEN-
TLY, raise or lower the rail.
Make sure to lift slowly where indicated by
the “LIFT HERE” decal on
the short rail. Lifting the rail in
a quick, sudden motion may
result in damage to the
folding rail gearbox.
2. LIFT SLOWLY
DEC-00617
LIFT
HERE
1. DISABLE/
POWER OFF
DEC-00616
disable
switch
DISABLE switch

©Bruno Independent Living Aids, Inc.®SRE-2010 OPERATOR 02-08-2019
13
A2 Seat in UP Position (Seat Fold Switch Closed)
A3 Seat Out of Riding Position (Swivel Limit Open)
A7 Seat or Footrest Jammed (Actuator Stalled)
C1 Charging
C2 Off Charge (Running)
C4 Parked and Charger Not Detected
C5 Battery Voltage Critical (Charge Immediately)
C6 Battery Voltage Low
L1 Seat Safety Switch Open
L2 Up Limit Switch Open
L3 Down Limit Switch Open
L6 Mid-Rail Park Active
L8 Soft Stop Switch
DIAGNOSTIC CODES (underseat) and CHARGING
Keep the batteries charged to ensure
optimal operation of your SRE-2010.
The batteries are charging whenever the
carriage is at any location on the rail.
Failure to keep the batteries charged, or
allowing them to fully discharge, will
signicantly shorten the life of the batteries.
The green LED on the carriage (see left)
conrms that the unit is charging.
CHARGING

©Bruno Independent Living Aids, Inc.®SRE-2010 OPERATOR 02-08-2019
14
charging
power
on
ready
RED YELLOW GREEN BLUE STATUS
ON ON (< 1 sec.)
OFF OFF OFF charger not connected to battery
ON (<5 sec.)
ON
ON
ON (<5 sec.)
OFF
OFF
ON (<5 sec.)
BLINK (5 sec.)
OFF
OFF battery disconnect situation
detected; 5-second delay until
yellow and green LED’s
completely off
ON ON OFF OFF charger delivering maximum
current (2.2A)
ON ON OFF OFF charger at maximum voltage;
current continues to drop
ON OFF ON OFF batteries fully charged;
yellow LED occasionally turns off
ON BLINKS
ALTERNATELY BLINKS
ALTERNATELY OFF low voltage indication
BLINKS
ALTERNATELY BLINKS
ALTERNATELY OFF OFF battery defective or heavily
sulfated
ON OFF FAST BLINK OFF partially open circuit; bad
contact or battery sulfation
ON battery connector reversed
BATTERY CHARGER
If the charger is subject to a power line
surge, the AC input fuse may blow. Refer to
the illustration to the left for fuse location.
To replace fuse:
1. Turn OFF the battery charger power
switch.
2. Remove power cord from wall outlet.
3. Twist the fuseholder cap and pull out to
remove the fuse.
4. Replace with the same size and type
fuse: (Bussmann GMD-2A or equivalent)
2A, Slo-Blow, 5 x 20mm.
fuse
charger power switch
REPLACING THE FUSE
LEDS

©Bruno Independent Living Aids, Inc.®SRE-2010 OPERATOR 02-08-2019
15
TRANSMITTERS and MAINTENANCE
The SRE-2010 is designed to provide many years of reliable service with minimal maintenance.
For best service life:
• Keep the rail channel clean and free of debris.
• Keep the battery charger plugged into a live outlet at all times.
• At least once a year, have the stairlift
examined, cleaned and lubricated by a
qualied, authorized Bruno service technician.
Transmitter Battery Replacement
To replace the batteries in the remote transmitters,remove
the access panel on the back of the transmitter.
Two AA alkaline batteries required.
Change batteries annually.
The SRE-2010 hand-held transmitter may experience certain types of interference
caused by portable and mobile radio frequency (RF) communications equipment.
However, the SRE-2010 uses infrared (IR) communications to minimize the possibility of
interference.
Also, receivers are mounted on both sides of the SRE-2010 carriage to minimize interference.
Should interference occur, the unit will stop. This feature has been integrated into the
SRE-2010 to ensure your safety.
The direct line between the transmitter to either of the (2) transmitters should be clear of
obstacles for optimal operation. It may be necessary to reposition the transmitters so that
they are aimed at the carriage.
To reduce the possibility of interference:
• While riding in the seat, ALWAYS operate the elevator using the rocker switch on the
armrest.
• Operating the SRE-2010 with a transmitter while riding in the seat can lead to signal
interference.
• DO NOT mount the transmitters behind an obstacle such as a rail post or around a
corner.
• DO NOT allow direct sunlight to shine on the receivers (blinding the receivers on the
carriage).
• DO replace transmitter batteries regularly.
• Depleted or nearly-depleted batteries alter the effective range of the transmitter.
• DO keep the transmitter and receiver lens free of dirt and debris.
• Use a non-abrasive cleaner suitable for glass or acrylic surfaces.
• Do not use polishes or cleaning products containing wax. These products will leave
a lm on the lens that will reduce the signal transmission range.
MAINTENANCE
TRANSMITTERS

©Bruno Independent Living Aids, Inc.®SRE-2010 OPERATOR 02-08-2019
16
Your SRE-2010 is not operating correctly. What should you do?
Before calling your Bruno dealer, refer to the solutions listed below. This could save you
an unnecessary service call!
• Seat swivel. Is the seat locked in the riding position?
• Footrest. Is there an obstruction on the stairway that the footrest is contacting?
• Carriage safety panels. Is there an obstruction on the stairway that the carriage
safety panels are contacting?
• Battery charger. A discharged battery will cause the carriage to move more slowly
until the voltage drops to the point where the controller will shut
off. If this should occur, pause for a moment, then run the carriage
down to exit the seat.
Partially charged batteries will run the carriage down, but not up.
Contact your Bruno dealer to have the unit serviced.
Conrm that the charger is plugged into a live outlet and wait for
the batteries to charge. Red and green LED’s are illuminated.
Is the charger plugged into a functional outlet? Do not use outlets
which are controlled by a wall switch.
Is the RED power light on?
Has the main circuit breaker or the residence tripped? Has a fuse
blown in the electrical panel of the residence?
• Visual check. Do you notice anything about your stairlift that is different or out of
place?
If your SRE-2010 continues to function improperly or not at all after completing the
preceding checklist, contact an authorized Bruno dealer to perform all required service,
repair and maintenance operations.
TROUBLESHOOTING

©Bruno Independent Living Aids, Inc.®SRE-2010 OPERATOR 02-08-2019
17
VACATION AND LONG-TERM STORAGE
circuit breaker
(ON/OFF switch)
If the stairlift will remain unused for an
extended period of time, turn off the circuit
breaker (ON/OFF switch on the carriage),
turn off the battery charger power switch (if
equipped) and unplug the charger from the
wall outlet.
The batteries may require recharging
before normal use if the elevator
remained in the OFF position for an
extended period of time.
To recharge, turn on the circuit breaker,
reconnect the charger to the wall outlet,
and turn on the battery charger power
switch (if equipped). Then wait until the
charger LED’s indicate that the batteries
are fully recharged.

rev. 04-18
BRUNO GOLD LIMITED WARRANTY FOR STAIRLIFT
Limited Lifetime Major Components — 2 Year Parts
Bruno Independent Living Aids, Inc. (Bruno) is condent in its USA-designed and built stairlift units and is
pleased to provide the Original Purchaser of a Bruno Stairlift with the following “Industry Leading” warranty.
The quality of parts used, along with the care of Bruno’s employees in constructing Bruno’s products, allow
Bruno to provide the following warranty coverage to the Original Purchaser of the Bruno Stairlift:
◊ All Parts, other than Major Components, are/will be free of defects in material and workmanship for a
period of two (2) years after the date of installation by a Bruno Authorized Dealer.
◊ All Major Components, including the motor, gearbox, drivetrain, and rail system of the Bruno Stairlift,
are/will be free of defects in material and workmanship for the lifetime of the Bruno Stairlift and as long
as the Original Purchaser owns the Stairlift.
◊ All labor, to be provided by a Bruno Authorized Dealer, to address any defect of the Bruno Stairlift is covered
for the rst thirty (30) days after installation thereof by a Bruno Authorized Dealer.
◊ All Bruno warranties begin on the date of installation of the Bruno Stairlift by a Bruno Authorized Dealer,
but that date should be no later than 14 months after it was shipped from the factory.
Bruno Authorized Dealers are trained to evaluate your unique situation and then install the best Bruno
Stairlift to meet your needs. The trained installation and service technicians employed by a Bruno
Authorized Dealer have the appropriate equipment and resources needed to correctly install and maintain
the Bruno Stairlift and should be the rst contact for any warranty or service needs.
WHAT IS NOT WARRANTY COVERAGE:
◊ Damage to units caused by misuse, abuse, accidents, neglect or modications NOT made by a Bruno
Authorized Dealer.
◊ Consumable items such as remote batteries
◊ All labor by a Bruno Authorized Dealer after the rst thirty (30) days since installation.
◊ Reasonable wear and tear.
ADDITIONAL NOTES:
◊
All Service and Warranty claims must be brought to the attention of a Bruno Authorized Dealer. To ensure
warranty coverage, all maintenance and repair work on the Bruno Stairlift, other than maintenance
provided by the Original Purchaser as called for in the Operator’s Manual, must be performed by a Bruno
Authorized Dealer.
◊ In no event shall Bruno be responsible for indirect, incidental or consequential damages, whether such
damages arise based on claims based on contract, warranty, tort (including negligence, strict liability or
product liability).
◊ Bruno, at its sole discretion, reserves the right to replace, repair, or, if not commercially practical and/or
feasible, elect to refund the Original Purchaser the purchase price of the Bruno Stairlift.
◊ This warranty gives the Original Purchaser specic legal rights for which the Original Purchaser may also
have other rights that vary from state to state. Bruno specically does not authorize any person to extend
the time or scope of this warranty.
For further information regarding this limited warranty, please contact Bruno using the contact information
shown below:
In North America: In the UK and Europe
Bruno Independent Living Aids, Inc.® Bruno
Attn: Service Department Unit 5, Millennium Court,
1780 Executive Drive Clayhill Industrial Park Neston,
Oconomowoc, Wisconsin 53066 United States Wirral CH64 3UZ United Kingdom
Tel. 1-800-882-8183 (toll free) Tel. 0151 559 0732

SRE-2010 ELITE
Salvaescaleras de riel recto
MANUAL DEL USUARIO
N.º de pieza 2010-O
08 de febrero 2019
Contacte a su distribuidor Bruno si tiene alguna pregunta o duda acerca del servicio,
a través de los datos de contacto a continuación:
(Distribuidor: datos de contacto a continuación).
Nombre del distribuidor:
Dirección:
N.º telefónico:

©Bruno Independent Living Aids, Inc.®SRE-2010 USUARIO 08 de FEBRERO 2019
20
FORMULARIO DE REGISTRO DE PRODUCTO
Bruno se complace en proporcionarle este
producto para mejorar la movilidad.
El Formulario de registro del producto se
envía en una bolsa de plástico adjunto a
este manual. Es muy importante que usted
llene y devuelva este formulario a su más
pronta conveniencia para que podamos
completar el proceso de registro de la
garantía para su unidad.
El número de serie se encuentra en las
etiquetas adheridas al manual, así como
en la unidad.
Los números de serie y modelo deben
proporcionarse al momento de presentar
el reclamo de una garantía, solicitar servicio
o pedidos de piezas. Le recomendamos
mantener esta información a la mano en
todo momento.
Nota que la garantía para el Salvaescaleras
SRE-2010 se anulará o invalidará en
caso de que la unidad se instale o sea
mantenida por cualquier persona ajena
a un distribuidor autorizado Bruno.
EJEMPLO
Formulario de registro del producto
Por favor, use letra de MOLDE en MAYÚSCULAS.
Correo electrónico __________________________________________________________
Número telefónico __________________________________________________________
Fecha de compra (mm/dd/aa) _________________________________________________
Distribuidor: Localice la calcomanía con
el número de modelo y número de serie
en la hoja de calcomanías enviada
junto con la unidad y pegue aquí.
N.º de modelo______________
*
N.º de serie_______________
Tenga la seguridad de que Bruno no compartirá ni venderá la información que usted proporcione.
©2014,2005 Bruno Independent Living Aids, Inc.®
Califique su nivel de satisfacción con su distribuidor Bruno:
excelente buena regular mala
Califique su nivel de satisfacción con su producto Bruno:
excelente buena regular mala
Bruno se reserva el derecho de usar la información indicada en este formulario en sus materiales
disponibles en línea, en video, audio e impresos. Los nombres se abreviarán para garantizar
la privacidad y anonimato del individuo.
Registro en línea disponible en http://www.bruno.com/warranty.html
Rev. 04-17-2014
N.º de pieza PROD REG STD
* = campo obligatorio
*Nombre _____________________________________________ Segundo nombre_____
*Apellidos _______________________________________________________________
*Domicilio_________________________________________________ N.º interior_____
*Ciudad _____________________________________________ *Estado ____________
*Código Postal ___________________________________________________________
Usuario final: Para agilizar el registro,
vaya al sitio web arriba indicado.
Table of contents
Languages:
Other Bruno Stairlift manuals

Bruno
Bruno ELAN SRE-3050 User manual

Bruno
Bruno ELITE User manual

Bruno
Bruno ELECTRA-RIDE SRE-1540 User manual

Bruno
Bruno SRE-3000 Elan Operating and installation instructions

Bruno
Bruno OUTDOOR ELITE SRE-2010E User manual

Bruno
Bruno ELECTRA-RIDE II User manual

Bruno
Bruno SRE-3000 Elan User manual

Bruno
Bruno ELAN SRE-3050G User manual

Bruno
Bruno SRE-3000 Elan User manual

Bruno
Bruno SRE-1550 Electra-Ride II User manual