Bticino TVCC User manual

TVCC
06/04- SC PART. T9655A
391635
Manuale d’installazione
Installationsanweisung
Manuel d’installation
Installation manual
Manual de instalación
Installatiehandleiding
Manual de instalação
Egxeirìdio egkatàstashz

2
TVCC

3
Italiano Pag. 4
Deutsch Pag. 5
Français Pag. 6
English Pag. 7
Español Pag. 8
Nederlands Pag. 9
Português Pag. 10
Ellhnikà Pag. 11
I
NL
F
GR
GB
P
E
D

4
TVCC
Descrizione
Telecamera monocromatica CCD 1/3”.
Alimentare la telecamera con tensione 230Va.c. 50Hz.
Regolare il fuoco dell’obiettivo ed il diaframma (nel caso in cui
vengano utilizzati obiettivi a diaframma manuale) per ottimizzare
l’immagine.
Obiettivi
Utilizzare obiettivi con attacco CS. E’ possibile utilizzare anche
ottiche con passo C tramite opportuno adattatore (fornito a
Caratteristiche
Alimentazione 230Va.c. +/- 10% / 50 +/- 1 Hz
Assorbimento 100 mA
Sensore 1/3” bianco e nero CCD
a trasferimento di interlinea.
Elementi dell’immagine Totali : EIA 537(H) x 505 (V)
CCIR 537(H) x 597 (V)
Effettivi : EIA 510(H) x 492 (V)
CCIR 500(H) x 582 (V)
Sistema di scansione
EIA standard 525 linee, 30 frames/sec.
CCIR standard 625 linee, 25 frames/sec.
Sistema di sincronizzazione
Interno
Risoluzione 420 linee TV
Illuminazione minima 0.15 Lux / F1.2
Gamma 0.45
Rapporto segnale/rumore 46 db (AGC OFF)
Otturatore elettronico EIA (1/60 – 1/100000)
CCIR (1/50 – 1/100000)
Diaframma automatico Connettore 4p (DC – VIDEO)
Segnale di uscita 1,0 Vpp composito – 75 ohm
Temp. di funzionamento - 10°C +50°C
Dimensioni (mm) 50 (l) x 50 (h) x 130 (p)
Peso 560g
Avvertenze
- Non orientare la telecamera verso il sole.
- Non puntare la telecamera verso il sole anche se non si è in
fase di ripresa
- Non riprendere in presenza di luce eccessivamente intensa
- Non far cadere la telecamera o provocare colpi o vibrazioni
- Non toccare parti interne
- Installare la telecamera in un luogo dove non possa bagnarsi.
Nel caso si bagnasse, staccare immediatamente l’alimentazio-
ne e contattare il centro assistenza.
- Installare la telecamera lontana da fonti di disturbo video.
Quando si pongono i cavi della telecamera in prossimità di
conduttori elettrici o di antenne per apparecchi televisivi, si
possono manifestare disturbi all’immagine. Se ciò accadesse,
riposizionare i cavi o reinstallare l’apparecchio.
- Controllare la temperatura ambiente e l’umidità.
La qualità dell’immagine può essere deteriorata o alcune parti
all’interno della telecamera possono essere soggette a guasti, se
la temperatura ambiente è superiore o inferiore a quella indicata
nelle specifiche.
E’ opportuno evitare di usare la telecamera in tali circostanze.
Occorre prendere precauzioni anche in presenza di un alto grado
di umidità.
Denominazione delle parti e funzioni
1 - Attacco degli obiettivi: attacco CS
2 - Vite di fissaggio telecamera: a parete, in custodia etc.
3 - Terminale IRIS : collegare nel caso in cui si utilizzi un
obiettivo a diaframma automatico.
4 - Connettore per uscita video (BNC)
5 -
Cordone di alimentazione: collegare alla rete 230V.a.c. 50Hz
6 - Interruttore otturatore: per mettere in azione la
modalità (otturatore elettronico automatico) con obiettivi
a diaframma manuale, posizionare su ON.
Posizionare su SH nel caso si utilizzino obiettivi a
diaframma automatico.
7 - Interruttore AUTO IRIS : posizionare su VIDEO per
obiettivi con amplificatore; posizionare su DC per
obiettivi senza amplificatore.
8 - LED indicatore presenza alimentazione
9 - Potenziometro DC VR per regolare il livello dell’uscita
video qualora si utilizzino obiettivi con IRIS automatico.
I
130 mm
DC
VIDEO
DN
SH
VIDEO OUT
DC VR
IRIS OUT
POWER
50 mm
50 mm
1
2
4
4
8
6 7
4
9
3
5
corredo). Se si utilizzano ottiche con diaframma automatico
collegare il connettore dell’obiettivo al terminale IRIS sul retro
della telecamera.
Nota: Utilizzando obiettivi con zoom motorizzato nella custodia
da esterno art. 391803 è necessario fissare alla staffa interna
di supporto, oltre all’obiettivo, anche la telecamera mediante il
distanziale a corredo, avvitandolo al corpo della telecamera.
La telecamera è fornita in posizione di back focus standard. Tut-
tavia, per alcuni tipi di obiettivi con zoom, può essere necessaria
una regolazione.
1
3
2
4
TERMINALE IRIS
DC position
Control
1
Control
2
Drive
3
Drive
4(GND)
VIDEO position
9V alim. IRIS
(50mA max)
0,8Vpp
segnale video
GND
GND
TelecameraTerminale IRIS
Lato saldatura
Obiettivo
Vista inferiore
Vista laterale

5
D
IRIS-SCHUH
DC position
Control
1
Control
2
Drive
3
Drive
4(GND)
VIDEO position
9V Speis. IRIS
(50mA max)
0,8Vpp
Videosignal
GND
GND
Beschreibung
Monochromatik-1/3”-Kamera.
Kamera mit einer Spannung von 230V AC 50Hz speisen.
Scharfeinstellung des Objektivs und Blende (bei Objektiven
mit manueller Blende) so regulieren, dass die Bildwiedergabe
optimiert wird.
Objektive
Objektive mit CS-Anschluss verwenden. Mit dem entsprechen-
den Adapter (mitgeliefert) können auch Optiken mit C-Schritt ve-
Eigenschaften
Stromversorgung 230Va.c. +/- 10% / 50 +/- 1 Hz
Stromaufnahme 100 mA
Sensor 1/3” schwarz/weiß CCD
Zur Weitergabe der Zwischenzeile.
Bildelemente Insgesamt: EIA 537(H) x 505 (V)
CCIR 537(H) x 597 (V)
Effektiv: EIA 510(H) x 492 (V)
CCIR 500(H) x 582 (V)
Abtastungssystem
EIA standard 525
Zeilen
, 30 F/sek.
CCIR standard 625
Zeilen
, 25 F/sek.
Synchronisation Intern
Auflösung 420 TV-Zeilen
Mindestbeleuchtung 0.15 Lux / F1.2
Bereich 0.45
Verhältnis Signal/Geräusch
46 db (AGC OFF)
Elektronischer Verschluss EIA (1/60 – 1/100000)
CCIR (1/50 – 1/100000)
Automatische Blende Verbinder 4p (DC – VIDEO)
Ausgangssignal 1,0 Vpp Kompositsignal – 75 ohm
Betriebstemperatur - 10°C +50°C
Abmessungen (mm) 50 (l) x 50 (h) x 130 (p)
Gewicht 560g
Hinweise
- Kamera nicht ins Sonnenlicht richten.
- Kamera auch dann nicht ins Sonnenlicht richten, wenn keine
Aufnahme erfolgt
- Nicht bei übermäßig starkem Licht aufnehmen
- Kamera nicht fallen lassen und keinen Stößen oder Vibrationen
aussetzen
- Teile im Inneren nicht berühren
- Kamera so installieren, dass sie nicht nass werden kann. Falls
sie trotzdem nass wird, Stromkabel sofort herausziehen und
den Kundendienst verständigen.
-
Kamera nicht in der Nähe von Bildstörquellen installieren. Wenn
die Kamerakabel in der Nähe von Strom- oder Antennenkabel für
TV-Geräte verlegt werden, kann das Bild gestört sein. In diesem
Fall die Kabel neu verlegen oder das Gerät neu installieren.
- Umgebungstemperatur und Luftfeuchtigkeit kontrollieren.
Die Bildqualität kann beeinträchtigt werden und bestimmte Teile
im Inneren der Kamera können Schaden nehmen, wenn die
Umgebungstemperatur die vorgegebenen Betriebstemperaturen
über- oder unterschreitet.
In diesen Fällen sollte die Kamera nicht eingesetzt werden.
Auch bei erhöhter Feuchtigkeit in der Umgebungsluft sind Vor-
sichtsmaßnahmen zu treffen.
Bezeichnung der Teile und Funktionena
1 - Objektivanschluss: CS-Anschluss
2 - Befestigungsschraube Kamera: Wandmontage, im Gehäuse
usw.
3 - IRIS-Anschluss: bei Objektiven mit automatischer Blende
anschließen
4 - Verbinder für Videoausgang (BNC)
5 - Versorgungsstrang: an das Stromnetz anschließen 230V AC
50Hz
6 - Verschlussschalter: auf ON stellen, um den automatischen
elektronischen Verschluss bei Objektiven mit manueller
Blende zu aktivieren.
Auf SH stellen, wenn Objektive mit automatischer Blende
verwendet werden.
7 - AUTO-IRIS-Schalter: bei Objektiven mit Verstärker auf VIDEO
stellen; bei Objektiven ohne Verstärker auf DC stellen.
8 - Anzeigelampe Strom ein
9 - DC-VR-Potentiometer zur Regulierung des Pegels des Vi-
deoausgangs bei Objektiven mit automatischer Blende.
130 mm
DC
VIDEO
DN
SH
VIDEO OUT
DC VR
IRIS OUT
POWER
50 mm
50 mm
1
2
4
4
8
6 7
4
9
3
5
rwendet werden. Bei Verwendung von Optiken mit automatischer
Blende den Verbinder des Objektivs an den IRIS-Anschluss an
der Rückseite der Kamera anschließen.
Anmerkung: Bei Einsatz von Objektiven mit motorisiertem
Zoom und Gehäuse für Freimontage Art.391803 muss neben
dem Objektiv auch die Kamera mit dem beiliegenden Abstan-
dhalter (am Kameraköroper verschraubt) am inneren Winkel der
Halterung befestigt werden. Die Kamera wird in Position Back
Focus Standard geliefert. Bei einigen Objektiven mit Zoom kann
jedoch ggf. Eine Einstellung erforderlich sein.
1
3
2
4
KameraIRIS-Anschluss
verschweißte Seite
Objektiv
Ansicht von unten
Seitenansicht

6
TVCC
F
TERMINAL IRIS
Position DC
Contrôle
1
Contrôle
2
Commande
3
Commande
4(GND: Terre)
Position VIDEO
9V alim. IRIS
(50mA max)
0,8Vpp
Signal vidéo
GND (Terre)
GND (Terre)
Description
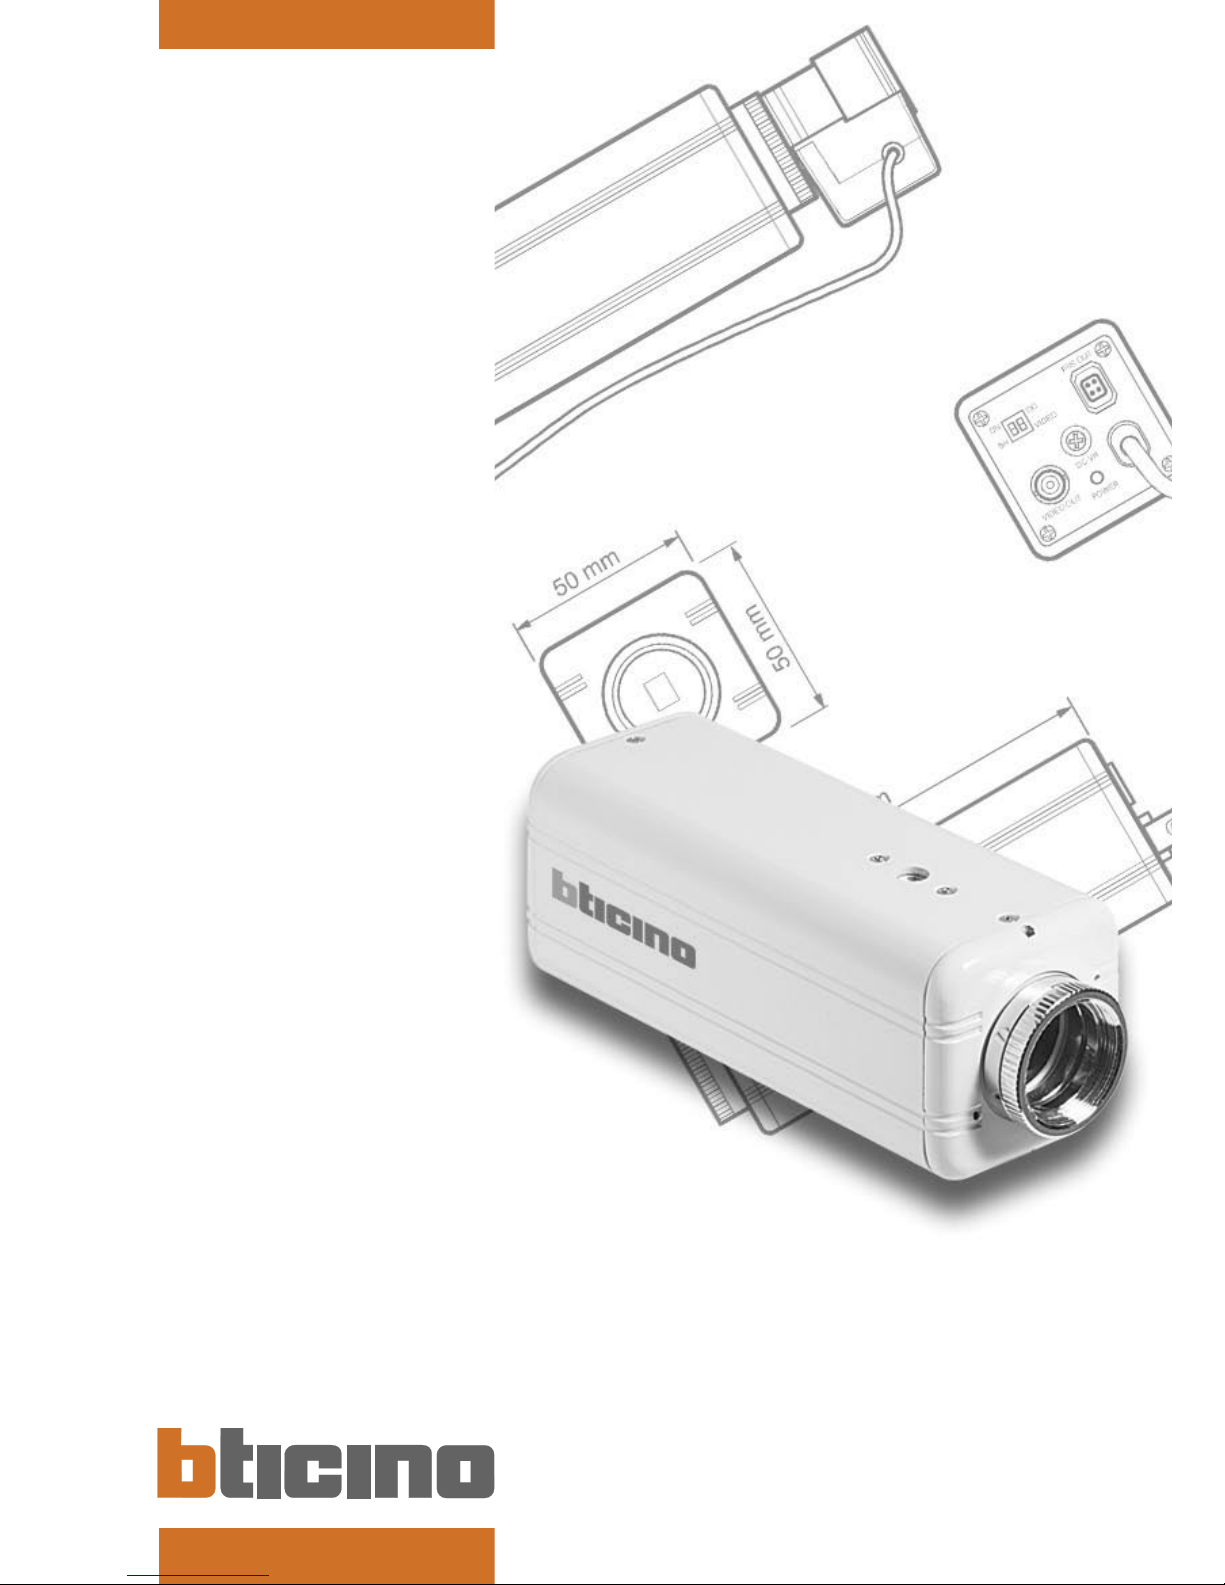
Télécaméra monochromatique CC 1/3”
Alimenter la télécaméra sous une tension de 230V c.a. 50Hz.
Régler la mise au point de l’objectif et le diaphragme (au cas où
l’on utilise des objectifs à diaphragme manuel) pour optimiser
l’image.
Objectifs
Utiliser des objectifs à raccord CS. Il est possible d’utiliser
aussi des optiques avec pas C par l’intermédiaire d’adaptateur
Caractéristiques
Alimentation 230Va.c. +/- 10% / 50 +/- 1 Hz
Absorption 100 mA
Capteur 1/3” noir et blanc CCD
à transfert d’interligne.
Eléments de l’image Totaux : EIA 537(H) x 505 (V)
CCIR 537(H) x 597 (V)
Effectifs : EIA 510(H) x 492 (V)
CCIR 500(H) x 582 (V)
Système de balayage
standard EIA 525 lignes, 30 frames/sec.
standard CCIR 625 lignes, 25 frames/sec.
Système de synchronisation
Interne
Résolution 420 lignes TV
Eclairage minimal 0.15 Lux / F1.2
Gamma 0.45
Rapport signal/bruit 46 db (AGC OFF)
Obturateur électronique EIA (1/60 – 1/100000)
CCIR (1/50 – 1/100000)
Diaphragme automatique Connecteur 4p (DC – VIDEO)
Signal de sortie 1,0 Vpp composite – 75 ohm
Température d’exercice - 10°C +50°C
Encombrement (mm) 50 (l) x 50 (h) x 130 (p)
Poids 560g
Avertissements
- Ne pas orienter la télécaméra vers le soleil.
- Ne pas diriger la télécaméra vers le soleil, même si elle n’est
pas en cours de prise.
- Ne pas filmer en présence de lumière excessivement forte.
- Ne pas laisser tomber la télécaméra ou lui donner de coups
ou la soumettre à vibrations.
- Ne pas toucher aux parties internes.
- Installer la télécaméra en un endroit où elle ne puisse pas se
mouiller. Au cas où elle se mouille, couper immédiatement
l’alimentation et contacter le service après-vente.
- Installer la télécaméra loin de sources d’interférence vidéo.
Lorsqu’on pose les câbles de la télécaméra à proximité de
conducteurs électriques ou d’antennes pour appareils de télévi-
sion, des troubles de l’image peuvent se manifester. Si cela se
produisait, repositionner les câbles ou réinstaller l’appareil.
- Contrôler la température ambiante et l’humidité.
La qualité de l’image peut être détériorée ou certaines parties à
l’intérieur de la télécaméra peuvent être sujettes à des pannes, si
la température ambiante est supérieure ou inférieure à celle indi-
quée dans les caractéristiques. Il est opportun d’éviter d’utiliser
la télécaméra dans ces cas-là. Il convient de prendre des précau-
tions également en présence d’un degré d’humidité élevé.
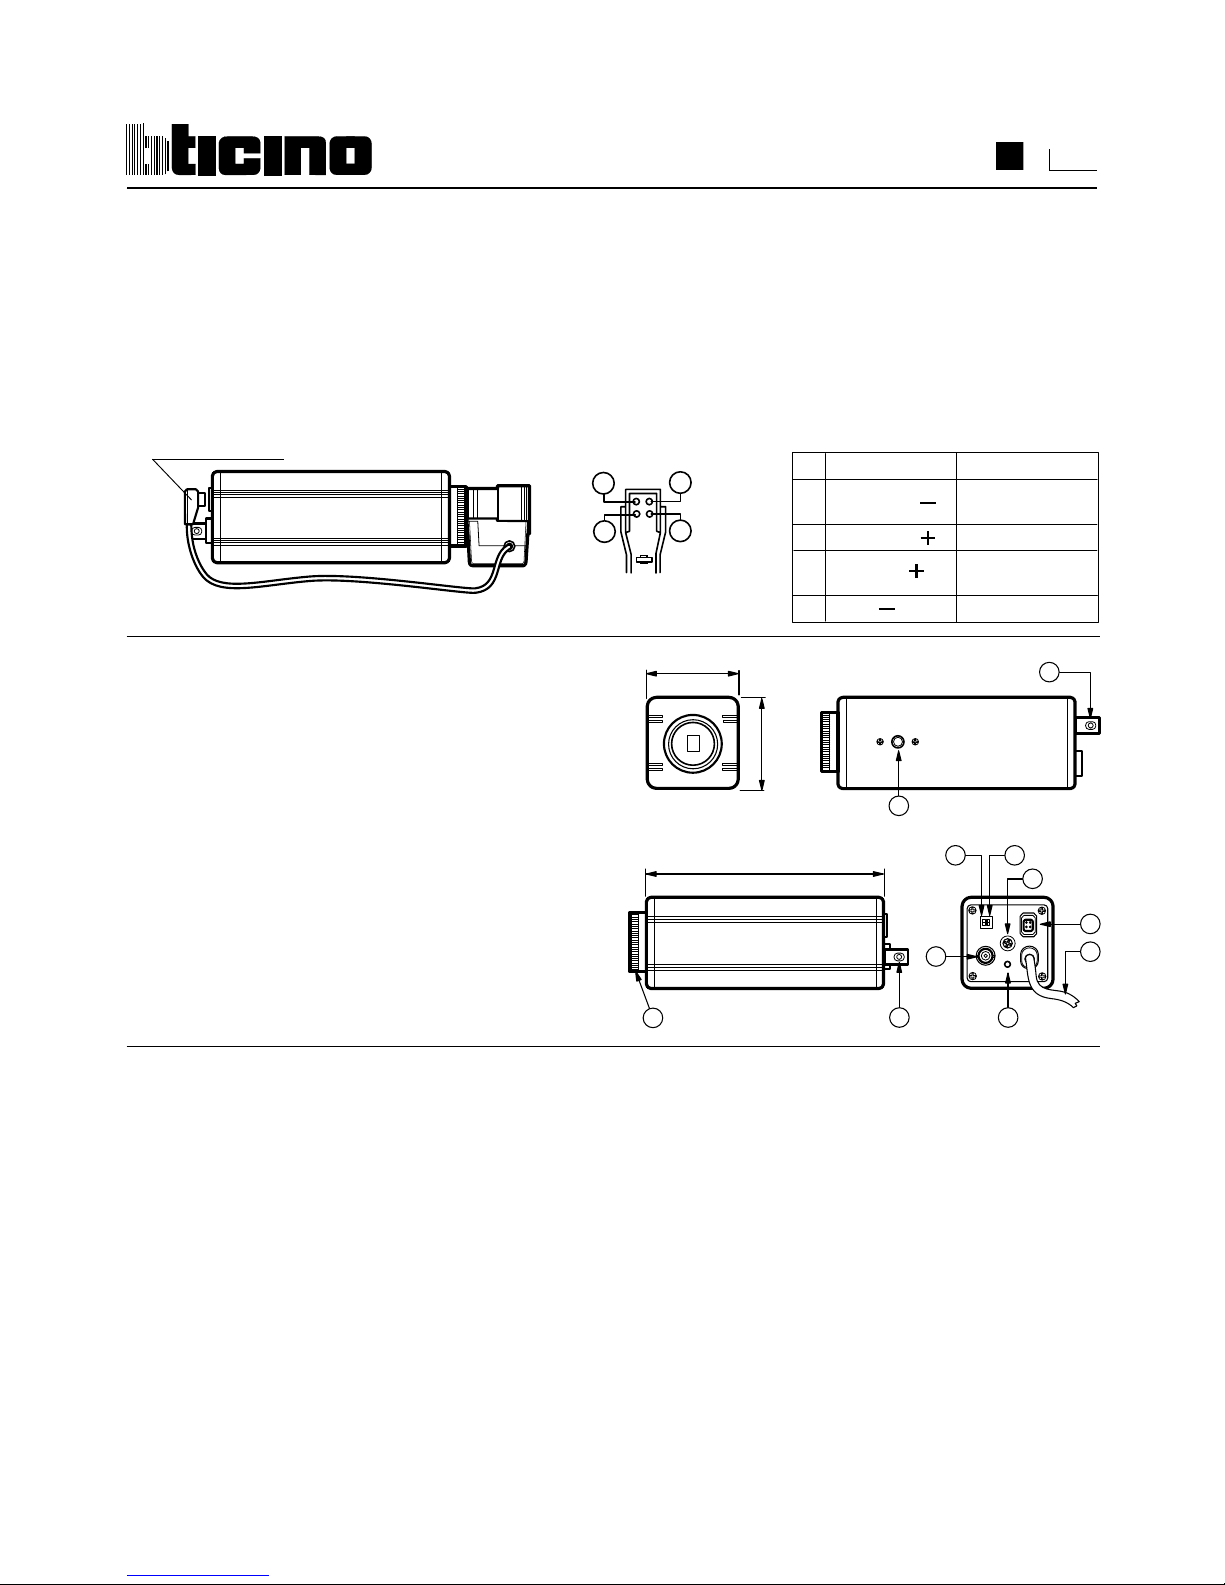
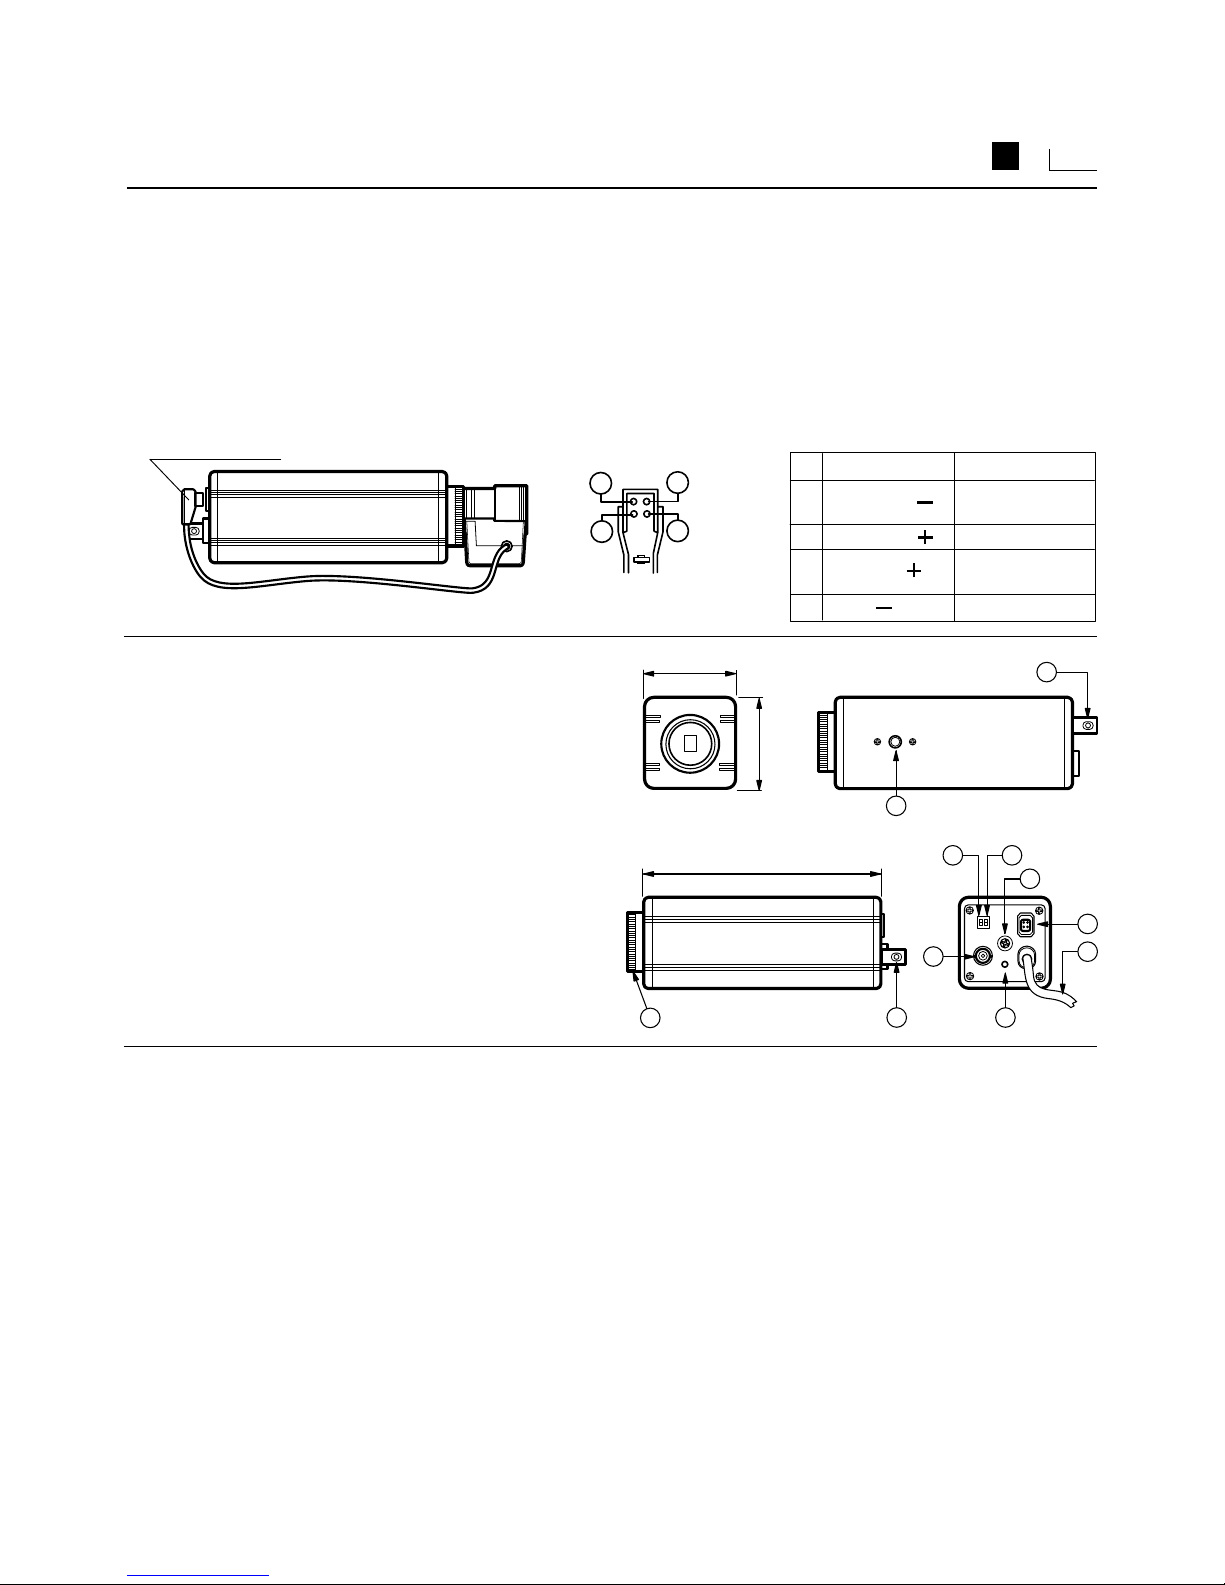
Dénomination des pièces et fonctions
1 - Raccord des objectifs: raccord CS
2 - Vis de fixation télécaméra: en apparent, sous boîtier, etc.
3 - Terminal IRIS: à brancher au cas où l’on utilise un objectif à
diaphragme automatique.
4 - Connecteur pour sortie vidéo (BNC)
5 - Câble d’alimentation: à brancher sur le réseau 230V c.a.
50Hz
6 - Interrupteur obturateur: pour mettre en action la modalité
(obturateur électronique automatique); avec des objectifs à
diaphragme manuel, positionner sur ON.
Positionner sur SH dans le cas où l’on utilise des objectifs à
diaphragme automatique.
7 - Interrupteur AUTO IRIS: positionner sur VIDEO pour des
objectifs avec amplificateur; positionner sur DC pour des
objectifs sans amplificateur.
8 - LED indicateur présence alimentation
9 - Potentiomètre DC VR pour régler le niveau de la sortie vidéo,
si l’on utilise des objectifs avec IRIS automatique.
130 mm
DC
VIDEO
DN
SH
VIDEO OUT
DC VR
IRIS OUT
POWER
50 mm
50 mm
1
2
4
4
8
6 7
4
9
3
5
opportun (livré en dotation). Si l’on utilise des optiques avec
diaphragme automatique, raccorder le connecteur de l’objectif
au terminal IRIS à l’arrière de la télécaméra.
Remarque: Si l’on utilise des objectifs avec zoom motorisé dans
le boîtier pour extérieur réf. 391803, il faut fixer à l’étrier interne
de support, en plus de l’objectif, également la télécaméra à l’aide
de l’entretoise fournie, en le vissant au corps de la télécaméra.
La télécaméra est livrée en position de back focus standard.
Cependant, pour certains objectifs avec zoom, un réglage peut
s’avérer nécessaire.
1
3
2
4
TélécaméraTerminal IRIS
Côté soudure
Objectif
Vue de dessous
Vue de côté

7
GB
IRIS TERMINAL
DC position
Control
1
Control
2
Drive
3
Drive
4(GND)
VIDEO position
9V IRIS feed
(50mA max)
0.8Vpp
Video signal
GND
GND
Description
CCD 1/3” monochromatic camera.
Supply the camera with 230V a.c. 50 Hz.
Adjust the lens focus and the diaphragm (when manual
diaphragm lenses are used) to optimise the picture.
Lenses
Use lenses with CS coupling. Lenses with C pitch can also be
used with adapter (supplied). If lenses with automatic diaphragm
Features
Power supply 230Va.c. +/- 10% / 50 +/- 1 Hz
Absorption 100 mA
Detector 1/3” black and white CCD
with interline transfer.
Picture elements Total : EIA 537(H) x 505 (V)
CCIR 537(H) x 597 (V)
Effective : EIA 510(H) x 492 (V)
CCIR 500(H) x 582 (V)
Scanning system
EIA standard 525 lines, 30 frames/sec.
CCIR standard 625 lines, 25 frames/sec.
Tuning system Internal
Resolution 420 TV lines
Minimum lighting 0.15 Lux / F1.2
Range 0.45
Signal/noise ratio 46 db (AGC OFF)
Electronic shutter EIA (1/60 – 1/100000)
CCIR (1/50 – 1/100000)
Automatic diaphragm 4p connector (DC – VIDEO)
Output signal 1,0 Vpp composite – 75 ohm
Operating temperature - 10°C +50°C
Dimensions (mm) 50 (l) x 50 (h) x 130 (p)
Weight 560g
Warnings
- Do not turn the camera towards the sun.
- Do not point the camera towards the sun even if it is not fil-
ming.
- Do not film when the light is too bright.
- Do not drop the camera, do not subject it to blows and vibra-
tions.
- Do not touch internal parts.
- Install the camera in a place where it cannot get wet. If it gets
wet, detach it from the power supply immediately and contact
the after-sales service.
- Install the camera away from video noise sources.
When the camera cables are laid near to electrical conductors
or antennae for televisions, there may be interference on the
picture. If this happens, reposition the cables or reinstall the
device.
- Check the ambient temperature and humidity.
The picture quality may be worsened or some parts inside the
camera may be subject to faults, if the ambient temperature is
higher or lower than that indicated in the specifications.
The camera should not be used in these circumstances.
Precautions should also be taken if there is a high degree of
humidity.
Name of the parts and functions
1 - Lens coupling: CS lens
2 - Camera fastening screw: on the wall, in a case etc.
3 - IRIS terminal: connect when an automatic diaphragm is
used.
4 - Connector for video output (BNC)
5 - Power supply cord: connect to the 230V a.c. 50Hz mains
6 - Shutter switch: to start the mode (automatic electronic
shutter) with manual diaphragm lenses, position on ON.
Position on SH when using automatic diaphragm lenses
7 - AUTO IRIS switch: position on VIDEO for lenses with ampli-
fier, position on DC for lenses without amplifier.
8 - LED, power supply ON indicator
9 - DC VR potentiometer to adjust the video output level when
using lenses with automatic IRIS.
130 mm
DC
VIDEO
DN
SH
VIDEO OUT
DC VR
IRIS OUT
POWER
50 mm
50 mm
1
2
4
4
8
6 7
4
9
3
5
are used connect the lens connector to the IRIS terminal on the
back of the camera.
Note: Using lenses with motorised zoom in the external case
Item 391803, as well as fastening the lens to the internal support
bracket, the camera should also be fastened to it, screwing the
spacer provided to the camera body.
The camera is supplied in standard back focus position. An
adjustment may be necessary, however, for some types of lens
with zoom.
1
3
2
4
CameraIRIS terminal
Welding side
Lens
Lower view
Side view

8
TVCC
E
TERMINAL IRIS
Posición DC
Control
1
Control
2
Drive
3
Drive
4(GND)
Posición VIDEO
9V alim. IRIS
(50mA
máx
)
0,8Vpp
Señal vídeo
GND
GND
Descripción
Telecámara monocromática CCD 1/3”.
Alimente la telecámara con tensión 230Va.c. 50Hz.
Regule el foco del objetivo y el diafragma (si se utilizan objetivos
de diafragma manual) para optimizar la imagen.
Objetivos
Utilice objetivos con conexión CS. Es posible utilizar también
ópticas con paso C por medio del adaptador suministrado.
Características
Alimentación 230Va.c. +/- 10% / 50 +/- 1 Hz
Absorción 100 mA
Sensor 1/3” blanco y negro CCD
de transferencia de interlínea.
Elementos de la imagen Totales: EIA 537(H) x 505 (V)
CCIR 537(H) x 597 (V)
Efectivos
: EIA 510(H) x 492 (V)
CCIR 500(H) x 582 (V)
Sistema de exploración
EIA estándar 525 líneas, 30 tramas/seg.
CCIR estándar 625 líneas, 25 tramas/seg.
Sistema de sincronización
Interior
Resolución 420 líneas TV
Iluminación mínima 0.15 Lux / F1.2
Gama 0.45
Relación señal/ruido 46 db (AGC OFF)
Obturador electrónico EIA (1/60 – 1/100000)
CCIR (1/50 – 1/100000)
Diafragma automático Conector 4p (DC – VIDEO)
Señal de salida 1,0 Vpp compuesto – 75 ohm
Temp. de funcionamiento - 10°C +50°C
Dimensiones (mm) 50 (l) x 50 (h) x 130 (p)
Peso 560g
Advertencias:
- No oriente la telecámara hacia el sol.
-
No oriente la telecámara hacia el sol aunque no esté filmando
- No filme en presencia de luz excesivamente intensa
-
No haga caer la telecámara ni provoque golpes o vibraciones
- No toque las partes interiores
-
Instale la telecámara en un lugar en donde no se pueda mojar.
Si se mojara, corte inmediatamente la alimentación y contacte
al Servicio de Asistencia.
-
Instale la telecámara lejos de fuentes de interferencias vídeo.
Al tender los cables de la telecámara cerca de conductores
eléctricos o antenas de televisiones, se pueden producir
interferencias en la imagen. En este caso, tienda los cables
nuevamente o reinstale el aparato.
- Controle la temperatura ambiente y la humedad.
La calidad de la imagen se puede deteriorar o algunas de las par-
tes internas de la telecámara se pueden averiar si la temperatura
ambiente es superior a la indicada en las especificaciones.
Es aconsejable no utilizar la telecámara bajo estas condicio-
nes.
Es necesario tomar precauciones inclusive en presencia de una
elevada tasa de humedad.
Descripción de las piezas y funciones
1 - Conexión de los objetivos: conexión CS
2 - Tornillo de fijación telecámara: de pared, en caja etc.
3 - Terminal IRIS : conecte si se utiliza un objetivo de diafragma
automático.
4 - Conector para salida vídeo (BNC)
5 - Cordón de alimentación: conecte a la red 230V.A.c. 50Hz
6 - Interruptor obturador para poner en acción el modo (obtu-
rador electrónico automático) con objetivos de diafragma
manual), lleve a ON.
Lleve a SH al utilizar objetivos de diafragma automático.
7 - Interruptor AUTO IRIS : ponga en VIDEO en caso de obje-
tivos con amplificador; ponga en DC en caso de objetivos
sin amplificador.
8 - LED indicador presencia alimentación
9 - Potenciómetro DC VR para regular el nivel de la salida video
al utilizar objetivos con IRIS automático.
130 mm
DC
VIDEO
DN
SH
VIDEO OUT
DC VR
IRIS OUT
POWER
50 mm
50 mm
1
2
4
4
8
6 7
4
9
3
5
Si se utilizan ópticas con diafragama automático, enchufe el
conector del objetivo al terminal IRIS en la parte posterior de
la telecámara.
Nota: Al utilizar objetivos con zoom motorizado en la caja para
exteriores art. 391803 es necesario fijar a la abrazadera de
soporte interior, además del objetivo, la telecámara mediante el
separador suministrado, enroscándolo al cuerpo de la telecá-
mara. La telecámara se suministra en posición de back focus
estándar. Sin embargo, para algunos tipos de objetivos con
zoom, puede requerir un ajuste.
1
3
2
4
TelecámaraTerminal IRIS
Lado soldadura
Objetivo
Vista inferior
Vista lateral

9
NL
DC stand
Control
1
Control
2
Drive
3
Drive
4(GND)
VIDEO stand
9V
voeding
IRIS
(50mA
max
)
0,8Vpp
Videosignaal
GND
GND
Beschrijving
1/3 inch zwart-wit camera.
Voed de camera met een spanning van 230VAC 50Hz.
Regel het brandpunt van het objectief en het diafragma (als er
een objectief met manueel diafragma wordt gebruikt) om de
beste beeldkwaliteit te verkrijgen.
Objectieven
Gebruik objectieven met een CS mount. Met gebruik van de
speciale meegeleverde adapter kunnen er ook objectieven
met een C mount worden gemonteerd. Als u een objectief met
Eigenschappen
Voeding 230Va.c. +/- 10% / 50 +/- 1 Hz
Stroomopname 100 mA
Sensor 1/3 inch zwart-wit CCD
met interline transfer.
Beeldelementen Totaal: EIA 537(H) x 505 (V)
CCIR 537(H) x 597 (V)
Effectief: EIA 510(H) x 492 (V)
CCIR 500(H) x 582 (V)
Scanning EIA 525 lijnen, 30 frames/sec
CCIR 625, 25 frames/sec
Synchronisatie Inwendig
Beeldresolutie 420 TV-lijnen
Minimum lichtsterkte 0.15 Lux / F1.2
Gamma 0.45
Signaal/ruis verhouding 46 db (AGC OFF)
Elektronische sluiter EIA (1/60 – 1/100000)
CCIR (1/50 – 1/100000)
Automatisch diafragma 4p connector (DC – VIDEO)
Uitgangssignaal 1,0 Vpp samengesteld – 75 ohm
Bedrijfstemperatuur - 10°C +50°C
Afmetingen (mm) 50 (l) x 50 (h) x 130 (p)
Gewicht 560g
Waarschuwingen
- Richt de camera niet op de zon.
- Richt de camera niet op de zon, ook niet wanneer er geen
opname bezig is.
- Maak geen opnames bij te fel licht.
- Laat de camera niet vallen en stel hem niet bloot aan stoten
of trillingen.
- Niet aan het binnenwerk komen.
-
Installeer de camera op een plek waar hij niet nat kan worden. Als
de camera nat geworden is, dient u hem onmiddellijk van de elektri-
sche voeding af te sluiten en het servicecentrum te contacteren.
- Installeer de camera op afstand van iedere storingsbron. Als
de draden van de camera in de buurt van elektrische leidingen
of TV-antennes geïnstalleerd worden, kan het beeld gestoord
worden. Als dat het geval is, dient u de camera op een andere
plek te installeren of de draden te verleggen.
- Controleer de omgevingstemperatuur en vochtigheidsgraad
Een omgevingstemperatuur die hoger of lager is dan de vermelde
bedrijfstemperatuur kan afbreuk doen op de beeldkwaliteit en
de kans op defecten verhogen. Gebruik de camera dus liever
niet onder deze omstandigheden.
Neem gepaste voorzorgsmaatregelen bij een hoge luchtvochti-
gheidsgraad.
Naam en functie van de onderdelen
1 - Koppeling van de objectieven: CS mount
2 - Bevestigingsschroef camera: wand, behuizing, enz.
3 - IRIS terminal: aansluiten bij het gebruik van een objectief
met automatisch diafragma
4 - Video out connector (BNC)
5 - Netsnoer: aansluiten op elektriciteitsnet 230VAC 50Hz
6 - Schakelaar van de sluiter: zet deze op ON (automatische
elektronische sluiter) bij het gebruik van een objectief met
manueel diafragma.
Zet de schakelaar op SH bij het gebruik van een objectief
met automatisch diafragma.
7 - AUTO IRIS schakelaar: zet deze op VIDEO bij het gebruik
van een objectief met versterker of op DC bij het gebruik
van een objectief zonder versterker.
8 - ‘Spanning aanwezig’ indicatieled
9 - DC VR potentiometer voor de niveauregeling van het video-
signaal bij het gebruik van een objectief met automatische
IRIS.
130 mm
DC
VIDEO
DN
SH
VIDEO OUT
DC VR
IRIS OUT
POWER
50 mm
50 mm
1
2
4
4
8
6 7
4
9
3
5
een automatisch diafragma gebruikt, dan moet u de connector
van het objectief op de IRIS terminal aan de achterkant van de
camera aansluiten.
Opmerking: Als u een objectief met gemotoriseerde zoom in
een behuizing voor buitenmontage art. 391803 gebruikt, dan
moet u niet alleen het objectief aan de inwendige beugel beve-
stigen, maar ook de camera met gebruik van de meegeleverde
afstandshouder die u aan het lichaam van de camera bevestigt.
De camera wordt in de standaard ‘back focus’stand geleverd.
Desalniettemin kan er bij het gebruik van sommige zoomobjec-
tieven een bijstelling nodig zijn.
1
3
2
4
CameraIRIS terminal
Gelaste kant
Objectief
Gezien van onderaf
Gezien zijvaards

10
TVCC
P
TERMINAL IRIS
DC posição
Controlo
1
Controlo
2
Drive
3
Drive
4(GND)
VIDEO posição
9V
alim.
IRIS
(50mA
máx
)
0,8Vpp
sinal vídeo
GND
GND
Descrição
Câmara monocromática CCD 1/3”.
Alimente a câmara com a tensão 230 V c.a. 50Hz
Regule o foco da objectiva e o diafragma (se forem utilizados
objectivas com diafragma manual) para que a imagem seja
óptima.
Objectivas
Utilize objectivas com engate CS. É possível utilizar também
objectivas com passo C por meio do adaptador apropriado
Características
Alimentação 230Va.c. +/- 10% / 50 +/- 1 Hz
Absorção 100 mA
Sensor 1/3” branco e preto CCD
com transferência de entrelinha.
Elementos da imagem Totais: EIA 537(H) x 505 (V)
CCIR 537(H) x 597 (V)
Efectivos:
EIA 510(H) x 492 (V)
CCIR 500(H) x 582 (V)
Sistema de varredura
EIA padrão 525 linhas, 30 frames/seg.
CCIR padrão 625 linhas, 25 frames/seg.
Sistema de sincronização
Interno
Resolução 420 linhas TV
Iluminação mínima 0.15 Lux / F1.2
Gama 0.45
Relação sinal/rumor 46 db (AGC OFF)
Obturador electrónico EIA (1/60 – 1/100000)
CCIR (1/50 – 1/100000)
Diafragma automático Conector 4p (DC – VÍDEO)
Sinal de saída 1,0 Vpp compósito – 75 ohm
Temp. de funcionamento
- 10°C +50°C
Tamanho (mm) 50 (l) x 50 (h) x 130 (p)
Peso 560g
Advertências
- Não dirija a câmara para o sol.
-
Não aponte a câmara para o sol mesmo que não esteja filmando.
- Não filme quando a luz estiver excessivamente intensa.
- Não deixe a câmara cair ou não deixe que sofra golpes ou
vibrações.
- Não toque as peças internas.
- Instale a câmara em um lugar em que não se possa molhar.
Se, por acaso, se molhasse, desligue imediatamente a ali-
mentação e contacte o serviço de assistência.
-
Instale a câmara longe de fontes que perturbem o vídeo. Se os
cabos da câmara forem colocados nas redondezas de conduto-
res eléctricos ou de antenas de aparelhos televisivos, podem-se
verificar perturbações na imagem. Se isto acontecer, posicione
novamente os cabos ou instale novamente o aparelho.
- Controle a temperatura do ambiente e a humidade
A qualidade da imagem pode ficar deturpada ou algumas peças
da câmara podem ficar sujeitas a enguiços, se a temperatura
do ambiente for superior ou inferior àquela indicada nas ca-
racterísticas.
Recomenda-se evitar usar a câmara em tais circunstâncias.
É preciso tomar precauções mesmo quando houver um grande
grau de humidade.
Denominação das peças e funções
1 - Engate das objectivas: engate CS
2 - Parafusos de fixação da câmara: de parede, com custódia,
etc.
3 - Terminal IRIS: conecte se for utilizada uma objectiva com
diafragma automático.
4 - Conector para saída do vídeo (BNC).
5 - Cabo de alimentação: conecte com rede de 230 V c.a. 50 Hz
6 - Interruptor obturador: para dar início à modalidade (obtu-
rador electrónico automático) com objectivas de diafragma
manual, posicione em ON.
Posicione em SH caso se utilizarem objectivas com diafrag-
ma automático.
7 - Interruptor AUTO IRIS: posicione em VÍDEO para objectivas
com amplificador; posicione em DC para objectivas sem
amplificador.
8 - LED indicador de presença de alimentação.
9 - Potenciómetro DC VR para regular o nível de saída do vídeo
se forem utilizados objectivas com IRIS automática.
130 mm
DC
VIDEO
DN
SH
VIDEO OUT
DC VR
IRIS OUT
POWER
50 mm
50 mm
1
2
4
4
8
6 7
4
9
3
5
(fornecido com a câmara). Se forem utilizadas objectivas com
diafragma automático ligue o conector da objectiva ao terminal
IRIS atrás da câmara.
Nota: Se forem utilizados objectivas com zoom na custódia
para exterior art. 391803 é preciso fixar no gancho interno do
suporte, além da objectiva, também a câmara com o distanciador
fornecido, aparafusando-o ao corpo da câmara.
A câmara vem na posição de back focus padrão. Todavia, para
alguns tipos de objectivas com zoom, pode ser necessário
realizar uma regulação.
1
3
2
4
CâmaraTerminal IRIS
Lado soldadura
Objectiva
Vista inferior
Vista lateral

11
GR
TERMATIKO IRIS
DC position
Control
1
Control
2
Drive
3
Drive
4(GND)
VIDEO position
9V
trof.
IRIS
(50mA
max
)
0,8Vpp
sçma bìnteo
GND
GND
Perigrafç
Monoxrvmatikç thlekàmera CCD 1/3”.
Trofodoteìte thn thlekàmera me tàsh 230Va.c. 50Hz.
Ryumìwete thn estìash toy fakoù kai toy diafràgmatoz (se
perìptvsh poy xrhsimopoioùntai fakoì xeirokìnhtoy dia-
fràgmatoz) gia thn beltistopoìhsh thz eikònaz.
Fakoì
Xrhsimopoieìte fakoùz me sùndesh CS. Eìnai epìshz dyna-
tç h xrçsh optikèn diatàjevn me bçma C mésv katàllhloy
Xarakthristikà
Trofodòthsh 230Va.c. +/- 10% / 50 +/- 1 Hz
Aporròfhsh 100 mA
Aisuhtçraz 1/3” Aspròmayroz CCD
metaforàz metajù grammèn.
Stoixeìa thz eikònaz Synolikà: EIA 537(H) x 505 (V)
CCIR 537(H) x 597 (V)
Pragmatikà: EIA 510(H) x 492 (V)
CCIR 500(H) x 582 (V)
Sùsthma sàrvshz
EIA stàntar 525seiréz, 30 frames/deyt.
CCIR stàntar 625seiréz, 25 frames/deyt.
Sùsthma sygxronismoù Esvterikò
Eykrìneia 420 seiréz TV
Elàxistoz fvtismòz 0.15 Lux / F1.2
Gàmma 0.45
Lògoz sçmatoz proz uòrybo
46 db (AGC OFF)
Hlektronikò diàfragma EIA (1/60 – 1/100000)
CCIR (1/50 – 1/100000)
Aytòmato diàfragma Bùsma 4p (DC – VIDEO)
Sçma ejòdoy 1,0 Vpp sùnueto – 75 ohm
Uermokrasìa peribàallontoz
- 10°C +50°C
Diastàseiz (mm) 50 (l) x 50 (h) x 130 (p)
Bàroz 560g
Proeidopoiçseiz
- Mhn kateyuùnete thn thlekàmera proz ton çlio.
- Mhn skopeùete me thn thlekàmera proz ton çlio akòma ki eàn den
eìnai se fàsh lçchz.
- Mhn pragmatopoieìte lçceiz paroysìa yperbolikà éntonoy fvtòz.
- Mhn afçsete thn thlekàmera na pései ç na ypoblhueì se xtypçmata
kai kradasmoùz
- Mhn aggìwete esvterikà ejartçmata
- Egkatastçste thn thlekàmera se éna shmeìo òpoy den mporeì na
braxeì. Se perìptvsh poy braxeì, kòcte amésvz thn trofodòthsh
kai epikoinvnçste me to grafeìo ejyphréthshz.
- Egkatastçste thn thlekàmera makrià apò phgéz diataraxçz eikò-
naz. ¢Otan topouetoùntai ta kalèdia thz thlekàmeraz plhsìon
hlektrikèn agvgèn ç keraìvn thleoptikèn syskeyèn, mporeì na
ekdhlvuoùn diataraxéz sthn eikòna. Eàn symbeì kàti tétoio, epa-
natopouetçste ta kalèdia ç epanegkatastçste th syskeyç.
- Elégjte th uermokrasìa peribàllontoz kai thn ygrasìa.
H poiòthta thz eikònaz mporeì na xeirotereùsei ç merikà ejartçma-
ta mésa sthn thlekàmera mporoùn na ypoblhuoùn se blàbez, eàn h
uermokrasìa peribàllontoz eìnai anèterh ç katèterh apò aytçn poy
endeìknytai stiz prodiagraféz. Eìnai kalùtera na apofùgete th xrçsh
thz thlekàmeraz se aytéz tiz peristàseiz. Xreiàwetai na làbete métra
prostasìaz kai paroysìa enòz ychloù baumoù ygrasìaz.
Onomasìa tvn ejarthmàtvn kai leitoyrgìez
1 - Sùndesh tvn fakèn: sùndesh CS
2 - Bìda sterévshz thlekàmeraz: toìxoy, se uçkh klp.
3 - Termatikò IRIS : syndéetai se perìptvsh poy xrhsimo-
poieìtai énaz fakòz aytòmatoy diafràgmatoz.
4 - Bùsma gia éjodo bìnteo (BNC)
5 - Kalèdio trofodòthshz: syndéetai sto dìktyo
230V.a.c.
50Hz
6 - Diakòpthz diafràgmatoz: gia na teueì se leitoyrgìa o
tròpoz (aytòmato hlektronikò diàfragma) me fakoùz
xeirokìnhtoy diafràgmatoz, topouetçste sto ON.
Topouetçste sto SH se perìptvsh poy xrhsimopoioùntai
fakoì aytòmatoy diafràgmatoz.
7 - Diakòpthz AUTO IRIS : topouetçste sto VIDEO gia fakoùz
me enisxytç, topouetçste sto DC gia fakoùz xvrìz
enisxytç.
8 - LED deìkthz paroysìaz trofodòthshz
9 - Potensiòmetro DC VR gia rùumish stàumhz thz ejòdoy
bìnteo òpote xrhsimopoioùntai fakoì aytòmatoy IRIS.
130 mm
DC
VIDEO
DN
SH
VIDEO OUT
DC VR
IRIS OUT
POWER
50 mm
50 mm
1
2
4
4
8
6 7
4
9
3
5
prosarmostç (xorhgeìtai stàntar). Eàn xrhsimopoioùntai
optikéz diatàjeiz me aytòmato diàfragma syndéete to bù-
sma toy fakoù sto termatikò IRIS sthn pìsv pleyrà thz
thlekàmeraz.
Shmeìvsh: xrhsimopoièntaz fakoùz me mhxanokìnhto woym
sth uçkh ejvterikçz xrçshz eìd. 391803 eìnai anagkaìo na
stereèsete ston esvterikò anastoléa stçrijhz, ektòz apò to
fakò, kai thn thlekàmera mésv toy stàntar apostàth, bidè-
nontaz sto sèma thz thlekàmeraz. H thlekàmera xorhgeìtai
sth uésh back focus standard. Vstòso, gia merikoùz tùpoyz
fakèn me woym, mporeì na xreiasteì mia rùumish.
1
3
2
4
Thlekàmera
Termatikò IRIS
Pleyrà sygkòllhshz
Fakòz
Kàtv òch
Plainç òch

BTicino s.p.a.
Via Messina, 38
20154 Milano - Italia
www.bticino.com
BTicino si riserva il diritto di variare, in qualsiasi momento, i contenuti illustrati nel presente stampato.
Table of contents
Languages:
Other Bticino Security Camera manuals

Bticino
Bticino 391716 User manual

Bticino
Bticino 391615 User manual

Bticino
Bticino 391769 User manual

Bticino
Bticino 391348 User manual

Bticino
Bticino 391891 User manual

Bticino
Bticino 391782 User manual

Bticino
Bticino LE03110AA User manual

Bticino
Bticino 391696 User manual

Bticino
Bticino 391780 User manual

Bticino
Bticino LE06585AA-01AT-13W27 User manual