manuals.online logo
Brands
  1. Home
  2. •
  3. Brands
  4. •
  5. Calsense
  6. •
  7. Controllers
  8. •
  9. Calsense ET2000 400 Series User manual

Calsense ET2000 400 Series User manual

® RAIN BUCKET SETUP
making
since 1986
water work
RAIN BUCKET
ET2000 (400 SERIES) RAIN BUCKET SETUP
1
10 9
8
4
8
5
6
7
3
2
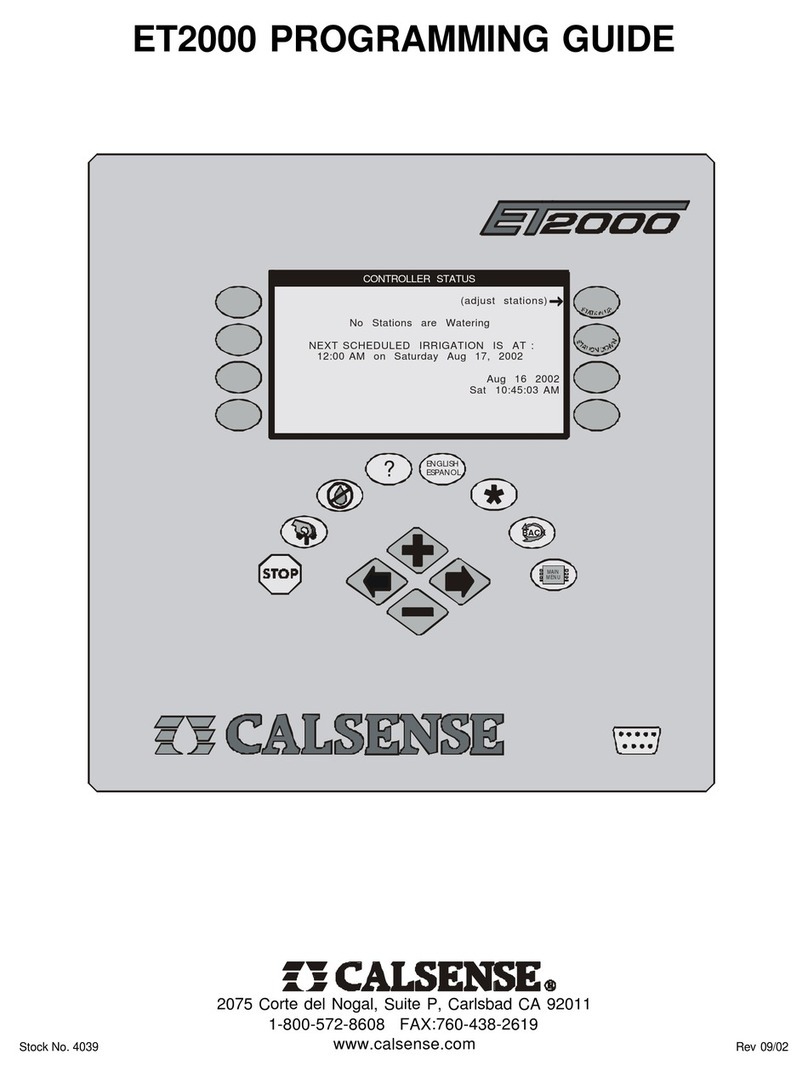
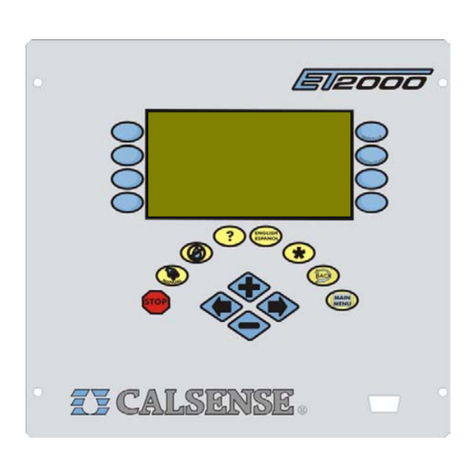
1STOP – The STOP key will stop any currently
running Scheduled watering Cycle, Manual
Cycle, Test Cycle, Manual Special Sequence.
2MANUAL – The MANUAL key will perform
Manual Water, Test, Master Valve Override and
Manual Special Sequence.
3NO WATER – The NO WATER key will turn the
controller Off and set No Water Days.
4?– The ? key is used to access the controller
Help screens.
5ENGLISH / ESPANOL – The ENGLISH /
ESPANOL key allows you to toggle the displayed
text between English and Spanish.
6BACK – The BACK key will go back to the
previous screen.
7MAIN MENU – The MAIN MENU key is used to
access the different program features of the
controller.
8MENU KEYS – MENU keys select the different
features of commands in the different screens
and are adjacent to the left and right side of the
controller’s display screen. The text in the screen
will point towards the MENU key that needs to
be pressed.
9LEFT / RIGHT ARROW KEYS – The LEFT /
RIGHT ARROW keys move the highlighted
cursor around the different screens when setting
up or editing the controller’s features and
options.
10 PLUS / MINUS KEYS – The PLUS / MINUS
keys increase or decrease values or answer Yes
or No questions in the different screens.
RAIN BUCKET SETUP ®
making
since 1986
water work
RAIN BUCKET SETUP ( WITH RAIN
BUCKET INSTALLED )
1. Press the MAIN MENU key.
2. Press the WEATHER Menu
key (Figure 1).
Setup Status
Flow Radio Remote
Weather Reports
CALSENSE WATER MANAGEMENT SYSTEM
Programs & Stations Lights
Figure 1
The WEATHER SETUP screen (Figure 2).
Rain Switch
Wind Gage Moisture
Rain Bucket Budget
WEATHER SETUP
ET Gage ET
Figure 2
3. Press the RAIN BUCKET
Menu key.
The RAIN BUCKET SETUP screen (Figure 3).
STOP Irrigation After 0.10 inches
MAXIMUM Rain in ONE Hour is 0.20 inches
MAXIMUM Rain in 24 Hours is 0.60 inches
Let Rain Only Build up to 1.50 inches
RAIN BUCKET SETUP
Set Use of Rain by Program
Figure 3
The four (4) settings on the screen determine how
much actual rainfall will be placed into the rain table,
which are used to offset irrigation run times. The
following is a description of each:
Stop irrigation after: This setting determines how
much rain must fall before the controller will start
accumulating rainfall values in the rain table. It also
determines when to halt any on going irrigation. In
figure 3 0.10 inches of rain will have to fall before
any rain data starts to accumulate in the rain table.
Maximum Hourly Rain: This setting determines the
maximum amount of rain that will be put in the rain
table after a period of one (1) hour of rain. In figure
3, a maximum of 0.20 inches of rain will be put into
the rain table, no matter how much rain falls in a one
(1) hour period. The amount of rain from this setting
put into the rain table, will increase only until it
reaches the 24 HOUR TOTAL setting.
Maximum 24 Hour Total: This setting determines
the maximum amount of rain that will be put into the
rain table in a 24 hour period. In figure 3, a
maximum of 0.60 inches of rain will be put into the
table, no matter how much rain falls in a 24 hour
period. The amount of rain from this setting put into
the rain table, will increase only until it reaches the
LET RAIN ONLY BUILD UP TO: setting.
Let Rain Only Build Up to: This setting determines
the maximum amount of rain that can be stored in
the rain table. In figure 3, the controller will stop
storing rain data in the rain table if the “Maximum 24
Hour” Total reaches 1.50 inches of rain.
4. Press the PLUS or MINUS
keys to change the settings.
5. Press the blue ARROW keys to
move the cursor to the next entry.
Set Use of Rain by Program: This section
describes how to enable the use of rain in the
ET2000 controller. Each program can be set
individually to either use or not use rain to offset
irrigation run times.
® RAIN BUCKET SETUP
making
since 1986
water work
From the RAIN BUCKET SETUP screen (Figure 3).
6. Press the SET USE OF RAIN BY
PROGRAM Menu key.
The USE OF RAIN BY PROGRAM screen
(Figure 4).
PROG A . . . . . . . . . . . . . . . . . . . . . . . . . . . . . .YES
PROG B . . . . . . . . . . . . . . . . . . . . . . . . . . . . . .YES
USE OF RAIN BY PROGRAM
which acts to cancel irrigation.
Rain causes negative hold-over to build
Allow RAIN on the following:
DRIP 2 . . . . . . . . . . . . . . . . . . . . . . . . . . . . . . . YES
PROG C . . . . . . . . . . . . . . . . . . . . . . . . . . . . . .YES
PROG D . . . . . . . . . . . . . . . . . . . . . . . . . . . . . .YES
PROG E . . . . . . . . . . . . . . . . . . . . . . . . . . . . . .YES
DRIP 1 . . . . . . . . . . . . . . . . . . . . . . . . . . . . . . . YES
Figure 4
Here you will have the option of enabling or
disabling the use of negative hold-over (rain) for any
of the controller’s seven programs. If you select
YES, Negative hold-over will be used for that
program to reduce irrigation run times. If you select
NO, rain will have no effect on irrigation run times for
that program. If there is no rain bucket installed and
you are not sharing rain data through the Calsense
Command Center program, these settings will have
no effect on irrigation.
7. Press the PLUS or MINUS keys
to change the setting.
8. Press the blue ARROW keys to
move the cursor to the next entry.
9. Press the MAIN MENU key to
return to the MAIN MENU screen
(Figure 5).
Setup Status
Flow Radio Remote
Weather Reports
CALSENSE WATER MANAGEMENT SYSTEM
Programs & Stations Lights
Figure 5
RAIN BUCKET SETUP ( WITHOUT
RAIN BUCKET INSTALLED )
Note: This would be used by Command Central
software users, or controllers in a chain.
Form the MAIN MENU screen.
1. Press the WEATHER Menu key
(Figure 6).
Setup Status
Flow Radio Remote
Weather Reports
CALSENSE WATER MANAGEMENT SYSTEM
Programs & Stations Lights
Figure 6
The WEATHER SETUP screen (Figure 7).
Rain Switch
Wind Gage Moisture
Rain Bucket Budget
WEATHER SETUP
ET Gage ET
Figure 7
2. Press the RAIN BUCKET Menu
key.
The RAIN BUCKET SETUP screen (Figure 8).
Let Rain Only Build up to 1.50 inches
RAIN BUCKET SETUP
setings. This controller does not
Rain Bucket controllers have 3 more
have a -RB interface.
Set Use of Rain by Program
Figure 8
RAIN BUCKET SETUP ®
making
since 1986
water work
If a controller is not wired to a rain bucket, the RAIN
BUCKET SETUP screen will only have one setting
(Figure 8). This setting is described below:
Let Rain Only Build Up to: This setting determines
the maximum amount of rain that can be stored in
the rain table. In figure 8 the controller will stop
storing rain data in the rain table if the Maximum 24
Hour Total reaches 1.50 inches of rain.
Note: If you are not sharing rain data using the
Calsense Command Center software, this setting will
have no effect on irrigation.
3. Press the PLUS or MINUS keys
to change the setting.
Set Use of Rain by Program: This section
describes how to enable the use of rain in the
ET2000 controller. Each program can be set
individually to either use or not use rain to offset
irrigation run times. From the RAIN BUCKET SETUP
screen (Figure 8) press the SET USE OF RAIN BY
PROGRAM Menu key to access the USE OF RAIN
BY PROGRAM screen (Figure 9).
PROG A . . . . . . . . . . . . . . . . . . . . . . . . . . . . . .YES
PROG B . . . . . . . . . . . . . . . . . . . . . . . . . . . . . .YES
USE OF RAIN BY PROGRAM
which acts to cancel irrigation.
Rain causes negative hold-over to build
Allow RAIN on the following:
DRIP 2 . . . . . . . . . . . . . . . . . . . . . . . . . . . . . . . YES
PROG C . . . . . . . . . . . . . . . . . . . . . . . . . . . . . .YES
PROG D . . . . . . . . . . . . . . . . . . . . . . . . . . . . . .YES
PROG E . . . . . . . . . . . . . . . . . . . . . . . . . . . . . .YES
DRIP 1 . . . . . . . . . . . . . . . . . . . . . . . . . . . . . . . YES
Figure 9
Here you will have the option of enabling or
disabling the use of negative hold-over (rain) for any
of the controller’s seven programs. If you select
YES, Negative hold-over will be used for that
program to reduce irrigation run times. If you select
NO, rain will have no effect on irrigation run times for
that program. If there is no rain bucket installed and
you are not sharing rain data through the Calsense
Command Center program, these settings will have
no effect on irrigation.
4. Press the PLUS or MINUS keys
to change the setting.
5. Press the blue ARROW keys to
move the cursor to the next entry.
6. Press the MAIN MENU key.
The MAIN MENU screen (Figure 10).
Setup Status
Flow Radio Remote
Weather Reports
CALSENSE WATER MANAGEMENT SYSTEM
Programs & Stations Lights
Figure 10
RAIN SWITCH SETUP
From the MAIN MENU screen.
1. Press the WEATHER Menu key
(Figure 11).
Setup Status
Flow Radio Remote
Weather Reports
CALSENSE WATER MANAGEMENT SYSTEM
Programs & Stations Lights
Figure 11
This will bring you to the WEATHER SETUP screen
(Figure 12).
® RAIN BUCKET SETUP
making
since 1986
water work
Rain Switch
Wind Gage Moisture
Rain Bucket Budget
WEATHER SETUP
ET Gage ET
Figure 12
2. Press the RAIN SWITCH Menu
key if you want to activate a Rain
Switch.
The RAIN SWITCH SETUP screen (Figure 13).
a Rain Switch Device? NO
RAIN SWITCH SETUP
Is the controller connected to
There is special way to wire them to
this controller to avoid NO CURRENT
and NO FLOW errors.
A Rain Switch is a device like a
MINI-CLIC or RAIN GUARD.
Figure 13
3. Press the PLUS or MINUS keys
to change the setting.
If you select YES this will change the screen to read,
“Irrigation will be stopped when the rain switch
detects rain”. If you do not want irrigation to be
affected by the rain switch leave the setting at the
default setting of NO (Figure 14).
a Rain Switch Device? YES
RAIN SWITCH SETUP
Is the controller connected to
Irrigation will be STOPPED when the
rain switch detects rain.
There is special way to wire them to
this controller to avoid NO CURRENT
and NO FLOW errors.
A Rain Switch is a device like a
MINI-CLIC or RAIN GUARD.
Figure 14
4. Press the MAIN MENU key to
return to the MAIN MENU
screen.
REPORTS / ET & RAIN TABLES.
From the MAIN MENU screen.
1. Press the REPORTS Menu
key (Figure 15).
Setup Status
Flow Radio Remote
Weather Reports
CALSENSE WATER MANAGEMENT SYST EM
Programs & Stations Lights
Figure 15
The REPORTS screen (Figure 16).
REPORTS
This Month / Last Month Diagnostics
24 Month History Log Lines
Irrigation Details
Station Order ET & Rain Tables
Figure 16
2. Press the ET & RAIN TABLES
Menu key.
The ET & RAIN TABLE screen (Figure 17).
h.31 h.31 h.31 h.31 h.31 h.31 h.31
m.06 o.00 o.00 r.23 r.18 o.00
ET & RAIN TABLE
Thu Wed Tue Mon Sun Sat Fri
h.31 h.31 e.35 e.34 h.31 h.31 h.31
h.31 h.31 h.31 h.31 h.31 h.31 h.31
g.32 g.33 g.31 h.31 e.36 h.31 h.31
ET TABLE: (from 08/25/2005 back)
o.00 o.00 o.00 o.00 o.00 o.00 o.00
RAIN TABLE: ( h0.00 t0.00 r0.00 m0.00 )
Thu Wed Tue Mon Sun Sat Fri
o.00 o.00 o.00 o.00 o.00 o.00 o.00
Figure 17
RAIN BUCKET SETUP ®
making
since 1986
water work
The ET & RAIN TABLE (Figure 17) is where the
controller stores rainfall numbers (measured in
inches). The numbers in this table can only be
generated from a Rain Bucket wired to the
controller, or shared, using the Calsense Command
Center software, from a controller wired to a rain
bucket. In figure 17 the rain table has a combination
of numbers, the letter next to the value indicates
what the value represents:
o– Original, this value is zero (no usable rain), it
has no effect on irrigation run times.
m– Below minimum, the below minimum value is
measured rain but it is not enough to offset irrigation
run times.
r – Usable rain, this value is rain that is used to
offset irrigation run times.
s– Shutdown, this means that irrigation was
stopped due to rain polling being shared with this
controller.
The usable rain in the Rain Table is used to reduce
each stations irrigation run times. The amount of
time each station is reduced is determined by the
precipitation rate of each station and the amount of
usable rain. Usable rain in the Rain Table is
determined by settings programmed at the Rain
Bucket setup screen at the controller. When
scheduled irrigation is set to occur, the controller will
use up the usable rain first by the amount of time
scheduled to irrigate for each station. Until the
usable rain is used up, there will be no irrigation.
This will continue until all of the rain is used up at
which time the irrigation will start again.
3. Press the BACK key twice to
return to the MAIN MENU
screen.
®
2075 Corte del Nogal, Suite P, Carlsbad CA 92011
1-(800)-572-8608 FAX: 1-(760)-438-2619
www.calsense.com
Stock Number: PG1-RB-D2 Rev. 03/06

Other Calsense Controllers manuals

Calsense CS3000 User manual

Calsense

Calsense CS3000 User manual

Calsense ET2000e User manual

Calsense

Calsense ET2000e User manual

Calsense ET2000e Operating instructions

Calsense

Calsense ET2000e Operating instructions

Calsense ET1 User manual

Calsense

Calsense ET1 User manual

Calsense ET2000e User manual

Calsense

Calsense ET2000e User manual

Calsense ET2000 Operating instructions

Calsense

Calsense ET2000 Operating instructions

Calsense 500 Series User manual

Calsense

Calsense 500 Series User manual

Calsense 500 Series Operating instructions

Calsense

Calsense 500 Series Operating instructions

Calsense CS3000 User manual

Calsense

Calsense CS3000 User manual

Calsense ET1 User manual

Calsense

Calsense ET1 User manual

Calsense ET2000 500 Series User manual

Calsense

Calsense ET2000 500 Series User manual

Popular Controllers manuals by other brands

IAI ACON-C Series First step guide

IAI

IAI ACON-C Series First step guide

microHAM ARCO manual

microHAM

microHAM ARCO manual

Sunricher SR-1007 Series manual

Sunricher

Sunricher SR-1007 Series manual

safgard 1100M manual

safgard

safgard 1100M manual

SWP Float Switch Installation and Instruction Guide

SWP

SWP Float Switch Installation and Instruction Guide

blackloud Buzzi Sprinkler quick guide

blackloud

blackloud Buzzi Sprinkler quick guide

CLEOPATRA 90187070 Instructions for use/assembly instructions

CLEOPATRA

CLEOPATRA 90187070 Instructions for use/assembly instructions

ITALFARAD PFC144evo operating manual

ITALFARAD

ITALFARAD PFC144evo operating manual

Siemens SSA31.04 Mounting instructions

Siemens

Siemens SSA31.04 Mounting instructions

Unitronics UniStream Built-in Series installation guide

Unitronics

Unitronics UniStream Built-in Series installation guide

Maytronics pH Drive instruction manual

Maytronics

Maytronics pH Drive instruction manual

Data Aire Mini dap4 Installation, operation & maintenance manual

Data Aire

Data Aire Mini dap4 Installation, operation & maintenance manual

Joy-it MaKey quick start guide

Joy-it

Joy-it MaKey quick start guide

Fort VSC-006 Hardware manual

Fort

Fort VSC-006 Hardware manual

Federal Signal Corporation UltraVoice UVRI-B Series Description, Specifications, Installation, and Operation Manual

Federal Signal Corporation

Federal Signal Corporation UltraVoice UVRI-B Series Description, Specifications, Installation, and Operation Manual

Linear Technology LT3971 quick start guide

Linear Technology

Linear Technology LT3971 quick start guide

Solidyne sLON-5 Tech Data Sheet

Solidyne

Solidyne sLON-5 Tech Data Sheet

RADEMACHER Troll Comfort Mounting and operating instruction

RADEMACHER

RADEMACHER Troll Comfort Mounting and operating instruction

manuals.online logo
manuals.online logoBrands
  • About & Mission
  • Contact us
  • Privacy Policy
  • Terms and Conditions

Copyright 2025 Manuals.Online. All Rights Reserved.