manuals.online logo
Brands
  1. Home
  2. •
  3. Brands
  4. •
  5. CAME
  6. •
  7. Gate Opener
  8. •
  9. CAME FAST Series Manual

CAME FAST Series Manual

Other manuals for FAST Series

1

This manual suits for next models

1

Other CAME Gate Opener manuals

CAME A 3000 User manual

CAME

CAME A 3000 User manual

CAME AX302304 User manual

CAME

CAME AX302304 User manual

CAME OPS series User manual

CAME

CAME OPS series User manual

CAME BXL04AGS User manual

CAME

CAME BXL04AGS User manual

CAME A 3006 User manual

CAME

CAME A 3006 User manual

CAME ATI 24V User manual

CAME

CAME ATI 24V User manual

CAME SDN Series User manual

CAME

CAME SDN Series User manual

CAME U 8700 User manual

CAME

CAME U 8700 User manual

CAME ATI KIT User manual

CAME

CAME ATI KIT User manual

CAME DIR-L User manual

CAME

CAME DIR-L User manual

CAME AGTK200V03 User manual

CAME

CAME AGTK200V03 User manual

CAME ATS50DGM User manual

CAME

CAME ATS50DGM User manual

CAME RSDN002 User manual

CAME

CAME RSDN002 User manual

CAME BK Series User manual

CAME

CAME BK Series User manual

CAME 8K01MI-0523 User manual

CAME

CAME 8K01MI-0523 User manual

CAME Sipario Series Setup guide

CAME

CAME Sipario Series Setup guide

CAME ZLX24MA User manual

CAME

CAME ZLX24MA User manual

CAME TOP-434EE User manual

CAME

CAME TOP-434EE User manual

CAME ATS-P324 User manual

CAME

CAME ATS-P324 User manual

CAME 8K01MI-0515 User manual

CAME

CAME 8K01MI-0515 User manual

CAME BXE 24 User manual

CAME

CAME BXE 24 User manual

CAME FA70230E User manual

CAME

CAME FA70230E User manual

CAME MYTO Series User manual

CAME

CAME MYTO Series User manual

CAME ZC3C User manual

CAME

CAME ZC3C User manual

Popular Gate Opener manuals by other brands

Nortek Security & Control Mighty Mule HD272 installation manual

Nortek Security & Control

Nortek Security & Control Mighty Mule HD272 installation manual

tousek TURN 10 Installation and operating instructions

tousek

tousek TURN 10 Installation and operating instructions

SOMFY AXOVIA 220B RTS installation instructions

SOMFY

SOMFY AXOVIA 220B RTS installation instructions

Nice HySecurity CBOX1050 Installation and programming manual

Nice HySecurity

Nice HySecurity CBOX1050 Installation and programming manual

Aprimatic ONDA 500 installation instructions

Aprimatic

Aprimatic ONDA 500 installation instructions

Turnstiles FSW 900 manual

Turnstiles

Turnstiles FSW 900 manual

Erreka BUL BL33 Quick installation and programming guide

Erreka

Erreka BUL BL33 Quick installation and programming guide

Extel VERA quick guide

Extel

Extel VERA quick guide

Beninca R1-2 WBV quick start guide

Beninca

Beninca R1-2 WBV quick start guide

Erreka VULCAN D user manual

Erreka

Erreka VULCAN D user manual

Motorline professional FORT User& installer's manual

Motorline professional

Motorline professional FORT User& installer's manual

Beninca BOB5024 manual

Beninca

Beninca BOB5024 manual

AGA GATEMASTER 900 HD installation manual

AGA

AGA GATEMASTER 900 HD installation manual

Cardin BL Series manual

Cardin

Cardin BL Series manual

Westfalia 85 27 06 instruction manual

Westfalia

Westfalia 85 27 06 instruction manual

Riello Elettronica CARDIN ACE FAST Instruction handbook

Riello Elettronica

Riello Elettronica CARDIN ACE FAST Instruction handbook

Telcoma ARM Instruction handbook

Telcoma

Telcoma ARM Instruction handbook

Telcoma ACE Instruction handbook

Telcoma

Telcoma ACE Instruction handbook

manuals.online logo
manuals.online logoBrands
  • About & Mission
  • Contact us
  • Privacy Policy
  • Terms and Conditions

Copyright 2025 Manuals.Online. All Rights Reserved.

Documentazione
Tecnica
T51
rev. 0.1
03/2004
©
CAME
CANCELLI
AUTOMATICI
F7002
CANCELLI AUTOMATICI
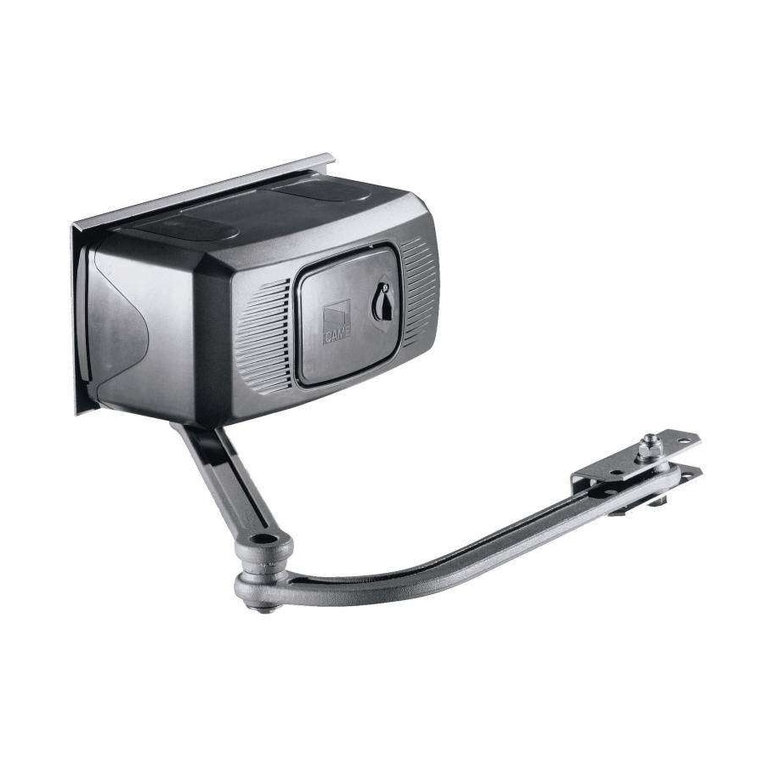
1) Straight arm
2) Slide guide
3) Caps for guide
4) Runner
5) Spacer bushing
6) UNI5737 M12x60 hexagonal-head
screw
7) Self-locking nut
8) UNI5931 M8x20 cheese-headed
screw
9) Hole-covering caps
1) Bras droit
2) Rail
3) Bouchons pour rail
4) Patin
5) Douille entretoise
6) Vis à six pans UNI5737 M12x60
7) Écrou de verrouillage
8) Vis à tête cylindrique UNI5931 M8x20
9) Bouchons couvre trous
1)2)
2
6
4
1
4
9
8
5
7
119DT51
SERIE FAST | FAST SERIES | SÉRIE FAST | BAUREIHE FAST | SERIE FAST | SERIE FAST
BRACCIO DRITTO DI TRASMISSIONE
STRAIGHT TRANSMISSION ARM
BRAS DROIT DE TRANSMISSION
GERADER ANTRIEBSARM
BRAZO RECTO DE TRANSMISIÓN
RECHTE TRANSMISSIE-ARM
ITALIANO
Procedura di montaggio
1) Prima di eseguire la posa, vericare
le misure di ssaggio.
2) Fissare la staffa e la guida di scorri-
mento allineandoli.
1) Braccio dritto
2) Guida di scorrimento
3) Tappi per guida
4) Pattino
5) Boccola distanziale
6) Vite esagonale UNI5737 M12x60
7) Dado autobloccante
8) Viti testa cilindrica UNI5931 M8x20
9) Tappi coprifori
1) Brazo recto
2) Guía de deslizamiento
3) Tapones para guía
4) Patín
5) Anillo distanciador
6) Tornillo hexagonal UNI5737
M12x60
7) Tuerca de seguridad
8) Tornillo hexagonal UNI5931
M8x20
9) Tapones para agujeros
1) Rechte arm
2) Loopgeleider
3) Doppen voor de geleider
4) Geleischoen
5) Bus afstandshouder
6) Zeskantschroef UNI5737 M12x60
7) Zelfblokkerende moer
8) Schroeven met cilinderkop UNI5931
M8x20
9) Doppen voor afsluiting gaten
1) Gerader Arm
2) Laufschiene
3) Schienenverschlusskappen
4) Gleitschuh
5) Distanzbuchse
6) Sechskantschraube UNI5753 M12x60
7) Selbsthemmende Mutter
8) Zylinderkopfschrauben UNI5931
M8x20
9) Lochabdeckkappen
250 350
0
120˚ max
175405
90˚
200
200
405
90˚
0
LOCK
UNLOCK
CAME
LOCK
UNLOCK
CAME
1
2
6,5 M8
160 160 160
1
DEUTSCH
Montage
1) Vor der Montage die Befestigung-
smaße überprüfen.
2) Den Bügel und die Gleitschiene an-
gleichen und befestigen.
ENGLISH
Mounting procedure
1) Make sure the mounting measure-
ments are correct berfore mounting.
2) Mount the bracket and the slide guide
in alignment.
ESPAÑOL
Procedimiento de montaje
1) Antes de efectuar la instalación, com-
pruebe la medida de jación.
2) Fije el estribo y la guía de desliza-
miento alineándolos.
FRANÇAIS
Procédure de montage
1) Vérier les mesures de xation avant
de commencer à monter.
2) Fixer la bride et le rail en les alignant.
NEDERLANDS
Montageprocedure
1) Controleer de afmetingen voor beves-
tiging alvorens tot de plaatsing over te
gaan.
2) Bevestig de beugel en de loopgelei-
der en lijn deze uit.
CANCELLI AUTOMATICI
CAME LOMBARDIA S.R.L._____COLOGNO M. (MI)
(+39) 02 26708293 (+39) 02 25490288
CAME SUD S.R.L. ___________________NAPOLI
(+39) 081 7524455 (+39) 081 7529109
CAME (AMERICA) L.L.C.________MIAMI (FL)
(+1) 305 5938798 (+1) 305 5939823
CAME AUTOMATISMOS S.A__________MADRID
(+34) 091 5285009 (+34) 091 4685442
CAME BELGIUM__________________LESSINES
(+32) 068 333014 (+32) 068 338019
CAME FRANCE S.A.____NANTERRE CEDEX (PARIS)
(+33) 01 46130505 (+33) 01 46130500
CAME GMBH________KORNTAL BEI (STUTTGART)
(+49) 07 15037830 (+49) 07 150378383
CAME GMBH____________SEEFELD BEI (BERLIN)
(+49) 03 33988390 (+49) 03 339885508
CAME PL SP.ZO.O______________WARSZAWA
(+48) 022 8365076 (+48) 022 8369920
CAME UNITED KINGDOM LTD___NOTTINGHAM
(+44) 0115 9210430 (+44) 0115 9210431
CAME CANCELLI AUTOMATICI S.P.A.
DOSSON DI CASIER (TREVISO)
(+39) 0422 4940 (+39) 0422 4941
SISTEMA QUALITÅ
CERTIFICATO
ASSISTENZA TECNICA
NUMERO VERDE
800 295830
WEB
www.came.it
E-MAIL
[email protected]
12
2
1
2
1
LOCK
UNLOCK
3
3) 4)
5)
ITALIANO »
3) Fissare il pattino e boccola lubricata
con la vite M12x60 e dado al braccio
dritto e quest’ultimo ssarlo all’albero
motore.
4) Sbloccare il motore e inserire il patti-
no nella guida.
5) Fissare il motoriduttore sulla staffa
base, inserire i tappi per guida e ssare
il coperchio sul motore.
Tutti i dati sono stati controllati
con la massima cura. Non ci
assumiamo comunque alcuna
responsabilità per eventuali errori
od omissioni.
All data checked with the maximum
care. However, no liability is accepted
for any error or omission.
Todos los datos se han controlado
con la máxima atención. No obstan-
te no nos responsabilizamos de los
posibles errores u omisiones.
Toutes les données ont été
contrôlées très soigneusement.
Nous n’assumons de toute façon
aucune responsabilité pour les
erreurs ou omissions éventuelles.
De gegevensin deze handleiding
werden zorgvulding gecontroleerd.
Wijn niet verantwoordelijk voor
eventuele drukfouten.
Die Daten wurden mit höchster
Sorgfalt geprüft. Für eventuelle
Fehler oder Auslassungen
übernehmen wir keine Haftung.
ENGLISH »
3) Secure the runner and e oiled bush-
ing with the M12x60 screw and nut to
the straight arm and the latter to the
driving shaft.
4) Unlock the motor and insert the run-
ner in the guide.
5) Fix the gearmotor to the base bracket,
insert the guide caps and secure the
cover over the motor.
FRANÇAIS »
3) Secure the runner and e oiled bush-
ing with the M12x60 screw and nut to
the straight arm and the latter to the
driving shaft.
4) Unlock the motor and insert the run-
ner in the guide.
5) Fixer le motoréducteur à la bride de
base, placer les bouchons du rail et xer
le couvercle sur le moteur.
DEUTSCH »
3) Den Gleitschuh und die geschmierte
Buche mit der Schraube M12x60 und
Mutter am geraden Arm befestigen und
letzteren an der Motorwelle montieren.
4) Den Motor entsperren und den Gleit-
schuh in die Schiene einführen.
5) Den Getriebemotor am Grundbügel
befestigen, die Verschlusskappen ein-
führen und den Deckel auf dem Motor
befestigen.
ESPAÑOL »
3) Fije el patín y el casquillo lubricado
con el tornillo M12x60 y la tuerca al bra-
zo recto y je este último al eje motor.
4) Desbloquee el motor e introduzca el
patín en la guía.
5) Fije el motorreductor en el estribo de
base, monte los tapones para la guía y
je la tapa en el motor.
NEDERLANDS »
3) Bevestig de geleischoen en de ge-
smeerde bus met de schroef M12x60 en
moer aan de rechte arm. Bevestig deze
laatste aan de motoras.
4) Deblokkeer de motor en plaats de
geleischoen in de geleider.
5) Bevestig de motorreductor op de
basisbeugel, plaats de doppen voor de
geleider en bevestig het deksel op de
motor.