1
Conteúdo
목차
Содержание
目次
Contents
Sommaire
目录 Sommario
Índice
Inhalt
共同包装部件一览.................................................. 1
组装支架 ................................................................ 2
安装出纸堆叠器 ..................................................... 3
安装堆叠器............................................................. 4
用电缆连接堆叠器和打印机 ................................... 7
使用堆叠器............................................................. 9
Contenuto della confezione............................................ 1
Assemblaggio del Supporto............................................ 2
Installazione dell'Impilatrice di Uscita ............................. 3
Installazione dell'impilatrice ............................................ 4
Collegamento di impilatrice e stampante con il cavo...... 7
Utilizzo dell'impilatrice .................................................... 9
동고품 일람..................................................................... 1
스탠드 조립..................................................................... 2
바스켓 장착..................................................................... 3
스택커 설치..................................................................... 4
케이블로 스택커와 프린터 연결...................................... 7
스택커 사용..................................................................... 9
同梱品一覧...................................................................... 1
スタンドを組み立てる.................................................... 2
バスケットを取り付ける................................................ 3
スタッカーを設置する.................................................... 4
スタッカーとプリンタをケーブルで接続する................ 7
スタッカーを使用する.................................................... 9
Paketinhalt...................................................................... 1
Aufbau des Gestells ....................................................... 2
Befestigung des Ausgabestaplers .................................. 3
Installation des Staplers ................................................. 4
Anschluss des Staplers und des Druckers mithilfe
des Kabels...................................................................... 7
Verwendung des Staplers............................................... 9
Содержимое упаковки .................................................. 1
Собрать подставку........................................................ 2
Прикрепление приемника бумаги................................ 3
Установка приемника ................................................... 4
Соединение приемника и принтера с помощью
кабеля............................................................................ 7
Использование приемника........................................... 9
Package Contents .......................................................... 1
Assemble the Stand ....................................................... 2
Attach the Output Stacker .............................................. 3
Install the stacker............................................................ 4
Connect the stacker and printer by cable....................... 7
Use the stacker............................................................... 9
Contenido de la caja....................................................... 1
Monte el Soporte ............................................................ 2
Instale el Apilador de Salida ........................................... 3
Instale el apilador ........................................................... 4
Conecte el apilador y la impresora con el cable............. 7
Utilice el apilador ............................................................ 9
Conteúdos da embalagem ............................................. 1
Montar o suporte ............................................................ 2
Instalar o empilhador de saída ....................................... 3
Instalar o empilhador...................................................... 4
Conectar o empilhador e a impressora com um cabo.... 7
Usar o empilhador .......................................................... 9
Contenu du colis............................................................. 1
Assembler le Socle......................................................... 2
Attacher le Bac de sortie ................................................ 3
Installer l'empileur........................................................... 4
Raccorder l'empileur et l'imprimante par câble............... 7
Utiliser l'empileur ............................................................ 9
El paquete puede también contener otras guías.
•
Es sind ggf. weitere Dokumentation in der Packung enthalten.
•
この他にも、各種ご案内が同梱されている場合があります。•
Other documentation may also be included in the package.
•
L'autre documentation pourra aussi être inclue dans le paquet.
•
È possibile che la confezione includa altre guide.
•
有时还同时包装了其他各种介绍。
•
이외에도 각종 안내서가 동봉되어 있는 경우가 있습니다 .
•
В упаковке может быть в наличии и другая документация.
•
Contenuto della confezione
Contenido de la caja
Paketinhalt
同梱品一覧
Package Contents
Contenu du colis
共同包装部件一览
Conteúdos da embalagem
동고품 일람
Содержимое упаковки
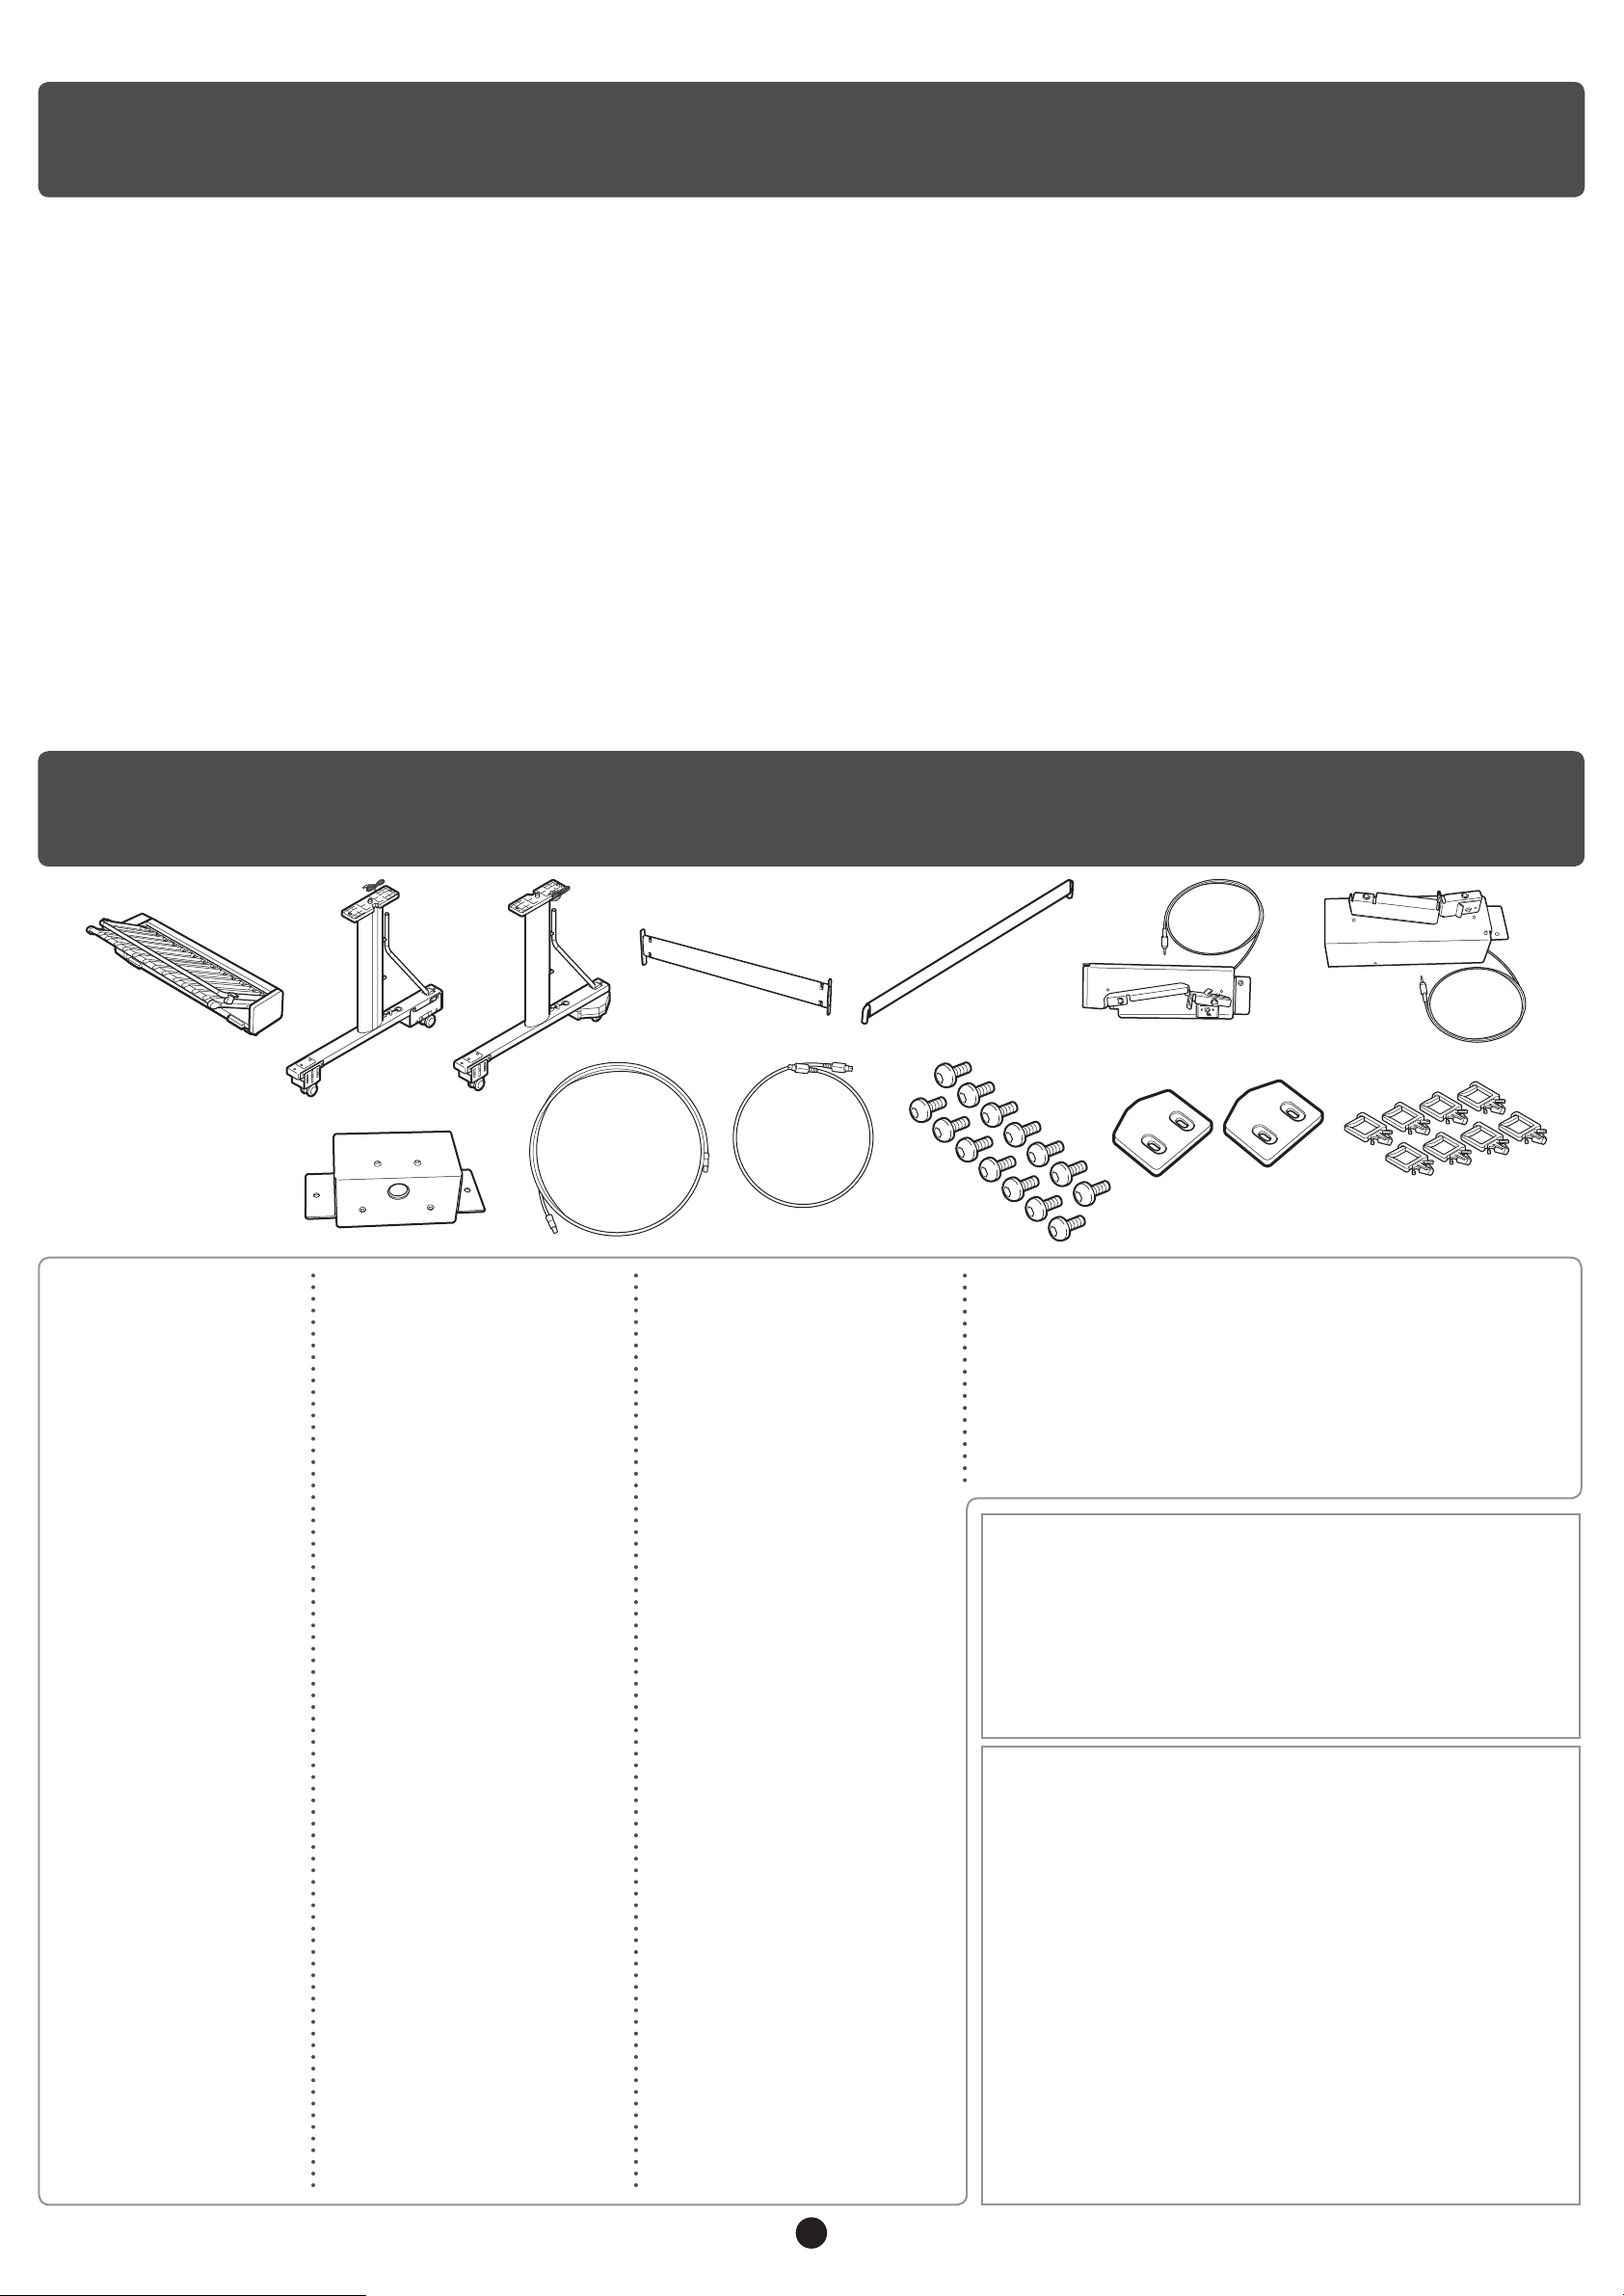
a.
スタッカー本体
Stacker
Empileur
Impilatrice
Stapler
Apilador
堆叠器
스택커
Приемник
Empilhador
Pode estar incluída no pacote outra documentação.
•
d.
スタンドステー
Stand stay
Soutien du support
Tirante del piedistallo
Ständerstütze
Travesaño del soporte
固定支架
스탠드 스테이
Держатель подставки
Apoio do suporte
c.
スタンドレッグ右
Stand leg right
Jambe droite du socle
Gamba del supporto destra
Gestellbein rechts
Pata del soporte derecha
右侧支架支脚
스탠드 다리 우측
Ножка подставки справа
Perna direita do suporte
b.
スタンドレッグ左
Stand leg left
Jambe gauche du socle
Gamba del supporto sinistra
Gestellbein links
Pata del soporte izquierda
左侧支架支脚
스탠드 다리 좌측
Ножка подставки слева
Perna esquerda do suporte
k.
六角ビス(× 14)
Hex screw (x 14)
Vis hexagonale (x 14)
Vite esagonale (x 14)
Sechskantschraube (x 14)
Tornillo hexagonal (x 14)
六角螺丝 (x 14)
6각나사 (x 14)
Шестигранный винт (x 14)
Parafuso hexagonal (x 14)
m.
ケーブル固定部材(× 8)
Cable retainer (x 8)
Attache-câble (x 8)
Sostegno del cavo (x 8)
Kabelhalter (x 8)
Retenedor de cable (x 8)
电缆固定器 (x 8)
케이블 고정구 (x 8)
Фиксатор кабеля (x 8)
Retentor do cabo (x 8)
l.
調整プレート(× 2)
Adjustment plate (x 2)
Plaque de réglage (x 2)
Piastra di regolazione (x 2)
Einstellplatte (x 2)
Placa de ajuste (x 2)
调整板 (x 2)
조정판 (x 2)
Регулировочная пластина (x 2)
Placa de ajuste (x 2)
j.
スタッカー中継ケーブル
Stacker relay cable
Câble du relais de l'empileur
Cavo relé dell'impilatrice
Stapler-Relaiskabel
Cable del relé del apilador
堆叠器中继电缆
스택커 릴레이 케이블
Релейный кабель приемника
Cabo de transmissão do empilhador
i.
スタッカーケーブル
Stacker cable
Câble de l'empileur
Cavo dell'impilatrice
Staplerkabel
Cable del apilador
堆叠器电缆
스택커 케이블
Кабель приемника
Cabo do empilhador
h.
中継ボックス
Relay box
Armoire à relais
Scatola relé
Relais-Gehäuse
Caja de relés
中继器盒
릴레이 박스
Блок реле
Caixa de transmissão
g.
ドッキングユニット右
Docking unit right
Station d'accueil droite
Unità di alloggiamento destra
Docking-Einheit rechts
Unidad de acoplamiento derecha
右侧对接单元
도킹 유닛 우측
Блок упаковки справа
Unidade de acoplamento direita
f.
ドッキングユニット左
Docking unit left
Station d'accueil gauche
Unità di alloggiamento sinistra
Docking-Einheit links
Unidad de acoplamiento izquierda
左侧对接单元
도킹 유닛 좌측
Блок упаковки слева
Unidade de acoplamento esquerda
바스켓
出纸堆叠器
e.
Output stacker
Apilador de salida
Ausgabestapler
Impilatrice di uscita
Bac de sortie
バスケット
Приемник бумаги
Empilhador de saída
スパナと六角レンチは同梱されていません。プリンタに同梱されてい
るスパナと六角レンチをご使用ください。
Die Schrauben- und Inbus-Schlüssel sind im Lieferumfang nicht
enthalten. Verwenden Sie die im Lieferumfang des Druckers
enthaltenen Schrauben- und Inbus-Schlüssel.
La llave y la llave Allen no están incluidas. Utilice la llave y la llave Allen
que se incluyen con la impresora.
•
•
The wrench and Allen wrench are not included. Use the wrench and
Allen wrench that are included with the printer.
La clé et la clé Allen ne sont pas fournies. Utilisez la clé et la clé Allen
fournies avec l'imprimante.
•
•
•
Chiave di manovra e chiave a brugola non inclusi. Utilizzare la chiave
di manovra e la chiave a brugola fornite a corredo con la stampante.
•
스패너 및6 각렌치는 포함되어 있지 않습니다 . 프린터에 부속된 스패
너및6 각렌치를 사용하십시오 .
不包含扳手和内六角扳手。用打印机随附的扳手和内六角扳手。
•
•
Двусторонний гаечный ключ и универсальный гаечный ключ в
комплект не входят. Используйте двусторонний гаечный ключ и
универсальный гаечный ключ, поставляемые с принтером.
•
A chave inglesa e a chave Allen não estão incluídas. Use a chave
inglesa e a chave Allen que acompanham a impressora.
•
a b e f
il
k
c d
j
g
h
m


