manuals.online logo
Brands
  1. Home
  2. •
  3. Brands
  4. •
  5. CareCo
  6. •
  7. Mobility Aid
  8. •
  9. CareCo BD06018 User manual

CareCo BD06018 User manual

Other CareCo Mobility Aid manuals

CareCo Tuni Bossa User guide

CareCo

CareCo Tuni Bossa User guide

CareCo WA01057 User guide

CareCo

CareCo WA01057 User guide

CareCo proLite VISAGE User manual

CareCo

CareCo proLite VISAGE User manual

CareCo Access-Tec MS09130 User manual

CareCo

CareCo Access-Tec MS09130 User manual

CareCo BA09023 User manual

CareCo

CareCo BA09023 User manual

CareCo Aluminium Glider 2.0 User manual

CareCo

CareCo Aluminium Glider 2.0 User manual

CareCo Evo User guide

CareCo

CareCo Evo User guide

CareCo Comet User manual

CareCo

CareCo Comet User manual

CareCo iCONNECT STEALTH User manual

CareCo

CareCo iCONNECT STEALTH User manual

CareCo Endeavour 2.0 User manual

CareCo

CareCo Endeavour 2.0 User manual

CareCo Kona User guide

CareCo

CareCo Kona User guide

CareCo GoodKnight BD06023 User manual

CareCo

CareCo GoodKnight BD06023 User manual

CareCo Secco 4 User guide

CareCo

CareCo Secco 4 User guide

CareCo PRIMA WA04032 User manual

CareCo

CareCo PRIMA WA04032 User manual

CareCo Breeze 8 II User manual

CareCo

CareCo Breeze 8 II User manual

CareCo SAMBA DUO User manual

CareCo

CareCo SAMBA DUO User manual

CareCo Rollafold User guide

CareCo

CareCo Rollafold User guide

CareCo DL06107 User manual

CareCo

CareCo DL06107 User manual

CareCo ProLite Carbon X-TRAIL User manual

CareCo

CareCo ProLite Carbon X-TRAIL User manual

CareCo Pano Walker Programming manual

CareCo

CareCo Pano Walker Programming manual

CareCo Burly User manual

CareCo

CareCo Burly User manual

CareCo BA07036 User manual

CareCo

CareCo BA07036 User manual

CareCo WA01047 User guide

CareCo

CareCo WA01047 User guide

CareCo XPEDITION Transport Chair User guide

CareCo

CareCo XPEDITION Transport Chair User guide

Popular Mobility Aid manuals by other brands

Drive DeVilbiss GoLite 200 operating instructions

Drive DeVilbiss

Drive DeVilbiss GoLite 200 operating instructions

Invacare 8153-J user manual

Invacare

Invacare 8153-J user manual

Clearwell Mobility Brandon User instructions

Clearwell Mobility

Clearwell Mobility Brandon User instructions

Handicare 1100 user manual

Handicare

Handicare 1100 user manual

NRS Healthcare M11090 User instructions

NRS Healthcare

NRS Healthcare M11090 User instructions

Alber Scalamobil iQ operating instructions

Alber

Alber Scalamobil iQ operating instructions

Ferno CCT-PX user manual

Ferno

Ferno CCT-PX user manual

Medline MDS86835DSHEC User Instructions & Warranty

Medline

Medline MDS86835DSHEC User Instructions & Warranty

Guldmann Twin Turner II user manual

Guldmann

Guldmann Twin Turner II user manual

Ferno 35-ITA user manual

Ferno

Ferno 35-ITA user manual

Drive ROOMBA Operation manual

Drive

Drive ROOMBA Operation manual

Gate Balder operating instructions

Gate

Gate Balder operating instructions

Decon wheel TNS Notos Assembly instructions

Decon wheel

Decon wheel TNS Notos Assembly instructions

ExoAtlet ExoAtlet-II user manual

ExoAtlet

ExoAtlet ExoAtlet-II user manual

Invacare Storm Series parts catalog

Invacare

Invacare Storm Series parts catalog

Rhythm Healthcare B3800F manual

Rhythm Healthcare

Rhythm Healthcare B3800F manual

AMF-BRUNS PROTEKTOR installation manual

AMF-BRUNS

AMF-BRUNS PROTEKTOR installation manual

Drive DeVilbiss Healthcare OTTER Instructions for use

Drive DeVilbiss Healthcare

Drive DeVilbiss Healthcare OTTER Instructions for use

manuals.online logo
manuals.online logoBrands
  • About & Mission
  • Contact us
  • Privacy Policy
  • Terms and Conditions

Copyright 2025 Manuals.Online. All Rights Reserved.

BD06018 – Sure Support Bed Rail
Assembly and Installation:
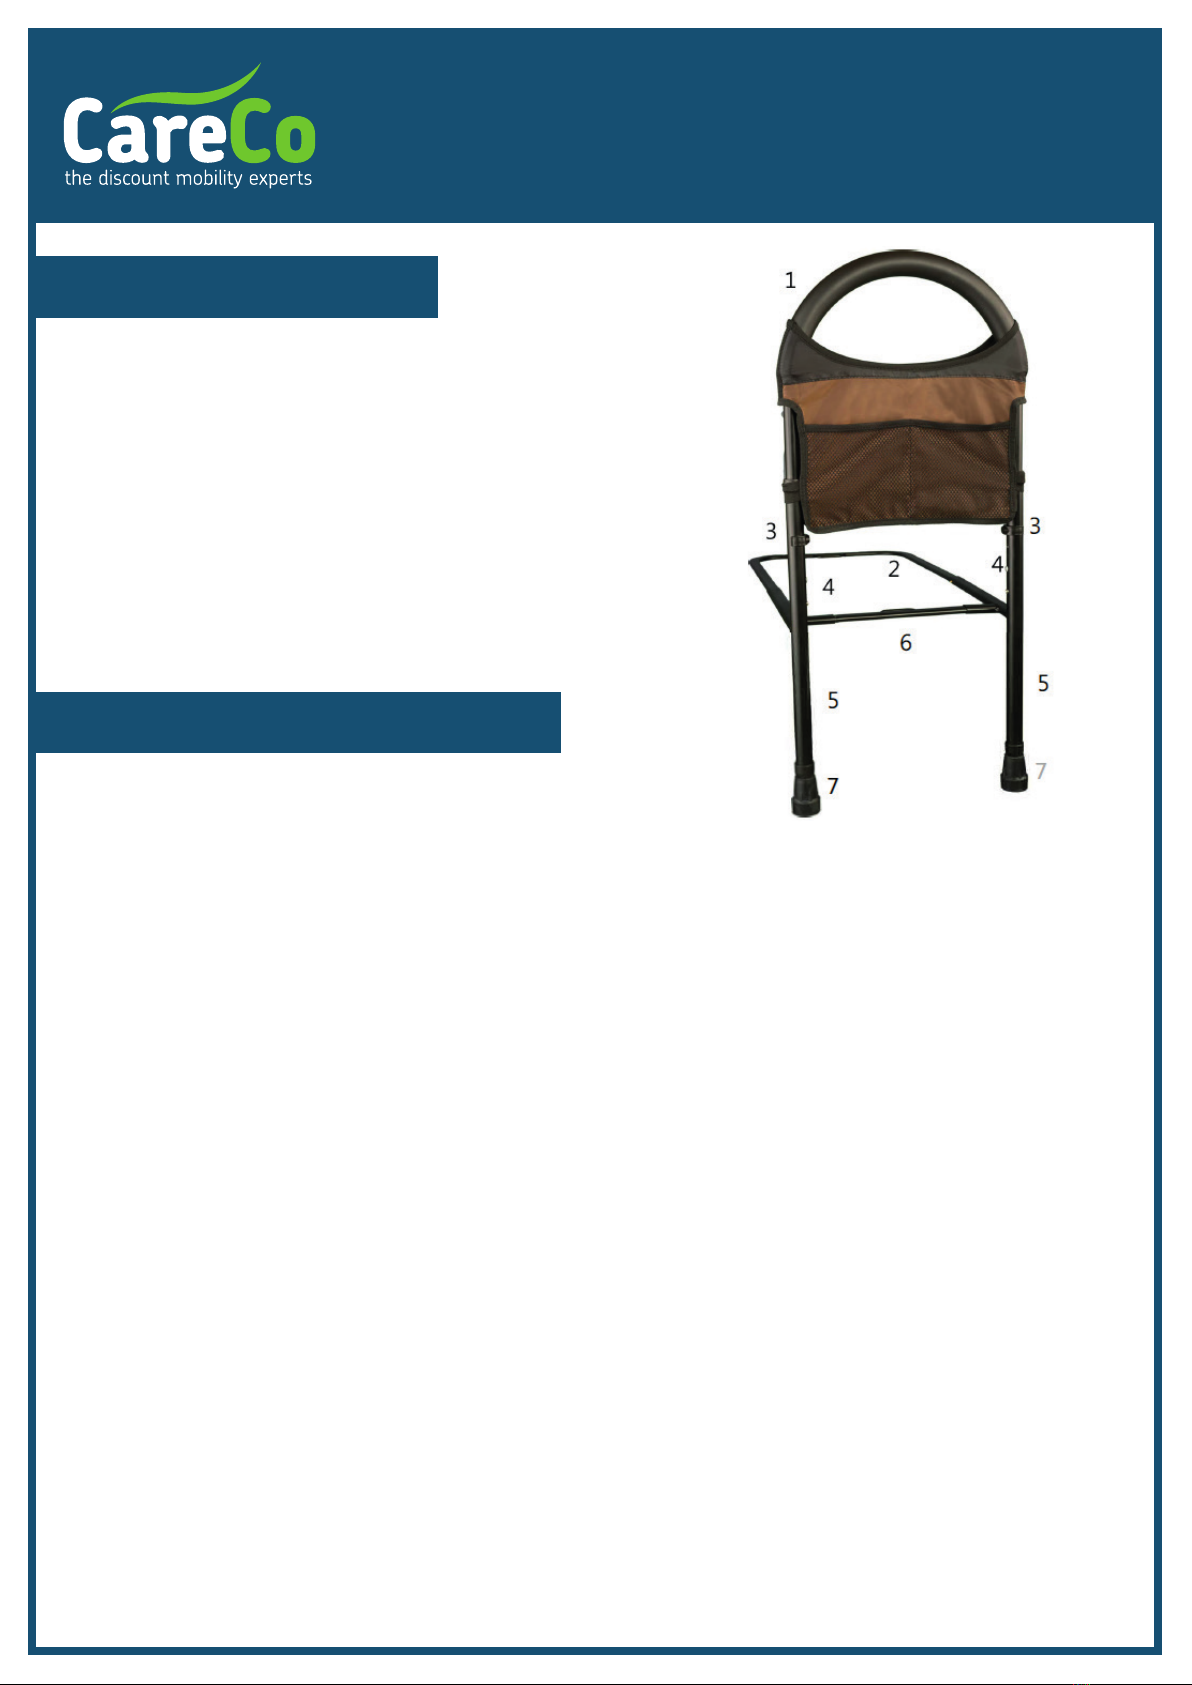
Product Parts:
1. Locate all items from the box and lay them out on the floor.
2. Locate the two main tube structures denoted by smaller bar
sections protruding out. The left side will have the protrusions at 3:00 and 12:00 if looking top
down. The right side will have the protrusions at 9:00 and 12:00 if looking top down.
3. Locate the transverse bar and their respective push pins. Insert to left side by lining up the push pins
to the small receiving tube. Push the pin, insert, and ensure an audible click is heard indicating the
push pin is in the locked position. Repeat on the right side.
4. Locate the padded hand-grip. This will be installed on the top portion of the main tube structure.
The top portion can be found by locating the two rivets found in the general mid-section of the
tube. The rivets should be positioned above the transverse bar. To install the padded hand-grip,
locate the push pins. Depress them, and slide the tube into the main tube structure. Ensure an
audible click is heard indicating the push pin is in the locked position. Repeat on the other side.
5. Locate each height-adjustable leg and insert into the main tube section. Locate the push pins.
Depress them, and slide the tube into the main tube structure. Ensure an audible click is heard
indicating the push pin is in the locked position. Repeat on the other side. To adjust the height of
the legs, depress the push pin, slightly twist the legs and slide the leg tube up or down until
desired height is achieved. Twist back and ensure an audible click is heard ensuring it is in the
locked position.
6. Locate the shaped hand-grip locking pin. Insert on the inside of the main tube structure.
They should be inserted in the receiving holes above the rivet.
7. Locate the horseshoe shaped bar. Insert into the receiving tube at the rear of the main tube
structure. Locate the push pins. Depress them, and slide the tube into the main tube structure.
Ensure an audible click is heard indicating the push pin is in the locked position. Repeat on the
other side.
8. Bed Installation: Fully insert the bed rail between the mattress and box spring of the bed.
The padded hand-grip should be 18” away from the head of the bed and 4” to 6” above the top
of the mattress.
1. Padded hand-grip
2. Horseshoe shaped bar
3. Padded hand-grip locking pin
4. Height adjust push pin
5. Main tube structure
6. Transverse bar
7. Height adjustable legs
Note: Always seek the advice of your doctor or primary care
giver in the safe use of the bed rail as it pertains to your
mobility needs.
Please find assembly diagram overleaf.
Warranty:
Your CareCo branded product is under warranty to be free from defects in material and workmanship
for one year from date of purchase. This warranty expresses our confidence in the workmanship and
materials used for our products.
In the event of a defect covered by this warranty, CareCo will, at our discretion, replace the product
or supply parts to remedy. This warranty does not cover device failure due to owner misuse or
negligence, or due to normal wear and tear. The warranty does not extend to non-durable parts which
are subject to normal wear and tear or/and require periodic replacement.
If you have any queries please contact CareCo.
CareCo, Hubert Road, Brentwood,
Essex CM14 4JE
www.careco.co.uk
Check all parts
1.
5.
2.
6.
3.
7.
4.
8.
Insert foam handle
Connect cross bar
to posts (x2)
Use E-clips (x2) to
secure handle and
adjust height
Add under-bed
support frame
Add mesh pouch
Insert legs (x2) so they
rest firmly on the ground
Secure safety strap by
looping around bed rail
and back through slot on
under bed frame
Assembly Diagram: