Carrier DLS VRF User manual

Manufacturer reserves the right to discontinue, or change at any time, specifications or designs without notice and without incurring obligations.
Catalog No. 20-40VM900010-01 Printed in U.S.A. Form 40VM-10SI Rev 1 Pg 1 10-20 Replaces: 40VM-10SI
Installation and Operating Instructions
Part Number 40VM900010
TABLE OF CONTENTS
Page
SAFETY CONSIDERATIONS.........................................1
GENERAL..........................................................................1
ACCESSORIES.................................................................2
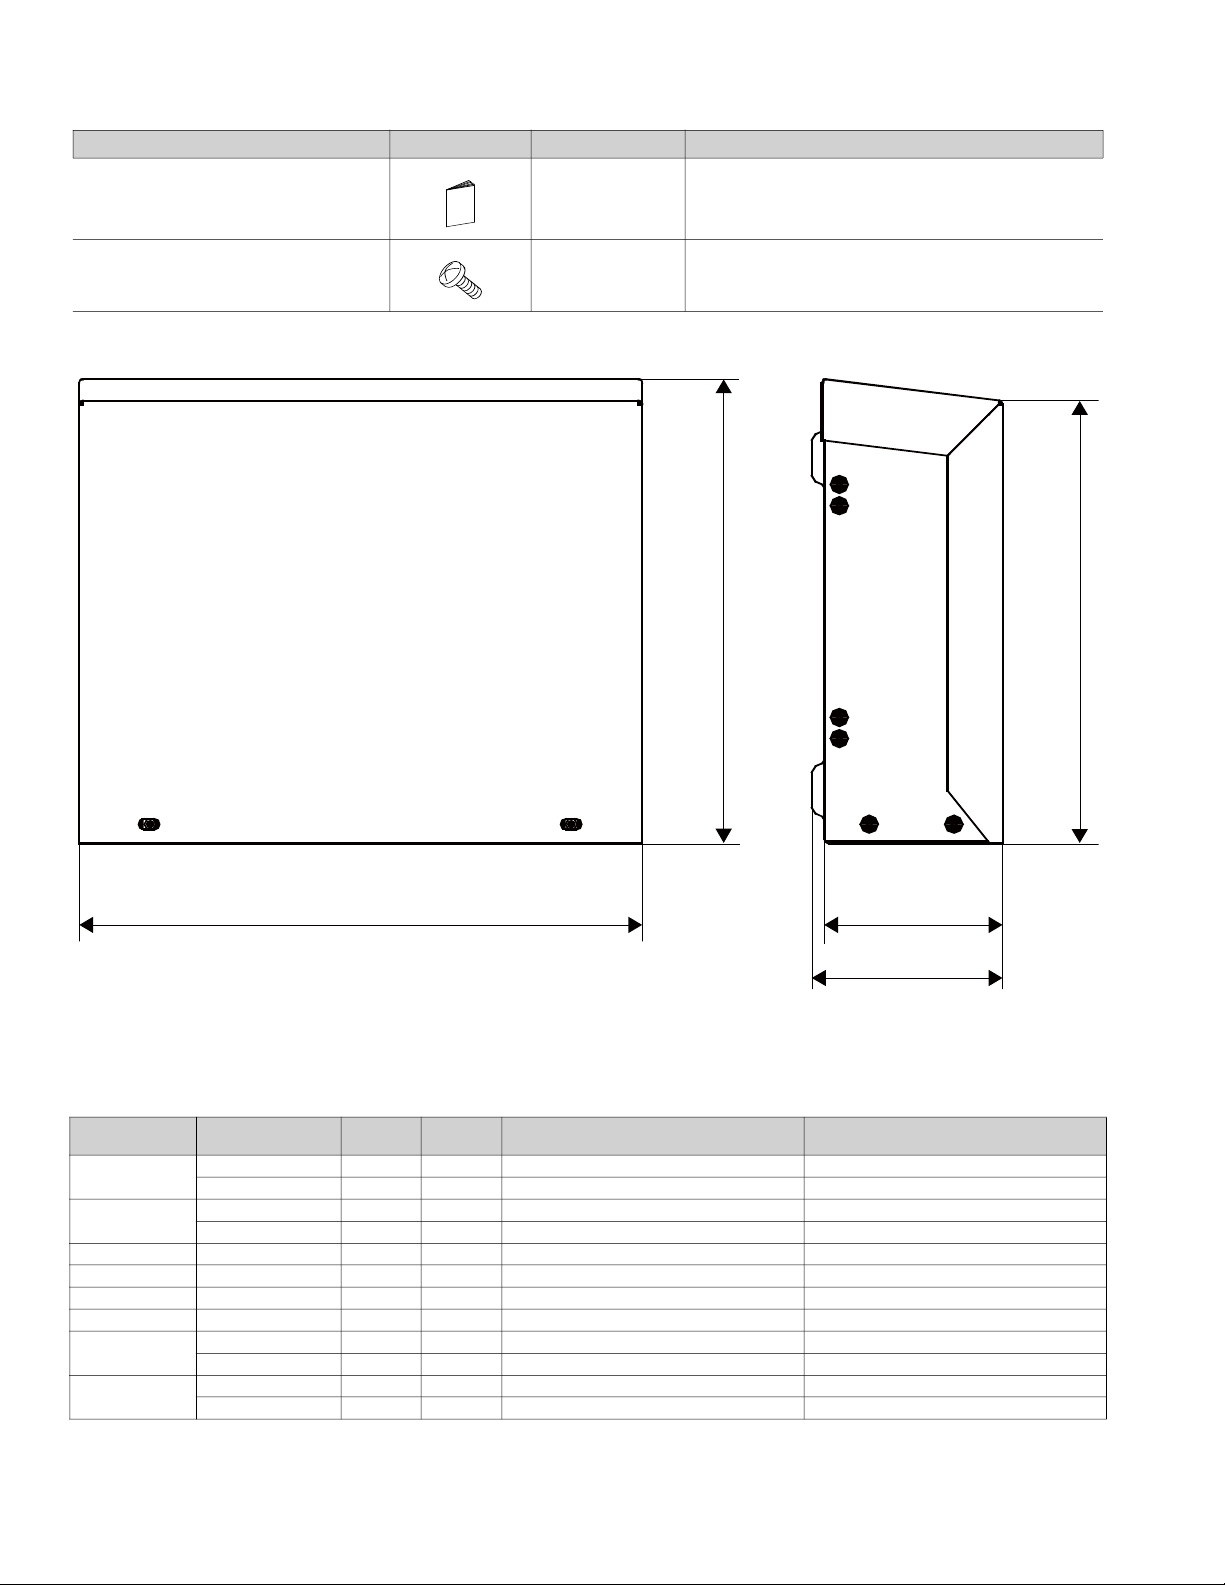
DIMENSIONS....................................................................2
DLS UNIT COMPATIBILITY.........................................2
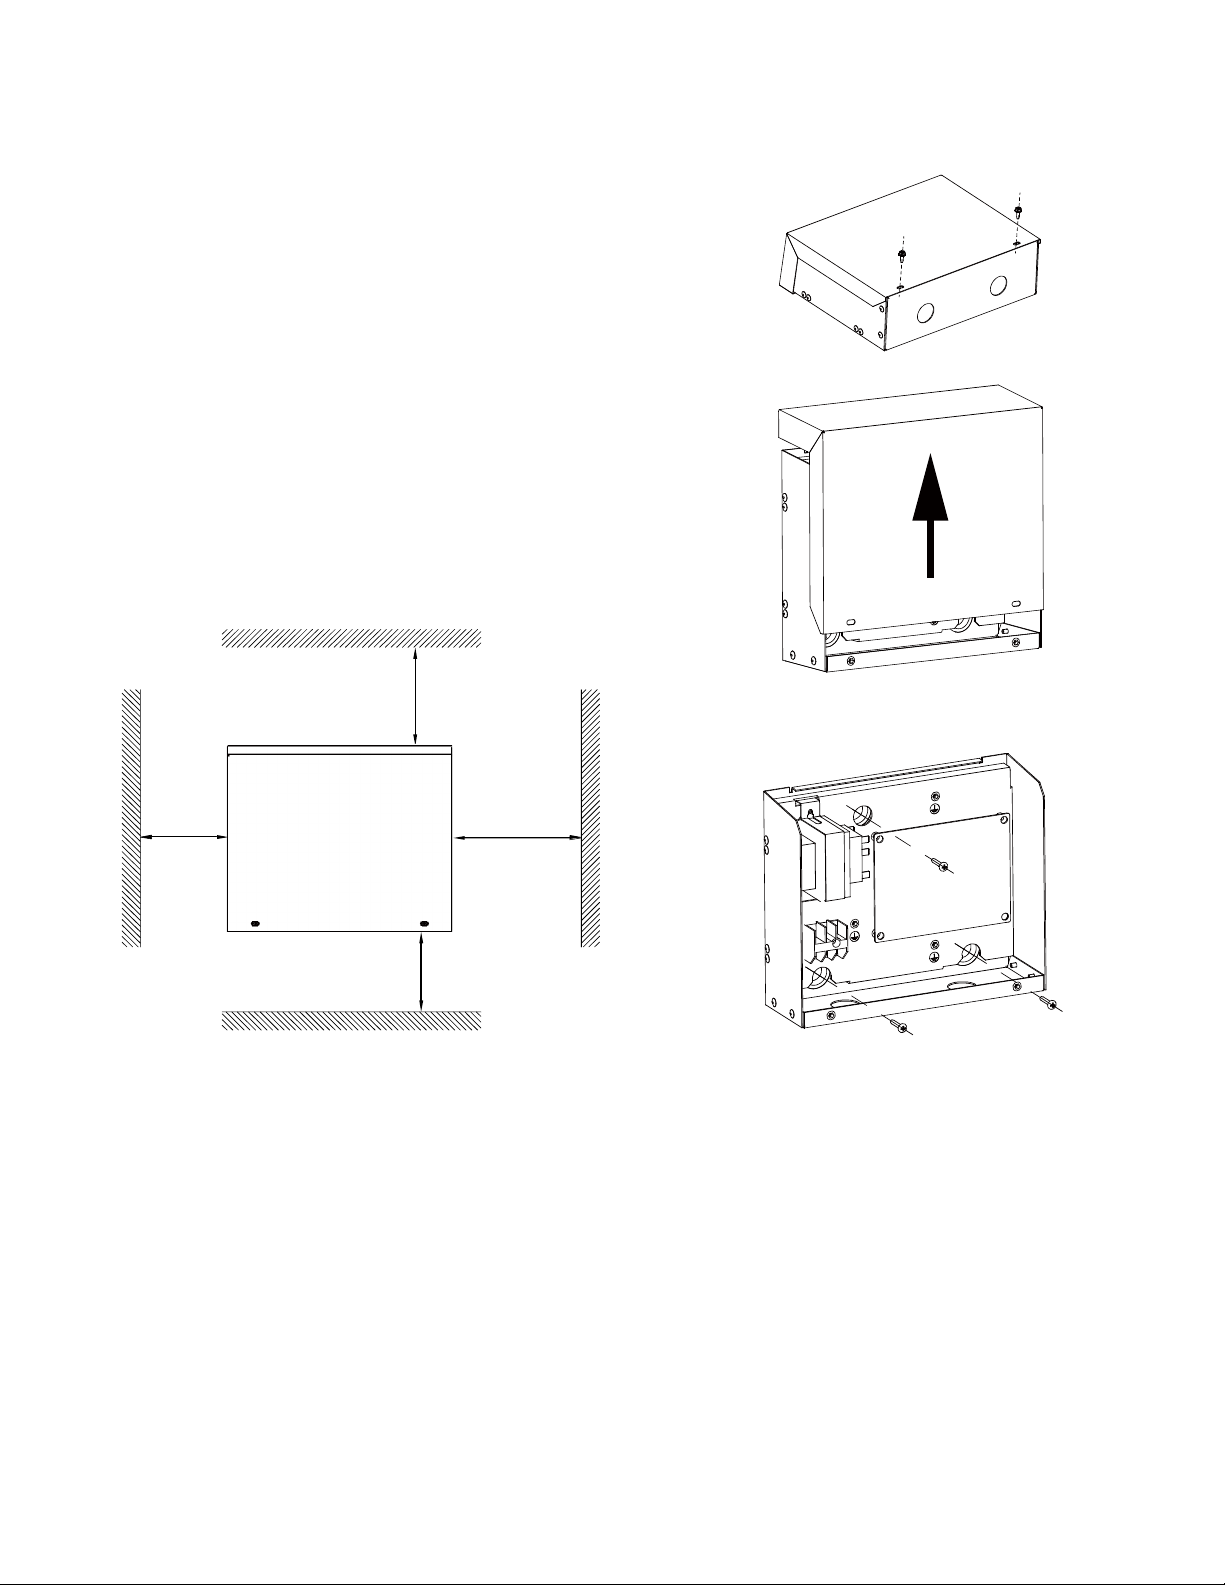
SELECTING INSTALLATION POSITION..................3
RECOMMENDED CLEARANCES................................3
INSTALLATION...............................................................3
Installation Method..........................................................3
WIRING DIAGRAM.........................................................4
POWER WIRING..............................................................5
COMMUNICATION WIRING........................................5
AUX HEAT SIGNAL INPUT............................................2
DIP SWITCH SETTINGS.................................................5
OPERATING INSTRUCTIONS......................................6
Step -1 – Getting Started..................................................6
Step – 2 – Discovering Ductless Indoor Unit...................6
Step – 3 – Configuring the Ductless Indoor Unit..............7
COMMON QUESTIONS..................................................8
SAFETY CONSIDERATIONS
Read and follow manufacturer instructions carefully. Follow all
local electrical codes during installation. All wiring must
conform to local and national electrical codes. Improper wiring
or installation may damage thermostat.
Understand the signal words — DANGER, WARNING, and
CAUTION. DANGER identifies the most serious hazards,
which will result in severe personal injury or death.
WARNING signifies hazards that could result in personal
injury or death. CAUTION is used to identify unsafe practices,
which would result in minor personal injury or product and
property damage.
Recognize safety information. This is the safety-alert symbol
( ). When this symbol is displayed on the unit and in
instructions or manuals, be alert to the potential for personal
injury. Installing, starting up, and servicing equipment can be
hazardous due to system pressure, electrical components, and
equipment location.
Note that changes or modifications of this product are not
expressly approved by the party responsible for compliance
and could void the user’s authority to operate the equipment.
NOTE: This equipment has been tested and found to comply
with the limits for a Class B digital device, pursuant to Part 15
of the FCC rules. these limits are designed to provide
reasonable protection against harmful interference in a
residential installation. This equipment generates, uses, and can
radiate radio frequency energy and, if not installed and used in
accordance with the instructions, may cause harmful
interference to radio communications. However, there is no
guarantee that interference will not occur in a particular
installation.
If this equipment does cause harmful interference to radio or
television reception, which can be determined by turning the
equipment off and on, the user is encouraged to try to correct
the interference by one or more of the following measures:
Reorient or relocate the receiving antenna.
Increase the separation between the equipment and the
receiver.
Connect the equipment into an outlet on a circuit different from
that to which the receiver is connected.
Consult dealer or an experienced radio/TV technician for help.
GENERAL
The DLS VRF Interface is a communication device that allows
you to connect ductless indoor units into VRF touch screen
central controller. Ductless indoor units, any style, will be
shown as high wall unit icon on the touch screen central
controller. Ductless indoor unit can be controlled using VRF
wired controller.
40VM900010 DLS VRF Interface
VRF (Variable Refrigerant Flow) System
Indoor Unit Interface

2
ACCESSORIES
Table 1 —40VMC Physical Data
DIMENSIONS
Fig. 1 —Dimensional Drawing
DLS UNIT COMPATIBILITY
Table 2 —Relevant DLS Units (Compatibility)
* Part number for the adapter board is 17222000A50275. Part number for the display board is 17222000A50275. Available on EPIC.
NAME OUTLINE QUANTITY FUNCTION
Installation and Owners Manual 1 As reference for installation and operation
Mounting Screw 3 For mounting the box
Model Number Sizes Voltage XYE Bus Requires Purchase of Adapter Board and
Display Board Compatible with DLS VRF Interface
40MHHC 12 115V Yes No Yes
12,18,24 230V Yes No Yes
40MHHQ 12 115V Yes No Yes
12,18,24 230V Yes No Yes
40MPHA 9,12,18,24 230V Yes No Yes
40MBAA 24,36,49 230V No No No
40MBCQ 9,12,18,24, 36,48 230V Yes No Yes
40MBDQ 9,12,18,58,24,36,48 230V Yes No Yes
40MBFQ 9,12 230V No No No
18,24, 36,48,58 230V Yes No Yes
40MAQ 9,12 115V No Yes* Yes
9,12,18,24,30,36 230V No Yes* Yes
10-1/2 3-5/16
3-7/16
8-3/4
8-1/4
NOTE: All Dimensions are in inches.

3
SELECTING INSTALLATION POSITION
Read this manual carefully before installing the interface
and keep the manual for future reference. The DLS VRF
Interface should be installed as close as possible to the
ductless indoor unit. Avoid installing DLS VRF Interface
near high voltage components and heat generating devices.
Follow the local code for wiring methods between DLS
unit, VRF touch screen central controller, and DLS VRF
Interface. Make sure the cover of DLS VRF Interface is
installed after wiring to avoid any moisture or dust
accumulation.
Do not install the controller in a place exposed to water or in
a condensing environment.
Do not install the device in a location where there is direct
sunlight or where the temperature may become greater than
118°F(48°C) or less than -4°F(-20°C).
This product is neither waterproof nor dust proof, so it can
only be installed indoors.
NOTE: The communication wire should be 2-core stranded
shielded 18 AWG cable.
RECOMMENDED CLEARANCES
Fig. 2 —Mounting Clearances
INSTALLATION
Installation Method
1. Use screwdriver to remove screw (2) of the box cover.
2. Slide and lift up the box cover as shown below.
3. Use the mounting screws (3) in the accessory bag to
mount the controller on the wall or solid surface as
shown below.
4. Follow the wiring instruction for power and
communication before installing cover back on the box.
min. 2 inches
min. 2 inches
6 inches or more
min. 2 inches

4
WIRING DIAGRAM
NOTES:
1. The address set through ENC1 and SW7 must be consistent with the address of connect in indoor unit.
2. The set temperature unit through SW2_1 must be consistent with central controller, wired controller, and indoor units.
Fig. 3 —Wiring Diagram
CN5
CN54
CN3 CN4 CN2
ENC2 ENC1 SW7
ON
12
ON
SW2
ON
12
ON
CN7
CN8
RED
RED
BLACK
BLACK Y/G
Y/G
CN1
CN6
L1 L2
To VRF
controller
To Touch
screen
controller
To Ductless
intdoor
unit
POWER INPUT
( Voltage range: 0-24V AC/DC)
( Current range: 0-1A)
Control port of
auxiliary heater etc.
X E Y X E Y HB HA
TRANSFORMER
TERMINAL
LED1
COM
Ÿ<
Ÿ& Ÿ5
Ÿ:
240V
24V
YELLOW
YELLOW
DEBUG

5
POWER WIRING
Fig. 4 —Power Input
COMMUNICATION WIRING
Type: 2-core stranded shielded cable
Diameter: AWG 18
Maximum wiring length:
• 3937 ft. between the ductless indoor unit and the DLS
VRF Interface
• 3280 ft. between the touchscreen central controller and
the DLS VRF Interface
• 820 ft. between the wire controller and DLS VRF
Interface
Fig. 5 —Communication Wiring
AUX HEAT SIGNAL INPUT
CN54 is the terminal for ON/OFF signal input for auxiliary
heat on DLS VRF Interface. The signal type is dry contact.
NOTE: Some of the indoor units do not support AUX heat
function.
Voltage and current must meet the requirements of Tables 3.
Table 3 —Max. Current and Voltage
DIP SWITCH SETTINGS
• ENC1/ENC2 are rotary dial whereas SW7 is ON/OFF.
• ENC2 is used to set the network address.
• Combination of ENC1 and SW7 allows you to set the
indoor unit address. See Table 4.
Example:
A system has 10 VRF indoor units and 2 DLS indoor units
with DLS VRF Interfaces. There is no automatic addressing
function for the DLS VRF Interface. If the VRF indoor units
are addressed 0-9, the DLS indoor units will be 10 and 11
following the settings in Table 4.
Table 4 —DIP Switch Settings
NOTE: The address assigned through ENC1 & SW7 must
be same as indoor unit address on wall controller.
Table 5 —SW2_1 and SW2_2 Definition
Table 6 —0/1 Definition of Each Dial Code Switch
NOTE: Temperature unit (°F or °C) set through SW2_1 must
be same as touch screen central controller and wall controller.
Table 7 —EF and E8 Error Codes
Table 8 —LED 1
Power
Phase 1-Phase
Volt and
Frequency 230V-60Hz
Fuse on board 5A/250VAC
Wire 2-core stranded shielded cable
18AWG
PORT MAX. VOLTAGE (V AC/DC) MAX. CURRENT (A)
CN54 24 1
Note:0
Touch Screen
Controller
(TSCC)
X E Y
CN2
HB HA
DLS VRF interface 1#
CN3 CN4
X E Y X E Y
VRF
controller
Ductless
Indoor
unit 1#
+$+%
X Y E
CN2
HB HA
DLS VRF interface M#
CN3 CN4
X E Y X E Y
VRF
controller
Ductless
Indoor
unit N#
+$+%
X Y E
<;
Matched
resistance
CN54
Control port of
auxiliary heater etc.
(Voltage range: 0-24V AC/DC)
(Current range: 0-1A)
ENC2 Set network address (0~7)
ENC1 and
SW7
Set IDU address, valid range is 0~15
Set IDU address, valid range is 16~31
Set IDU address, valid range is 32~47
Set IDU address, valid range is 48~63
SW2_1 0Temperature: °F (default)
1Temperature: °C
SW2_2 Reserved
ERROR CODE INSTRUCTIONS
EF IF TSCC or wired controller displays EF error code, you
need to check whether IDU appears fault or protection
E8 IF TSCC or wired controller displays E8 error code, you
need to check whether the IDU has a communication
problem with the interface
Blink 1time/1Hz Net address >7
Blink 2times/1Hz interface and IDU communication error
Blink 3times/1Hz interface and TSCC communication error
Blink 4times/1Hz interface and wired controller communication error
ON
SW1

6
OPERATING INSTRUCTIONS
Step -1 – Getting Started
1. Connect ductless indoor unit to touch screen central
controller using DLS VRF Interface as instructed in the
installation manual.
2. Turn on the power for ductless indoor unit.
3. Turn on the power for DLS VRF Interface.
4. Turn on the power for touch screen central controller.
5. Select you brand based as shown below in Fig. 6 and
press “Always” or “Just Once.”
Fig. 6 —Brand Selection
6. Login screen will appear as shown below in Fig. 7.
• Default login – superAdmin
• Default password – 66668888
7. Press login.
Fig. 7 —Login Screen
8. Home screen appears as shown below in Fig. 8.
Fig. 8 —Home Screen
Step – 2 – Discovering Ductless Indoor Unit
1. Press the “Install” icon on the bottom of the screen as
shown below in Fig. 9.
Fig. 9 —Install Icon
2. The Install screen will appear. Press “Auto Search” as
show below in Fig. 10.
Fig. 10 —Auto Search Function
3. The Auto search screen will appear as show below in
Fig. 11 looking for ductless indoor units and VRF
system on XYE communication bus. This might take
few seconds to discover all the units.
Fig. 11 —Auto Search Function in Process

7
4. Once the ductless indoor units and VRF systems are
found, they will appear on the screen as shown in Fig.
12 (example).
Fig. 12 —Auto Discover of Indoor Unit
5. Press Confirm to accept the search (Fig. 13).
Fig. 13 —Confirm the Search
Step – 3 – Configuring Ductless Indoor Unit
1. The ductless indoor unit model will always default to
“HWALL” as shown below in Fig. 14.
2. To change the name of the ductless indoor unit, press
HWALL. A pop up screen will appear with a different
style of indoor unit name. Select the appropriate name
as shown below in Fig. 14.
Fig. 14 —Indoor Unit Style Selection
3. Press on the unit name to change the name of indoor
unit. Edit screen will appear with a keyboard as shown
below in Fig. 15.
Fig. 15 —Renaming the Unit
4. To include indoor unit capacity, press on capacity box.
Edit screen will appear with a keyboard as shown
below in Fig. 16.
Fig. 16 —Editing Capacity
5. To go back to the Home screen by pressing the return
arrow at the bottom on the screen as shown below in
Fig. 17.
Fig. 17 —Return to Home Screen
6. The screen below (Fig. 18) shows the number of units
connected to the controller.
Fig. 18 —Home Screen Showing Number of Units
For other features and function on the Touch Screen Central
Controller, refer to the Touch Screen Central Controller
Installation Manual.

Manufacturer reserves the right to discontinue, or change at any time, specifications or designs without notice and without incurring obligations.
Catalog No. 20-40VM900010-01 Printed in U.S.A. Form 40VM-10SI Rev 1 Pg 8 10-20 Replaces: 40VM-10SI
© Carrier Corporation 2020
COMMON QUESTIONS
Q. How is the ductless indoor unit displayed on the touch
screen central controller?
A. The ductless unit will always appear as a high wall.
The icon cannot be changed to match the indoor unit
style (for example – cassette will appear as high wall).
However, you can change the name (for example
HWALL to CCAS).
Q. Is the DLS indoor unit controlled by the VRF or DLS
wall controller?
A. DLS indoor unit is controlled by the VRF wall
controller connected to HA/HB of the interface.
Q. What are the functions you can control through the
touch screen central controller for the DLS indoor unit?
A. The functions controlled through touch screen central
controller for the DLS indoor unit are:
• Set mode
• Set temperature
• Set airflow
• ON/OFF
• Set indoor unit address
• Set auxiliary heater
• Error codes
Q. What are the functions you can control through the
VRF wall controller for the DLS indoor unit?
A. The functions you can control through the VRF wall
controller for the DLS indoor unit are:
• Set mode
• Set temperature
• Set airflow
• ON/OFF
• Set indoor unit address
• Set auxiliary heater
• Error codes
Q. If there is a multi-zone system with (3) indoor units
serving (3) different zones / rooms, do I need (3)
separate DLS VRF Interface?
A. Yes, you need (3) separate DLS VRF Interfaces for each
DLS indoor unit.
Q. If there is a multi-zone system with (3) indoor units
serving the same zones / rooms, can I implement group
control option?
A. No, group control is NOT an option. All the DLS indoor
units will need separate DLS VRF Interfaces.
Q. Instead of the touch screen central controller, can I tie
the DLS VRF Interface to the BACnet Interface?
A. No, the DLS VRF Interface will not work with the
BACnet Interface.
Q. How many DLS VRF Interfaces I can connect to the
touch screen central controller?
A. You can connect up to a total of (48) DLS VRF
Interfaces to touch screen central controller, (8) DLS
VRF Interface per communication channel.
Q. Does the DLS VRF Interface need network address?
A. Yes, each DLS VRF Interface would need network
address. The address should be between 0 to 7 and
unique. Similar to addressing ODU / system on the
VRF side.
Q. Does the DLS indoor unit need a unique ID?
A. Yes, each DLS indoor unit will need a unique ID. The
address on the wall controller as well as the touch
screen controller should match; otherwise an error will
be displayed on the controller.
Q. Is a network resistor needed when the DLS VRF
Interface is used?
A. Yes, the 120 Ohm network resistor should be connected
to the XYE bus of the last DLS VRF Interface in the
system. If there are VRF heat pump units in the system,
connect one network resistor to the PQE bus of the last
indoor unit as normal and another resistor to the XYE
bus of the last DLS VRF interface.
This manual suits for next models
1
Table of contents
Other Carrier Recording Equipment manuals

Carrier
Carrier System Touch Assembly instructions

Carrier
Carrier KSAIF0401AAA User manual

Carrier
Carrier System Touch Assembly instructions

Carrier
Carrier 30RBV User manual

Carrier
Carrier Fireye NXTSD507HD Owner's manual

Carrier
Carrier CSM Operating instructions

Carrier
Carrier KSAIF0101AAA User manual

Carrier
Carrier KSAIC0301230 User manual

Carrier
Carrier KSAIC0301230 User manual

Carrier
Carrier i-Vu XT Installation manual