Casio CW-50 - Disc Title Printer Color Thermal... User manual

E
Application Version 3.0
For Windows®
User’s Guide
•We recommend that you use this product for printing on blank,
unrecorded CD-R discs and other media.
•Printing on CD-R discs and other media that already has data
recorded on it may cause the data to become corrupted.
•Note that CASIO COMPUTER CO., LTD. shall not be held liable
for any loss or corruption of data recorded on CD-R discs and
other media arising through the use of this product.
Be sure to read the Safety Precautions contained in this manual before
trying to use for the first time, and always keep this manual on hand for
future reference.

GUIDELINES LAID DOWN BY FCC RULES FOR USE OF THE
UNIT IN THE U.S.A. (not applicable to other areas).
NOTICE
This equipment has been tested and found to comply with the limits for a Class B digital
device, pursuant to Part 15 of the FCC Rules. These limits are designed to provide
reasonable protection against harmful interference in a residential installation. This
equipment generates, uses and can radiate radio frequency energy and, if not installed
and used in accordance with the instructions, may cause harmful interference to radio
communications. However, there is no guarantee that interference will not occur in a
particular installation. If this equipment does cause harmful interference to radio or
television reception, which can be determined by turning the equipment off and on, the
user is encouraged to try to correct the interference by one or more of the following
measures:
•Reorient or relocate the receiving antenna.
•Increase the separation between the equipment and receiver.
•Connect the equipment into an outlet on a circuit different from that to which the
receiver is connected.
•Consult the dealer or an experienced radio/TV technician for help.
Caution: Changes or modification to the product not expressly approved by CASIO
could void the user’s authority to operate the product.
FCC WARNING
Changes or modifications not expressly approved by the party responsible for
compliance could void the user’s authority to operate the equipment.
Proper connectors must be used for connection to host computer and/or
peripherals in order to meet FCC emission limits.
Cable specified for PC Windows®compatible PC to CW-50
Declaration of Conformity
Model Number: CW-50
Trade Name: CASIO COMPUTER CO., LTD.
Responsible party: CASIO, INC.
Address: 570 MT.PLEASANT AVENUE, DOVER, NEW JERSEY 07801
Telephone number: 201-361-5400
This device complies with Part 15 of the FCC Rules. Operation is subject to the
following two conditions: (1) This device may not cause harmful interference,
and (2) this device must accept any interference received, including interference
that may cause undesired operation.

1
Important!
The copyright of this User’s Guide and all rights related to the software shall
revert to CASIO COMPUTER CO., LTD.
•Microsoft, Windows, Windows Media and Windows NT are registered
trademarks or trademarks of Microsoft Corporation in the United States and
other countries.
•Pentium is a registered trademark of Intel Corporation in the United States.
•Macintosh, Mac OS and TrueType are registered trademarks of Apple
Computer, Inc. in the United States and other countries.
•Easy CD Creator is a trademark of Roxio, Inc. in the United States.
•Other company and product names used herein may also be company and
product names of others.
© Copyright 2002 CASIO COMPUTER CO., LTD. All rights reserved
•Be sure to read this manual carefully before attempting to use the product for
the first time.
Read This First!
•CASIO COMPUTER CO., LTD. shall not be held liable for any loss or
claims by you or any other person or entity that may arise through the use
of this product.
•Reproduction of this manual in any form, either in part or its entirety, is
forbidden without the express permission of CASIO COMPUTER CO.,
LTD. You are granted permission to use this software for your own personal
use. Any and all other use of this software without the express permission
of CASIO COMPUTER CO., LTD. is forbidden under international copyright
laws.
•The contents of the manual are subject to change without notice.
•Due to the time required for printing on paper, contents of the manual may
be outdated by the version of software supplied to you. Because of this,
the software and the contents of the displays it produces may be different
from those described in this manual, or some items described in this
manual may no longer be available.
•The DISC TITLE PRINTER application is an application designed to
run under Windows 98, 98SE, Me, 2000 Professional, or XP.
•The application may not be able to run correctly on certain system
hardware and software configurations.
•See page 15 for information about minimum computer system
requirements.

2
Safety Precautions
Thank you for purchasing this quality CASIO product. Before using it, be sure
to read the following Safety Precautions. Keep the manual in a convenient
location for future reference when necessary.
Warning
This symbol indicates information that, if ignored or applied incorrectly,
creates the possibility of death or serious personal injury.
Caution
This symbol indicates information that, if ignored or applied incorrectly,
creates the possibility of personal injury or material damage.
Examples of graphic markings
indicates something you should not do. The symbol shown here
indicates you should not try to take the unit apart.
indicates something you should do. The symbol shown here
indicates you should unplug the unit from the wall outlet.
Warning
Smoke, abnormal odor, overheating, and other
abnormalities
Continued use of the product while it is emitting smoke or strange
odor, or overheating creates the risk of fire and electric shock.
Immediately perform the following steps whenever any of the
above symptoms are present.
1. Disconnect the USB cable.
2. Unplug the power cord from the wall outlet.
3. Contact your original retailer.
Power cord, AC adaptor, USB cable
Misuse of the power cord, AC adaptor, or USB cable creates the
risk of fire and electric shock.
Make sure you follow the precautions listed below.
•Use only items that come bundled with the product.
•Use only a power source whose output matches the rating
marked on the plate on the back of the product.
•Never plug the power cord into a wall outlet that is shared by
other devices, or into a shared extension cord.
Power cord, AC adaptor, USB cable
Misuse of the power cord, AC adaptor, or USB cable can damage
it and create the risk of fire and electric shock. Make sure you
follow the precautions listed below.
•Never place heavy objects on these items or subject them to
direct heat.
•Never modify these items or subject them to bending.
•Do not subject these items to twisting or pulling.
•Should the power cord, AC adaptor, or USB cable or its plug
ever become damaged, contact your original retailer.

3
Warning
Do not incinerate.
Never dispose of the product by incineration. Doing so creates
the risk of fire and personal injury due to explosion.
Plastic bag precaution
Never place the plastic bags in which the product comes packed
over your head. Doing so creates the risk of suffocation.
Particular care is required in households where young children
are present.
Caution
Power cord, AC adaptor, USB cable
Misuse of the power cord, AC adaptor, or USB cable can damage
it and create the risk of fire and electric shock. Make sure you
follow the precautions listed below.
•Never locate these items near a stove or other source of
intense heat.
•When unplugging the power cord and USB cable, be sure to
grasp the plug. Never pull on the cord or cable.
•Plug in the power cord into the wall outlet as far as it will go.
•Plug in the USB cable into the computer and the printer as far
as it will go.
•Before leaving the product unattended for long periods (such
as when you go on a trip), unplug the power cord and USB
cable.
•At least once a year, clean away any dust built up in the area
around the prongs of the power cord’s plug.
Warning
Power cord, AC adaptor, USB cable
Never touch the power cord, AC adaptor, or USB cable or its
plugs while your hands are wet.
Doing so creates the risk of electric shock.
Dropping and rough treatment
Continued use of the product after it has been damaged due to
dropping or other rough treatment creates the risk of fire and
electric shock. Immediately perform the following steps if the
product should ever become damaged.
1. Disconnect the USB cable.
2. Unplug the power cord from the wall outlet.
3. Contact your original retailer.
Do not disassemble or modify the product.
Never try to take the product apart or modify it in any way. Doing
so creates the risk of electric shock, burn injury, or other personal
injury.
Leave all internal inspection, maintenance, and repair up to your
original retailer.
Water and foreign objects
Water, liquids, or foreign objects (especially metal) getting inside
the product creates the risk of fire and electric shock. Immediately
perform the following steps if liquid or a foreign object should
ever get inside the product.
1. Disconnect the USB cable.
2. Unplug the power cord from the wall outlet.
3. Contact your original retailer.

4
Caution
Keep heavy objects off.
Never place a heavy object on top of the product. Doing so can
cause the object to lose balance and fall, creating the risk of
personal injury.
Location
Avoid the locations listed below for the product. Such locations
create the risk of fire and electric shock.
•Areas subject to high humidity and large amounts of dust
•Food preparation areas or other location subjected to oil steam
•Near heaters, on a heated carpet, in direct sunlight, in a closed
vehicle parked in the sun, and other areas subjected to high
heat.
Avoid unstable surfaces.
Never place the product on an unstable table, desk, etc. Doing
so can cause the product to fall, creating the risk of personal
injury.
Connection precaution
Connect only items that come bundled with the product to its
connectors. Connecting a non-bundled item creates the risk of
fire and electric shock.
High temperature precaution
Never touch the print head or other metal objects near the head.
These items become very hot, and touching them creates the
risk of burn injury.
Operating Precautions
Observe the following precautions to ensure that the printer provides you with
the years of trouble-free operation for which it is designed.
•Avoid use in areas subjected to direct sunlight, high humidity, and temperature
extremes.
Operating Temperature Range: 10°C to 35°C (50°F to 95°F)
•Never allow paper clips, pins, or other similar objects to get inside the printer
mechanism.
•Never place objects on top of the printer.
•Never try to take the printer apart. Doing so can lead to malfunction.
•Never drop the product, tip it over, or subject it to strong impact.
•Never touch the print head.
•Never use excessive force when pulling the disc tray. The disc tray will not
open unless the power cord, AC adaptor, and USB cable are connected to
the printer.

5
Contents
Safety Precautions ................................................................ 2
Operating Precautions .......................................................... 4
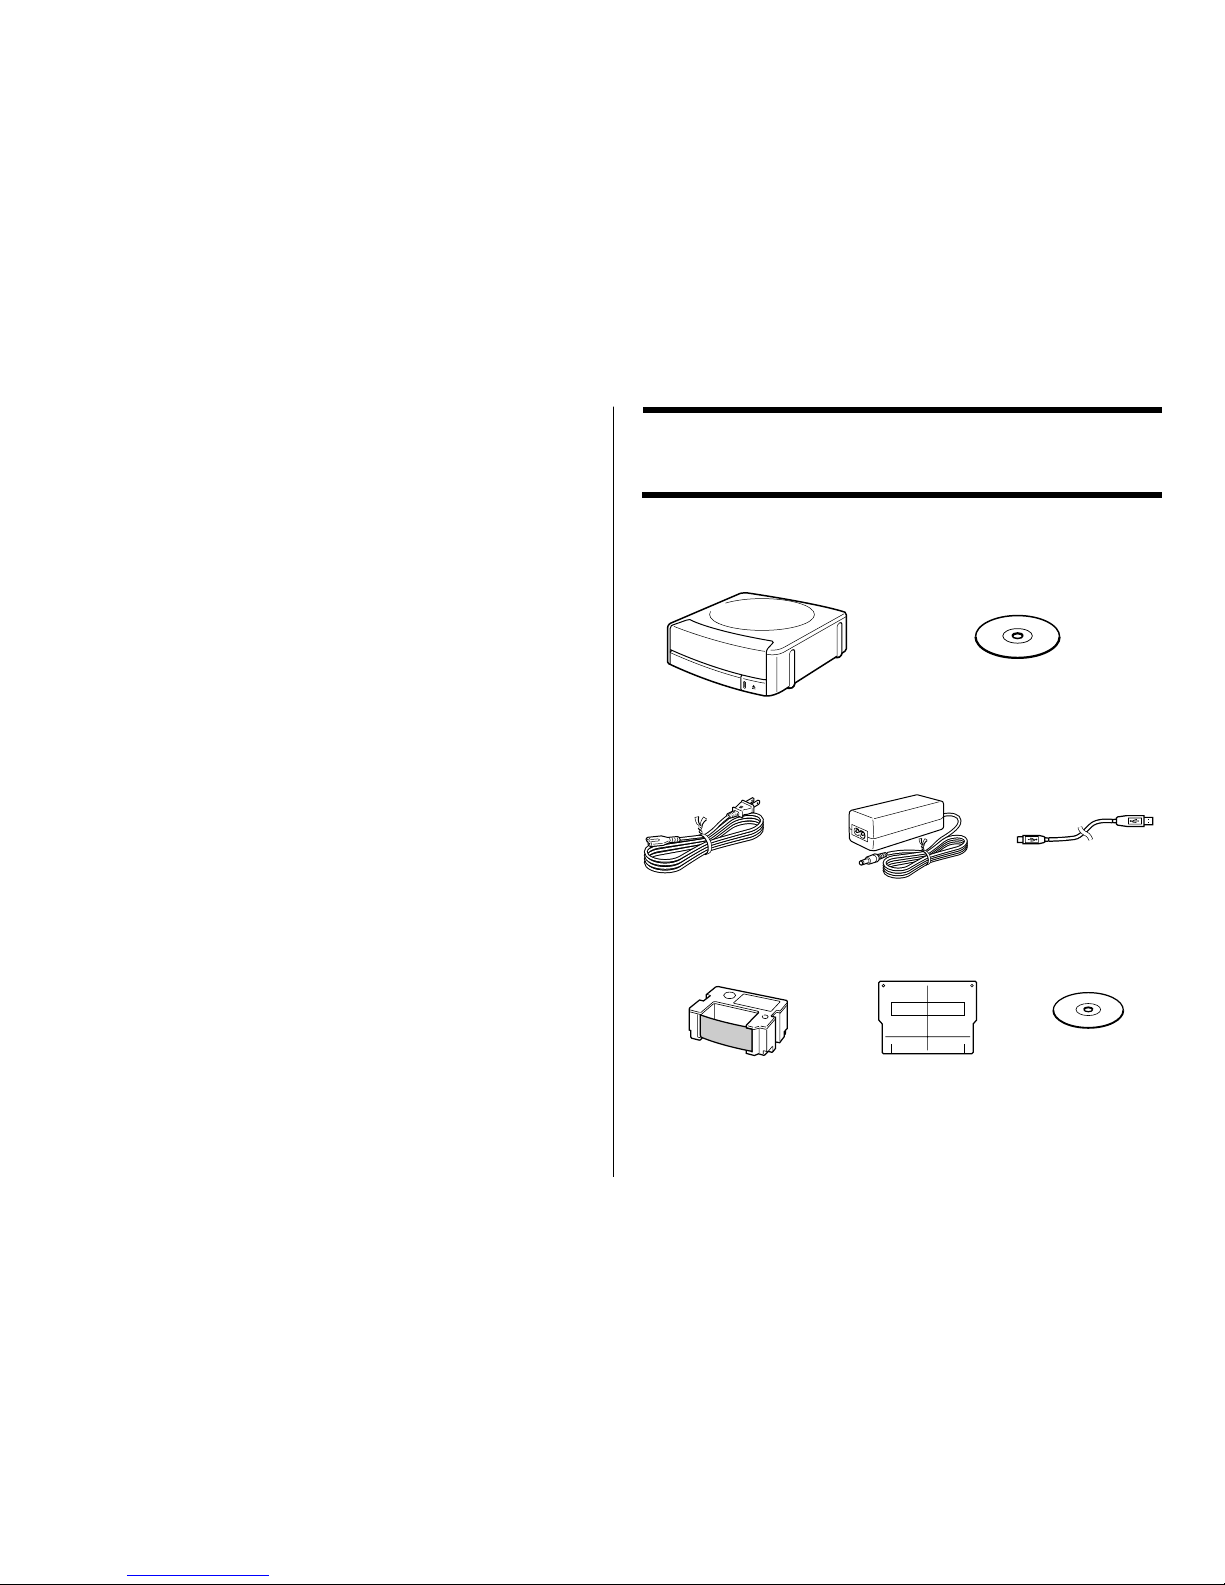
Unpacking the Printer ........................................................... 6
About the Bundled CD-ROM and CD-R ............................... 7
Using this Manual ................................................................. 7
Button Operations ............................................................. 8
How to use this Manual ........................................................ 9
CW-50 Printer Features ...................................................... 10
General Guide...................................................................... 14
Using the DISC TITLE PRINTER Application .................... 15
Your Computer and Minimum System Requirements ..... 15
Installing the DISC TITLE PRINTER Application .............. 16
To install the application .................................................. 16
To uninstall the application .............................................. 18
Connecting to a Power Source and a PC ......................... 19
To connect to a power source and a PC ......................... 19
To disconnect from a power source and a PC ................ 20
Loading and Removing the Ink Ribbon Cassette ............ 21
To load the Ink ribbon cassette into the printer ............... 21
To replace the ink ribbon cassette .................................. 24
Label Making Overview
Label Creation Basics......................................................... 25
To create a label .............................................................. 25
To print a label ................................................................. 29
To save label data ........................................................... 30
To quit the DISC TITLE PRINTER application ................ 30
Label Making with Preset Templates
Automated Label Layout .................................................... 31
Using the Assistant Feature .............................................. 33
Using the Assistant screen ............................................. 33
Using the Main Window ...................................................... 34
Importing Text Data ............................................................. 36
Importing CD-Text Data for a Music Label ...................... 36
Importing Media Player Data for a Music Label .............. 37
Importing Easy CD Creator Data for a Music Label ........ 39
Importing File and Folder Name
for a Data Label or Digital Image Label ........................... 40
Useful Text Input Functions ............................................... 42
Saving Label Data ............................................................... 43
Opening a Label Data File .................................................. 44
Creating a Data Index File .................................................. 44
Configuring Layout Settings .............................................. 45
To configure layout settings ............................................ 45
Configuring Text Layout Settings .................................... 47
Configuring Font Settings .................................................. 48
Inserting an Image into a Label ......................................... 50
To input an image from a file ........................................... 50
Capturing a PC Screen Image ........................................ 50
Controlling the Aspect Ratio of an Image ....................... 52
About color images ......................................................... 53
Original Label Making
Creating an Original Label Layout ..................................... 54
Free Text Label Template Main Window .......................... 55
Free Design Label Template Main Window ..................... 55
Free Design and Free Text Template Main Windows ...... 56
Toolbars........................................................................... 56

6
Unpacking the Printer
Make sure that all of the items shown below are present as you unpack the
printer. If anything is missing, contact your original retailer.
CW-50 DISC TITLE PRINTER DISC TITLE PRINTER
Application
CD-ROM
Power cord
AC adaptor
AD-2105S
USB cable
(1.8 meters)
(5.9 feet)
Ink ribbon cassette
(black)
TR-18BK
Positioning guide 1 blank CD-R disc
Configuring Font Settings
(Free Text Template, Free Design Template) ..................... 58
Inserting a Label Background Image
(Free Text Layout) ................................................................ 59
Fields (Free Design Templete) ........................................... 60
Field Types ...................................................................... 60
Common Text Field and Image Field Operations ............ 60
Inputting Text into a Text Field (Free Design Templete) ... 61
To input text manually ..................................................... 61
To input text imported from a file ..................................... 61
To configure font settings for the text in a field ................ 62
To delete a text field ........................................................ 62
Inserting an Image into a Label
(Free Design Templete) ....................................................... 62
To insert an image into a label ........................................ 62
To delete an image field .................................................. 62
Resizing a Field (Free Design Template) ........................... 63
Aligning and Resizing Fields (Free Design Template) ..... 63
To align fields .................................................................. 64
Configuring Field Properties (Free Design Template) ..... 65
To reposition and resize a field ........................................ 65
Useful Text Input Functions
(Free Text Template, Free Design Template) ..................... 66
Printing a Label ................................................................... 67
To print a label ................................................................. 67
Configuring Advanced Settings ........................................ 70
To configure advanced print settings ............................... 70
Registering and Deleting a Phrase Memory Entry .......... 70
To configure advanced layout settings ............................ 71
Using Help ........................................................................... 72
To use Help ..................................................................... 72
Caring for the Printer .......................................................... 73
Phrase Library List ............................................................. 74
Troubleshooting .................................................................. 74
Error Messages ................................................................... 76
Specifications ...................................................................... 77

7
About the Bundled CD-ROM and CD-R
Handling Precautions
•Handle the disc to avoid finger smudges, dirt, scratches, etc. on either of its
surfaces.
•Should the disc become dirty, use an eyeglass cleaning cloth or some other
soft dry cloth to wipe it lightly from the center of the disc outwards towards
its edge. Never use phonograph record cleaner or any other cleaning agent.
•Never write on either of the disc’s surfaces with a pen or pencil or other
sharp writing utensils, or affix a sticker to the disc surfaces.
•Use of a disc that is cracked or deformed, or a disc that has adhesive on it
is dangerous. Never use such a disc.
Storage Precautions
•Avoid storing discs in areas subjected to high temperature, high humidity, or
direct sunlight.
•When you are not using a disc, store it in its original case.
•Avoid storing a disc so its label comes in direct contact with the surface of a
vinyl case, bag, etc.
Warning!
Never play a CD-ROM disc on any device that is not specifically designed to
play back CD-ROM discs. Audio output at a high volume setting creates the
risk of damaged hearing and damage to audio speakers.
Using this Manual
This User’s Guide explains operation of the CW-50 printer and the DISC TITLE
PRINTER application, which is designed to run under Windows® 98, 98SE,
Me, 2000 Professional, or XP (referred to in this manual collectively as
“Windows”).
Note that this User’s Guide does not contain information about using Windows,
and assumes that you are already familiar with the following standard Windows
operations.
•Mouse operations such as click, double-click, right-click, drag, drag and
drop, etc.
•Menu operations using the mouse
•Text input using the keyboard
•Standard Windows window operations
If you are not already familiar with these and other basic Windows operations,
see the user documentation that came with your PC or Windows package.
Using the Assistant Feature
The DISC TITLE PRINTER application has an Assistant feature that
guides you step-by-step through certain operations. (See page 33.)
Help
You can access information about procedures and precautions using the
DISC TITLE PRINTER application’s Help feature. (See page 72.)

8
Button Operations
All operations in this manual are performed using the mouse.
•Command operations are indicated as shown below.
1. Click the button.
2. On the menu that appears, click New.
•Dialog box button operations are indicated as shown below.
3. Click Save.
•All of the sample screens in this manual show operation under
Windows XP. Screens will be different when running the application
under another operating system.
•Note that the screen images shown in this manual may differ somewhat
from those that actually appear on your computer screen.
1.
2.
3.

9
How to use this Manual
•This section takes you through the basic label creation and printing process, using a
music CD label as an example.
The sections of this manual are arranged as shown below.
Refer to the indicated pages for details.
Getting Ready
•Unpacking (page 6)
•Installing the Software (page 16)
•Connecting to Your PC (page 19)
•Removing the Packing
Materials/Loading the Ink
Ribbon Cassette (page 21)
Label Making
with Preset Templates
Automated Label Layout (page 31)
•This section describes how to create
labels quickly and easily using preset
templates.
•You can select a music label, data label,
or digital image label template.
Creating an Original Label Layout
(page 54)
•This section describes how to layout text
and images to create exactly the type of
look you want.
•A Free Text label template gives you wide
ranging control over text you input into a
label.
•A Free Design label template provides
you with maximum freedom when
creating your label design.
Original Label Making
This section explains how to print a completed label.
•Simply place the CD-R onto the tray as instructed by the message that appears on the screen.
•This section also provides details about other settings.
Printing and Other Operations (page 67)
Troubleshooting Guide
(page 74)
•Check this section whenever you run into
problems.
•Here you will find details about online help
and error messages.
Label Making Overview (page 25)

10
Your CW-50 Printer lets you quickly and easily print labels on a CD-R, CD-RW, and other types of discs.
You can also import track names from
Windows Media
TM
Player, or Easy CD
Creator, or you can import CD-Text from a
CD (page 36).
•Screen shots shown in this manual are
based on Media Player for Windows
XP.
•Music Discs
Labels can include artist names and track titles (page 31).
CW-50 Printer Features

11
This printer and its software do not include functions for recording to a CD-R, CD-RW or other types of discs.
•Data Discs
You can import the names of folders and files
you plan to store on a disc and print them on
its label. You can also type in information
manually (pages 31 and 40).
•Digital Image Discs
You can import recording dates and image
descriptions from your PC and print them on
the label. You can also type in information
manually (pages 31 and 40).
Important!
Business report.xls
Holiday work.xls
New employees research data.doc
Weekly meeting summary.doc
New order.xls
Counter error data.doc

12
•Print with TrueType
®
fonts installed on your PC
(page 48).
•Support for both text and images (page 50).
Note that images are printed in monochrome.
•
A collection of preset templates lets you
produce great looking labels with minimum
effort.
CW-50 Printer Features

13
•A Free Text Template allows more control over the
appearance and layout of text (Free Text →page
54).
•A Free Design template gives you almost total
freedom for laying out text and images to create
exactly the look you want (Free Design →page
54).

14
General Guide
Front Back
Front cover
Open this cover to
load or remove the ink
ribbon cassette.
Indicator lamp
•Lights when the printer is connected
correctly to a PC.
•Flashes when printing is in progress.
Print head
Disc tray
Eject button
Press to open the disc tray.
Carriage
Disc positioning guides
These guides help to position the disc
correctly when you place it onto the tray.
AC adaptor terminal
Connect the bundled AC
adaptor here.
If the disc tray will not open due to
printer malfunction, you can open
it manually by inserting a thin,
pointed object (at least 20 mm
long, and less than 1.5 mm thick)
into this hole.
Use this hole to manually open the
disc tray only when absolutely
necessary. Do not use it normally
to open the tray.
* Do not use an object with an
easily breakable tip. Doing so
creates the risk of malfunction.
USB port
Connect the bundled USB
cable here when connecting to
your PC.
Do this first!
The front parts of the printer are secured
with tape to protect them during
shipment. Make sure you remove the
tape before using the printer for the first
time.

15
Using the DISC TITLE PRINTER Application
This section describes the computer system required to run the DISC TITLE
PRINTER application.
Your Computer and Minimum System Requirements
PC
The following shows an example of a computer that meets the minimum
requirements to run the application. Check to make sure that your computer
has a similar configuration.
The locations of the various ports may be different on your computer.
Minimum System Requirements
OS: Microsoft® Windows® 98, 98SE, Me, 2000 Professional, or XP
PC: IBM PC/AT with the following specifications.
•Windows 98, 98SE, Me, 2000 Professional, or XP pre-installed
•Pentium®II 266MHz or higher CPU or CPU recommended for running the
OS you are using.
•USB port
Memory: 64MB minimum (128MB minimum recommended)
Hard disk: At least 40MB available for installation of this application, at least
60MB available for running the application.
Display: Color display (256 colors minimum, High-Color recommended),
compatible with Windows 98, 98SE, Me, 2000 Professional, or XP,
and capable of being connected to your computer.
Resolution: 800 ×600 or higher
Pointing device: Mouse or other equivalent device compatible with Windows
98, 98SE, Me, 2000 Professional, or XP
Keyboard
CD drive
•The application may not run correctly on certain system hardware and
software configurations.
•Operation under Windows 3.1, 95, and NT®, on a Macintosh®, and under
Mac® OS is not supported.
•Operation of this application is not guaranteed on a computer upgraded to
Windows 98, 98SE, Me, 2000 Professional, or XP from another OS.
Computer
With a display adaptor
that supports at least
256 colors.
CD drive
Color display
Capable of displaying
at least 256 colors.
Hard disk
Keyboard
Mouse
USB port
USB port

16
Installing the DISC TITLE PRINTER Application
This section describes the steps you need to perform to install the DISC TITLE
PRINTER application.
Important!
•Be sure to install the DISC TITLE PRINTER application before you connect
the printer to your PC. (See page 19.) Connecting before you install the
application can result in improper operation.
•Make sure you quit all other applications running on your PC before starting
installation. Installing while other applications are running can result in
incorrect installation.
•The examples in this manual show installation from a CD drive named drive E:.
To install the application
1. Start up Windows, and place the DISC TITLE PRINTER Application CD-
ROM into your computer’s CD drive.
•The installer should start up automatically, and display the screen shown
below.
Note
Depending on how your PC is configured, the above screen may not appear
automatically. If this screen does not appear on your computer, click the
Windows Start button and then select Run. On the dialog box that appears,
type in E:\DISC_TITLE_PRINTER\Setup\SETUP.EXE and then click OK.
2. Click Next.
This causes the Preceding License Agreement to appear.
Important!
Be sure to read all of the terms and conditions of the Preceding License
Agreement.
3. If you agree to be bound by the agreement, click Yes.
This causes the Software End User License Agreement to appear.
Important!
Be sure to read all of the terms and conditions of the Software End User
License agreement.

17
4. If you agree to be bound by the agreement, click Yes .
5. Check the installation location, and then click Next.
•This starts installation.
•A screen appears to let you know when the installation is complete.
Note
The InstallShieldWizard Complete screen may not appear in some cases.
If you can see the DISC TITLE PRINTER icon on your computer’s desktop,
it means that the application is installed properly.
If you want to change the installation location, click Browse.
6. Click Finish.
A DISC TITLE PRINTER shortcut icon should be on your Windows
desktop.

18
To uninstall the application
1. Click the Windows Start button, and then click Control Panel.
2. Click the Add or Remove Programs icon.
This causes the Add or Remove Programs dialog box to appear.
3. In the list of installed software, click DISC TITLE PRINTER to select it.
4. Click the Change/Remove button.
Note
Some files may cause a separate confirmation dialog box to appear before
they can be deleted. If you are unsure about where you should keep a file,
select No.
5. Click Finish.
This deletes the DISC TITLE PRINTER application.
List of installed software
Table of contents
Other Casio Printer manuals

Casio
Casio IT-3000 Series User manual

Casio
Casio IT-3000 - Win CE .NET 4.1 400 MHz User manual

Casio
Casio UP-250 User manual

Casio
Casio FP-12 User manual

Casio
Casio SP-1300 User manual

Casio
Casio UP-250 User manual

Casio
Casio KL-G2TC User manual

Casio
Casio UP-360 User manual

Casio
Casio IT-9000 Series User manual

Casio
Casio MEP-U10 User manual