CDA DC740 Safety guide

Customer Care Department • The Group Ltd. • Harby Road • Langar • Nottinghamshire • NG13 9HY
DC740 Built-Under Double Oven
DC940 Built-In Double Oven
Manual for Installation, Use and Maintenance

2
Important
This appliance must only be used for the purpose for which it is
intended, i.e. domestic cooking. Any other use could be dangerous
and may lead to premature failure of the appliance.
The CDA Group Ltd cannot be held responsible for injuries or losses
caused by incorrect use or installation of this product. Please note that
CDA reserve the right to invalidate the guarantee supplied with this
product following incorrect installation or misuse of the appliance.
This appliance is not designed to be used by people (including
children) with reduced physical, sensorial or mental capacity, or
who lack experience or knowledge about it, unless they have had
supervision or instructions on how to use the appliance by someone
who is responsible for their safety.
Under no circumstances should any external covers be removed for
servicing or maintenance except by suitably qualified personnel.
User information:
•Ovens become hot during and immediately after use.
•The oven door can become hot during operation.
•After use, please ensure that the oven switches are in the ‘O’
position.
•Keep children away from the appliance when in use, and
immediately after use.
•Keep the oven door closed when the applaince is in use.

3
Appliance information:
Please enter the details on the appliance rating plate below for
reference, to assist CDA Customer Care in the event of a fault with
your appliance and to register your appliance for guarantee purposes.
Appliance Model
Serial Number
CE Declarations of Conformity:
This oven has been designed, constructed and marketed in
compliance with safety requirements of EEC Directive 2006/95/EEC
(Low voltage) and requirements of EMC Directive 2004/108/EEC.
This appliance has been manufactured to the strictest standards and
complies with all applicable legislation, including Electrical safety (LVD)
and Electromagnetic interference compatibility (EMC). Parts intended
to come into contact with food conform to EEC/89/109.4
IMPORTANT INFORMATION FOR CORRECT DISPOSAL OF THE
PRODUCT IN ACCORDANCE WITH EC DIRECTIVE 2002/96/EC.
At the end of its working life, the product must not be disposed of as
urban waste. It must be taken to a special local authority dierentiated
waste collection centre or to a dealer providing this service.

4
Disposing of a household appliance separately avoids possible
negative consequences for the environment and health deriving from
inappropriate disposal and enables the constituent materials to be
recovered to obtain significant savings in energy and resources. As a
reminder of the need to dispose of household appliances separately,
the product is marked with a crossed-out wheeled dustbin.
Important
• Read the user instructions carefully before using the oven for the
first time.
• Follow the instructions for first use of the oven.
• Clean the oven regularly.
• Steam cleaners must not be used when cleaning this appliance.
• Remove spills as soon as they occur.
• Always use oven gloves when removing shelves and trays from the
ovens.
• Do not allow children near the oven when in use.
• Do not allow fat or oils to build up on the oven shelves, grill pan or
oven base.
• Do not place any cooking utensils or plates directly on the oven
base.
• Keep the oven door closed when the oven is in use.
• Do not grill food containing fat without using the grill pan grid.
• Do not cover the grill pan grid or the oven walls with aluminium foil.
• Do not use the oven tray for roasting.
• Do not perform maintenance or cleaning of the oven without first
switching o the electricity supply. If the oven has recently been
used, allow to cool.

5
• Do not place hot enamel parts in water. Leave them to cool first.
• Do not allow vinegar, coee, milk, saltwater, lemon or tomato juice
to remain in contact with enamel parts.
• Do not use abrasive cleaners or powders that will scratch the
surface of the enamel.
• Do not attempt to repair the internal workings of your oven.
• The oven is equipped with a safety thermostat which will switch
o the oven in the event of the oven overheating. If the safety
thermostat should switch o the power, you must wait for the oven
to cool down before using it again.
First Use of the Oven
The metal casing of this appliance has been coated with a
preservative to protect it during transport and storage. This should
be removed during installation by using a non-abrasive stainless steel
cleaner. Always follow the instructions given with the cleaner being
used.
Before using the oven for the first time we recommend that you clean
both oven cavities with soapy water, rinse carefully and then heat
on each of the below programmes at maximum temperature for the
specified time. A slightly unpleasant smell may be produced, caused
by grease remaining on the oven elements from the production
process.
Top oven
15 minutes full grill
6
60 minutes conventional
Lower oven
60 minutes fan oven
Please note:
• This oven has been fitted with a cooling fan to achieve maximum
eciency and to maintain low surface temperatures.
• The cooling fan will switch on automatically when the oven is
switched on and runs for a while after the oven has been switched
o - the length of time can vary and will be increased by poor
ventilation.
Oven Controls and Use
Cooking function knob
To set the function, turn the cooking function knob for the required
oven clockwise to the required function.
Each of the oven functions uses dierent elements within the oven to
oer you the best choice of cooking every time. These are explained
below:

7
Conventional oven
This function uses the top and bottom heating elements
only with a temperature between 50ºC and 250ºC.
Natural convection creates a perfect cooking zone in the
centre of the oven, ideal for dark fruit cakes and pastries.
Warming oven
This function uses the bottom heating element only with a
temperature set between 50ºC and 250ºC. This natural
heat is perfect for dough proving and blind-baking.
Grill
This function radiates the heat from the grill element and
the top element.
This fully temperature variable grill is ideal for grilling a
full family meal. It can be set between 50ºC and 250ºC.
When grilling, please note:
• Always grill with the oven door closed.
• Put the grill pan as close to the grill as possible.
• Do not grill for more than 30 minutes at a time.
• Preheat the grill for approximately five minutes with the oven door
closed.
Oven Lamp
This function switches on the oven light in the cavity.
Please note: the oven light will operate on all cooking
functions

8
Defrost
Using the fan only this oven function circulates the air
around the oven cavity, speeding up the natural defrost
process (1kg takes approximately one hour, depending
on the type of food).
Fan Oven
Using the circular element and the fan with a temperature
between 50ºC and 250ºC, this cooking function blows
the air into and around the oven cavity. Temperatures are
achieved quicker, reducing or even removing the need
for preheating. Both cooking temperatures and cooking
times can be reduced for a more energy ecient cooking
programme.
This function is perfect for cooking various food types simultaneously
as foods are sealed quickly to prevent flavour transfer.
Temperature knob
• To set the temperature, turn the temperature knob for the required
oven clockwise to the required temperature.
• Once the oven has reached the required temperature, the temperature
indicator lamp on the control panel will switch o.
• The temperature indicator lamp will light up when the oven elements
are working.
9
Programming the
Oven
Please note:
• The semi-automatic and automatic
cooking programmes will only work
with the main oven.
• The alert beep will cut o after
two minutes if it is not switched o
manually.
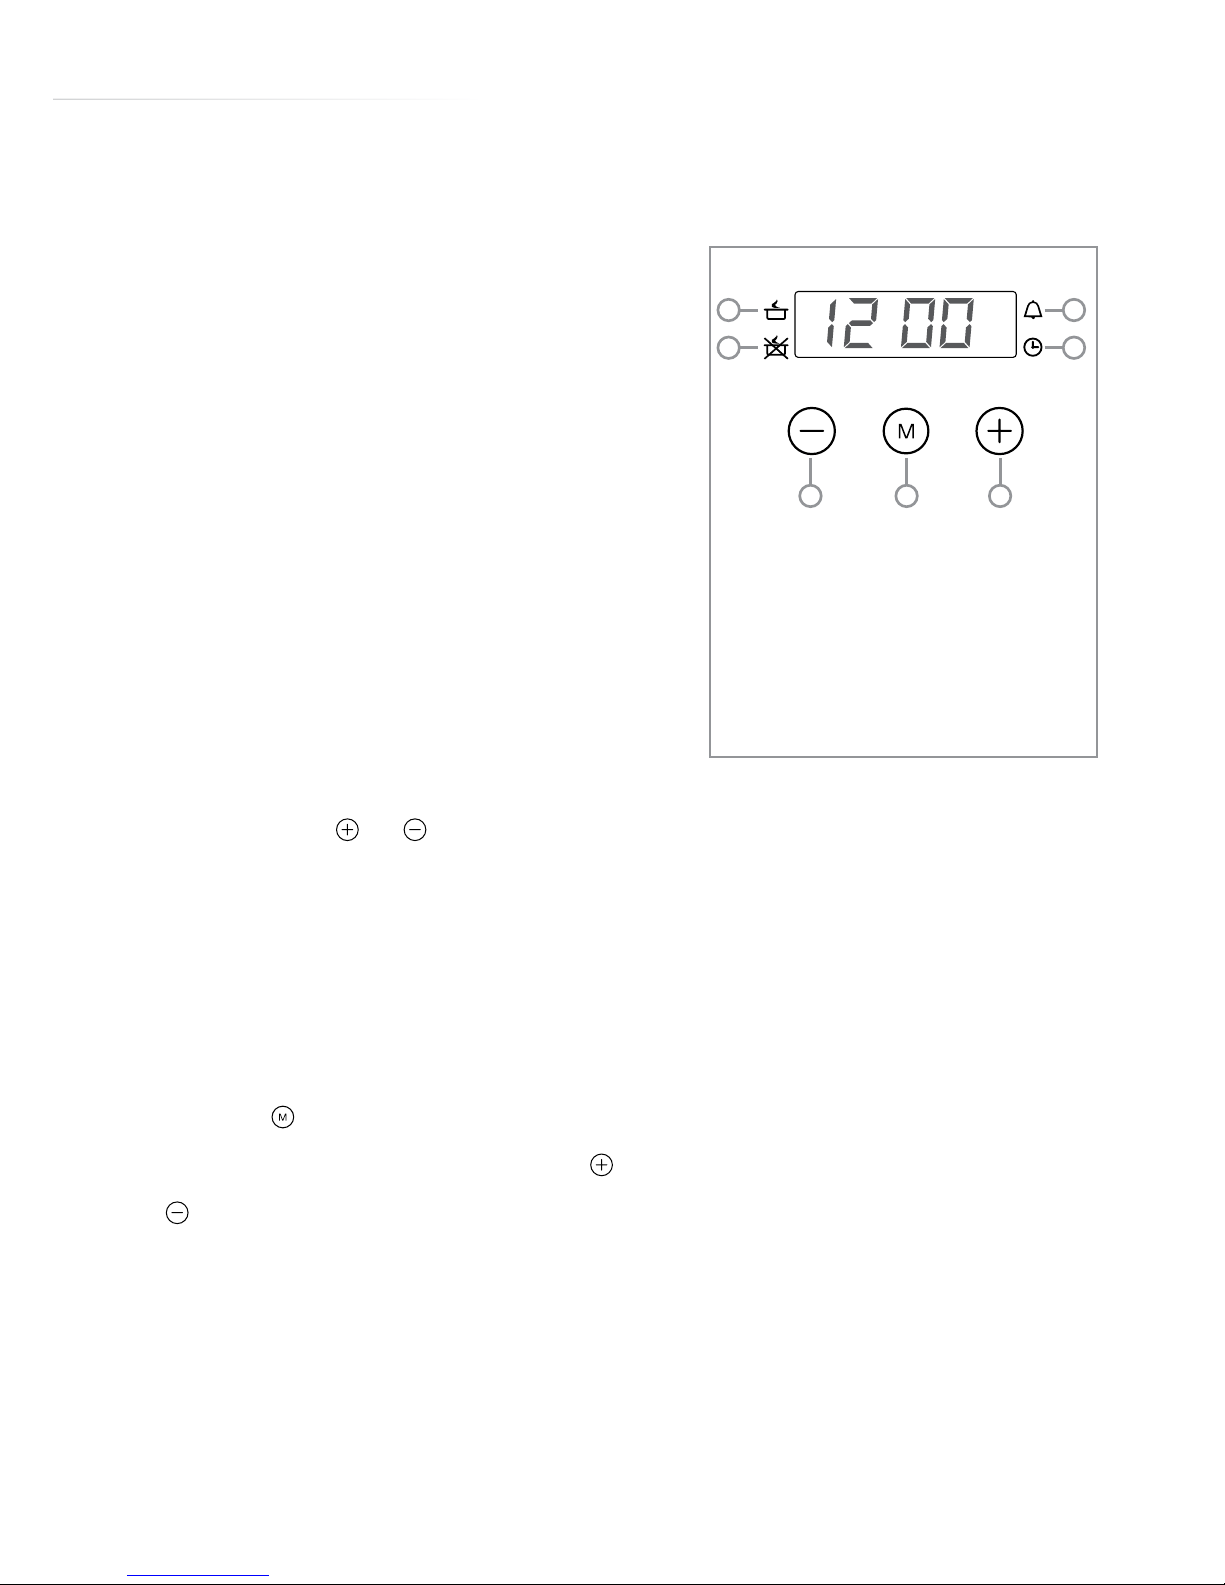
Setting the clock
The clock is preset to 12:00, and will
revert to this after a power failure.
When the current time indicator is
flashing, touch or . When the
correct time is shown on the display,
the clock will set after approximately
five seconds’ delay.
To change the clock once it has been
set, touch repeatedly until the current
time indicator flashes, then touch
or . When the correct time is shown
on the display, the clock will set after
approximately five seconds’ delay.
fig. 1
1
2
3
4
5 6 7
1 Cooking time indicator
2 End of cooking time indicator
3 Minute minder indicator
4 Current time indicator
5 Decrease key
6 Mode key
7 Increase key

10
The minute minder
The minute minder can be used when the oven is switched on or o.
It can be set for up to 23 hours and 59 minutes.
To set the minute minder:
• Touch repeatedly until the minute minder indicator flashes.
• Then touch or to select the required duration for the minute
minder. When the correct duration shows on the display, either
touch or wait for approximately five seconds. The minute minder
indicator will remain lit to confirm the minute minder is on.
• When the countdown is complete, there will be an alert beep which
will continue for two minutes and the minute minder indicator will
flash. To switch o the alert beep, touch any key.
Please note:
At the end of the countdown, the minute minder will not switch o the
oven. Remember to turn o the oven manually.
Other manuals for DC740
1
This manual suits for next models
1
Table of contents
Other CDA Oven manuals


CDA
CDA SK800 Installation and operating instructions

CDA
CDA SG121SS Quick start guide

CDA
CDA SK651 Quick start guide

CDA
CDA SV500 for Reference manual

CDA
CDA SV 210 for Reference manual

CDA
CDA RV 1200 Series User manual

CDA
CDA sk450 Reference manual

CDA
CDA SL500SS User guide

CDA
CDA RV921 Reference manual

CDA
CDA Oven Instruction Manual


