Cervélo C SERIES User manual

C SERIES MANUAL

1
INTRODUCTION
Welcome to the Cervélo family, and congratulations on your decision to enjoy a C Series bicycle.
Designed to inspire, C Series bicycles combine the exceptional lightness and stiness engineered
into every Cervélo , with a geometry designed to elevate your condence, and deliver day long riding
comfort. After 25 years of dening high performance, we are honoured to join you as you travel down
the path less taken.
This document has been prepared to guide you through the assembly of the unique features of the C
Series, but is intended only as a supplement to the assembly instructions oered by your component
manufacturer.
TABLE OF CONTENTS
Introduction............................................. 1
Frame Features........................................... 2
Fork Preparation......................................... 3
Small Parts.............................................. 5
Frame Preparation........................................ 6
Brake Housing Installation............................... 7
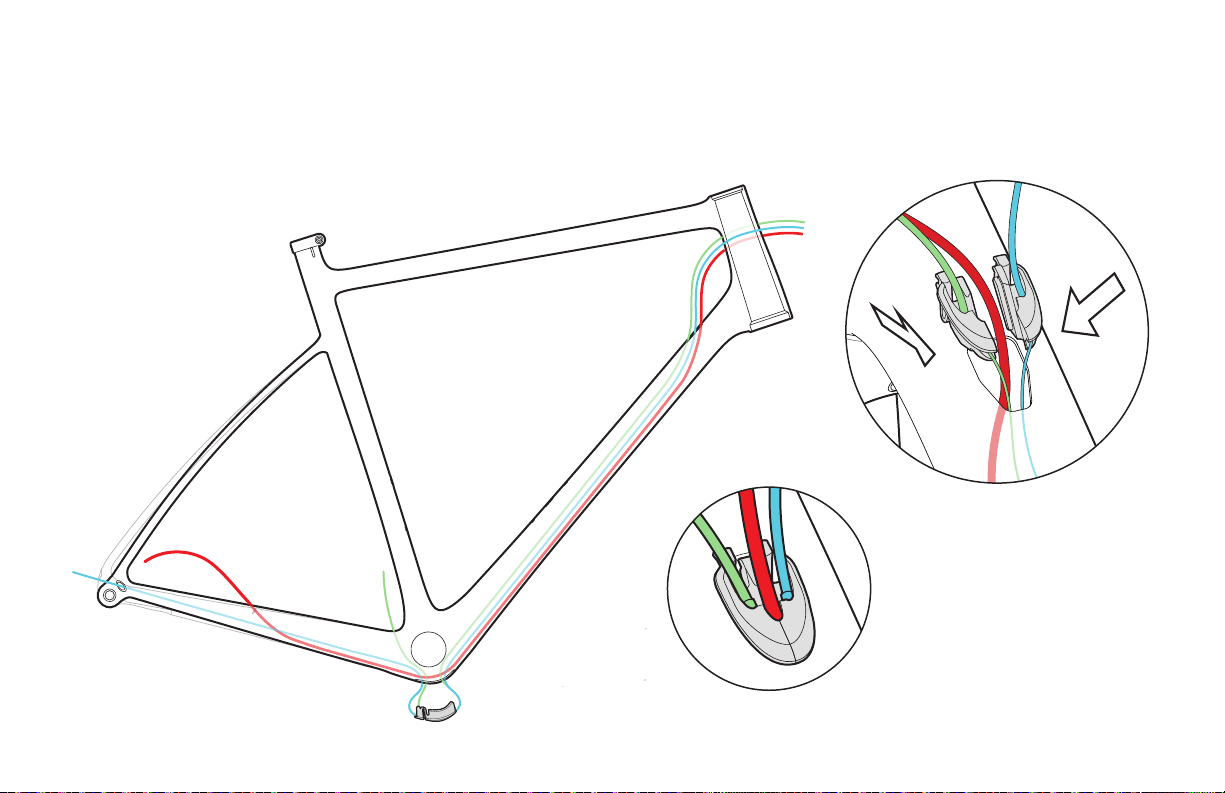
Mechanical Cable Routing................................. 9
Electric Cable Routing.................................. 11
Mudguard Installation................................... 13
Frame Guard Installation................................ 16
Through-Axle Wheel Installation......................... 17
Version 2 - 2018-07-05 - CER-C23-V2

2
FRAME FEATURES
A guide to your Cervélo C Series frame.
Rear dropout cable exit
Front derailleur
wire exit hole,
electric and
mechanical
Bottom bracket cable port
Down tube battery
wire hole
Down tube internal
cable ports

3
FORK PREPARATION
A
B
Max.
4mm
A 2.5mm spacer under
the Stem Cap is advised
1st Mark 2nd Mark /
Final Cut
C
D
E
F G
H
I
J
A.Stem Cap + 5mm bolt
B.Headset Spacers
C.Bearing Cap
D.Compression Ring
E.Bearings
F.Fork Insert
G.Two-Part Epoxy
H.Mixing Stick
I.Isopropyl Alcohol Wipe
J.Sandpaper (120 Grit)
1. Apply grease to the bearing seats, and Install the upper & lower
headset bearings into the head tube.
2. Fit the fork into the head tube with the complete headset,
required spacers, and the stem.
3. Apply the minimum pressure needed to ensure the assembly is
fully seated. Mark the steerer tube at the top of the stem.
4. Remove fork and clearly mark the fork steerer tube at a
point 4mm below the rst mark. Take care to verify that this
measurement is correct as this denes the cut line for the
steerer tube.
Avoid breathing the dust created during cutting carbon
composite materials.
Do not exceed 50 mm maximum total spacer height,
including the bearing cap.

4
5. To trim fork steerer, use only a saw suitable for cutting carbon,
and a cutting guide.
6. Carefully sand a bevel to the inside of the cut end of the steerer
tube to t the insert.
7. Dry t insert to check that it is ush with the cut end of the
steerer tube.
8. Use isopropyl alcohol to clean the inside of the steerer tube
and the outside of the insert.
9. Fully mix the two-part epoxy and apply to the outer surface of
the insert with the wooden mixing stick.
10. Slide the insert into the steerer while rotating it slowly until the
ared end sits ush with the top of the steerer.
11.Wipe away any excess glue from the outside surface of the
steerer tube with the isopropyl alcohol wipe.
12. Set the fork aside and allow it to sit undisturbed for the full
curing period.
Do not attempt to t the fork into a bike prior to the completion
of the full curing period.
Improper cutting of the steerer tube could cause a failure that
results in severe injury or death.
Insert should be ush
with cut end of the
fork steerer tube

5
Down Tube Cable
Stop (Mechanical)
CBS-2DT112ME
Bottom Bracket
Cable Guide
(Mechanical)
BBG-R-2013
Seat Stay
Fender Mount x2
M5x16mm
Bolt
M5 Nyloc
Flange Nut
M4x4mm
Set Screw x4
M4 Nut x4
Thread In Fender
Mount x4
Disc Hose
Bushing
BU-DH1290 x3
Front Derailleur
Wire Hole
Blanking Plug
GR-BVT-TT-S5
Down Tube
Battery Wire
Hole Blanking
Plug GR-DT-
BATTERY
Rear
Derailleur
Hanger
Rear Derailleur
Hanger Fixing Nut
C Series Fender Kit
MTA-FND112
C Series Rear
Derailleur Hanger
Assembly DRH-WMN112
Rear Derailleur
Press-In Cable
Stop (Mechanical)
CBS-DRPOUT
Rear Derailleur
Wire Guide
(Electric)
GR-DRPOUT-GUIDE
Bottom Bracket
Access Port
Rubber Blanking
Plug (Electric)
GR-BB-GUIDE
Down Tube Cable
Stop (Electric)
CBS-2DT112EL
SMALL PARTS
Designed to accommodate electronic, mechanical and hydraulic controls, the C Series frames are
engineered to provide seamless integration of all shifting systems, regardless of method or brand. In
order to do so, you will require the parts shown below:

6
Install chain catcher when installing the front
derailleur. Complete nal adjustment with the
chain in the small chainring and largest cassette
cog.Tighten the connecting bolt to 4 Nm.
Install the front derailleur
using the bolt provided
with the derailleur.
Torque to the derailleur
specications.
FRAME PREPARATION
Lightly grease Rear Derailleur Hanger Fixing
Nut and install Rear Derailleur Hanger, nger
tight. Final tightening will be done after rear
wheel installation.
Do not nal tighten rear derailleur hanger assembly
without rear wheel installed. Doing so will result in a
misaligned derailleur and poor shifting.

7
BRAKE HOUSING INSTALLATION
It is recommended that the hydraulic brake hoses or brake cable housing is installed rst. These routing
illustrations are intended as a supplement to the manufacturer’s installation instructions only. For both
hydraulic and mechanical disc brakes, please refer to the component manufacturer’s service center
or website for further information.

8
Route hydraulic brake hose or mechanical brake
housing through the frame and fork using the Disc
Hose Bushings. Install and adjust calipers as per
manufacturer’s instructions.
NOTE:The brake line
entry hole on the C3 and
C2 is on the fork's front
surface.

9
With the brake hose
already in place, install two
piece DownTube Cable
Stop (Mechanical) and
route cable housing (with
ferrules) into stop, until the
housing rests securely in
the pockets.
MECHANICAL CABLE ROUTING
It is recommended that front and rear derailleur cables be installed after the brake hose has been installed.
These routing illustrations are intended as a supplement to the manufacturer’s installation instructions
only. Please refer to the component manufacturer’s service center or website for further information.

10
Route gear cables out of the bottom
bracket cable port. Ensure that the
cables are not twisted together.
The front cable travels across the non-drive side slot, and in
the direction of the seat tube. The rear cable travels along the
drive side slot, and along the chain stay. When complete, snap
Bottom Bracket Cable Guide into place.
Install Rear Derailleur Press-In Cable Stop.
As per manufacturer’s instructions, install rear derailleur on rear
derailleur hanger, cut appropriate housing length, and attach cable.

11
With the brake hose already
in place, route the down
tube electric wire to the
bottom bracket. Install the
two piece DownTube Cable
Stop (Electric).
ELECTRIC CABLE ROUTING
It is recommended that electric cabling and junction points be installed after the brake hose has been
installed.These routing illustrations are intended as a supplement to the manufacturer’s installation
instructions only. Please refer to the component manufacturer’s service center or website for further
information.

12
With all wires inside, cap the bottom bracket
access port with the Bottom Bracket Access
Port Rubber Blanking Plug.
Install the Rear Derailleur Wire Guide.

13
MUDGUARD INSTALLATION
Remove set screw from threaded
mud guard eyelet hole.
Lightly grease threads and install M4
nut on the fender mount bolt. Install the
bolt into the frame, turning 4-4.5 times
by hand, until oriented vertically.Tighten
4mm nut against frame to lock (~1 Nm).
Do not overtighten, overstressing the threads can
result in de-bonding of the insert. Always use the
M4 nut to secure the eyelet’s position.

14
Install mudguard stays as per manufacturer’s
instructions.
Install the seat stay bridge using the supplied M5 xing
screw and nut. It is recommended that this remain only
nger tight, until all mudguard xing screws are in place
and nal adjustment is being performed. Adjust height
as per manufacturer’s instructions.
The Cervélo C Series eyelets are designed to be
used with mudguards only, and will not support use
of a cargo rack.

15
Using a greased M5 xing screw and washer, attach
mud guard to the outside face of the eyelet.
Using a greased M5 xing screw and washer, attach
the front mudguard hanger to the rear of the fork, as
per manufacturer’s instructions.

16
24mm
FRAME GUARD INSTALLATION
Clean the down tube using isopropyl alcohol. Install
the DownTube Guard by removing adhesive backing,
and xing the guard with the two M4 xing screws.
Clean the chain stay using isopropyl
alcohol. Install the Chain Stay Guard
by removing adhesive backing, and
xing the guard to the frame. The
rearward edge should be 24mm from
the edge of the rear dropout cable exit.

17
THROUGH-AXLE WHEEL INSTALLATION
Put axle lever in open position.
To secure the front wheel, install the greased
axle, through the drive side drop out, through
the wheel hub, and rotate to thread axle into
opposite fork drop out until tight.
Once tightened, close lever to lock.
Adjust brakes as per manufacturer’s instructions.
Adjust shifting as per manufacturer’s
instructions.
If using an aftermarket wheelset, please refer to
the component manufacturer’s service center
or website for further information.

18
To secure the rear wheel, install the greased axle,
through the non-drive side dropout, through the
wheel hub, and rotate to thread axle into the Rear
Derailleur Hanger until tight.
Once tightened, close lever to lock.
Perform nal tightening on
Rear Derailleur Hanger Fixing
Nut using a 17mm wrench.
This action is unique to initial
assembly, and should not
require adjustment afterwards.

www.cervelo.com
C SERIES MANUAL CER-C23-V2
Table of contents
Other Cervélo Bicycle manuals

Cervélo
Cervélo PX Series User manual

Cervélo
Cervélo S5 2023 User manual

Cervélo
Cervélo R5 Disc User manual

Cervélo
Cervélo R5 Disc User manual

Cervélo
Cervélo R3 Rim User manual

Cervélo
Cervélo P5X User manual

Cervélo
Cervélo S5 Instructions and recipes

Cervélo
Cervélo multi-speed racing bicycles User manual

Cervélo
Cervélo RCA Instructions and recipes

Cervélo
Cervélo SOLOIST User manual