Cervélo SOLOIST User manual

SOLOIST RETAILER ASSEMBLY MANUAL

1 2
TABLE OF CONTENTS
This manual is intended to guide ocial Cervélo retailers through the assembly and adjustment
of the Cervélo Soloist. This manual outlines the process and procedure associated with the
installation of Cervélo components, as well as the routing of shifting and braking control lines
only. Proprietary parts referenced in this manual are available only through Cervélo or its
authorized distributors.
Failure to use the specied parts and follow these assembly instructions may result in loss
of control while riding, and lead to serious injury. This manual is not intended to replace the
assembly and service instruction provided by third-party component manufacturers, and assumes
that the assembler is a trained, professional bicycle mechanic. See https://www.probma.org/
CER-STA-V1 2022-02-14
IMPORTANT INFORMATION
NOTE: Cervélo strongly recommends that
all assembly and adjustment procedures
be performed by an authorized Cervélo
retailer. If you are a Cervélo Soloist
consumer/purchaser reading this manual
we suggest that before attempting to
undertake any of the procedures in this
manual that you consult your authorized
Cervélo retailer, or visit us at www.
cervelo.com/support
NOTE: This manual was developed
to compliment the Cervélo General
User Manual, and is intended as
a supplement to the assembly and
installation instructions supplied by
the component manufacturers (provided
with this bicycle).
NOTE: All non-proprietary components
such as those from Shimano or SRAM are
available from your local distributor.
LIST OF TOOLS & SUPPLIES
This manual outlines a number of procedures for
making adjustments to the Soloist bicycle. The
following tools and parts listed are required for
these adjustments. Cervélo strongly recommends
that all assembly and adjustment procedures be
performed by an authorized Cervélo retailer.
Important Information .................. 1
List of Tools & Supplies. . . . . . . . . . . . . . . . . 2
Soloist Parts List. . . . . . . . . . . . . . . . . . . . 3
Small Parts ....................... 4
AB07 Handlebar ..................... 6
ST36 Stem ........................ 7
Frame & Component Preparation .............. 8
Fork Preparation & Installation .............11
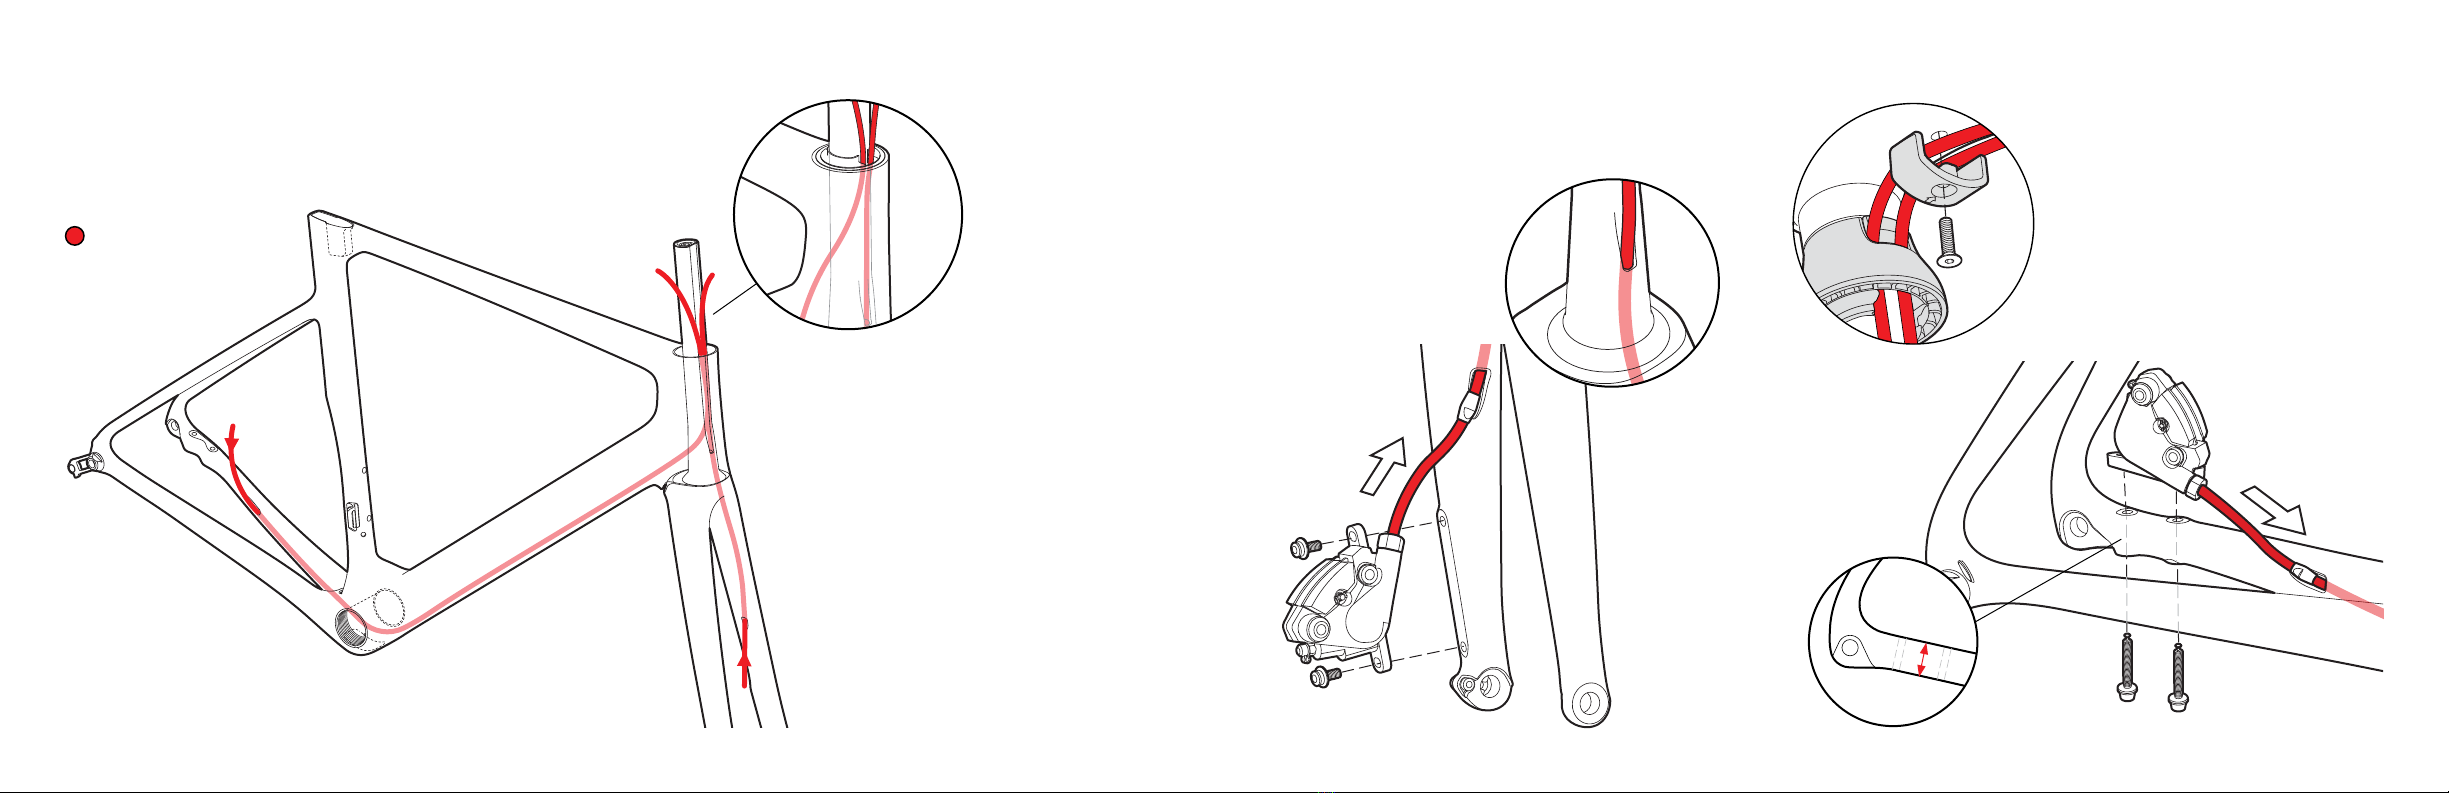
Brake Hose Routing. . . . . . . . . . . . . . . . . . . . 13
Electric Wire Routing & Installation. . . . . . . . . . . 15
Mechanical Housing Routing & Installation ........17
Seatpost Assembly . . . . . . . . . . . . . . . . . . . . 19
Seatpost Cutting Instructions ..............20
Di2 Battery Installation. . . . . . . . . . . . . . . . . 21
Tire/Rim Clearance. . . . . . . . . . . . . . . . . . . . 22
Aero Thru-Axle Installation ...............23
Intended Use of The Soloist Bicycle ...........25
Soloist Torque Specications. . . . . . . . . . . . . . . 27
Soloist Frame Details ..................28
Soloist Frame Geometry. . . . . . . . . . . . . . . . . . 29
Cervélo Customer Support. . . . . . . . . . . . . . . . . 30
Tools
Bicycle workstand (types which
secure bike by the seatpost, or
pro-type stand with fork mount)
Torque wrench(es) with 2.5Nm to
15Nm range and adaptors:
Allen (Hex) head inserts:
2mm, 2.5mm, 3mm, 4mm, 5mm,
6mm, 8mm, 10mm
Open ended wrenches:
7mm, 8mm, 10mm, 17mm
Cable cutters
Pliers
Phillips-head screwdriver
Slot-head screwdriver
Tools
Pedal wrench
Brake rotor lockring tools
Hydraulic bleed kit
Isopropyl alcohol
Di2 wire tool – Shimano
Good quality bicycle grease &
carbon assembly compound
Saw cutting guide (Park Tool SG-7.2
or equivalent)
Hacksaw (with carbon and
aluminum specic blades)

3 4
SOLOIST PARTS LIST
The Soloist frame is engineered to provide seamless integration of
mechanical and electronic shifting systems, regardless of brand. In
order to do so, you may require the parts shown below:
SMALL PARTS
Front/Rear
Derailleur Wire
Hole Blanking
Plug(6mm) x3
GR-576
Disc Hose
Bushing x2
CBG-DBH
Seatpost Clamp
SPC-STA
Seatpost Clamp
Cover
SPCC-STA
Direct Mount
Derailleur
Hanger
DRH-SDM
Derailleur
Hanger
DRH-WMN112
Derailleur
Hanger Fixing
Nut Front Derailleur
Mount w/ Fixing
Screws FDM-OEO
Front
Derailleur
Mount Blanking
Plate (1x)
FDM-CVR
BB Blanking
Plug
GR-BB-140
Threaded Fork
Insert w/Fixing
Screw
QRI-THD
Item Description Cervélo Part No.
Soloist Seatpost
Clamp Assembly SPC-STA
Soloist Seatpost
Clamp Cover SPCC-STA
Front Derailleur
Mount w/Fixing
Screws
FDM-0E0
FDM Blanking Plate FDM-CVR
Rear Derailleur
Hanger w/Fixing Nut DRH-WMN112
Shimano Direct Mount
RDH w/Fixing Nut DRH-SDM
Threaded Fork Insert
w/Fixing Screw QRI-THD
Disc Brake Hose
Guide CBG-DBH
BB Blanking Plug GR-BB-140
6mm Blanking Plug
for Front & Rear
Derailleur
GR-576
Item Description Cervélo Part No.
Soloist Headset
Bearing Cap Kit
(30mm)
BC-STA
Soloist Low Bearing
Cap Kit (14mm) BC-STA-644
Soloist Headset Split
Ring SR-STA
AB07 Handlebar see page 6
ST36 Stem see page 7
ST36 Cable Guide MT-597
SP27 Carbon Post
0mm Oset w/Head SP-SP27-ZERO
SP27 Carbon Post
15mm Oset w/Head SP-SP27-15MM
SP27 Seatpost Battery
Mount Holder BTM-596
Item Description Cervélo Part No.
Soloist Chainstay
Protector PRO-CS-ASP
Cervélo Front
Aero Thru Axle w/
Removable Handle
QRA-AERO2-F
Cervélo Rear Aero Thru
Axle w/Removable
Handle
QRA-AERO2-R
Removable Handle for
Cervélo Aero Thru Axle QRA-AERO2-HNDL
Accessory Mount-Front MT-LM-F-004
Accessory Mount-Rear MT-LM-R-003
D-Shaped
Compression Plug FKI-CL005-517A

5 6
SP27 Seatpost
Battery Mount
BTM-596 Accessory Mount
Kit-Front
MT-LM-F-004
Accessory Mount
Kit-Rear
MT-LM-R-003
SMALL PARTS
See page 10 for mounting
instructions.
AB07 HANDLEBAR
Cervélo AB07
Handlebar (Aluminum)
80mm
380mm
400mm
420mm
440mm
128mm
38cm HB-AB07-38
40cm HB-AB07-40
42cm HB-AB07-42
44cm HB-AB07-44
Brake hoses and
shifter cable
housing run in
the channels
on underside of
handlebar.

7 8
ST36 STEM
Cervélo ST36 Stem
(Aluminum)
80mm ST-A027-80*
90mm ST-A036-90
100mm ST-A036-100
110mm ST-A036-110
120mm ST-A036-120
130mm ST-A036-130
80mm version does
not include ST36
Cable Guide.
*
ST36 stem can not
be ipped for
additional stack.
To mount a cycling
computer or
accessory such as a
light or camera, use
Accessory Mount Kit
(Front) MT-LM-F-004
Tighten fork
steerer xing
screws to 5Nm.
Tighten stem
faceplate xing
screws to 6Nm.
Tighten ST35 Cable
Guide (MT-597) xing
screw nger tight
(1Nm max)
FRAME & COMPONENT PREPARATION
Hold the frame using a secured seatpost only.
Clamping the top tube can damage the frame
and void your warranty.
1. Slide Seatpost Clamp Cover
onto seatpost.
2. Apply carbon paste to the
frame and seatpost shaft to be
inserted into the frame.
3. Insert the seatpost and the
assembled Seatpost Clamp
(SPC-STA) into the frame.
4. Adjust height and torque
the Seatpost Clamp to 8Nm
maximum.
Generously grease
all internal
surfaces of the
Seatpost Clamp.
NOTE: Non-use of the
Seatpost Clamp Cover
may result in seatpost
binding due to
accumulated debris.

Lightly grease Rear Derailleur Hanger
Fixing Nut and install either Rear
Derailleur Hanger (DRH-WMN112) or
Direct Mount Rear Derailleur Hanger
(DRH-SDM) nger tight. Final tightening
will be performed after rear wheel
installation.
Do not nal tighten rear derailleur
hanger assembly without rear wheel
installed. Doing so may result in a
misaligned derailleur and poor shifting.
DRH-SDMDRH-WMN112
50mm
910
FRAME & COMPONENT PREPARATION
Accessory Mount
includes inserts
for Garmin & Wahoo
computers.
1. Lightly grease supplied M4 xing screw. Install
the Threaded Fork Insert (QRI-THD) and xing
screw, tightening only lightly.
2. Without wheel in place, install the axle and
tighten until the ange meets the fork dropout
face, but does not compress the fork blades.
3. Tighten the xing screw to 3Nm.
4. Remove the axle and install wheel. Reinstall
axle and tighten to 12-15Nm.
5. Remove axle and wheel, and re-torque the xing
screw to 3Nm.
Install Front
Derailleur Mount
(FDM-0E0), and
ensure xing
screws are
torqued to 3Nm.
For 1x systems
replace with
the Front
Derailleur
Mount Blanking
Plate (FDM-
CVR).
Ensure the Chainstay
Guard wraps around the
inside of the chainstay.
Clean the chainstay using isopropyl alcohol.
Install the Chainstay Guard (PRO-CS-ASP) by
removing adhesive backing, and xing the guard
to the frame. The bottom rearward edge should
be approximately 50mm forward from the back
of the rear dropout.
Torque
to 2.5Nm. Torque to 2Nm.
Torque
to 1Nm.
To install Accessory
Mount - Front (MT-
LM-F-004), angle mount
into ST36 stem faceplate
and torque to 2Nm.
or
Torque
M5x20mm
to 2.5Nm
For use without
accessory, clip
may be hidden,
by reversing the
upper clamp.
To install Accessory
Mount - Rear (MT-
LM-R-003), replace
the rear upper clamp
of the seatpost
with the kit version.
Tighten to maximum
8Nm.

11 12
Max.
4mm
1mm
1st Mark
2nd Mark /
Final Cut
D-Shaped
Compression
Plug adds 1mm
to height of
cut fork
Stem Top
Cap
Bearing
Top Cap
30mm
(BC-STA)
Headset
Spacers
Bearing
Top Cap 14mm
(BC-STA-644)
or
Split Ring
(SR-STA)
Bearing Cap Plug
Preload
Fixing
Screw
M6 x 25
Upper Bearing
1-1/4" 45ºx 45º
Lower Bearing
1-1/2" 36ºx 45º
Your Cervélo frame & fork have
been designed to work together.
Do not substitute a dierent
size fork without rst consulting
Cervélo Customer Service to
conrm compatibility with your
frame.
FORK PREPARATION & INSTALLATION
Improper cutting of the steerer tube could
cause a failure that may result in severe injury
or death.
Avoid breathing the dust created during cutting
carbon composite materials.
1. Apply grease to the bearing pockets and install
the upper and lower headset bearings into the
frame.
2. Fit the fork provided with your frame into the
head tube with the complete headset, required
spacers, and the stem.
3. Apply the minimum pressure needed to
ensure the assembly is fully seated. Mark the
steerer tube at the top of the stem.
4. Remove fork and clearly mark the fork steerer
tube at a point 4mm below the rst mark. Take
care to verify that this measurement is correct
as this denes the cut line for the steerer tube.
5. To trim fork steerer, use only a saw suitable for
cutting carbon, and a cutting guide.
6. Insert D-Shaped Compression Plug and tighten
to hold in place. Do not apply nal torque until
after the stem is installed.
7. Place Lower Bearing over the fork steerer and
insert into the frame from the bottom of the
head tube.
8. Install over the steerer in order: Upper Bearing,
Split Ring, Bearing Top Cap, Spacers, and
Stem. Do not install the Stem Top Cap.
9. Tighten the Compression Plug to 8Nm using a
torque wrench.
10. Install the Stem Top Cap and Preload Fixing
Screw into the stem. Tighten the Preload
screw only enough to remove all play from the
headset, and ensure the bearings rotate freely
(typically 1 to 2Nm).
11. Tighten the stem to fork xing screws to 5Nm
maximum.
Install D-Shaped
Compression Plug
(FKI-CL005-517A)
in fork steerer and
lightly tighten. Apply
rated torque of 8Nm
following stem and
spacer installation.
Insert Bearing Cap Plug into
the groove in fork, and slide
down to seal brake hoses
and cable housing in the
Bearing Top Cap. Cover with
spacers and stem to complete
assembly.
Left
Wedge
Right
Wedge
Rear Wedge
Do not torque Compression Plug past
the recommended 8Nm maximum. If the
Compression Plug requires tightening past
8Nm, please contact Cervélo Customer
Service.
The component parts of the compression
plug are side-specic. Re-assembling
parts incorrectly may result in loss of
preload in the system. Refer to the
images shown for correct assembly.
Do not exceed 5mm total
spacers above the stem.
Do not exceed
52mm maximum
total spacer height,
including the
Bearing Top Cap.

Route front brake hose
starting at the fork
blade through the pass-
through in the fork
steerer.
13 14
BRAKE HOSE ROUTING
These routing illustrations are intended as a supplement to
the manufacturer’s installation instructions only. For both
hydraulic and mechanical disc brakes, please refer to the
component manufacturer’s service center or website for
further information.
Chainstay
height: 25mm
Route rear brake
hose around drive
side of fork
inside head tube.
Route hydraulic brake hose through the frame and fork with
the Disc Hose Guide (CBG-DBH). Install and adjust calipers as
per manufacturer’s instructions.
Brake hose pass-
through in fork
steerer does not
require use of a
Disc Hose Guide.
Brake
Route rear
brake hose from
chainstay through
the down tube and
up through the
head tube.
It is recommended to include 20mm-
25mm of additional brake hose/cable
housing length to the amount required
for the nal customer t. Doing so will
permit sucient length for disassembly
and service purposes.
1. Measure customer t
2. Add additional 20-25mm of spacers
3. Check brake hose/cable housing
length and cut.
4. Remove extra spacers
5. Complete assembly
Brakes hoses route
through the ST36 Stem
Cable Guide,Bearing
Top Cap and Split
Ring into the frame.

For wireless shifting
systems install the
Blanking Plug (GR-576).
For wired shifting
systems install
the Shimano EW-
SD300 grommet for
6mm hole (sold by
Shimano)
15 16
ELECTRIC WIRE ROUTING & INSTALLATION
Brake
Cap the Bottom Bracket Cable
Port with the BB Blanking Plug
(GR-BB-140).
These routing illustrations are intended as a
supplement to the manufacturer’s installation
instructions only. Please refer to the component
manufacturer’s service center or website for
further information.
800mm
E-Wire
1200mm
E-Wire
E-Wire(SD300)

Brakes hoses and shifter
housing route through
the ST36 Stem Cable
Guide,Bearing Top Cap
and Split Ring into the
frame.
17 18
MECHANICAL HOUSING ROUTING & INSTALLATION
These routing illustrations are intended as a
supplement to the manufacturer’s installation
instructions only. Please refer to the component
manufacturer’s service center or website for
further information.
Rear Shifter*
Front Shifter*
Brake
With all housing routed, cap the
Bottom Bracket Cable Port with the
BB Blanking Plug (GR-BB-140). As per manufacturer’s instructions, install rear derailleur on rear
derailleur hanger, cut appropriate housing length, and attach cable.
The Cervélo Soloist
requires the use
of full length
shifter housing for
mechanical front
and rear shifting.
*

Cut Line
1cm
1cm
19 20
SEATPOST ASSEMBLY
15mm Offset Seatpost
(SP-SP27-15MM)
0mm Offset Seatpost
(SP-SP27-ZERO)
50mm
30mm
M5 Seatpost
Fixing Screws
Actual Size
1. Ensure Loctite 242 is applied to threads
below the head of the 50mm button head
cap screw. Install crossbar on 50mm
button head cap screw and tighten
together.
2. Install the curved washer and adjustment
wheel in the seatpost cutout.
3. Install the button head cap screw with
crossbar installed, and turn the wheel
until threads are engaged.
4. Install the spherical washer on the 30mm
spherical cap screw, so that the concave
face, mates with the convex surface of
the screw.
5. Ensure Loctite 242 is applied to the
lower threads of the 30mm spherical cap
screw.
6. Install cross bar.
7. Apply light coat of carbon assembly
compound to the radius on the upper
face of the seatpost.
8. Install the lower saddle clamp base, as
per the diagram.
9. Locate saddle rails between upper and
lower clamping surfaces.
10. Establish desired saddle angle by rst
using adjustment wheel.
11. Tighten opposing angle adjusting screw
to secure saddle at 8-9Nm.
Button Head
Cap Screw
M5x50mm
Button Head
Cap Screw
M5x50mm
Crossbar
Saddle
Clamp
Base
Adjustment
Wheel
Spherical
Cap Screw
M5x30mm
Spherical
Cap Screw
M5x30mm
NOTE: The SP27
seatpost is compatible
with both metallic
saddle rails (7mm
diameter) and carbon
saddle rails (7x9mm
cross section).
1. Taking care to maintain the minimum required seatpost insertion of 6.5cm and
maximum of 8.5cm, carefully measure and use a light colored grease pencil to
accurately mark the cut-o location on the seatpost.
2. Insert the seatpost in the Park Tool SG-7.2 Saw Guide (or equivalent) so that the
cut-o line can be seen clearly through the blade guide in the tool.
3. Using a blade designed specically for cutting carbon composite materials (or
a ne tooth blade with greater than 32 teeth per inch); proceed with cutting the
Seatpost (as per Park Tool’s instructions).
4. Use ne grit sandpaper to carefully remove any fraying or burring from the cut
end. Reposition clamp approximately 10cm from the cut end.
5. With a grease pencil, mark a point 1cm from the cut end on the trailing edge of
the Seatpost, and another 1cm from the back, on the bottom edge. Draw a line
connecting them, forming a 45 degree guideline.
6. Placing the blade of your saw on the grease pencil mark, very carefully
proceed to cut, resulting in a 45 degree chamfer being cut onto the trailing
edge of the Seatpost.
7. Carefully sand the end and after applying carbon assembly compound,
return to the frame.
Note: It is essential that all Cervélo Aero Seatposts have a 45
degree chamfer cut on the rear trailing edge of the post. If trimming
is required after tting, the following method is recommended.
SEATPOST CUTTING INSTRUCTIONS
If trimming is required, nal length should allow for a minimum
6.5cm of seatpost remaining in the frame. Failure to meet this
requirement, may result in damage to the frame not covered by
warranty policy, or serious injury to rider.

21 22
Press the Di2 battery
into the SP27 Seatpost
Internal Battery Mount
(BTM-596) and attach
the E-wires according
to manufacturer
instructions.
Insert the
assembled battery
and holder into
the seatpost.
DI2 BATTERY INSTALLATION
The battery for your Shimano Di2 system mounts inside the
seat tube using the SP27 Seatpost Internal Battery Mount (BTM-596). As this is
an enclosed location, it is important to test the system prior to nal installation.
TIRE/RIM CLEARANCE
Your Cervélo bicycle complies with the ISO 4210-2:4.10.2 standard for tire clearance. In order to comply with these safety standards and
maintain your Limited Lifetime Warranty, a minimum of 4mm of clearance must remain between the tire and any frame element. Due to
the growing complexity of tire and rim interfaces, Cervélo recommends identifying the available space before choosing a tire.
1. Measure the space between the chainstays at
the bottom bracket junction.
2. Measure the space between the seatstays at the
top of the tire.
3. Using the smaller of those two numbers (Frame
Clearance), subtract 8mm (4mm per side) to
determine the maximum Allowable Tire/Rim
Dimension.
4. With the tire installed and fully inated on your
wheel, measure the greater of the rim or tire
width and ensure it is less than the calculated
Allowable Tire/Rim Dimension width to ensure
that it ts.
Tire/Rim
Dimension
Frame
Clearance
Contact between the tire or rim and the
frame or fork may result in a loss of control
while riding and potentially serious injury.
Failure to follow these guidelines may result
in damage to the frame not covered by
Cervélo Limited LifetimeWarranty.

23 24
AERO THRU-AXLE INSTALLATION
To ensure rider safety, it is critical to install the Cervélo
Aero Thru-Axle correctly. Failure to do so may result in an
accident with potential for serious injury to the rider.
Tighten rear axle
to 12-15Nm.
Tighten
front axle
to 12-15Nm.
or
6mm Allen key /
torque wrench
Perform nal tightening on
Rear Derailleur Hanger Nut
using a 17mm wrench. Torque
to 12-15Nm. This action is
unique to initial assembly,and
should not require additional
adjustment.
Adjust brakes as per manufacturer’s
instructions.
To secure wheels, install the greased axle, through the drop
out and the wheel hub, aligning the threaded end of the axle
with the threaded insert. Once aligned and engaged, thread
the axle (clock-wise) into the threaded component of the insert
until the axle is secured tightly.
Cervélo Aero
Thru-Axle with
Removable Handle
(QRA-AERO2-F &
QRA-AERO2-R)

25 26
INTENDED USE OF THE SOLOIST BICYCLE
No one type of bicycle is suited for all purposes. Your retailer can help you
pick the “right tool for the job” and help you understand its limitations.
There are many types of bicycles and many variations within each type.
There are many types of mountain, road, racing, hybrid, touring, cyclocross
and tandem bicycles. There are also bicycles that mix features. For
example, there are road/racing bikes with triple cranks. These bikes have
the low gearing of a touring bike, the quick handling of a racing bike, but
are not well suited for carrying heavy loads on a tour. For that purpose you
want a touring bike.
Within each of type of bicycle, one can optimize for certain purposes. Visit
your bicycle shop and nd someone with expertise in the area that interests
you. Do your own homework. Seemingly small changes such as the choice
of tires can improve or diminish the performance of a bicycle for a certain
purpose.
NOTE: Usage conditions are generalized and evolving. Consult
your retailer or Cervélo Customer Service about how you intend
to use your bike.
NOTE: Cervélo bicycles are tested to a maximum combined
bicycle/rider/luggage weight of 100kg. Components have
different weight limits, and if replaced can alter the maximum
safe bike weight limit. Consult your retailer or Cervélo
Customer Service about what components are appropriate for
your bicycle.
High-Performance Road - Condition 1
Bikes designed for riding on a paved surface where the tires do not lose
ground contact.
Intended To be ridden on paved roads only.
Not Intended For o-road, cyclocross, touring with racks or panniers, or
mounting child seats or trailers.
Trade-O Material use is optimized to deliver both light weight and specic
performance. You must understand that (1) these types of bikes are intended
to give an aggressive racer or competitive cyclist a performance advantage
over a relatively short product life, (2) a less aggressive rider will enjoy longer
frame life, (3) you are choosing light weight (shorter frame life) over more frame
weight and a longer frame life, (4) you are choosing light weight over more dent
resistant or rugged frames that weigh more. All frames that are very light need
frequent inspection. These frames are likely to be damaged or broken in a crash.
They are not designed to take abuse or be a rugged workhorse.
Understand your bike and its intended use. Choosing the wrong bicycle
for your purpose can be hazardous. Using your bike the wrong way is
dangerous.
Maximum Weight Limit - Cervélo Soloist
Rider 194 lbs 88 kg
Gear* 11 lbs 5 kg
Total 220.5 lbs 100 kg
*Seat bag / water bottles / bento bag / handlebar bottle / storage mounts only
SOLOIST TORQUE SPECIFICATIONS
Component Torque(Nm) Notes
Frame
Bottom bracket - threaded - T47 50 Nm
Clean & grease the BB shell threads inside the frame. Grease the outside threads of the BB cups. Thread both sides of the
BB cups into the frame - noting that the right side cup is reverse threaded. Using a torque wrench and the appropriate
adaptor, tighten both sides to the specied torque until they are ush with the frame.
Rear derailleur xing nut (disc brake) 12 to 15 Nm Finger tight prior to rear wheel installation, nal torque to approximate torque using open ended wrench.
Removable FDM / FDM blanking plate 3 Nm Lightly grease the xing screws.
Water bottle cage xing screws 2 to 3 Nm Lightly grease the xing screws.
Correct tightening torque of threaded fasteners is
crucial to your safety. Always tighten fasteners to
the correct torque. In case of a conict between
the instructions in this manual and those
provided by a component manufacturer, consult
with your retailer or with Cervélo Customer
Service for clarication. Fasteners that are too
tight can stretch and deform. Fasteners that are
too loose can move and fatigue. Either mistake
can lead to a sudden failure of the fastener.
Use only a correctly calibrated torque wrench to
tighten critical fasteners on your bike. Carefully
follow the torque wrench manufacturer’s
instructions on how to set and use the tool for
accurate results. Ensure you read all relevant
documentation and have the correct tools prior to
attempting any adjustments yourself.
It is recommended that you permit your retailer to
perform the following adjustments, as they have
the proper tools and experience to ensure it is
done correctly.
Prior to assembling and tightening any bolts,
all threads must be generously greased with a
quality, non-lithium type grease unless the bolt
is pre-coated with Loctite® thread locker. All bolts
should have either grease or Loctite - but never
both. Torque wrenches with scale appropriate
for the particular torque setting are strongly
recommended for tightening all threaded
fasteners.
Cervélo strongly recommends the use of carbon
assembly compound/friction paste for all areas
of clamping to carbon ber, such as the seatpost
to frame, the stem to fork, and the handlebar to
stem joints. Benets to using this paste include
reduced corrosion potential, and a decrease in
required clamping force needed to support a
given load. The paste should be evenly spread on
the carbon surface under the clamped area, and
the applicable bolt tightened as per the following
recommendations.
WARNING: In case of a disagreement
or a conict between the following
list and any supplier literature on
recommended torque values for original
equipment components, please contact
Cervélo Customer Support for review and
clarication of the required torque prior
to installation.

27 28
Component Torque(Nm) Notes
Fork
Fork steerer compression plug 8 Nm Lightly grease the xing screw and tighten to the recommended torque.
Fork dropout insert 3 Nm
Lightly grease screw, install nger tight on NDS fork dropout. Install the axle (no wheel), and tighten until the axle ange
meets the fork dropout - then tighten the xing screw to recommended torque. Remove the axle, install the axle & wheel
to recommended torque, then remove. Re-torque the xing screw to recommended torque
Stem
Stem to fork steerer tube 5 Nm Lightly grease the stem xing screw and torque and evenly & alternately tighten to recommended torque.
Stem to alloy handlebar 5 Nm Lightly grease the handlebar xing screws and evenly & alternately tighten to recommended torque.
Handlebar
Brake/shift levers (to handlebar) 6 to 8 Nm Refer to manufacturer’s instructions for installation of brake/shift levers.
Accessory mount - front 2 Nm Lightly grease the xing screws.
Seatpost Clamp (frame to seatpost)
Wedge clamp – Rounded front 8 Nm Use carbon assembly compound between the seatpost and the frame.
Saddle (seatpost head bolts) – SP27 Aero Carbon
2 bolt head 8 to 9 Nm Ensure Loctite 242 is used on both bolts (1 is pre-applied).
Wheels
Cervélo aero thru-axle / Cervélo aero thru-
axle with removable handle 12 to 15 Nm Requires the use of a 6mm allen key type wrench or Removable handle.
Other
Pedals 30 to 35 Nm Refer to manufacturer's instructions.
Soloist (FM151)
Bike Name Soloist
ModelYear 2023
Serial Number Code SN151
Frame Code FM151
Fork Code FK151
Brake Mount Type Flat Mount Disc
Chainstay Height (Flat Mount) 25MM
Frame Sizes 48/51/54/56/58/61
Wheel Size 700C
BB Type T47 BBRight (Threaded)
Headset Type Intergrated 1-1/4" x 1-1/2"
Soloist (FM151)
Upper Headset Bearing Dimensions 1-1/4", 34 x 46.8 x 7, 45°x45°
Lower Headset Bearing Dimensions 1-1/2", 40 x 51.8 x 7.5, 36°x45°
Seatpost SP-SP27-ZERO, SP-SP27-15MM
Seatpost Clamp SPC-STA
Rear Derailleur Hanger DRH-WMN112
Rear Derailleur Hanger (Shimano DM) DRH-SDM
Front Derailleur Hanger FDM-0E0
Front Thru-Axle Dimensions 12 x 100MM
Rear Thru-Axle Dimensions 12 x 142MM
Fork Dropout Insert QRI-THD
Maximum Tire Width (Actual) 34mm with 4mm clearance*
SOLOIST FRAME DETAILSSOLOIST TORQUE SPECIFICATIONS
Tire measurements shall be taken at the
widest point of the tire when it is installed
on the rim and inated. 4mm of distance is
required between the tire and any frame or
fork element.
*

29 30
CERVÉLO CUSTOMER SUPPORT
Contacting Customer Support
Visit www.cervelo.com/contact-us to submit a
question to Cervélo.
Product Registration
Visit www.cervelo.com/support to register your
Cervélo bicycle through your MyCervélo account.
Manuals
Visit www.cervelo.com/product-manuals for
additional information on Cervélo products.
Warranty
Visit www.cervelo.com/warranty for information
on Cervélo’s warranty policy.
SOLOIST FRAME GEOMETRY
Soloist (FM151) 48cm 51cm 54cm 56cm 58cm 61cm
Reach 365mm 374mm 383mm 392mm 401mm 410mm
Stack 491mm 515mm 540mm 565mm 590mm 615mm
Bottom Bracket
Drop 74.5mm 74.5mm 72mm 72mm 69.5mm 69.5mm
Chainstay Length 410mm 410mm 410mm 410mm 410mm 410mm
Seat Tube Angle 73˚ 73˚ 73˚ 73˚ 73˚ 73˚
Head Tube Angle 71˚ 72˚ 73˚ 73˚ 73˚ 73˚
Fork Length
(Axle to Crown) 373mm 373mm 373mm 373mm 373mm 373mm
Fork Oset 57.5mm 51.5mm 45.5mm 45.5mm 45.5mm 45.5mm
Front Center 574mm 576mm 578mm 595mm 6 11 mm 628mm
Head Tube Length 86mm 106mm 130mm 156mm 184mm 2 11 mm
Wheelbase 972mm 974mm 977mm 994mm 1 011 mm 1028mm
Standover Height 439mm 479mm 503mm 527mm 550mm 574mm
Seat Tube Length 433mm 483mm 507mm 531mm 555mm 579mm
Top Tube Length 516mm 532mm 548mm 565mm 581mm 598mm

www.cervelo.com
CER-STA-V1 2022-02-14
SOLOIST RETAILER ASSEMBLY MANUAL
Table of contents
Other Cervélo Bicycle manuals

Cervélo
Cervélo PX Series User manual

Cervélo
Cervélo RCA Instructions and recipes

Cervélo
Cervélo ASPERO User manual

Cervélo
Cervélo R5 Disc User manual

Cervélo
Cervélo R5 Disc User manual

Cervélo
Cervélo P5X User manual

Cervélo
Cervélo S5 Instructions and recipes

Cervélo
Cervélo P5 User manual

Cervélo
Cervélo S3 2019 User manual

Cervélo
Cervélo R3 Rim User manual