Chasing M2 User manual

User Manual
V1.0
www.chasing.com
support@chasing-innovation.com

Disclaimer ROV
CHASING M2 is a professional underwater ROV/Drone designed for professional users and industrial appli-
cations. M2 has 8 Vectored Thrusters layout which allows OMNI movement in all directions. The Maximum
speed is 3 Knots, depth is 100 meters (330 FT) and the maximum horizontal radius is 200 meters (660FT).
Compatible with sophisticated attachments such as Robot Claw, GoPro camera, external LED lights and laser
scaler etc. CHASING M2 offers a built in 4K/ 1080p and 12-megapixel EIS image stabilization camera, 4000
lumen LED lights, removable battery and removable SD memory card. The aluminum alloy compact body
(weighs less than 4.5KG / 10lbs) allows single person operation and Quick-Deployment in 3 minutes. The
CHASING M2 is your portable, user-friendly and reliable light industrial underwater ROV.
1.Camera
2.LED lights
3.Thruster/ Propeller
4.Micro SD slot
5.Tether socket / Charging socket
6.Sensor
7.Main Cabin
8.Battery Cabin
9.Buckle bracket
10.Peripheral interface
11.Battery pull ring
(For battery disassembling)
12.Battery fastener
13.Battery twistlock knob
3
3
5
43
7
9
8
3
3
3
2
2
1
3
3
13
13
11
12
10
6
Thank you for purchasing the CHASING M2 underwater drone. Please read this entire
document carefully before using the drone. By using this product, you hereby signify
that you have read this disclaimer and all instructions carefully and that you understand
and agree to abide by the terms and conditions herein.
Chasing accepts no liability for damage, injury, or any legal responsibility incurred
directly or indirectly from the use of the CHASING M2 in the following conditions:
01. Damage(s) or injuries incurred when users are drunk, taking drugs, drug anesthesia, dizz-
iness,fatigue, nausea and any other conditions no matter physically or mentally that could
impair your ability.
02. Damage(s) or injuries caused by subjective intentional operations.
03. Any mental overcompensation caused by accident.
04. Failure to follow the guidance of the manual to assemble or operate.
05. Malfunctions caused by refit or replacement with non-Chasing accessories and parts, or
unauthorized modification, disassembly, or shell opening not in accordance with official
instructions.
06. Damage(s) or injuries caused by using third-party products or fake Chasing products.
07. Damage(s) or injuries caused by misoperation or subjective misjudgment.
08. Damage(s) or injuries caused by mechanical failures due to erosion, aging.
09. Damage(s) or injuries caused by operating the unit with a low battery alert.
10. Damage(s) or injuries caused by operating the drone out of maximum safe range and depth.
11. Damage(s) or injuries caused by knowingly operating the product in abnormal conditions
( such as the assembly is not completed, or the main components have obvious faults,
obvious defect or missing accessories ).
12. Damage(s) or injuries caused by operating the drone in a sensitive zone such as a military
area or private waters without official permission.
13. Damage or injury caused by using in bad water conditions (such as high winds, or turbid zone).
14. Damage or injury caused by uncontrollable external factors, including severe collision,
tidal wave. swallowed by animal.
15. Damage(s) or injuries caused by infringement such as any data, photo or video material
recorded by the use of the CHASING M2. 16. Other losses that are not covered by the scope
of Chasing's liability.

The Chasing M2 remote controller had integrated communication and control. It connects directly to
the drone via the included tether and connects wirelessly to your mobile phone/tablet via Wi-Fi. It
allows the drone to display a live video feed on your phone/tablet, which enables users to control the
drone in real-time. The base station's HDMI output can also be used to display a live video feed to a
larger screen.
Remote controller
1. Power switch: Turns controller on/off
2. Power Indicator:
Green (High power)
Blue (Medium power)
Red (Low power)
3. Signal Indicator:
2.4G:2.4Ghz Wi-Fi indicator,always on when working
5G:5Ghz Wi-Fi indicator,always on when working
ROV(drone):Indicates the communication status
between the controller and the drone (Steady light
indicates successful connection; Blinking light indi-
cates disconnection.)
4. Unlock:Unlock/Lock,current state of the Thruster will show on the APP
5. One-key reset:Short press to reposition the ROV return to a horizontal state/ Long press
to switch control mode
6. Led Control:On / off led light (third gear)
7. Safety Buckle:Can be used with a safety rope to prevent the remote control from falling
8. Control Sticks:Used to control the navigation of the ROV
9. Phone/Tablet Clamp:Used to attach phone/tablet mount to mounting bracket
10. Clamp Button:Pull apart the two ends and put in
the phone/tablet, then press this button to tighten
11. Robotic Arm Control:Short press to close and stop,
long press for one second to open
12. Photo/Video:Short press to take photos, long press
to start / end recording video
13. Left Angel Adjustment:Adjust the pitch angle
14. Right Angel Adjustment:Adjust the rollover angle
15. HDMI Socket:1080P HD image real-time output
16. Tether Connection Socket/Charging socket
* Note: Do not put the controller in the water to avoid damaging the device, damages caused by water ing-
ress are not covered by the warranty.
9
8
7
6
1
3
2
5
8
10
11
15
14
12
16
13
4
Handle indicators introduction
Battery:
Red:10%↓ Red light flashes quickly;10-19% Red light flashes slowly;20-29% Red light always on.
Yellow:30-69% Yellow light always on;
Green:70-100% Green light always on;
Signal Indicator:
2.4G:2.4Ghz Wi-Fi indicator,always on when working.
5G:5Ghz Wi-Fi indicator,always on when working.
ROV:Indicates the communication status between the controller and the ROV (Steady light indicates
successful connection, Blinking light indicates disconnection.)
Gesture back Button:
The blue light is always on when the ROV is in a non-horizontal position
Unlock Button:
Locking: No lights
Unlocking: Blue light on
Led Control Button:
Bright light:Blue light always on;
Low light: Blue light flash;
No light: Blue light off.
100/200 meters Tether & Winder
The tether is used to connect the drone and the remote controller
The winder is used to store the tether.
1. Tether connectors
2. Tether
3. Winder
4. Fastener
* Warning: ·Do not put exposed (unconnected) tether into the water or plashing liquid to the tether.
·Check whether the O-ring on the tether connector pre-dive, make a replacement when it is
missed or damaged.
2
4
31
1

Wi-Fi
Wi-Fi
Gladius_5G_xxxxx
xxxxxxxxxx
CHOOSE A NETWORK...
6:27 89%
Settings
xxxxxxxxxx
xxxxxxxxxx
Chasing_xxxxx
a. On the Phone/Tablet, go to Wi-Fi settings.
b. Wait for 5-10 seconds and the Chasing_xxxx network will appear as an option.
c. Click to connect and enter the Wi-Fi password: 12345678
4 Wi-Fi Connection
Open the APP and enter the camera, you will see the real-time scene transmission.
5 App interface Introduction
a. Grasp the grips on both sides of the ROV with both hands and gently throw the ROV into the water.
b. Unlock the Thruster(motors) to dive.
c. For a better experience, it is recommended to ensure that the water depth exceeds 1 meter.
6 Drop the ROV into Water
* Note:1. As the drone will connect to the 2.4G Wi-Fi by default, you can switch to 5G Wi-Fi to get a better
experience. (Turn on 5Ghz in the Settings-ROV, the drone's Wi-Fi will automatically restart, and
you may need to re-connect to the Gladius Wi-Fi).
2. You could check more guidance videos on the website page https://www.chasing.com/,or you
could contact the global support team with any questions :[email protected]om
Installation & Connection
CHASING GO1 App:
Scan the following QR code or visit the IOS APP
Store/Google Play/Chasing website for downloading.
(For IOS 9.0 or later/Android version 4.4 or later)
1 Download CHASING GO1 App
a. Insert one end of the tether connector into the remote controller connector socket.
b. Reserve a suitable length and hang the Buckle on the Buckle Bracket, and make it tension.
c. Insert the other end of the tether connector to the ROV.
d. Securely hand-tighten both connectors.
2 Connect ROV with Remote Controller
a. Turn on the remote controller power button.
b. A few seconds later, the remote controller’s
indicator lights up, 5G or 2.4G light will be always on.
The drone LED lights will flash shortly,
accompanied by two self-tests sounds.
c. Check all the connectors and lights pre-dive, and
unlock the ROV when everything is ready underwater.
3 Start (turn on) the ROV
* Warning: Check whether the O-ring on the tether connector pre-dive. If it is missed or damaged, please
replace it in time.
2
5
General
Settings Compass
VR Live Stream
Shrink
Video Slow
Motion
Return
Side
Menu
Depth
Light
Angle Unlock/lock ROV Mode
3D
Gesture
Signal Strength
Battery
White
Balance
Lock
Picture
Video
Recording
Camera
Settings
Temperature

Wi-Fi
Wi-Fi
Gladius_5G_xxxxx
xxxxxxxxxx
CHOOSE A NETWORK...
6:27 89%
Settings
xxxxxxxxxx
xxxxxxxxxx
Chasing_xxxxx
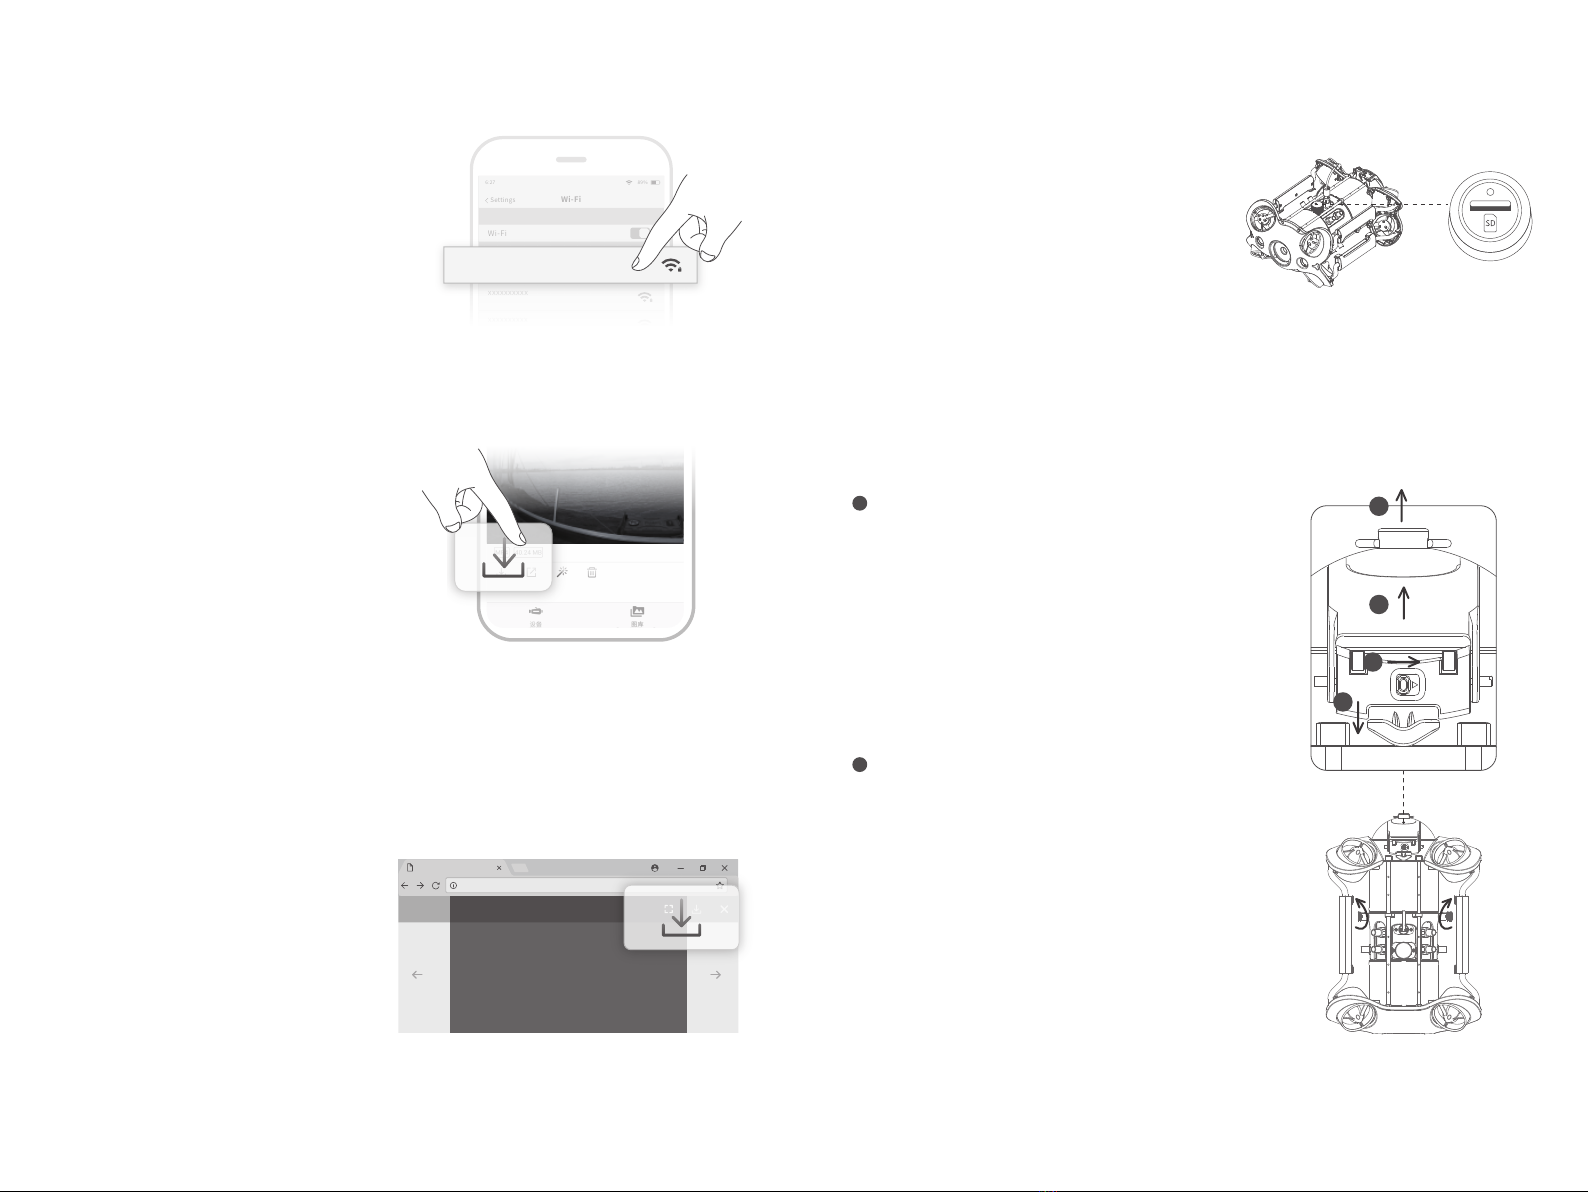
Video and Photo Download Micro SD card copy
1 )R emove the cover on the SD card socket counter
clockwise, then open the waterproof rubber plug,
and gently press the SD card. It will pop up aut-
omatically, then remove the SD card.
2)Read the SD card in a Card reader, and copy the
images with computer.
3 )I nsert the SD card back to the SD card socket after
copying the images, press gently to ensure the
SD card and waterproof rubber plug are locked,
and tighten the cover clockwise downward.
Disassemble and Install the
Battery compartment
1 )T urn the knobs on both sides of the fuselage 90°
to the shallow card slot;
2 )T urn the switch ① on the slider to the left, and
pull the lock assembly upwards while holding
the chute ②;;
3 ) P ull the lower sides of the pressure plat③, by
hand, pull down to deform the pressure plate ③,
and make the buckle come off the rear bracket.
4 )P ull the Battery compartment slowly to pull it out.
a Disassemble:
1 )R otate the knobs on the both sides of the fuselage
90 ° to the deep card slot;
2 )S lowly install the Battery compartment along the
chute under the fuselage. Press down hard until
you hear a "click" sound, and the knobs close in
place.
3 )P ull the lower sides of the Pressure Plate by hand,
pull down to deform the Pressure Plate ③, make
the buckle fasten on the rear bracket;
4 )P ress down firmly on the chute of the locking
assembly. When you hear a “click” sound, the
buckle is snapped into place properly, then the
installation is complete.
b Install:
* Warning:1. Before removing or installing the Micro SD card, please switch remote controller power button
to off, and wipe off the water on the ROV;
2. Check the O-ring on the tether connector, please be sure the O-ring cannot be squeezed out
when tightening the cover. If it is missed or damaged, please replace it in time.
3
4
1
2
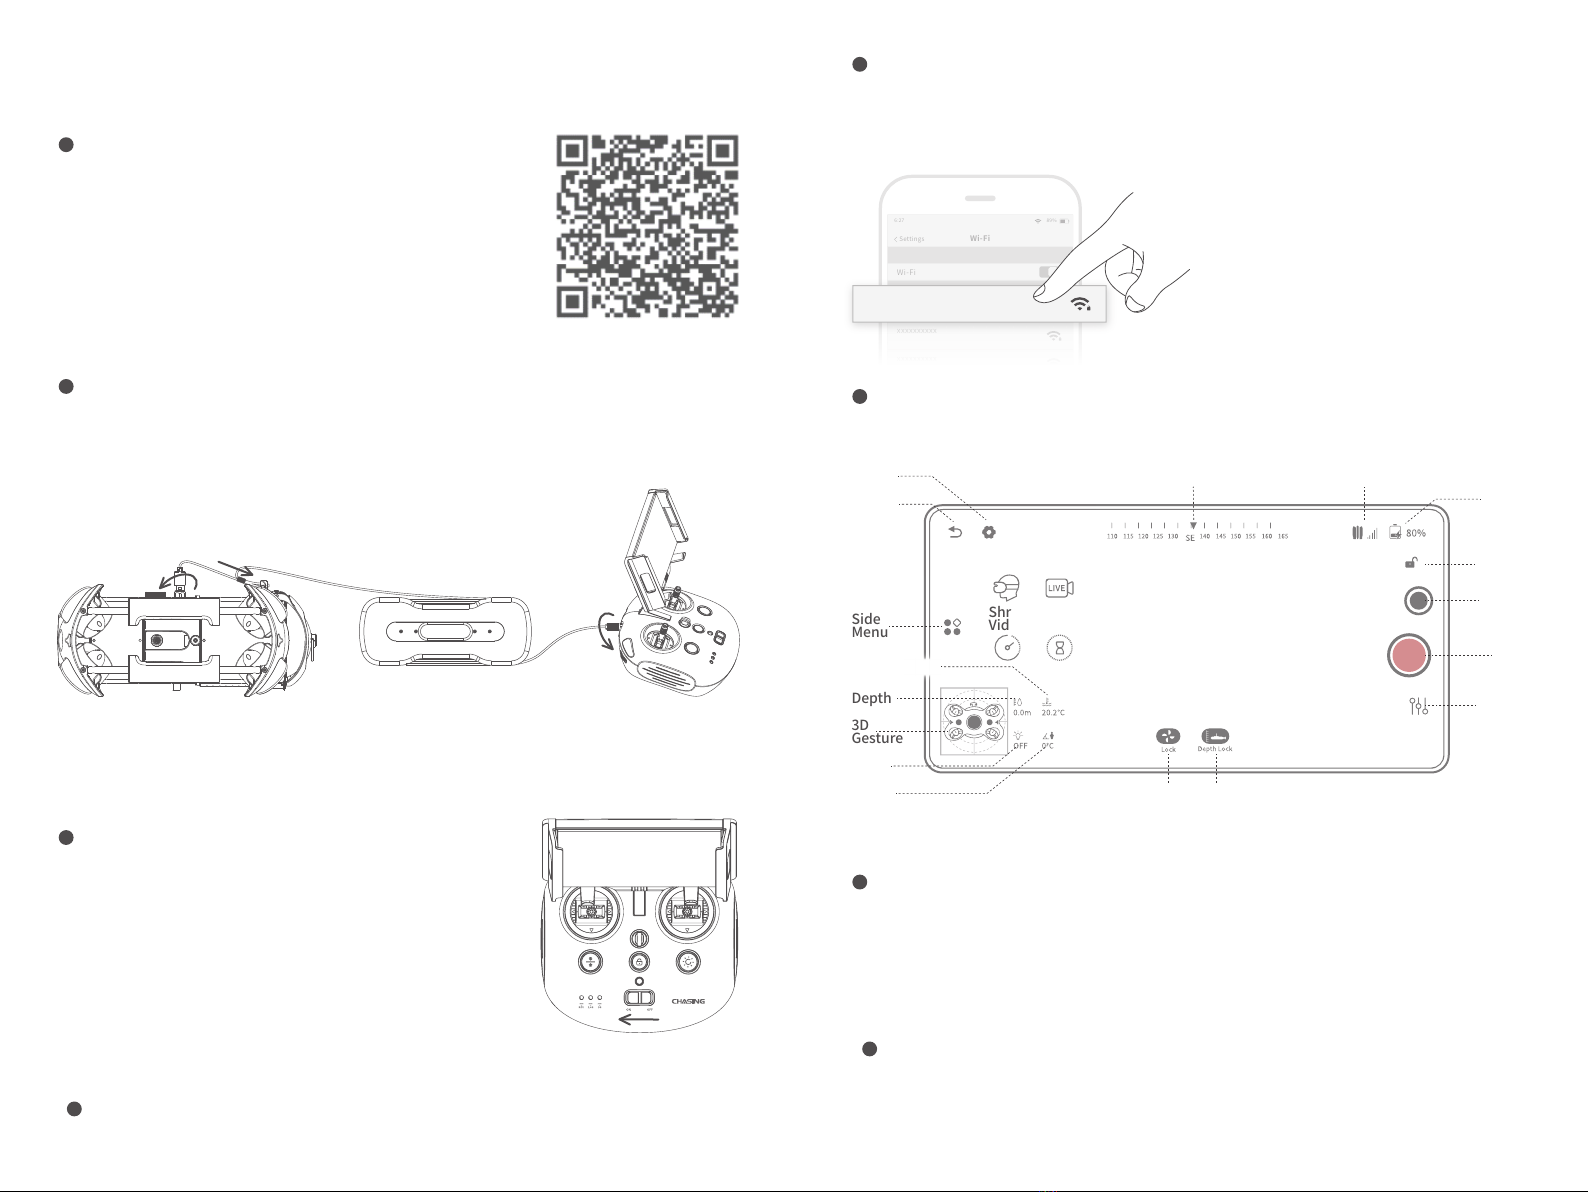
1 )C onnect the ROV with remote controller
by the tether, Switch remote controller
power button to on.
2 )F ind the M2_xxxxxxxx Wi-Fi on the phone/
tablet/laptop Wi-Fi list.
3)Input M2 Wi-Fi Password :12345678
Connect Wi-Fi
1 )O pen CHASING GO1 App, click the Media
button in the lower right corner.
2 )F ind the video/photo that you want to
download. Click the download button and
the image will be saved directly to the
phone/tablet's photo album (Download
folder).
Download to Phone/Tablet
1)Open the web browser and type IP ad-
dress:192.168.1.88
2)Find the video/photo that you want to
download. Click the download icon and
save, then the images will generally save
in the Download folder.
3 )I t is recommended to use Firefox or Google
Chrome browser for better experience.
Download to Computer
(laptop or the computer which could use Wi-Fi)
Media
Not secure | 192.168.1.88
1/11

Navigation
M2 has 8 Vectored Thrusters layout which allows OMNI movement (up, down, left and right, back and forth,
pitch, roll, and pan) in all directions. The default is basic control mode, suitable for beginners. Navigation
attitude and remote control are as follows:
If necessary, users can switch modes by long pressing the "One-key reset " button of the remote controller.
When switching to the advanced mode, the ROV can achieve all-round full-freedom movement.
The advanced mode is based on the first-person perspective.
Charging Guidance
ROV & Remote Controller
Adapter(25.2V 2.9A) : It is a 3 in 1 charger that could charge the ROV, Remote Controller, Battery Cabin & E-reel,
Red light indicates Charging, green light indicates fully charged.
Rov
(Flight Direction)
Forward/backward
Remote
Controller
Left Joystick
Rov
(Flight Direction)
Turn Left / Right
Remote
Controller
Left Joystick
Pan Left and RightRight Rocker Up / DownRight Rocker
Turn the Dial To Adjust
the Pitch Attitude
Scroll the
Left Wheel
Turn the Dial to Adjust The Roll
Attitude, Release to Fix Status
Scroll the
Right Wheel
Specifications
ROV
Size
Weight
Battery
Maximum Depth
Maximum Speed
Battery Life
Battery Cycle
Operating
Temperature
15*10.5*6.5 inch
4.5kg
97.68Wh
328 ft
1.5 m/s (3 Knots))
≤4h
(Depend on working condition)
>300times
14℉~113℉ Tether & Winder
328ft Version (100M)
656ft Version(200M)
1.8kg
2.5kg
Adapter
Adapter
ROV Charging time
Remote controller
charging time
2.9A/25.2V
2.5h
2h
Dimmable LED Lights
Brightness
Color Temperature
CRI
Dimming
2 x 2000lm
5000K~5500K
85
Three adjustable
Sensor
IMU
Depth Sensor
Temperature Sensor
Three-axis gyroscope
acceleration
compass
<±0.25m
<±2℃
Camera
CMOS
Aperture
Focal Length
ISO Range
Field of View
Maximum Image
Resolution
Image File Types
Normal video
Slow motion video
Time-lapse video
Video Maximum
Stream
Video Type
SD Card Memory
1/2.3
F1.8
1m
100-6400
152°
12M
JPEG/DNG
4K UHD:3840*2160 30fps
FHD:1920*1080 30/60/120fps
720P: 8x (240fps)
1080P:4x (120fps)
4K/1080P
60M
MP4
Standard 64G
(maximum support 512G)
Remote Controller
Size
Weight
Battery capacity
Battery life
Wireless
HDMI
6.3*6.1*4.9 inch
0.685kg
2500mAh
≥6H (Depend on working
condition)
Wi-Fi
1080P
* Note: in the basic mode, the maximum Angle of pitch and roll is about 80 degrees.

Maintenance and Precautions
This content is subject to change without prior notice.
you could have the latest user manual by the
https://www.chasing.com
Navigation Safety
1
Battery Protection
2
Other
1. Do not turn on the LED lights before entering the water to avoid damages.
2. Check if the Thrusters/propellers are getting stuck by seaweed or external matters, rinse the ROV with fresh
water and then dry and put it back in the packing box.
3. Remote control cannot be washed with water, please clean it with towel.
4. The pull ring at the end of the battery can only be used to remove the battery, not to lift the ROV, otherwise
it may damage the ROV.
5. Do not place heavy objects on drone or accessories to avoid possible damage.
6. People under the age of 16 should only use this drone under adult supervision.
7. When not in use, please do not expose the drone and accessories under sunlight. Store it in a cool place or
in a special box.
8. Chloride or other chemicals can erode Chasing M2. Do not use if the pool is under high chlorine level.
Support
1. Any questions about our products please contact by support@chasing-innovation.com or leave a message
on the Chasing Website (https://www.chasing.com) chatting window.
2. You can also join the OFFICAL CHASING OWNERS GROUP on Facebook for latest news, app update and
other shared stories with Chasing Products worldwide.
Open sea
navigation Relatively clear
water quality, no
dense seaweed
No dense radio
or radar signals Do not dive
more than
330 ft
330ft
Charging Protection
3
·Only use the Chasing standard adapter.
·Red light means charging.
·Green light means fully charged.
a. Do not touch the propellers of the Thruster
b. Do not unlock the Thruster for more than 30 seconds in the air to avoid overheating
c . After using the ROV in the salt water, please put it in fresh water for about 1 hour and turn it on, let the
drone run for10 minutes to discharge the salt, and try out the water after cleaning with a towel.
Thruster/ Propeller
4
Connector Sockets /Tether Connectors
5
·Check the Connector socket and tether pre-dive, keep dry and clean.
Salt and moisture may cause corrosion of the connector. Be sure to wash the socket with fresh water if
the interface has water stains, and make the connectors dry after cleaning.
O-ring
6
· Check whether the O-ring on the tether connector/Battery socket/SD card socket pre-dive, and make
a replacement when it is missed or damaged.
· It is recommended to grease the o-ring at the interface seal for maintenance each time when the battery
cabin and Micro SD card are removed and installed
Do not run out
of battery power Charge when
power is less
than 25%
When not in use,
keep battery power
at 50% - 70%
Working
temperature
-10 °C ~ 60 °C
( -18°F-140°F)
Other manuals for M2
2
Table of contents
Other Chasing Drone manuals

Chasing
Chasing GLADIUS MINI S User manual

Chasing
Chasing E-Reel User manual

Chasing
Chasing GLADIUS mini User manual

Chasing
Chasing F1 User manual

Chasing
Chasing GLADIUS mini User manual

Chasing
Chasing F1 User manual

Chasing
Chasing GLADIUS mini User manual

Chasing
Chasing ROV Operating manual

Chasing
Chasing Gladius Standard Pro User manual

Chasing
Chasing M2 S User manual