Chinavision CVUZ-9434 User manual

USER MANUAL


Introducing vour MID
Features: Press and hold to power on/offthe MID
Short press to put the MID into sleep mode. press any key will
key Press to retum to the Home screen from mlvhere.
Press and hold to rotate the Applications window
Menu kev Press to open a list ofactions available on the cunent screen.
Press and hold to see the menu shortcuts for that screen.
The shortcuts will blink in place as you hold down the Menu kev
Back key Press to go back to the previous screen or to dismiss a dialog box
or menu,
Power Slide to tum orVoffthe device power
Battery
__. You can charge your MID via charger. MID has an internal charging battery.
We suggest to charge up the battery when the battery power is low.
Charge via the charger
i. Pl]rg in the Power adapter to Power adaptor port of device, Battery chtrge
LED will light up. Charging procedure will be completed once the LED tums
green.
2. During battery charging,you can operate MID.
The charging time will be longer when operating md chtrging at sme time.
SD card
You device comes with a removable microSD memon crd nhere vou can
store multimedia files, such as video clips, music rracks. somd filc. and images.
Copy files to the memory card
You can transfer files such as music and pictures between your MID and
you computer.
.To view files on your MID,just launch the appropriate application and
navigale to the file wilhin rbar applicarion.
1. Connect your MID to your computer using the USB cable.
2. On the home screen, press the Menu key. -
3. Touch Notifications, touch USB conneited.
4. Touch Turn on USB storage.
5. On yom computet go to the Removable Disk folder.
6. Locate the files on the computer that you want to copy to vour MID.
7. Copy and paste files to the desired location in the Removable Disk folder
Delete files on the memory card
l. Locate the file that you want to delete.
2. Touch and hold the file name.
3. TouchDelete.
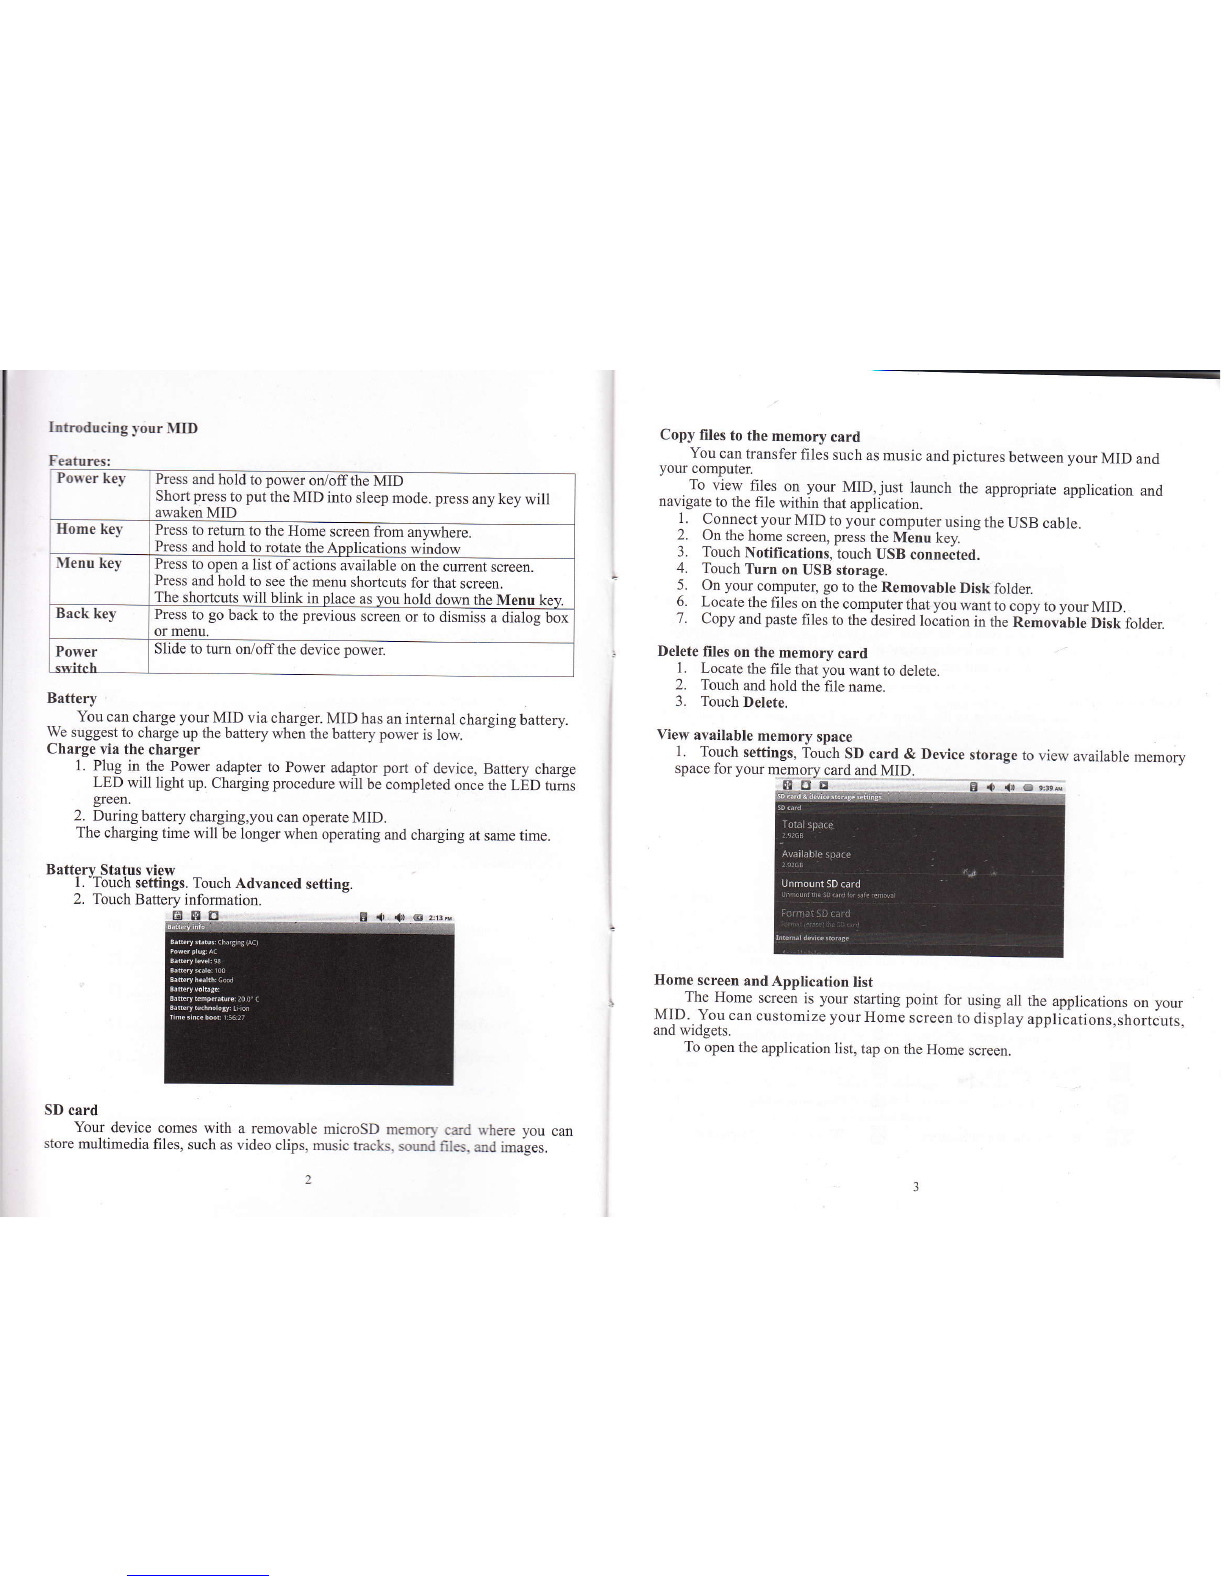
View available memory space
1. Touch settings, Touch SD 9a-rq & Device storage to view available memory
space for your memory card and MID.
Home screen and Application list
The Home screen is yom starting point for using all the applications on your
MID. You can customize vorrr Home screen to display applications,shortcuts,
and widgets.
To open the application list, tap on the Home screen.
Batterv Status view
1. "Touch settings. Touch Advanced setting.

\otification and
. ^-{long the top ofyou screen is the status bar. On the left side, icons will apper
nolii you of new messages, upcoming calendar events, alams, and more. On the
rigit side of the status bar, you will see ihe comection status icom.
Read notifications
. \!'hen you see a notihcation^in the status bar, tap the br and slide you finger
do$n the screen to open the list ofnotifications.
To open the notification, tap the item.
To clear notifications, Touch Clear at the top ofthe notification window.
19L1'1&!'++- .-E {--g-q !'?
IIDMI & Host
Usinglhe IIDMI outDur
.l louch settings.'touch Display.
2. Touch HDMI. selecr - ouprt.od.
3. Press Back. Touch Sound.
g usB dehugEing .onne.ted
hhd to dhr. lsB deediq
$ useconn*teu
4. Touch HDMI switch to open the sound of HDML
USB Host
& es rite rrptorer
E Updaaer.vailaile
To close the notification window, slide your finger up the screen
. USB. host supports USB-mouse, USB-keyboard, 3G Modem
peripherals.
Language & keyboard
Language
You car serting language for MID .To sening
I ]"r"| selrings. louch language & kelboard.
l. louch Select language.
3. Touch the language rhat you wanl to sening.
Keyboard
You can serting keyboard lor MlD.To sening
J. Touch seflings. rouch language & keyEoard.
2. Touch rhe keyboard that you wmr to use.
and other
&No SD card {n Battery is charging
EI USB comected 6Wireless services are off
Awarmng Silent mode
dr Volume reduction +) Volume increase
Status Bar:
@New e-mail message oDownloading
6Upcoming event iContent domloaded
tr Song is playing mAlarm is set
&SD card is fu1l &Data is syncing
aa
3I Battery change indicators aWi-Fi seruice comected

You cm install other keyboard for MID
Manage Applications
Allow install of non-Market applications
l. Touch settings.
2. TouchApplications.
3. Touch Unknown sources.
Uninstall Application
l. Touch settings.
2. Touch Applications.
3. Touch Manage applications.
4. Touch the application that you wdnt to Uninstall.
5. Touch Uninstall.
6. Touch OK. Touch OK.
1. On the home screen touch the Application button.
2. Touch Music, Touch Songs. Vou can also touch Artists, Albums, or
Playlists.
3. Touch the song to play.
Add sotrgs to new play list
2. On the home screen, touch the Application button.
3. TouchMusic. Touch Songs.
4. Touch andhold the song that you wmt to add to the play list.
5. TouchAddtoplaylist.
6. Touch New.
7. T)?e the name for rhe play list.
8. Touch Save
Delete play lists
l. On the home screen, touch the Application button.
2. Touch Music. louch playlis(.
3. Touch and hold the play lisr you wmr lo delere.
4. Touch Delete
Photo
^__ Y-our MID can play the photo file formats as follows:JpG. BMp. pNG.
GIF. You can keep these files in SD card.
Slideshow the photos:
1. Copy the photo to SD card.
2. On the home screen touch the Application button.
3. Touch Gallery.
4. Touch thefoldu ofphotos. Touch the photo.
5. Touch Slideshow.
Access and play music
Music
_. .You _music is organized into four categories: Artists, Albms, Songs, and
Playlists. Select a category to view the lists within each. Once in a categot,.keep
selecting until you reach the music you want to play. For exmple, if yoriseiect the
Artists category you will see a list ofartists in A-Z order, the iist opens to display
that artist's albums. Select m album, and the album,s song list displays.
._-._ IorI-\!_P *ill play the following music file formats:Mp3,WMA,OGG,
WAV. andMIDI.

Your MID can play the vrdeo file formats as follows:RMVB.
MP,l. WMV. 3GP. MPG You can save these files on SD card.
Play a video:
1. Copy the video to SD card.
2. On the home screen touch the Application button.
3. TouchUTPlay.
4. Touch the video.
RM. AVI.
wi-Fi
Your MID can conirect to Wi-Fi networks.To connect
1. Touch settings, touch wireless & networks.
2. Touch Wi-Fi to tum it on. Touch Wi-Fi settings. YourMlDscansfor
available Wi-Fi networks.
3. Touch the Wi-Fi network that you want to connect to.
4. Touch Connect. Some network may need you input the password.
On the Wi-Fi settings screen, press the Menu key, touch Advanced, you will
get more settings for Wi-Fi.
Browser
Go to your home page
The Browser always opens to the last Web page you were viewing.
The frrst time you enter the Browser after powering on, your home page will display.
Change your home page
1. Touch Browser.
2. Press the Menu key.
3. Touch more, touch settings, touch Set home page.
4. Type the site address and touch OK.
Visit Web pages
1. Touch Browser.
2. Press the Menu key.
3. Touch address ban
4. T)?e the Web address, touch Go.

Coegle r1
With.Gmal], all you messages on the same subject are threaded together into
conversations. To read the messages in a conversation, open the conversation md
scroll though the individual messages. The most ,."iri -"r.ug" appears at the
bottom-
Need network comection
Gmail
message, its label
Read new messages
l
-,-,, .--.;r,6_0.s_&-1*
n :. il@gma'.om
L - - - --. -t
Need network connection
Maps
Find a location
l. On the Home screen, touch the Application button.
2. Touch Maps.
3. Press the Menu key.
4. Touch Search.
5. Tlpe an address. Touch Go.
6. Touch to see the result on a map.
Get direction
1. On the Home screen, touch the Application Iist button.
2. Touch Maps.
3. Press the Menu key. Touch Directions.
1. 1, f" From field, rlpe you starting address, at to To field, type you
destination address. Touch Go.
vrewing. To view
l. On the Home screen, touch the Application button.
2. Touch Maps.
3. Press the Menu key.
4. Touch Map mode. ll
1. On the home screen, touch Gmail to display you inbox.
2. Touchamessagetoread.
Write new messages
1. On the Home screen, touch Gmail to display you Inbox.
2. Press the Menu key.
3. Touch Compose.
1. Typ" a name or e-mail address in the To field. Matching contacts will appear
Select the contact or continue typng.
5. T)?e the subject md message.
6. To attach pictures, press the Menu key and touch the picture to attach.
7. Touch Send.
1
)
IO

fouch satellite, Traffic, or Street View.
O sE,i usaE6 3. Touch the category and the video in that catcgory.
Search for YouTube videos
l. On the Home screen, touch the Application button.
2. Touch YouTube. The main YouTube screen appears showing popular video
categories.
3. Press the Menu key.
4. Touch Search. Type your search.
5. Touch Search.
Recorder
A sound recordins and nlar back:
L On the Home"screeh. t6uch rhe Applicalion bunon.
2. Touch Sound Recorder.
3. Touch Record and Touch Stop when thc sound recording is complctcd.
4. Touch Use this recording.
5. On the Home screen, touch the Application button.
6. Touch Music.
7. Touch Playlists,touch My recordings.
8. Touch the recordings to play.
Camera
Shootine and plavback a video:
l. Oii rhe Honie screen. rouch rhe Application bunon
2. Touch Camera.
3. Drag the button to the shooting mode.
Bro$se contents
When you fist enter Mtrket, you will see featured items, a list of item
caregories, a link to search, and a link to Mv domloads.
. Scroll through the featured items or ielect a category to browser its contents,
then select a subcategory Within each subcategory y-ouian select to view items
sorted By.populrltf 9. ny date. Note that all iiems in s subcategory are listed in
each tab,-those in the By popularity tab are sorted most popular to ieait popular, md
ihose in the By date tab are sorted newest oldest.
IbuTube
YouTube is a free online video_streaming seruice that allows anyone to view
and share videos that have been uploaded by the youTube members. you do not
need a YouTube account to browse ind view videos.
\\atch YouT[rbe videos
l. On the Home screen, touch theApplication button.
2. Touch YouTube. The main youiube screen appears showing popular video
categories.
13

4. Toch Shooting. When finished recording press the Stop
5. On the Home screen, touch the Apptication button.
6. Touch Gallery. And fomd ihis video just taken.
7. Touch the video md Select a video player to play.
Photo shoot
1. On the Home screen, touch the Application button.
2. Touch Camera.
3. Drag the button to the photo mode.
4. Touch shooting.
Product Specifications
CPI] Samsms V2 1 0,Cortex-A8, I GHz
3D Grz PowerYR SGx540
Storage 4GB/8GB/l6GB option
OS Android2.3/4.0
Memory 5I2MB DDR2
Touch Capacitance Multi-Touch
V'iIFI 802.llb/e/n
Bluetooth V2.1+EDR
JU Built-in 3G Module(option),
WCDMA"/HSDPA,support calling. message.
Wifi ad hoc
GPS Built-in GPS Module(ot tion )
Camera Front-0.-lM.Rem-2M oixels
USB USB Host 2.0.USB Device 2.0
SD Ilo to 32G Micro SD
HDMT 1 080P 30fts
Video codec 1 080p Hardware decode:H263 /I1264/MPEG4/^/C- 1
Support video fomt:
A\1 /3 GP/MP 4 /H2 64AVMVMKVA4OV/FLV/1/OB
RMVR(4ROn\
Audio codec
Photo JPEG/PNG/BMP
Battery 4000AW7.4v
Power 9V/ 1.5A adapter chusine

+ GPS
Find this function
.r& 3G Ca11s and message
+ 3G Setting Interface
Support 3G nobile versjon, plug in SIU card, Can use mob:.1e coflnunication
function, That cal1, nessage data communication, the Intemet functions. et.:.
Wl. SI[,{ card slot will inscrt SII\1 card:
2. The inlerf.rce into the systen, through the pover nranagement ivindov
components, open 3G nodule power supply!
Through "long press the interface ) widget-> pover control,, to add the parts
i .o ,rnon l
Enter "Settings ) wireless and network-) lnobile network Settings
pic 7.2 GpS interface
GPS Map InstalLation and use nethod, please refer to kailide mao datzr
Pic 7.1 GPS Module power interface
Cl1ck "Program inlerface ffi -, m,,
re

Dialing and Call interface
Find this fuction Click .,program interface & -, m,,
Through rhe application, can the speech conmunication, check call
age0ent the address book
Itr conlacts interface, can be a contact nanagement
Pic 4.5 Contacts manage
records, nan
In "dialing page" to dia1,
up and wait operalion
Pic 4.3 3G Call interface
bluetooth ca1is, voice comunication throu6;h and hang
Pic 4.4 Dialing interface
Table of contents
Other Chinavision Tablet manuals

Chinavision
Chinavision CVUZ-9410-XMAS User manual

Chinavision
Chinavision CVUZ-7423 User manual

Chinavision
Chinavision CVUZ-74111 User manual

Chinavision
Chinavision CVWG-PC22 User manual

Chinavision
Chinavision T07R User manual

Chinavision
Chinavision CVWF-PC31 User manual

Chinavision
Chinavision CVUZ-74120 User manual

Chinavision
Chinavision CVZT-7476 User manual

Chinavision
Chinavision CVUZ-9410 User manual

Chinavision
Chinavision CVYF-8426 User manual