Chipkin CAS 2700 User manual
Toll Free: 1 866 383-1657
3381 Cambie St., #211 Vancouver, BC Canada V5Z 4R3
Chipkin™ CAS 2700 HTTP Push
USER MANUAL
VERSION: 0.08
PRODUCT NUMBER: CAS‐2700
DOCUMENT REVISION: 1
Chipkin™ ™ CAS 2700 HTTP Push User Manual
3381 Cambie Street, #211 © 2018 Chipkin Automation Systems
Vancouver, BC, Canada, V5Z 4R3 All rights reserved
1-866-383-1657 Chipkin.com Page 2of 22
TABLE OF CONTENTS
TABLE OF CONTENTS .........................................................................................................................................2
LIST OF FIGURES ...................................................................................................................................................3
LIST OF TABLES .....................................................................................................................................................3
COPYRIGHT & TRADEMARKS ...........................................................................................................................4
DISCLAIMER ...........................................................................................................................................................4
CONFIDENTIALITY ...............................................................................................................................................4
DOCUMENT REVISION HISTORY.....................................................................................................................4
1. PREFACE..................................................................................................................................................................5
WELCOME ...................................................................................................................................................5
CHIPKIN........................................................................................................................................................5
SAFETY WARNINGS ..................................................................................................................................5
CUSTOMER SUPPORT ..............................................................................................................................5
2. CONNECTIONS .....................................................................................................................................................7
NETWORK CONNECTIONS.....................................................................................................................7
COMUNCATION PORTS...........................................................................................................................8
3. HTTP Push Configuration.....................................................................................................................................9
End Point Configuration...........................................................................................................................11
Method and Headers Configuration......................................................................................................13
Select End Point .............................................................................................................................14
Method Configuration ..................................................................................................................14
Header Configuration....................................................................................................................15
Task Configuration....................................................................................................................................17
Default JSON..................................................................................................................................17
VeederRoot JSON..........................................................................................................................19
THANK YOU..............................................................................................................................................................22

Chipkin™ ™ CAS 2700 HTTP Push User Manual
3381 Cambie Street, #211 © 2018 Chipkin Automation Systems
Vancouver, BC, Canada, V5Z 4R3 All rights reserved
1-866-383-1657 Chipkin.com Page 3of 22
LIST OF FIGURES
Figure 3.1-1. Network Connections Block Diagram............................................................................................7
LIST OF TABLES
Table 1 - Document Revision History ....................................................................................................................4
Table 2 - Communication ports ...............................................................................................................................8

Chipkin™ ™ CAS 2700 HTTP Push User Manual
3381 Cambie Street, #211 © 2018 Chipkin Automation Systems
Vancouver, BC, Canada, V5Z 4R3 All rights reserved
1-866-383-1657 Chipkin.com Page 4of 22
COPYRIGHT & TRADEMARKS
Copyright © 2017 Chipkin Automation Systems All rights reserved.
TM(TM) are trademarks of Chipkin Automation Systems
DISCLAIMER
Chipkin Automation Systems™ has limited its liability for damages incurred by the customer or its
personnel in the contractual documents pursuant to which the product is provided to the customer.
The information and specifications contained throughout this user manual are up to date at the time of
publication. Chipkin Automation Systems has used, and continues to use, its best efforts to maintain
this user manual to reflect the most current configuration of the product. Chipkin Automation Systems
reserves the right to change the contents of this user manual at any time without notice and assumes
no liability for its accuracy. In the preparation of this user manual, Chipkin Automation Systems has
incorporated, and/or compiled service information and maintenance procedures sourced from
manufacturers and vendors of parts and components used in the manufacturing of this product.
Therefore, Chipkin Automation Systems shall not be liable for omissions or missing data. It is not the
intension of this user manual to instruct service technicians in using common sense, basic skills and
rules of service repair.
CONFIDENTIALITY
The information contained in this document is the intellectual property of Chipkin Automation
Systems and is Commercially Confidential. No part of this document may be reproduced or
transmitted in any form or by any means, electronic or mechanical, for any purpose, without the
express written permission of Chipkin Automation Systems.
DOCUMENT REVISION HISTORY
REVISION
DATE
AUTHOR
NOTE
1
2019-Mar-12
ACF
Document created
Table 1 - Document Revision History

Chipkin™ ™ CAS 2700 HTTP Push User Manual
3381 Cambie Street, #211 © 2018 Chipkin Automation Systems
Vancouver, BC, Canada, V5Z 4R3 All rights reserved
1-866-383-1657 Chipkin.com Page 5of 22
1. PREFACE
WELCOME
As a new owner of Chipkin Automation Systems’™ (CAS) Gateway you have joined thousands of
satisfied customers who use Chipkin’s protocol gateways, data clients and integration services to meet
their building and industrial automation requirements. Our configuration expertise in this field
combined with free BACnet and other tools ensure your success; and our customer support via phone,
email and remote desktop tools means that we’re there when you need us. Thank you for choosing
Chipkin’s products.
CHIPKIN
Chipkin offers expert solutions for your building and industrial automation requirements. We develop,
configure, install and support gateways (protocol converters), data loggers, and remote monitor and
controlling applications. Founded in October 2000, Chipkin provides expert solutions for converting
BACnet®, Modbus®, and Lonworks®—to name just a few—and enabling interfaces for HVAC, fire,
siren, intercom, lighting, transportation and fuel systems. The high-quality products we offer (including
those from other vendors) interface with Simplex™, Notifier™, McQuay™, GE™ and many others—so
you can rest assured that Chipkin will select the most appropriate solution for your application.
SAFETY WARNINGS
The CAS Gateway User Manual provides information on how to install and configure the gateway and
is intended for engineers, project management consultants and building management services. Before
you install the device, please observe the safety warnings described in in this manual.
CUSTOMER SUPPORT
Chipkin is a small responsive company, and we live or die by the quality of our service—and with
offices in two time-zones—we can provide support when you need it. For information on sales,
service, obtaining documentation or submitting a service request, please call us toll free at 1-866-383-
1657. Thanks for choosing Chipkin’s protocol gateways, data clients and integration services to meet
your building and industrial automation requirements.

Chipkin™ ™ CAS 2700 HTTP Push User Manual
3381 Cambie Street, #211 © 2018 Chipkin Automation Systems
Vancouver, BC, Canada, V5Z 4R3 All rights reserved
1-866-383-1657 Chipkin.com Page 6of 22
SALES AND CUSTOMER SUPPORT
TOLL FREE: 1-866-383-1657
FAX: 1-416-915-4024
EMAIL: [email protected]
GENERAL
TOLL FREE: 1-866-383-1657
FAX: 1-416-915-4024
EMAIL: support@chipkin.com
SHIPPING ADDRESS
3381 Cambie St., #211
Vancouver, BC, Canada V5Z 4R3
Chipkin™ ™ CAS 2700 HTTP Push User Manual
3381 Cambie Street, #211 © 2018 Chipkin Automation Systems
Vancouver, BC, Canada, V5Z 4R3 All rights reserved
1-866-383-1657 Chipkin.com Page 7of 22
2. CONNECTIONS
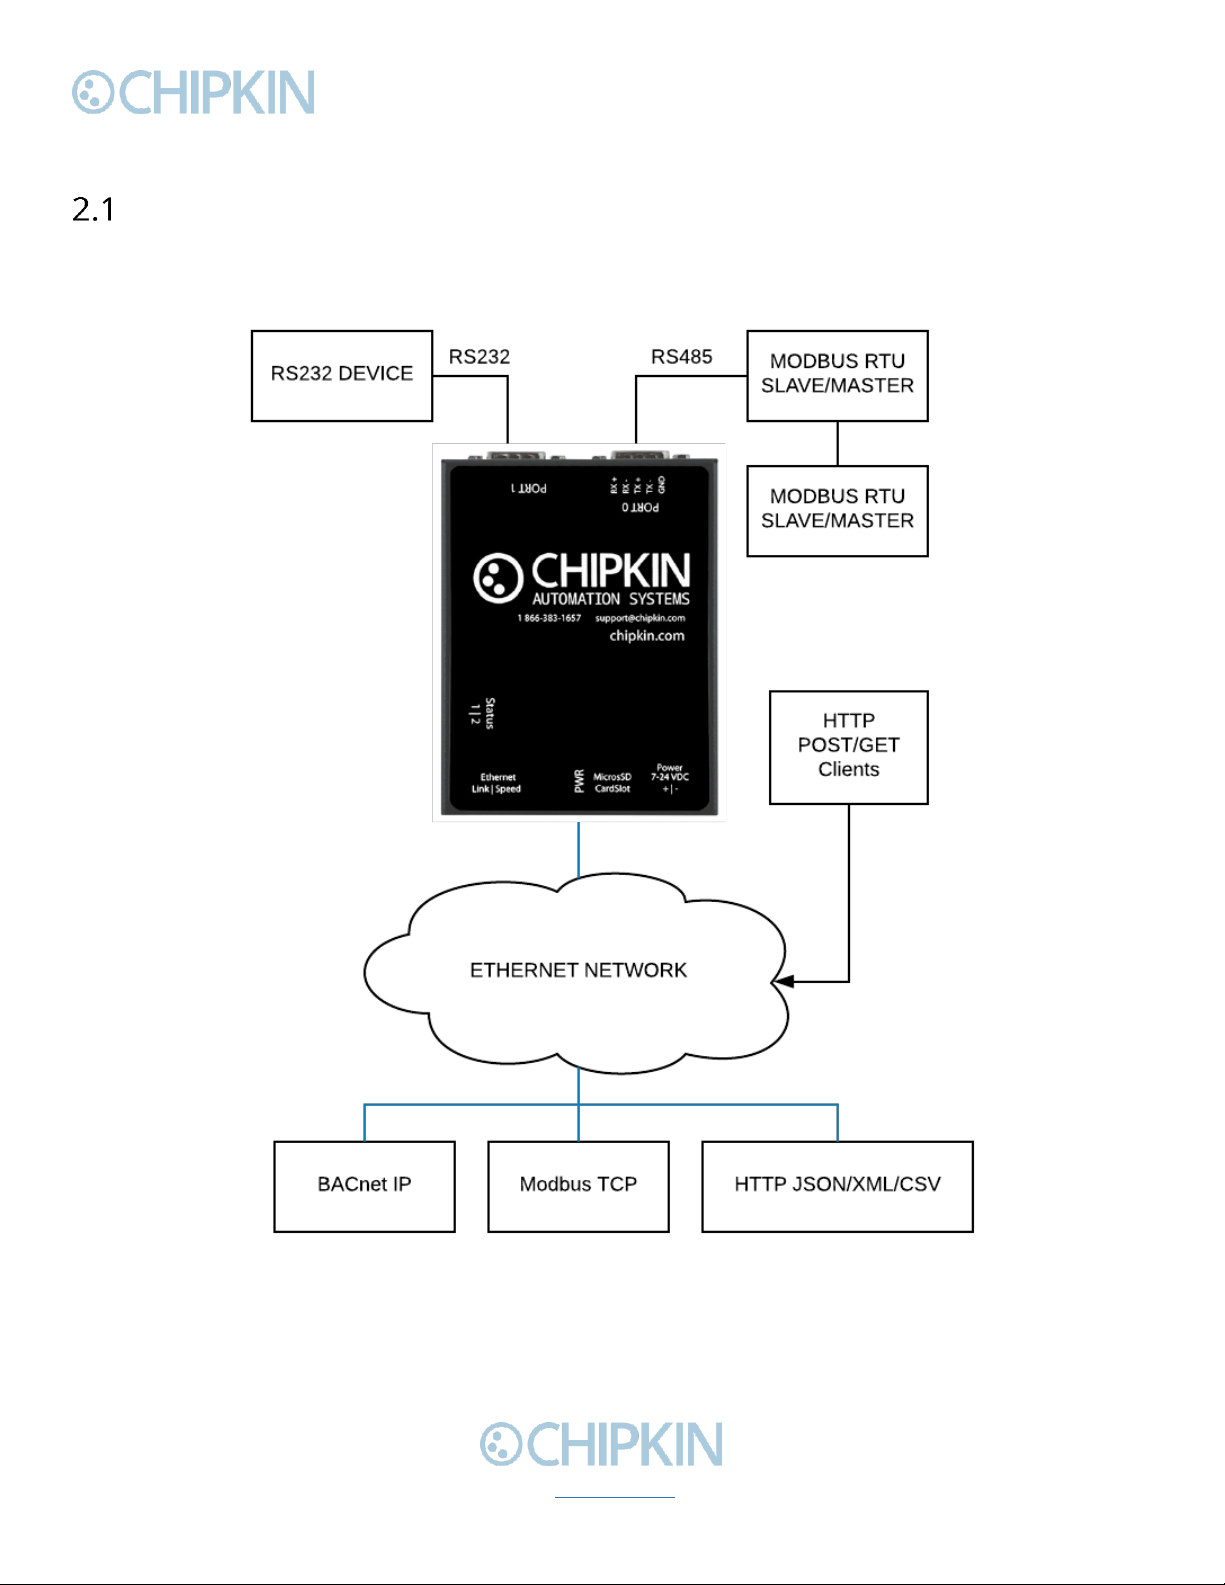
NETWORK CONNECTIONS
This block diagram lists common network connections that can monitor and control data from HTTP
devices using BACnet IP, Modbus RTU/TCP, etc.
Figure 2.1-1. Network Connections Block Diagram

Chipkin™ ™ CAS 2700 HTTP Push User Manual
3381 Cambie Street, #211 © 2018 Chipkin Automation Systems
Vancouver, BC, Canada, V5Z 4R3 All rights reserved
1-866-383-1657 Chipkin.com Page 8of 22
COMUNCATION PORTS
The Gateway uses the following ports for communication:
Protocol
Port
Notes
HTTP
TCP 80
Web server.
BACnet IP
UDP 47808
Default port, can be configured.
Modbus TCP
TCP 502
Default port, can be configured.
Syslog
UDP 514
Can be disabled.
FTP
TCP 21
Can be disabled.
Table 2 - Communication ports

Chipkin™ ™ CAS 2700 HTTP Push User Manual
3381 Cambie Street, #211 © 2018 Chipkin Automation Systems
Vancouver, BC, Canada, V5Z 4R3 All rights reserved
1-866-383-1657 Chipkin.com Page 9of 22
3. HTTP Push Configuration
This section contains instructions on how to configure the CAS Gateway CAS-2700 to send data as
HTTP Put or HTTP Post payloads. The current driver contains only two options for payloads: Default
JSON or Veeder JSON. These will be described in more detail below. If a specific format is required
(JSON, XML, or other), please contact Chipkin to discuss.
To access the configuration page, open a web browser and type in the following url:
http://{ipaddress}/bin/httppush/config
where {ipaddress} is the IP Address of the CAS Gateway.
Or, from the main system page, click on the following link:
Figure 3-2.2-1 HTTP Push Config Link

Chipkin™ ™ CAS 2700 HTTP Push User Manual
3381 Cambie Street, #211 © 2018 Chipkin Automation Systems
Vancouver, BC, Canada, V5Z 4R3 All rights reserved
1-866-383-1657 Chipkin.com Page 11 of 22
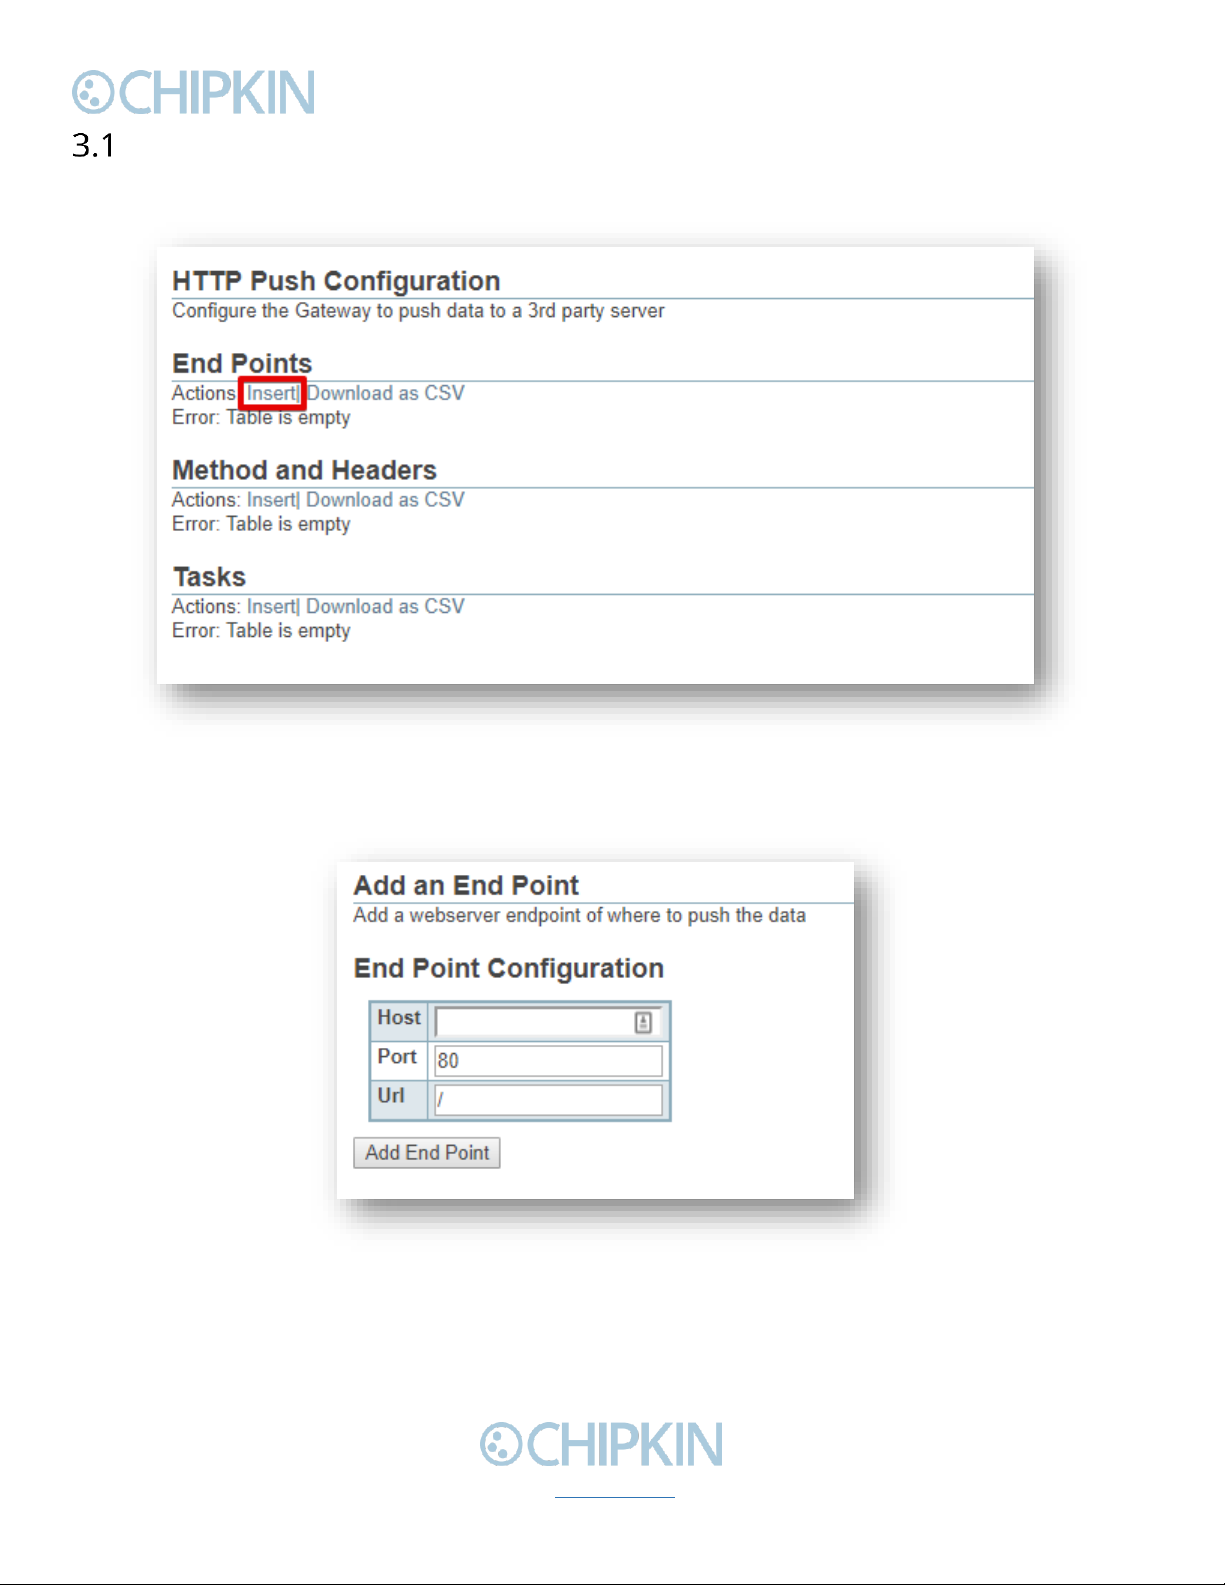
End Point Configuration
First add an end point. Click on the End Points “insert”link to add a new end point.
Figure 3.1-1 End Point Insert Link
You will see the following form:
Figure 3.1-2 End Point Form
Fill out the following fields:
•Host –The IP Address or Host domain of the server that will receive the data
Chipkin™ ™ CAS 2700 HTTP Push User Manual
3381 Cambie Street, #211 © 2018 Chipkin Automation Systems
Vancouver, BC, Canada, V5Z 4R3 All rights reserved
1-866-383-1657 Chipkin.com Page 12 of 22
•Port –The port to use when pushing data. Default: 80
•Url –The url end point of where to send the data payload.
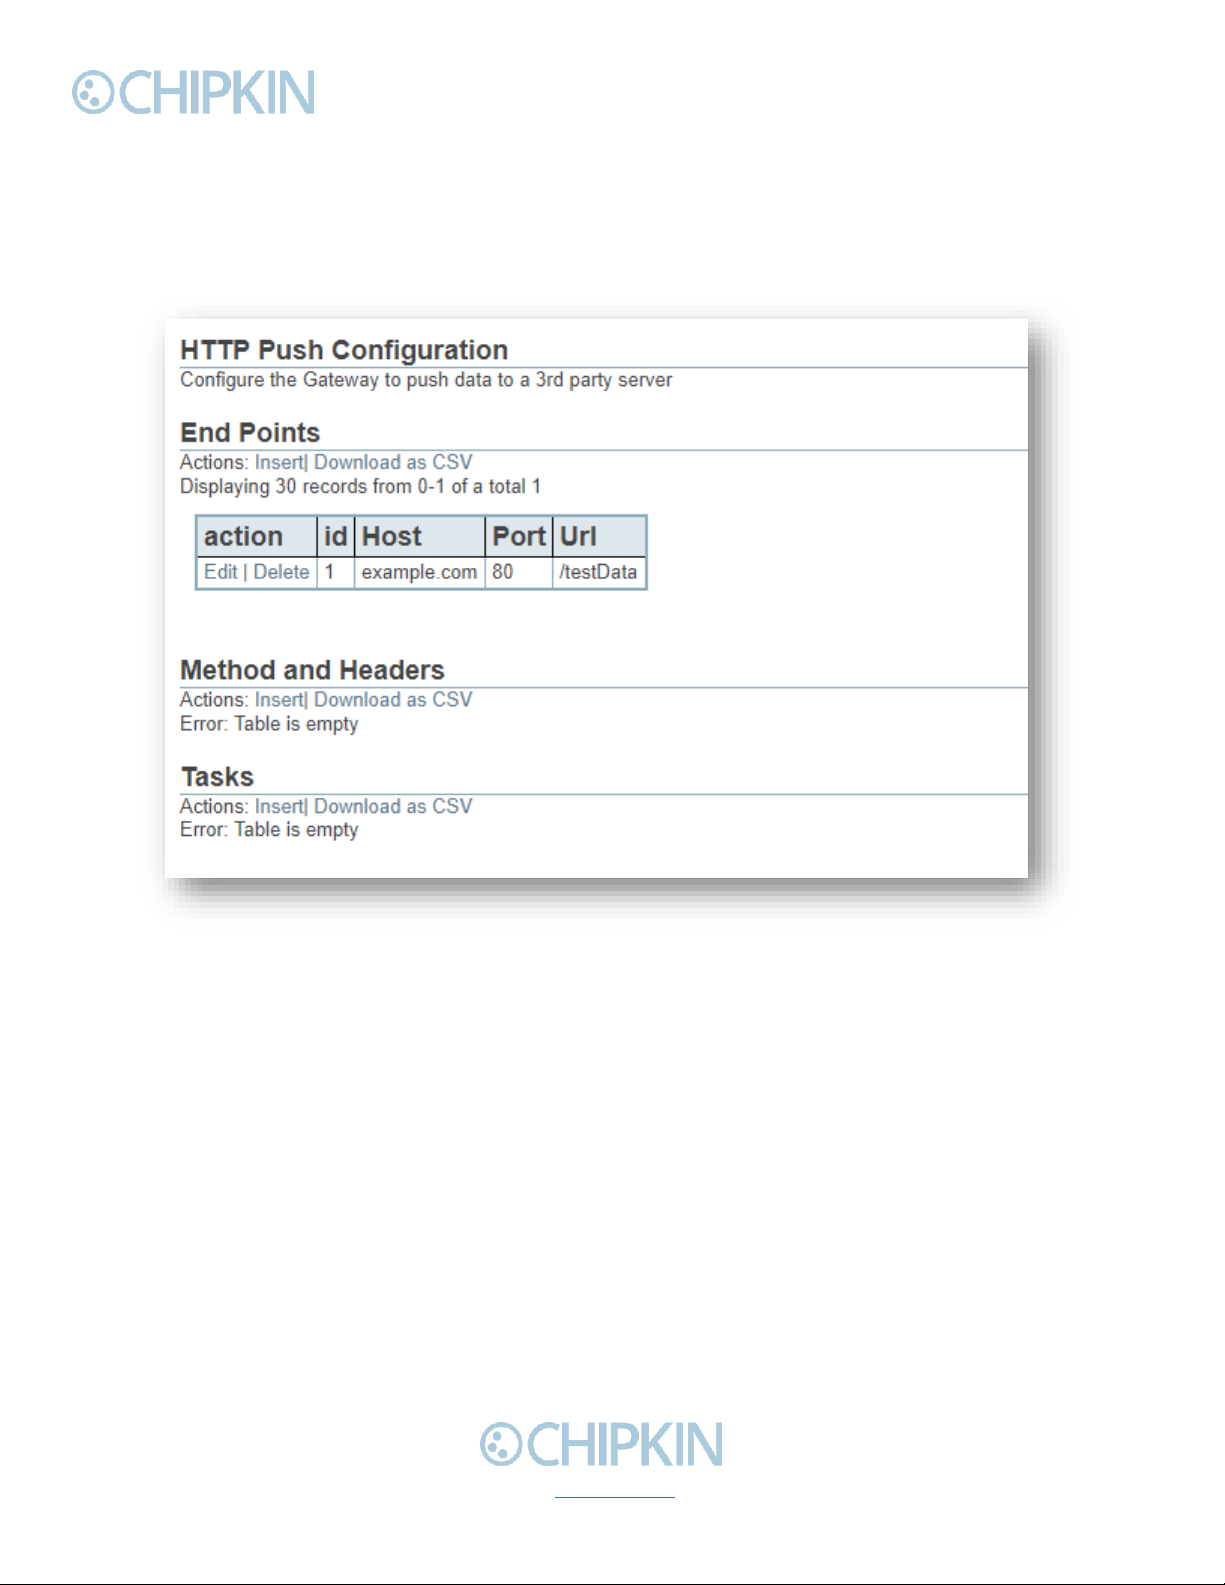
Once the fields are filled, click the “Add End Point”button. If successful, you will see a new entry on
the main configuration page as seen below:
Figure 3.1-3 End Point added successfully
Chipkin™ ™ CAS 2700 HTTP Push User Manual
3381 Cambie Street, #211 © 2018 Chipkin Automation Systems
Vancouver, BC, Canada, V5Z 4R3 All rights reserved
1-866-383-1657 Chipkin.com Page 13 of 22
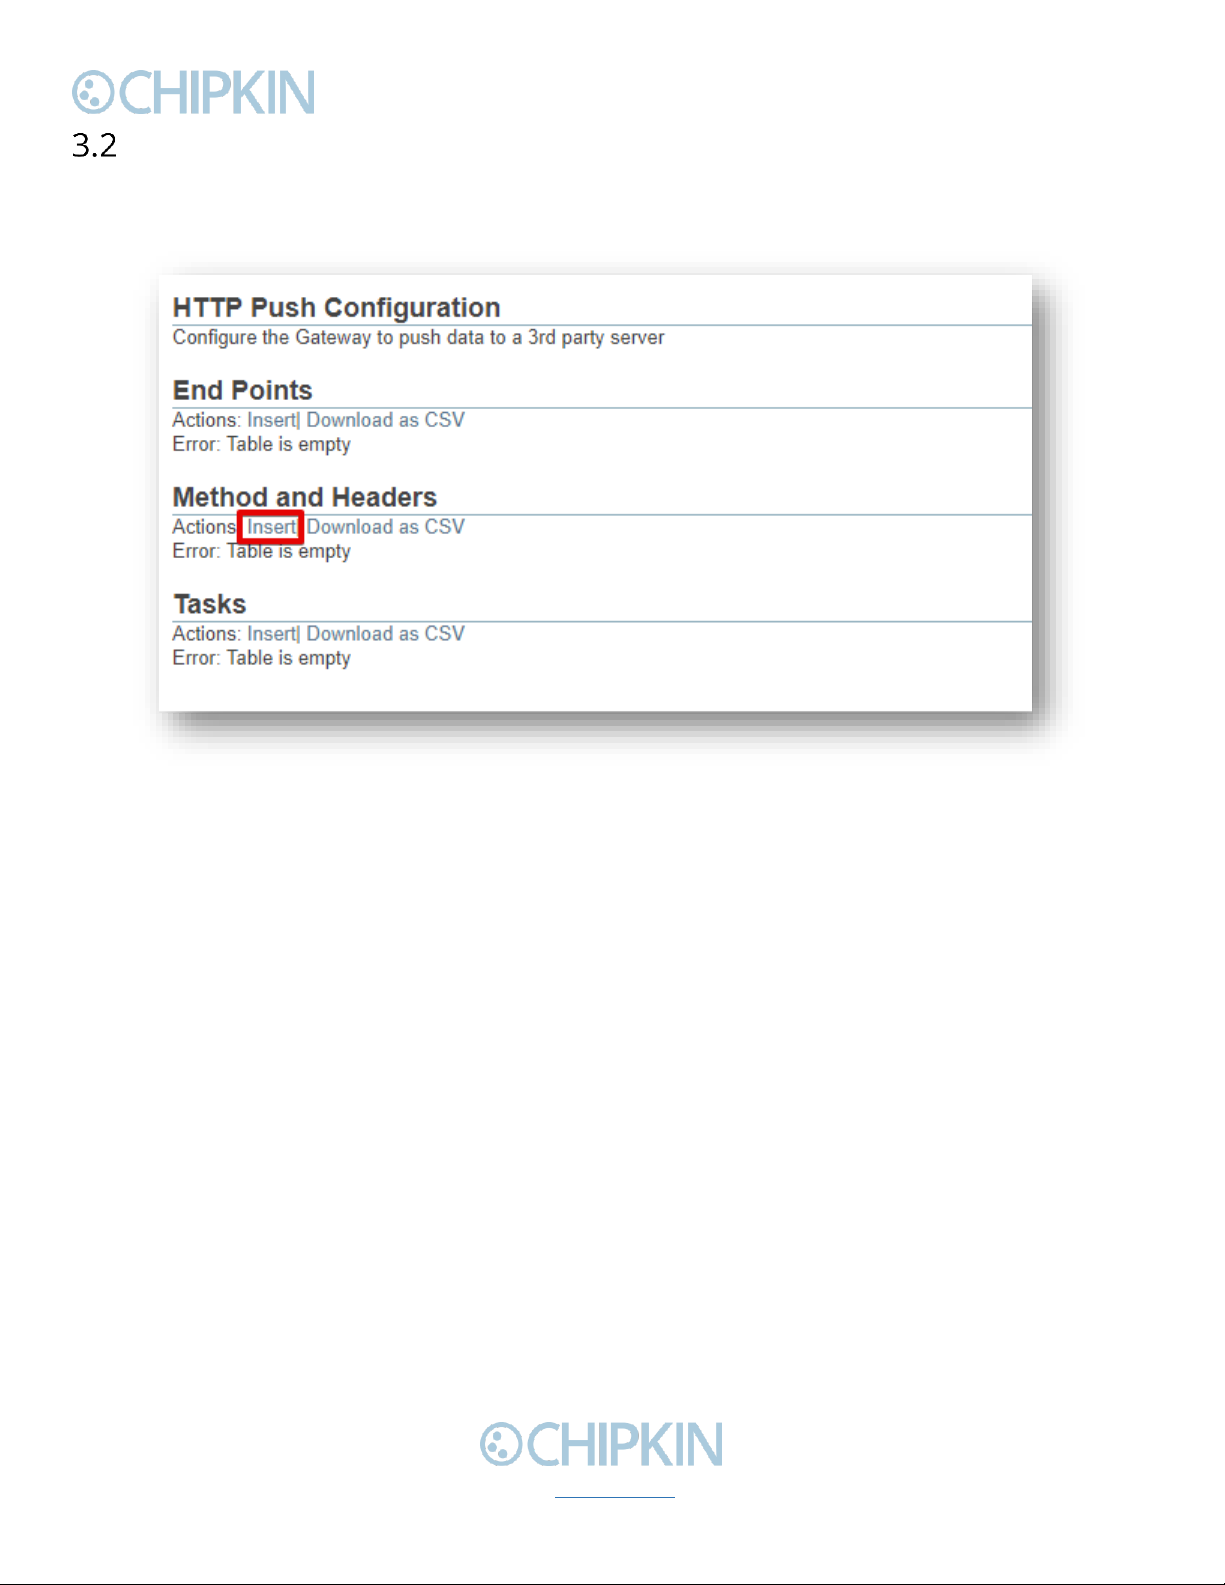
Method and Headers Configuration
Next, add a method and headers to the end point. Click on the Methods and Headers “insert”link to
add a new one.
Figure 3.2-1 Method and Headers Insert Link
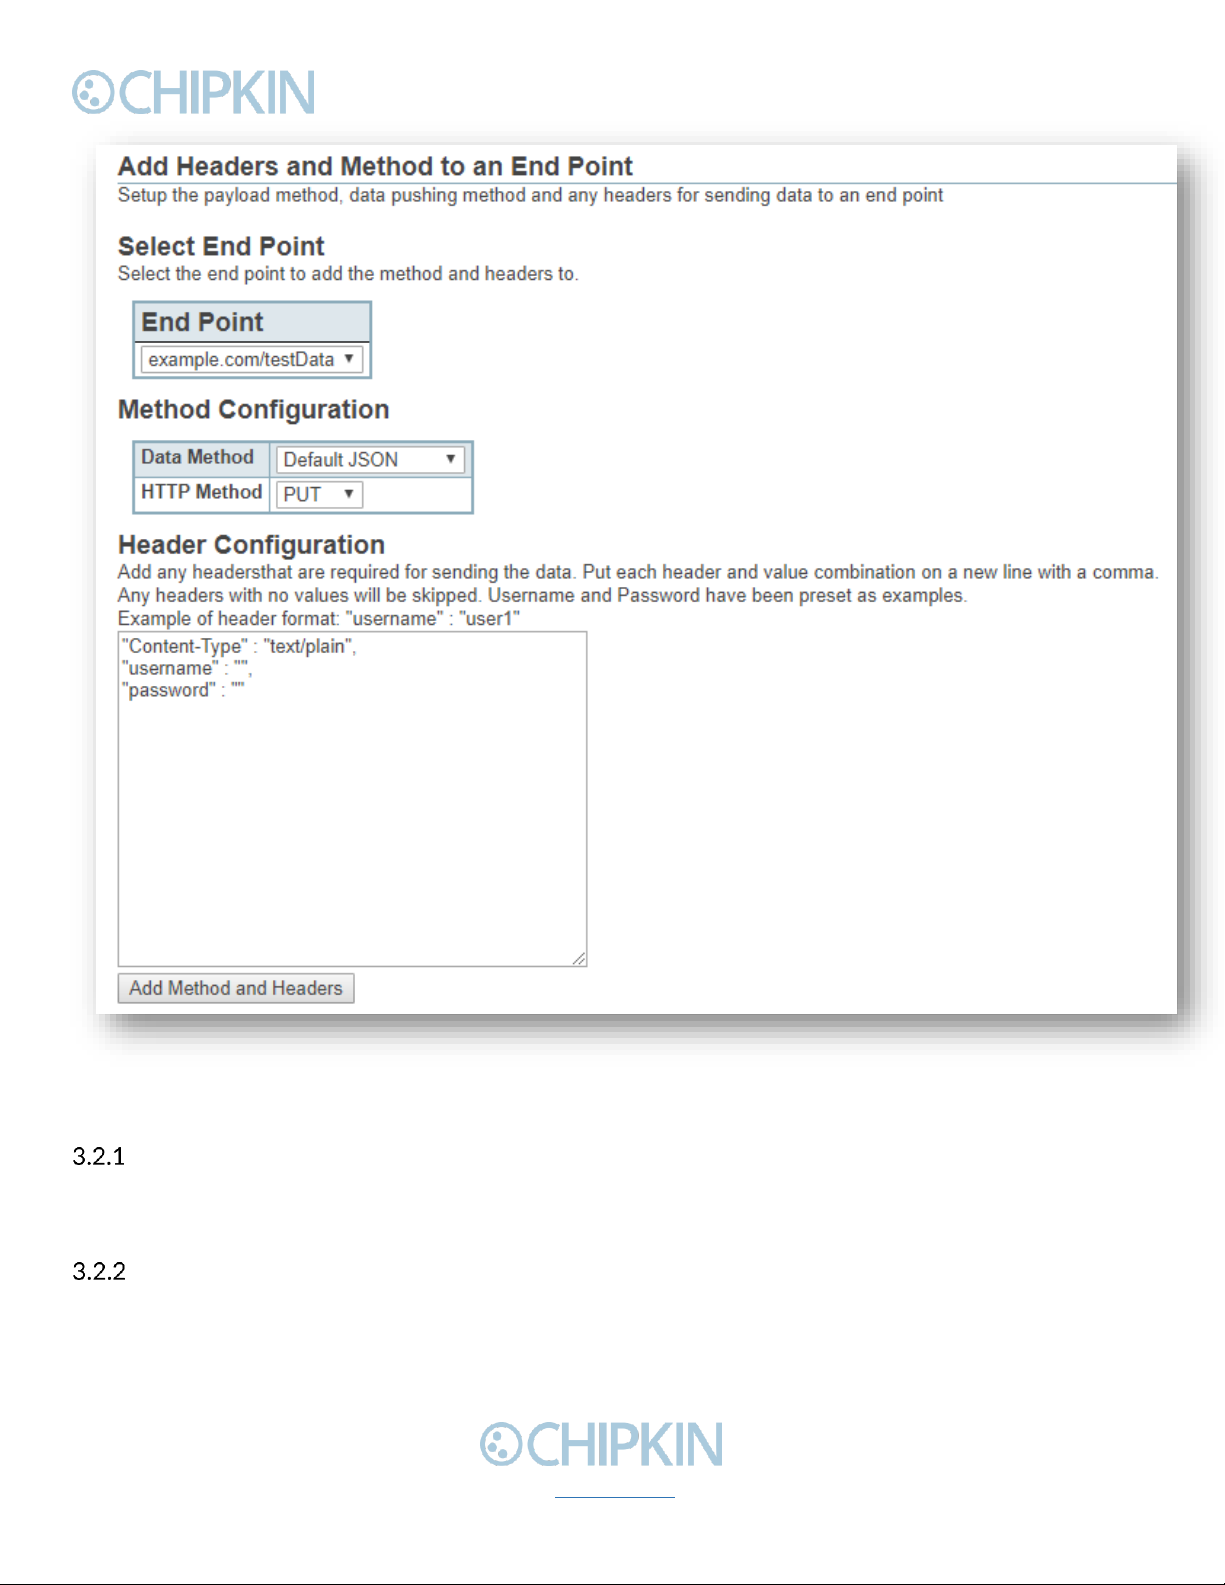
You will see the following form:
Chipkin™ ™ CAS 2700 HTTP Push User Manual
3381 Cambie Street, #211 © 2018 Chipkin Automation Systems
Vancouver, BC, Canada, V5Z 4R3 All rights reserved
1-866-383-1657 Chipkin.com Page 14 of 22
Figure 3.2-2 Method and Headers Form
Select End Point
First, select the End Point to use from the drop-down box. This will include a list of all the end points
that have been configured.
Method Configuration
Choose the Data and HTTP Methods to use

Chipkin™ ™ CAS 2700 HTTP Push User Manual
3381 Cambie Street, #211 © 2018 Chipkin Automation Systems
Vancouver, BC, Canada, V5Z 4R3 All rights reserved
1-866-383-1657 Chipkin.com Page 15 of 22
Data Methods
At the time of the writing of this manual, the HTTP Push driver only supports the following data
methods:
•Default JSON –uses Chipkin’s default JSON payload
•VeederRoot JSON –a specific payload for Veeder Root data
If you require a specific payload (JSON format, XML schema, CSV, etc), please contact Chipkin to
discuss your requirements.
HTTP Methods
Select either PUT or POST as the HTTP Method for sending the data payload.
Header Configuration
Add any headers that are required for sending the data payload. These headers are stored as a JSON
object and must conform to JSON spec. When adding additional headers, make sure each header is
on a new line and that there is a trailing comma where needed.
Please note that all standard HTTP headers will use their specific formatting. For example: Content-
Type etc.
For authorization, use username and password headers. Note that these are all lower case:
Here is an example of some headers:
"Content-Type" : "application/json",
"username" : "admin",
"password" : "12345"
If you do not require any additional headers, simply delete any contents and keep the Header
Configuration text area empty.
Click on the “Add Method and Headers”button to save the items. If successful, you will see a new
entry in the Method and Headers section of the configuration page as seen below:

Chipkin™ ™ CAS 2700 HTTP Push User Manual
3381 Cambie Street, #211 © 2018 Chipkin Automation Systems
Vancouver, BC, Canada, V5Z 4R3 All rights reserved
1-866-383-1657 Chipkin.com Page 17 of 22
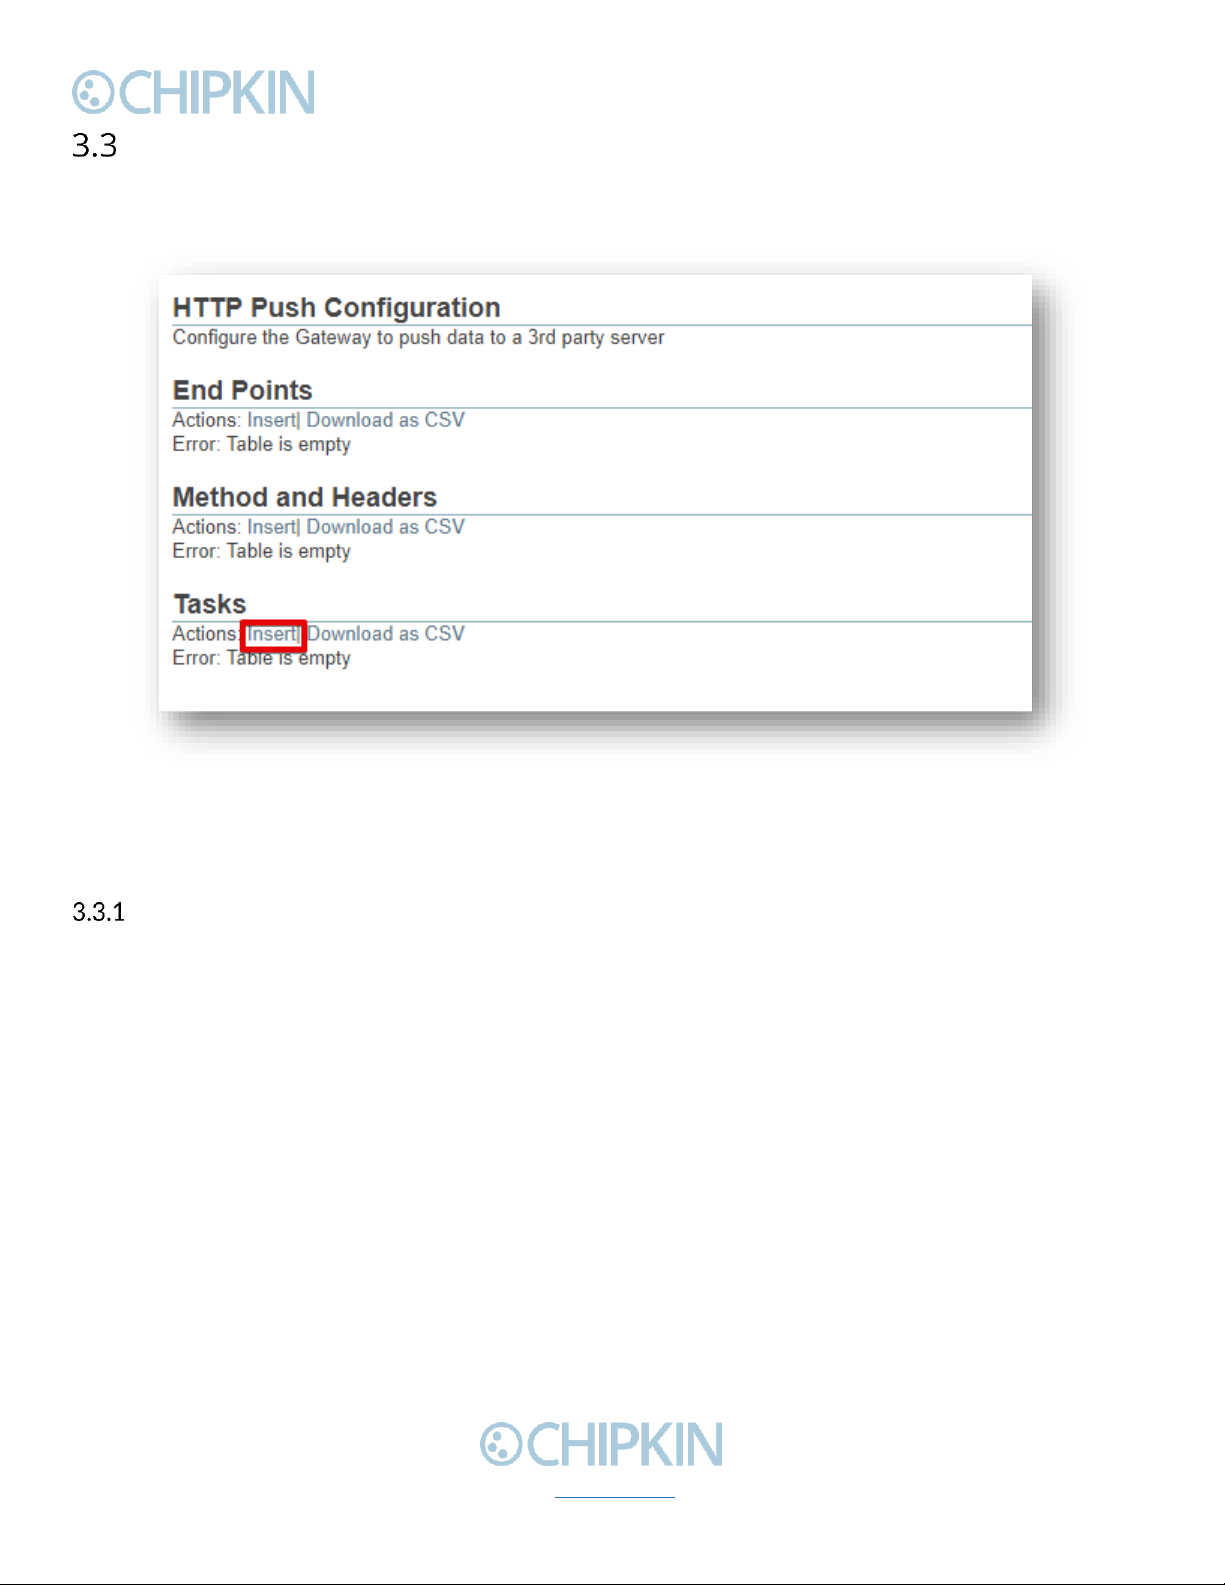
Task Configuration
Finally, add tasks that will package the data and send the payload.
To add a task, click on the Task Configuration “Insert”link as seen below:
Figure 3.3-1 Tasks Insert Link
Depending on what Data Method was selected in step 3.2, a different form is displayed.
Default JSON
If using the Default JSON data method, you will see the following Task form:

Chipkin™ ™ CAS 2700 HTTP Push User Manual
3381 Cambie Street, #211 © 2018 Chipkin Automation Systems
Vancouver, BC, Canada, V5Z 4R3 All rights reserved
1-866-383-1657 Chipkin.com Page 18 of 22
Figure 3.3-2 Default JSON Form
First, select the End Point and Method of where to send the data.
Next, fill out the form with the following fields:
•Task Name –The name of the task, this is used just for identification.
•Data Table –The data table where the data is stored. Default: da_data
•Data Offset –The index in the data table of the first data point to use.
•Data Length –The number of data points to push.
•Frequency –How often in seconds to push the data.
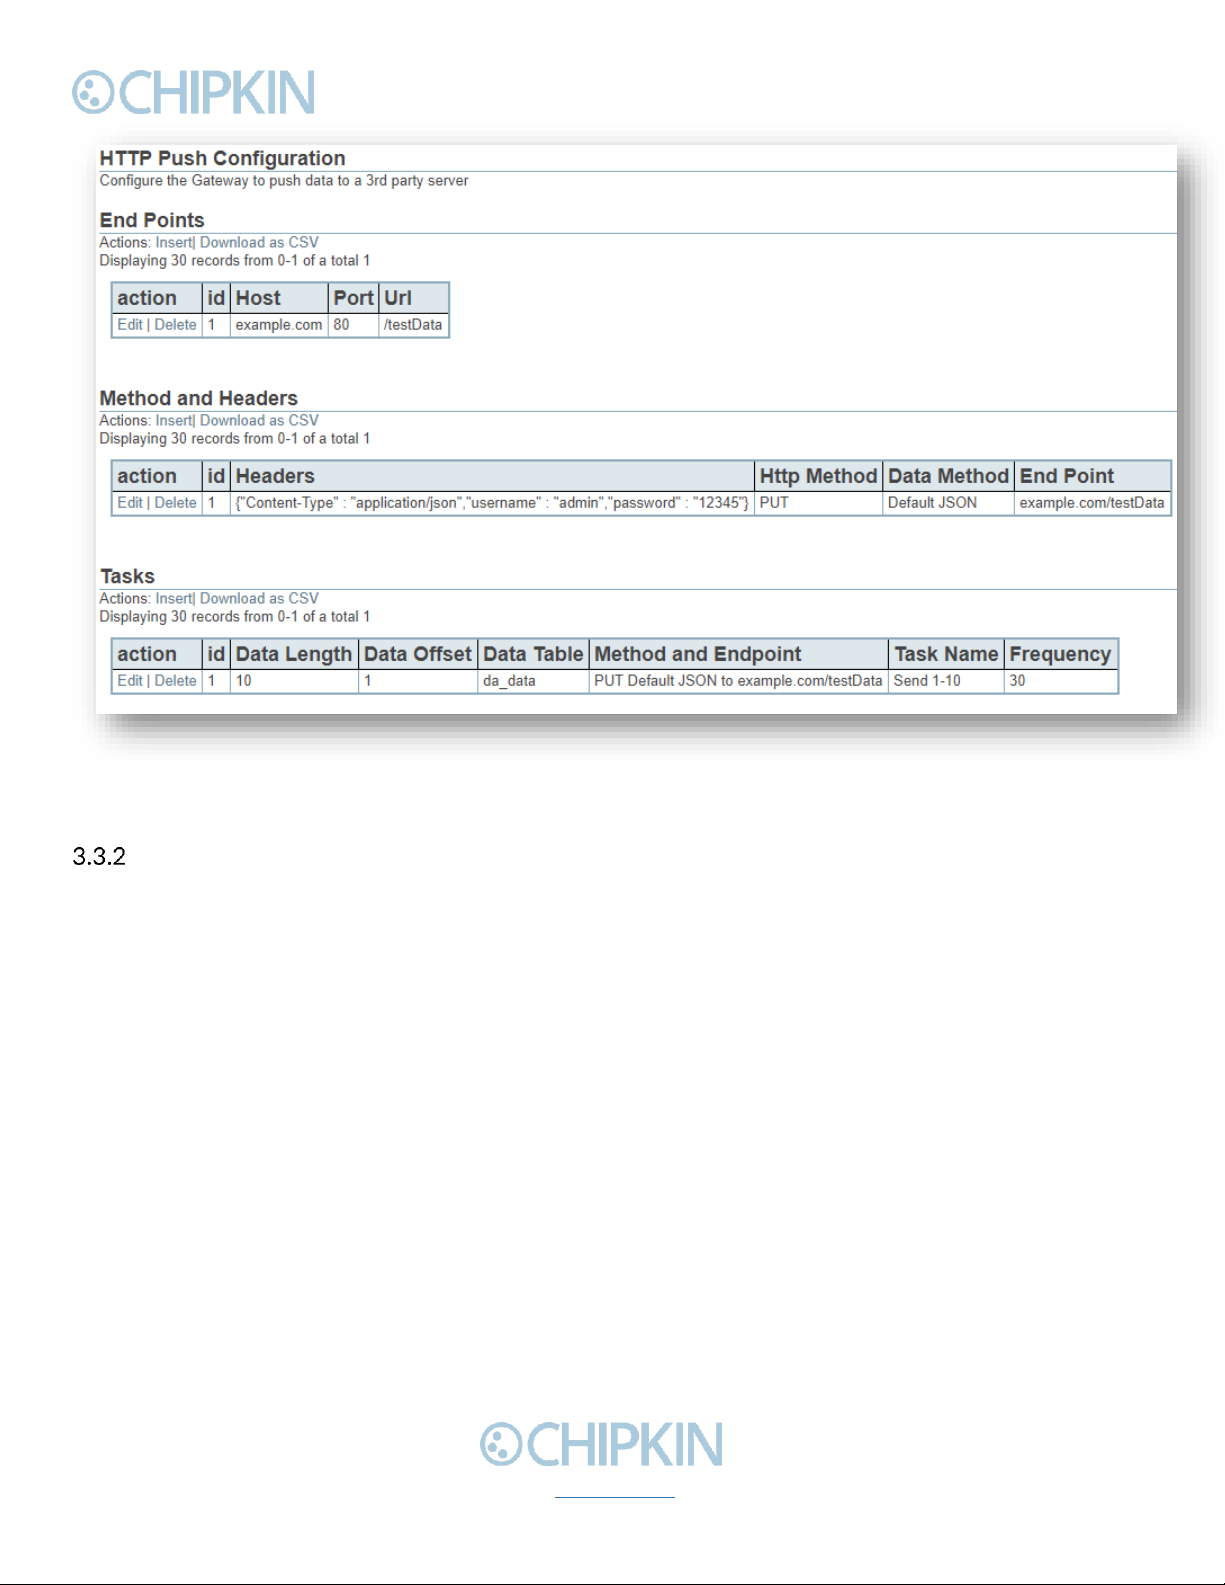
After filling out the fields, click the “Add Task”button to add the task. If successful, you will see the
task in the configuration page as seen below:
Chipkin™ ™ CAS 2700 HTTP Push User Manual
3381 Cambie Street, #211 © 2018 Chipkin Automation Systems
Vancouver, BC, Canada, V5Z 4R3 All rights reserved
1-866-383-1657 Chipkin.com Page 19 of 22
Figure 3.3-3 Default JSON Task added successfully
VeederRoot JSON
If using the VeederRoot JSON method you will see the following form:
Chipkin™ ™ CAS 2700 HTTP Push User Manual
3381 Cambie Street, #211 © 2018 Chipkin Automation Systems
Vancouver, BC, Canada, V5Z 4R3 All rights reserved
1-866-383-1657 Chipkin.com Page 20 of 22
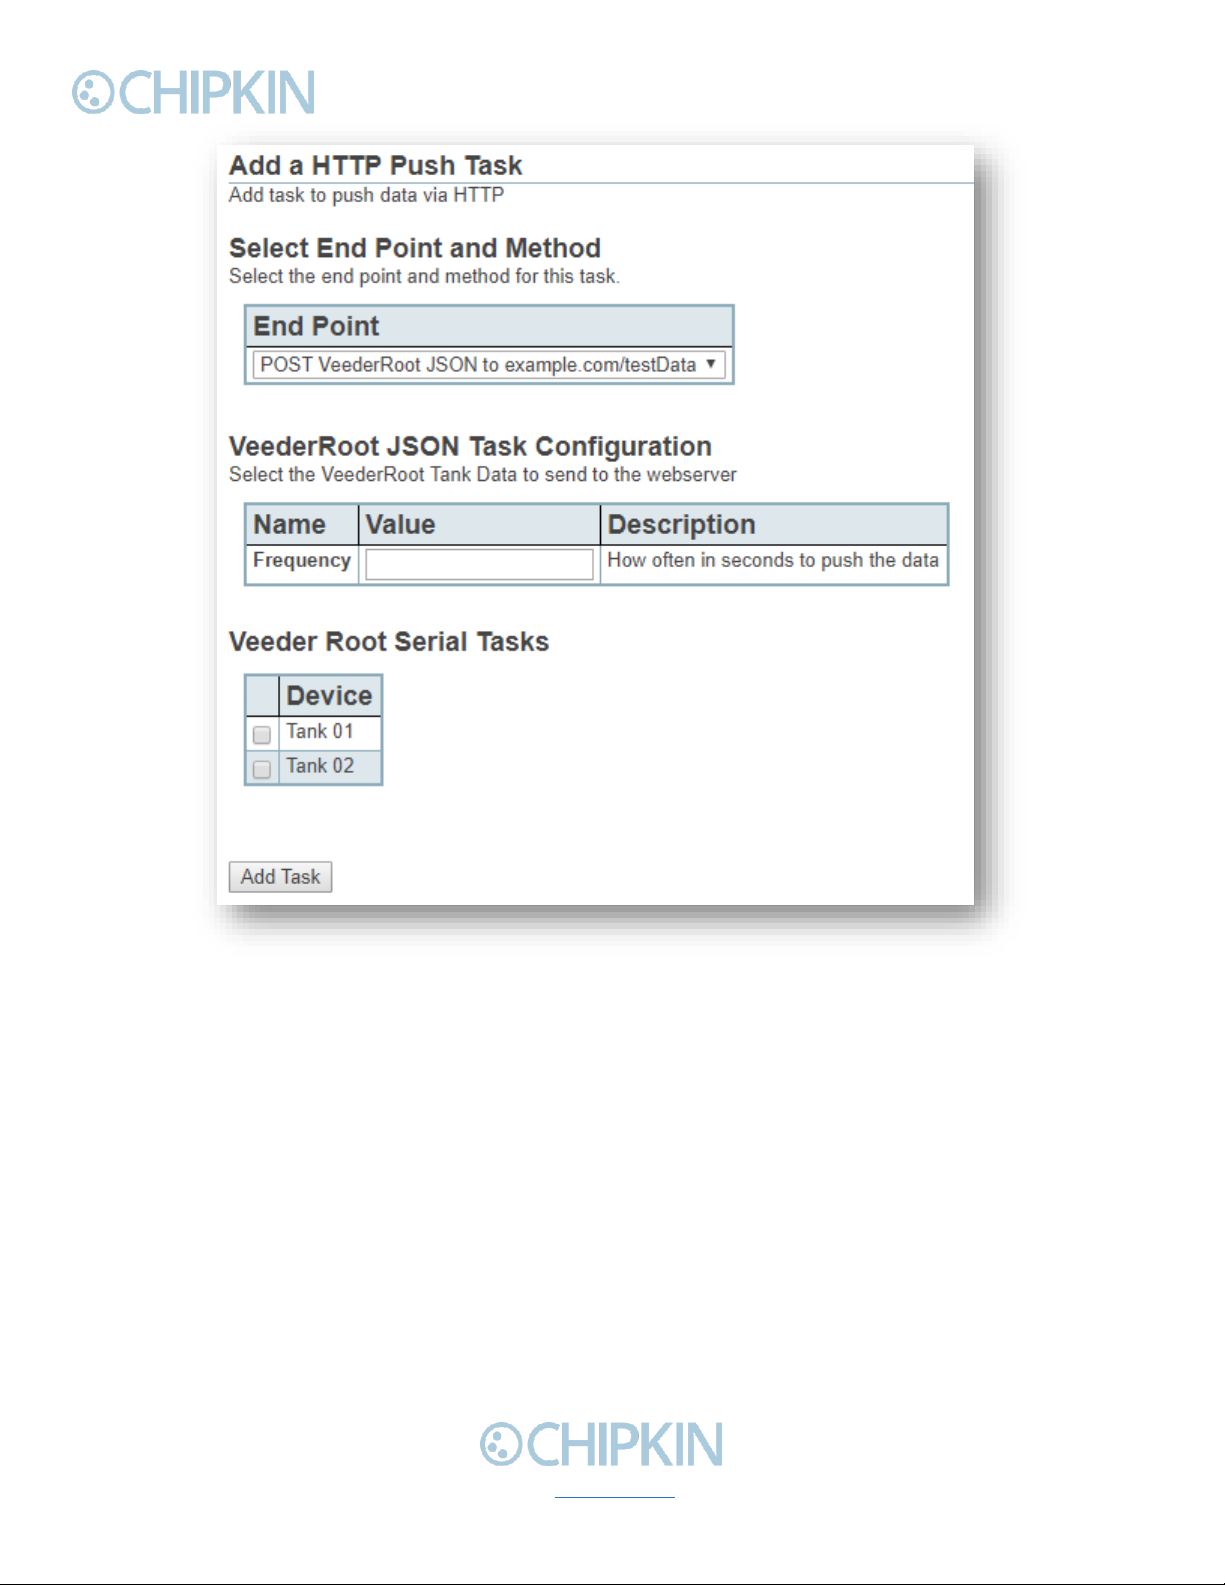
Figure 3.3-4 VeederRoot JSON Form
First, select the End Point and Method of where the data will be pushed.
Next, fill out the Frequency field to specify how often in seconds to push the data.
Finally, select the Veeder Root Tank data to send.
Note: There must be a VeederRoot configuration completed for this method to work.
Once all the fields have been filled and selected, click the “Add Task”button. If successful, you will
see new tasks added to the configuration page as seen below:
Other manuals for CAS 2700
1
Table of contents
Other Chipkin Gateway manuals


