manuals.online logo
Brands
  1. Home
  2. •
  3. Brands
  4. •
  5. Dräger
  6. •
  7. Respiratory Product
  8. •
  9. Dräger X-plore 9500 User manual

Dräger X-plore 9500 User manual

X-plore 9500
Airline belt manifold Instructions for Use
i
3363575 (A3-D-P)
1 For your safety
1.1 General safety statements
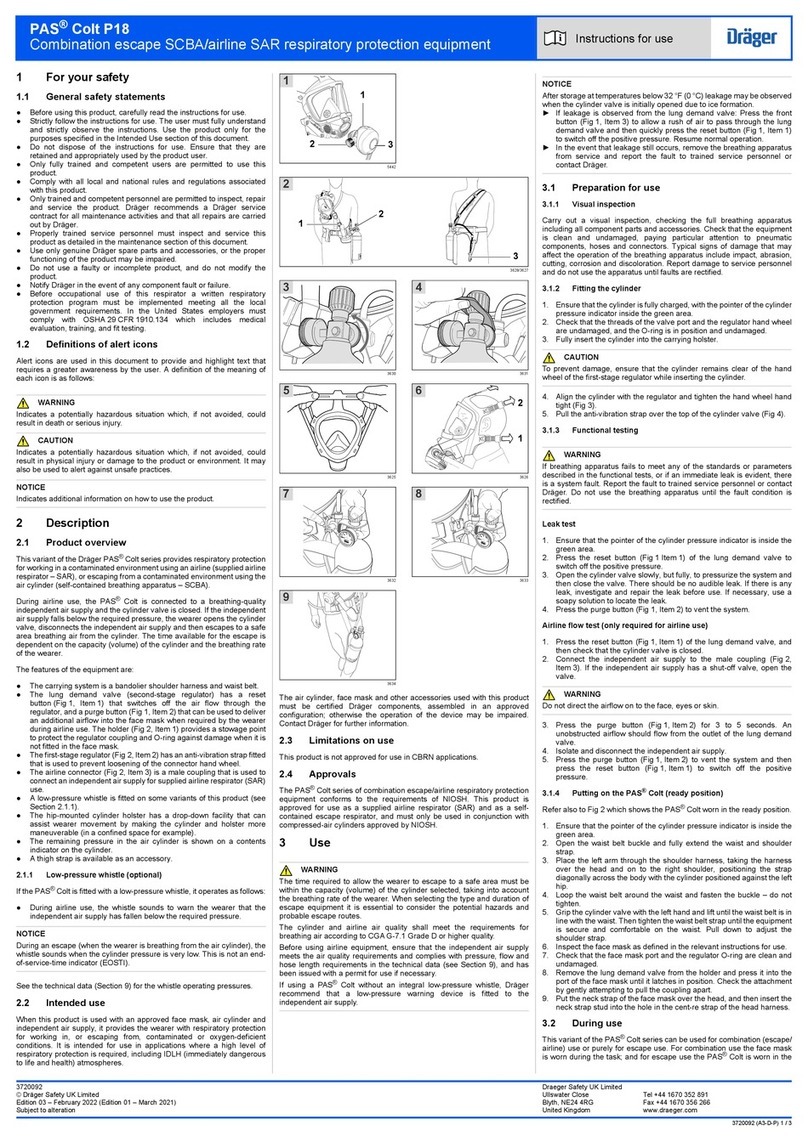
●Before using this product, carefully read the Instructions for Use.
●Strictly follow the Instructions for Use. The user must fully understand
and strictly observe the instructions. Use the product only for the
purposes specified in the Intended Use section of this document.
●Do not dispose of the Instructions for Use. Ensure that they are
retained and appropriately used by the product user.
●Only fully trained and competent users are permitted to use this
product.
●Comply with all local and national rules and regulations associated
with this product.
●Only trained and competent personnel are permitted to inspect, repair
and service the product. Dräger recommend a Dräger service contract
for all maintenance activities and that all repairs are carried out by
Dräger.
●Properly trained service personnel must inspect and service this
product as detailed in the Maintenance section of this document.
●Use only genuine Dräger spare parts and accessories, or the proper
functioning of the product may be impaired.
●Do not use a faulty or incomplete product, and do not modify the
product.
●Notify Dräger in the event of any component fault or failure.
1.2 Definitions of alert icons
Alert icons are used in this document to provide and highlight text that
requires a greater awareness by the user. A definition of the meaning of
each icon is as follows:
WARNING
Indicates a potentially hazardous situation which, if not avoided,
could result in death or serious injury.
CAUTION
Indicates a potentially hazardous situation which, if not avoided,
could result in physical injury or damage to the product or
environment. It may also be used to alert against unsafe practices.
NOTICE
Indicates additional information on how to use the product.
2 Description
2.1 Product overview
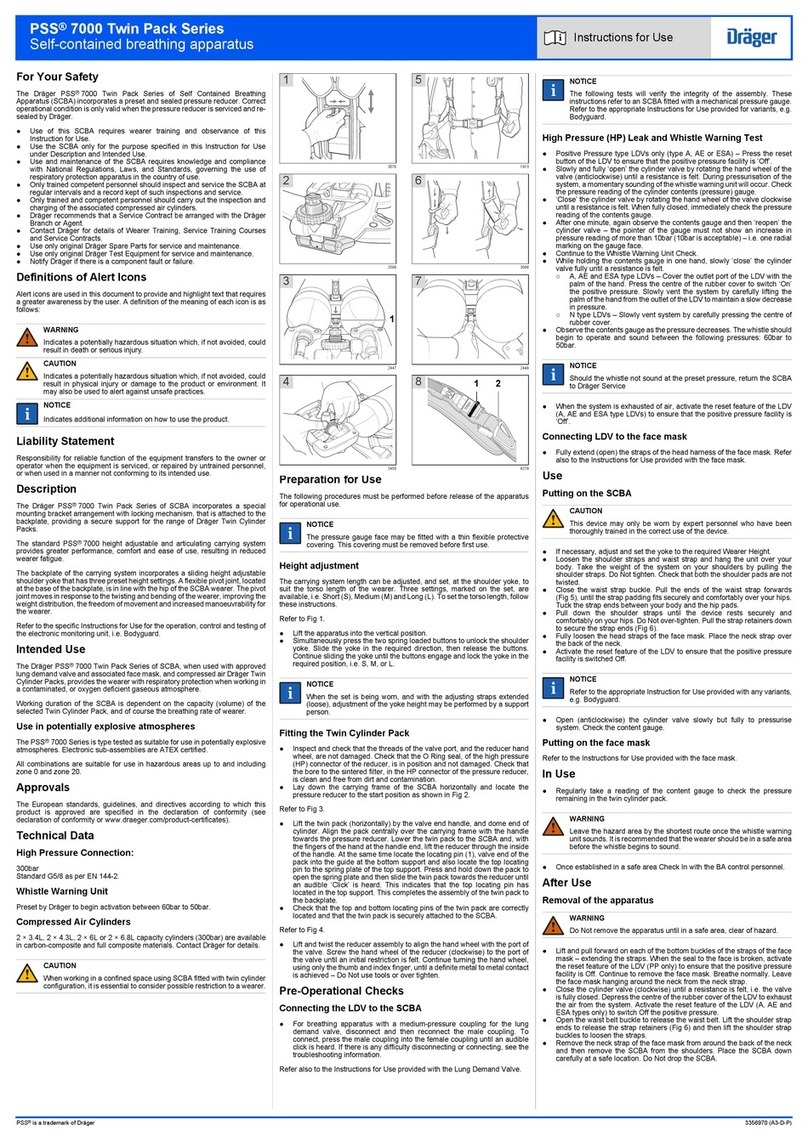
The Dräger X-plore 9500 (Fig 1) is a belt mounted manifold that is used to
connect an external breathing air supply (an airline) to a mask. The
manifold has an input connector (5) to connect the airline and has an
output at a mask adaptor (1) to connect the mask.
During use, a pressure reducer inside the manifold supplies a continuous
flow of air from the airline to the mask. This air flow is within the safe limits
required at the mask. The excess flow valve (2) in the mask adaptor
releases excess air continuously during use to maintain the correct air
pressure inside the mask. The X-plore 9500 is available with or without an
adjustable flow control valve (3). When fitted, the flow control valve allows
the wearer to adjust the air flow within preset limits.
The X-plore 9500 is available with or without a whistle. When fitted, the
whistle (4) is a low input pressure warning device which sounds during use
to alert the wearer if the breathing air supply falls below the pressure
required to provide adequate breathing air.
The X-plore 9500 is used with a compatible Dräger face mask from the
FPS 7000, X-plore 6000 or Panorama Nova series of masks (the Dräger
X-plore 6300 mask is shown). The compatible Dräger masks are classified
as Class 4B according to EN 14594:2005. For a full description of the
mask see the Instructions for Use supplied with the product.
Radio-frequency identification (RFID) is an option available for this product
to allow electronic asset management and tracking using a radio-frequency
reader. When fitted, the RFID tag is positioned inside the manifold casing.
2.1.1 Filter respirator use
The mask can be used as a filter respirator when the wearer is moving to
or from a work area. Removing the blanking plug from the mask adaptor
and fitting a filter canister (Fig 2) prepares the mask for filter respirator use.
The mask only operates as a filter respirator when there is no airline
connected or the supply from the airline falls to a very low pressure.
The filter canister is an accessory available from Dräger. When using the
mask as a filter respirator, see also the Instructions for Use supplied with
the filter canister.
2.1.2 Breathing air supply
The breathing air supply (airline supply) is an external source of breathing air
from an air cylinder or compressor arrangement capable of supplying the
specified air quality, pressure and flow rates (see Section 3.1 for details).
2.2 Intended use
The X-plore 9500 is intended for use with approved compressed airline
breathing equipment or a filter canister to provide respiratory protection
against the effects of harmful substances. The equipment is intended to be
used as an airline respirator at a work area, or as a filter respirator for
moving to or from the work area.
The compressed airline breathing equipment and other accessories used
with this product must be certified components, assembled in an approved
configuration; otherwise the operation of the device may be impaired.
Contact Dräger for further information.
2.3 Limitations on use
This product is not approved for use in CBRN (chemical, biological,
radiological and nuclear) applications.
2.4 Approvals
The Dräger X-plore 9500 must be used as a part of an approved airline
respiratory protection system. It is the responsibility of the user to ensure
that the equipment is approved by a relevant local or national approval
agency before using the equipment.
2.5 Marking and symbols
The product type is indicated on the label on the manifold casing, and the
product serial number is marked on the body of the manifold
3 Use
3.1 Breathing air supply
WARNING
The quality of the air supply shall meet the requirements for
breathing air according to EN 12021. Do not use oxygen or
oxygen-enriched air. The moisture content of breathing air should
be controlled within the specified limits in the standard to avoid
freezing the equipment.
Carry out a risk assessment of the workplace to ensure that it is
not possible to connect to any air supply other than breathable air
(e.g. Nitrox).
Adequate protection may not be provided by the equipment in
certain highly toxic atmospheres.
The user must ensure that the capacity of the air supply system is
sufficient for every user connected to it. The user must also ensure
that they can retreat safely if the supply from the airline fails.
Use a breathing air cylinder arrangement with a pressure reducer, or a
fixed or mobile compressor with a suitable filtration and air heating or
cooling system. Ensure that the air supply meets the air quality
requirements, and complies with the following pressure and flow
requirements:
●Input pressure 0.28 to 1.0 MPa
●Input flow 200 to 1200 liters/minute (to provide the full range of
flow on versions with a flow control valve, a minimum
of 350 liters/minute is required)
The maximum number of users that can be connected simultaneously to
Dräger breathing air supply equipment is specified in the supply equipment
Instructions for Use.
3.1.1 Compressed air supply hose
Ensure that the airline coupling is compatible with the product input
coupling. The coupling shown in the illustrations is the CEJN/Rectus type
coupling (other couplings are available from Dräger).
When using Dräger approved hose: a maximum of 100 m of hose may be
used, and no more than four individual hoses (a maximum of five hose
connections) are permitted in the airline. The maximum working pressure
of the Dräger compressed air supply hose is 3.0 MPa.
3.2 Preparation for use
3.2.1 Preparing the product
The manifold can be worn on the left or right side. To swap sides, loosen
the belt, remove the backplate if fitted and rotate the manifold (Fig 3).
When reassembling, ensure that the lip of the whistle cover sits under the
rib in the manifold bracket (Fig 4). Ensure that the position of the manifold
on the waist allows full head movement without pulling the hose, and that
the hose will not present a snag hazard.
If using a version without an integral whistle, Dräger recommend that a
low-pressure warning device is fitted to the air supply.
1. Carry out a visual inspection (see Section 5.2).
2. Put on the belt and adjust as necessary.
3. Connect the mask adaptor to the mask (Fig 5).
4. Fit a filter canister to the mask if required: remove the blanking plug
and fit the filter to the mask adaptor (Fig 2). The filter canister should
only be fitted in a non-hazardous environment.
WARNING
Correct fit of a mask can only be achieved if the complete mask
seal makes contact with skin. Head hair, facial hair (including
beard stubble and sideburns), earrings, other facial piercings and
normal spectacles will interfere with the mask seal and are not
permitted in the sealing area. Additionally, head hair that could
affect the face mask fit (buns, pony-tails, hairpieces, etc.) is not
permitted.
5. Put on the mask (see the Instructions for Use supplied with the mask).
6. If a filter canister is fitted, proceed to the work area using the mask as
a filter respirator.
7. Connect the airline supply to the manifold input coupling (Fig 6). If a
whistle is fitted, it will sound briefly as the pressure increases.
8. Ensure that the pneumatic hoses are not kinked or compressed by
clothing or equipment.
9. Take several deep breaths to ensure that sufficient air is available and
then breathe normally.
3.3 During use
NOTICE
The excess flow valve (Fig 1, Item 2) releases air continuously
during use to maintain the correct air pressure inside the mask.
This is normal operation for the X-plore 9500.
Where hearing protection or sound attenuation communications
equipment is used, consider the reduction in audibility of the
whistle.
Flow control valve: Set the control knob to the minimum flow position at
the start of the task (Fig 7). Use the knob to adjust the air flow as necessary
to suit your work intensity.
Air supply failure: If the whistle sounds or the air supply fails, immediately
cease the work activity and leave the hazardous area by the shortest and
safest route. Do not disconnect the airline supply from the manifold.
Remove the mask as soon as it is safe to do so.
Filter respirator use: When a filter canister is fitted, disconnect the airline
from the manifold to move from the work area using the mask as a filter
respirator.
!
!
i
i
!
!
i
i
4445
4443
4441
7
MAXIMUM
MINIMUM
4480
3
D
äger
äger
D
D
D
D
D
D
D
5
6
4444 4429
4
4528
D
D
D
D
D
D
D
D
D
D
D
D
äger
äger
D
D
D
D
D
D
D
D
äger
äger
1
1
2
3
4
5
2
D
äger
äger
X-plore 9500
Airline belt manifold Instructions for Use
i
3363575 (A3-D-P)
3363575
© Dräger Safety UK Limited
Edition 01 – September 2014
Subject to alteration
Distributed in China by: Dräger Safety Equipment (China) Co Ltd
A 22 Yu An Rd, B Area, Tianzhu Airport Industrial Zone
Shunyi District, Beijing 101300 Tel + 86 10 8049 8000
PR China Fax + 86 10 8049 8005
Manufacturer: Draeger Safety UK Limited
Ullswater Close Tel +44 1670 352 891
Blyth, NE24 4RG Fax +44 1670 356 266
United Kingdom www.draeger.com
3.4 After use
WARNING
Do not remove the equipment until you are in a safe breathing
environment.
1. Remove the mask (see the Instructions for Use supplied with the
mask).
2. Disconnect the airline supply from the input coupling if connected.
3. Disconnect the mask adaptor from the mask.
4. Open the waist belt buckle and remove the equipment.
5. Carry out the after use maintenance tasks in the maintenance table
(see Section 5.1).
4 Troubleshooting
The table shows fault diagnosis and repair information for product users.
Further troubleshooting information is available in Instructions for Use
supplied with associated equipment (e.g. the mask or air supply
equipment).
Contact service personnel or Dräger if the symptom remains after the
remedy actions have been attempted.
5 Maintenance
5.1 Maintenance table
Dräger recommend that regular inspection, testing and servicing of the
breathing equipment is carried out in accordance with the table below. The
table applies also to out-of-use (stored) equipment. Record all
maintenance in the equipment log book. See also the maintenance
information for all equipment used (mask, filter, etc.). Additional inspection
and testing may be required in the country of use to ensure compliance
with national regulations.
5.2 Visual inspection
Carry out a visual inspection, checking the full breathing equipment
including all component parts and accessories. Check that the equipment
is clean and undamaged, paying particular attention to pneumatic
components, hoses and connectors. Typical signs of damage that may
affect the operation of the breathing equipment include impact, abrasion,
cutting, corrosion and discoloration. Report damage to service personnel
and do not use the equipment until faults are rectified.
5.3 Cleaning and disinfecting
CAUTION
Cleaning agents and disinfectants listed below are not
manufactured by Dräger and have been reviewed only for
compatibility when used to clean or disinfect the subject Dräger
product(s). Read and comply with all instructions for use provided
by the manufacturers of such agents and disinfectants. Dräger
expressly disclaims all responsibility for any damage, personal
injury or loss resulting from the use of such agents or disinfectants.
Do not exceed 30 °C for washing, disinfecting and rinsing
solutions. Do not exceed 60 °C for drying, and remove
components from the drying facility immediately when dry. Drying
time in a heated dryer must not exceed 30 minutes.
Do not immerse pneumatic or electronic components in cleaning
solutions or water. Contact Dräger for information about additional
cleaning methods for heavily soiled parts if required.
If water is trapped and then freezes inside the pneumatic system
of the breathing apparatus, operation will be impaired. Prevent any
liquid from entering, and thoroughly dry the breathing apparatus
after cleaning to prevent this from occurring.
Always clean Dräger X-plore equipment in a well-ventilated room
or outdoors. There may be deposits of harmful substances in parts
of the equipment.
See also to the Instructions for Use for the mask and other associated
equipment.
Cleaning and disinfecting materials:
●Cleaning agents – Sekusept (concentration: 0.5 % – 1 %) or
Safetywash (concentration: 0.7 %)
●Disinfecting agents – Incidin Rapid (concentration: 1.5 %) or
Safetywash (concentration: 20 %; meets the requirements of
EN 13727:2012 as a bacterial disinfectant)
●Use only clean lint-free cloths
1. Prepare cleaning solution as per manufacturer’s instructions. Clean
the breathing apparatus manually using a cloth moistened with
cleaning solution to remove excess dirt.
○Disassemble and clean the parts separately if required. Fig 8
shows the parts disassembled and Fig 9 shows the belt routing
through the buckle during re-assembly to ensure that the belt can
be tightened.
2. Prepare disinfecting solution as per manufacturer’s instructions. Apply
to all internal and external surfaces, ensuring that all surfaces remain
visibly wet for 10 minutes.
3. Rinse all components thoroughly with clean water to remove all
cleaning and disinfecting agents.
4. Dry all components using a dry cloth, in a heated dryer or in air.
5. Contact service personnel or Dräger if disassembly of pneumatic or
electronic components is required.
6 Storage
Ensure that the storage environment is dry, free from dust and dirt, and
does not subject the equipment to wear or damage due to abrasion. Do not
store the equipment in direct sunlight. Route hoses in such a way that the
bend radius is not too acute and the hose is not stretched, compressed or
twisted.
See the storage temperature ranges in the technical data (Section 8).
7 Disposal
The product life is 10 years from the first use. When required, dispose of
the product in accordance with national or local regulations for waste
disposal.
8 Technical data
Weight (manifold and belt) < 0.5 kg
Belt size (standard belt) 38 mm x 750–1450 mm
Belt size (large belt) 38 mm x 750–1950 mm
Mask adaptor (mask/filter connectors) Rd 40 thread
Whistle volume > 90 dB(A)
Input pressure 0.28 to 1.0 MPa
Input flow 200 to 1200 liters/minute (to
provide the full range of flow on
versions with a flow control valve,
a minimum of 350 liters/minute is
required)
Operating temperature -10 to +60 °C
Storage temperature -15 to +40 °C
9 Order list
Symptom Fault Remedy
Air leak Loose or dirty
connector
Disconnect, clean and
reconnect couplings and
retest
Faulty hose or
component
Substitute user
replaceable items and
retest
Leak from face mask
(other than normal
air release from the
excess flow valve)
See the Instructions for
Use supplied with the
mask
Whistle sounding or
insufficient air flow to
the wearer
Air supply restricted Remove any kinks or
restrictions from the hoses
Faulty hose or
component
Substitute user
replaceable items and
retest
Input filter blocked Contact service personnel
or Dräger
Excessive leakage
from the excess flow
valve
Faulty valve Contact service personnel
or Dräger
Inoperative or poor
sounding whistle
Dirty whistle or
whistle cover
Clean the whistle flute and
cover as necessary
Faulty activation
mechanism
Contact service personnel
or Dräger
Mask visor fogs up Blocked exhalation
valve
See the mask Instructions
for Use
Task Before
use
After
use
Every
year
Visual inspection (see Section 5.2) O O
Clean and disinfect (see Section 5.3) O
Functional test1
Notes
O Dräger recommendations
1 This maintenance task may only be carried out by Dräger or trained
service personnel. Details of the test are contained in the technical
manual which is issued to service personnel that have attended a
relevant Dräger maintenance course.
O
!
!
Description Quantity Order code
Sekusept cleaner 4 × 2 litres 7904071
Safetywash 1 litre with dispenser 3380164
1 litre 3380165
5 litres with dispenser 3380166
5 litres 3380167
Incidin Rapid 2 litres R61860
3 × 2 litres R61870
6 litres R61880
30 litres R61890
4433
9
8
D
D
D
D
äger
D
D
D
D
D
D
D
D
äger
ä
äger
4432

Other Dräger Respiratory Product manuals

Dräger NIV Operating instructions

Dräger

Dräger NIV Operating instructions

Dräger Panorama Nova S User manual

Dräger

Dräger Panorama Nova S User manual

Dräger X-plore 8000 Configuration guide

Dräger

Dräger X-plore 8000 Configuration guide

Dräger X-plore 2100 User manual

Dräger

Dräger X-plore 2100 User manual

Dräger PAS Colt Series User manual

Dräger

Dräger PAS Colt Series User manual

Dräger CDR 4500 User manual

Dräger

Dräger CDR 4500 User manual

Dräger FPS 7000 User manual

Dräger

Dräger FPS 7000 User manual

Dräger X-plore Bayonett User manual

Dräger

Dräger X-plore Bayonett User manual

Dräger Panorama Nova PE User manual

Dräger

Dräger Panorama Nova PE User manual

Dräger PARAT 3100 User manual

Dräger

Dräger PARAT 3100 User manual

Dräger X-plore 8000 User manual

Dräger

Dräger X-plore 8000 User manual

Dräger Panorama Nova S User manual

Dräger

Dräger Panorama Nova S User manual

Dräger X-plore 1300 Series User manual

Dräger

Dräger X-plore 1300 Series User manual

Dräger X-plore 6300 User manual

Dräger

Dräger X-plore 6300 User manual

Dräger Oxy 3000 MK II User manual

Dräger

Dräger Oxy 3000 MK II User manual

Dräger Panorama Nova RP User manual

Dräger

Dräger Panorama Nova RP User manual

Dräger PAS Colt P18 User manual

Dräger

Dräger PAS Colt P18 User manual

Dräger X-plore 1950 User manual

Dräger

Dräger X-plore 1950 User manual

Dräger X-plore 6570 User manual

Dräger

Dräger X-plore 6570 User manual

Dräger PAS Micro Series User manual

Dräger

Dräger PAS Micro Series User manual

Dräger Panorama Nova P - sideport - RA User manual

Dräger

Dräger Panorama Nova P - sideport - RA User manual

Dräger X-plore 4700 User manual

Dräger

Dräger X-plore 4700 User manual

Dräger X-plore 8000 User manual

Dräger

Dräger X-plore 8000 User manual

Dräger PARAT C box User manual

Dräger

Dräger PARAT C box User manual

Popular Respiratory Product manuals by other brands

Joycare JC-117 manual

Joycare

Joycare JC-117 manual

MSA FireHawk M7 Upgrade instructions

MSA

MSA FireHawk M7 Upgrade instructions

Pari 041G0746 instructions

Pari

Pari 041G0746 instructions

Lowenstein Medical JOYCEclinic Full Face Instructions for use

Lowenstein Medical

Lowenstein Medical JOYCEclinic Full Face Instructions for use

3M 6035 Technical data sheet

3M

3M 6035 Technical data sheet

Omron COMPAIR NE-C28 instruction manual

Omron

Omron COMPAIR NE-C28 instruction manual

Omron NE-C900 instruction manual

Omron

Omron NE-C900 instruction manual

Sanosil Q-Jet Advanced 2 Series Operation and maintenance manual

Sanosil

Sanosil Q-Jet Advanced 2 Series Operation and maintenance manual

IBP CN-01 M manual

IBP

IBP CN-01 M manual

Koolmask Hexa 001 user manual

Koolmask

Koolmask Hexa 001 user manual

3M N95 Tips for use

3M

3M N95 Tips for use

CSE BIOMARINE BIOPAK 240-R User instructions

CSE

CSE BIOMARINE BIOPAK 240-R User instructions

DeVilbiss PulmoNeb 3655LT Series Instruction guide

DeVilbiss

DeVilbiss PulmoNeb 3655LT Series Instruction guide

Spasciani H 900 CO P Instructions for use

Spasciani

Spasciani H 900 CO P Instructions for use

AW BREATH-CLEAN PAPR Installation, operation, and parts manual

AW

AW BREATH-CLEAN PAPR Installation, operation, and parts manual

semmco DONNING instructions

semmco

semmco DONNING instructions

Moldex 8000 Series instruction manual

Moldex

Moldex 8000 Series instruction manual

Omron COMP A-I-R RE-C800KD Cleaning instructions

Omron

Omron COMP A-I-R RE-C800KD Cleaning instructions

manuals.online logo
manuals.online logoBrands
  • About & Mission
  • Contact us
  • Privacy Policy
  • Terms and Conditions

Copyright 2025 Manuals.Online. All Rights Reserved.