Clearaudio TT5 User manual

User manual
Bedienungsanleit ung
© clearaudioelectronic GmbH, 2018/ 12 Made in Germany
TT5

User manual / Bedienungsanleit ung
2© clearaudioelectronic GmbH, 2018/ 12
User manual ......................................................... 2 - 15
Bedienungsanleit ung ............................................ 16 - 30
Dear Clearaudio customer,
Thank you for purchasing the Clearaudio
TT5
tangential tonearm.
Wit h the
TT5
, Clearaudio oers vinyl fans a more aordable entry point into the high performance
of tangential tonearm technology.
Please read this user manual carefully to ensure the appropriate care of your tonearm and to avoid
any invalidation of your warranty by misuse. The manual will help you with both initial set-up and
ongoing maintenance.
We wish you much listening pleasure with your new Clearaudio TT5 tangential tonearm.
Clearaudio electronic GmbH
Warning
Do not expose the equipment to rain or moisture.
Do not handle the mains lead with wet hands.
No naked ame sources, such as lighted candles, should be placed on the equipment.
Only for use on turntables.
CE-MARKI ERUNG

User manual / Bedienungsanleit ung
Made in Germany 3
Cont ent s
1. Package contents....................................................... 4 - 5
2. Mounting the clamping ring ...................................... 6 - 8
3. Mounting the
TT5
tonearm ........................................ 9
4. Mounting the cartridge.............................................. 9
5.
TT5
adjustment ......................................................... 10 - 14
6. Special notes ............................................................. 14
7. Technical data ........................................................... 15
Warranty information ................................................... 31 - 32

User manual / Bedienungsanleit ung
4© clearaudioelectronic GmbH, 2018/ 12
1. Package contents
The Clearaudio
TT5
tangential tonearm is delivered in specially designed packaging to ensure
safe shipment . Please retain this packaging in case you need to safely t ransport, ship or store the
tonearm at a future date.
Please check the package contents rst. On removing the tonearm from its packaging, be sure to
handle the tonearm’s sensitive signal cables with the utmost caution.
Note: All threads are right-hand thread (metric).
Pic. 1: Pa ck a ge co n t e n t s
1 2
3 4
678
9
5

User manual / Bedienungsanleit ung
Made in Germany 5
1.
TT5
tonearm; with pre-installed
precision-machined silver carbon
arm tube with aluminium headshell
(without cartridge)
6. Tan g e n t i al al i g n m e n t g au g e
2. Aluminium clamping ring with M6 x 8 7. 1 pair of white gloves
3. 1x hex wrench (# 1.5)
1x hex wrench (# 2)
1x hex wrench (# 2.5)
1x hex wrench (# 3)
8. Mini Level Gauge
4. Clamping ring mounting bolts:
- 3x allen screws M4 x 10
Cartridge mounting screws
(not pictured):
- 2x M2.5 x 12
- 2x M2.5 x 14
9. TT5 VTA x
5. 4x counterweights:
2.3; 2.6; 4.3 and 8.0 grams
10. Not pictured:
War rant y car d; User m anual ; Clea ra udio
quality certicate and return delivery note

User manual / Bedienungsanleit ung
6© clearaudioelectronic GmbH, 2018/ 12
2. Mounting the clamping ring
2.1 Selecting the correct tonearm base
If you would like to use the
TT5
in combination with swing base, please go ahead and mount of the
swing base as described in the user manual. The clamping ring is not needed in this case.
Whether you want to use the
TT5
with or without swing base, the following instructions (from point
4 onwards) for setting the
TT5
apply if for both options.
Before mounting the clamping ring, rst check that the correct tonearm base is mounted on your
turntable.
For Clearaudio Performance DC and Ovation turntables you can use the following tonearm bases.
• Uni concept / Performance DC / Ovation (Art. No. AC031-5)
This tonearm base is equally suitable for mount ing all Clearaudio radial tonearms and
TT5
tangential tonearm without additional mounting of the clamping ring.
Please note: This tonearm base is not suitable to mount the sw ing base!
• Unify base (Art. No. AC031-4)
Fo r m ou n t i n g t h e cl a m pi n g r i n g o r t h e Clearaudio swing base.
Pic. 3: Unify base (Art. No. AC031-4)
Pic. 2: Uni concept / Performance DC / Ovation (Art. No. AC031-5)

User manual / Bedienungsanleit ung
Made in Germany 7
Please tighten all three screws rmly (Pic. 6).
Pic. 5: Mount ing t he clamping ring Pic. 6: Fixi ng t he clam ping r ing
• To mount the clamping ring on a turntable in the Clearaudio Innovation series you will need
to mount the Unify 12 inch level base (Art. No. AC030-4).
2.2 Mounting the clamping ring
If the mounting of the clamping ring is necessary, please proceed as follows. Otherwise you can
proceed to point 3.
At t ach t he aluminium clamping r ing t o t he clean surf ace of t he t urnt able chassis using t he included
M4 x 10 hex socket head cap screws and the matching hex wrench (#3).
Make sure that the clamping ring sits perfectly at on the mounting surface.
Pic. 4: Unify 12 inch level base (Art. No. AC030-4)

User manual / Bedienungsanleit ung
8© clearaudioelectronic GmbH, 2018/ 12
Mounting the aluminum clamping ring on a non-Clearaudio turntable:
To install the aluminium clamping ring on the turntable chassis, you will need to drill the required
holes. Please refer to the drilling template shown below (Pic. 7) for the measurements to mark the
exact drilling holes.
Please be informed, that this draw ing is not suitable for use as a mounting tool.
Use a 3. 3mm HSS dr ill bit , t hen cut an M4 t hr ead int o each hole using an appr opr iat e t ap cut t ing
tool.
If the turntable chassis material is not suitable for cutting threads, please use a 4.5mm HSSdrill bit
to drill the holes through the material. In this case use standard bolts and nuts to x the arm base.
Pic. 7: Mounting the aluminium clamping ring on a non-Clearaudio turntable

User manual / Bedienungsanleit ung
Made in Germany 9
3. Mounting of the
TT5
tonearm
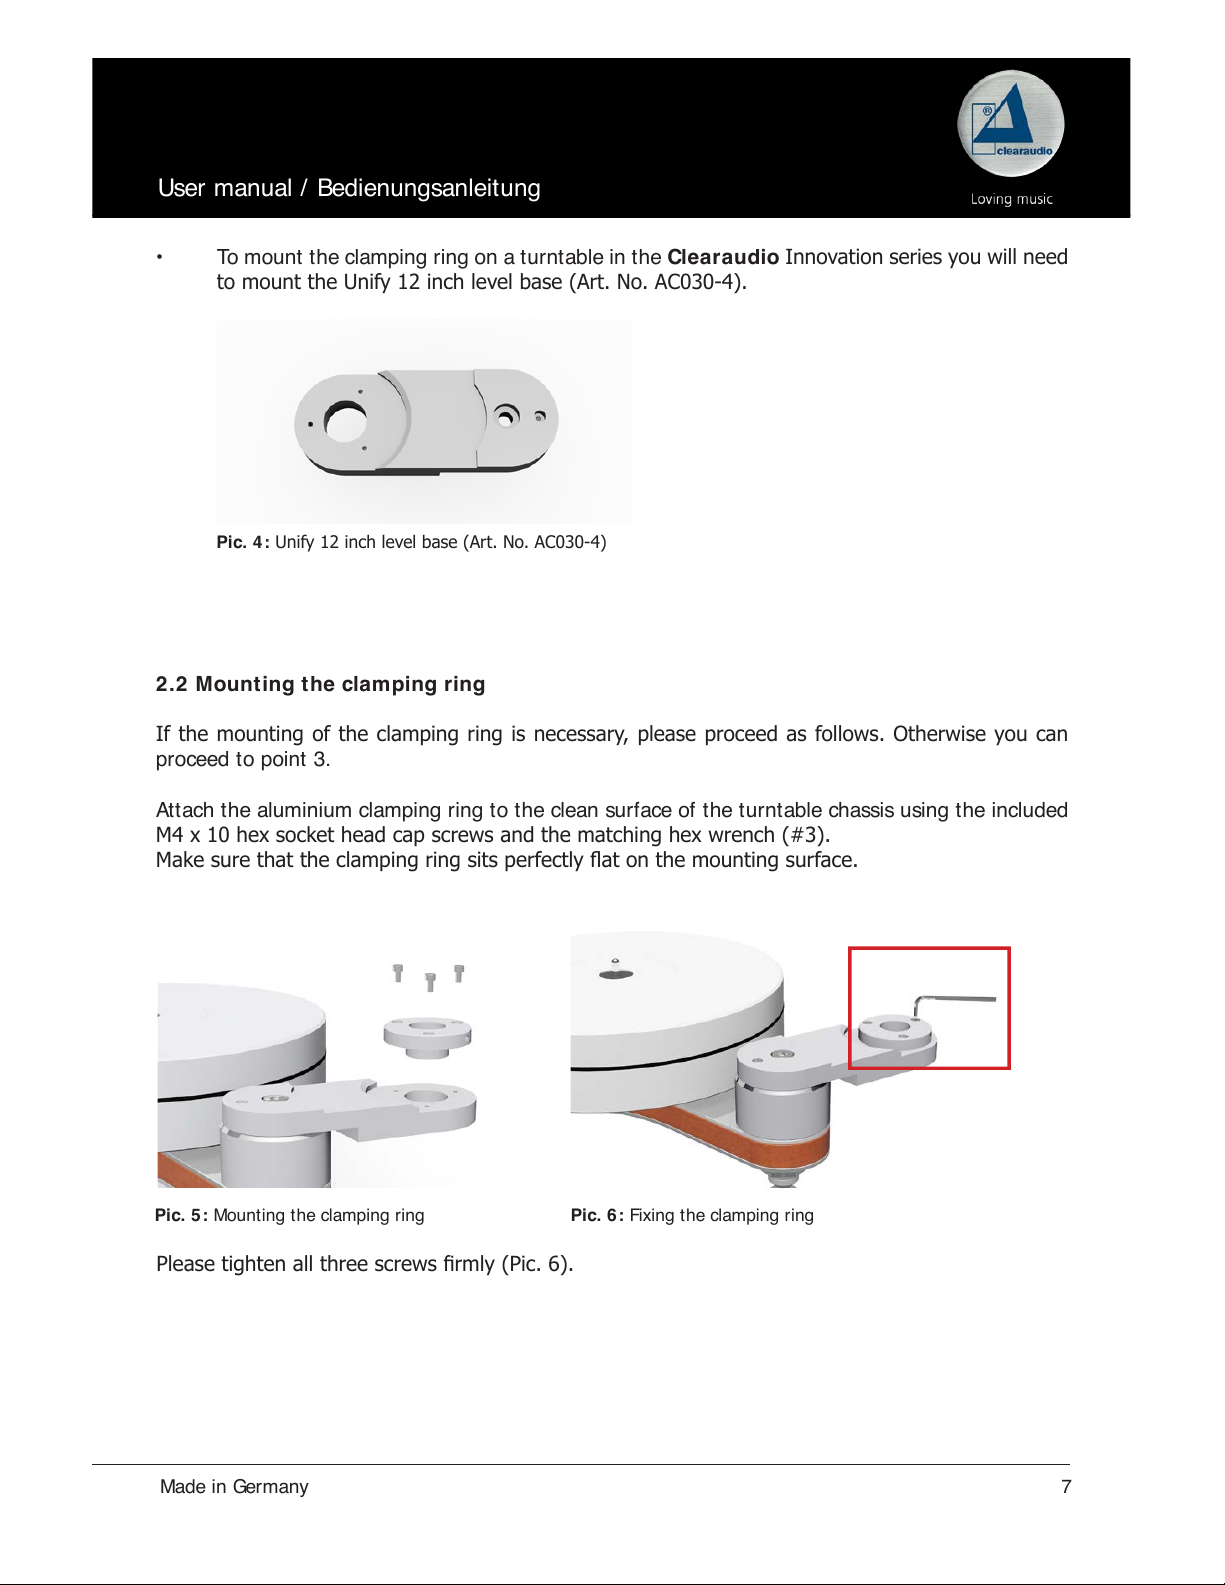
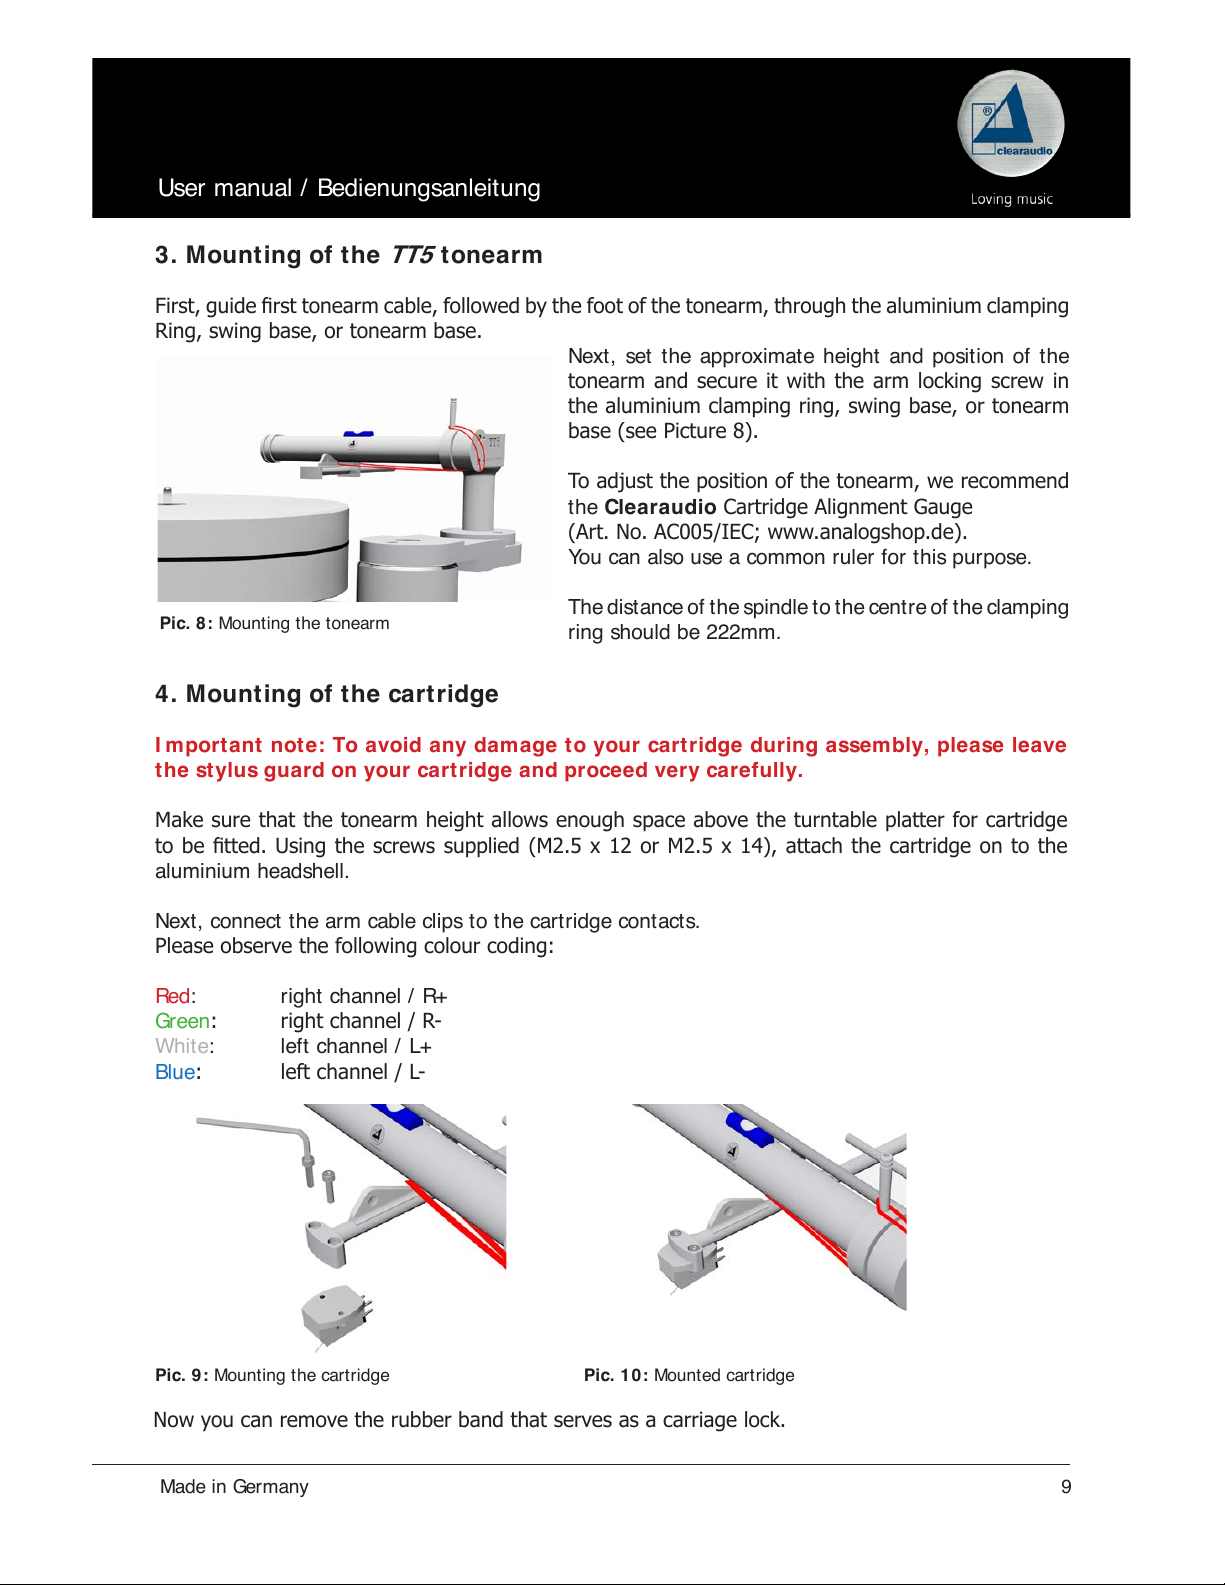
First, guide rst tonearm cable, followed by the foot of the tonearm, through the aluminium clamping
Ring, swing base, or tonearm base.
Next , set t he approximate height and posit ion of the
tonearm and secure it with the arm locking screw in
the aluminium clamping ring, swing base, or tonearm
base (see Picture 8).
To adjust the position of the tonearm, we recommend
the Clearaudio Cartridge Alignment Gauge
(Art. No. AC005/IEC; www.analogshop.de).
Yo u c an a l s o u se a c o m m o n r u l e r f o r t h i s p u r p o se .
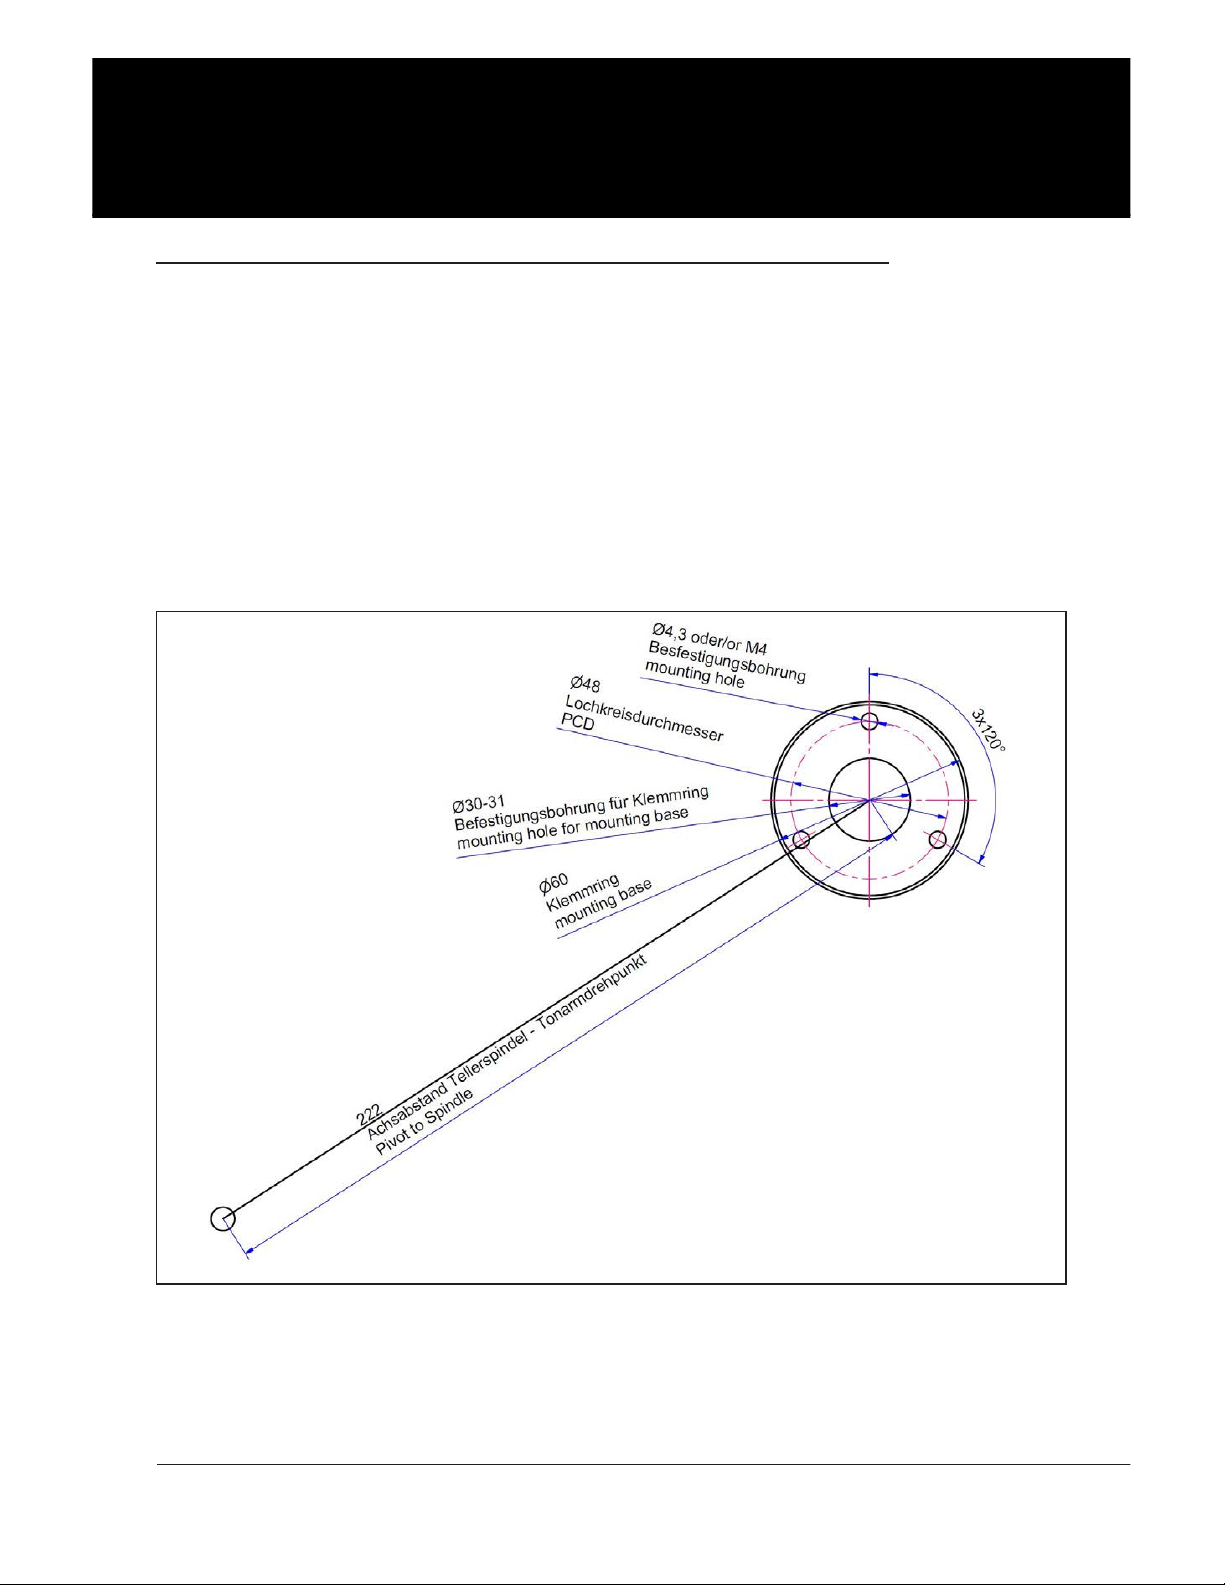
The distance of the spindle to the centre of the clamping
ring should be 222mm.
Pic. 8: Mount ing t he t onearm
Pic. 9: Mount ing t he cart ridge Pic. 10: Mount ed cart ridge
Now you can remove the rubber band that serves as a carriage lock.
4. Mounting of the cartridge
Important note: To avoid any damage to your cartridge during assembly, please leave
the stylus guard on your cartridge and proceed very carefully.
Make sure that the tonearm height allows enough space above the turntable platter for cartridge
to be tted. Using the screws supplied (M2.5 x 12 or M2.5 x 14), attach the cartridge on to the
aluminium headshell.
Next , connect t he arm cable clips to t he cartridge contact s.
Please observe the following colour coding:
Red :right channel / R+
Gr een : right channel / R-
White:left channel / L+
Blue: left channel / L-

User manual / Bedienungsanleit ung
10 © clearaudioelectronic GmbH, 2018/ 12
5.
TT5
adjustment
5.1 Setting the position
Use a r uler t o measure t he dist ance f rom t he t ip of t he needle t o t he f ront edge of t he t onear m slide.
The optimum measurement is 64mm.
To adjust it, slightly open both screws on top of the tonearm carriage using the #1.5 hex wrench
and move the headshell into the correct position.
Pic. 12: Correct positionPic. 11: Screws of the tonearm slide
64mm
5.2 Pre-adjustment of the tracking force
Note: This step requires removing the stylus guard from the cartridge.
Please proceed w ith great care to avoid any damage.
Use one of the counterweights supplied to adjust the tracking force, so that the cartridge is lowered
with minimal force. The choice of counterweight will depend on the weight of the cartridge.
Our r ecommendat ion:
Weight size 1 for cartridges weighing 7g
Weight size 3 for cartridges weighing 8g
Weight size 4 for cartridges weighing 12g
This tonearm is suitable for cartridges with a weight of 7g or more. If your cartridge is lighter, use a
weight between the headshell and the cartridge (headshell plate is not included).
Pic. 13: Mounting the cartridge weight Pic. 14: Fixing the weights

User manual / Bedienungsanleit ung
Made in Germany 11
5.3 Positioning the tonearm horizontally
After correct horizontal adjustment of your turntable, loosen the two screws with an hex wrench #2
(Pic. 15) by about one turn.
By alternately tightening the screws, you can position the tonearm horizontally, in accordance with
the bubble level.
Pic. 15: Horizontal adj ustment
5.4 VTA-Adjustment
The Clearaudio linear gauge is suitable for adjusting the tonearm height, since it corresponds to
the thickness of a record and the linear track is marked.
Pl ace t h e Clearaudio linear gauge through the existing hole on the turntable spindle and align it so
that it points toward the tonearm base.
Place the included Mini Level Gauge on the headshell (Pic. 16; page 12), and by lowering the lift, the
VTA sett ing can be checked and readj ust ed if necessary.
Proceed as follows
• If using the clamping ring / a tonearm base:
Loosen the screw on the clamping ring / tonearm base and move the tonearm in the appropriate
direction until the bubble of the Mini Level Gauge is centered in its housing.
• If using the swing base:
Lift the top of the swing base and loosen the screws on the bottom of the swing base, then move
the tonearm in the appropriate direction until the bubble of the Mini Level Gauge is centred in its
housing.
Repeat this process until the desired alignment is achieved.
Fix t his posi t ion and check it again.
To x the VTA during further adjustment of the TT5. We recommend the use of the included TT5
VTA clamp.

User manual / Bedienungsanleit ung
12 © clearaudioelectronic GmbH, 2018/ 12
5.5 Adjustment of the azimuth
(vertical position of the cartridge / stylus in the record groove)
Important: Please use extreme caution during this step. Always lift the arm upwards
during the adjustment.
Using the arm lift lever, lower the cartridge carefully onto the included adjustment gauge. Now
check from the front and with the help of the Mini Level Gauge the alignment of the cartridge and
re-adjust it if necessary.
The cartridge is in perfect alignment when it is vertical to the surface of the platter (see Pic. 17)
and the bubble of the Mini Level Gauge is centered (Pic. 18).
For this, remove both screws from the TT5 VTA clamp with the enclosed hex wrench #3.
Place the two halves of the VTA clamp around the tonearm pillar so that they sit on the tonearm
base or swing base and gently tighten the screws with the hex wrench #3.
Now you can loosen the screw of the clamping ring / tonearm base, or the screws of the swing base,
and continue to point 5.5.
Pic. 16: Adjusting the VTA with the TT5 VTA x
ab
a = b
Pic. 17: Per f e ct Azi m u t h Pic. 18: Adj ust ment of t he azi mut h
90°

User manual / Bedienungsanleit ung
Made in Germany 13
5.6 Fine adjustment of the tracking force
Set t he cor rect t r ack i n g for ce of your car t r idg e accor ding t o t h e m an uf act ur er s i n st r uct ions.
To set the correct tracking force, we recommend the digital cartridge weight „Weight Watcher“ from
Clearaudio (Art. No. AC094, also available at www.analogshop.de; Pic. 19)
Af t er complet ing all set t ings, please make sure t hat t he signal cable f or ms a smoot h loop t o t he r ear.
Pic. 19: Adj ust ment of t he t rackin g f or ce
Abb. 2 0 : Absenken über der „Auslaufrille“ Abb. 2 1 : Absenken über der „Einlaufrille“
5.7 Setting the tangential
Rep osi t i on t h e Clearaudio linear gauge through the existing hole on the turntable spindle and align
it so it points toward the tonearm base.
Now use arm lift lever to lower the needle onto the Clearaudio linear gauge at the run-out groove
position and move the gauge carefully until needle tip sits exactly on the reference line (see Pic. 20,
red mark).
Lift the cartridge again up and move it to the inlet groove (Pic. 21). Lower the cartridge again.
Never move the cartridge when it is lowered in the adjustment gauge!

User manual / Bedienungsanleit ung
14 © clearaudioelectronic GmbH, 2018/ 12
6. Special notes
6.1 Maintenance
• If the
TT5
tonearm is not in use for a long period, please cover the tonearm to protect it from
dust.
• To clean the glass tube, use cotton swabs and a commercially available glass cleaner. Put some
glass cleaner onto the cotton swab and move it through the glass tube, moving from lead-in t
groove to the run-out groove end.
• Pl ease m a ke su r e t h at t h e p r e ci si o n dr y b al l b ear i n g s ar e n ot b e t ou ch ed , cl ean ed o r l u b r i cat ed
in any way. Please only clean the glass tube.
WARNI NG:
Never insert the oil into the precision bearing as this will result in damage of bearing.
6.2 Transportation
Shou l d f ur t her t r an spor t at i on of t he
TT5
tonearm be necessary, please alway use the original packing
material. Otherwise serious damage could occur.
6.3 Service
If any servicing or repair of a Clearaudio product is necessary, please rst contact your dealer or
distributor. Alternatively contact Clearaudio directly and we will advise you of your nearest service
location.
PLEASE RETAIN ALL ORIGINAL PACKAGING. You will need it if this product has to be transported
and/or shipped. Any further questions you may have about this product should be directed to your
local dealer or direct to Clearaudio.
If the needle is not parallel to the reference line, rotate the tonearm base in the appropriate
direction, x it slightly, and check you result again.
Rep eat t h i s p r o cess u n t i l t h e n e ed l e t i p si t s pe r f e ct l y i n b ot h p o si t i o n s i n t h e r e f e r en ce l i n e o f t h e
linear gauge. Finally, tighten the screw/screws of the tonearm base to x your result.
Now, check all settings as described from point 5 and repeat the adjustment if necessary.
After setting the tangential tracking angle, x the tonearm pilar in the tonearm base / clamping ring
or TT5 swing base. Now you can remove the TT5 VTA x by unscrewing the M4 cylinder head screws
with a hex wrench (# 3).
The Clearaudio TT5 tonearm is now fully adjusted and ready to play.

User manual / Bedienungsanleit ung
Made in Germany 15
7. Technical Data
Const r uct ion det ails: Tan g e n t i al t r a ck i n g t o n ear m , r eso n an c e o p t i m i ze d c h assi s
Drive
• Pu r el y m ech an i ca l
• High-precision, extremely smooth-running and dry-running ball
bearing
• Po l i sh ed g l ass t u b e
Wiring: Clearaudio Sixtream Super Wire (1.1 m) terminated with RCA
connector
Mounting style: Clearaudio
Total w eight: Approx. 560 gram (without aluminium clamping ring)
aluminium clamping ring: 60 gram
Dimensions
(W/ D/ H in inch):
Approx. 7.87 x 5.51 x 5.91
Dimensions
(W/ D/ H in mm):
Approx. 200 x 140 x 150
Warranty: 5 years*
* Provided that the warranty card is correctly completed and returned to Clea r audio, or your product is registered
online at https://clearaudio.de/en/service/registration.php, within 14 days of purchase..
Clear audio electronic is not responsible for typographical errors in descriptions.
Technical specications subject to change or improvement without prior notice.
Product availability is as long as stock lasts.
Copies and reprints of this documents, including extracts, require written consent from
Cle ar au di o e lect r on ic Gm bH ; Ge rm a ny
Other manuals for TT5
2
Table of contents
Other Clearaudio Accessories manuals

Clearaudio
Clearaudio TT5 User manual

Clearaudio
Clearaudio Unify Series User manual

Clearaudio
Clearaudio Tangent User manual

Clearaudio
Clearaudio VTA-Lifter User manual

Clearaudio
Clearaudio Clarify User manual

Clearaudio
Clearaudio Statement TT1 User manual

Clearaudio
Clearaudio Master Innovation User manual

Clearaudio
Clearaudio Clarify User manual

Clearaudio
Clearaudio Concept User manual

Clearaudio
Clearaudio Satisfy Kardan User manual